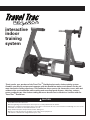
1
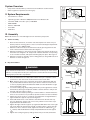
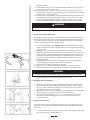
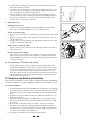
interactive
indoor
training
system
Thank you for your purchase of the Travel Trac™ RealAxiom interactive indoor training system.
Combine your bicycle and personal computer with the RealAxiom trainer and software for the ultimate interactive training experience. The RealAxiom allows you to ride interactive courses with and
without video synchronization while tracking and recording speed, distance, ride time, cadence,
power, and heart rate. Your indoor training has never been as fun or effective as it will be with the
Travel Trac™ RealAxiom.
!! CAUTION
• Read and follow all instructions.
• Before beginning each workout, be sure bicycle is securely attached to the trainer.
• During use, resistance unit may become hot enough to cause burns. Do not touch resistance unit during use or for some
time after use until it has had sufficient time to cool.
• Keep children and pets away from the trainer during use.
• Before you start any exercise program you should consult a physician.
• This trainer is intended for single-rider bicycles only.
Table of Contents
I.
II.
III.
Parts List and System Overview ................................................................ 2
System Requirements ................................................................................. 3
Assembly Instructions ................................................................................. 3
A. Trainer Assembly ............................................................................ 3
B. Bicycle Installation ......................................................................... 3
C. SofTrac Drive Roller ........................................................................ 4
D. Handlebar Console Installation ..................................................... 4
E. Cadence Kit Installation ................................................................. 4
F. Cable Connections.......................................................................... 5
G. Using the Travel Trac RealAxiom without a PC ........................... 5
IV. Hardware and Software Installation .......................................................... 5
V. Program Overview ....................................................................................... 6
VI. Before You Begin .......................................................................................... 6
A. Using the Keyboard, Mouse and Handlebar Console ................. 6
B. Create Rider Profile......................................................................... 7
C. Edit or Delete an Existing Profile .................................................. 7
D. Using a Heart Rate Transmitter Strap .......................................... 7
E. Pre-Ride Checklist ........................................................................... 8
VII. Riding a RealAxiom Interactive Video Course .......................................... 8
A. Choose a Course ............................................................................. 8
B. Create a Sub-course ....................................................................... 8
C. Select and Adjust Competitor ....................................................... 9
D. Starting the Course ........................................................................ 9
E. During the Ride ............................................................................... 9
F. Finish the Course ........................................................................... 10
VIII. Riding an Axiom (non-video) Course ....................................................... 10
A. Choose a Course ........................................................................... 10
B. Adjust Competitor ........................................................................ 10
C. Starting the Course ...................................................................... 11
D. During the Ride ............................................................................. 11
E. Finish the Course .......................................................................... 11
IX. Viewing History Screens ........................................................................... 12
X. Customizing Your Workout ....................................................................... 12
A. Heart Rate Target Zone Settings................................................. 12
B. Adjusting the Competitor ............................................................ 12
C. Creating Your Own Course .......................................................... 12
XI. Troubleshooting............................................................................................ 13
H
A
C
D
B
G
P
E
F
1
I
I. Parts List
K
J
M
L
N
O
Part
Part Code
Quantity
Travel Trac™ RealAxiom Trainer Base...............A ........................................ 1
Resistance Unit ....................................................B ........................................ 1
Resistance Unit Mounting Plate .........................C ........................................ 1
Knob Bolt .............................................................D ........................................ 1
Rubber Feet..........................................................E ........................................ 4
Handle ..................................................................F ........................................ 1
Locking Ring ....................................................... G ........................................ 1
Axle Support Cups ..............................................H ........................................ 2
Handlebar Console .............................................. I ......................................... 1
Rubber Shims ......................................................J ........................................ 2
Cadence Sensor and Cable.................................K ........................................ 1
Cadence Magnet..................................................L ........................................ 1
Software and DVD Courses ............................... M........................................ 3
Console-PC Cable ............................................... N ........................................ 1
Console-Resistance Unit Cable ......................... O ........................................ 1
Resistance Unit Power Cord ...............................P ........................................ 1
Large Zip-tie ........................................................ Q ........................................ 1
Small Zip-ties .......................................................R ........................................ 3
Q
R
2
System Overview
•
•
Components included with your Travel Trac™ RealAxiom shown in black.
Owner supplied components shown in grey.
2
I
Monitor
O
K
II. System Requirements
A
B
PC
L
•
PC: Pentium 3 or better
•
Operating system: Windows 2000, Windows NT or Windows XP
•
Hard disk: 10GB of free disc space / 7200 RPM
•
RAM: 256MB
•
Monitor: 800 X 600
•
Port: USB
•
DVD Drive
P
N
III. Assembly
F
Note: All references to Left and Right are from the rider’s perspective.
3
A. Trainer Assembly
1. Remove the trainer base, resistance unit and all parts from the box. If you
believe parts are missing, please contact our Technical Support department
for assistance at 1-800-553-8324.
2. Attach the rubber feet (E) to the trainer base (A) by pressing them into the
ends of the trainer base frame tubes. See Figure 3.
3. Attach the handle (F) to the end of the axle support bolt that protrudes from
the trainer base. Align the “D” shaped end of the bolt with the corresponding
recess inside the handle, and tap the handle lightly into place. See Figure 3.
4. Attach the resistance unit (B) to the mounting plate (C) using 2 M5 bolts and
washers as shown in Figure 4.
E
B
4
D
C
B. Bicycle Installation
! WARNING
G
H
Read and follow all instructions concerning installation of the bicycle on the trainer.
Failure to securely attach the bicycle to the trainer could result in the bicycle falling,
causing injury to the rider or bystanders.
F
UNLOCKED
1. Place the trainer base on a flat, stable surface near your computer so that
you’ll have a clear view of the monitor when seated on the bike.
2. Note: Replace the bicycle’s rear wheel quick release (QR) skewer with the
one provided with the trainer. See bicycle owner’s manual for instructions
on how to properly adjust the QR skewer. Make sure the QR skewer is tight
and not damaged or bent.
3. Loosen the locking ring (G) by sliding it all the way to the right until it contacts
the handle (F). See Figure 5. Spin the handle counterclockwise to fully loosen
the right side axle support cup (H).
4. Loosen the knob bolt (D) by turning it counterclockwise so that the resistance
unit is as close to the floor as possible (to provide clearance for the rear wheel).
5. Lift the bicycle into position, so that the rear QR skewer is aligned with the
right and left axle support cups (H). See Figure 6.
6. Fit the QR skewer lever on the left side of the wheel into the left axle support cup. Rotate the support cup as necessary, until the notch in the cup is
aligned with the QR skewer lever.
7. Tighten the right side axle support cup against the QR skewer nut on the right
side of the wheel by spinning the handle clockwise until it contacts the QR
skewer nut. Once contact is made, tighten the handle an additional 1/4 to
1/ rotation, until the QR skewer is firmly clamped between both axle support
2
cups.
8. Tighten the locking ring (G) by sliding it all the way to the left (toward the
3
5
LOCKED
F
H
6
H
bike). See Figure 5.
9. Check that the bicycle is securely installed in the trainer by pushing or pulling on the bicycle’s top tube or seat.
10. If the bicycle is not secure, check to see that the QR skewer lever and nut
are properly positioned in the axle support cups, and that the right side axle
support cup is securely tightened.
11. It is important to maintain the correct pressure between the tire and the drive
roller. Tighten the Knob Bolt (D) until the drive roller touches the tire. Then
turn the Knob Bolt an additional three complete rotations. If the tire slips
during use, tighten the bolt by additional 1⁄2 turns to eliminate the slippage.
! WARNING
Failure to securely attach the bicycle to the trainer could result in serious injury.
C. SofTrac Polyurethane Drive Roller
The unique SofTrac drive roller on the RealAxiom is made of durable polyurethane, which significantly reduces tire noise and tire wear while increasing traction between the tire and roller (less tire slippage). There are a few important
points to keep in mind about the SofTrac roller.
7
1. To avoid damaging the roller, DO NOT apply the rear brake while using the
trainer. Locking the rear wheel at high speed can seriously damage the polyurethane roller.
2. Allowing the tire to slip against the roller will also accelerate roller wear.
Maintain sufficient pressure between the tire and the drive roller to prevent
slipping. During installation, tighten the Knob Bolt (D) until the drive roller
touches the tire. Then turn the Knob Bolt an additional three complete rotations. If the tire slips during use, tighten the bolt by additional 1⁄2 turns to
eliminate slippage.
3. Pedaling with a smoother stroke and applying power more evenly when
accelerating will also help prevent the tire from slipping.
4. Use a smooth tread tire at least 23mm in width.
5. Maintain the recommended maximum inflation pressure for your tire.
6. Over time the SofTrac roller may show some slight signs of wear. This is
CAUTION
To avoid damaging roller, DO NOT apply rear brake while roller is spinning.
L
R
Q
K
8
D. Handlebar Console Installation
R
9
L
normal, and does not affect the performance of the roller.
Q
1. Attach the console to the handlebar as shown in Figure 7. Open the quick
release bracket and install on the handlebar, preferably close to the stem.
For use on larger diameter handlebars, it may be necessary to remove the
two rubber shims (J) from the bracket.
2. Spin the quick release lever to adjust bracket clamping tension, and then flip
the quick release lever upward to secure the bracket in place.
3. If the bracket clamping tension is too loose or too tight, open the quick
release lever, adjust clamping tension, close the lever and re-check for
secure attachment.
E. Cadence Kit Installation
The cadence kit consists of a magnet (attached to the crank arm) and a sensor
(attached to the left chainstay), which counts the number of pedal revolutions
per minute.
10
L
1. Loosely attach the sensor (K) to the outside of the left (non-drive side) chain
stay using two zip-ties (R). See Figure 8.
4
2. Loosely attach the magnet (L) to the inside of the left crank arm using one
zip-tie (Q). See Figure 9 and 10.
3. Position the sensor and magnet so that the space between them is no more
than 2-3mm. Proper spacing is often achieved by sliding the magnet and
sensor toward the rear of the bike. See Figure 11.
4. Once the magnet and sensor are positioned properly, tighten the zip-ties
securely. Secure the sensor cable to the chain stay using additional zip-ties
as necessary, and trim the loose ends from all zip-ties to prevent contact
with the spokes or drivetrain components.
F.
11
Cable Connections
I
Handlebar Console to PC
Connect one end of the USB cable (N) to the handlebar console and the
other end to an available USB port on your PC. See Figure12a.
12a
Console to Resistance Unit
1. The console to resistance unit cable (O) has a phone jack type plug at both
ends.
2. Plug one end of the cable into the appropriate outlet at the back of the console. See Figure 12a.
3. Plug the other end of the cable into the appropriate outlet at the back of the
resistance unit (B). See Figure 12b.
O
N
P
Cadence Sensor to Resistance Unit
Plug the cadence sensor cable (K) into the appropriate outlet at the back of
the resistance unit.
Resistance Unit to Power Supply
Only after all other connections are complete, connect the resistance unit
power cord (P) to the resistance unit and then to a standard electrical wall
outlet (120V AC). If all cables are connected correctly, the green LED on the
console should be lit.
G. Using the Travel Trac™ RealAxiom without a PC
The RealAxiom can be used as a stand-alone trainer, independent of the
PC. When the handlebar console is not connected to the PC, the green LED
on the console will flash green. Use the "+" and "-" buttons on the console
to increase or decrease the resistance level. There are 8 levels to choose
from. The red LED on the console will flash each time the resistance level is
adjusted. After 20 seconds of inactivity, the resistance level will automatically return to the lowest level.
IV. Hardware and Software Installation
Your Travel Trac™ RealAxiom includes software compatible with Windows® 2000, NT
and XP. The software also includes the USB driver required for the handlebar console.
A. Software Installation
1. Insert the RealAxiom CD in the CD-ROM drive. The installation should begin
automatically. If the installation does not start automatically, click on the CDROM drive to explore the contents, and double click the "RealAxiomInstall"
icon.
2. Follow the on-screen installation instructions. When the installation is complete, remove the CD.
3. During the software installation the USB driver for the handlebar console
will also be installed automatically, and a RealAxiom desktop shortcut will
be created.
4. Insert the Verona Championship Course DVD or Limoges Course DVD.
5. The DVD course installation should begin automatically. During installation, be sure to select the desired units of measure (Metric or English). If the
installation does not start automatically, click on the DVD drive to explore
the contents and double click the Setup icon.
6. The DVD course installation may require several minutes.
5
K
O
12b
Note: You do not have to install the DVD courses until you plan to ride a RealAxiom
interactive video course. If you plan to ride only the Axiom non-video courses,
there is no need to install the DVD courses.
B. Software Updates
RealAxiom software updates will be available periodically. To check for updates,
click on the Help tab in the toolbar at the top of the screen and select the
Upgrade Wizard. If a newer version of the RealAxiom software is available, the
Upgrade Wizard will lead you through the download and installation process.
C. Hardware Installation
1. If for some reason the USB driver is not installed during the initial software installation, you may see a "Device not Found" error the first time you
launch the RealAxiom program.
2. Make sure the USB plug from the handlebar console is connected to an
available USB port on your computer (and connected to the same port each
time you use the trainer).
3. If the Windows® hardware installation wizard requests that you install the
USB Serial driver, insert the RealAxiom CD in the CD-ROM drive and select
"Install From a Specific Path (Expert User)".
4. Select "Search in Removable Disks (CD-ROM)" and click "Continue".
5. Click "Finish" to complete the installation of the USB Serial driver.
6. Next, if Windows® asks you to install the USB Serial Port driver, follow the
same procedure as above.
V. Program Overview
The Travel Trac™ RealAxiom electronic trainer provides a means for cyclists to measure, record and analyze training data in order to improve their fitness and performance level. The trainer provides an excellent workout with automatic changes in
resistance levels to simulate changes in terrain. During the workout the RealAxiom
allows you to view current, average and maximum values for speed, distance,
cadence, heart rate and power output data. After the workout, course data can be
saved to a history file for later analysis and comparison with other rides. In addition
to the above data, the RealAxiom provides a Power to Weight (W/Kg) ratio which can
be used to track progress during a training program.
The Power to Weight ratio has often been used to evaluate dynamic objects as
diverse as automobiles and athletes. Power is defined as work done over time. In
terms of cycling, the greater the ratio of power to weight, the more easily (or faster)
a cyclist can propel the bicycle. The Power to Weight ratio is calculated by dividing
power output (measured in watts) by body weight. The resulting value is a good
indicator of your cycling efficiency, and a useful tool for monitoring your fitness.
As your fitness and pedaling efficiency improve, you should see an increase in the
Power to Weight ratio, provided your body mass does not increase proportionally.
The only way to improve your Power to Weight ratio is either to produce more power
without gaining weight, or to loose weight while maintaining the same power output. Monitoring your Power to Weight ratio over time can be especially valuable for
cyclists trying to lose weight without sacrificing power.
The Power to Weight ratio is included in the course history files to allow you to track
your progress over time. See section IX for more information on viewing course history files.
VI. Before You Begin
A. Using the Keyboard, Mouse and Handlebar Console
The keyboard, mouse and handlebar console can be used to navigate the
RealAxiom screens.
Keyboard: There are certain functions for which the keyboard must be used.
6
These include:
• Entering rider data
• Creating a custom course
Mouse or Keyboard: The mouse or keyboard can be used to navigate between
screens, or to move from field to field within a screen.
• Use the mouse or the Tab key to move the cursor between fields or to
select buttons.
• Use the Return key to confirm data entered in data fields
• Use the mouse or the arrow keys to move the cursor within a data field.
Handlebar Console: The buttons on the console perform the same functions as
the Tab, Return and arrow keys on the keyboard.
• The "+" button performs the same function as the → arrow key
• The "-" button performs the same function as the ← arrow key
• The "→|" button performs the same function as the Tab key
• The "← " button performs the same function as the Return key
13
Home Screen
14
B. Create Rider Profile
Before your first ride, you must create a Rider Profile which includes age, weight
and other pertinent data for each rider. Each rider using the RealAxiom should
create his or her own profile.
1. Double click the RealAxiom desktop icon to launch the program. From the
Home screen (Figure 13) click the NEW button to access the Rider Profile
screen (Figure 14).
2. Click the NEW RIDER button at the top of the screen.
3. Enter your Name, Birth Date (mm/dd/yyyy), Weight, Max Heart Rate, Target
Zone Upper Limit and Target Zone Lower Limit in the appropriate fields. Use
the mouse or the Tab key to move from field to field within the box.
Note: The program will automatically calculate your maximum heart rate and upper
and lower target zone limits based on your age*. To enter a different value, simply type over the system-generated values in the appropriate field.
4. Select Metric or English units of measure (Kilometer, Meters, Kilograms or
Miles, Feet, Pounds) by clicking on the appropriate button in the UNIT OF
MEASURE box.
5. Once all data has been entered, click the SAVE RIDER button to save
the profile.
6. Each rider using the program should create their own Rider Profile.
Thereafter, select the appropriate rider using the arrow buttons on the Home
screen (Figure 13). The currently selected rider’s name appears in the name
field at the bottom of the Home screen.
7. Click the BACK button at the bottom of the screen to return to the Home screen.
*A standard maximum heart rate formula of 220-age = MHR is used, and target zone values of 80% of max heart rate for the upper limit and 70% of max heart rate for the lower
limit are used for the system-calculated values. A target zone range of 70-80% of maximum heart rate is appropriate for trained athletes. If you have been inactive, you may
want to use a lower target zone.
C. Edit or Delete an Existing Profile
1. To edit an existing rider Profile, go to the Rider Profile screen and select the
rider name in the RIDER field. Then click the DELETE RIDER button.
2. To edit an existing profile, select the rider name in the RIDER field, make the
desired changes and then click the SAVE RIDER button to save the changes.
D. Using a Heart Rate Transmitter Strap
The RealAxiom can be used with or without a heart rate transmitter strap. To get
the most from the RealAxiom features, we recommend using a transmitter strap.
A transmitter strap is not included with the RealAxiom trainer, but virtually all
7
Rider Profile Screen
heart rate transmitter straps are compatible with the RealAxiom.
15
16
1. Adjust the elastic strap for a snug, comfortable fit, and position the transmitter
on the bare chest just below the breast. See Figure 15.
2. Moisten the back surface of the transmitter strap with water, saliva or conductive gel. Do not use moisturizing lotion, which is an insulator and will not
conduct an electrical pulse.
3. When placed on the body, the transmitter is automatically activated (and
deactivated when removed). To prolong battery life, the transmitter should
be removed when not in use.
4. If you have difficulty obtaining a regular heart rate reading, check the following:
• Ensure transmitter strap is positioned correctly and sufficiently snug
• Ensure back side of transmitter strap (against skin) is sufficiently moist
• Ensure transmitter battery is not weak or dead
5. To avoid electromagnetic interference which may cause abnormally high or
erratic heart rate readings, maintain a distance of about four feet between
the handlebar console and common sources of interference, such as the
computer monitor, TV’s, other wireless transmitters, fluorescent lights and
motor driven equipment.
E. Pre-Ride Checklist
Choose Course Screen
1. Inflate tires to maximum recommended inflation pressure (printed on tire
sidewall).
2. DO NOT apply the rear brake while using the trainer. Locking the rear wheel
at high speed can seriously damage the polyurethane drive roller.
3. Use a smooth tread tire at least 23mm in width.
4. Use a smooth tread tire on mountain bikes as well. The smooth tread will
reduce tire and roller wear, improve traction and reduce noise and vibration.
5. Use the Windows® control panel to set your PC’s screen saver interval for a
period of time longer than you expect to be riding.
VII. Riding a RealAxiom Interactive Video Course
The RealAxiom video courses synchronize film footage with the rider’s speed, while
the resistance unit and the RealAxiom software automatically regulate resistance
to simulate gradient changes in slope along the course. The result is a surprisingly
realistic and interactive ride.
A. Choose a Course
The RealAxiom includes two interactive video courses, the Limoges climb, from
Stage 10 of the 2004 Tour de France, and the 2004 Verona World Championship
Road Course. Additional course titles are available separately.
1. Double click the RealAxiom desktop icon to launch the program. From the
Home screen (Figure 13), click the REALAXIOM button to see a list of available courses in the Choose Course screen (Figure 16).
2. Click on a course name in the CHOOSE COURSE box to view a graphic profile of the course and other course details.
3. Once you have selected a course which seems the right distance and difficulty for your desired workout, click the NEXT button at the bottom of the
screen.
B. Create a Sub-course
If you prefer a shorter ride or want to train on a particular section of the course,
you can specify your own start and end points to create a custom sub-course of
the full length video course.
Remember: You must finish a selected course in order to save any of the ride data
for that course. (For details on course history files, see section IX, p.12).
1.
In the Choose Course screen (Figure 16), click on the NEW COURSE button
8
2.
3.
4.
and select “Create Sub-Course.”
A screen will appear that shows the entire course length. Click on
the desired start and end points within the course, or use the up
and down arrows at the right of the screen to specifiy the course length.
Name the sub-course by clicking the Description tab and entering a
name.
Click SAVE to save the new sub-course, which will then appear in the list
of available courses.
C. Select and Adjust Competitor
Two competitor options are available, Personal Best and the Champion.
Personal Best is a virtual competitor that allows you to race against your own
best time on a given course. Since you have to complete a given course at least
once to establish your best time, the Personal Best competition is not
available the first time you ride a course.
1. In the Choose Course screen (Figure 16), if you select a course you have previously ridden and saved, you can choose to ride against your personal best
time by clicking the ENABLE COMPETITOR button and selecting “My best
course.”
2. You can then adjust the Competitor’s pace by increasing or decreasing his/
her average speed or course time. Click the SPEED or TIME button and
adjust the desired value in the appropriate field.
3. The adjustment screen is not accessible once the ride is started, so make
any desired adjustments before you begin the course.
4. After selecting a course and adjusting the Competitor, click the NEXT button
at the bottom of the screen to proceed to the course screen, where you will
start the ride.
17
RealAxiom Course Screen
The Champion (available on the Larciano video course) pits you against a pro
rider on the same course to let you see how well you stack up against serious competition.
1. In the Choose Course screen (Figure 16), click the ENABLE COMPETITOR
button to see whether the Champion option is available for the selected
video course. If "Course With a Champion" appears in the pop-up window,
the option is available.
2. Click on "Course With a Champion" to select this competitor option, and
then click the NEXT button at the bottom of the screen to proceed to the
course screen, where you will start the ride.
3. During the ride, an inset screen of the champion will appear in the main
screen. The champion’s speed and the distance gap will also appear in the
inset screen. In addition, the size of the screen itself will vary in proportion
to the distance gap—the closer you get to the champion, the larger the inset
screen. If you overtake the champion, the inset screen will disappear to the
right of the course.
D. Starting the Course
1. Having selected a course, adjusted the Competitor, and clicked NEXT, you
should be looking at the course screen, with an image of the course displayed on your monitor. See Figure 17.
2. You can warm up for as long as you like before starting the course while
viewing current Speed, Heart Rate, Cadence and Power data.
3. When you’re ready to begin the course, click the start (4) button at the bottom of the screen. Use the handlebar console Tab key (→|) to highlight the
button and the Return key (← ) to select it.
E. During the Ride
9
1. Data on Time, Distance, Slope, Cadence, Power, Heart Rate and Speed will
be displayed on the right of the screen. Data collection for your ride begins
as soon as you start the ride. Average and maximum data values are calculated from the moment you click "start" until the course is completed (unless
you pause during the ride). Remember, you must complete the course in
order for any ride data to be saved.
2. Press the "+" button on the console to display the course profile at the bottom of the screen. Press the "+" button again to display a heart rate and
power graph. The two solid yellow bars in the graph indicate the heart rate
target zone upper and lower limits. Press the "+" button a third time to display the difference in speed and distance between you and the Virtual competitor (if activated). Press the "-" button to hide the displays.
3. The progress bar at the bottom of the screen indicates the percentage of
the course completed. As you ride, a red bar (representing the Rider) and a
gray bar (representing the virtual competitor, if activated) will appear on the
course profile display to indicate your position relative to the virtual competitor.
4. If your heart rate rises above or falls below the programmed training zone
limits, a pop-up window will appear to indicate heart rate is too high or too
low. If your heart rate exceeds the programmed max heart rate, resistance
will be reduced to zero. You can bypass this precaution by programming
your max heart rate slightly higher than your actual max.
5. To pause at any point during the ride, use the console Tab (→|) and
Return (← ) keys to highlight and click the Pause (;) button at the bottom of
the screen. To resume the ride click the Start (4) button. To terminate a ride
without completing the course, click the Stop (<) button. Remember: Ride
data will not be saved if the ride is not completed. When you click the Stop
(<) button a dialog box will appear to confirm your decision to terminate
the ride.
F.
Finish the Course
1. When you reach the end of the course, a message will appear indicating the
course is complete, and data collection will cease. You can continue pedaling
as you cool down; current Speed, Cadence, Heart Rate and Power data will
continue to be displayed, but will not be recorded as part of the ride data.
2. To save your ride data at the end of a course, click the SAVE button at the
bottom of the screen. Your ride data will be saved in the Course History file
for later comparison with other rides on the same course or for a review of
all rides within a specified date range. For more information on viewing the
course history files, see section IX, p.12.
VIII. Riding an Axiom (non-video) Course
18
Choose Course Screen
A. Choose a Course
The RealAxiom includes eleven pre-programmed courses of varying length and
difficulty, plus a four week training course. You can also create a custom course to
meet your specific training goals, or to replicate your favorite real world rides. See
section X, C, p.12 for more details on custom course design.
1. Double click the RealAxiom desktop icon to launch the program. From the
Home screen (Figure 13), click the AXIOM button to see a list of available
courses in the Choose Course screen (Figure 18).
2. Click on a course name in the CHOOSE COURSE box to view a graphic profile of the course and other course details.
3. Once you have selected a course which seems the right distance and difficulty for your desired workout, click the NEXT button at the bottom of the
screen.
Remember: You must finish a selected course in order to save any of the ride data
for that course. (For details on course history files see section IX, p.12).
B. Adjust Competitor
10
The "Competitor" is your own best time on a given course, and therefore is not an
available option the first time you ride a given course. Beginning with your second
ride on a given course you can choose to ride against the Competitor (your previous
best time on that course) and can adjust the Competitor’s speed.
1. In the Choose Course screen, if you select a course you have ridden to completion at least once before, you can choose to ride against the Competitor
by clicking the ENABLE COMPETITOR button.
2. You can then adjust the Competitor’s pace by increasing or decreasing
his/her average speed or course time. Click the SPEED or TIME button and
adjust the desired value in the appropriate field.
3. Make all adjustments to the Competitor before you begin the course. The
adjustment screen is not accessible once the ride is started.
4. After selecting a course and adjusting the Competitor, click the NEXT button
at the bottom of the screen to proceed to the course screen, where you will
start the ride.
C. Starting the Course
1. Having selected a course, adjusted the Competitor, and clicked NEXT, you
should be looking at the course screen, with the course profile displayed at
the bottom of your screen. See Figure 19.
2. You can warm up for as long as you like before starting the course while
viewing current Speed, Heart Rate, Cadence and Power data.
3. When you’re ready to begin the course, click the Start (4) button at the bottom of the screen. Use the handlebar console Tab key (→|) to select the button and the Return key (← ) to click it.
19
D. During the Ride
1. Data on Time, Distance, Slope, Cadence, Power, Heart Rate and Speed will
be displayed at the top of the screen. Data collection for your ride begins as
soon as you start the ride. Average and maximum data values are calculated
from the moment you click "start" until the course is completed (unless you
pause during the ride). Remember, you must complete the course in order
for any ride data to be saved.
2. As you ride, a red bar (representing the Rider) and a gray bar (representing
the Competitor, if activated) will appear on the course profile display to indicate your position relative to the Competitor. Also displayed is the difference
in speed and distance between you and the competitor.
3. Current Heart Rate and Power are displayed in the graph above the course
profile. The two solid yellow bars in the graph indicate the heart rate target
zone upper and lower limits.
4. If your heart rate rises above or falls below the programmed target zone limits, a pop-up window will appear to indicate heart rate is too high or too low.
If your heart rate exceeds the programmed max heart rate, resistance will be
reduced to zero. You can bypass this precaution by programming your max
heart rate slightly higher than your actual max.
5. To pause at any point during the ride, use the console Tab (→|) and
Return (← ) keys to highlight and click the Pause (;) button at the bottom of
the screen. To resume the ride click the Start (<) button. To terminate a ride
without completing the course, click the Stop (<) button. Remember: Ride
data will not be saved if the ride is not completed. When you click the Stop
( < ) button a dialog box will appear to confirm your decision to terminate
the ride.
E. Finish the Course
1. When you reach the end of the course data collection will cease. You can
continue pedaling as you cool down; current Speed, Cadence, Heart Rate
and Power data will continue to be displayed, but will not be recorded as
part of the ride data.
2. To save your ride data at the end of a course, click the SAVE button at the
bottom of the screen.
3. To view data from the ride just completed, click the NEXT button at the bot11
Axiom Course Screen
tom of the screen. This summary of course data will be saved in the Course
History files for later comparison with other rides on the same course or for
a review of all rides within a specified date range. For more information on
viewing the course history files, see section IX.
20
IX. Viewing History Screens
The History screen (Figure 20) allows you to view key data for all saved rides on all
courses or on a particular course and enables you to sort the data by date.
Course History Screen
21
Ride Stats Screen
1. From the Home screen (Figure 13) select the rider whose history you wish to
view. Then click the HISTORY button.
2. Each line in the history screen represents a single ride, and lists the date,
ride time, distance, average power, average speed, average heart rate, and
elevation gain for that ride.
3. The field at the bottom of the screen lists the sum totals and averages for all
rides displayed.
4. To view more detailed information for a particular ride (Figure 21), highlight
the ride and click the STATS button at the bottom of the screen.
5. To view all the rides on one particular course, select the course name from
the pull down list at the top of the screen.
6. To view rides within a specific date range (on all courses or on a particular
course) use the date fields at the top of the screen to specify the date range.
7. To return to the HOME screen, click the BACK button at the bottom of the
screen.
X. Customizing Your Workout
A. Heart Rate Target Zone Settings
When you create your Rider Profile, the software calculates a suggested maximum
heart rate value and upper and lower heart rate target zone limits as follows:
1. Maximum Heart Rate calculation: 220bpm–age = MHR
2. Target zone lower limit calculation: 70% of MHR
3. Target zone upper limit calculation: 80% of MHR
You can adjust the maximum heart rate value or target zone limits at any time
prior to starting a course. Many helpful books are available which provide guidance on training by heart rate. The Travel Trac™ RealAxiom allows you to customize each workout by adjusting the target zone limits according to your goals
for that particular ride.
1. From the Home screen (Figure 13) click the NEW button to access the Rider
Profile screen (Figure 14).
2. Select the rider name in the RIDER field, make the desired changes to the target
zone settings and then click the SAVE RIDER button to save the changes.
B. Adjusting Competitor
Before beginning a ride on a given course, you can adjust the performance of
the Competitor, provided that you have ridden the course previously and saved
your ride data. Adjusting the Competitor’s pace can help you achieve your
goals—pushing you to improve on your previous best, or allowing you to take it
more slowly on a recovery day.
1. In the Choose Course screen click the ENABLE COMPETITOR button.
2. You can then adjust the Competitor’s pace by increasing or decreasing
his/her average speed or course time. Click the SPEED or TIME button and
adjust the desired value in the appropriate field.
3. Make all adjustments to the Competitor before you begin the course. The
adjustment screen is not accessible once the ride is started.
C. Creating Your Own Course
12
Creating a custom course allows you to specify the precise length and elevation
gain of the course. You can tailor a course to meet your specific training goals,
or replicate your favorite real world rides.
1. To create a custom course, click the AXIOM button on the Home screen to
access the Choose Course screen. Then click the NEW COURSE button at the
bottom of the screen.
2. Enter a name for the course in the NAME field (Figure 22). Each course will
be divided into a series of sections, with a distance and slope specified for
each section.
3. Enter a distance for the first section of the course in the Length field and
press Return. The minimum distance for any section is 0.01 Mi. or Km.
4. Then enter either the slope or the ending elevation of the first section in the
appropriate field and press Return.
Note: Slope is the ratio of elevation gain (or loss) to distance traveled. For
example, a 6% slope indicates 6 feet of elevation gain for every 100 feet of
forward distance traveled.
Note: The maximum slope simulated by the RealAxiom resistance unit is 12%.
Slope values in excess of 12% will not produce any greater resistance from
the resistance unit. The maximum slope that can be entered is +/-20%. If you
enter an elevation value that produces a slope in excess of +/-20%, an error
message will appear requesting that you modify the value.
5. Continue entering distance and slope data for each section of the course
until the course is complete. Click the SAVE button at the bottom of the
screen to save your new course.
6. Click the BACK button at the bottom of the screen to return to the Choose
Course screen. Your new course will appear in the list of course names in
the CHOOSE COURSE box.
XI. Troubleshooting
1. When I open the program a "No Device Found" error message appears.
• Make sure the USB cable between the handlebar console and PC is secure at
both ends.
• Make sure the resistance unit power cord is connected to an electrical outlet.
• Make sure the cable from the handlebar console to the resistance unit is secure
at both ends.
• If the USB port is not recognized, or the Windows® Hardware Installation
Wizard tries to install a driver, see “Hardware Installation,” Section IV, p.5.
2. No data is displayed during a ride.
Make sure the following connections are secure:
• USB cable between the handlebar console and PC.
• Resistance unit power cord to an electrical outlet.
• Cable between handlebar console to the resistance unit.
• Make sure cadence sensor and magnet are aligned, and that the cadence cable
is securely connected to the resistance unit.
3. The program displays cycling data such as speed and distance, but no heart
rate data (or erratic heart rate data)
If heart rate data is absent or erratic, the signal from your transmitter chest strap
is probably to blame. Ensure that the strap is positioned correctly (see section
VI, D, p.7) and sufficiently snug, and that the back side of the strap (against the
skin) is sufficiently moist.
To avoid electromagnetic interference which may cause abnormally high or erratic
heart rate readings, maintain a distance of about four feet between the handlebar
console and common sources of interference, such as the computer monitor, TV’s,
other wireless transmitters, fluorescent lights and motor driven equipment.
13
22
Custom Course Screen
If you continue to experience poor signal transmission, change the battery in
your transmitter. If the transmitter battery is not user serviceable or if the transmitter is more than five years old, you should replace it with a new one.
4. I rode a course yesterday, but can’t find it in the course history
• Remember to save your ride data at the end of each ride by clicking the SAVE
button.
• Remember you must complete the course to save the data.
• Be sure you’re looking for the ride history under the correct rider name and
course name (see section IX, p.11). To double check, use the date fields to
review the history for all rides around the date in question.
• Make sure your PC calendar is set to the correct date. Click on the Date/Time
settings in the Windows® Control Panel and correct the date if necessary.
5. My weight has changed since I created my Rider Profile
Change your weight setting in the Rider Profile screen. See section VI, B, p.7
for details.
6. I need to interrupt the ride in the middle of a course, but want to resume the
ride later
To pause during a ride, use the handlebar console Tab (→|) and Return (← ) keys
to select and click the Pause (;) button at the bottom of the screen. To resume
the ride after a pause, click the Start (4) button. While the ride is paused no
data will be recorded.
7. The screen saver comes on in the middle of my ride.
If your PC screen saver is set to activate too quickly, it may come on during your
ride. Before starting your ride, use the Windows® control panel to set the screen
saver interval for a period of time longer than you expect to be riding.
Tech Support 1(800)553-8324
Made in Italy
40-3969
0708_1