1
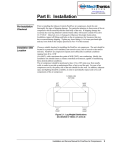
SCALEGARD™ LP REVERSE OSMOSIS FILTRATION SYSTEM
CUNO MODEL NUMBER SGLP-RO
®
CUNO INCORPORATED
400 RESEARCH PARKWAY
MERIDEN, CT 06450 U.S.A
PH: 1-888-218-2866
IN CONN. OR WORLDWIDE
203-237-5541
FAX: 203-238-8701
TABLE OF CONTENTS
SAFETY INSTRUCTIONS ......................................................................................................................................PAGE 1
FEEDWATER PARAMETERS ................................................................................................................................PAGE 1
PARTS LIST............................................................................................................................................................PAGE 1
MOUNTING ............................................................................................................................................................PAGE 1
PLUMBING CONNECTIONS ................................................................................................................................PAGE 2
SYSTEM START-UP ..............................................................................................................................................PAGE 3
CARTRIDGE CHANGE INSTRUCTIONS ..............................................................................................................PAGE 4
PRODUCT DIMENSIONS ......................................................................................................................................PAGE 5
TROUBLESHOOTING GUIDE ..............................................................................................................................PAGE 6
WARRANTY ..........................................................................................................................................................PAGE 7
PLANNED MAINTENANCE ..................................................................................................................................PAGE 8
MOUNTING TEMPLATE ................................................................................................................INSIDE BACK COVER
WARRANTY
A warranty card is shipped with every new CUNO® system that leaves the factory, and will be found in the same envelope as this
owner's manual. Please fill out the bottom portion and return it to CUNO Incorporated as soon as the system is installed. Keep the
top portion for your records.
CUNO offers a 2 year warranty on this system after purchase if any part of the CUNO system is found to be defective in materials or
workmanship by CUNO's Engineers, CUNO Incorporated will replace such part at no charge, F.O.B. Enfield factory. CUNO
Incorporated, however, shall not be liable for damages or delays caused by any defective material or workmanship, or by failure of any
parts due to normal wear and tear.
No equipment may be returned without a Returned Goods Authorization Number (RGA). Call CUNO Incorporated to obtain your RGA.
Installation Procedure
PARTS LIST (SEE FIGURE 1, PAGE 2)
SAFETY
Always follow these safety precautions when
installing and operating the water filter system:
DO NOT use with water that is microbiologically
unsafe or of unknown quality without adequate
disinfection before or after the system.
DO NOT use a torch or other high temperature
sources near filter or cartridge.
DO NOT install on line pressures above 125 psi
(862 kPa).
DO NOT install on hot water line. Maximum
temperature allowed is 100°F (38°C).
DO NOT install in direct sunlight.
DO NOT reverse connections. The system must
be installed with the inlet and outlet as labeled.
DO NOT install filter system in locations where it
can be damaged by other freestanding equipment.
DRAIN filter system at temperatures below 40°F
(4.4°C). Protect from freezing.
INSTALLATION must comply with existing state
or local plumbing codes.
This piece of equipment is made in America and
has American sizes on hardware. All metric
conversions are approximate and vary in size.
THE FOLLOWING PARTS ARE INCLUDED WITH
THE SCALEGARD REVERSE OSMOSIS WATER
FILTRATION SYSTEM. PLEASE UNPACK THE
CONTENTS FROM THE PRODUCT BOX AND
CHECK TO VERIFY THAT ALL OF THE PARTS
LISTED BELOW ARE INCLUDED. SHOULD ANY
PARTS BE MISSING, PLEASE CONTACT CUNO
AT 1-888-218-2866.
QTY
1
1
1
1
1
1
1
1
DESCRIPTION
TANK & BRACKET ASSEMBLY
PREFILTER CARTRIDGE
REVERSE OSMOSIS MEMBRANE
CARTRIDGE
WATER SAMPLE VALVE ASSEMBLY
(SEE FIGURE 1)
1’ LENGTH OF 3/8” BLUE TUBING
10’ LENGTH OF RED TUBING
ADAPTER - STEM X BARB (1/4X1/4”)
ADAPTER - STEM X BARB (3/8 X 1/4”)
MOUNTING
1) Remove the mounting bracket template from
this manual. Tape it to the wall where the
mounting bracket is to be installed.
2) Install mounting screws (not included) into
each of the keyhole locations on the template.
Be sure to leave a 1/8" to 1/4" space between
the bottom of the screw head and the wall so
that the bracket can be hung.
NOTE: Mounting hardware must be
capable of supporting a minimum of 50 lbs
(22.7 kg).
3) Hang the Bracket/Tank Assembly from the
mounting screws.
4) Once the bracket is hung, tighten the
mounting screws so that the bracket is snug
between the screw and the wall.
Note: Make sure that the bracket is securely
mounted to a wall stud or other appropriate
wall structure.
FEEDWATER PARAMETERS
Be sure to confirm that the feedwater falls within
the limits shown below. If you’re not sure if this has
been done, check with your distributor before
installing the system. This is important because
failures caused by water related problems are not
covered under the system warranty.
Feed TDS . . . . . . . . .Up to 2,000 ppm (mg/L)
Hardness* . . . . . . . . . . .<10 grains (171 mg/L)
Iron (Fe) . . . . . . . . . . . . . . . . . . . . . .<0.1 mg/L
Hydrogen Sulfide . . . . . . . . . . .none allowable
Feed pH . . . . . . . . . . . . . . . . . . . . . . . . . .4-11
Free chlorine . . . . . . . . . . . . . . . . . . . .<2 mg/L
Manganese (Mn) . . . . . . . . . . . . . .<0.05 mg/L
Turbidity . . . . . . . . . . . . . . . . . . . . . . . .<5 NTU
* NOTE: For waters over 10 grain hard, a CUNO water
softener is recommended for pretreatment. Consult
CUNO technical services for correct sizing.
1
Plumbing Connections
Note: The ScaleGard LP Reverse Osmosis 4) Insert the 3/8” x 1/4” Stem x Barb adapter into
Water Filtration System requires a minimum
the open 3/8” port of the sample valve
50 psi inlet water pressure. If inlet water
assembly. Run a 1/4” I.D. hose from the water
pressure is less than 50 psi, a water booster
sample valve assembly to the inlet of the
pump may be required. Refer to Figure 1 for
Foodservice Equipment. See Figure 1.
proper tubing connections.
5) Remove the white plug from the bottom port of
the RO Module.
All connections are made with "Push-In" 6) Remove the red cap from the RO module and
connectors. Refer to Figure 2 on the use of "Pushmoisten the o-rings with water. Insert the
In" plastic fittings. Use care in routing the tubing to
cartridge into the filter head. Be sure the ears
ensure that there are no bends or kinks.
on the cartridge line up with the spaces in the
head. Then turn the cartridge 1/4 turn to the
1) Shut off water supply and water booster pump
right.
(if applicable).
7) Connect the 1/4” red tube from the “Brine In”
2) Insert the 1/4” x 1/4” Stem X Barb Adapter
side of the permeate pump to bottom port of
(See Figure 1) into Inlet Water Valve. Run a
the RO Module. (See Figure 3).
1/4” I.D. hose from the Water Supply or 8) Run the separate 1/4” red tubing (included)
Booster Pump to the Inlet Water Valve.
from the “Brine Out” port of the permeate
3) Insert one end of the 3/8" blue tubing (included)
pump to the drain.
into one end of the outlet tee on the RO system
and the other end to one side of the Water
Sample Valve Assembly. See Figure 1.
Step
8
Tank Shut-Off Valve
1/4” Red Tubing
(To Drain)
Step
4
Step
“Brine Out”
Port
3
Outlet Tee
“Brine In”
Port
3/8”
Blue Tubing
3/8” x 1/4”
Stem x Barb Adapter
To Equipment
Step
2
Red
Tubing
Inlet Water Valve
Water Sample
Valve Assembly
(To Bottom
of RO
Membrane
Cartridge)
1/4” x 1/4”
Stem x Barb Adapter
Step
Feedwater
from Incoming
Water Line or
Booster Pump
7
Prefilter Cartridge
P/N: 55706-10
Feedwater from Incoming
Water Line or
Booster Pump
Reverse Osmosis (RO)
Membrane
P/N: 55987-20
RO Membrane Plug
Step
5
Schrader Air Valve
Side View
Front View
Figure 1
2
How to Use ‘Push-In’ Connectors (Figure 2)
This product is outfitted with user friendly ‘Push In’ connectors. Proper use of the connectors
is shown in the diagrams. It is most important that the tubing selected for use with these
connectors be of high quality, exact size and roundness, and with no surface nicks or
scratches. If it is necessary to cut the tubing, use a plastic tubing cutter or sharp razor knife.
Make a clean square cut.
Should a leak occur at a ‘Push-In’ connector, the cause is usually defective tubing.
To Fix: 1. Relieve pressure
4. Reattach tubing
To Attach Tubing
1 Tube O-Ring
2. Release tubing
3. Cut off at least 1/4” from end
5. Confirm connection is leak free
2
To Release Tubing
1
2
Push in collet to release tubing.
Pull tubing straight out.
Grey Collet
Push tubing straight in as far as it will go. Tubing is secured in.
System Start-Up
4) Divert the Water Sample Valve outlet to drain.
Open valve and let water run through the RO
to drain for 10 minutes.
5) Close sample valve.
6) Allow tank to fill (Approximately 60 minutes).
7) Open Water Sample Valve outlet to drain.
Empty tank. Water flowing from tank will
reduce to a fast drip when tank is empty.
8) Allow product water to run to drain for 60
minutes.
9) Close sample valve and allow the tank to fill
(Approximately 60 minutes).
1) Remove the prefilter cartridge from its
packaging. Remove the red cap from the
cartridge and moisten the o-rings with water.
Insert the cartridge into the filter head. Be sure
that the ears on the cartridge line up with the
spaces in the head. Then, turn the cartridge
1/4 turn to the right.
Note: Be sure to install the cartridge into the
proper head by matching the icon on the
cartridge label with the icon on the head.
2) Check that all plumbing connections are
secure.
3) Open the tank shut-off valve and inlet water
valve. Turn on the incoming water supply or
beverage booster pump (if applicable) and
check the system for leaks. If any leaks are
noted, turn off the water supply and/or booster
pump and correct the leak before proceeding.
If a leak is detected at a push-in fitting, refer to
Figure 2.
3
Cartridge & RO Membrane Change Instructions
Membrane (Replace every 36 months)
Cartridge (Replace every 6 months)
1. Close tank valve.
2. Open Water Sample Valve and divert to drain
for 5 minutes.
3. Close Water Sample Valve and open tank
valve.
1. Close tank shut-off and inlet valves (see Fig. 1).
2. Turn used RO module cartridge 1/4 turn to the
left.
3. Pull down on cartridge.
4. Remove the red tubing from the fitting (refer to
Figure 3).
5. Discard used cartridge.
6. Remove red cap from new module and
moisten the o-ring with water.
7. Remove the plug from the RO Module.
8. Insert the red tubing from Step 4 into the new
module.
9. Insert of new cartridge into the filter head. Be
sure that the ears on the cartridge line up with
the spaces in the head.
10. Turn new cartridge 1/4 turn to the right.
11. Open sample valve and divert to drain.
12. Open inlet valve and allow system to run for
30 minutes.
13. Flush membrane — follow steps 4 to 9 under
system start up instructions.
Note: Be sure to install the cartridge into the
proper head by matching the icon on the
cartridge label with the icon on the head.
Note: Be sure to install the cartridge into the
proper head by matching the icon on the
cartridge label with the icon on the head.
1.
2.
3.
4.
5.
6.
7.
8.
9.
Close tank shut-off and inlet valves (see Fig. 1).
Turn used prefilter cartridge 1/4 turn to the left.
Pull down on cartridge.
Discard used cartridge.
Remove red cap from new cartridge and
moisten the o-ring with water.
Insert new cartridge into the filter head. Be
sure that the ears on the cartridge line up with
the spaces in the head.
Turn new cartridge 1/4 turn to the right.
Open tank shut-off and inlet valves (see Fig. 1).
Check for leaks.
Flush Instructions
(1) Prefilter Sediment & Carbon
(2) RO Membrane
Remove the red tubing from the fitting before
completely removing the RO membrane cartridge
Figure 3
4
Product Dimensions (Figure 4)
9 5/16"
(23.7 cm)
12 1/4"
(31 cm)
17 3/4"
(45 cm)
1 1/2" (3.8 cm) MINIMUM DISTANCE
REQUIRED FOR CTG REMOVAL
Replacement Parts
Part Number
54-3030
Description
Stainless steel bracket complete with filter heads and RO shut-off valve
56-161351
Tank
60-23296
Tank shut-off valve
30-6049
Tank banding clamp
55706-10
Prefilter cartridge
55987-20
RO module
60-232270
Inlet water valve
82-11302
3/8" blue tubing (1 ft)
82-11205
1/4" red tubing (10 ft)
53-52001
Flow Control Assembly
68512-03
Water Sample Valve Assembly (Includes 3/8" Tee, 3/8" x 1/4" Adapter, and 1/4" Shut off valve)
74-3560404
1/4" x 1/4" Stem x Barb Adapter
74-3560606
3/8" x 1/4" Stem x Barb Adapter
89-1331202
Permeate Pump
5
Troubleshooting Guide
Problem
Cause
Solution
Notes
Repair Existing Booster Pump /
System (If Applicable)
Contact Dealer
Low Feed Water Pressure
Add Water Booster Pump
Replace RO Module
RO Membrane Fouled
Only if Beverage Booster System
is not installed
Feed Water Pressure,
Temperature, RO Module Flow
Rate and Reject Flow Rate
should be checked before
replacing Module
Drain Tank using Sample Valve,
with Sample Valve Open, PumpUp Air Charge, 8 to 10 psi, Close
Sample Valve
Unscrew Blue Cap to Access
Schrader Air Valve
Pre-Filter is Plugged by
Sediment (Particles)
Replace Pre-Filter
A more frequent pre-filter
change-out schedule may be
needed
Slow Leak In the Distribution
Line
Repair Leak
The unit produces pure water
slowly. A dripping leak can
prevent the tank from filling
Unit Runs Low or Out of Water
Storage Tank Air Charge is Low
RO Membrane Partially Fouled,
Unit can not produce enough
water to keep up with demand
Replace RO Module
Unit Never Shuts Off
(Continually Runs to Drain)
Product Water Check Valve has
Failed allowing storage tank flow
to drain after unit has shut-off
6
Check Reject Water flow to drain
in the morning. Unit should be
off and no flow to drain. If flow
to drain exists, turn off the feed
water valve and check for flow to
drain in 10 minutes. If flow to
drain remains steady, replace
RO Module.
High levels of hardness minerals
may be present in feed water,
monitor reject flow for plugging
Reject Water flow to drain
should stop when the feed water
valve is off.
A warranty card is shipped with every new CUNO® system that leaves the factory, and will be found in the same envelope as
this owner's manual. Please fill out the bottom portion and return it to CUNO Incorporated as soon as the system is installed.
Keep the top portion for your records.
CUNO offers a 2 year warranty on this system after purchase. If any part of the CUNO system is found to be defective in
materials or workmanship by CUNO's Engineers, CUNO Incorporated will replace such part at no charge, F.O.B. Enfield
factory. CUNO Incorporated, however, shall not be liable for damages or delays caused by any defective material or
workmanship, or by failure of any parts due to normal wear and tear.
No equipment may be returned without a Returned Goods Authorization Number (RGA). Call CUNO Incorporated at
1-888-218-2866 to obtain your RGA.
7
Reverse Osmosis
CUNO: Model SGLP-RO
Check Tank Pressure
1. Drain water from the storage tank.
a. Shut off the inlet water valve or water booster system if applicable.
b. Make sure the tank shut-off valve located at the top of the water tank is open.
c. Attach a piece of tubing from the water sample valve to drain
OR use a bucket to catch water from the water sample valve.
d. Open the water sample valve and drain the tank until empty. Leave water
sample valve open.
2. Unscrew the blue cap on the side of the tank to expose the Schrader Air Valve.
CUNO ScaleGard LP SGLP-RO
Tank Shut-Off Valve
Pictures and Additional
Information: Corresponding
chapter of Equipment Manual
Inlet Water Valve
When
Yearly
Tools
Piece of 3/8” tubing OR
Bucket
Bicycle or tire pressure
gauge
Bicycle tire pump
Schrader Air Valve
3. Using a standard bicycle or automobile tire pressure gauge that is capable of
reading pressure accurately from 0-10 psi. Connect the air pressure gauge to
the Schrader Air Valve on the water tank.
4. Read the tank's air pressure.
5. The air pressure should be between 8 and 10 psi.
6. If the air pressure is below 8 psi or above 10 psi complete the following steps.
a. Using a standard bicycle pump add or release air pressure
in the tank.
b. Repeat Steps 4-5 until the pressure is 8-10 psi.
c. Make sure the blue cap is replaced on the air pressure port.
7. Close the water sample valve.
8. Turn on the inlet water valve and/or booster system (if applicable).
9.
Allow 60 minutes for tank to fill before operating equipment.
8
CUNO Incorporated
INSTR4232 0305
400 Research Parkway
Meriden, CT 06450 U.S.A.
Toll Free: 1-888-218-CUNO
Worldwide: 203-237-5541
Fax: 203-238-8701
www.cunofoodservice.com • www.cuno.com
7.000
.750
.450
CUNO Incorporated
INSTR4232 0305
400 Research Parkway
Meriden, CT 06450 U.S.A.
Toll Free: 1-888-218-CUNO
Worldwide: 203-237-5541
Fax: 203-238-8701
www.cunofoodservice.com • www.cuno.com