1
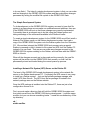
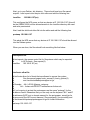
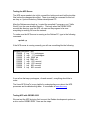
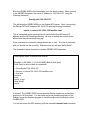
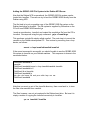
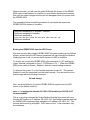
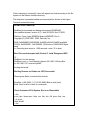
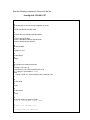
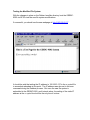
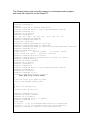
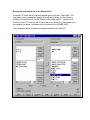
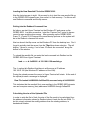
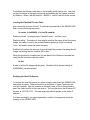
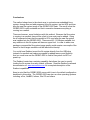
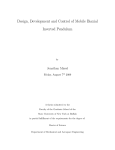
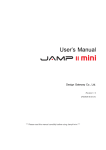
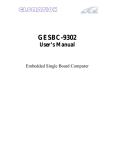
A Simple File Development System for the GESBC-9302
Paul H. Muller - Documatrix
www.documatrix-usa.com [email protected]
Disclaimer: The programs and procedures described here have been tested
and are thought to be accurate but are offered as is, with no warranty or
guarantee.
Introduction
The previous article, “Getting Started with the GESBC-9302”, described how to
set up a Debian development system, install the ARM cross-compiler, write, load
and then execute new programs. But how do you embed these programs and
make permanent changes to the GESBC-9302 Linux system? This article
describes how to set up the GESBC-9302 file system on your Debian
development platform, modify the contents of the file system, add files or
programs and then boot the GESBC-9302 from the Debian system via NFS to
test the changes. Finally, the revised file system will be written to the GESBC9302 flash memory so that it will be launched directly on power-up of the
GESBC-9302.
How the GESBC-9302 System is Organized
The GESBC-9302 is capable of running other operating systems in other
configurations. The GESBC-9302 Linux stock system is comprised of three main
parts: Linux kernel, file system and the bootloader. These components are
stored in permanent flash memory on board the GESBC-9302. When the board
is first powered, Redboot, the bootloader, is the first program to execute. This is
similar to the BIOS on your PC. Redboot next loads the Linux kernel from flash
and writes it into dynamic RAM.
Once the kernal is loaded, Redboot brings the Linux file system out from flash
and loads it into RAM also. The file system consists of all those directories and
files that you see in a typical Linux system: /bin /sbin /etc /home /mnt /var
/usr and so on. Linux then begins its bootup process and the GESBC-9302
eventually comes up ready for instructions from users.
For the standard Linux version all of what you see when you are logged into the
GESBC-9302 is located in dynamic RAM. You can change existing files or
transfer new files to the GESBC-9302 Linux system, but they will be lost when
the power is removed. (Of course you could mount a USB drive and save things
permanently there, but the GESBC-9302 itself normally does not store anything
in its own flash.) The idea of a simple development system is that you can make
and test changes to the GESBC-9302 file system and then make these changes
permanent by writing the modified file system to the GESBC-9302 flash.
The Simple Development System
To do development on the GESBC-9302 file system, we need to have that file
system in a place where we can make our modifications and additions, then see
if the GESBC-9302 will boot so that these changes are correctly implemented.
Fortunately there is an elegant way to do this using the Debian system and
taking advantage of the commands available in the Redboot loader.
To create a simple development system for the GESBC-9302 we will first install a
Network File System server on the Debian development system, then load a
copy of the GESBC-9302 file system onto the Debian system from the Glomation
CD. We can then interrupt the GESBC-9302 boot process using a special
Redboot command so that it obtains its file system via NFS from the Debian PC
instead of its own flash. That way we can make any changes we want to the
GESBC-9302 file system residing on the Debian, and test them with the GESBC9302 as it boots.
When all the changes we want are in place and working correctly, the new file
system will be written into the GESBC-9302 flash memory so that it will be
permanently stored and loaded during the normal power-up process.
Installing a Network File System (NFS) Server on the Debian PC
The heart of the GESBC-9302 simple development system is the network file
server on the Debian development PC. Fortunately the NFS server is very easy
to install on a Debian system. Just run the Aptitude package manager and
install NFS-User-Server. The NFS-User-Server package is located in the
network package area on the Debian website.
Once the NFS package is installed onto the Debian PC, there are just a few
configuration chores to do.
First, we must make a directory that will hold the GESBC-9302 file system and
from which we will boot the GESBC-9302 during development. I used the name
armfiles, but you can choose something better. I made this a subdirectory off the
top directory:
cd /
mkdir armfiles
Next, go to your Debian /etc directory. There should now be a file named
exports. Load exports into the pico text editor and add the following line:
/armfiles
192.168.0.127(rw)
This configures the NFS server so that any device at IP 192.168.0.127 (this will
be the GESBC-9302) will be allowed access to the /armfiles directory with read
and write permissions.
Next, load the /etc/hosts.allow file into the editor and add the following line:
portmap 192.168.0.127
This alerts the NFS server that any device at IP 192.168.0.127 should be allowed
into the Debian system.
When you are done, the files should look something like that below.
/etc/exports file:
# /etc/exports: the access control list for filesystems which may be exported
#
to NFS clients. See exports(5).
/armfiles
192.168.0.127(rw)
/etc/hosts.allow file:
# /etc/hosts.allow: list of hosts that are allowed to access the system.
#
See the manual pages hosts_access(5), hosts_options(5)
#
and /usr/doc/netbase/portmapper.txt.gz
#
# Example: ALL: LOCAL @some_netgroup
#
ALL: .foobar.edu EXCEPT terminalserver.foobar.edu
#
# If you're going to protect the portmapper use the name "portmap" for the
# daemon name. Remember that you can only use the keyword "ALL" and IP
# addresses (NOT host or domain names) for the portmapper, as well as for
# rpc.mountd (the NFS mount daemon). See portmap(8), rpc.mountd(8) and
# /usr/share/doc/portmap/portmapper.txt.gz for further information.
#
portmap: 192.168.0.127
Testing the NFS Server
The NFS server needs to be told to re-read the /etc/exports and /etc/hosts.allow
files before the changes take effect. There is probably a command for this but I
am lazy so I just re-booted my Debian development PC.
After the Debian came back up, I copied the compiled C program a.out (“Hello
World”) into the new /armfiles directory. That way when the GESBC-9302
mounts this directory over the NFS, we can run the program to be sure
everything is working OK over the network.
To make sure the NFS server is running on the Debian PC, type in the following
command:
rpcinfo –p
If the NFS server is running correctly you will see something like the following:
program vers proto
100000 2 tcp
100000 2 udp
100003 2 udp
100003 2 tcp
100005 1 udp
100005 2 udp
100005 1 tcp
100005 2 tcp
port
111 portmapper
111 portmapper
2049 nfs
2049 nfs
833 mountd
833 mountd
836 mountd
836 mountd
If see a line that says portmapper, nfs and mountd , everything should be in
order.
The Linux NFS-HowTo is very helpful in understanding more about the NFS
processes and troubleshooting them. It is available at www.linux.org
Testing NFS with GESBC-9302
We can test the NFS by trying first to mount the Debian development system as
a drive on the GESBC-9302. Here are the steps:
Boot the GESBC-9302 in the normal way from the serial console. When you are
in the GESBC filesystem, first set its IP address to 192.168.0.127, using the
following command:
Ifconfig eth0 192.168.0.127
This will allow the GESBC-9302 into the Debian NFS server. Next, try mounting
the Debian NFS at IP address 192.168.0.125 with the following command:
mount –o nolock 192.168.0.125:/armfiles /mnt
This is a standard mount command but it now includes the NFS server IP
address and the NFS-enabled directory. Be sure to include the nolock option;
without this the command will hang up!
If the command is successful, change directories to /mnt. Run the ls command
and you should see the a.out file. Execute it and you will see “Hello World!”.
The screenshot below shows the complete GESBC-9302 sequence:
Please press Enter to activate this console.
BusyBox v1.00 (2005.11.11-02:53+0000) Built-in shell (ash)
Enter 'help' for a list of built-in commands.
~ # ifconfig eth0 192.168.0.127
~ # mount -o nolock 192.168.0.125:/armfiles /mnt
~ # cd /mnt
/mnt # ls
a.out
/mnt # ./a.out
Hello World!
/mnt #
It worked! The GESBC-9302 has mounted the Debian system as just another
directory in its file system. You can write and cross-compile programs on the
Debian, move the compiled program to /armfiles and execute directly from the
GESBC-9302.
You can un-mount the NFS directory with the standard umount /mnt command.
Adding the GESBC-9302 File System to the Debian NFS Server
Now that the Debian NFS is operational, the GESBC-9302 file system can be
loaded into /armfiles. Then we can try to boot the GESBC-9302 directly from the
Debian using NFS.
The first task is to put a complete copy of the GESBC-9302 file system on the
Debian hard drive in /armfiles. The file system is supplied by Glomation on the
CD at /Linux/GESBC-9302/ramdisk.gz
I made a new directory, /armdisk, and copied the ramdisk.gz file from the CD to
/armdisk. Decompress using the gzip command: gzip –d ramdisk.gz
This produces a single file simply called ramdisk. The next step is to mount the
ramdisk on the Debian development PC. This is done by mounting it as a loop
device, as follows:
mount –o loop /armdisk/ramdisk /armdisk
If the mount command is successful you should be able to see the GESBC-9302
file system in /armdisk on your Debian machine. This sequence is shown in the
screenshot below:
DebDevel:/armdisk# ls
ramdisk
DebDevel:/armdisk# mount -o loop /armdisk/ramdisk /armdisk
DebDevel:/armdisk# cd /
DebDevel:/# cd /armdisk
DebDevel:/armdisk# ls
bin dev etc home lib mnt proc sbin tmp usr var
DebDevel:/armdisk#
Note that you must go out of the /armdisk directory, then come back in, to view
the files now mounted from ramdisk.
The files, however, are not yet captured to the Debian hard drive. But now it is
simply a matter of copying the /armdisk recursively to /armfiles.
cp –ra /armdisk/* /armfiles
When successful, you will have the entire RAM disk file system of the GESBC9302 captured permanently to /armfiles on your Debian development machine.
Now you can make changes and they will not disappear when you power down
the GESBC-9302.
The screenshot below shows the sequence of commands that copies the
GESBC-9302 file system to /armfiles.
DebDevel:/armdisk# cp -r /armdisk/* /armfiles
DebDevel:/armdisk# cd /armfiles
DebDevel:/armfiles# ls
a.out bin dev etc home lib mnt proc sbin tmp usr var
DebDevel:/armfiles#
Booting the GESBC-9302 from the NFS Server
Now that we have the complete GESBC-9302 file system residing on the Debian
system, and we have the NFS server operational, we can interrupt the Redboot
loading process to tell it to mount the file system via NFS at /armfiles.
To do this, we connect the GESBC-9302 to the serial port of a PC and launch
Hyper-Terminal configured for Com1, 57,600 baud, 8, N, 1. When the GESBC9302 power switch is thrown, Redboot starts its normal loading sequence.
To interrupt this, press ^C on the terminal keyboard (control C). This causes
Redboot to wait for commands from the serial console. First we load the Linux
kernel image with the following command:
fis load zimage
Next, we direct Redboot to load the GESBC-9302 file system from the NFS
server on the Debian machine:
exec –c “root=/dev/nfs nfsroot=192.168.0.125:/armfiles ip=192.168.0.127
console=ttyAM0”
This is a very long command but it tells Redboot that the file system will come
from the NFS server at IP address 192.168.0.125 (the Debian machine) and that
the GESBC-9302 machine will be assigned to IP address 192.168.0.127. The
terminal will be running as ttyAM0. Don’t leave out the “ in the command, they
are necessary.
If the command is successful, Linux will unpack and load according to the file
system on the Debian /armfiles directory.
This sequence (somewhat edited and commented) is shown in the HyperTerminal screenshot below:
GESBC-9302 Powers Up
RedBoot(tm) bootstrap and debug environment [ROMRAM]
Non-certified release, version v2_0 - built 20:59:09, Nov 10 2005
Platform: Cirrus Logic EDB9302 Board (ARM920T) Rev A
Copyright (C) 2000, 2001, 2002, Red Hat, Inc.
RAM: 0x00000000-0x02000000, 0x00041e48-0x01fdd000 available
FLASH: 0x60000000 - 0x61000000, 128 blocks of 0x00020000 bytes
each.
== Executing boot script in 1.000 seconds - enter ^C to abort
Boot Process Interrupted with Control C, Load Zimage and NFS
^C
RedBoot> fis load zimage
RedBoot> exec -c "root=/dev/nfs nfsroot=192.168.0.125:/armfiles
ip=192.168.0.127 console=ttyAM0"
booting the kernel.
Booting Process on Debian via NFS Successful
Please press Enter to activate this console.
BusyBox v1.00 (2005.11.11-02:53+0000) Built-in shell (ash)
Enter 'help' for a list of built-in commands.
Check Contents of File System, Run a.out Executable
~ # ls
a.out_/dev /home /mnt /sbin /usr /bin /etc /lib /proc /tmp /var
~ # ./a.out
Hello World!
~ # ls
Modifying and Testing the GESBC-9302 File System
Now that we can boot the GESBC-9302 from the Debian system, the file system
can be modified and tested on boot-up. So we need a project to embed into the
GESBC-9302.
A simple modification project would be the following:
Replace the default index webpage and have the GESBC-9302 assigned to
IP address 192.168.0.127on power-up.
It is easy to change the default webpage. Log into the Debian system as root, cd
to the /armfiles/home/www . There are two files located there, cirrus.jpg (the
Cirrus Logic logo image) and index.html, the default web page. Delete both files.
Creating a simple default webpage is easy. Run the pico editor with the following
command:
Pico index.html
Create the index page file as shown below.
<HTML>
<BODY>
<H3>This is a Test Page for the GESBC-9302 System</H3>
<P>
If you can read this, it works!
<P>
</BODY>
</HTML>
This page will now appear when a web browser is pointed at the GESBC-9302
system at IP 192.168.0.127.
The GESBC-9302 can assign itself to IP address 192.168.0.127 by editing the
/etc/rc.sysinit file. Simply cd to the /armfiles/etc directory, and load rc.sysinit into
the pico editor.
Add the following command to the end of the file:
ifconfig eth0 192.168.0.127
#!/bin/sh
#
# Set the path so we can find the programs we need.
#
PATH=/usr/bin:/bin:/usr/sbin:/sbin
#
# Mount the /proc and /dev/pts filesystems.
#
mount -t proc proc /proc
mount -t usbdevfs usbdevfs /proc/bus/usb
mount -t devpts devpts /dev/pts
#
# Start syslogd.
#
syslogd -C -m 0
#
# Start klogd.
#
klogd
#
# Configure the network interfaces.
#
ifconfig lo 127.0.0.1 up
route add -net 127.0.0.0 netmask 255.0.0.0 lo
if [ "x`grep ip= /proc/cmdline`" = "x" ]
then
udhcpc -i eth0 -b -p /var/run/udhcpc.eth0 >/dev/null 2>&1
fi
#
# Start inetd.
#
inetd
#
# Start crond.
#
crond
#
# Set the serial port speed to 57600.
stty -F /dev/ttyAM0 ospeed 57600
#
# Set to IP 192.168.0.127
#
ifconfig eth0 192.168.0.127
Testing the Modified File System
With the changes in place on the Debian /armfiles directory boot the GESBC9302 via NFS to test the new file system modifications.
If successful, you should see the new webpage at http://192.168.0.127
It should be said that setting the IP address to 192.168.0.127 in the rc.sysinit file
is somewhat redundant at this point. The IP address was also set in the exec
command during the Redboot process. But once the new file system is
embedded in the GESBC-9302, and it stands alone, the setting of the static IP
address at the rc.sysinit level will be the only time it is done.
Writing the New File System into the GESBC-9302 Flash Memory
We now have built and tested a modified file system that includes a new default
webpage and assigns the GESBC-9302 to a static IP address using added
commands to the rc.sysinit file. The final step is to embed this new file system in
the GESBC-9302 flash memory so that on power-up the GESBC-9302 will load
our new file system instead of the file system originally shipped with the board.
To do this we will need to create a single ramdisk file, gzip it, then load it to the
GESBC-9302 dynamic ram and write to flash using Redboot commands.
Preparing the Development System Network
To load and write the new file system to the GESBC-9302 requires the Debian
development system PC and a Windows PC at static IP addresses on the same
LAN as the GESBC-9302.
Configuring the Windows PC
The Windows PC runs Hyper-Terminal to communicate to the GESBC-9302
console, as previously described. The Windows PC also is the host for a special
ftp server that will move the new ramdisk file to the GESBC by Redboot
command. In addition, the Windows PC should have a standard ftp client so that
you can acquire the new ramdisk file from the Debian development PC.
Setting Up the TFTP Server on the Windows PC
Redboot has a limited command set and cannot negotiate the normal ftp
username and password process to log into a host ftp server. So the easiest
way to move the ramdisk file to the GESBC-9302 is to install the Trivial FTP
server, tftp, available from the Glomation CD in the Utilities folder. Installation is
simple: just create a new folder, tpft, and copy over the tftp executable from the
CD. I also created a shortcut to the desktop.
Configuring tftp is simple. Start the tftp server from the desktop shortcut. Go to
the Tftpd button in the upper left corner of the server window and select
Configure from the drop-down menu. All that is necessary is to set the home
directory to C:\tftp.
To start the server, go to the Tftpd button and select Start from the dropdown
menu. The server is now running and will serve any file requested by name that
is located in the Windows PC C:\tftp folder. There is no username or password
negotiation required with tftp and this makes it compatible with the Redboot load
command.
Generic FTP Clinet for Windows PC
In order to move the new GESBC-9302 ramdisk file system from the Debian PC
to the tfpt server folder, a generic FTP client is needed for the Win PC. I use WS
FTP. This is a very old FTP freeware client dating from Win 3.1, but it is small
(about 200K) and easy to get running. The ramdisk file is 1.7 Mbytes when
gzipped, so it is just a bit too big for transfer by floppy to the Win PC. Any
generic FTP client that can log into the Debian FTP server can be used,
however.
Preparing the New Ramdisk File on the Debian Development PC
The modified GESBC-9302 file system currently exists as a series of directories
and files on the Debian development PC in /armfiles. This is useful for testing
and development, but what we need is a single file to upload to the GESBC-9302
flash. The way we get to a single file is very clever: the original ramdisk file is
again mounted as a loop device, the changed and new files are copied from the
development /armfiles directory to the mounted ramdisk. When the ramdisk file
is umounted, all the changes are preserved!
The changes we made to the file system were to delete the existing webpages,
add a new index webpage, and add a new line to the rc.sysinit file. So we will
mount the original ramdisk file, delete the two existing webpages, and copy
index.html and rc.sysinit from the /armfiles development directory. As a
precaution, we will first save a copy of the original ramdisk file.
cd /armdisk
cp ramdisk ramdisk.bak
Next, we mount ramdisk as a loop device, then change directories and come
back in to /armdisk to operate on the mounted file system.
mount –o loop /armdisk/ramdisk /armdisk
cd /
cd /armdisk
Now we cd to the /homewww directory and make the changes:
cd home/www
rm cirrus.jpg
rm index.html
cp /armfiles/home/www/index.html index.html
Next, we cd to /etc to make the rc.sysinit change:
cd /armdisk/etc
rm rc.sysinit
cp /armfiles/etc/rc.sysinit rc.sysinit
The changes are complete. The /armdisk is umounted, then remounted to verify
that the changes are in place.
cd /
umount /armdisk
mount –o loop /armdisk/ramdisk /armdisk
cd /
cd /armdisk
cd /home/www
ls
At this point, just the new index.html file should be in this directory. You can use
the more command to have a quick look at it. Also visit the /etc directory and
verify that the ifconfig eth0 command appears near the end of the rc.sysinit file.
umount /armdisk and now the new ramdisk file is almost ready to go. The
ramdisk file must be gzipped so that it can be loaded into the GESBC-9302:
gzip -r -9 ramdisk
Next, copy the zipped ramdisk file to /home/arm for ftp to the Windows PC:
cp ramdisk.gz /home/arm/ramdisk.gz
The following screen shot shows the sequence of commands used to prepare
and check the ramdisk file on the Debian PC:
DebDevel:/# cd armdisk
DebDevel:/armdisk# ls
ramdisk
DebDevel:/armdisk# cp ramdisk ramdisk.bak
DebDevel:/armdisk# mount -o loop /armdisk/ramdisk /armdisk
DebDevel:/armdisk# cd /
DebDevel:/# cd armdisk
DebDevel:/armdisk# ls
bin dev etc home lib mnt proc sbin tmp usr var
DebDevel:/armdisk# cd home/www
DebDevel:/armdisk/home/www# ls
cirrus.jpg index.html
DebDevel:/armdisk/home/www# rm cirrus.jpg
DebDevel:/armdisk/home/www# rm index.html
DebDevel:/armdisk/home/www# cp /armfiles/home/www/index.html index.html
DebDevel:/armdisk# cd etc
DebDevel:/armdisk/etc# ls
fstab hosts
inittab passwd
rc.sysinit shadow
group inetd.conf mtab
protocols services
DebDevel:/armdisk/etc# rm rc.sysinit
DebDevel:/armdisk/etc# cp /armfiles/etc/rc.sysinit rc.sysinit
DebDevel:/armdisk/etc# cd /
DebDevel:/# umount /armdisk
DebDevel:/# cd armdisk
DebDevel:/armdisk# ls
ramdisk ramdisk.bak
DebDevel:/armdisk# mount -o loop /armdisk/ramdisk /armdisk
DebDevel:/armdisk# cd /
DebDevel:/# cd armdisk
DebDevel:/armdisk# cd etc
DebDevel:/armdisk/etc# more rc.sysinit
(Last part only of file shown)
#
# Set the serial port speed to 57600.
stty -F /dev/ttyAM0 ospeed 57600
#
# Set to IP 192.168.0.127
#
ifconfig eth0 192.168.0.127
DebDevel:/armdisk/etc# cd /
DebDevel:/# umount /armdisk
DebDevel:/# cd /armdisk
DebDevel:/armdisk# gzip -r -9 ramdisk
DebDevel:/armdisk# ls -l
total 7864
-r-xr-xr-x 1 root root 6284288 2006-04-08 12:31 ramdisk.bak
-r-xr-xr-x 1 root root 1745461 2005-11-22 13:25 ramdisk.gz
DebDevel:/armdisk# cp ramdisk.gz /home/arm/ramdisk.gz
Moving the ramdisk.gz file to the Windows PC
A simple FTP client will put the new ramdisk.gz file into the C:\tftp folder: The
user name arm and password gesbc will bring the ftp client into the directory
holding the ramdisk.gz file on the Debian development server. I set the local
directory of the FTP client to the C:\tftp folder on my Win PC so the transfer puts
the ramdisk file where it will need to be for upload to the GESBC-9302.
The screenshot below shows the completed transfer to the Win PC.
Loading the New Ramdisk File to the GESBC-9302
Now the last steps are in sight. All we need to do is load the new ramdisk file up
to the GESBC-9302 dynamic ram, then write it to flash memory. For this we will
use Redboot commands and the tftp server.
Getting into the Redboot Command Line
As before, we start Hyper-Terminal on the Windows PC and power up the
GESBC-9302. Just as a precaution, I start the “Capture Text” option to have a
record in case anything goes wrong. After powering-up the GESBC-9302,
Press ^C (Control C) to interrupt the normal bootup process so the system will
be in the Redboot command line mode.
Next we launch the tftp server on the Windows PC from the desktop icon. Don’t
forget to actually start the server from the Tftpd drop-down selection. Tftp will
display “Server is running. 0 out of max 32 clients are connected” along the
bottom of the window.
To upload the ramdisk file, we enter the load command into Redboot on the
GESBC-9302 from Hyper-Terminal:
load –v –r –b 0x800000 –h 192.168.0.128 ramdisk.gz
The –h option tells Redboot that there is a tftp server at IP address
192.168.0.128 (the Windows PC address on the LAN).
During the upload process the cursor in Hyper-Terminal will rotate. At the end of
the upload process a message is displayed:
Raw File loaded 0x00800000-0x009aa234, assumed entry at 0x00800000
This indicates that the ramdisk file is now residing in the GESBC-9302 dynamic
ram and occupies memory (hex) addresses 0x800000 through 0x9aa234.
Calculating the size of the Uploaded File
In order to write the file to flash, the size of the file needs to be calculated from
the address information shown by Redboot when it loads the file into RAM. To
do this, simply subtract the ending address from the starting address, in
hexdecimal notation.
Fortunately the Windows calculator in the scientific mode can do this. Just click
on the Hex button in the upper left corner and subtract the two values provided
by Redboot. When I did this 9aa234 – 800000 = 1aa234, and this looks correct.
Loading the Ramdisk File into Flash
Now comes the moment of truth! To write the uploaded file to the GESBC-9302
flash, use the following command:
fis create –b 0x800000 –l 0x1aa234 ramdisk
Redboot will ask: an image named ‘ramdisk’ exists – continue (y/n)?
Respond with y. The reason is that ramdisk must be the name of the file system
image; this name is used in the normal Redboot power-up script for starting
Linux. We need to keep the name the same.
Redboot will confirm the steps as its goes through the process of erasing the old
image and writing the new ramdisk file to flash.
When the process is complete and you are back at the Redboot command line,
verify the file has been correctly loaded:
fis list
A table of all the file images will be given. Ramdisk will be shown starting at
0x00800000, just as intended.
Verifying the New File System
To be sure the new file system is in place, simply power down the GESBC-9302
and power up again. Observe the boot-up sequence in Hyper-Terminal to be
sure all is normal. After the console is activated, have a look in /home/www to
see if the index.html file is the new version. You can also point the Windows PC
browser at 192.168.0.127. The new web page should appear at this static IP
address.
If all was successful, you can congratulate yourself on having done real brain
surgery on the GESBC-9302!
The following commented screenshot shows the sequence of Redboot
commands and the GESBC-9302 responses:
------- Power up GESBC-9302 and interrupt Redboot ----------== Executing boot script in 1.000 seconds - enter ^C to abort
^C
RedBoot> load -v -r -b 0x800000 -h 192.168.0.128 ramdisk.gz
/
Raw file loaded 0x00800000-0x009aa234, assumed entry at 0x00800000
RedBoot> fis create -b 0x800000 -l 0x1aa234 ramdisk
An image named 'ramdisk' exists - continue (y/n)? y
... Erase from 0x602c0000-0x60480000: ..............
... Program from 0x00800000-0x009aa234 at 0x602c0000: ..............
... Erase from 0x60fe0000-0x61000000: .
... Program from 0x01fdf000-0x01fff000 at 0x60fe0000: .
RedBoot> fis list
Name
FLASH addr
Mem addr Length
Entry point
RedBoot
0x60000000
0x60000000 0x00040000 0x00000000
RedBoot config 0x60FC0000
0x60FC0000 0x00001000 0x00000000
FIS directory
0x60FE0000
0x60FE0000 0x00020000 0x00000000
ramdisk
0x602C0000
0x00800000 0x001C0000 0x00800000
zImage
0x60480000
0x00080000 0x000C0000 0x00080000
RedBoot>
----- Power GESBC-9302 down, then power up again ---------The usual boot-up lines scroll by here
Please press Enter to activate this console.
BusyBox v1.00 (2005.11.11-02:53+0000) Built-in shell (ash)
Enter 'help' for a list of built-in commands.
~ # cd /home/www
/home/www # more index.html
<HTML>
<BODY>
<H3>This is a Test Page for the GESBC-9302 System</H3>
<P>
If you can read this, it works!
<P>
</BODY>
</HTML>
/home/www #
Conclusions
The method shown here is the classic way to customize an embedded Linux
system: change files and add programs to the file system, test via NFS and then
burn the new file system image to the GESBC-9302 flash. The result is that the
GESBC-9302 is self-contained and fast in execution because everything is
running in a ramdisk.
There are however, some limitations with this method. Because the file system
is running in a ramdisk, there will be a limit to how much can be added. Using
the df command shows that the ramdisk is 65% used after the new file system
was installed into the GESBC-9302. There are still 2.116 Mbytes available, but
any additions to this file system will have an upper limit. In order to add a new
package or expand the file system image greatly would require a recompile of the
kernel so that a larger ramdisk could be launched at bootup.
You could have Redboot mount the file system directly from the USB drive
instead of a ramdisk and trade some speed for added memory and flexibility.
And you could even set the GESBC-9302 to find its file system via NFS on
power-up.
The Redboot loader has a scripting capability that allows the user to specify
loading the file system from any number of places. Read the Redboot command
documentation at www.ecoscentric.com for a complete description of the
Redboot capabilities.
Keep in mind that the GESBC-9302 comes with Linux in the default configuration
described in this article. The GESBC-9302 can also run other operating systems
including: eCos, NetBSD, Inferno, Win CE and others.