1
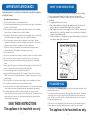
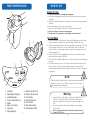
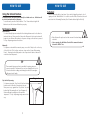
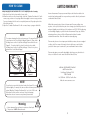
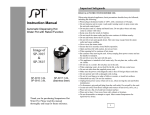
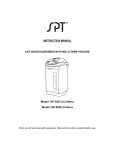
With the Aroma® Hot Water Central, hot water is just a button
away. Boil up to 3 liters of water in just 30 minutes, then have it hot
throughout the day.
With hot water available around the clock, the Hot Water Central
is ideal for quick preparation of all kinds of hot meals and
beverages. Including:
Hot Water Central
•
•
•
•
•
•
Electric Hot Water Dispenser
Instruction Manual
Hot Tea
Hot Chocolate
Quick Noodles
Baby Formula
Instant Coffee
Oatmeal
For more information on your Hot Water Central or for additional
kitchen solutions, visit us online at www.Aromaco.com.
Please read the following instructions carefully before your first use.
Published By:
www.AromaCo.com
Aroma Housewares Co.
6469 Flanders Drive
San Diego, CA 92121
U.S.A.
1-800-276-6286
www.aromaco.com
AAP-325W
© 2008 Aroma Housewares Company All rights reserved.
IMPORTANT SAFEGUARDS
Basic safety precautions should always be followed when using electrical appliances,
including the following:
1. Read all instructions before use.
2. Do not touch hot surfaces. Use handles or knobs.
3. To protect against electrical shock, do not immerse cord, plug or the appliance
in water or any other liquid.
4. Close supervision is necessary when this appliance is used by or near children.
This appliance is not intended to be used by children.
5. Unplug from outlet when not in use and before cleaning. Allow to completely
cool before putting on or taking off any parts, and before cleaning.
6. Do not operate this appliance with a damaged cord or plug or after the
appliance malfunctions or has been damaged in any manner. Contact the
appliance manufacturer for examination, repair or adjustment.
7. The use of accessory attachments not recommended by the appliance
manufacturer may cause injuries or damage to the product.
8. Do not use outdoors.
9. Do not let cord hang over the edge of a table or counter, or touch hot surfaces.
10. Do not place on or near a hot gas or electric burner, or in a heated oven.
11. Extreme caution must be used when moving the appliance containing hot
water.
12. Always attach the plug to the appliance first, then plug the cord into the wall
outlet. To disconnect, remove the plug from the wall outlet.
13. Do not use this appliance for other than intended use.
14. Never allow fill the water over the “FULL” mark in the ‘Inner Pot’ or below the
“REFILL” mark on the ‘Water Level Indicator’, otherwise it will spill over or dry-up
during boiling.
15. Do not open the top lid when water is boiling to avoid scalding by hot steam.
16. Do not fill the air pot with any substance other than water.
17. Water in the Hot Water Central will be extremely hot. Use caution when serving
as hot water may cause scalding. Always test temperature before serving.
18. If making baby formula with hot water from the air pot, always add cold
water as water from the air pot will be too hot for the baby. The amount of cold
water needed to reach an adequate temperature will vary. Always test the
temperature before serving.
SAVE THESE INSTRUCTIONS
This appliance is for household use only.
1
SHORT CORD INSTRUCTIONS
1. A short power-supply cord is provided to reduce the risks resulting
from becoming entangled in or tripping over a longer cord.
2. Longer extension cords are available and may be used if care is
exercised.
3. If a longer extension cord is used:
a. The marked electrical rating of the extension cord should be at
least as great as the electrical rating of the appliance.
b. The longer cord should be arranged so that it will not drape over
the counter top or tabletop where it can be pulled by children or
tripped over unintentionally.
c. If the appliance is of the grounded type, the extension cord should
be a grounding- type 3-wire cord.
POLARIZED PLUG
This appliance has a polarized plug (one blade is wider than the other); follow
the instructions below:
To reduce the risk of electric shock, this plug is intended to fit into a polarized
outlet only one way. If the plug does not fit fully into the outlet, reverse the
plug. If it still does not fit, contact a qualified electrician. Do not attempt to
modify the plug in any way.
If the supply cord is damaged, it must be replaced by the manufacturer, its
service agent or a similarly qualified person in order to avoid a hazard.
This appliance is for household use only.
2
PARTS IDENTIFICATION
Before First Use
3
2
1
HOW TO USE
4
8
7
1. Read all the instructions and important safeguards.
2. Remove all packaging materials; check that all items are received in good
condition.
3. Wash the ‘Stainless Steel Inner Pot’ with warm, soapy water using a sponge or
dishcloth.
4. Rinse thoroughly to remove any soapy residue.
5. Wipe body and ‘Stainless Steel Inner Lid’ clean with a damp cloth.
Ø Do not use abrasive cleaners or scouring pads.
Ø Do not immerse the appliance, cord or plug in water at any time.
5
9
10
6
11
15
14
1.
2.
3.
4.
5.
6.
7.
8.
12
13
Lid Handle
Manual Dispensing Pump
Load/Unload Hinge
Pressure Pump Safety Lock
Handle
Water Level Indicator
Cup Switch
Dispensing Spout
3
9.
10.
11.
12.
13.
14.
15.
Stainless Steel Inner Pot
Stainless Steel Inner Lid
Unlock Button
Automatic Dispenser
Re-boil Button
Warm Indicator Light
Heating Indicator Light
To Heat Water
1. Lift the ‘Lid Handle’ to open the lid. If needed, for filling purposes, the entire
lid can be removed from the ‘Load/Unload Hinge’ on the back of lid.
2. Fill the ‘Stainless Steel Inner Pot’ with water anywhere between the “Full” mark
in the ‘Stainless Steel Inner Pot’ and the “Refill” mark on the ‘Water Level
Indicator Window’, depending on desired quantity. Properly replace the lid
before heating water.
3. Attach the power cord by plugging the connector to the main body and
then connect the plug to wall outlet.
4. The ‘Heat Indicator Light’ will illuminate and the water will automatically begin
heating.
5. Once the water has come to a boil, the unit will automatically switch to the
“Warm” function. The ‘Heat Indicator Light’ will go off and the ‘Warm
Indicator Light’ will illuminate. It will remain in the “Warm” function as long as it
is plugged in.
NOTE
If filled to the full, 3-liter capacity, water will take approximately 30
minutes to reach a boil. Smaller amounts of water will have a
proportionally shorter boiling time.
•
•
•
Warning
Never fill water past the “FULL” mark in the ‘Stainless Steel
Inner Pot’ or below the “REFILL” mark on the ‘Water Level
Indicator’, otherwise it may spill over or cause damage to the
unit.
Do not open the lid while water is boiling to avoid scalding
by hot steam.
Never operate the Hot Water Central if the amount of water is
below the “REFILL” line.
4
HOW TO USE
Using the Unlock Feature
For safety reasons, this unit will automatically lock after each use. All buttons will
be locked and water will not dispense.
To use the unit, press the ‘Unlock Button’. The ‘Warm Indicator Light’ will
illuminate and all buttons will function properly.
To Dispense Water
Automatically:
To automatically dispense water, first the locking feature must be disabled as
instructed above. Then press the ‘Automatic Dispenser’ button and water will
begin to pour. Water will continue to dispense as long as the button is pressed.
To stop dispensing, release the button.
Manually:
To dispense water with the manual pump, move the ‘Safety Lock’ on the top
of the lid to the “On” position and press down on the ‘Manual Dispensing
Pump’. Pressing down will dispense water. Repeat until desired amount of
water has been dispensed.
TIP
The manual dispense option is excellent for serving, since no
power is needed. Disconnect the cord and bring the hot pot to
a hard surface for making and sharing favorite hot beverages
with guests and family.
Cup Switch Dispensing:
To dispense using the ‘Cup Switch’, first the locking
feature must be disabled as instructed above.
Then press a cup against the ‘Cup Switch’ located
behind the ‘Dispensing Spout’ (see Diagram A).
Water will begin pouring once the switch is
depressed. To stop dispensing, simply remove the
cup.
5
Diagram A
To Reboil
HOW TO USE
Water may be reboiled at any time. If you wish to bring the water to a boil
again, press the ‘Reboil Button’. In order to use the “Reboil” function, the unit
must be in the “Warming” function (the ‘Warm Indicator Light’ will be lit).
NOTE
• Reboil time will vary based on the amount of water being
reboiled.
• Never operate the Hot Water Central if the amount of water is
below the “REFILL” line.
HOW TO USE
Using the Unlock Feature
For safety reasons, this unit will automatically lock after each use. All buttons will
be locked and water will not dispense.
To use the unit, press the ‘Unlock Button’. The ‘Warm Indicator Light’ will
illuminate and all buttons will function properly.
To Dispense Water
Automatically:
To automatically dispense water, first the locking feature must be disabled as
instructed above. Then press the ‘Automatic Dispenser’ button and water will
begin to pour. Water will continue to dispense as long as the button is pressed.
To stop dispensing, release the button.
Manually:
To dispense water with the manual pump, move the ‘Safety Lock’ on the top
of the lid to the “On” position and press down on the ‘Manual Dispensing
Pump’. Pressing down will dispense water. Repeat until desired amount of
water has been dispensed.
TIP
The manual dispense option is excellent for serving, since no
power is needed. Disconnect the cord and bring the hot pot to
a hard surface for making and sharing favorite hot beverages
with guests and family.
Cup Switch Dispensing:
To dispense using the ‘Cup Switch’, first the locking
feature must be disabled as instructed above.
Then press a cup against the ‘Cup Switch’ located
behind the ‘Dispensing Spout’ (see Diagram A).
Water will begin pouring once the switch is
depressed. To stop dispensing, simply remove the
cup.
5
Diagram A
To Reboil
HOW TO USE
Water may be reboiled at any time. If you wish to bring the water to a boil
again, press the ‘Reboil Button’. In order to use the “Reboil” function, the unit
must be in the “Warming” function (the ‘Warm Indicator Light’ will be lit).
NOTE
• Reboil time will vary based on the amount of water being
reboiled.
• Never operate the Hot Water Central if the amount of water is
below the “REFILL” line.
HOW TO CLEAN
Always unplug the unit and allow it to cool completely before cleaning.
1. Wipe the lid and body clean with a damp cloth.
2. When the unit has cooled completely, wash the ‘Stainless Steel Inner Pot’ with
warm, soapy water and a sponge. Rinse thoroughly to remove soapy residue.
For easy cleaning, the lid can be completely removed. Properly replace the
lid before next use.
3. Wipe the ‘Stainless Steel Inner Lid’ with a warm, damp sponge or dishcloth.
NOTE
For easier cleaning, the lid may be removed. To remove the lid,
press down on the ‘Load/Unload Hinge’ (Figure A). Then, while
holding down on the ‘Load/Unload Hinge’ remove the lid as in
Figure B. To replace the lid, place it back into place while
holding down on the ‘Load/Unload Hinge’. Once it is in place,
release the ‘Load/Unload Hinge’.
Figure B
Figure A
NOTE
LIMITED WARRANTY
Aroma Housewares Company warrants this product free from defects in
material and workmanship for one year from provable date of purchase in
continental United States.
Within this warranty period, Aroma Housewares Company will repair or
replace, at its option, defective parts at no charge, provided the product is
returned, freight prepaid with proof of purchase and U.S. $12.00 for shipping
and handling charges payable to Aroma Housewares Company. Before
returning an item, please call the toll free number below for return
authorization number. Allow 2-4 weeks for return shipping.
This warranty does not cover improper installation, misuse, abuse or neglect
on the part of the owner. Warranty is also invalid in any case that the
product is taken apart or serviced by an unauthorized service station.
This warranty gives you specific legal rights, which may vary from state to
state, and does not cover areas outside the United States.
AROMA HOUSEWARES COMPANY
6469 Flanders Drive
San Diego, California 92121
1-800-276-6286
M-F, 8:30 AM - 5:00 PM, Pacific Time
Website: www.aromaco.com
If you live in an area that has hard water, the ‘Inner Pot’ may
discolor slightly. To remedy this, mix a solution of lemon juice and
water, filling the ‘Stainless Steel Inner Pot’ up to the “Full” mark.
Boil water and let soak for one hour. Repeat cleaning
instructions above to remove any lemon juice residue.
Warning
• Never immerse the appliance in water or other liquid.
• This product is NOT dishwasher safe.
7
8