1
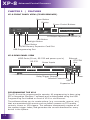
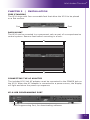
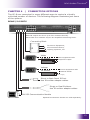
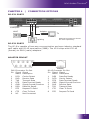
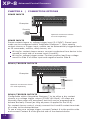
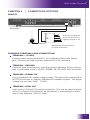
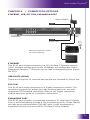
Installation and Operation Guide
It’s Under Control®
It’s Under Control®
XP-8
Advanced Control Processor
V 1.0
1
XP-8
Advanced Control Processor
Copyright © 2007
Remote Technologies Incorporated
All rights reserved.
2
It’s Under Control®
Federal Communications Commission Notice
This equipment has been tested and found to comply with the limits for a
Class B digital device, pursuant to Part 15 of the FCC Rules. These limits
are designed to provide reasonable protection against harmful interference
in a residential installation.
This equipment generates, uses, and can radiate radio frequency energy
and, if not installed and used in accordance with the instructions, may
cause harmful interference to radio communications. However, there is no
guarantee that interference will not occur in a particular installation.
If this equipment does cause harmful interference to radio or television
reception, which can be determined by turning the equipment off and on,
the user is encouraged to try to correct the interference by one or more of
the following measures:
Reorient or relocate the receiving antenna.
Increase the separation between the equipment and the receiver.
Connect the equipment into an outlet on a circuit different from that to which the receiver is connected.
Consult the dealer or an experienced radio/TV technician for help.
This device complies with Part 15 of the FCC Rules. Operation is subject to
the following two conditions:
1. This device may not cause harmful interference.
2. This device must accept any interference received including
interference that may cause undesired operation.
3
XP-8
Advanced Control Processor
Safety Suggestions
Read Instructions. Read all safety and operating instructions before
operating the unit.
Retain Instructions. Keep the safety and operating instructions for
future reference.
Heed Warnings. Adhere to all warnings on the unit and in the
operating instructions.
Follow Instructions. Follow operating instructions and instructions
for use.
Heat. Keep the unit away from heat sources such as radiators, heat
registers, stoves, etc., including amplifiers that produce heat.
Power Sources. Connect the unit only to a power supply of the type
described in the operating instructions, or as marked on the unit.
Power Cord Protection. Route power supply cords so that they are
not likely to be walked on or pinched by items placed on or against
them, paying particular attention to the cords at plugs, at convenient
receptacles, and at the point at which they exit from the unit.
Water and Moisture. Do not use the unit near water—for example,
near a sink, in a wet basement, near a swimming pool, near an open
window, etc.
Object and Liquid Entry. Do not allow objects to fall or liquids to be
spilled into the enclosure through openings.
Servicing. Do not attempt any service beyond that described in
the operating instructions. Refer all other service needs to qualified
service personnel.
Damage Requiring Service. The unit should be serviced by qualified
service personnel when:
The power supply cord or the plug has been damaged.
Objects have fallen or liquid has been spilled into the unit.
The unit has been exposed to rain.
The unit does not appear to operate normally or exhibits a
marked change in performance.
The unit has been dropped or the enclosure has been damaged.
WARNING!
TO REDUCE THE RISK OF FIRE OR ELECTRIC SHOCK,
DO NOT EXPOSE THE UNIT TO RAIN OR MOISTURE.
4
It’s Under Control®
Limited Warranty and Disclaimer
Remote Technologies Incorporated warrants its products for a period of one
(1) year from the date of purchase from Remote Technologies Incorporated
or an authorized Remote Technologies Incorporated distributor.
This warranty may be enforced by the original purchaser and subsequent
owners during the warranty period, so long as the original dated sales
receipt or other proof of warranty coverage is presented when warranty
service is required. Except as specified below, this warranty covers all
defects in material and workmanship in this product. The following are not
covered by the warranty:
Damage resulting from:
1. Accident, misuse, abuse, or neglect.
2. Failure to follow instructions contained in this Guide.
3. Repair or attempted repair by anyone other than Remote Technologies
Incorporated.
4. Failure to perform recommended periodic maintenance.
5. Causes other than product defects, including lack of skill, competence
or experience of user.
6. Shipment of this product (claims must be made to the carrier).
7. Being altered or which the serial number has been defaced, modified
or removed.
Remote Technologies Incorporated is not liable for any damages caused by
its products or for its failure of its products to perform, including any lost
profits, lost savings, incidental damages, or consequential damages.
Remote Technologies Incorporated is not liable for damages based upon
inconvenience, loss of use of the product, loss of time, interrupted
operation, commercial loss, any claim made by a third party or made by
you for a third party.
Remote Technologies Incorporated’s liability for any defective product is
limited to repair or replacement of the product, at our option.
If your XP-8 Processor needs service, please contact Remote Technologies
Incorporated by telephone, fax or E-mail for return information. Please do
not return products to Remote Technologies Incorporated without
return authorization.
All rights are reserved. No part of this document may be photocopied,
reproduced, or translated without the prior written notice of Remote
Technologies Incorporated.
The information contained in this document is subject to change without
notice. Remote Technologies Incorporated shall not be liable for errors or
omissions contained herein or for consequential damages in connection
with the furnishing, performance, or use of this guide.
Microsoft and Windows are registered trademarks of Microsoft Corporation.
Other brands and their products are trademarks or registered trademarks
of their respective holders.
XP-8, It’s Under Control®, Integration Designer™, and the RTI logo are
registered trademarks of Remote Technologies Incorporated.
5
XP-8
6
Advanced Control Processor
It’s Under Control®
table of Contents
Federal Communications Commission Notice................3
Safety Suggestions....................................................... 4
Limited Warranty and Disclaimer ................................ 5
Contents....................................................................... 7
Chapter 1 - Welcome.................................................... 9
Important Notes....................................................... 9
Product Contents.................................................... 10
Chapter 2 - Features.................................................... 11
Front, Real Panels.................................................... 12
Programming.......................................................... 12
Chapter 3 - Installation............................................... 13
Freestanding or Rack Mount...................................... 13
Chapter 4 - Connection Options................................... 15
Rear I/O Ports......................................................... 15
IR Emitters............................................................. 16
Power Sensor Modules.............................................. 16
Communication Modules........................................... 16
RS-232 Ports........................................................... 17
Sense Inputs........................................................... 18
Relay/Trigger Inputs................................................. 18
Rear IR Connections................................................. 19
Infrared Receivers, RF Receivers, IR High Out.............. 20
Ethernet, USB, RTI COM, Expansion Port..................... 21
Chapter 5 - Operation.................................................. 23
Main Menu.............................................................. 25
Processing Rules...................................................... 29
Chapter 6 - Specifications............................................ 31
Chapter 7 - Troubleshooting........................................ 33
Chapter 8 - Service and Support.................................. 35
Index.......................................................................... 37
7
XP-8
8
Advanced Control Processor
It’s Under Control®
Chapter 1 | Welcome
Thank you for using the XP-8 Advanced Control Processor.
The XP-8 is a high-end remote control processor for automating the
operation of electronic systems in homes and office buildings. These
systems include home theaters, lighting, HVAC and many other
applications.
The combination of a blazing fast MPU, real-time/multitasking operating
system, and tremendous expandability make the XP-8 the perfect solution
for large scale and complex projects.
Like other RTI processors, the XP-8 has been designed to interface
seamlessly with all RTI remote controls and touchpanels. In addition to an
abundance of basic control ports such as infrared, contact closures, and
power sensors – the XP-8 provides advanced control interface options such
as two-way RS-232, USB, and Ethernet. An internet connection to the XP-8
allows convenient services such as updating system files and monitoring.
The XP-8 requires the Integration Designer™ programming software.
Before using the XP-8, please read and follow all of the instructions in this
guide.
IMPORTANT NOTES
Please read these important notes about the XP-8:
The XP-8 should be placed in an area where it is around normal room temperature (between 50 F to 90 F).
Do not let the XP-8 get wet. It should not be handled with wet hands or placed in an area where it could get wet.
Do not subject the XP-8 to smoke, dust, or vibrations.
Use only the power supply that is provided with the XP-8. Using the wrong type of power supply may result in permanent damage.
Do not disassemble the unit. Service and repair should be performed by an authorized technician only.
9
XP-8
Advanced Control Processor
Chapter 1 | Product Contents
Contents within the box include the following items:
One (1) XP-8 Remote Control Processor
One (1) Installation Guide
One (1) Universal Power Supply
One (1) Power Cord
Eight (8) IR Emitter Adapter Cables
Eight (8) RJ-45 (female) to DB-9 (male) Adapters for dedicated RS-232 ports
Four (4) Removable Feet
Two (2) Rack Mounting Wings.
UNPACKING AND INSPECTION
After unpacking your new XP-8 Remote Control Processor, save all of the
packing materials in case you ever have to ship the unit.
Thoroughly inspect the XP-8 and packing materials for signs of damage.
Report any damage to the carrier immediately. Report any equipment
malfunctions to RTI or an authorized RTI distributor.
10
It’s Under Control®
Chapter 2 | Features
The XP-8 provides superior quality and reliability as well as these specific
features:
Powerful 32-bit, 200MHz XScale® processor.
32MByte of non-volatile Flash memory.
Front panel controls/display (7 buttons for front panel control).
Three USB ports, 1 programming, 2 external devices (future use).
Eight MPIO multi-purpose I/O ports (IR, RS-232, power sensing).
Eight programmable relays/voltage trigger outputs.
Eight bi-directional RS-232 ports.
Eight sense inputs.
I/O ports are compatible with industry standard IR emitters, blasters, and repeater systems.
All output ports incorporate both short-circuit and overload protection.
Variable IR output on all I/O ports.
MPIO ports support all optional RTI power sensing and communications modules.
Programmed using the Integration Designer™ Software.
Non-volatile Flash memory stores your system configuration even
when power is not present.
Field upgradable firmware.
USB and Ethernet programming.
Input for connection of multiple RF receiver modules.
RS-485 communications port for future expansion.
Real-time clock function.
Rack mountable or free standing.
NOTE
The XP-8 I/O ports are compatible with infrared (IR) commands that
have carrier frequencies between 15kHz and 460kHz, as well as those
commands that do not use a carrier. This covers virtually all of the remotes
that exist to date.
The dedicated RS-232 ports and MPIO ports (when combined with a
CM-232 communication module) are compatible with RS-232 devices
that operate at baud rates between 110 bps and 115.2 Kbps. This covers
virtually all devices that exist to date.
11
XP-8
Advanced Control Processor
Chapter 2 | Features
XP-8 Front Panel View (Cover Removed)
Menu Button
Display
Cursor Control Buttons
IR Output Adjustment Controls (8)
Exit Button
Backlight Button
Reset Button
SD/MM Memory Expansion Card Slot
USB Programming Port
XP-8 Rear Panel View
MPIO Ports (IR out, RS-232 and power sync in)
RS-232
Sense Inputs
Ethernet
RTI COM
Port
Relay/Trigger Outputs
Infrared Connections
USB
Expansion Port
Power
PROGRAMMING THE XP-8
The XP-8 must be programmed to operate. All programming is done using
RTI’s Integration Designer™ software and is downloaded using the USB
Programming Port located on front of XP-8 or via Ethernet.
The software allows you to create actions (e.g. commands, macros, etc.)
that are associated with events such as button presses on RTI remote
controls, timers or I/O triggers. The software transparently creates all of
the system trigger codes, and generates the correct download for every
device in the system.
12
It’s Under Control®
Chapter 3 | Installation
Free Standing
The XP-8 ships with four removable feet that allow the XP-8 to be placed
on a flat surface.
Foot
Foot
Rack Mount
The XP-8 can be mounted in a component rack as part of a comprehensive
control system. Remove feet before mounting in a rack.
CONNECTING THE AC ADAPTER
The included 120 Volt AC adapter must be connected to the POWER jack on
the XP-8. When the AC Adapter is connected to a power source, the display
will light and show the power-up sequence.
XP-8 USB Programming Port
USB Programming Port, for downloading software
13
XP-8
14
Advanced Control Processor
It’s Under Control®
Chapter 4 | Connection Options
The XP-8 can connected in many different ways to control a virtually
unlimited number of devices. The following diagram illustrates just some
of the options.
Rear I/O Ports
Each IR output can drive up to four emitters directly.
More than four emitters require an amplified connecting block.
Connecting Block
To Source Equipment,
Surround Processors,
Lighting Systems, etc.
Video
IR Emitter
Video equipment with
Composite output
Voltage
IR Emitter
Source equipment with
switched outlet.
Power supply
Direct to Back Panel IR Port.
Use IR emitter adapter cables.
Single or Dual Emitters.
Use IR emitter adapter cables.
CM-232 Communication Module
Optional accessories shown are sold separately.
15
XP-8
Advanced Control Processor
Chapter 4 | Connection Options
CONNECTING IR EMITTERS TO OUTPUT PORTS
The multi-purpose I/O ports on the XP-8 are compatible with industry
standard infrared emitters and infrared repeating systems. Each output
port is capable of driving up to four infrared emitters directly. The use
of more than four infrared emitters requires the addition of an amplified
connecting block. A connecting block can be wired up to 1000 feet away
from the XP-8 using #22 AWG (minimum) wire.
For the most reliable connection to the XP-8 MPIO ports, make sure
to use the included IR emitter adapter cables.
CONNECTING POWER SENSOR MODULES (VPS-1 / SPS-1)
The multi-purpose I/O ports on the XP-8 are compatible with RTI power
sensing modules (e.g. VPS-1 and SPS-1). Follow the guide included with
the modules for installation instructions, and follow the instructions in the
Integration Designer™ software guide for programming details. Do not use
IR emitter adapter cables.
CONNECTING COMMUNICATION MODULES (CM-232)
The multi-purpose I/O ports on the XP-8 are compatible with RTI
communication modules (e.g. CM-232). Follow the guide included with
the modules for installation instructions, and follow the instructions in the
Integration Designer™ software guide for programming details. Do not use
IR emitter adapter cables.
ADJUSTING IR OUTPUT GAIN
The IR output gain can be separately adjusted for each of the eight output
ports. The XP-8 is shipped with the IR gain set to the optimum level for
most equipment, and it should only need to be adjusted if the attached
equipment is not responding reliably.
If adjustment is needed, rotate the IR output controls on the front of the
XP-8 clockwise for higher output power, or counter-clockwise for lower
output power.
16
It’s Under Control®
Chapter 4 | Connection Options
RS-232 Ports
Examples:
HVAC
cat5
Adapter
Lighting
TV
Optional accessories shown
are sold separately.
RS-232 PORTS
The XP-8 is capable of two-way communication and uses industry standard
cat5 cable with RJ-45 termination (568B). The XP-8 ships with 8 RJ-45
(female) to DB-9 (male) adapters.
adapter pinout
DB-9 Connector Pin Out
Pin Signal Signal
Name Description 1 DCD Carrier Detect
2 RXD Receive Data
3 TXD Transmit Data
4 DTR Data Terminal Ready
5 GND Signal Ground/Common
6 DSR Data Set Ready
7 RTS Request To Send
8 CTS Clear To Send
9 NC Not Connected
RJ-45 Connector Pin Out
Pin Signal Signal
Name Description
1 DSR Data Set Ready
2 DCD Carrier Detect
3 DTR Data Terminal Ready
4 GND Signal Ground/Common
5 RXD Receive Data
6 TXD Transmit Data
7 CTS Clear To Send
8 RTS Request To Send
17
XP-8
Advanced Control Processor
Chapter 4 | Connection Options
Sense Inputs
Examples:
+ Security
+ Optional accessories shown
are sold separately.
Receiver
SENSE INPUTS
Sense contact closure or voltage trigger input (2-12VDC). Sense input
mode can be configured within Integration Designer™. Upon sensing
contact closure or trigger input, events can be automatically triggered such
as IR commands, macros, relay closure, etc.
Wiring for contact closure sense: connect conductors from device to be
sensed to each side of a sense input (A and B).
Wiring for voltage trigger sense: Connect positive lead from voltage
source to Side A of sense input and negative lead to Side B.
Relay/Trigger Outputs
Examples:
+ -
Drapes
+ Optional accessories shown
are sold separately.
Screen Lift
RELAY/TRIGGER OUTPUTS
Configurable within Integration Designer™ to be either a dry contact
closure or a voltage trigger output (12VDC @100mA). All relays are
Normally Open when not energized, but they can be programmed to
behave Normally Closed (as long as power is applied to the XP-8).
For contact closure control, simply connect the A and B contact terminals
of a relay to the desired device.
To use a relay as a voltage trigger, connect Contact A to the positive side
and connect Contact B to the ground side of the desired device.
18
It’s Under Control®
Chapter 4 | Connection Options
Rear IR
Examples:
Connecting Block
To Source Equipment,
Surround Processors,
Lighting Systems, etc.
RF or IR Receivers
Optional accessories shown
are sold separately.
INFRARED TERMINALS AND CONNECTIONS
TERMINAL: +12VDC
Positive power supply connection. It is internally tied to the Power
jack. This can be used to power external IR or RF receivers.
TERMINAL: GROUND
Common ground connection. Use this ground reference for any device
that is connected to the +12VDC, SIGNAL IN, OR HIGH OUT terminals.
TERMINAL: SIGNAL IN
Input connection for system trigger codes. This should be connected to
an RTI RF receiver or industry standard IR repeater system. The signal
voltage can be from 3VDC - 12VDC.
TERMINAL: HIGH OUT
High current (200mA) IR output connection. This can be used to power
up to 10 infrared mini-emitters, an IR blaster, or extending IR control
over a long distance (1000 ft. max).
19
XP-8
Advanced Control Processor
Chapter 4 | Connection Options
INFRARED RECEIVERS
The XP-8 is compatible with industry standard IR receivers, repeater
systems, and keypads. Connect the SIGNAL INPUT, GROUND, and +12VDC
(if power is needed) terminals to the signal out, ground, and power (if
needed) terminals of the desired device.
If the XP-8 sees an incoming system trigger code with a matching zone ID,
it will execute the command or macro associated with that code. The XP-8
can be programmed to either block or pass miscellaneous IR data through
its output ports.
RF RECEIVERS
The XP-8 is compatible with RTI RF receiver modules (e.g. RM-433). Up to
10 RM-433 receiver modules can be connected with a maximum total wire
run of 1000 ft. Follow the guide included with the modules for installation
instructions.
INFRARED HIGH OUT
The XP-8 is compatible with industry standard IR connecting blocks.
Connect the HIGH OUT and GROUND terminals to the signal input and
ground terminals on the connecting block. This is useful if you have many
devices to control, or you want to extend control into other rooms.
This output has short circuit protection, but does not provide a series
resistor for current limiting. It should not be connected directly to IR
emitters.
20
It’s Under Control®
Chapter 4 | Connection Options
Ethernet, USB, RTI COM, Expansion Port
Zigbee Module
LAN
Examples:
cat5
USB
(Future Use)
Power
Supply
CB-4
Optional accessories shown
are sold separately.
RCM-12
ETHERNET
This RJ-45 port allows connection to a 10/100 Base-T Ethernet network
(LAN). Network settings such as the IP address are configurable within
Integration Designer™. Ethernet can be used to download system files to
the XP-8.
USB PORTS (REAR)
These are host ports for external devices and are intended for future use.
RTI COM
This RJ-45 port allows connection to a Zigbee transceiver module. The
connection supports full duplex two-way communication for use with
compatible RTI handheld controllers. Refer to the Zigbee transceiver module operation guide for installation instructions.
EXPANSION PORT
This RJ-45 port provides a convenient connection for receiving IR signals
from in-wall touchpanels through a CB-4 connecting block. It also enables
two-way serial communication (RS-485) with in-wall touchpanels or
expansion devices such as the RCM-12 (Relay Control Module).
21
XP-8
22
Advanced Control Processor
It’s Under Control®
Chapter 5 | Operation
SETTING THE ZONE CODE
If the XP-8 is installed in close proximity to others, the system Zone Code
can be changed in the Integration Designer™ software. This allows up to
256 separate control systems to operate in the same general area such as
multi-dwelling units or homes with more than one media system.
Reset
Backlight
RESET BUTTON
Push to reset the XP-8. The Reset button may be used in the event the
XP-8 stops functioning properly or to initiate a firmware update.
BACKLIGHT BUTTON
Press this button to turn the display backlight on or off.
SETTING THE TIME
Configurable through Integration Designer™. This feature is useful for time
based events such as triggering macros, closing relays, sending
RS-232, etc.
This enables:
setting of the clock from a PC when downloading.
when Ethernet is connected, synchronization with an NTP server to ensure accurate time.
time zone configuration within Integration Designer™, including
Longitude/Latitude for accurate sunrise/sunset.
configuration to automatically adjust for Daylight Savings Time.
23
XP-8
Advanced Control Processor
Chapter 5 | Operation
MENU
EXIT
DISPLAY
SEL
CURSOR
CHANGING LOCAL SETTINGS USING DISPLAY/MENU
The MENU button always takes you to the main menu, unless the system
is locked, in which case, it takes you to the unlock screen.
The SEL button takes you to the selected menu/function.
The EXIT button takes you to back one level (function to menu, or menu
to previous menu). If you’re already at the main menu, EXIT takes you
back to the clock. The CURSOR buttons navigate the selected menu
options.
In functions, SEL and the cursors are function specific. Some functions
have multiple levels, so EXIT may need to be pressed more than once to
exit the function.
Top level is the clock.
If enabled, the password lock screen is the next level.
The next level is the main menu.
Display Menus
The display on the XP-8 is designed to give the installer feedback on the
current status of the XP-8, change settings such as the time/date and offer
some basic diagnostic tools for troubleshooting.
NOTE
Any configuration changes made through the XP-8 display settings will be
overwritten after the XP-8 is rebooted or an RTI system file is downloaded
into the XP-8 memory.
If a hard button is pushed and the XP-8 screen briefly “bounces” this
indicates a selection that is invalid.
Front Panel Lockout
It is possible to set a passcode that will block access to the menu system
on the XP-8. This can be set in the properties of the XP-8 within the RTI
Integration Designer™ programming software and downloaded as part of
the system file. Use the cursor buttons on the XP-8 to enter the correct
passcode to open the menu display.
24
It’s Under Control®
Chapter 5 | Operation
Main Menu
Status
Status
Setup
I/O
Main Menu
Diagnostics
I/o status
MPIOs
Displays sensing status of a power sync module. (SPS-1/VPS-1) on each port
• On = Voltage or video present on sync module on each port
• Off = No voltage or video present on sync module on each port
• Blank = Port being used for serial communication
Sense
Displays status of each sense input.
• On = Input in Voltage Trigger mode and voltage present
• Off = Input in Voltage Trigger mode and no voltage present
• Open = Input in Contact Closure mode and no contact closure present
• Close = Input in Contact Closure mode and contact closure present
Relays
Displays the current state of each relay.
• Open = Relay is open
• Closed = Relay is closed
version
Displays the firmware version/date running on the XP-8.
25
XP-8
Advanced Control Processor
Chapter 5 | Operation
Main Menu (continued)
Status (continued)
system status
time/date
Displays the current time settings.
• Current Time and Date
• Time Zone
• Sunrise Time and Sunset Time
Storage
Displays the memory and storage status of the XP-8
Ext Storage
• Displays external storage status
Memory (RAM)
• Displays internal memory (RAM) status
Int Storage
• Internal Storage - Displays internal storage status
Configuration Status
Lat/Long
• Displays current latitude and longitude
Program Info
Displays the XP-8 and system zone code information defined in Integration Designer™
• System Name = Name of XP-8 (defined in Integration Designer™)
• Macro Engines = Number of macros that can run simultaneously
• System Zone Code = Zone code used for system file
• Device Code = Code assigned to device in system file
network
Displays current network settings.
• IP = IP Address
• Sub = Subnet Mask
• Gateway = Gateway IP address (may be missing if no gateway is defined)
• DNS = DNS IP address
• DHCP or Static = Displays which method of IP address configuration being used
26
• MAC = MAC Address
It’s Under Control®
Chapter 5 | Operation
Main Menu (continued)
DISPLAY example
Diagnostics
1c
I/O
Diagnostic I/O Menu
2C
Relay Diagnostics
3t 4T 5c 6c 7c
8t
Open | Close | Open All | Close All
Relay
Relay Diagnostics
Displays and allows adjustment of the current mode (contact closure/voltage trigger) and state (open/close) of each relay.
To determine the current mode and state:
• c = Relay in contact closure mode – relay open
• C = Relay in contact closure mode – relay closed
• t = Relay in voltage trigger mode – relay open
• T = Relay in voltage trigger mode – relay closed
To change the state of a relay use the menu options along the bottom of the screen:
• Open = Opens selected relay
• Close = Closes selected relay
• Open all = Opens all relays
• Close all = Closes all relays
To change the mode (contact closure/voltage trigger) of a relay use the up and down cursor buttons (^/v)
High Out IR Diagnostics
Allows a sample IR code to be sent out the High Out IR output
• Test = Sends sample IR code
MPIO Diagnostic Menu
I/O Test
MPIO I/O Test Diagnostics – Display/adjust current state and testing of MPIO ports
• To determine current state
• + = Power/video present on sync module
• - = No power/video present on sync module
• No +/- = Port in serial mode
To adjust/test MPIO ports use the menu options along the bottom of the screen.
• IR Test – Sends sample IR code out selected port
• Sense – Changes selected port to sense mode
• Serial - Changes selected port to serial mode
Tx Test = Sends sample RS-232 string out selected port
27
XP-8
Advanced Control Processor
Chapter 5 | Operation
Main Menu (continued)
Diagnostics (continued)
Test String – Display/adjust the sample RS-232 string that will be sent out on Tx Test
Baud Rate – Display/adjust RS-232 settings
Use cursor up/down buttons to change values of:
• Baud rate
• Data bits
• Parity
• Stop bits
SeriaL – Send sample RS-232 string out selected port
Diagnostic System Menu
Network
Diagnostic Network Menu – Use the cursor up/down buttons to display and adjust network settings. Press the SEL button to keep the settings. Use the Rebind function to apply the settings.
NOTE: Network settings should be changed on the XP-8 for diagnostic purposes only. Settings will be lost upon downloading of a system file or if power is lost.
• IP Address
• Netmask
• DNS
• DHCP/Static
• Gateway
• Rebind – after changing any of previous settings, select rebind to apply all new settings simultaneously.
Setup
Clock
Clock – Display/adjust current time and date
• Set Time – use the cursor buttons to adjust
• Set Date – use the cursor buttons to adjust
Menu Timeout – Adjust where the display menu reverts to after the backlight timeout.
• Enable – Will revert the display back to the system clock after backlight timeout.
• Disable – Will remain at the most recently selected menu after backlight timeout.
28
It’s Under Control®
Chapter 5 | Operation
processing rules
Standalone IR codes
The XP-8 will send out standalone IR codes in the order they are received
from the remotes.
• If an IR code is being sustained, it can be sustained indefinitely. If a
trigger code is received that requests an IR code or RS-232 string to
be sent, the sustained code will be interrupted and the new IR code or
RS-232 string will be delivered.
Macros
There are 6 macro engines that run simultaneously. This allows up to 6
macros to all run at one time.
The macro engines are assigned to incoming requests as follows:
• Any system macros (including system macros triggered by remotes,
all sense triggered event macros and periodic/scheduled macros)
are allowed to run in parallel. If all 6 engines are busy and there’s
a system macro waiting to run, one of the previous six macros must
complete before the new macro can begin.
• Device macros for a given keypad/remote can only run on a single
engine at a given time. If multiple requests arrive from the same
remote, any requests after the first are queued up until the first macro
completes. Then any remaining requests are run in order.
• If a macro calls another macro, (which could call another macro, etc.)
the rules of the base macro take precedence and apply to all the other
macros above it. (Nested macros will run on the same engine as the
base macro.)
There is only one IR generator on the XP-8, so it must be shared by the
macro engines and the standalone IR codes.
It uses the following rules:
• Once an IR code begins, it runs to completion.
• If a macro tries to send IR codes, it will wait at that step until the IR
generator is free.
• Once a macro begins transmitting IR codes, that macro engine has
exclusive use of the IR generator until it tries to execute an instruction
other than to send IR (such as checking a flag, closing a relay,
delaying, calling another macro, the macro ends, etc).
RS-232 codes follow the IR rules above. This also means that multiple
RS-232 codes can’t be sent simultaneously, nor can they be sent
simultaneously with IR codes.
29
XP-8
30
Advanced Control Processor
It’s Under Control®
Chapter 6 | Specifications
Power Supply
+12VDC, 1.25A
Multi-Purpose
Output Ports
Eight custom 3.5mm 4-conductor jacks, designed
for RTI modules (Sense input/RS-232 output) as
well as industry standard IR emitters.
IR Output Drive
IR Frequency
Transmission Range
Infrared Input
Relays
100mA maximum (per port, adjustable)
200mA maximum (high IR output port)
15kHz - 460kHz
Compatible with industry standard repeaters
and receivers.
Eight, 3 Amps @ 30 VDC or 12V/100mA Trigger
Sense Inputs
Eight, Analog/Digital/Closure, 2 - 12 VDC
RS-232 Ports
Eight, RJ-45 Connections, bi-directional,
110 bps - 115 Kbps, (adapters included)
Ethernet
10/100 Base-T
USB Ports
Two Host, 1 Programming
RTI COMM
RJ-45, bi-directional RF communication
Expansion Port
Memory Expansion
Display
Display Size
(H x W)
RS-485 / IR / PWR
SD/MM Card Slot
High-contrast STN LCD, 32h x 122w pixels
0.7 in x 2.8 in (18mm x 60mm)
Backlights
Blue LED (Display/Keypad)
Mounting
Rack-mount or free standing
Dimensions
(W x H x D)
Weight
Warranty
17 in (432mm) x 1.75 in (43mm) x 6.4 in
(162mm)
4 lb. (1814g)
One Year (Parts & Labor)
All specifications subject to change without notice.
31
XP-8
32
Advanced Control Processor
It’s Under Control®
Chapter 7 | Troubleshooting
If you are having problems with your XP-8 Remote Control Processor,
please read these troubleshooting tips and frequently asked questions
before contacting technical support.
If you continue to have problems, see Chapter 8 for more information on
contacting RTI technical support.
XP-8 DOES NOT FUNCTION PROPERLY
Make sure the original factory power supply is plugged into a known good, non-switched outlet and the connector is seated properly on the XP-8.
Verify the button on the remote is programmed to output system
trigger codes. Also verify that the programmed output method (IR or
RF) matches the receiver being used.
Try re-programming both the XP-8 and the remote control to make
sure the programming is up-to-date (i.e.“in sync”) in each of them.
Make sure the IR or RF receiver wire is attached to the XP-8 properly.
Make sure the IR or RF receiver is mounted away from strong
electromagnetic energy sources.
Make sure you are using known good IR emitters, and they are
attached to the correct location on the device being controlled. Also
verify that an IR emitter adapter cable is being used between the XP-8
and the IR emitter plug.
POWER SENSOR MODULES ARE NOT FUNCTIONING
Verify that the modules are programmed to use the correct output
port and the proper conditional statement is used in the Integration
Designer™ software.
Make sure you are using a known good IR emitter, and it is attached to
the correct location on the device being controlled.
XP-8 USB PROGRAMMING PORT DOES NOT WORK
Verify that your PC is using Windows 2000® or higher and have the
RTI USB driver installed. If you do not have the driver installed, The
RTI USB driver installation file rtiusb.exe can be found in the drivers
folder in the Integration Designer™ program folder. Additional
measures to try may be to reboot your computer or try a different USB
cable.
ETHERNET CONNECTIVITY
Check lights on RJ-45 connector for link and activity status. Link light
should be solid, Activity light should blink. Check the XP-8 display to
verify network settings are correct for your LAN.
33
XP-8
Advanced Control Processor
Chapter 7 | Troubleshooting
all emitters blinking even when ir codes routed
If IR Passthrough is enabled in the XP-8 properties within Integration
Designer™, feedback/blinking emitters will blink regardless of whether
the IR codes being sent have been routed out a specific port. IR
Passthrough allows the trigger codes received from RTI controllers to
be passed through to the emitters, but this should not have any affect
on devices being controlled.
34
It’s Under Control®
Chapter 8 | Service and Support
For news about the latest updates, new product information, and new
accessories, please visit our web site at:
www.rticorp.com
CONTACTING RTI
For general info, you can contact RTI at:
Tel. (952) 253-3100
Fax (952) 253-3131
[email protected]
RTI TECHNICAL SUPPORT
At RTI, customer service and satisfaction is an utmost priority. If you are
encountering any problems or have a question about your RTI product,
please contact RTI Technical Support for assistance.
RTI provides technical support by telephone, fax or e-mail. For the highest
quality service, please have the following information ready, or provide it in
your fax or e-mail.
Your Name
Company Name
Telephone Number
E-mail Address
Product model and serial number (if applicable)
If you are having a problem with hardware, please note the equipment in
your system, a description of the problem, and any troubleshooting you
have already tried.
If you are having a problem with software, please note what version you
have installed, the operating system on your PC, a description of the
problem, and any troubleshooting you have already tried.
If you are calling about a software or programming question or problem,
please be at you computer when you place your call. This will considerably
speed up the troubleshooting process.
For technical support or assistance with your XP-8, software, or
accessories, contact RTI at:
(952) 253-3137
[email protected]
www.rticorp.com
For questions regarding service or repair of your XP-8, contact RTI at:
(952) 253-3136
[email protected]
www.rticorp.com
Please do not return products to RTI without return authorization.
35
XP-8
Advanced Control Processor
Chapter 8 | Service and Support
Shipment of XP-8 for Service
RTI will pay all labor and material expenses for all repairs covered by this
product’s warranty. If necessary repairs are not covered by warranty, or if
a unit is examined which is not in need of repair, you may be charged for
the repairs or examination.
If it is necessary to ship the XP-8 Remote Control Processor for service: Please pack it securely (we suggest that it be insured).
Do not include accessories such as power cords or manuals unless instructed to do so.
You must pay any shipping charges incurred in getting your XP-8 Remote
Control Processor to RTI. RTI will pay reasonable return shipping charges
via a carrier of our choice to any destination within the United States if the
repairs are covered under warranty.
A copy of the original dated sales receipt must be provided whenever
warranty service is required. You will need this receipt to establish the date
of purchase.
36
It’s Under Control®
Index
Connection Options............................................................ 15
Adjusting IR Output Gain................................................. 16
Communication Modules (CM-232)................................... 16
Ethernet........................................................................ 21
Expansion Port............................................................... 21
Infrared High Out........................................................... 20
Infrared Receivers.......................................................... 20
Infrared Terminals and Connections.................................. 19
IR Emitters.................................................................... 16
Power Sensor Modules (VPS-1 / SPS-1)............................. 16
Rear I/O Ports................................................................ 15
Rear IR......................................................................... 19
Relay/Trigger Outputs..................................................... 18
RF Receivers.................................................................. 20
RS-232 Adapter Pinout.................................................... 17
RS-232 Ports................................................................. 17
RTI COM....................................................................... 21
Sense Inputs................................................................. 18
USB Ports (Rear)............................................................ 21
Contents............................................................................ 7
Features........................................................................... 11
Front Panel.................................................................... 12
Rear Panel..................................................................... 12
Federal Communications Commission Notice........................... 3
Installation....................................................................... 13
AC Adapter.................................................................... 13
Free Standing................................................................ 13
Rack Mount................................................................... 13
Limited Warranty and Disclaimer........................................... 5
37
XP-8
Advanced Control Processor
Index
Operation......................................................................... 23
Backlight Button............................................................. 23
Change Local Settings Using Display/Menu........................ 24
Display Menus............................................................... 24
Front Panel Lockout........................................................ 24
Macros.......................................................................... 29
Main Menu.................................................................... 25
Diagnostics.............................................................. 27
Setup...................................................................... 28
Status..................................................................... 25
Processing Rules............................................................ 29
Reset Button.................................................................. 23
Setting the Time............................................................ 23
Setting the Zone Code.................................................... 23
Standalone IR codes....................................................... 29
Product Contents............................................................... 10
Programming the XP-8....................................................... 12
Safety Suggestions.............................................................. 4
Service and Support.......................................................... 35
Contact RTI................................................................... 35
Technical Support........................................................... 35
Specifications.................................................................... 31
Troubleshooting................................................................. 33
Unpacking and Inspection................................................... 10
USB Programming Port....................................................... 13
38
It’s Under Control®
notes
39
XP-8
Advanced Control Processor
It’s Under Control®
Remote Technologies Incorporated
5775 12th Avenue East, Suite 180
Shakopee, MN 55379
Tel: 952-253-3100
Fax: 952-523-3131
www.rticorp.com
© 2007 Remote Technologies Inc. All rights reserved. Printed in USA.
40