1
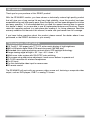
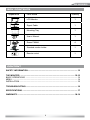
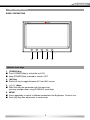
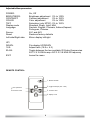
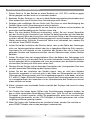
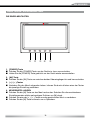
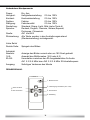
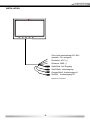
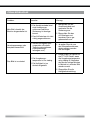
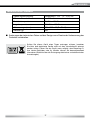
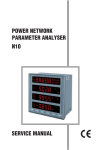
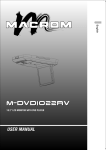
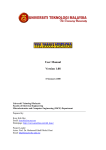
MODEL N0: 15.7 CM/6.2“ WIDE-VGA DIGITAL MONITOR USER MANUAL GERMAN/ENGLISH ZE-MU62D Thank you for your purchase of this ZENEC product! With the ZE-MU62D monitor, you have chosen a technically mature high quality product that will give you a long service life and very high reliability, since this product has been assembled using only high quality parts. Even though this unit has been designed for intuitive and easy operation, it is recommended that you read this manual learning how to operate this device in detail, so you are able to use all implemented features and functions. Please retain this operating manual in a safe place after reading it, for future reference. Read the warranty conditions at the end of this manual, to make sure you benefit from full coverage. If you have further questions about this product, please consult the dealer where it was purchased, or the ZENEC distributor in your country. TECHNICAL FEATURES ■ 15.7cm/6.2“ 16:9 aspect ratio TFT-LCD active matrix display of high brightness ■ 800 x 480 pixels digital Wide-VGA resolution panel (384‘000 dots) ■ Extended color space and picture contrast due to LED backlight technology ■ Large viewing angle left/right > 50° / top > 40° / down > 15° ■ Multi-norm video system with PAL/NTSC auto switching ■ On-screen setup and picture adjustment, touch sensor buttons to operate unit ■ 2-CH IR transmitter for wireless headphones ■ 1x A/V-input ■ 1x Auto-switchable video-input for reverse cam ■ IR remote control The ZE-MU62D will work with any common video source unit, featuring a composite video output, such as DVD-players, DVB-T or analog TV-tuners. 2 ZE-MU62D BOX CONTENTS CKING LIST CKING LIST CKING LIST LIST CKING Appearance Appearance Appearance Appearance Appearance Appearance Parts Name Name of Parts Name of Parts Name ofParts Parts Name of LCD Monitor Name of Parts LCD Monitor LCDMonitor Monitor LCD Monitor LCD 3M Signal Cable LCD Monitor 3M Signal Cable 3MSignal SignalCable Cable 3M IR Remote Control & Battery Signal Cable Signal3M Cable IR Remote Control Battery IRRemote RemoteControl Control&& &Battery Battery IR IR Remote Control & Battery Mounting Tray Mounting Tray Mounting Tray Mounting Tray Mounting Tray Mounting Tray User’s Manual User’s Manual User’s Manual User‘sUser’s ManualManual User’s Manual Screw PM4x8 Screw PM4x8 ScrewPM4x8 PM4x8 Screw ScrewScrew PM4x8PM4x8 Quantity Quantity Quantity Quantity 1Quantity Quantity 1 111 11 111 11 1 111 1 11 111 11 1111 14 444 4 4 only the contents of this package to install. Use of any accessories not provided only the contents of this package to install. not provide onlythe thecontents contentsof ofthis thispackage package toinstall. install. Use Use of of any any accessories accessoriesnot notprovided provide only to holder Use of any accessories itor may result in damage to themonitor monitor. only the contents of this Standard package to install. Use of any accessories1 not provided itor may result in damage to the monitor. nitor may result in damage to the monitor. tor may result in damage to the monitor. tor may result in damage to the monitor. 1 eo ec oo Remote control CONTENT 8 SAFETY INFORMATION ............................................................................................ 12 8 88 8 THE MONITOR ..................................................................................................... 13-15 BASIC OPERATIONS ................................................................................................ 13 MENU .......................................................................................................................... 14 INSTALLATION ............................................................................................................ 15 TROUBLESHOOTING ................................................................................................ 16 SPECIFICATIONS ...................................................................................................... 17 WARRANTY ........................................................................................................... 18-19 3 SAFETY INFORMATION 1. The unit is designed for using with a DC +12V, negative ground battery power supply, it may not be connected and/or used differently. 2. Do not operate the unit in any way other than described in this manual. Failure to follow the instructions will invalidate your warranty. 3. Do not disassemble or alter the unit in any way. Any such attempts my result in damage to the unit and void your warranty. 4. Use only the supplied accessories to install the unit. The use of any accessories except those provided might result in damage to the unit. 5. If the fuse blows, first make sure that the cables have not caused a short circuit, then replace the old fuse with a new one with the same rating. 6. According to the law in different European countries, driving with monitors in use in the viewing range of the driver is not allowed. Please respect the traffic regulations of your country, or you might face penalties in case of an accident. 7. Be careful not to run down the car battery while using the unit! Using this unit stationary without the engine running may drain the battery, and prevent you from being able to start the engine later on. 8. To clean this monitor, use a glass cleaning agent with a soft towel or tissue. Do not use any detergents or organic solvents, as these fluids may damage the surface of the housing. 9. Avoid installing and operating the unit in direct sunlight or near hot air vents. Please note that the normal working temperature of the unit is between 0°C to 45°C. If the internal temperature of the vehicle is extremely high, a short cooling down period is necessary before operating the unit. 10. If the inside of the car is very cold and the monitor is used soon after switching on the heater, moisture may form on the panel of the unit. Turn off the unit immediately! Failure to do so may cause the internal components to short-circuit. Allow the unit to rest for about one hour to allow the condensation to evaporate before operation. 11. The appearance of small black, shiny dots inside the liquid crystal panel is normal. 12. Do not drop or hit the LCD panel with hard objects, as it may cause permanent damage to the unit. If you come into contact with any spilled LCD fluid, wash and clean affected areas with plenty of water and soap and seek medical attention immediately. 13. Refer to authorized dealers or the distributor in your country, if you have any queries about the product. 4 ZE-MU62D THE MONITOR BASIC OPERATIONS ➀ ➃ ➂ Monitor front keys 1. [POWER]-Key ■ Push [POWER]-Key to switch the unit ON. ■ Keep [POWER]-Key pressed to switch it OFF. 2. [AV]-Key ■ Press this key to toggle between AV1 and AV2 source. 3. [] / []-Keys ■ After choosing the parameter with the menu key, you may change values using DOWN/UP arrow keys. 4. MENU ■ Press repeatedly to switch to different parameters like Brightness, Contrast, etc. ■ Press [M]-Key after adjustment to save values. 5 Adjustable Menuparameters POWER: BRIGHTNESS: CONTRAST: COLOR: TINT: Display mode Language: Source: Reset: Left side/Right side: UP/ DOWN: 16:9: IR A:B: EXIT: On, Off Brightness adjustment 0% to 100% Contrast adjustment 0% to 100% Color adjustment 0% to 100% Saturation (only NTSC) 0% to 100% Standard, Sharp, Light, Mild Deutsch, English, Francais, Italiano,Espanol, Portugues, Chinese. AV1 and AV2 Restores factory defaults Mirror display left/right Flip display UP/DOWN Aspect ratio (16:9 o. 4:3) Toggle between the two available IR Output frequencies. AV1 2.3/ 2.8 MHz resp. AV2 3.2/ 3.8 MHz IR frequency Leave the menu REMOTE CONTROL: Remote control 1. 5. Next parameter 6. Decrease value Monitor ON/OFF 2. Toggle videoinput (AV1 o.AV2) Mode Select 3. Increase value MENU 4. Display mode Mode Select 6 ZE-MU62D INSTALLATION Green Autotoggle AV1-AV2 (when connected to +12V) Purple: ACC (+) Black: GND (-) Yellow/Yellow: A/V input White/Yellow: Videoinput Orange/White: Audioinput L1 Red/Red: Audioinput R1 Cable/ Plug 7 TROUBLESHOOTING Problem: Cause: Solution: No picture when the display is turned on. 1. Power wire is connected improperly or fuse blown. 1. Check the power wire and replace the fuse. 2. System cable is not connected properly. 2. Check system cable or replace with a new one. Blurred picture on the screen. 1. Interfered by shortdistanced strong RF emissions. (E.g. high voltage wire, transformation station or aircraft etc...) 1. The reception of signal will get better when moving away from source of interference. The picture on the screen is dark. 1. The monitor is used at a low temperature area. 1. This is the characteristic of LCD display at low temperature, it will restore to normal brightness after display is in use for few minutes. 2. BRIGHTNESS is not correctly set 2. Check BRIGHTNESS adjustment. 8 ZE-MU62D SPECIFICATIONS Operating Voltage Range: Car Battery DC +12V (+- 2.5V) Operating Current: ca. 500mA Operating Temperature: -5° C to +55° C Storage Temperature: -20° C to +70° C Dimensions (mm): 180 x 125 x 19 (W x D x H) Weight (g): 600 ■ Specification and design of this model is necessarily subject to changes without notice. If at any time in the future you should need to dispose this product please note that electrical products should not be disposed with household waste. Please recycle where facilities exist. Check with your Local Authority or retailer for recycling advice. (Waste Electrical and Electronic Equipment Directive) 9 ZE-MU62D Vielen Dank für den Kauf dieses ZENEC Produktes! Mit dem Kauf des ZE-MU62D haben Sie sich für ein technisch ausgereiftes Produkt entschieden, das Ihnen durch die Verwendung von hochwertigen Materialien und Bauteilen eine lange Lebensdauer garantiert. Bei dem ZE-MU62D von ZENEC handelt es sich um einen 15.7cm/6.2“ 16:9 TFT-LCD Aktiv-Matrix Wide VGA Monitor mit LED-Backlight, der sich aufgrund seiner Größe und den vielfältigen Anschlussmöglichkeiten in jede A/V-Anlage integrieren lässt. Größten Wert wurde bei der Entwicklung auf die Bedienungsfreundlichkeit gelegt. Dennoch muss der ein oder andere Bedienungsschritt mit Hilfe dieser Bedienungsanleitung näher erläutert werden. Sollten Sie dennoch weitere Fragen haben, wenden Sie sich bitte an Ihren ZENEC-Händler oder den jeweiligen Landesvertrieb. GERÄTE–FEATURES ■ ■ ■ ■ ■ ■ ■ ■ ■ ■ 15.7cm/6.2“/16:9 TFT-LCD Aktiv-Matrix Monitor mit hoher Leuchtintensität Digitales TFT-LCD Panel mit Wide-VGA Auflösung 800 x 480 Pixel (384'000 Punkte) Erhöhter Farbraum und Bildkontrast durch LED Backlight Technik Großer Betrachtungswinkel, links/rechts > 50° / oben > 40° / unten > 15° Multi-Norm Videosystem mit automatischer PAL/NTSC-Umschaltung On-Screen Menüführung für alle Einstellungen, Touchsensoren zur Monitor Bedienung 2-CH IR Sendemodul für drahtlose Kopfhörer 1 x A/V-Eingang 1 x Video-Eingang für Rückfahrkamera mit Umschaltfunktion IR-Fernbedienung Der ZE-MU62D kann mit allen Videoquellen kombiniert werden, welche über einen Composite-Videoausgang verfügen. Dazu zählen alle handelsüblichen DVD-Player, DVB-T bzw. analoge TV-Tuner. 10 ZE-MU62D LIEFERUMFANG CKING LIST CKING LIST LIST CKING CKING LIST Abbildung Appearance Appearance Appearance Appearance Appearance Element Name of Parts Name of Parts Name ofParts Parts Name of LCD Monitor Name of Parts LCD Monitor LCDMonitor Monitor LCD Monitor LCD 3M Signal Cable LCD Monitor 3M Signal Cable 3MSignal SignalCable Cable 3M IR Remote Control & Battery 3M Signal Cable Anschlußkabel IR Remote Control Battery IRRemote RemoteControl Control&& &Battery Battery IR IR Remote Control & Battery Mounting Tray Montagerahmen Mounting Tray MountingTray Tray Mounting Mounting Tray User’s Manual User’s Manual User’sManual Manual Bedienungsanleitung User’s User’s Manual Screw PM4x8 Screw PM4x8 ScrewPM4x8 PM4x8 Screw Schrauben PM4x8 Screw PM4x8 Menge Quantity Quantity Quantity 1Quantity Quantity 1 1 11 11 111 11 1 111 1 11 111 11 1111 14 444 4 4 only the contents of this package to install. Use of any accessories not provided only the contents of this package to install. Use of any accessories not onlythe thecontents contentsof ofthis thisStandardhalterung packageto toinstall. install.Use Useof ofany anyaccessories accessories not provided provide only package 1 not provided itor may result in damage to the monitor. only the contents of this package to install. Use of any accessories not provided itor may result in damage to the monitor. nitor may result in damage to the monitor. tor may result in damage to the monitor. tor may result in damage to the monitor. 1 eo ec oo Fernbedienung 8 8 88 8 INHALTSVERZEICHNIS SICHERHEITSHINWEISE ........................................................................................... 4 DER WIDE VGA-MONITOR ......................................................................................5-7 DIE EINZELNEN TASTEN ............................................................................................ 5 MENÜEINSTELLUNGEN .............................................................................................. 6 INSTALLATION DES GERÄTES .................................................................................. 7 FEHLERSUCHE .......................................................................................................... 8 SPEZIFIKATIONEN ..................................................................................................... 9 GARANTIE ............................................................................................................ 18-19 11 SICHERHEITSHINWEISE 1. Dieses Gerät ist für den Betrieb an einem Bordnetz mit +12V (DC) und Minus gegen Masse geeignet und darf auch nur so betrieben werden. 2. Bedienen Sie das Gerät nur so, wie es in dieser Bedienungsanleitung beschrieben wird. Alles andere kann zum Erlöschen Ihres Garantieanspruches führen. 3. Zerlegen oder modifizieren Sie das Gerät nicht. Dies kann zu einer Beschädigung des Gerätes führen und Ihr Garantieanspruch erlischt dadurch. 4. Benutzen Sie nur das Originalzubehör um das Gerät zu installieren und zu betreiben, da ansonsten eine Beschädigung des Gerätes riskiert wird. 5. Bevor Sie eine defekte Sicherung austauschen, sollten Sie erst einmal überprüfen was der Grund für den Kurzschluss war. Achten Sie dabei besonders auf die Kabel der Stromversorgung! Wenn der Kurzschluss nicht aus einem Fehler in der Stromversorgung resultiert, müssen Sie die defekte Sicherung gegen ein neues Exemplar mit identischen Werten austauschen. Sollte der Kurzschluss immer noch vorhanden sein, wenden Sie sich bitte an Ihren ZENEC-Händler. 6. Achten Sie bei der Installation des Monitors darauf, dass er den Fahrer des Fahrzeuges nicht vom Verkehrsgeschehen ablenkt oder ihm in irgendeiner Weise die Sicht versperrt. Informieren Sie sich deshalb vor der Installation des Gerätes über die in Ihrem Land geltenden Gesetze und Verkehrsvorschriften, die den Gebrauch eines solchen Gerätes betreffen. 7. Achten Sie darauf dass bei ausgeschaltetem Motor die Batterie des Fahrzeuges nicht entladen wird. Da es sich bei dem Gerät um einen Verbraucher handelt und die Batterie nur bei laufendem Motor aufgeladen wird, kann es passieren dass die Batterie entladen wird und das Fahrzeug sich nicht mehr starten lässt. 8. Reinigen Sie das Display nicht mit ätzenden Chemikalien oder Lösungsmitteln. Dies kann zu einer dauerhaften Beschädigung des Displays führen. 9. Achten Sie bei der Installation des Gerätes darauf, dass es nicht dem direktem Sonnenlicht ausgesetzt ist und auch nicht in der Nähe von Wärmequellen wie z.B den Öffnungen der Heizung montiert wird. Die Umgebungstemperatur sollte daher zwischen 0°C und 45°C liegen. Sollte die Temperatur im Inneren des Fahrzeuges extrem hoch sein, ist es empfehlenswert den Innenraum vor der Inbetriebnahme des Gerätes erst einmal etwas abkühlen zu lassen. 10. Kleine, schwarze oder leuchtende Punkte innerhalb des Displays sind normal für diese Art von Produkt. 11. Das Display darf keinen harten Stößen oder Erschütterungen ausgesetzt werden, da dies zu einer dauerhaften Beschädigung führen kann. Falls Sie mit der auslaufenden Flüssigkeit in Kontakt kommen, sollten Sie gegebenenfalls einen Arzt aufsuchen. Alle Gegenstände die ebenfalls mit der LCD-Flüssigkeit in Kontakt gekommen sind, sollten sorgfältig mit Wasser gereinigt werden. 12. Wenn Sie Fragen oder Probleme bei der Installation haben, wenden Sie sich bitte an einen ZENEC-Händler oder an den jeweiligen Landesvertrieb. 12 ZE-MU62D DER WIDE VGA-MONITOR DIE EINZELNEN TASTEN ➀ ➁ ➂ ➃ ➂ 1. [POWER]-Taste ■ Drücken Sie die [POWER]-Taste um das Gerät ein- bzw. auszuschalten. ■ Halten Sie die [POWER]-Taste gedrückt um das Gerät wieder auszuschalten. 2. [AV]-Taste ■ Drücken Sie die [AV]-Taste um zwischen beiden Videoeingängen hin-und herzuschalten 3. [] / []-Tasten ■ Nachdem Sie das Menü aufgerufen haben, können Sie durch drücken einer der Tasten die jeweilige Einstellung verändern. 4. MENÜEINSTELLUNGEN ■ Drücken Sie die [M]-Taste um das Menü aufzurufen. Schalten Sie die verschiedenen Einstellparameter mittels mehrmaligem Drücken von [M] durch. ■ Drücken Sie eine der [] / []-Tasten um den gewünschten Wert zu verändern. ■ Drücken Sie die [M]-Taste nochmals um zu Speichern. 13 Veränderbare Menüparameter Power: Helligkeit: Kontrast: Farbton: Sättigung: Darstellung: Sprache: Quelle: Rücksetzung: Linke Seite/ Rechte Seite: Aufwärts/ Abwärts: 16:9: IR A:B: Ausgang: Ein, Aus Helligkeitseinstellung 0% bis 100% Kontrasteinstellung 0% bis 100% Farbton 0% bis 100% Farbintensität 0% bis 100% Standard, Sharp, Light, Mild (siehe Taste 4) Deutsch, English, Francais, Italiano,Espanol, Portugues, Chinesisch. AV1 und AV2 Alle Werte werden in den Auslieferungszustand (Werkseinstellung) zurückgesetzt. Spiegeln des Bildes Anzeige des Bildes normal oder um 180 Grad gedreht Auswahl des Bildformates (16:9 oder 4:3) Umschalten zwischen den IR Ausgabekanälen für Audio AV1 2.3/ 2.8 MHz bzw. AV2 3.2/ 3.8 MHz IR Arbeitsfrequenz Sofortiges Verlassen des Menüs FERNBEDIENUNG: Remote control LCD REMOT E 1. 5. Weiter im Menü 6. Wert vermindern Monitor Ein/Aus 2. Videoeingang umschalten (AV1 o.AV2) Mode Select 3. Wert erhöhen MENU 4. Darstellung Mode Select 14 ZE-MU62D INSTALLATION Grün Autoumschaltung AV1-AV2 (sobald +12V anliegen) Dunkelrot: ACC (+) Schwarz: GND (-) Gelb/Gelb: A/V Eingang Weiß/Gelb: Videoeingang Orange/Weiß: Audioeingang L1 Rot/Rot: Audioeingang R1 Kabelfarbe/ Steckerfarbe 15 FEHLERSUCHE Problem: Kein Bild, obwohl der Monitor eingeschaltet ist. Ursache: Lösung: 1. Die Anschlusskabel sind nicht richtig angeschlossen oder eine Sicherung ist durchgebrannt. 2. Das A/V-Interface ist nicht richtig angeschlossen. Verschwommenes oder komplett blaues Bild. Das Bild ist zu dunkel. 1. Starke Störsignale (hervorgerufen z.B. durch Transformatorstationen, Hochspannungsleitungen usw.). 1. Die Umgebungstemperatur ist zu niedrig. 2. Die Helligkeit ist zu dunkel eingestellt. 1. Überprüfen Sie die Anschlusskabel und wechseln Sie die Sicherung aus. 2. Überprüfen Sie das A/V-Interface und tauschen Sie es gegebenenfalls aus. 1. Je weiter Sie sich von der Störquelle entfernen, desto weniger werden die Störungen. 1. Dieser Effekt ist typisch für ein TFT-LCD Panel, wenn die Umgebungstemperatur sehr niedrig ist. Nachdem der Monitor einige Minuten in Betrieb ist, wird das Bild wieder normal. 2. Überprüfen Sie die Helligkeitseinstellung. 16 ZE-MU62D SPEZIFIKATIONEN Spannungsversorgung: Autobatterie + 12V (+/- 2,5V) DC Stromverbrauch: ca. 500 mA Betriebstemparatur: -5° C bis +55° C Lagertemperatur: -20° C bis +70° C Abmessungen (mm): 180 x 125 x 19 (B x T x H) Gewicht (g): 600 ■ Änderungen der technischen Daten und des Designs zum Zwecke der Verbesserung des Produktes vorbehalten. Sollten Sie dieses Gerät eines Tages entsorgen müssen, beachten Sie bitte, daß elektrische Geräte nicht mit dem Haushaltsmüll entsorgt werden sollten. Führen Sie das Gerät, wenn möglich, dem Recycling zu. Ihre lokalen Behörden oder Ihr Händler können Sie dementsprechend informieren (Richtlinie über die Entsorgung elektrischer und elektronischer Ausstattungen). 17 2 YEARS LIMITED WARRANTY Dear customer Thank you for purchasing this ZENEC product. It is advisable to keep the original packing material for any future transporting of the product. Should your ZENEC product require warranty service, please return it to the retailer from whom it was purchased or the distributor in your country. This ZENEC product is warranted against defective materials or workmanship for a period of TWO years from date of purchase at retail. Warranty Limitations This warranty does not cover any damage due to: 1. Improper installation, incorrect audio or mains connection(s). 2. Exposure to excessive humidity, fluids, heat sun rays or excessive dirt or dust. 3. Accidents or abuse, unauthorized repair attempts and modifications not explicitly authorized by the manufacturer. This warranty is limited to the repair or the replacement of the defective product at the manufacturer’s option and does not include any other form of damage, whether incidental, consequential or otherwise. The warranty does not cover any transport costs or damages caused by transport or shipment of the product. Warranty work will not be carried out unless this warranty certificate is presented fully completed with model, serial number, purchaser’s address, purchasing date and dealer stamp together with the original sales slip! 2 JAHRE GARANTIE Sehr geehrter Kunde, Vielen Dank, dass Sie sich zum Kauf dieses Produktes von ZENEC entschlossen haben. Wir bitten Sie, die Originalverpackung aufzuheben, z.B. für den Transport bei einem Garantiefall. Wenn Sie Garantie-Leistungen für dieses ZENEC Produkt beanspruchen, wenden Sie sich bitte direkt an den Händler, bei dem das Gerät gekauft wurde. Dieses ZENEC Produkt ist durch eine Werksgarantie von 2 Jahren ab Kaufdatum im Fachhandel gegen Material- oder Herstellungsfehler geschützt. Garantie-Einschränkungen Nicht unter Garantie fallen Schäden infolge von: 1. unsachgemässem Einbau oder inkorrektem Audio- oder Stromanschluss. 2. Einwirkung von übermässiger Feuchtigkeit, Flüssigkeit, Hitze, Sonneneinstrahlung oder starker Verschmutzung. 3. mechanischer Beschädigung durch Unfall, Fall oder Stoss; Schäden durch nicht autorisierte Reparaturversuche und/oder Modifikationen. Die Garantie dieses Produkts bleibt in jedem Fall auf die Reparatur bzw. den Ersatz (Entscheidung beim Hersteller) des ZENEC Produktes beschränkt. Transportschäden und die Kosten des Rücktransportes sind durch diese Garantie nicht abgedeckt. Jeder über diese Garantie-Erklärung hinausgehende Anspruch und Haftung für direkte / indirekte Folgeschäden werden ausdrücklich abgelehnt. Garantie-Ansprüche können nur mit einer korrekt und vollständig ausgefüllten GarantieKarte und dem Original-Kaufbeleg geltend gemacht werden. 18 ZE-MU62D ZENEC MODEL: ZE-MU62D Serial Number:.............................................................................................................................. Date of Purchase: ......................................................................................................................... Your name:.................................................................................................................................... Your address: ................................................................................................................................ City: .............................................................................................................................................. State: ................................... ZIP or Postal Code ......................................................................... Country: ....................................................................................................................................... Dealer’s address & stamp 19 ZENEC by ACR AG · Bohrturmweg 1 · Bad Zurzach · Switzerland