1
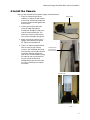
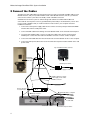
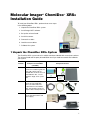
Molecular Imager® ChemiDoc XRS+ Installation Guide ™ To install your ChemiDoc XRS+, perform these seven steps in the following order: 1. Unpack the ChemiDoc XRS+ system. 2. Install Image Lab™ software. 3. Set up the universal hood. 4. Install the camera. 5. Connect the cables. 6. Load the camera driver. 7. Calibrate the system. 1 Unpack the ChemiDoc XRS+ System The ChemiDoc XRS+ system arrives in multiple containers labeled with several part numbers. The universal hood and the parts pictured below are all you need to assemble and calibrate your system. Part No. ChemiDoc XRS+ System Components for PC/Mac (170-8265) Component Pictures 170-8299 ChemiDoc XRS+ Installation Kit contains this installation guide, the Image Lab software CD, the standard filter, the white Lens Flat Field Calibration disc, a Focus Calibration Target, and a system label 170-8180 Universal hood accessory box includes the 10 ft. USB cable, power cord, and thumbscrew. A separate box has the FireWire cable, and a FireWire card (if your computer did not already have one) 170-8255 ChemiDoc XRS+ camera (includes camera with attached lens and power supply) 1 Molecular Imager ChemiDoc XRS+ System Installation 2 Install Image Lab Software Before assembling your ChemiDoc XRS+ system, install Image Lab software on the computer you intend to use with the system. You must be in the “administrator” user group to install software. Windows 1. Place the Image Lab software CD into a CD drive. The installation should start automatically. If not, open “My Computer” and click your CD drive icon. 2. Double-click setup.exe to install the software. The Image Lab software icon appears on your desktop. There is no need to start the software now. Instead, follow the instructions below to assemble and calibrate your system. Macintosh 1. Place the Image Lab software CD into a CD drive. 2. Double-click the CD icon on your desktop to see the folder contents. 3. Double-click the Image Lab.dmg file. 4. Drag the Image Lab application icon into the Applications folder. There is no need to start the software now. Instead, follow the instructions below to assemble and calibrate your system. 3 Set Up the Universal Hood The components from the universal hood accessory box, and the hood itself are everything you need to assemble the universal hood. 1. Lift the top lid and the cardboard sides off the main box. Carefully lift the universal hood from the bottom foam, and place it on a workbench. Level the hood by adjusting the rubber feet, if necessary. CAUTION: The universal hood should be carried by at least two people, holding the instrument from the bottom. Be sure that the door and drawer are completely closed before lifting. A 2. The filter slider on the right side of the camera support (A) aligns the filter with the hole on top of the hood. There are three selectable filter positions. Move the filter selector so that it is in the Filter 1 position. 3. Open the hood door. Locate the standard filter (170-8081) from the installation kit. While looking up into the hood (B), thread the filter clockwise onto the ring that is currently centered under the hole. 2 B Molecular Imager ChemiDoc XRS+ System Installation 4 Install the Camera Now you will need the camera, power supply, and thumbscrew. 1. Place the camera on the bench sideways as shown (C) and remove the lens cap. Screw the thumbscrew onto the camera mounting plate two or three turns. Thumbscrew C 2. Lift the camera to the top of the universal hood and slide the thumbscrew through the slot in the vertical camera bracket (D). This orients the camera so the camera lens can be centered in the gasket. 3. Make sure that the camera lens is upright and seated on the gasket (E). Tighten the thumbscrew. 4. There is an adhesive-backed label with the name of your camera system in the Installation Kit. Read the instructions on the label sheet to see where and how to place the label on the universal hood. Placing this label on your system makes it easy for you to tell Technical Support which type of camera you are using, should you ever require assistance. D Thumbscrew in vertical slot of the camera bracket Thumbscrew E Gasket 3 Molecular Imager ChemiDoc XRS+ System Installation 5 Connect the Cables You’ll find one 10 ft. USB cable in the universal hood accessory box. You’ll find a FireWire cable in a box labeled 170-8177, and you may find a FireWire card in a box labeled 170-8173, if the PC you intend to connect to the camera system does not already contain a FireWire connection. CAUTION: Do not turn the system on until the Image Lab software is installed and all cables are connected. Be sure the power source is grounded and is protected by a circuit breaker. If your PC does not yet contain a FireWire card, you need to install one. Please refer to your computer manual for installation instructions. 1. Connect the camera power supply cable into the camera connector panel port marked “POWER” and the other end into a wall power outlet. 2. Connect the MZL cable into the oblong connector labeled “LENS” on the universal hood rear panel. 3. Locate the 6 ft. FireWire cable. Connect one end of the cable to the camera connector panel FireWire port. Connect the other end to the FireWire connector on the PC or Mac computer. 4. Connect the 10 ft. USB cable from the universal hood connector labeled “TO PC” to the computer. 5. Connect the main power cable to the rear of the universal hood power module and then to the wall power outlet. Top of FireWire ChemiDoc Camera ChemiDoc camera with MZL cable FireWire Connector Camera power switch 1 From camera power supply to wall outlet 3 FireWire cable from camera power supply to PC or Mac FireWire connector Rear of universal hood enclosure 4 10 ft. USB cable to computer 2 Oblong connector marked “LENS” 5 Power cable to wall outlet To Camera 4 To PC Universal hood power switch Molecular Imager ChemiDoc XRS+ System Installation 6 Load the Camera Driver NOTE: Do not launch your Image Lab software until this process is complete. Turn on the camera power switch on the power supply, and the universal hood power switch (refer to the drawing on page 4 for their locations). Once the camera and the universal hood are turned on, the computer will detect the camera and display a “Found New Hardware Wizard” screen. If your operating system is Windows XP, the following screens will display. If your computer runs Windows Vista, Windows 7, or the Macintosh operating system, this camera driver installation requires no intervention. The wizard starts at a welcome screen. Follow these steps to install the camera driver. 1. Click “No, not this time,” and then click “Next” to continue. 2. Select “Install software automatically,” and then click “Next” to continue. A message appears, indicating that the wizard has installed the camera driver. Click on the “Finish” button when it appears. 5 Molecular Imager ChemiDoc XRS+ System Installation 7 Calibrate the System The Instrument Calibration wizard performs several procedures required to calibrate your system, based on the illumination sources and accessories you choose. Once these calibrations are performed, your image focus remains correct, whether you view an entire sample or a small section of a gel or blot. While some of these calibrations can be skipped, performing calibrations for all accessories that you have is required for accurate results. The Instrument Calibration wizard appears automatically when a ChemiDoc XRS+ system is detected the first time. The wizard need only be used once, as your system is installed. The calibrations remain valid over the life of the instrument. 1. Start Image Lab software by clicking on the desktop software icon. (If your system runs a Macintosh operating system, open your Applications Folder to click on the software icon.) The New Instrument Found screen displays the system name and serial number. Click “Next” to continue. 2. Specify all accessory illumination options and any optional filter you have installed in the instrument. If you aren’t sure which illumination options you have, click on the question mark buttons to the right of each option. You will see an illustration and part number for each option. There is also a dropdown list of filter options. The question mark to the right of filter options includes application information and part numbers. Choose the filter you have installed in Filter Position 2. 3. Click “Next” to continue. The illumination and filter options you have chosen will determine which calibration screens are presented in the wizard. 4. Perform the steps on the Focus Calibration screen to calibrate your system focus. NOTE: This step may take up to seven minutes. 6 Molecular Imager ChemiDoc XRS+ System Installation As the system is calibrating, various screens display which help track your progress. The wizard also tells you which filter selection to use as you proceed through the various screens. If any illumination option was selected in step 2, the tallest option displays in the Focus Calibration with Height Offset screen. The focus height for the other options are interpolated by the software. 5. Place the indicated illumination option and then the Focus Calibration Target in the imager. After following the listed steps, click the “Start Calibration” button. 6. This step acquires a bias value correction image, which is required to reduce the background intensity in your images. 7. The Lens Flat Field calibration corrects for the non-uniformity inherent in any lens. This requires a special Lens Flat Field Calibration disc to be installed in filter position 2. Once the filter is installed, click “Start Calibration”. This step can take up to 8 minutes. NOTE: After completing this calibration, remove the Lens Flat Field Calibration disc and replace the filter normally in position 2, if any. 7 Molecular Imager ChemiDoc XRS+ System Installation 8. This calibration only displays if you have selected the White Light Conversion Screen in step 2. Perform the steps listed on the screen, then press the “Start Calibration” button. The wizard prompts you to move the correct filter into position. When you select “OK,” the system performs the calibration. 9. The Orange Light Flat Field calibration corrects for the distortion inherent in a UV light source, when using orange light applications like EtBr and SYPRO Ruby. If you do not have this accessory, skip this calibration. 10.The last screen of the wizard displays a setup summary which indicates which options have been calibrated. The Instrument Calibration wizard is only used during system installation. Click on “Instrument Setup” under the Edit menu to display your calibrations. These calibrations need not be changed unless you add accessories, such as a new light source. Recalibrate your system to use any new accessories by using the Instrument Setup screen. Now that your ChemiDoc XRS+ system is unpacked, assembled, and calibrated, refer to the instruction manual (10017218) on the software CD for detailed instructions to operate the system. Mac and Macintosh are trademarks of Apple Inc. Windows XP, Windows Vista, and Windows 7 are trademarks of Microsoft Corporation. 8 Molecular Imager ChemiDoc XRS+ System Installation 9 Bio-Rad Laboratories, Inc. Web site www.bio-rad.com USA 800 4BIORAD Australia 61 02 9914 2800 Austria 01 877 89 01 Belgium 09 385 55 11 Brazil 55 21 3237 9400 Canada 905 364 3435 China 86 21 6426 0808 Czech Republic 420 241 430 532 Denmark 44 52 10 00 Finland 09 804 22 00 France 01 47 95 69 65 Germany 089 318 84 0 Greece 30 210 777 4396 Hong Kong 852 2789 3300 Hungary 36 1 455 8800 India 91 124 4029300 Israel 03 963 6050 Italy 39 02 216091 Japan 03 6361 7000 Korea 82 2 3473 4460 Mexico 52 555 488 7670 The Netherlands 0318 540666 New Zealand 0508 805 500 Norway 23 38 41 30 Poland 48 22 331 99 99 Portugal 351 21 472 7700 Russia 7 495 721 14 04 Singapore 65 6415 3188 South Africa 27 861 246 723 Spain 34 91 590 5200 Sweden 08 555 12700 Switzerland 061 717 95 55 Taiwan 886 2 2578 7189 United Kingdom 020 8328 2000 Life Science Group 10016999 Rev A US/EG Sig 1108