1
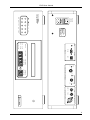
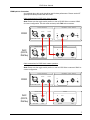
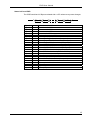
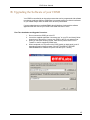
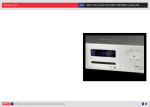
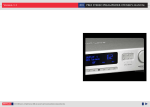
CDSD DISC TRANSPORT
USER MANUAL
Version 2.4
CDSD User Manual
CAUTION
This product is a Class 1 laser product, but this product contains a laser diode higher than Class 1. To ensure
continued safety do not remove any covers or attempt to gain access to the inside of the product. Refer all
servicing to qualified personel. The following caution label appears on your unit on the rear panel:
CAUTION
Use of controls or adjustments or performance of procedures other than those specified herein may result in
hazardous radiation exposure. The use of optical instruments with this product will increase eye hazard.
INFORMATION TO THE USER
Alteration or modification carried out without appropriate approval may invalidate the user’s right to operate
the equipment.
WARRANTY
EMM Labs warrants the CDSD product against defects in material and workmanship under normal use and
service for a period of time specified by the product’s serial number from the date of first delivery to the
owner. The warranty time period is 1 year for the drive unit and 5 years for all other parts and is limited to the
original owner.
EMM Labs will pay for return shipping charges back to the owner when the product is sent to EMM Labs
within the first 90 days after purchase. Otherwise, owner will be responsible for all shipping charges to and
from EMM Labs.
For all warranty claims, a copy of the original invoice must accompany the product.
Opening the product or modifying it in any way by the owner, including but not limited to cryogenic treatment,
will void any warranty.
Please contact EMM Labs ([email protected]) for RMA number and shipping instructions before
shipping any product to EMM Labs.
EMM Labs products are sold worldwide through authorized dealers with restricted territories. If any EMM Labs
product is purchased from non-authorized dealers or from a dealer selling outside his / her authorized territory
all warranties will be void.
2
CDSD User Manual
CDSD Disc Transport
The CDSD is a disc player for CD and stereo / multichannel SA-CD. It is the companion
product for EMM Labs high quality digital-to-analog converters, either in stereo or 6channel configurations, and provides a proprietary digital audio link via fiber optical cable
(EMM OptiLink). As a unique feature, the CDSD up-samples any PCM signal to twice the
sample rate as it is used on SA-CD’s before sending it to its EMM OptiLink output. There
is no internal D/A conversion.
Features
•
Supported disc formats:
• Redbook CD
• Stereo and Multichannel SA-CD
• MP3
•
Outputs:
• AES/EBU for CD and MP3 only
• EMM Labs OptiLink (all discs) for up to 6 discrete channels of digital audio
•
Optical and BNC clock inputs allow external D/A converter to be clock master for best
sonic performance
•
System control via Infrared remote and serial RS-232
•
USB port for future software upgrades (see Appendix B)
•
Power supply
• Power factor corrected
• Factory set to 100V or 115V or 230V, 50/60Hz
• Power consumption: 30W
•
Dimensions W x D x H: 435 x 400 x 140mm
•
Weight: 11kg
3
AES / EBU - PCM
DATA
DSD
CLOCK
DIGITAL OUTPUTS
emm Labs
EXT
INT
OPTIC
75
BNC
HI Z
REPEAT TRK
READING
EXTERNAL CLOCK INPUTS
TRACK TIME
TRACK PLAY
USB
REMOTE
RESET
NO DISC
M-CH
SACD
RS 232
SYSTEM
REPEAT ALL
2-CH
SACD
CD PCM 2-CH
6969
SERIAL
MADE IN CANADA
CDSD
MODEL
ALT
LOCK
emmLabs
LOAD
MODE
REPEAT
PLAY
85 - 260 V
50 / 60 HZ
150 W MAX
CDSD
STOP
meitnerdesign
PAUSE
CDSD User Manual
4
CDSD User Manual
Function Switches and Indicators
Power
The main power switch is on the back of the unit. The chrome power button on the front
is a momentary switch that toggles the operation between power on and power save
mode every time the user pushes it. During the power save mode the remote control and
all front panel functions become inactive.
Default program setting for SA-CD
The CDSD can be programmed to always choose either the stereo or multichannel
program from the SA-CD layer every time it reads a SA-CD for the first time. After the
CDSD has chosen the default program the user can still manually change the program
with the MODE button as described below. The default program is set with the ALT key
(see below).
Switches on rear panel of CDSD
INT / EXT:
This toggle switch selects between 2 possible external clock inputs
from either the optical or BNC connector. Please refer to the
explanation of the Clock Master and Clock Slave operation later in
this manual for more information. If the BNC clock input is connected
via a T-connector it should not be terminated (HI Z), and for all other
connections it should be terminated with 75 Ohms.
OPTIC / BNC:
Selects source for clock input between optical (OptiLink) or BNC.
75Ω / HI Z:
This toggle switch turns cable termination for the BNC clock input on
/off. In HI Z position it is turned off.
RESET:
Used in connection with software upgrades via the USB port. Should
not be used during normal operation.
Front Panel Keys and Indicators
MODE:
During playback of a SA-CD disc with stereo and multichannel
program this button can be pressed to switch between the 2
programs. If a hybrid SA-CD is played the button can be pressed to
also switch between Redbook CD and SA-CD playback (the player
has to be in Stop in order to switch disc formats).
LOCK:
This indicator is lit whenever the selected clock operation (master or
slave) is locked and operational. If the blue light is off, there will be
no audio. When changing clock setups this can take several seconds
to settle and light up – be patient!
PLAY:
Starts playback or continues it from Pause mode.
PAUSE:
Pauses playback (press PLAY to continue).
STOP:
Stops playback
LOAD:
Opens and closes disc tray
5
CDSD User Manual
ALT:
This key is used to change default settings of the CDSD. The basic
operation for this is to press and hold the ALT, and then to press a
second key for the appropriate function. Then both keys should be
released at the same time. This process takes about 15 seconds.
During that time the CDSD should be in STOP and not turned off as
the setting is written into internal memory.
Second key functions:
PREVIOUS: sets stereo program selection to stereo
NEXT: sets program selection to multichannel
REPEAT:
This buttons toggles through 3 states: repeat off – repeat track
(repeats current track) – repeat all (repeats entire disc).
PREVIOUS:
Jumps back a track. Hold down for 3 seconds to enter fast rewind
mode (exit mode by pressing PLAY).
NEXT:
Jumps to next track. Hold down for 3 seconds to enter fast forward
mode (exit mode by pressing PLAY).
Basic Operations and Typical Connections
Wired remote control
On the rear panel you can find a DIN 9-pin (RS-232) connector for serial remote control.
See appendix for more details. The USB port is currently only used for servicing.
Two Interface Choices
The CDSD can be connected to the DAC via 2 different digital audio interfaces: EMM
OptiLink and AES/EBU. The latter is muted during SA-CD playback as it cannot transmit
DSD signals which are the SA-CD native signal encoding method. EMM OptiLink,
however, is designed for DSD and PCM signals and works for playback of all discs. For
best performance with EMM Labs converters you should always use the EMM OptiLink
connections with the 3 provided optical ST glass cables.
Clock Master and Clock Slave Modes
The CDSD provides 2 basic ways for how to connect it to an external D/A converter, such
as the EMM Labs DCC2 or DAC6e: clock master or clock slave modes. Master / slave is
in reference to who provides the clock signal to the D/A conversion process and who
receives an external clock as a guide signal to lock to.
In clock master mode the CDSD generates and provides the clock to the D/A conversion
process. Of course, for this the D/A converter has to be configured such that it selects the
external clock input for its timing signal. This mode does not provide the best possible
sonic performance and should only be used with D/A converters that do not provide a
clock output.
In clock slave mode the CDSD receives its clock reference from the D/A converter. An
additional connection between CDSD and D/A converter needs to be provided for this.
For best results the CDSD should always be operated in clock slave mode.
6
CDSD User Manual
EMM OptiLink Connection
As explained above this mode should be used for best performance. Please use the ST
glass optical cables provided with the CDSD.
Cable connections for CDSD clock slave operation:
Note: Please note the toggle switch position on rear of CDSD. Refer to manual of DAC
for correct configuration. Use this mode and setup with EMM Labs converters.
DIGITAL OUTPUTS
DATA
EXTERNAL CLOCK INPUTS
CLOCK
CDSD
INT
75
OPTIC
BNC
EXT
HI Z
DSD
AES / EBU - PCM
CLOCK
DIGITAL INPUTS
DAC
(DCC2,
DAC6e)
PUSH
OPTICAL
DATA
AES / EBU
IN
OUT
OPTICAL
DSD
BNC
Cable connections for CDSD clock master operation:
Note: Please note the toggle switch position on rear of CDS. Refer to manual of DAC for
correct configuration.
DIGITAL OUTPUTS
DATA
EXTERNAL CLOCK INPUTS
CLOCK
CDSD
INT
75
OPTIC
BNC
EXT
AES / EBU - PCM
HI Z
DSD
CLOCK
DIGITAL INPUTS
DAC
(DCC2,
DAC6e)
PUSH
AES / EBU
OPTICAL
DATA
DSD
IN
OUT
OPTICAL
BNC
7
CDSD User Manual
Channel assignment when using EMM OptiLink
The CDSD can play back up to 6 channels from SA-CD when combined with the EMM
Labs DAC6 series converter. In this case the analog output channels of the DAC6 have
the following channel assignment:
Channel 1: Left front
Channel 2: Right front
Channel 3: Center front
Channel 4: Low Frequency Subwoofer
Channel 5: Left rear surround
Channel 6: Right rear surround
8
CDSD User Manual
AES/EBU Connection
Cable connections for CDSD clock slave operation:
Note: Please note the toggle switch position on rear of CDSD. Refer to manual of DAC
for correct configuration.
DIGITAL OUTPUTS
DATA
EXTERNAL CLOCK INPUTS
CLOCK
CDSD
INT
75
OPTIC
BNC
EXT
HI Z
DSD
AES / EBU - PCM
CLOCK
DIGITAL INPUTS
DAC
(DCC2,
DAC6e)
PUSH
OPTICAL
DATA
AES / EBU
IN
OUT
OPTICAL
DSD
BNC
Cable connections for CDSD clock master operation:
Note: Please note the toggle switch position on rear of CDSD. Refer to manual of DAC
for correct configuration.
DIGITAL OUTPUTS
DATA
EXTERNAL CLOCK INPUTS
CLOCK
CDSD
INT
75
OPTIC
BNC
EXT
HI Z
DSD
AES / EBU - PCM
CLOCK
DIGITAL INPUTS
DAC
(DCC2,
DAC6e)
PUSH
AES / EBU
OPTICAL
DATA
DSD
IN
OUT
OPTICAL
BNC
9
CDSD User Manual
Infrared Remote Control
The optional remote control provides combined
functions for the EMM Labs CDSD and DCC2
products. The functions that are relevant to the
CDSD specifically are highlighted in blue
rectangles in the drawing on the right.
DISPLAY – CDSD: This function toggles the
front panel display on the
CDSD on and off while the
players continues to
operate normally otherwise.
Numeric Buttons: These buttons can be used
to directly access any track
on the disc.
MODE:
This provides the same
functionality as the button
on the front panel (i.e.
toggling through CD – SACD stereo – SA-CD multi
channel playback).
REPEAT:
Toggles through No Repeat
– Repeat track – Repeat all.
Transport keys:
These buttons provide the
same functionality as the
corresponding ones on the
front panel. The STOP key
can be pressed twice within
1 second to open the
drawer.
DCC2
CDSD
DISPLAY
1
2
3
4
5
6
7
8
9
0
REPEAT
MODE
PLAY
PAUSE
STOP
XLR
INPUT
RCA
DIGITAL
ANALOG
VOLUME
PHASE
MUTE
emm Labs
10
CDSD User Manual
Appendix
The following technical notes are provided for informational purposes, and are for use by
authorized personnel only.
A: Serial Remote Control (RS-232)
The CDSD is equipped with a 9-pin RS232 connector for system remote control via a
serial cable (not provided by EMM Labs). The cable should be non-crossed for
connections between a PC and the CDSD. The parameters and settings for this link are:
•
•
•
•
•
19,200 baud
8 bits
1 stop bit
no flow control
no parity bit
Commands to CDSD
All commands sent to the CDSD consist of 3 ASCII characters followed by a <CR>.
Repeating a <CR> will repeat the last command sent. Received commands are not
stored in a stack and, therefore, need to be sent in intervals of at least 500ms to allow
enough time for the CDSD to execute a command before receiving the next one.
Char 0
Char 1
Char 2
<CR>
Char 0
>500ms
ply
pse
stp
mod
rpt
prv
nxt
try
don
dof
pon
pof
tr0, tr1, ..
Start playback
Pause playback
Stop playback
Toggles between CD – SA-CD stereo, SA-CD multichannel. The first time
this command is sent after a playback period it needs to be repeated after
about 1 second to get activated.
Toggles between no repeat – repeat track – repeat all
Jumps back one track
Jumps to next track
Opens / closes tray
Turns front panel display on
Turns front panel display off (unit keeps operating)
Turns CDSD on from Standby mode
Stops playback and sets CDSD to standby
Direct access to tracks on disc. Track number above 10 can be accessed
by first sending a command with the tens, and then a command with the
ones.
11
CDSD User Manual
Status info from CDSD
The CDSD sends back 10 Bytes terminated with a <CR> whenever any status changes.
Byte 0
Byte 0
Byte 1
Byte 2
Byte 3
Byte 4
Byte 5
Byte 6
Byte 7
Byte 8
Byte 9
bit 0
bit 1
bit 2
bit 3
bit 4
bit 5
bit 6
bit 7
bit 0
bit 1
bit 2
bit 3
bit 4
bit 5
bit 6
bit 7
Byte 1
Byte 9
<CR>
Seconds ones in ASCII
Seconds tens in ASCII
Minutes ones in ASCII
Minutes tens in ASCII
Hours ones in ASCII
Track number ones in ASCII
Track number tens in ASCII
1 when “Reading” indicator is on (front panel)
1 when “Repeat Track” indicator is on( front panel)
1 when “Repeat All” indicator is on (front panel)
1 when “CD PCM 2HC” indicator is on (front panel)
1 when “SACD 2CH” indicator is on (front panel)
1 when “SACD MCH” indicator is on (front panel)
1 when MP3 disc is selected
1 when DVD disc is selected (DVD-V or DVD-A)
reserved
1 when front panel display is off
1 when CDSD in Standby mode
1 when “No Disc” indicator is on (front panel)
1 when internal clock selected
1 when optical clock selected
1 when in pause
1 when clock is locked
<CR> (x0D)
12
CDSD User Manual
B: Upgrading the Software of your CDSD
Your CDSD is controlled by an internal processor that can be programmed with software
to enhance or add new features. EMM Labs is constantly working to refine this software
so your CDSD always offers the state-of-the-art sonic performance.
If a new update becomes available EMM Labs will distribute it along with a software
application that will connect your CDSD via its USB connector to a PC.
First Time Installation and Upgrade Procedure:
1. Do not connect the CDSD yet to the PC
2. Launch the supplied application “emmsetup.exe” on your PC and closely follow
instructions on the screen. Connect your CDSD to the PC only when told so.
3. When you reach the following screen, make sure to point the field “File to
Transfer” to the file supplied by EMM Labs.
4. When completed, turn off power to the CDSD (switch on back panel), wait 15
seconds and power it back on again. DO NOT POWER OFF BEFORE
PROGRAMMING IS COMPLETE (which can take up to 1 minute).
13
CDSD User Manual
Subsequent Upgrade Procedure:
After you have used the EMMSETUP utility for the first time a shortcut “EMM Labs
Update Utility” is installed on the desktop of your PC as well as in the
START>PROGRAMS>EMM Labs folder. There is no need to launch the “emmsetup.exe”
application anymore.
1. Connect your CDSD to the PC via a USB cable
2. Launch “EMM Labs Update Utility” from the desktop of your PC and you should
see the above screen directly.
3. Proceed from here as for first time installation.
IMPORTANT NOTE:
THE ENTIRE UPDATE PROCEDURE CAN TAKE UP TO 1 MINUTE. IT IS IMPORTANT
THAT YOU DO NOT INTERRUPT POWER TO THE CDSD, NOR DISCONNECT THE
USB CABLE, NOR TURN OFF THE PC DURING PROGRAMMING, OR ELSE YOUR
CDSD WILL NOT BE ABLE TO BOOT NORMALLY.
In case the programming has been interrupted accidentally, please follow the steps
below:
1. Turn off power to the CDSD via its back panel switch
2. Press and hold the Reset button on the back panel
3. Turn power back on. Release the Reset button only after the lights on the front
panel turn on.
4. Proceed as described under “Subsequent Upgrade Procedure”.
14