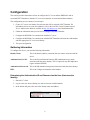
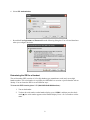
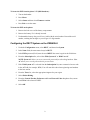
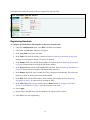
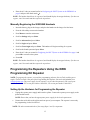
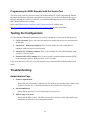
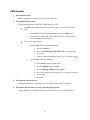
1
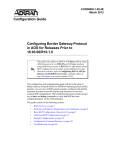
NetVanta Unified Communications Technical Note ___________________________________________________________________________________ Installing and Configuring the Polycom KIRK Wireless Server 600v3 Introduction The KIRK Wireless Server 600v3 (KWS600v3) is scalable for up to 1500 wireless users. Available as either a single-cell or a multi-cell solution, it can be adjusted to meet exact requirements. The IP interface to the private branch exchange (PBX) makes it an ideal solution for businesses with several locations. A multi-site solution can be customized with a number of single-cell and multi-cell solutions depending on the size of each location. When there is a need for more than one KWS600v3 at a location, a primary KWS600v3 is needed and the location is considered to be multi-cell. Up to 256 radio units can be applied to obtain the necessary radio coverage. A single-cell version consists of one KWS600v3 and up to 6 KIRK repeaters. The server runs on an existing local area network (LAN). Known Integration Issues When an invalid number is dialed, the PBX will not play the corresponding audio prompt indicating that the number is invalid. There is no workaround at this time. Attempting to use a KIRK handset registered with the KWS600v3 to pick up a call ringing at another extension will result in the call disconnecting. The initiator of the original call will be diverted to voicemail. There is no workaround at this time. 1 Preparation This section provides instructions on how to change the KWS600v3’s factory IP address setting and upgrading the firmware. Connecting a Computer to the KWS600v3 The KWS600v3 communicates through a standard LAN cable. 1. Connect the LAN cable to the computer or LAN switch. 2. Connect the LAN cable to the ETH1 port of the KWS600v3. PC Network Settings The KWS600v3 is configured by default with a static IP address of 192.168.1.1. In the event that this IP address conflicts with other IP addresses in your local network, or that this IP address is not in the same subnet as your network, then you must change the KWS600v3’s IP address. To access the KWS600v3 and change its IP address, you must first change your PC’s IP address to be on the same subnet. NOTE: Take note of your original network settings before making any changes, because you must change these settings back after changing the network configuration on the KWS600v3. To change the IP address of your computer for Windows® Server 2008/Windows Vista: 1. Select Start > Control Panel. 2. If you have the classic view, double-click Network and Sharing Center and then select Manage Network Connections. If you have the category view, double-click Network and Internet > View network status and tasks and then Manage Network Connections. 3. Double-click the active LAN or Internet connection. 4. Select Properties. 5. In the Networking tab, highlight the Internet Protocol (TCP/IP) item, and select Properties. 6. In the General tab, select Use the following IP address and enter: IP address: 192.168.1.2 Subnet mask: 255.255.255.0 7. Select OK. 2 To change the IP address of your computer for Windows Server 2003/Windows XP: 1. Select Start > Control Panel. 2. If you have the classic view, double-click Network Connections. If you have the category view, double-click Network and Internet Connections, and then select Network Connections. 3. Double-click your active LAN or Internet connection. 4. Select Properties. 5. In the General tab, highlight the Internet Protocol (TCP/IP) item, and select Properties. 6. In the General tab, select Use the following IP address, and enter: IP address: 192.168.1.2 Subnet mask: 255.255.255.0 7. Select OK. Changing the IP Address on the KWS600v3 New (or factory reset) KWS600v3s are configured with a static IP address. This must be changed so that the device can communicate on your network. To change the wireless server’s IP address: 1. Open your browser and enter the IP address of the KWS600v3. The factory default is 192.168.1.1. 2. When prompted, use the following default Web access username and password: Web Access Username: admin Web Access Password: ip1200 3. Under the Configuration menu, select ETH0. 4. Configure the device for Dynamic Host Configuration Protocol (DHCP) or a static IP address. To configure the device for DHCP: Select on DHCP under the ETH0 configuration menu. From the Mode list, select Client and then select OK. Select Reset (under the Administration menu) to save your configuration. To configure a static IP address: Select DHCP under the ETH0 configuration menu. From the Mode list, select Disabled and then select OK. Select Reset (under the Administration menu) to save your configuration. 3 Under the Configuration menu, select ETH0 and then select IP. In the IP Address field, enter the new IP address. In the Network mask field, enter the network mask. In the Default gateway field, enter the IP address of the default gateway on your network. Select OK. Select Reset (under the Administration menu) to save your configuration. 5. Connect the device to your network via the ETH0 port. 6. Change your computer’s IP address parameters back to their original values. Upgrading the Firmware Refer to UC Server Interoperable SIP Device Features and Comparisons technical note, available at http://kb.adtran.com, to determine the most recently supported version of firmware for the device. Performing firmware upgrades 1. Retrieve the firmware and radio update files from the Polycom website. You will need to download the Asterisk version. Refer to http://www.polycom.com/support/voice/dect/dect_ws_600v3.html. 2. Open your browser and enter the IP address of the KWS600v3. 3. When prompted, use the following default Web access username and password: Web Access Username: admin Web Access Password: ip1200 4. Under the Administration menu, select Upload. 5. Select Radio. 6. Select Browse. A dialog box will appear to prompt you for the radio update file. 7. Select the firmware file and then select Open. 8. Select Send File. 9. Wait for the system to finish updating. 10. Under the Administration menu, select Upload and Firmware. 11. Select Browse. A dialog box will appear to prompt you for the firmware file. 12. Select the firmware file and then select Open. 4 13. Select Upload. 14. Wait for the system to finish updating. 15. Select Immediate Reset. 5 Configuration This section provides instructions on how to configure the UC server and the KWS600v3 and its associated DECT handsets so that the UC server user identities are associated with the handsets. The configuration process consists of several steps: 1. Create a UC server user identity for each user that will be assigned a DECT handset. For information on how to create user identities, refer to the NetVanta Unified Communications Server Administrator Manual, available at http://kb.adtran.com, or the installation media. 2. Gather the information that you will need to configure each DECT handset. 3. Configure the KWS600v3 to communicate with the UC server. 4. Configure the KWS600v3 to communicate with the DECT handsets and associate each handset with the appropriate UC server user identity. 5. Test your configuration. Gathering Information To configure the device, you need the following information. Identity/Name: This is the identity address (extension) that you want to associate with the device. Authentication User ID: This is the Session Initiation Protocol (SIP) authentication user name associated with the above identity. This is required by any SIP endpoint to register with the SIP PBX. Authentication Password: This is the SIP authentication password associated with the above identity. IPEI: This is the 12-digit serial number of the handset. Determining the Authentication ID and Password as the User (that owns the identity) 1. Start the UC client. 2. Log in as the user whose identity you want to associate with the handset. 3. In the bottom left pane, take note of the identity name and address. 6 4. Select the icon on the right and select SIP Authentication. 5. Record the User/login name and Password from the following dialog box. You will need them later when you configure the device. To Determine the Authentication ID and Password as the Administrator 1. Start the UC client. 2. Log in as the administrator. 3. Select the Identities tab in the left pane. 4. Navigate to View > Display Identities for all Profiles. 5. Find the identity in the list that you want to use and double-click the entry. 7 6. Select SIP Authentication. 7. Record the User/login name and Password from the following dialog box. You will need them later when you configure the device. Determining the IPEI for a Handset The serial number (IPEI) consists of a five-digit handset type (manufacturer code) and a seven-digit handset number. This serial number is required by the KWS600v3 to associate a specific handset with an identity. You can locate the IPEI in several different ways: To locate the IPEI from the phone’s UI (3040/4020/4040/4080 handsets): 1. Turn on the handset. 2. To show the serial number on the handset display, press *99984*, and then press the check mark (); the serial number appears on the handset display. Press < for 5 seconds to exit the menu. 8 To locate the IPEI from the phone’s UI (5020 handsets): 1. Turn on the handset. 2. Press Menu. 3. Select Status and then select Firmware version. 4. Press Exit to exit the menu. To locate the IPEI on the phone: 1. Remove the back cover of the battery compartment. 2. Remove the battery if it is already inserted. 3. Underneath the battery slot you will see a label with the serial number. Record the serial number, omitting the last digit so you will get a 12-digit number. Configuring the DECT System on the KWS600v3 1. Under the Configuration menu, select DECT, and then select System. 2. In the Name field, the name must always be DECT. 3. In the PWD (password) field, enter the word DECT then enter it again in the field below. 4. From the Subscription list, select either With System AC or With User AC. NOTE: System AC allows you set a system-wide password for subscribing handsets. User AC allows you to set the password on a per-user basis. 5. If the With System AC is selected from the Subscription list, enter a numerical access code in the AC field (for example, 3179). You will enter this code when registering new handsets to the base station. 6. From the Tones list, select the appropriate ringtone for your region. 7. Select Enbloc Dialing. 8. From the General Encoder Preference and Local Network Coder dropdown lists, ensure that G711u is the selected CODEC. 9. Select OK. 9 The figure below shows an example of how to complete the required fields. SIP Configuration To configure the KWS600v3 to communicate with the UC server: 1. Under the Configuration menu, select DECT, and then select Master. 2. In the GK and GK-id fields, enter the IP address of the UC server (for example, 192.168.8.83). 3. Uncheck Name for Authentication. 4. Select OK. 5. Select Reset Required. 10 The figure below shows an example of how to complete the required fields. Registering Handsets To configure specific handsets with identities so that they can make calls: 1. Under the Administration menu, select DECT and then select Users. 2. Select New. An Edit User dialog box will appear. 3. In the Long Name field, enter any name. 4. In the Name field, enter the identity (extension). Refer to Gathering Information on page 6 for instructions on locating the identity. No spaces are allowed. 5. In the Number field, enter the SIP identity address (extension). Refer to Gathering Information on page 6 for instructions on locating the SIP identity address. 6. In the Password field, enter the SIP authentication password. Refer to Gathering Information on page 6 for instructions on locating the SIP authentication password. 7. In the Display Text field, enter a standby text. This is displayed on the handset. This can be the identity or a name to identify the location of the handset. 8. In the IPEI field, enter the IPEI number (serial number) of the handset. Refer to Gathering Information on page 6 for instructions on locating the IPEI. 9. In the Auth Code field, if you previously selected With User AC in Configuring the DECT System on the KWS600v3 on page 9, enter the numerical access code. 10. Select Apply. 11. Repeat Steps 1 through 10 for each new handset to be registered to the system. 12. Select OK to save the registration(s). 11 The figure below shows an example of how to complete the required fields. Powering On and Registering Handsets to the KWS600v3 Once the KWS600v3 has been installed and configured, you must manually register the handsets using the instructions below. Manually Registering the 4020/4040 Handsets 1. Insert the battery, plug in the charger, and place the handset in the charger for four hours. 2. Press the handset key ( 3. When the handset is powered on, press MENU. 4. Scroll to LOGIN. 5. Press the check mark ( ) on the handset. 6. Scroll to SUBSCRIPTION CREATE. 7. Press the check mark ( ) on the handset. 8. Wait for the handset to find the base station ID and press the check mark ( ) for a half a second to turn on the handset. 12 ). 9. Enter the AC code you created earlier in Configuring the DECT System on the KWS600v3 on page 9 and press the check mark ( ). NOTE: The handset should now be registered, and should display the assigned identity. If it does not register, wait 10 seconds and then repeat the steps above. Manually Registering the 5020/5040 Handsets 1. Insert the battery, plug in the charger, and place the handset in the charger for four hours. 2. Press the left softkey to turn on the handset. 3. Press Menu to enter the main menu. 4. Scroll to Settings and press Select. 5. Scroll to Advanced and press Select. 6. Scroll to Login and press Select. 7. Scroll to Create login and press Select. The handset will begin searching for a system. 8. Scroll to the found system and press Select. 9. Enter the AC code you created in Configuring the DECT System on the KWS600v3 on page 9 and press OK to connect to the system. 10. Press OK. NOTE: The handset should now be registered, and should display the assigned identity. If it does not register, wait 10 seconds and then repeat the steps above. Programming the Repeaters Using the KIRK Programming Kit Repeater NOTE: To program the repeater, you need the programming software (ServiceTool), and the power supply. The ServiceTool is not part of the Programming Kit Repeater, but can be downloaded from www.polycom.com. The power supply for the repeater is to be ordered separately (UK version part number: 84642421; EU version part number: 84642420; US version part number: 84642432). Setting Up the Hardware for Programming the Repeater 1. Unplug the repeater power supply and insert the splitter. Connect the repeater power supply to the splitter and the mains. NOTE: Ensure that you have the appropriate power supply for the local requirements. 2. Connect the serial cable to the splitter and com port of your computer. The repeater is now ready for programming via the ServiceTool. NOTE: The above mentioned order of the setup (Steps 1 and 2) is important. 13 Programming the KIRK Repeater with the ServiceTool The ServiceTool is the tool you access from your desktop and use for repeater programming; handset adjustment and software download to the handset and repeater. The ServiceTool identifies the type of repeater, and with this software it is possible to program the KIRK Repeater to connect to the KIRK DECT Radio Infrastructure solutions. Refer to the KIRK Repeater Installation and Configuration Guide available from http://www.polycom.com/support/voice/dect/dect_repeaters.html for more information. Testing the Configuration To ensure that the KWS600v3 and handsets are correctly configured, you must run the following tests: 1. Call to voicemail: Place a call to the voicemail access number and set the voicemail password for that user. 2. Internal call – hard phone/softphone: Place a call to another user with a hard phone or softphone. Make sure there is two-way audio. 3. Internal Call – Handset to Handset: Place a call to another user with a KWS handset. Make sure there is two-way audio. 4. External Call to PSTN number: Place a call to a public switched telephone network (PSTN) number through a gateway. Make sure there is two-way audio. If any of the above test cases fail, revisit the integration steps and consult the troubleshooting section below. Troubleshooting Administration Page 1. Firmware upload failed. Ensure that you are uploading valid firmware files and you are uploading radio firmware as IP firmware. Check to see if communication between PC and radio unit is interrupted. 2. Password mismatch. Ensure that the password is correct. Passwords are case sensitive. 3. IPEI too long or too short. Ensure that the IPEI is correct. The IPEI (serial number) consists of a five-digit handset type (manufacturer code) and a seven-digit handset number. 14 KIRK Handset 1. The telephone freezes. Remove and replace the battery pack. Turn on the telephone. 2. The telephone does not ring. Check whether the ringer is SILENT or RINGER VOL is OFF. The Silent icon will appear on the screen if the ringer is silenced. To adjust the ringer: On the KIRK Wireless 4020/4040 handset, press the Menu # key. On the Wireless 5020/5040, while in an idle state (no call in progress), press the menu key followed by #. To verify the ringer volume: On the KIRK Wireless 4020/4040 handset: 1) Press the Menu key. 2) Scroll to SET PROFILE RINGER VOL by using the right arrow key. 3) Turn the volume up and down using < and >. Confirm with . On the KIRK Wireless 5020/5040: 1) Press Menu to enter the main menu. 2) Scroll to Settings and press Select. 3) Scroll to Ringing volume and press Select. 4) Press left or right side of navigation key to adjust the volume of the ring tone. 5) Press Set. 3. The telephone will not turn on. Ensure that the battery is connected. If it is connected, charge battery or change it. 4. The handset turns off when receiving a call and going off-hook. Charge the battery. If the problem persists, change the battery as it might be defective. 15