1
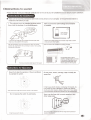
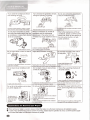
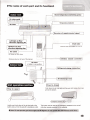
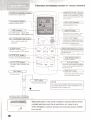
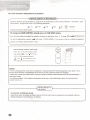
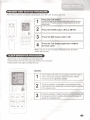
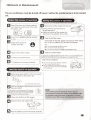
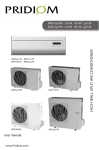
o>
ct
CD
c
CD
-!.
W
3.
o>
c
CD
g.
CT
USER'S MANUAL
CD1
o
3
d Air Conditioner
c
CQ
CD
TD
3
Q.
O)
MODEL
KFR-51GW/Ga
KFR-66GW/Ga
C
LU
us
O
C3
LISTED
AIR CONDITIONER
2MF3
Air conditioners are pieces of high value. In order to ensure your lawful rights and interests, please have
the professional technicians to do the installation for you.
This Instruction Manual is the universal-purpose version for the models of split wall-mounted air conditioners
manufactured by our Co. The appearance of the units that you purchase might be slightly different from
the ones described in the Manual, but it does not affect your proper operations and usage.
Please read carefully the sections corresponding to the specific model you choose, and keep the Manual
properly so as to facilitate your reference at later time.
Addition to the user manual:
The appliance is not intended for use by young children or infirm persons without supervision;
Young children should be supervised to ensure that they do not play with the appliance.
Contents
Instructions to users
The name of each part and its function
Operation and indication sections of remote controller
Use of remote controller
Features of heating operations
Methods of maintenance
Treatment at service call
We hope you will know the following when using the unit
1 ,
3
4
5
g
g
1Q
11
Installation of electric components
12
[Instructions to users]
Please read the "Instruction Manual" carefully prior to the use of your air conditioner so as to ensure proper operations.
Instructions for Installation
Make sure to have the professional after-sale service persons of our company or the authorized dealers to
install the units before you use.
1. The units are not to be installed at places where
Make sure that the earth leakage-circuit breaker
there might be leakage of combustible gases.
is installed.
m
B
In case that the leaked gas accumulates around the units, there
might occur the accident of fire hazards.
After the connecting of the wires between the indoor unit and the
outdoor unit, check whether the connecting is loose or not by pulling
the wire with a little force.
Earth leakagecircuit breaker
Absence of the earth leakage-circuit breaker might lead to electric
shock and some other hazards.
Make sure that the air conditioner is properly grounded.
The grounding wire on the air
conditioner should be tightly connected
to the ground of the power source.
Improper grounding might cause
electric shocks or other hazards.
,
The loose connecting might result in fire hazard.
Instructions for Operation
Never try to stop the operation of the air conditioner
Do not press, stretch, damage, heat or modify the
by operate the switch.
power line.
/
/ I \x
Such performance might cause electric shocks or fire hazards.
It might cause electric shocks, overheating, fire hazards, etc.
If the power line wire is damaged or needs to be replaced
due to some other reasons, please make sure to have dealer
or the authorized maintenance people to do the replacement.
Do not operate the switch by wet hands.
Never use the fuse with incorrect capacity or any
other metal wires.
It might cause electric shocks.
The use of metal or copper wires for fuse might cause operational
failures or fire hazards.
Try to avoid the sunlight and hot air
from entering the room.
Try to minimize the generation of heat
during the operation of cooling.
Do not use combusting apparatuses
in the air-conditioned room.
During the cooling operation, curtains or windowblinds should be used to shade off the sunlight
Place the heating sources out of the room.
It might lead to the incomplete combustion of i
apparatuses.
Do not place insecticides or paints
and other flammable sprays near the
air conditioner, or spray them directly
at the air conditioner.
It might cause fire hazards
When it is necessary to use the air
conditioner and the combusting
apparatuses in the same room, air
ventilation has to be made from time to
time.
Insufficient ventilation might lead to
lack of oxygen or some other dangers.
Do not insert sticks or bars into the air
vents.
Adjust the air direction correctly.
As the fan is in high-speed operation, the insertion
might lead to accidents
Properly adjust the up/down and left/right directions
of the air flow so as to get the even room temperature
Do not clean the air conditioner with
water.
„
It might cause electric shocks.
Do not sit on the outdoor unit or place
any other objects on it.
Prior to the maintenance of the air
conditioner, please cut off the power
supply first. Never do the cleaning of
the units when the fan is in highspeed operations.
Do not attach, hang or stack articles
on the air conditioner.
It might lead to the falling down of the air conditionei
unit, which will result in accidents or injuries.
Do not use the following substances:
Do not keep exposed to the cool air
for long time.
It might cause discomforts of the
body, which is harmful to your
health
Check the supporting structures of
the units carefully.
in case of damages, the supporting structures should
be immediately repaired so as to avoid falling down
of the unit, which might cause human injuries or
other accidents.
Put down the power when the unit is
not in use for long time so as to ensure
Safety
The falling down of
the unit or the objects
might cause human
injuries and other
accidents.
Hotwater(over104 : For40°C)
The use of hot water will deform the air conditioner
or make it fade in color.
Gasoline, paint diluent, benzene and polishing
agents, etc.
These substances will deform the air conditioner
or cause scratches.
'
' IB'.
When the plug is to be pulled out, make sure that
the switch of the air conditioner is turned off.
Instructions for Removal and Repair
• When removal or repair is needed, please contact the dealer or authorized maintenance & installation people.
• In case of any abnormal occurrences (smell of burning), please stop the operation at once, cut off the power supply
and contact the dealer or authorized maintenance people.
[The name of each part and its function]
Indoor Unit
USER'S MANUAL
Room temperature detecting probe
Air return grid
Takes in the indoor air
Receiver of remote control signal
Lelf/right air flow
direction adjusting fin
Up/down air flow
direction adjusting flap
Air blows out from here
Removes dust or dirt out of the inlet air
Outdoor Unit
Refrigerant piping connection
Unit operation section
[How to close]
Push down the air inlet grid and the push both sides of air inlet
grid at the bottom.
(Emergency operation key)—I LJ
Lightly push both sides of the air inlet grid at the
botton and pull it to this side till a resistance is felt.
This button can be used as an emergency measure to turn on/off
unit when remote controller is not available.
• Note: Do not open the grid at an angle over 60 degrees. Do not operate the units with too much force.
[Operation and indication sections of remote controller]
(OPERATION MODE indicator)-! ,
^
Indicates selected operation mode
\
Indicates the set temperature, (it doesn't
indicate temperature when operation mode
is AUTO select.)
^iVs HLI
( Fan speed indicator )
Indicates the selected air ra e.
f7T@f%|-
Indicates selected flap mode.
;,' ** .-* 'i\
CLOCK AM PM $|
C
TIME indicator
During TIMER operation
)—
1
( ON/OFF button
nd cator TIMER
During normal operation ndicstor PRESENT TIME
operation and stops when repressed.
ON/OFF
(SET TEMPERATURE button)—
1
\
The two buttons set the room
UU 1 rLAr DUtton
/
f o7\
1
-ooo-"1
f
)
This button changes to SLEEP operation.
X
Stf
fP
OUT FLAP
—(OPERATION MODE select button)
WO°
in the following order,
r~~N C -\^^~~~)
-^j ^_^c_^
This button used for selecting t med starting
m
°ST/\RT
0r
^ °Srop
HOUR
_)
( FAN SPEED button 3
H
IN FLAP button
— ( TIME SET button
\
__,1
V_
(
1
RST button
The two button used for setting presenl
time and auto start or auto stop.
")
Thisb utton let computer rese
Above figure shows all indications for the purpose of explanation,
but practcally only the pertinent
~~—"~~~"^
When air-conditioner is cool-
only model, the HEAT change to FAN.
•
Unload the back Cover
(Transmission procedure)
When each button on the remote controller is pressed with the remote
controller pointing toward the air conditioner unit, signal is sent.
When the signal is received correctly, the receiving sound is emitted
from the unit.
)
This button used for selection of the left/right
air flow direction, whenever pressed the in
flap will swing or fix.
HlH
stopping.
CLK button
C. (AUTO) - o (COOL) --. (DRY)^ a (HEAT)/ 6 (FAN)
IN FLAPfW SPttO
-OOO
)—
This button used for seec ng timed
C
This button.whenever pressed.changes the mod
E
( Al ITO C TAPT huttnn ^
( AUTO STOP button
)
This button used for selection of the up/down
airflow direction.Whenever pressed, changes
the direction is the following order:
temperature.
( SLEEP button
J
This button, when pressed, starts
)
[Use of remote controller]
AUTO MODE OPERATION PROCEDURE
Operates by selecting automatically the operation mode (DRY,COOL ,or HEAT) depending on the room temperature at starting.
With the remote controller pointing the air conditioner.
1 Press the ON/OFF button.
When the unit is not at AUTO SELECT mode.
Press the MODE button. Set to "AUTO SELECT"
Each time the button is pressed ,the operation mode is changed in
sequence ,from'C,"(AUTO)1" (COOL). 6(DRY)to°(HEAT)/©(FAN)
When the"CY'is displayed,the air conditioner is automatically
controlled at the optimum temperture
TO Stop:
Press the ON/OFF button.
The operation of the AUTO SELECT
mode can be performed by only
pressing the ON/OFF button from the
V next time.
CAUTION: restarting the unit must
If you don't like the content of AUTO SELECT mode operation.
Change to HEAT DRY or COOL than AUTO SELECT.
wait 3 minutes
Temperature adjusting procedure during AUTO SELECT operation
Adjusts air temperature during AUTO SELECT operation , press" A "button or" ^7 "button, adjusts temperature.
Press" A " one time ,the temperature raises about 1°F (or 1'C).
Press" v 7 " one time ,the temperature reduces about 1°F (or TC).
Cool/Heat(Fan)/Dry mode Operation Procedure
With the remote controller pointing toward the air conditioner.
Press the ON/OFF button.
Press the MODE select button
Select the operation mode .
(COOL, DRY, HEAT/FAN.AUTO)
Press ^ior "button.
Set to your favorite temperature pressA or ; button
HEAT
64'F-88'F(or16'C-31'C)
COOL
64:F-88'F(or16iC-31'C)
If CONT' is selected , room temperature isn't
controlled , operation being continuously.
Press the FAN SPEED button .
Set to your favorite air flow rate.
(jo stop : | Press the ON /OFF button .
• Changing procedure of the content of the operation Set to the content.
The content of the operation can be set or changed
even while the air conditioner is off operation .
The defrosting function for the unit is automatic mode instead of 2-hour compulsive defrosting mode.
Air flow direction adjustment procedure
-(Adjusting up/down air flow direction )Up/down direction can be adjusted by using the OUT FLAP button on the remote controller. This button , each
time pressed , changes the mode in the following sequence:
-(2)
(3)
(4)
(5)
(AUTO)
Change to the OUT FLAP mode.
TO change the VANE CONTROL velocity press the FAN SPEED button.
Each time the button is pressed.fan speed is changed in sequence, from . [Lo]*i [Mid]«*l[Hi]fS)[AUTO].
V^
To cool the whole room ,use the ,tt (HI) mode , (COOL MODE). If the sound of the air conditioner operating
disturbs your sleep ,use the SLEEP mode .
Recommended horizontal VANE range.
Use in the @ (AUTO) position usually.
Use positions ^—- (1) or ^ (2) in the
COOL or DRY mode and positions
/ (3) to I (5) in the HEAT mode
when adjusting to your requirements.
NOTE
• In the cooling operation ,when the air conditioner is operated with OUT FLAP blowing down (4) or (5) for 1 hour ,
the OUT FLAP direction is automatically set to level to prevent condensed water from dropping.
• Adjust the vertical OUT FLAP direction using the remote controller .If the horizontal vane are moved manually, it
may cause trouble.
• In heating operation , if the output air temperature is too low or when defrosting is done .the horizontal vane
position is set to (1).
(
Adjusting left/right air \_
flow direction
/
Horizontal & vertical auto swing.
Adjustlhe direction by remote controller.Press the IN FLAP button.the air swinging fins will constantly make the
left/right swinging or fixed direction in air delivery.
PRESENT TIME SETTING PROCEDURE
When cells are inserted, the present is automatically set to AM 12:00. EX.:Setto AM 10:30
1
Press the CLK button.
Unload the back cover push the clock botton with the tip of a
ball pen, etc. The time indicator is flickering and can set the
present time.
2
Press the HOUR button. (Set to AM 10:)
3
Press the MIN button. (Set to 30)
4
Press the CLK botton again,then reattach
the back cover
CD
AV
poo
-'-.----- -,:•-
NOTE The timer is set on the basis of the present time. So set the
present time correctly.
SLEEP OPERATION PROCEDURE
Use this mode to reduce operation sound when sleeping,etc.
Press the SLEEP button,the air flow sound from the indoor unit is decreased.
Press the SLEEP button again can release the mode.
r~
^
d | ' ••
\
;!» v
:
NOTE:
1
v~
?^
AV \»
2
ooo^
o> <o o
3
a
fff
OUT FLAP
DE
»
Wr
«r«r IN FLAP f W SPKO
OOO
rw°srop
mm
m«
Use the sleep mode when you are going to bed. If this mode is
used in the day.the capacity is reduced since the ambient
temperature is too high. (COOL MODE).
During the operation of cooling, the room temperature will be
raised higher than the setting after the machine begins to operate
in the sleeping mode.
During the operation of heating mode, the room temperature will
be dropped lower than the setting after the machine begins to
operate in the sleeping mode.
USER'S
It is convenient to set the timer
for the time when you go to
bed ,when you get
home ,when you get up , ect.
(
How to set the ON timer
)
Press the AUTO START button to set the on timer
mode when the AC is in the standby mode.
Each time the button is pressed, the ON timer mode alternates between
ON and OFF.
Set the time of the timer using the HOUR and MIN buttons.
2
Each time the HOUR button is pressed , the Set time is counted up by 1
hour; each time the "MIN" button Is pressed, the set time is counted by
10 minutes.
• To release the ON timer:
Press the AUTO START button to release the timer.
(
HOW to set the OFF timer
_
)
Press the AUTO STOP button to set the OFF timer
mode during operation.
ooo
oo
*ffP
OUT FLAP
™
Each time the button is pressed, the OFF timer mode alternates beteen ON and
• OFF.
»0£
OOO
HOUR
HI"
set the time of the timer using the HOUR and MIN buttons.
Each time the HOUR button is pressed , the Set time is counted up by 1
hour; each time the "MIN" button is pressed, the set time is counted by
10 minutes.
• TO release the OFF timer:
Press the AUTO STOP button to release the timer.
Programmnig timer operation
The ON timer and OFF timer can be used in combination .The time of the set time which is
reached first will operate first (^
» mark indicates the order of timer operations.)
• If the current time has not been set ,the timer operation cannot be done.
[Features of Heating Operations]
Basic principles and performances
O
The machines absorb heat from the outdoor air and transfer it indoors so as to heat the room air. The heating capabilities
through this principle of heat pump go up/down with the increase/decrease of the temperatures of the outdoor air.
O
It only needs a fairly short time for such hot air circulation system to raise the room temperature.
0
When the outdoor air temperature is very low, the system can be used together with other heating devices. But good
ventilation should be maintained to ensure safety and prevent accidents.
Defrosting
When the outdoor air temperature is very low and humidity is very high, frosting will occur to the heat exchanger of the outdoor
unit, which has negative impacts upon the efficiency of the heating performance. In such case, the automatic defrosting function
will come into play. The heating operation will be stopped for 5-10 minutes to do the defrosting.
O The fans of both the outdoor and indoor units are stopped. During the defrosting operation, the run light will flash
slowly.
0
During the defrosting, the outdoor unit might generate some steam. It is caused by fast defrosting, which is not a
performance failure.
0
Upon the completion of the defrosting process, the heating operation is resumed.
[Methods of Maintenance]
The air conditioner must be turned off power before the maintenance is to be carried
out.
Before the season of operation
During the season of operation
The cleaning of Ihe air fitter screen (Standard intervals should be once every two weeks).
I Check if there are any blocking materials >
Remove the air filter screen from the unit.
' in the intake and outlet vents of the indoor
» Gently press the two lower ends of
and outdoor units.
the grid and open it.
• Gently pull up the air filter screen and
take it out in the direction of your body.
I Check if the installation stand is corroded
or rusty.
Clean the air filter screen.
if the screen is very dirty, please use lukewarm water (about
86°F or 30'C) to clean it. Air it dry after the cleaning.
Check if the machine is
properly grounded.
Note:
• Do not use boiling water to clean the screen.
• Do not bake the screen dry over a fire.
• Do not exert too much force in pulling and stretching the screen.
Install the air filter screen.
Check if the air filter is clean.
To operate the air conditioner without the air filter screen on will cause the interior of the
machine dirty which might lead to poor performances or damages to the units.
Connect to the power source.
Clean the air conditioner
Put batteries in the remote controller.
• Use a soft and dry cloth to rub the air conditioner,
or use a vacuum cleaner to dean it.
• If the air conditioner is very dirty, use a piece of
cloth and soak it with neutral home-use detergent
to do the cleaning.
After the season of operation
the temperature at 86"F or 30°C and operate
( Set
in the fan status for about half a day.
To make the interior of the units dry
Lrl Stop the operation of the machine and turn off
tJ the power switch.
The air conditioner will consume about 5W of electric
ower after the machine is turned off. For the purpose
f energy saving and safety, it is advisable to pull the
)lug out during the non-operational seasons.
"•
*J Clean and install the air filter screen.
ICIean the indoor and outdoor units.
jjTakf
Take the batteries out from the remote controller.
Note:
If the air filter screen is blocked by dust or dirt, the
performance of cooling and heating will be affected, with
the operation noise and power consumption increased.
Therefore, the air filter screen should be cleaned regularly.
[Treatment at service call]
Please check the following before requesting after-sale service from your dealer.
The air conditioner does not operate at all.
Is the time set to
"ON" position ?
Is the power in an
outlet ?
|2"7£B
Room temperature can't be controlled .
(Too cold or too hot)
Is there a power
failure or a break
fuse ?
Is the room temperature setting too low
or too high?
Poor cooling or heating performance .
Is the room temperature
setting suitable ? /*.
Are the window (s) and
' Are the air filters
clean (Not clogged )? door(s) opened ?
Poor cooling performance .
Is direct sunlight
entering the room ?
Is there a heat source Are there too many
in the room ?
people in the room ?
If the air conditioner does not operate properly
ever after conducting the above checks , when
the doubt still remains even after consulting
page 11 or in case that such phenomena as
those shown below, turn off the power and
contact your distributor.
Cases requiring immediate contact with the distributor
Pull out the power plug immediately and inform to your distributor in the following situations:
Fuse or breaker often breaks off
Switch dose not actuate surely
Malfunction is observed TV , radio or other devices .
Abnormal noise is heard during operation
When faulty operation movement is observed when the RUN button is pressed , even after restarting the operation after
3 minutes , faulty movement does not disappear.
[We hope you will know the
following when using the unit]
The unit can not be restarted just after shut down .
( RUN lamp is illuminating )
/"
(f>'j ^^^^^
<
"^
Not operate '
Restart is stopped for 3 minutes after shut down to protect
the unit .
jflh
f Please wait for"1,
i 3 minutes .
j
\
pW^i
\y
J
Three-minute protection timer incorporated in the microcomputer actuates
automatically . Except that power is connected , this function does not
actuate .
Air is not blown out at starting of heating operation.
Air blow is stopped to prevent blowing out of cold air
until the indoor heat exchanger is warmed .( 2 to 5 min )
( HOT KEEP)
Air is not blown out for 6 to 12 min , at heating operation .
When outdoor temperature is low and humidity is high , the unit
sometimes performs defrosting automatically . Please wait . During
defrosting , water or steam are raising from the outdoor unit .
Air is not blown out at DRY operation .
Indoor fan is sometimes stopped to prevent vapor of dehumidified
moisture and save energy .
Mist is blown out at COOL operation .
This phenomenon sometimes occurs when the temperature and
humidity of the room are very high , but it will disappear with the
lowering of the temperature and humidity .
Odor is sent out .
Air blown out during operation may smell . This is the smell
of tobacco or cosmetics slicked to the unit .
Noise is heard cracking sound .
^^^
m
This is caused by the refrigerant that is circulating inside the unit.
Noise is heard cracking sound .After a power stoppage or after
disconnecting the power supply plug.
This is caused by heat expansion or contraction of plastics.
Operation can not be restarted even if the power is recovered.
The memory circuit of the microcomputer is cleared. Operate
the remote controller again to restart the operation .
Remote control signals may not be received when signal receiver
on the air conditioner body is exposed to direct sunlight or strong
lighting . In that case , interrupt the sunlight or darken the lighting.
Remote control signals are not received .
Moisture may form on the air outlet grilles .
V
If the unit is operated for a long period of time with the high
humidity , moisture may form on the air outlet grilles and drip
down .
[Installation of electric components]
Points of attention
•
HACK type breaker should be utilized along with proper installation;
•
Make sure of the applicable voltage and cables or wires for the specific model to be used, before doing the
connections;
•
Read the prompts at the terminal board for wiring. Make sure the wiring is done correctly.
•
Pay attention to the poles of the signal terminal and connect the terminals to match the identification numbers.
•
When the wiring connections are wrong, the compressor will not work.
•
The connecting wires are not supplied.
•
The connecting wires specification 14 AWG,VW-1(orTHHW),copper core and 105°C for model 5100W and
model 6600W Their set screw diameter is 4 mm.The power sourc is 240V,60Hz and 1 phase.Minimum circuit ampacity
of the wiring systems is 20A.
Connection of wires for outdoor unit and indoor unit
Outdoor unit
1 [2
3 L3L4[© : L1 L2 K;
To power source
Note:
•
The environment conditions must be taken into consideration when the connections of power cable are made (such as
the ambient temperature, direct exposure to heat/direct exposure to sunlight);
•
The specifications for the power cable refer to the minimum values of the metal core wires. Taking into consideration
the voltage losses, the core wire of power cable must be one size larger than the specifications;
•
The grounding wire must be connected to the indoor units and outdoor units;
•
The laying of power cables must be done by qualified electricians and comply with the regulations of the local power
supply authorities and with the standards of the electric appliances;