1
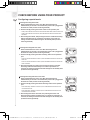
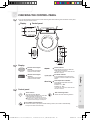
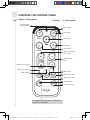
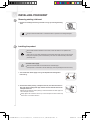
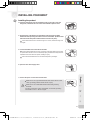
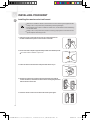
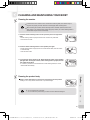
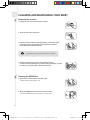
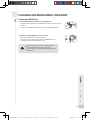
BA13-AR/AE
BA13-BR/BE
1210964 BA13 사용설명서_수출영문_(09.03.23).indd
1
2009.3.24
10:13:3 AM
Product features
BA13-AR/AE/BR/BE Common Functions
1. Instant warm water system
The water is instantly heated when using the rear and front cleaning functions so that you
can immediately use water at your desired temperature.
2. Air+ function
The water stream with air bubbles provides softer, stronger cleansing.
3. MESH Filter
The MESH filter is a semi-permanent item. You can use the filter repeatedly by cleaning it.
4. Eco mode
- Bidet eco mode: If the seat sensor does not detect someone sitting down or no panel or
remote control button is pressed for approximately 10 minutes, the seat temperature is set
to ‘L’, so that power consumption is reduced. When bidet eco mode is activated, the eco
mode indicator on the front is turned on.
- Remote control eco mode: If no remote control button is pressed for approximately 5
seconds, the remote control display is turned off to reduce the power consumption of the
remote control battery.
5. Stainless steel twin nozzle adopted for enhanced hygiene
By adopting Stainless steel nozzles, you can use the product more hygienically. In addition,
the separation of the cleansing nozzle and the bidet nozzle ensures extra hygiene.
6. Wide Water Stream
A widely spread water stream applied to the cleaning water for smoother cleaning.
Additional functions for the BA13-BR/BE
1. Wide function
You can directly select the degree of spread of the cleansing water from a strong flow of
water to a soft, spread-out water flow when using rear and front cleansing.
2. Deodorization function
Once the seat sensor detects a person sitting, the deodorization function automatically
deodorizes odors for 1 minute. After using the bidet, the deodorization function will remain
on for 3minutes ensuring a refreshed feeling.
3. Sterilization function using oxidized silver
This bidet sterilizes the nozzle with oxidized silver sterilizing water.
Contents
1
Product features ...................................01
Contents .....................................................01
Safety precautions ................................02
Part Names ..................................................07
Dimensions ...................................................07
Front / Rear view ...........................................08
Remote control . ............................................08
Installation parts ...........................................09
Check before using your product .....................10
Please keep in mind! .....................................10
Configuring a special mode ..........................11
Checking the control panel ..............................12
Using your bidet ...............................................15
Using the rear nozzle ....................................15
Using the front nozzle ...................................16
Installing your bidet .............................17
Removing existing toilet seat ........................17
Installing the product ....................................17
Installing the remote control wall mount ........19
Cleaning and maintaining your bidet ...............20
Cleaning the nozzles . ...................................20
Cleaning the product body ............................20
Removing the product . .................................21
Cleaning the MESH filter ...............................21
SPECIFICATIONS ...........................................23
troubleshooting ....................................24
warranty CARD..........................................25
1210964 BA13 사용설명서_수출영문_(09.03.23).indd
1
2009.3.24
10:13:5 AM
Safety precautions
IMPORTANT SAFETYGUARDS
Danger: If not observed, serious injury or even death may occur as a result of
electrocution.
WARNING: If these warnings are not observed, considerable physical injury or
property damage may occur as a result of burns, electrocution, fire, or injury.
CAUTION: If these cautions are not observed, slight physical injury or property
damage may occur.
READ ALL INSTRUCTIONS BEFORE USING.
Save these instructions for future reference.
When using electrical products, especially when children are present, basic safety precautions
should always be followed:
Danger:
• Do not use a damaged power plug or loose electric outlet. This may result in electric shock or fire.
• Make sure to use a dedicated electrical outlet. Failing to do so may result in electric shock or fire.
• Do not move the product by pulling the power cord. This may result in electric shock or fire.
• Do not handle the power plug with wet hands. This may result in electric shock or fire.
• Do not forcefully bend the power cord or place heavy objects on it to prevent it from being
damaged or deformed. This may result in electric shock or fire.
• Do not connect and pull out the power plug repeatedly. This may result in electric shock or fire.
• Unplug the product before repairing, inspecting, or replacing parts. Failing to do so may result
in electric shock or fire.
• Remove any dust or water from the power plug. Failing to do so may result in electric shock or fire.
• Do not plug the appliance into an electrical outlet or power strip that is being used by several
other appliances. Use an electrical outlet dedicated to the product. Failing to do so may result
in fire.
• Unplug the system if it is not being used for a long period of time. Failing to do so may result in
electric shock or fire.
• Do not attempt to repair or modify the power cord. This may result in electric shock or fire.
• If the power cord is damaged, do not replace the cord yourself. Call a Coway Service Center to
have it replaced. Failing to do so may result in electric shock or fire.
save these instructions
1210964 BA13 사용설명서_수출영문_(09.03.23).indd
2
2
2009.3.24
10:13:5 AM
Safety precautions
Danger:
• If the product produces a strange noise, a burnt smell, or emits smoke, unplug it immediately
from the electrical outlet and call our service center. Failing to do so may result in electric
shock or fire.
• Do not insert a wire or sharp object in any product gaps or the warm air outlet. This may result
in electric shock, fire, or product damage.
• Do not place an electric heater near the product or dispose of any burning materials such as a
lit cigarette in the toilet. This may result in fire or product deformation.
• Do not place any containers filled with water, medicine, food, any metallic objects, or any
flammable material on top of the product. If foreign material enters the product, this may result
in electric shock or fire.
• Do not use the product in locations exposed to excessive moisture and do not splash water
onto the product. This may result in electric shock or fire.
• Do not use the product if it is not working properly.
※ Please unplug the product immediately, and call our service center after closing the main
water supply valve. Failing to do so may result in electric shock or fire.
• While taking a shower or cleaning the bathroom, pull the power plug out of the electrical outlet
and exercise caution that water or detergent does not splash onto the bidet. Failing to do so
may result in electric shock or fire.
※ If foreign material enters the product, pull the power plug out of the electrical outlet, turn off
the main water valve, and call the Coway Service Center.
• Do not drop the remote control. This may result in product damage or a malfunction.
• Do not separate the seat from the bidet. This may result in electric shock, fire, or product
damage.
• Do not disassemble, repair, or modify the product yourself. This may result in electric shock,
fire, or product damage.
• Do not use the product while bathing.
• Do not place or store the product where it can fall or be pulled into a tub or sink.
• Do not place in or drop the product into water or any other liquid.
• Do not reach for the product if it has fallen into water. Unplug the product immediately.
3
save these instructions
1210964 BA13 사용설명서_수출영문_(09.03.23).indd
3
2009.3.24
10:13:5 AM
Safety precautions
WARNING:
• Do not operate or store the unit in locations where flammable or combustible materials are
used. This may result in electric shock or fire.
• Use main water supply as the supplied water. Industrial water or gray water, if used as supply
water may cause skin damage or disease.
• Do not block the warm air outlet with your hand. This may result in burns or fire.
• Please turn off the main water supply valve when cleaning the filter. Failing to do so may result
in electric shock or product damage.
• For children, the elderly, and those who cannot adjust the temperature themselves or have
sensitive skin, set the warm water temperature and seat temperature to ‘L.’ Failing to do so
may result in low temperature burns.
※ About ‘low temperature burns’: This refers to burns inflicted by making contact with
temperatures around 40 ℃ for an extended period of time).
• Do not press the buttons using excessive force. This may result in product damage or a
malfunction.
• Do not stand or place a heavy object on the seat cover. This may result in product damage or
a malfunction.
• Close supervision is necessary when this product is used by children or persons requiring
general assistance.
• Use this product for its intended use only, as described in this manual. Do not use attachments
not recommended by the manufacturer.
• Never operate this product if it has a damaged cord or plug, if it is not working properly, if it has
been dropped or damaged, or dropped into water. Return the product to a service center for
examination and repair.
• Keep the cord away from heated surfaces.
• Never block the air openings of the product or place it on a soft surface, such as a bed or
couch, where the air openings may be blocked. Keep the air openings free of lint, hair, etc.
• Never use the product while sleeping or when drowsy.
• Never drop or insert any object into any opening or hose.
• Do not use the product outdoors or operate where aerosol (spray) products are being used or
where it could be exposed to oxygen.
• Connect this product to a properly grounded outlet only. Refer to the Grounding Instructions.
• Unplug this product before filling. Fill (reservoir) with water only unless otherwise specified by
the manufacturer. Do not overfill (or specify filling instructions).
save these instructions
1210964 BA13 사용설명서_수출영문_(09.03.23).indd
4
4
2009.3.24
10:13:5 AM
Safety precautions
CAUTION:
• Do not connect the main water to the hot water pipe. This may result in a malfunction or
accident (Make sure to connect it to the cold main water supply pipe).
• After the installation, make sure to check the water supply connections for leaks. Rubber
packing should be applied to the connection hose.
• Do not install the air purifier in a location exposed to direct sunlight. This may result in
deformation or discoloration.
• Do not open/close the seat cover using excessive force or lean on the cover. This may result in
product damage or a malfunction or physical injury.
※ The seat cover closes/opens slowly using the ‘soft opening/closing’ method.
• Exercise caution that urine does not come into contact with the nozzles, air dryer outlet, or the
outside surface of the product. Failing to do so may result in bad odors or malfunctions.
• If the product will not be used for a long period of time, pull the power plug out of the electrical
outlet, close the main water supply valve, and drain the water in the water tank.
• Do not pull out the bidet hose or connection hose using excessive force. This may result in a
leak or malfunction.
• Pull the power plug out of the electrical outlet before cleaning the unit. Do not splash water
directly onto the bidet, or use thinner, benzene, chemicals, or hydrochloric acid detergent. This may result in corrosion to the metal parts or discoloration or scratches to the bidet body.
※ Use a soft cloth or sponge to clean the bidet.
• This appliance is not intended for use by persons [including children] with reduced physical,
sensory or mental capabilities, or lack of experience and knowledge, unless they have been
given supervision or instruction concerning use of the appliance by a person responsible for
their safety. Children should be supervised to ensure that they do not play with the appliance.
5
save these instructions
1210964 BA13 사용설명서_수출영문_(09.03.23).indd
5
2009.3.24
10:13:5 AM
Safety precautions
GROUNDING INSTRUCTIONS
• This product should be grounded. In the event of an electrical short circuit, grounding reduces
the risk of electric shock by providing an escape route (wire) for the electric current. This
product is equipped with a cord consisting of a grounding wire with a grounding plug. The
plug must be plugged into an outlet that is properly installed and grounded.
The improper use of the grounding plug can result in electric shock.
• If the repair or replacement of the cord or plug is necessary, do not connect the grounding
wire to either flat blade terminal. The insulation wire with an outer green surface with or
without yellow stripes is the grounding wire.
• Check with a qualified electrician or service technician if you do not understand the grounding
instructions completely, or if in you are in doubt whether the product is properly grounded.
Grounded
Outlet
Grounding
Pin
• This product is for use on a nominal 120V circuit, and has a
grounding plug that looks like the plug illustrated in Figure 1.
Figure 1
Extension cord
If it is necessary to use an extension cord, use only a three wire extension cord with a threeblade grounding plug, and a three-slot receptacle that will accept the plug of the product.
Replace or repair a damaged cord immediately.
save these instructions
1210964 BA13 사용설명서_수출영문_(09.03.23).indd
6
6
2009.3.24
10:13:6 AM
Part Names
Dimensions
The bidet has the following dimensions.
Do not install the bidet when the dimensions of the bidet differ from those of the toilet.
>> BA13-AR/BR (Round shape)
202 mm 382 mm 411 mm
(7.9 inch)
(15 inch)
(16.2 inch)
202 mm 382 mm 411 mm
(7.9 inch)
(15 inch)
(16.2 inch)
202 mm 382 mm 411 mm
(7.9 inch)
134 mm
350 mm
(5.3 inch)
(13.8 inch)
134 mm
350 mm
(15 inch)
(16.2 inch)
(5.3 inch)
inch)
>> BA13-AE/BE
(Elongated(13.8
shape)
134 mm
350 mm
(5.3 inch)
(13.8 inch)
202 mm 382 mm 411 mm
(7.9 inch)
(15 inch)
(16.2 inch)
202 mm 382 mm 411 mm
(7.9 inch)
(15 inch)
(16.2 inch)
202 mm 382 mm 411 mm
(7.9 inch)
134 mm
385 mm
(5.3 inch)
(15.2 inch)
134 mm
385 mm
(5.3 inch)
(15.2 inch)
134 mm
385 mm
(5.3 inch)
(15.2 inch)
>> Bottom view
(15 inch)
>> Distance between fixing holes
140 mm ~ 210 mm
140 mm ~ 210 mm
(5.5 ~ 8.3 inch)
(5.5 ~ 8.3 inch)
140 mm ~ 210 mm
140 mm ~ 210 mm
(5.5 ~ 8.3 inch)
49 mm (1.9 inch)
(16.2 inch)
(5.5 ~ 8.3 inch)
140 mm ~ 210 mm
140 mm ~ 210 mm
(5.5 ~ 8.3 inch)
(5.5 ~ 8.3 inch)
Rear fixing distance : 164 mm (6.5 inch)
49 mm (1.9 inch)
Rear fixing distance : 164 mm (6.5 inch)
49 mm (1.9 inch)
Rear fixing distance : 164 mm (6.5 inch)
7
1210964 BA13 사용설명서_수출영문_(09.03.23).indd
7
2009.3.24
10:13:7 AM
Part Names
Front / Rear view
1
12
2
3
13
4
14
15
5
7
8
17
6
11
9
10
16
1
2
3
4
5
6
7
8
9
Seat cover
Warning sticker
IR sensor
Nozzle
Seat sensor
Bidet seat
Water tank hose
Bidet hose
Main water supply pipe
Main water supply valve
connector
12 Power cord
13 Product sticker
14 Drain plug
15 Button
16 Installation plate
17 MESH filter
10
11 T-shaped
Remote control
BA13-AR/AE
BA13-A
BA13-BR/BE
BA13-A
BA13-B
BA13-B
8
1210964 BA13 사용설명서_수출영문_(09.03.23).indd
8
2009.3.24
10:13:8 AM
Part Names
Installation parts
1
9
8
2
3
7
4
6
5
10
11
12
13
1
2 fixing screws
9
Bidet hose
2
2 fixing rubbers
10
3
2 fixing washers
4
2 fixing nuts
Remote control wall mount
(including the sticker for
attachment)
11
2 screws
12
2 anchors
5
6
7
8
Installation plate
2 fixing sliders
Rubber packing
13 3
batteries (AAA)
T-shaped connector
9
1210964 BA13 사용설명서_수출영문_(09.03.23).indd
9
2009.3.24
10:13:9 AM
Check before using your product
Please keep in mind!
Connect the power.
Plug the power cord into the electrical outlet. The bidet only works normally when
the electricity is connected.
Tips
T
his product is for 120 V~ / 60 Hz only. Make sure to connect the power plug to a grounded electrical outlet (120 V~ / 60 Hz) dedicated to the product.
Open the main water supply valve.
The bidet only works normally when water is supplied.
Check whether the product is in eco mode before using it.
- If the seat sensor does not detect anyone sitting down or no panel or remote control button is
pressed for approximately 10 minutes, bidet eco mode is activated, the eco mode indicator
is turned on, and the seat temperature is set to ‘L’ to reduce the power consumption of the
product.
- When sitting down on the seat or pressing a panel button, the power indicator is turned on, the eco
mode indicator is turned off and the seat temperature returns to the last configured temperature.
- Even if you sit down on the seat or press a panel button, the power indicator is not turned
on. This means that the power is turned off. In this case, press the power selection button to
turn the power on before using it.
After the installation
Check if water leaks from the main water supply valve or the connecting hose. You must insert the rubber packing between the T-shaped connection pipe and the
main water supply pipe.
Cleaning the filter on a regular basis
C
lean the MESH filter on a regular basis (The cleaning interval may differ
depending on the water quility). If the MESH filter is contaminated by foreign
substances, the filter is blocked or non-filtered cleansing water may be ejected.
If the bidet has not been used for a long time
When the bidet has not been used for a long time, clean the filter and clean each part
of the bidet such as the air dryer outlet, the nozzle and the seat before use (see p.16).
Configure and use a special mode according to your preferences.
Y
ou can configure one of the special modes (eco mode, seat sensor lock mode,
silent mode) according to your preferences (see p.11).
Tips
R
emove the protective film from the operation part before using it.
10
1210964 BA13 사용설명서_수출영문_(09.03.23).indd
10
2009.3.24
10:13:11 AM
Check before using your product
Configuring a special mode
Selecting/cancelling silent mode
1. P
ress and hold down the ‘Power’ and ‘Rear Cleansing’ buttons
simultaneously for at least 1 second when the power cord is plugged into
the electrical outlet (an alarm sound is generated).
2. Set the mode by pressing the ‘Power’ button on the operation part.
- If the power indicator is turned on this indicates that silent mode has been set.
- If the power indicator is turned off, this indicates that silent mode has been
canceled.
3. After setting silent mode, and pressing the ‘Power’ and ‘Rear Cleansing’
buttons simultaneously or no button is pressed for 10 seconds, the
setting is saved and the bidet changes to the standby state (an alarm
sound is generated).
Selecting/cancelling bidet eco mode
1. Press
and hold down the ‘Power’ and ‘Rear Cleansing’ buttons
simultaneously for at least 1 second when the power cord is plugged into
the electrical outlet (an alarm sound is generated).
2. Set the mode by pressing the ‘Rear Cleansing’ button on the operation
part.
- If the eco mode indicator is turned on, this indicates that bidet eco mode has
been set. - If the eco mode indicator is turned off, this indicates that bidet eco mode has
been canceled.
3. After selecting bidet eco mode, and you press the ‘Power’ and ‘Rear
Cleansing’ buttons simultaneously or no button is pressed for 10
seconds, the setting is saved and the bidet changes to the standby state
(an alarm sound is generated).
Selecting/cancelling seat sensor lock mode
1. P
ress and hold down the ‘Power’ and ‘Rear Cleansing’ buttons
simultaneously for at least 1 second when the power cord is plugged into
the electrical outlet (an alarm sound is generated).
2. Set the mode by pressing the ‘Nozzle Cleaning’ button on the operation
part.
- If the seat temp. indicator is turned on, this indicates that seat sensor lock
mode has been set.
- If the seat temp. indicator is turned off, this indicates that seat sensor lock
mode has been canceled.
3. After setting seat sensor lock mode, and pressing the ‘Power’ and
‘Rear Cleansing’ buttons simultaneously or no button is pressed for 10
seconds, the setting is saved and the bidet changes to the standby state
(an alarm sound is generated).
11
1210964 BA13 사용설명서_수출영문_(09.03.23).indd
11
2009.3.24
10:13:13 AM
Checking the CONTROL PANEL
※ You can use the basic functions such as rear cleansing and nozzle cleaning from the bidet’s control panel
without using the remote control.
Display
Control panel
21
51
31
41
3
2
11
1
11
Display
11
51
Remote control signal
receiver
This receives the signals
from the remote control.
21
Remote control signal
receiver
This receives the signals
from the remote control.
31
co mode indicator
E
If you activate the eco function, this
indicator is turned on when eco mode
starts.
41
Seat Temperature indicator
This indicator represents the seat
temperature.
Indicator on - L/M/H
Indicator off - OFF
This indicator is turned off when bidet eco
mode is activated.
This indicator is turned off when bidet eco
mode is activated.
Control panel
1
‘Power’ button
Turns the product ON/OFF.
Press and hold the button for more than
2 seconds when you turn it off.
Power indicator
This indicator is turned on when the
bidet power is turned on.
2 ‘Rear Cleansing’ button
Selects the rear cleansing function.
If the ‘Power’ button is pressed while the front, rear
cleansing function is operating, the cleansing function
is stopped and the bidet changes to standby mode.
3 The ‘Nozzle Cleaning’ button
Cleans the nozzle. If you press ‘Nozzle cleaning’ button, the nozzle is extended fully,
and you can clean it conveniently.
1210964 BA13 사용설명서_수출영문_(09.03.23).indd
12
2009.3.24
12
10:13:14 AM
Checking the CONTROL PANEL
Display / Control panel
Display
Remote control 1
signal transmitter
Control panel
1 ‘Rear’ button
2 ‘Front’ button
3 ‘Stop’ button
4 ‘Dry’ button
5 ‘Move’ button
6 ‘Water Pressure/Dry
Temp.’ button
7 ‘Nozzle Position’
button
‘Water Temp.’ indicator 2
‘Seat Temp.’ indicator 3
8 ‘Wide’ button
‘Wide’ indicator 4
9 ‘Water Temp.’ button
10
‘Seat Temp.’ button
11 ‘Sterilize’ button
12 ‘Deodorize’ button
BA13-B
For the BA13-AR/AE, the ‘Wide’, ‘Sterilize’ and
‘Deodorize’ are excluded.
13
1210964 BA13 사용설명서_수출영문_(09.03.23).indd
13
2009.3.24
10:13:14 AM
Checking the CONTROL PANEL
Display
1
Remote control signal transmitter
Transmits the signal when a remote control
button is pressed.
3
‘Seat Temp.’ indicator
Whenever the ‘Seat Temp.’ button is
pressed, the temperature control indicator
cycles through the following options: L(Blue) M(Pink) H(Red)Off.
21
‘Water Temp.’ indicator
Whenever the ‘Water Temp.’ button is
pressed, the temperature control indicator
cycles through the following order:
L(Blue) M(Pink) H(Red) Off.
4
‘Wide’ indicator
Whenever the ‘Wide’ button is pressed,
the indicator cycles through the following
options: Straight line (Blue) Level1(Pink)
Level2(Red).
※ For the BA13-BR/BE only
2
‘Front’ button
Use this button to use the front cleansing
function for women.
Control panel
1
‘Rear’ button
Use this button to use the rear cleansing
function.
3 ‘Stop’ button
4 ‘Dry’ button
5 ‘Move’ button
6 ‘Water Pressure/Dry Temp.’ button
All currently operating functions will stop.
Use this button to use the move function.
If you press the ‘Move’ button, as the
nozzle is moved back and forth while
you operate the rear cleansing/front
cleansing function, you can clean a
wider area.
7 ‘Nozzle Position’ button
Use this button to control the nozzle
position during the rear cleansing/front
cleansing operation. You can move
the nozzle in 5 levels using the ‘Nozzle
Position’ button.
9
‘Water Temp.’ button
Use this button to control the water
temperature. Whenever the ‘Water
Temp.’ button is pressed, you can control
the water temperature in 4 levels (L M
H Off).
11 ‘Sterilization’ button
Use this button to perform the
sterilization function. Sterilizing water is
ejected for 30 seconds to sterilize and
clean the nozzle.
※ For the BA13-BR/BE only
Use this button to use the drying
function. It helps the drying process after
using the rear cleansing/front cleansing
function.
You can control the water pressure
in 3 levels (L M H) and control the air
dryer temperature in 4 levels (L M
H OFF) using the Water ‘Pressure/Dry
Temp.’ button.
You can control the water pressure when
operating the rear cleansing/front cleansing
functions and control the air dryer temperature
when operating the drying function.
8 ‘Wide’ button
Use this button to control the water
ejection range when using the cleansing
function. You can select the angle of the
water in 3 levels using the Wide function
button (Straight Line Level 1 Level 2).
Whenever this button is pressed, the
Wide function indicator turns a different
color.
※ For the BA13-BR/BE only
10 ‘Seat Temp.’ button
Use this button to control the seat
temperature. Whenever the ‘Seat Temp.’
button is pressed. You can control the
seat temperature in 4 levels (L M H
Off).
12 ‘Deodorization’ button
Use this button to perform the
deodorization function. When you press
this button, the deodorization function is
performed for approximately 1 minute.
※ For the BA13-BR/BE only
14
1210964 BA13 사용설명서_수출영문_(09.03.23).indd
14
2009.3.24
10:13:15 AM
Using your bidet
Using the rear nozzle
Using the rear nozzle
1. Sit down on the seat and press the ‘Rear Cleansing’ button on the operation part.
2. Self-cleaning for the rear cleansing nozzle is performed, removing the cold water remaining
inside the nozzle before the water stream is ejected so that the water can be set to a desired
temperature for cleansing.
T
he cleansing water ejection time may be delayed while the above functions are performed.
Tips
3. The cleansing water is ejected for approximately 1 minute and then stops automatically.
4. Self-cleaning for rear cleansing nozzle is performed for approximately 5 seconds after rear
cleansing. Then the nozzle retracts itself.
5. You can adjust the nozzle position by pressing the ‘Nozzle Position’ button.
6. You can adjust the water ejection angle by pressing the ‘Wide’ button (for the BA13-BR/BE
only).
If the ‘Rear Cleansing’ button is pressed again during the cleansing operation, the rear
cleansing function operates for another 1 minute.
Tips
W
hile cleansing, users can adjust the water temperature, water pressure, and nozzle
position according to their preferences.
Y
ou can not increase the water pressure level higher than level 2 if your area is in the
following conditions.
- Main water supply temperature under 10 ℃ and rated power source under 110 V~.
If the seat sensor does not detect a human body, the bidet will not work.
Moving
Press the ‘Move’ button on the operation part.
- The nozzle moves back and forth, providing a wider range of cleansing.
This will operate for as long as the rear cleansing function continues.
To stop the move function, press the ‘Move’ button once again.
You can control the nozzle position by pressing the ‘Nozzle Position’ button.
Drying
Press the ‘Dry’ button on the operation part.
- Warm air is emitted for approximately 2 minutes.
If you wipe off the water lightly before turning on the air dryer, drying will finish faster.
If you press the ‘Dry’ button again during the operation, additional drying starts for another 2 minutes.
You can control the air temperature by pressing the ‘Dry Temp.’ button.
If you press the ‘Dry’ button while cleansing, cleansing is stopped and drying starts immediately.
Stopping
To stop the current operation, press the ‘Stop’ button.
- This stops all currently operating functions.
The drying function stops 2 seconds after the ‘Stop’ button is pressed.
15
1210964 BA13 사용설명서_수출영문_(09.03.23).indd
15
2009.3.24
10:13:15 AM
Using your bidet
Using the front nozzle
Using the front nozzle
1. Sit down on the seat and press the ‘Front Cleansing’ button on the operation part.
2. Self-cleaning for the front cleansing nozzle is performed, removing the cold water remaining
inside the nozzle before the water stream is ejected so that the water can be set to a desired
temperature for cleansing.
T
he cleansing water ejection time may be delayed while the above functions are performed.
Tips
3. The cleansing water is ejected for approximately 1 minute and then stops automatically.
4. Self-cleaning for rear cleansing nozzle is performed for approximately 5 seconds after front
cleansing. Then the nozzle retracts itself.
5. You can adjust the nozzle position by pressing the ‘Nozzle Position’ button.
6. You can adjust the water ejection angle by pressing the ‘Wide’ button (for the BA13-BR/BE
only).
If the ‘Front Cleansing’ button is pressed again during the cleansing operation, the front
cleansing function operates for another 1 minute.
Tips
W
hile cleansing, users can adjust the water temperature, water pressure, and nozzle
position according to their preferences.
Y
ou can not increase the water pressure level higher than level 2 if your area is in the
following conditions.
- Main water supply temperature under 10 ℃ and rated power source under 110 V~ .
If the seat sensor does not detect a human body, the bidet will not work.
Moving
Press the ‘Move’ button on the operation part.
- The nozzle moves back and forth, providing a wider range of cleansing.
This will operate for as long as the front cleansing function continues.
To stop the move function, press the ‘Move’ button once again.
You can control the nozzle position by pressing the ‘Nozzle Position’ button.
Drying
Press the ‘Dry’ button on the operation part.
- Warm air is emitted for approximately 2 minutes.
If you wipe off the water lightly before turning on the air dryer, drying will finish faster.
If you press the ‘Dry’ button again during the operation, additional drying starts for another 2 minutes.
You can control the air temperature by pressing the ‘Dry Temp.’ button.
If you press the ‘Dry’ button while cleansing, cleansing is stopped and drying starts immediately.
Stopping
To stop the current operation, press the ‘Stop’ button.
- This stops all currently operating functions.
The drying function stops 2 seconds after the ‘Stop’ button is pressed.
16
1210964 BA13 사용설명서_수출영문_(09.03.23).indd
16
2009.3.24
10:13:15 AM
Installing your bidet
Removing existing toilet seat
1. Remove the existing toilet seat ① and seat cover ② by removing the fixing
nuts.
2
1
Tips
K
eep the removed toilet seat in a shaded location to prevent it from being damaged.
Installing the product
A
s the bidet should be installed on the toilet, ensure that water is not splashed onto the bidet.
Tips
T
here may be some water remaining inside the filter which was used to test the product
during the inspection process at the factory. This does not mean that the product was
previously used.
Cold main water supply
Caution
M
ake sure that the bidet is connected to the cold water pipe. (If the product is connected to the hot water pipe, this may damage the filter and hose).
1. Turn off the main water supply valve ① and separate the existing water
tank hose ②.
2
1
2. Connect the rubber packing, T-shaped connector, and water tank hose in
this order to the existing water pipe. Please connect the bidet hose to the
T-shaped connector.
Please ensure that the rubber packing is inserted between the water pipe and
the T-shaped connector. Firmly tighten the nuts below and on top of the T-shaped connector all the way
to the end in a clockwise direction.
17
1210964 BA13 사용설명서_수출영문_(09.03.23).indd
17
2009.3.24
10:13:16 AM
Installing your bidet
Installing the product
3. P
lace the fixing slider over the installation plate on the toilet, insert the
fixing bolts, and fasten the nuts so that the installation plate is fixed.
4. Align the back of the bidet to the installation plate and push the bidet
backwards while pressing the button to the left of the bidet. (Hold the bidet
with both hands and push it backwards until it clicks into place).
Check if the bidet moves to the left or right. If it moves, fasten the fixing nuts
again.
5. Connect the bidet hose to the side of the bidet.
Make sure that the bidet hose is firmly connected. If the main water supply valve
is opened when the hose is not connected properly, the bidet hose may become
separated and cause water to splash, resulting in injury.
Take care that the bidet hose is not excessively bent by twisting it.
6. Open the main water supply valve.
7. Connect the power cord to the electrical outlet.
M
ake sure to use a grounded electrical outlet. In the case of a short
circuit, grounding prevents electric shock or injury.
Caution
M
ake sure to use a dedicated electrical outlet with grounding
terminals.
If using an extension cord is unavoidable, use one with grounding
terminals for 120 V~ / 60 Hz or higher.
18
1210964 BA13 사용설명서_수출영문_(09.03.23).indd
18
2009.3.24
10:13:18 AM
Installing your bidet
Installing the remote control wall mount
M
ake sure to install the remote control wall mount on the wall using the supplied screws.
Failing to do so may result in the product falling and being damaged.
Tips
If the bathroom has 3 sides in a black or similar color, use the remote control while fixing
it to the wall holder.
F
ailing to do so may result in the product not working properly due to the remote control
signal reception ratio being too low.
1. P
lace the remote control wall mount over the required position on
the wall and mark the 2 points for the anchors on the wall.
2. Drill 2 holes with a depth of approximately 35 mm at the marked points.
U
se a drill bit with a diameter of ∅ 6.5 mm.
3. Insert the anchors into the holes and push them all the way in.
4. Remove the 2 pieces of protective film from the back of the remote
control wall mount, and attach the mount to the wall aligning the holes
with the anchors in the wall.
5. Place the remote control into the mount as shown by the figure.
19
1210964 BA13 사용설명서_수출영문_(09.03.23).indd
19
2009.3.24
10:13:19 AM
Cleaning and maintaining your bidet
Cleaning the nozzles
If excessive force is exerted on the nozzles when cleaning them, the nozzles may no
longer work properly or break. Hold the nozzles lightly when cleaning them.
W
hen cleaning the nozzles, Nozzle cleaning water is emitted. (However, when main
water supply is not supplied (main water supply stop status), no nozzle cleaning water is
emitted and only the nozzle is extended).
Tips
1. P
ress the ‘Nozzle Cleaning’ button on the operation part to the right of the
bidet.
- Nozzle cleaning water is sprayed and the front nozzle is fully extended.
- Clean the front nozzle.
2. Press the ‘Nozzle Cleaning’ button on the operation part again.
- Nozzle cleaning water is sprayed, the front nozzle retracts itself, and rear nozzle
is extended fully.
- Clean the rear nozzle.
3. If you press the ‘Power’ button or the ‘Nozzle Cleaning’ button on the operation
part again after cleaning the nozzles, nozzle cleaning water is sprayed, and the
rear nozzle retracts itself.
- If no button is pressed for 2 minutes after the nozzle cleaning starts, the nozzle
retracts itself automatically.
Cleaning the product body
Apply a neutral detergent to a soft cloth or sponge and clean the product.
- Failing to do so may result in deformation or product damage.
Tips
Do
not use thinner or benzene. Do not clean the product using a coarse scrub or abrasive detergent.
20
1210964 BA13 사용설명서_수출영문_(09.03.23).indd
20
2009.3.24
10:13:21 AM
Cleaning and maintaining your bidet
Removing the product
1. Unplug the power cord from the electrical outlet.
2. Close the main water supply valve.
3. P
ull the product forwards by holding both sides of the product while
pressing the button at the bottom left of the product, to separate the product from the installation plate.
Tips
Unplug the product if it will not be used for a long time.
4. Remove the drain plug at the back of the bidet by turning it
counterclockwise by 90 degrees ① and then pulling it forwards ② so that
the water in the hot water tank is drained into the toilet.
1
2
Cleaning the MESH filter
1. Separate the product from the installation plate.
- Refer to Removing the product (1~3).
2. Remove the MESH filter at the bottom left of the product.
- Remove the MESH filter by turning it with a ‘+’ screw driver.
21
1210964 BA13 사용설명서_수출영문_(09.03.23).indd
21
2009.3.24
10:13:22 AM
Cleaning and maintaining your bidet
Cleaning the MESH filter
3. Clean the MESH filter by shaking it under flowing water.
- Removing foreign substances from the MESH filter with a toothbrush is more
effective.
- Do not clean the MESH filter excessively, as it may damage the MESH.
4. Reinstall the cleaned MESH filter into the product.
- Check that the MESH filter is installed correctly.
- If you open the main water supply valve when the MESH filter is not
completely installed, water leakage may occur.
W
hen not using the product for a long period of time,
clean the filter before using the product again.
Tips
T
he filter cleaning interval may differ depending on the
water quality.
22
1210964 BA13 사용설명서_수출영문_(09.03.23).indd
22
2009.3.24
10:13:23 AM
SPECIFICATIONS
Product name
Coway Bidet
Model no.
BA13-AR/AE/BR/BE
Standard power voltage
120 V~ 60 Hz
Power consumption
1 200 W
Supply water pressure
0.11 MPa - 0.68 MPa
Dimensions
BA13-AR/BR
382 mm (Width) × 493 mm (Depth) × 144 mm (Height)
BA13-AE/BE
382 mm (Width) × 528 mm (Depth) × 144 mm (Height)
Weight
Maximum 0.5 L/min, automatic nozzle self-cleaning function
Front cleansing
Maximum 0.5 L/min, automatic nozzle self-cleaning function
Standard time
Warm water
Water pressure control
cleansing
device
Warm water temperature control
Air dryer
device
6 kg - 6.5 kg
Rear cleansing
Rear cleansing 1 minute, front cleansing 1 minute, drying 2 minutes
3 levels Micom control
4 levels (Off : Room temperature, L : 31.5 ℃, M : 34.5 ℃, H : 37.5 ℃)
Power consumption by heater
1 250 W
Safety devices
Bimetal, temperature sensor,
temperature fuse (overheating prevention), micro switch
Warm air temperature control
4 levels (Off : Room temperature, L, M, H)
Standard time
Drying for 2 minutes
Power consumption by heater
180 W
Safety devices
Bimetal, temperature fuse (overheating prevention)
Seat temperature control
4 levels (Off : Room temperature, L : 31 ℃, M : 34 ℃, H : 37 ℃)
Heated seat Power consumption by heater
MESH filter
60 W
Safety devices
Bimetal, temperature fuse (overheating prevention)
Specifications
25.2 mm (Length) × 19.8 mm (Ø)
Installation parts
T-shaped connector, Bidet hose, Installation plate, 2 fixing screws,
2 fixing rubbers, 2 fixing washers, 2 fixing nuts, 2 fixing sliders, 2 screws,
2 anchors, 3 batteries (AAA), Remote control wall mount
Other functions
Instant warm water system, AIR+water stream, MESH filter,
Eco mode, Stainless steel twin nozzle
(The Wide, Deodorization and Sterilization functions are supported
for the BA13-BR/BE only)
Operating temperature
0 ℃ - 40 ℃
M
anufacturer: Woongjin Cuchen Co., Ltd.
T
he specifications are subject to change without prior notice for reasons of improving the product
performance.
23
1210964 BA13 사용설명서_수출영문_(09.03.23).indd
23
2009.3.24
10:13:23 AM
TROUBLESHOOTING
The bidet may operate abnormally due to minor causes not because of a product malfunction but
because the user is unfamiliar with using the product. In such a case, problems can be easily solved
even without the help of the Service Center by checking the following. If you cannot solve the problem
after checking the following items, please call the Service Center.
PROBLEM
SOLUTION
The product is not
working.
• Make sure the bidet is plugged in.
• Check if there was a power failure.
• Check if the remote control batteries are flat. Replace them if necessary.
No water is ejected.
• Make sure the water valve is opened.
• Clean foreign material from the nozzle outlet holes using a toothbrush.
• Make sure the water supply is running.
The water pressure is
weak.
• Make sure that the water pressure is not too low.
• Clean foreign material from the nozzle outlet hole using a toothbrush.
• Remove, clean and then reinstall the filter (refer to p.21)
The seat or the water
is not warm.
• Make sure that the seat and water temperature control buttons are set to the ‘ON’
status. Please adjust the setting to the correct temperature by pressing the seat
temperatre button or the water temperature button.
• This bidet has a bimetal as one of safety device for water heater. The safety device
may cycle ‘OFF’ if temperature exceeds over normal level. In the event of the safety
device operation, the bidet do not work and show error message until the appliance
cool down and then the bimetal will automatically reset. If the error message shows
up, you can restart the bidet by pressing any button of remote control.
The air from the air
dryer is cold.
• During the drying operation. Adjust the temperature by pressing the air dryer
temperature control button.
Water leaks from
areas other than the
nozzles.
• If water is leaking from the T-shaped connector, make sure that the rubber packing
is inserted into the T-shaped connector, and firmly tighten the nut again.
• If water is leaking from the bidet hose connection, make sure that the bidet hose is
connected completely.
• If water is leaking from the filter, check if there is any foreign material between the
filter and the product.
• In this case, install the filter completely or reinstall the filter after cleaning it. Check whether the filter is damaged. If the filter is damaged, call our service center.
Water is emitted while
the bidet is not in use.
• The water that comes out between the nozzles after cleansing is for cleaning the
nozzles, and is not a malfunction.
• In some cases, water remaining around the nozzles may drip into the toilet. This is
not a malfunction.
The bidet does
not work when
the buttons on the
operation part are
pressed.
• If the seat sensor cannot detect that you are seated because you are too far away,
functions do not work.
W
hen bidet eco mode is set, you may feel that the seat is relatively cold when taking a
seat. If bidet eco mode is cancelled, the last set temperature is maintained.
Tips
F
or cancelling bidet eco mode, see page 11.
If the bidet or remote control is flooded, it may cause a malfunction or other problem.
24
1210964 BA13 사용설명서_수출영문_(09.03.23).indd
24
2009.3.24
10:13:23 AM
Model:
Serial Number:
Customer Name:
Date of Purchase:
WARRANTY CARD OR WARRANTY LETTER
ONE YEAR LIMITED WARRANTY
BIDET BA13-AR/AE/BR/BE (‘PRODUCT’)
(‘OWNER’)
What This Warranty Covers:
Limitations and Exclusions:
Commencing with the date of purchase of the
Product and continuing for a period of one year,
if manufacturing defects in the Product cause the
Product to not operate properly for its intended
use, then subject to the exclusions, conditions, and
limitations contained herein, COWAY at its sole
TO THE EXTENT PERMITTED BY APPLICABLE
LAW, COWAY DISCLAIMS ANY OTHER
WARRANTY EXPRESS OR IMPLIED, THAN THAT
PROVIDED FOR HEREIN. THIS WARRANTY
IS IN LIEU OF AND EXCLUDES ALL OTHER
WARRANTIES, GUARANTEES, CONDITIONS
AND REPRESENTATIONS, EXPRESS OR
IMPLIED, ORAL OR WRITTEN, STATUTORY
OR OTHERWISE, INCLUDING BUT NOT
LIMITED TO ANY IMPLIED CONDITIONS OR
WARRANTIES AS TO THE MERCHANTABILITY
OR FITNESS FOR A PARTICULAR PURPOSE
OF THE COWAY PRODUCT. SOME STATES
DO NOT ALLOW LIMITATIONS ON HOW
LONG AN IMPLIED WARRANTY LASTS, SO
THE ABOVE LIMITATION MAY NOT APPLY TO
YOU. COWAY DOES NOT AUTHORIZE ANY
PERSON INCLUDING ITS REPRESENTATIVES,
TO MAKE ANY REPRESENTATION OR TO
OFFER ANY WARRANTY, CONDITION OR
GUARANTY IN RESPECT OF THE PRODUCT
OTHER THAN THIS WARRANTY. THIS LIMITED
WARRANTY SHALL BE THE OWNER’S SOLE
AND EXCLUSIVE REMEDY AGAINST COWAY
AND COWAY SHALL NOT BE LIABLE FOR ANY
CONSEQUENTIAL, EXEMPLARY, SPECIAL,
INCIDENTAL OR OTHER DAMAGES INCLUDING,
BUT NOT LIMITED TO, LOSS OF PROFITS, AND
LOSS OF USE. INCIDENTAL, CONSEQUENTIAL
AND EXEMPLARY DAMAGES SHALL NOT
BE RECOVERABLE EVEN IF THE REMEDIES
OR THE ACTIONS PROVIDED FOR IN THIS
WARRANTY FAIL OF THEIR ESSENTIAL
PURPOSE. SOME STATES DO NOT ALLOW THE
EXCLUSION OR LIMITATION OF INCIDENTAL OR
CONSEQUENTIAL DAMAGES, SO THE ABOVE
LIMITATION OR EXCLUSION MAY NOT APPLY
TO YOU. COWAY SHALL NOT BE LIABLE FOR
ANY DAMAGES WHICH ARE BASED UPON
NEGLIGENCE, BREACH OF WARRANTY, STRICT
LIABILITY OR ANY OTHER LEGAL THEORY
OF LIABILITY OTHER THAN THE EXCLUSIVE
LIABILITY SET FORTH IN THIS WARRANTY.
option will repair or replace the Product.
Decisions as to the extent of repair or replacement
required will be made solely by COWAY.
The remedy under this Warranty is available only for
that portion of the Product exhibiting defects at the
time of the warranty claim. The replacement Product
as well as any remaining original Product will be
warranted only for the original one year warranty
period. This limited warranty applies only to Product
used for an application specified by COWAY for
the Product and applied in strict accordance with
COWAY published specifications in effect at the
time of application. IF PRODUCT IS USED FOR
OTHER THAN ITS INTENDED PURPOSE, IT
IS SOLD AS IS AND WITHOUT ANY EXPRESS
OR IMPLIED WARRANTIES, INCLUDING OF
MERCHANTABILITY OR FITNESS FOR A
PARTICULAR PURPOSE.
What This Warranty Does Not Cover:
This Warranty warrants that the Product will be free
from manufacturing defects which affect the ability
of the Product to operate for its intended use; it is
not a warranty that the Product will never require
repairs or to undertake responsibilities, liabilities or
obligations other than those specifically identified in
the preceding section.
COWAY is not responsible or liable for personal
injury or property damage of any kind, even if
arising from a breach of this Warranty.
25
1210964 BA13 사용설명서_수출영문_(09.03.23).indd
25
2009.3.24
10:13:23 AM
Limitations on Implied Warranties:
Any implied warranty of merchantability or fitness for
a particular purpose or use, shall be limited to the
Waiver:
COWAY’s failure at any time to enforce or rely upon
any of the terms or conditions stated herein shall not
duration of the foregoing express written warranty.
be construed to be a waiver of its rights hereunder.
Conditions of Warranty:
Obtaining Warranty Service and OWNER’S
Duties:
COWAY’s continuing liability under this Warranty is
conditioned upon the following:
a) The defect or damage is not caused by or is the
result of : abnormal use or conditions; improper
storage, unauthorized modifications or repair;
misuse, neglect, accident, alteration, improper
installation or other acts that are not the fault
of Coway or the manufacturer of the product
or that are not covered by the manufacturer’s
warranty;
b) The Product has not been altered, modified
or repaired without prior written approval of
COWAY;
c) The OWNER has notified COWAY in writing
of any failure of the Product covered by this
Warranty within thirty (30) days following such
failure;
d) There has been no misuse, abuse or
negligence with respect to the Product on the
part of the OWNER.
If the Product fails to operate for its intended
purpose, then notify COWAY at (852)2334-5660,
within 48 hours or within the next business day after
discovery of any defect in the Product. The OWNER
must give written notice to COWAY no later than thirty
(30) days after a defect is discovered or should by
reasonable diligence have been discovered. Claims
under this Warranty will require proof of purchase by
the OWNER.
COWAY is not responsible for any claims without
such proof of purchase. Should the alleged failure
or the remedy sought by the OWNER lie outside the
scope of this Warranty, OWNER agrees to promptly
reimburse COWAY for the cost of any investigation
requested by OWNER, including remedy costs, plus
a COWAY administrative fee.
26
1210964 BA13 사용설명서_수출영문_(09.03.23).indd
26
2009.3.24
10:13:24 AM
1210964
001
Made in Korea www.coway.com
1210964 BA13 사용설명서_수출영문_(09.03.23).indd
27
2009.3.24
10:13:24 AM