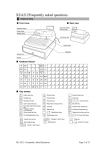
1
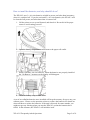
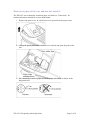
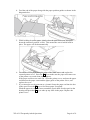
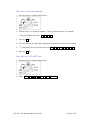
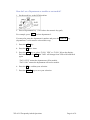
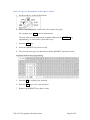
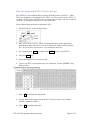
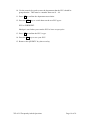
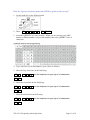
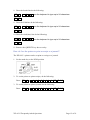
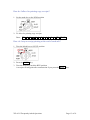
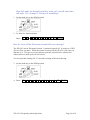
XEA213Frequently asked questions. How do I prepare my XEA213 for set-up? Take the XEA213 out of its box, remove the packing materials. Place the XEA213 on a flat stable surface, close to a power outlet. Also insure it will not be exposed to direct sunlight, and is away from water (taps, sinks, etc). How do I clear the XEA213 to ready it for programming? It is very important that you “initialise” the XEA213 correctly once you have removed it from the box, and are ready to start programming. If you do not “initialise” the XEA213, it might not work correctly. 1. Insert the MA key into the mode switch and turn it to the REG position. 2. Insert the plug of the power cord into a power outlet. This must be done without the batteries installed. If you have installed batteries; be sure to remove them before you start this procedure. The display will show: *** MRS. *** for about six seconds. The buzzer will then sound three times. If the buzzer does not sound three times, please try again. The cash register has now been “initialised”. If there were any data from a previous programming attempt it would have been cleared. The display should now show: NO BATTERY. XE-A213 Frequently Asked Questions Page 1 of 19 How to install the batteries, and why should I do so? The XEA213 uses 3 x AA size batteries to hold its preset, and sales data in memory when it is switched off. If you do not install 3 x AA size batteries; the XEA213 will be cleared of all preset, and sales data when it is turned off. 1. Lift the printer cover up and forward, and detach it. Be careful of the paper cutter to avoid cutting yourself. 2. Open the battery compartment cover next to the paper roll cradle. 3. Install 3 alkaline AA size batteries. When the batteries are properly installed the “No Battery” message on the display will disappear. 4. Close the battery compartment cover. A set of new alkaline batteries once installed will keep the memory for up to one year without power. Please see the question on how to replace the batteries for details on when and how to replace the batteries. If the unit is not used for some months, you might not get any warning when you turn the XEA213 on that the batteries have failed. In this instance, the XEA213 will initialise itself. XE-A213 Frequently Asked Questions Page 2 of 19 What sort of paper roll do I use, and how do I install it? The XEA213 uses a thermally sensitised paper roll which is: 57mm wide. Its maximum diameter should be no more than 80mm. 1. Remove the print cover; be careful not to cut yourself on the paper cutter. 2. Lift up the green print roller release lever to unlock and open the print roller arm. 3. Set a thermally sensitive paper roll in the paper roll cradle as shown in the diagram below: XE-A213 Frequently Asked Questions Page 3 of 19 4. Feed the end of the paper along with the paper position guides as shown in the diagram below. 5. While holding down the paper, slowly close the print roller arm, and push down the arm until you hear a click. This means the arm is locked back in place. The paper will feed automatically 6. Cut off the excess paper using the edge of the inner cover, and replace the external printer cover. Press the key to make sure the paper end comes out of the printer cover and clean paper appears. If the paper end does not come out. Open the printer cover, and pass the paper end between the paper cutter and the paper guide of the printer cover, and replace the cover. 7. If you intend to use the print out as a journal: Insert the paper end into the slot in the spool. Press the key to feed more paper if required. Wind the paper two or three turns around the spool shaft. Set the spool on the bearing and press the key to take up any slack in the paper. Replace the printer cover. XE-A213 Frequently Asked Questions Page 4 of 19 How do I set the time and date? 1. Set the mode key to the PGM position. 2. Enter the time as a four digit number. Use the 24 hour format. For example 2:30pm would be entered as 1 4 3 0 3. Press the # key 4. Enter the date as an eight digits using the day-month-year format. For example 5. 7th of December 2010 would be entered as 0 7 1 2 2 0 1 0 6. Press the # key How do I set a 10% GST rate? 1. Set the mode key to the PGM position 2. Enter: ST 9 1 1 0 XE-A213 Frequently Asked Questions ST TL/NS Page 5 of 19 How do I set a Department as taxable or not taxable? 1. Set the mode key to the PGM position 2. Press a Department key (1 to 6 above the numeric key pad) For example, press _2_ to select department 2. You may also enter the department’s number and press the _DEPT#_ key (departments 7 to 99 must be selected this way) 3. Press the _00_ key 4. Press the ST three times 5. Press the _00_ key to select “TAX 1 YES” or “TAX 1 NO on the display. Each time you press _00_ the TAX1 will change from YES to NO and back again. “TAX 1 YES” means the department will be taxable. “TAX 1 NO” means the department will not be taxable. 6. Press the ST to confirm your selection. 7. Press the TL/NS key to save your selection. XE-A213 Frequently Asked Questions Page 6 of 19 How do I set the letters GST to print on the receipt? 1. Set the mode key to the PGM position 2. Enter: ST 3 _●_ 9 __ G S _T ST TL You can enter characters with the QWERTY key sheet overlay. 3. Remove the QWERTY key sheet overlay How do I set the $ symbol to print on receipts? 1. Set the mode key to the PGM position 2. Insert the QWERTY key sheet overlay 3. Enter: ST 8 5 _●_ SPACE SPACE SPACE _$_ ST TL/NS Use the QWERY keyboard overlay as shown above the enter the 3 spaces and the $ symbol. 4. Remove the QWERTY key sheet overlay. XE-A213 Frequently Asked Questions Page 7 of 19 How do I give a department a descriptive name? 1. Set the mode key to the PGM position 2. Press a Department key (1 to 6 above the numeric key pad) For example press _2_ to select department 2. You may also enter the department’s number and press the _DEPT#_ key (departments 7 to 99 must be selected this way) 3. Press the _00_ key 4. Insert the QWERTY key sheet overlay 4. You can now enter up to 16 characters with the QWERTY keyboard overlay. 5. Press the ST to confirm your selection. 6. Press the TL key to save your selection. 7. Remove the QWERTY key sheet overlay XE-A213 Frequently Asked Questions Page 8 of 19 How do I program the PLUs? (Price Look Ups) The XEA213 is set at Master Reset (Factory Default) to have 210 PLUs. These PLUs are assigned to 3 keyboard levels. PLUs 1 to 70 are on level one. PLUs 71 to 140 are on level two, and PLUs 141 to 210 are on level three. PLUs are used to “look up”, a description and price for often sold items. Please follow the steps below to program a PLU 1. Set the mode key to the PGM position 2. Press a PLU key (1 to 70). These are the number keys to the right of the numeric key pad). If the PLU is on level 2 press the L2 key before the PLU key. If it is on level 3 press the L3 key before the PLU key 3. For example press _1_ to right of the TL/NS key to select PLU 1. 4. Press the _00_ key. 5. Insert the QWERTY key sheet overlay 6. Type in you PLU’s description, up to 16 characters. Use the QWERTY key sheet overlay. 7. Press ST to confirm the description. 8. Use the numeric key pad to enter the PLU’s price in cents. For example $14.00 is entered as 1400 9. Press ST to confirm the price. XE-A213 Frequently Asked Questions Page 9 of 19 10. Use the numeric key pad to enter the department that the PLU should be grouped under. This must be a number between 01 – 99. 11. Press ST to confirm the department association. 12. Press the _00_ key to switch between the two PLU types: PLU or SUBDDEPT. Subdept is used when you want the PLU to have an open price. 13. Press ST to confirm the PLU’s type. 14. Press the TL key to save your PLU 15. Remover the QWERTY key sheet overlay XE-A213 Frequently Asked Questions Page 10 of 19 How do I get my business name and ABN to print on the receipt? 1. Set the mode key to the PGM position 2. Enter: ST 1 1 __ 3 ST TL/NS 3. Insert the QWERTY key sheet overlay. When you are entering your ABN number or Phone number, only use the numbers above the QWERTY line of characters. 4. Type each line of your information, up to 6 lines as follows: 5. Enter the Top (first) line do the following: ST 4 _●_ 1 ST TL __ use the keyboard to type up to 24 characters 6. Enter the second line do the following: ST 4 _●_ 2 ST TL __ use the keyboard to type up to 24 characters 7. Enter the third line do the following: ST 4 _●_ 3 ST TL __ use the keyboard to type up to 24 characters XE-A213 Frequently Asked Questions Page 11 of 19 8. Enter the fourth line do the following: ST 4 _●_ 4 ST TL __ use the keyboard to type up to 24 characters 9. Enter the Fifth line do the following: ST 4 _●_ 5 ST TL __ use the keyboard to type up to 24 characters 10. Enter the sixth (last) line do the following: ST 4 _●_ 6 ST TL __ use the keyboard to type up to 24 characters 11. Remove the QWERTY key sheet overlay. How do I set the printer to print a receipt or a journal? The XEA213’s printer can be set print: a receipt, or a journal. 1. Set the mode key to the PGM position 2. To set the printer to print receipts, do the following: Enter: ST 6 1 1 0 0 0 1 1 1 ST TL/NS 3. To set the printer to print a journal, do the following: Enter: ST 6 0 1 0 0 0 1 1 1 ST XE-A213 Frequently Asked Questions TL/NS Page 12 of 19 How do I allow for printing copy receipts? 1. Set the mode key to the PGM position 2. To allow for printing copy receipts: Enter: ST 6 3 0 1 0 1 0 0 0 1 ST TL/NS How do I stop a receipt printing at the end of each sale? 1. Turn the Mode key to OP X/Z position 2. Press the -RCPT- key 3. Turn the mode key back the REG position A receipt will only print after a transaction if you press the -RCPT- key. XE-A213 Frequently Asked Questions Page 13 of 19 How do I make the decimal point key work; so I can sell other than full units. For: example 2.5 meters of something? 1. Set the mode key to the PGM position 2. To allow for fractional units: Enter: ST 5 0 0 0 0 0 0 0 0 ST TL/NS How do I turn off the Electronic Journal full error message? The XEA213 has an Electronic Journal. It cannot be turned off. It works on a FIFO (First in First out) basis. When the journal is nearly full the XEA213 will warn you that this is so. This gives you the option to print the journal before it deletes the oldest entries to make space for the newest. You can turn this warning off. To turn this warning off do the following: 3. Set the mode key to the PGM position 4. Enter: ST 6 -8 - 0 0 1 0 0 0 1 0 ST XE-A213 Frequently Asked Questions TL/NS Page 14 of 19 How shall I know when it is time to replace the batteries? The XEA213 will display a low battery warning message “LOW BATTERY” when the batteries are near to the end of their life. It will display the warning message “NO BATTERY” when the batteries are past the end of their life, or are not installed. The “LOW BATTERY” warning message is normally displayed about 2 days before the end of the batteries’ life. You should arrange to the replace the batteries within this period to reduce the chance of losing programming and sales data from your XEA213. If you see “NO BATTERY” displayed it is important that you do not turn the XEA213 off until you have replaced the batteries. If you do turn it off before you have replaced the batteries; you will loose all your programming and sales data. To replace the batteries, do the following. 1. Make sure the XEA213 is plugged in. 2. Remove the printer cover. 3. Open the battery compartment cover next to the paper roll cradle, and remove the old batteries. 4. Install three (3) new alkaline batteries (AA size), in the battery compartment. Be sure the positive and negative poles of each battery are facing in the correct direction. When they are installed correctly, the low battery or no battery message will disappear. 5. Close the battery compartment cover. 6. Replace the printer cover. XE-A213 Frequently Asked Questions Page 15 of 19 How do I make a sale? 1. Turn the mode key to REG 2. Sign on a clerk. For example to sign on clerk 1 enter: 1 CLK# 3. Enter the price in cents. For example $15.00 is entered as: -1- 5 0 0 4. Press the department key you wish to apply the $15.00 sale to for example department 2: 18 _2 _ 5. Or Press a PLU key for example _34_ to register a pre-programmed item 6. Press TL/NS to finalise the sale to cash The XEA213 display shows “NOT ASSIGNED” and I cannot make a sale. How to I fix this? You must sign a clerk on. Please do the following to fix this problem. 1. Press the CL button to clear the “NOT ASSIGNED” message. 2. Enter: 1 CLK# to sign on clerk 1. XE-A213 Frequently Asked Questions Page 16 of 19 The XEA213 displays “OVER LIMIT” when I try to finalise a sale to cash. How do I fix this? 1. First, you must either: finalise the sale to Credit card CR1 and CR2 CH1 or CH2 or Cheque or do a subtotal void to clear the sale. Subtotal void is done by entering: ST ST 2. Turn the mode key to PGM 3. Enter the following: -8 - ST TL/NS 4. Turn the mode key back to REG. The “OVER LIMIT” problem should be fixed. XE-A213 Frequently Asked Questions Page 17 of 19 How do I produce sales reports? There are two type types of reports: X or e(X)amine reports Z or (Z)ero reports X reports read out your sales data, but do not clear it from the XEA213 Z reports read out your sales data, and clear it from the XEA213 There are two levels of X and Z reports: Daily Period A daily X report allows you to examine your daily figures anytime during the day without clearing them. A daily Z report allows you to print out your daily figures at the end of the day, and clear them. This is done to ready the XEA213 for the next day’s trading. The daily Z report also adds its data to the Period report memory. A Period X report allows you to see your sales data for the period up to the time of the last Daily Z report. A Period Z report allows you to print out your period sales data, and clears it to ready the XEA213 for the next period. To produce a daily X report, do the following: 1. Turn the mode key to X1/Z1 position 2. Press the TL/NS key your daily X report will print. XE-A213 Frequently Asked Questions Page 18 of 19 To produce a daily Z report, do the following: 3. Turn the mode key to X1/Z1 position 4. Press ● TL/NS key your daily Z report will print. To produce a period X report, do the following: 5. Turn the mode key to X2/Z2 position 6. Press the TL/NS key your period X report will print. To produce a period Z report, do the following: 7. Turn the mode key to X2/Z2 position 8. Press ● TL/NS key your Period Z report will print. This list of Frequently Asked Questions is not intended to replace the XEA213 instruction manual. It does not list all the functions and features of the XEA213. Please refer to the XEA213 instruction manual for more guidance on functions and programming steps not covered in these “Frequently Asked Questions. XE-A213 Frequently Asked Questions Page 19 of 19