1
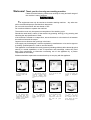
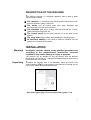
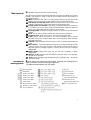
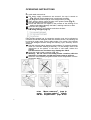
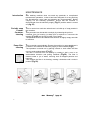
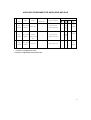
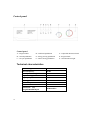
Contents
Warnings
2
Description of the machine
3
Installation
3
Operating instructions
6
Maintenance
8
Program tables
11-13
Control panel
13-15
Technical characteristics
15
1
Welcome!
Thank you for choosing our washing machine.
Please read the following instructions carefully for easy and safe usage of
the machine’s many functions.
WARNINGS
T
he equipment must only be used as a domestic washing machine. Any other use
will be considered improper and therefore dangerous.
Do not touch the machine with wet hands or feet.
Do not allow children to operate the machine.
The machine must only be opened on completion of the washing cycle.
Should the need arises, switch off the machine by pressing knob (p) or by pressing and
releasing the stop pushbutton if fitted.
If the machine is located on a carpet floor, ensure that there is a circulation of air between
the machine feet and the carpet.
Carpet must not obstruct the openings in the base.
If the supply cord is damaged, it must be replaced by manufacturer or its service agent or
a similarly qualified person in order to avoid a hazard.
This appliance is not intended for use by persons (including children) with reduced physical,
sensory or mental capabilities, or lack of experience and knowledge, unless they have
been given supervision or instruction concerning use of the appliance by a person
responsible for their safety.
Children should be supervised to ensure that they do not play with the appliance.
2
□ Do not remove or
insert the socket with
wet hands.
□ The machine must be
connected to a power supply
with an efficient earth
connection, according to the
law
□ Do not use an extension lead.
□ Do not expose the
machine to atmospheric
agents.
□ The machine cannot
be opened until three
minutes after the cycle has
finished or the machine
has been switch off.
□
For maintenance
work , disconnect the
machine from the power
supply.
□ Do not pull the power
feed
cable
or
the
equipment to remove the
plug from the power
socket.
□
After use, it is
advisable to disconnect
the machine from the
power supply and close
the water supply tap.
DESCRIPTION OF THE MACHINE
T he washing machine is a domestic appliance that is used to wash
various types of fabrics.
The machine is constructed from panels treated and painted such
that high aesthetic quality is achieved.
The motor and all moving parts have been designed and
manufactured to provide quiet operation.
The stainless steel drum is large and well mounted for a better
quality wash and longer linen life.
The control panel ensures easy selection of all the wash cycles
desired.
The large door makes loading and unloading the washing easier*.
Its excellent stability is the result of extensive research into the
equilibrium of masses in movement.
INSTALLATION
Warning!
Installation must be carried out by qualified personnel and
according to the manufacturer’s instructions. Incorrect
installation may cause damage or injury to persons.
The machine can be installed on any flat surface, with the ambient
temperature not less than 3℃ and that the cables and pipes at the rear of
the machine are not crushed.
Unpacking
T ransport the machine near to its installation place and remove the
external packing (Fig.2). If the integrity of the machine is in doubt, do not
use it. Seek advice from qualified personnel.
Fig 2
* See control panel (page 14) and program tables (page 11-13)
3
Warning! For transport reasons, the suspended unit located in the machine is locked
in position by four distance pieces and screws. Before operating the machine, remove
the blocking screws and insert four plastic caps to each hole accordingly.
(Fig.3) Save the screws and distance pieces for future use.
Once the screws and packing spacers have been removed, it is necessary to insert the
plugs provided, which can be found inside the bag containing the documents.
Installation
Electrical
Connection
Water
connection
Fig 3
Carefully transport the machine to the connection points.
The appliance must be positioned so that the plug is accessible.
For proper operation, the machine should be installed on a flat, level surface.
Levelling can be carried by adjusting the feet (Fig.4) on the machine.
Once the machine is level, block the feet by tightening the lock nuts with a spanner.
Check
that the voltage written on the technical data table inside the manual
corresponds to the mains supply voltage.
The counter, pressure relief valve, supply lines and power connection have all been
designed for the maximum load requested.
Insert the plug in the socket, ensuring that it is fitted with an earth (Fig.5)
If the electrical socket in which the plug of the machine is inserted is unsuitable, have
the socket replaced by qualified personnel.
It is good practice to avoid the use of adapters, extension leads and multiple sockets*.
T urn on the tap and allow a good quantity of water to flow until it is clear and free from
impurities. This procedure is especially applicable in the case of new water systems or
those that have remained unused for some time.
Connect the water supply hose to the tap; inserting the filter provided, and hand
tighten (Fig.6). Check that the other end of the hose is tight on the inlet (Fig.7).
Position the discharge hose at a minimum height of 60cm, though not more than 90cm,
from the ground (Fig.8).
N.B. To prevent siphoning, do not hermetically seal the machine’s discharge
hose.
Remember that the hoses must not be squashed when manoeuvring the machine
against the wall.
The appliance is to be connected to the water mains using new hose-sets and that old
hose-sets should not be reused.
Fig 4
Fig 5
Fig 7
Fig 8
* See warnings (page 2)
4
Fig 6
Stain removal
Not all stains can be removed by machine washing.
The following instructions describe the treatment to be given to material prior to being
loaded in the machine, in order to avoid an unsuccessful wash and the formation of
residual discolouring.
Wax: Remove the wax with a non-cutting edge in order to remove as much as
possible, then place a sheet of paper between an iron and the stained item.
Ball point and felt tip pens: Reduce the stain with the aid of a soft cloth
soaked in colourless 90°alcohol. Be careful not to spread the stain.
Damp marks and mildew: After having checked that the item is colorfast on
a non-visible part, put it to soak in water with added bleach. Otherwise, place the
item in 10% oxygenated water and leave for 10-15 minutes.
Ironing marks: If the fabric is slightly marked, use the procedure described for
mildew.
Rust: Use an anti-rust product following the manufacturer’s instructions.
Chewing gum: Dilute using acetone and remove with a clean cloth.
Paint: Do not wait for the paint to dry. Treat immediately with the solvent
indicated on the paint container (water, turps, trichloroethylene). Wash with soap
and water, then rinse.
Lipstick: Dab with ether if the item is wool or cotton, or with trichloroethylene if it
is silk.
Nail varnish: Place the stained part of the item on a sheet of absorbent paper,
and then wet the other side of the item with acetone. Ensure that the sheet of
absorbent paper is changed frequently. Continue until the stain has completely
disappeared.
Metal stains: Apply lemon juice until the stain has completely or almost
disappeared.
Grease or tar: Spread some fresh butter on the stain, leave for a while then
dab with oil of turpentine.
Grass: Soap delicately, treat with dilute bleach. For woollens, 90° alcohol can
give good results.
Description of
washing symbols
Before putting the material in the machine, examine the clothing label in
order to select the correct washing programme.
The table illustrated below may be helpful.
5
OPERATING INSTRUCTIONS
For each wash ensure that:
The water supply connections are secured*, the tap is turned on
(Fig.10) and the discharge hose is positioned correctly.
The programme selector (P) is in the stop position (STOP).
Then, with dry hands, insert the plug in the power socket (Fig.11).
Sort the washing into fabric types**.
Check that there are no objects in the pockets of the clothing to be
washed which may damage the fabric, washing machine or filter.
Open the door (Fig.12).
Load the washing in the machine and close the door.
N.B.Using detergent (Fig.13)
(Fig.14)
Each product poured into its respective section must not be allowed to
overflow. Should the detergent enter the softener section, the washing will
be rinsed in soapy water, leaving white marks. Vice versa, if the softener
enters the detergent section during the washing cycle, efficiency will be
affected.
Add the reduced lather detergent and softener (if required) specially
made for automatic washing machined). For the dosage, refer to the
instructions on the packet. In the case of soft water, reduce the
dosage.
N.B. Excessive use of softener may damage the fabric.
Close the soap powder container (Fig. 15).
Warning! Do not remove the soap powder container while the
machine is in operation, as this may cause water to spill out.
Select the most suitable programme and correct temperature from the
programme table***.
Fig 10
Fig 13
Fig 11
Fig 14
Fig 12
Fig 15
* See “Water connection” (page 4)
** See “Clothing symbols” (page5)
*** See Program tables (page 1111-13)
6
Pre-set using the “Adjustable thermostat (T) and programmer” (P) knob.
Warning!
Do not rotate the programmer knob (P) in an anticlockwise direction.
Fig.16
Fig.17
Fig.18
Fig.19
Press the no-spin pushbutton if required (Fig.16). When this pushbutton is pressed,
the machine completes the wash cycle without spinning. This option is useful for the
wash-n-wear clothing.
If the washing weighs 1/2kg or less, press the half-load pushbutton (Fig.17).
Light soiled materials option. Press the water saving pushbutton if required
(Fig.18) and the machine will complete automatically with one less rinse in the
process to save water.
Max. temperature option. Press the energy saving pushbutton if required (Fig.19 )
and the Max. temperature will be limited to 60℃ to save energy.
To start the machine, pull the program knob (P) if required (Fig.21), or if the machine
has pushbutton, press the start pushbutton (Fig.20): the luminous indicator will light
up.
If the required program position is accidentally passed, interrupt the program by
pressing the programmer knob (P) (Fig.21), or , if fitted, press the start pushbutton
to turn the machine off (Fig.20). Rotate the programmer (P) in a clockwise direction
until the required position is reached. Pull the programmer knob out again (P)
(Fig.21) or, if fitted, press the start pushbutton (Fig.20).
It is always possible, though not advisable, to add clothes which have been leftover
during the main washing cycle.
To do this, proceed as follows:
Always check, by looking through the transparent door, that there is no water
in the drum, otherwise rotate programmer knob (P) to the discharge position.
If there is no water in the drum, press programmer knob (P) (Fig.21), or press and
release the stop pushbutton if fitted (fig.20).
Wait approximately 3minutes (Fig.22) to allow the safety devices to de-activate.
Open the door (Fig.12); add the leftover clothing and re-close the door.
If required, add low lather detergent. To start the machine, pull programmer knob (P)
(Fig.21), or if the machine has pushbuttons, press the start pushbutton (Fig.20).
The indicator light will be illuminated (Fig.23).
At the end of the washing program, the machine will stop at one of the STOP
positions on the programmer (P).
Press the programmer knob (P) (Fig.21), or press and release the stop pushbutton
if fitted (Fig.20).
Wait three (3) minutes for the door to unlock (Fig.22).
Remove the washing.
With dry hands, disconnect the machine from the mains supply (Fig.11).
Turn off the water tap (Fig.24).
Fig.20
Fig.21
Fig.22
Fig.23
Fig.24
7
MAINTENANCE
Introduction
Our
washing machine does not need any particular or complicated
maintenance operations, in that it has been designed for a long working
life. Nevertheless, some care and attention are recommended*. Before
carrying out the following operations, ensure that the machine is
disconnected from the electricity supply (Fig.11) and the water is turned
off (Fig.25).
Periodic soap
Powder
Container
cleaning
T his is carried out each time when there is a build up of soap powder in
the container.
T he procedure can be carried out simply by extracting the pull-out
container from its housing (a sharp pull is required to overcome the
stopper) (Fig.26) and rinsing it under a jet of water.
The machine must not be cleaned with solvents. A slightly soapy wet cloth
is sufficient.
Pump filter
cleaning
T his is carried out periodically. Ensure the machine is empty and there is
no water in the tub and the electricity supply is disconnected (Fig.5).
The operation is carried out by placing a basin or cloth under the filter
Fig.25
cover to soak residual water (Fig.27).
The filter is removed from its seating by rotating it half a turn in an
anticlockwise direction and pulling outwards (Fig.28). The filter is
cleaned under a jet of water, ensuring that all trapped particles are
removed.
Then replace the filter in its housing, rotating it clockwise until it locks in
position (Fig.29).
Fig.26
Fig.27
Fig.28
*See “Warning” (page 2)
8
Fig.29
IF THE MACHINE DOES NOT WORK
Before consulting the technical assistance service, check that the
following operations have been carried out. This may lead to a saving in
both time and money.
Does not work
(indicator light off)
Check that:
1) The power supply is available at the mains.
2) The plug is inserted correctly in the socket.
3) The programmer knob (P) is pulled out, or the start pushbutton (if
fitted) is pressed*.
4) The door is closed.
5) Consult technical assistance.
Does not work
(indicator light on)
Check that:
1) The programmer knob (P) is on the selected program.
2) Refer to problem “Does not take in water”.
Does not
Take in water
Takes in and
discharges water
Continuously
Does not
discharge water
and does not spin
Check that:
1) Water is present in the supply system.
2) The tap is turned on.
3) The water feed hose is not kinked.
4) With the power disconnected, clean the inlet filter located between the
tap and discharge hose**.
5) Consult technical assistance.
Check that:
1) The discharge hose is at the correct height (60-90cm) ***.
2) The discharge hose outlet is not submerged under water.
3) Consult technical assistance.
Check that:
1) The discharge hose is positioned correctly.
2) The discharge hose is not kinked.
3) The detergent hose is not excessive.
4) The soap powder container is not blocked.
5) The detergent is the correct type for the washing machine.
*
See “Use of the machine” (page 6)
** See fig .7 (page 4)
*** See fig.8 (page 4)
9
Vibrates
or is noisy
The door
does not open
Check that:
1) Large articles (sheets, tablecloths, etc.) are not tangled or folded.
2) The washing machine is standing correctly on its feet *.
3) The four packing screws and distance pieces have been removed**.
1) Wait 3 minutes after the program has finished.
Try to start the machine to see whether the problem has been solved.
If the problem persists, call for technical assistance.
* See Fig.4 (page 4)
** See Fig.3 (page 4)
10
MAIN PROGRAMS FOR RESISTENT FABRICS
Knob Knob
(P)* (T)**
1
2
3
4
90℃
90℃
90℃
60℃
Fabric
Cotton, linen,
hemp
Examples and degree of
soiling
Sheets, white and solid
colour tablecloths, heavy
soil, underwear
Cotton, linen, Coloured underwear, shirts
resistant,
bath robes, cotton knits,
mixes
sheets, normal soil
Cotton, linen,
hemp
Sheets, white and solid
colour tablecloths, light
-soil, underwear
Cotton, linen, Coloured underwear, shirts
resistant,
bath robes, cotton knits,
mixes
sheets, normal soil
Dispenser
compartments Program description
Use of supplementary buttons
1,2,3
Prewash,mainwash,3
As
As
As
As
rinses, softener, empty
required required required required
and final spin
2,3
Prewash,mainwash,3
As
As
As
As
rinses, softener, empty
required required required required
and final spin
2,3
Main wash, 3 rinses,
As
As
softener, empty and
required required
final spin
_
As
required
2,3
Main wash, 3 rinses,
As
As
softener, empty and
required required
final spin
_
As
required
AUXILIARY PROGRAMS FOR RESISTENT FABRICS
Knob Knob
(P)* (T)**
5
6
7
Any
position
Fabric
Program
Cotton, linen,
hemp and
resistant,
mixes
Fast rinse
Any Cotton, linen, Whitener, scented softener
position hemp and
resistant
mixes
Any Cotton, linen,
position hemp and
resistant,
mixes
Dispenser
compartments Program description
3
3
Fast spin
___
Use of supplementary buttons
3 rinses, softener,
As
As
empty and final spin required required
__
As
required
1 rinses, softener,
empty and final spin
__
As
required
__
As
required
Empty and final spin
__
__
__
As
required
11
GENTLE ACTION PROGRAMS FOR SYNTHETICS AND MIXES
Knob Knob
(P)* (T)**
Fabric
Example and degree Dispenser
of soiling
compartments
8
60℃
Resistent
mixes
Shirts, sheets,
baby wear nappies;
heavy soil
1,2,3
9
40℃
Resistent
mixes
Shirts, sheets, baby
wear, nappies;
normal soil
2,3
Use of supplementary buttons
Program description
Prewash , main wash, 2 rinses,
softener, empty and slow spin
__
Recom
mended
__
As
required
Main wash, 2 rinses, softener,
empty and slow spin
__
Recom
mended
__
As
required
* Position of programmer knob
** Position of adjustable thermostat knob
SPECIAL WOOLLEN AND SILK PROGRAMS
Knob Knob
(P)* (T)**
10
11
35℃
Min.
Fabric
Woollen
underwear
Example and degree Dispenser
of soiling
compartments
Machine
washable wool
Synthetics
Colourfast shirts
(nylon,
blouses, skirts;
perlon) cotton
normal soil
mixes
Use of supplementary buttons
Program description
2,3
Main wash, 2 rinses, softener
empty and slow spin
__
Recom
mended
__
2,3
Main wash, 2 rinses, softener
empty and slow spin
__
Recomm
ended
__
* Position of programmer knob
** Position of adjustable thermostat knob
12
As
required
As
required
AUXILIARY PROGRAMS FOR WOOLLENS AND SILK
Knob
Knob
(P)*
Program
(T)**
Any
Program description
compartments
Mixes, delicate
12
2 rinses, softener,
Gentle rinse
position
Use of supplementary buttons
Dispenser
Fabric
3
synthetics
empty and final spin
__
Recom
mende
d
__
As
required
Whitener,
Any
Mixes, delicate
scented
1 rinses, softener,
13
3
position
synthetics
__
empty and slow spin
softener Gentle
As
required
Recom
mende
d
__
spin
Any
Mixes, delicate
14
As
Gentle spin
position
__
synthetics
Empty and slow spin
__
__
__
required
* Position of programmer knob
** Position of adjustable thermostat knob
13
Control panel
Control panel
A – Program Table
B – On/Off pushbutton
C – No-spin pushbutton
D – Half-load pushbutton
E – Energy Saving pushbutton
F – Water Saving pushbutton
Technical characteristics
14
Rated Voltage
Rated Frequency
220 ~240 V
50 Hz
Water pressure range
0.05—
— 1 MPa
Input washing power
Input spin power
315 W
750 W
Heating power
Maximum power
1700 W
2015 W
Maximum current
9A
Dimensions (cm)
Height×
× Width×
× Depth
85×
× 59.5×
× 53
T – Adjustable thermostat knob
P – Program knob
S – On/Off indicator light


![[color=orange]THIS IS A GUIDE ON REPLACING CAPACITORS IN](http://vs1.manualzilla.com/store/data/007379770_1-0cd8feb544c0f47df80b77b27322076c-150x150.png)