1
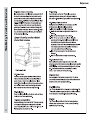
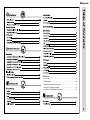
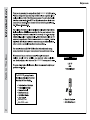
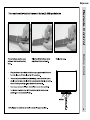
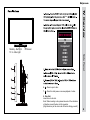
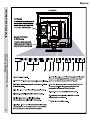
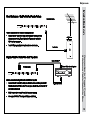
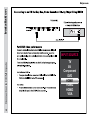
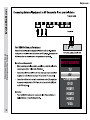
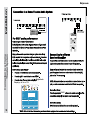
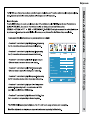
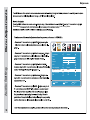
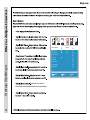
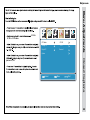
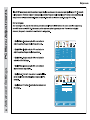
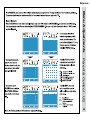
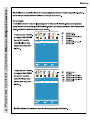
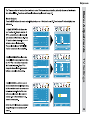
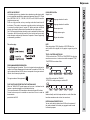
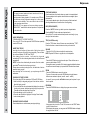
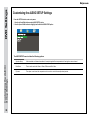
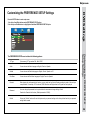
Meijer.com SLE3032D 32” LED TV COMBO DVD Safety Instructions Meijer.com 1 Meijer.com Safety Instructions 2 Safety Instructions Meijer.com 3 Meijer.com Table of Contents DVD Settings DISC Formats..........................................................................................................28 CD/DVD Operation..................................................................................................29 Customizing the GENERAL Setup Settings............................................................32 Customizing the AUDIO Setup Settings..................................................................33 Customizing the PREFERENCE Setup Settings.....................................................34 35 36 4 Wat's In The Box Introduction Meijer.com SLE3032D SLE3032D SLE3032D Warranty Card Mini YPbPr cable 5 Meijer.com Remote Control Battery Install 6 Overview Remote Control Meijer.com 7 Functions Using the Remote Control Handset 1. 2. 3. 4. 5. 6. 7. Power - Turn the television display On/Off. Mute - Press to temporarily turn sound off. Press again to resume. Numbers - Select desired TV channel directly. - To select digital channel four, press "4" "-" , "1" (4-1). - Press to select between the current and previously viewed TV channe. Channel List - Displays channel lists on the screen. Sleep - Press to activate the Sleep function to turn off the TV automatically; 5 Min > 10 Min > 15 Min >30 Min > 60 Min > 90 Min > 120 Min > 180 Min > 240 Min > OFF. 8. Guide - Press to review scheduled programming for the current channel viewed. 9. Source - Press to display all input sources on screen. 10. Info - Provides information on the currently viewed program. 11. ▲/▼/◄/► Arrows / OK - Navigate menus to make selections. Press OK to confirm. 12. Menu - Press to display the Main menu. 13. Exit - Press to exit a menu that is displayed. 14. Volume +/_ - Adjust volume up and down. 15. Zoom - Select viewable display options: Auto > Normal > Zoom > Cinema. 16. Freeze - Pause and still-frame the current image on the display. Press again for live TV. 17. Picture Mode - Select from various preset picture modes: Dynamic > Standard > Soft > User. 18. Channel+/_ - Scan channels up and down. 19. Add/Erase - Add and erase favorite channels. A-B - Segment Repetition button. 20. FAV - Press to display a list of favorite TV channels you have added. REP - Repetition button. 21. FAV_ - Press to scan to a lower channel from your list of favorites. TITLE - To DVD Title menu. 22. FAV+ - Press to scan to a higher channel from your list of favorites. GOTO - Search button. 23. MTS - Press to select an alternate audio language (if applicable). OPEN - To eject a disc. 24. CCD - Select closed caption subtitles (if available) OFF > ON > CC on Mute. D.SETUP - Press this button to show the DVD SETUP menu. 25. AUDIO - Press this button to select Dynamic, Standard, Sports, Movie or User sound modes of the TV. Press this button to change the audio language of the DVD. 26. SUB - To show the subtitle for the program you’re watching. 27. ► - Press this button to play or pause the DVD you’re watching. 28. ■ - Press this button to stop playing the DVD you’re watching. 29. D.MENU - To show the menu of the DVD disc. 30. ANGLE - To select different angles to which the picture suits your preference. NOTE: When using the remote control, point it directly at the TV. 1 2 3 4 5 6 7 8 9 10 11 12 13 15 14 16 18 17 19 20 21 23 24 25 26 27 28 29 30 31 32 22 Meijer.com INPUT SOURCE IR Reciver VOL+ 5 VOL- Side Panel Standby - Red light TV on - Blue light TV AV Component DVD HDMI1 HDMI2 HDMI3 VGA TV Overview blue 6 CH+ 7 CH- 8 4 VOL+ VOL+ VOLVOLCHCHMENU MENU SOURCE SOURCE STANDBY STANDBY POWER 1 6. - Press to eject a disc. 7. - Press this start pause or resume playback of a disc. CH+ CH+ SOURCE 2 MENU 3 8. Disc Slot Insert discs to disc slot. Note: When inserting a disc, please take note of the indication of direction around the disc slot for operation. (Right direction: put the mirror side of the disc facing yourself) 8 TV Overview Meijer.com Rear Panel & Pedestal Removal 4 1 2 3 4 5 Headphone Jack Mini YPbPr 12. 9 6 7 8 9 10 11 12 Meijer.com Installation Connection to Power Cord & Antenna Cable/Satellite Box 10 Connection to HDMI Inputs Installation Meijer.com 11 INPUT SOURCE INPUT SOURCE TV TV AV AV Component Component DVD HDMI1 HDMI1 HDMI2 HDMI2 HDMI3 HDMI3 VGA VGA Meijer.com Y Pb Pb Pr Pr Installation Y OK. TV TV AV AV Component Component DVD HDMI1 HDMI1 HDMI2 HDMI2 HDMI3 HDMI3 VGA VGA Connection to Component YPbPr Input INPUT INPUT SOURCE SOURCE . 12 Connection to a Composite Input Installation Meijer.com 13 INPUT INPUT SOURCE SOURCE TV TV AV AV Component Component DVD HDMI1 HDMI1 HDMI2 HDMI2 HDMI3 HDMI3 VGA VGA Meijer.com TV TV AV AV Component Component HDMI1 DVD HDMI2 HDMI1 HDMI3 HDMI2 VGA HDMI3 VGA Connection to a Personal Computer INPUT INPUTSOURCE SOURCE Installation TV REAR PANEL 14 Installation Meijer.com Connection to a Home Theater System Surround Left Speaker Digital Audio Output type ► Raw or PCM. Parental Sound Mode Standard SOUCE Bass Treble Balance MTS Stereo Audio Language English Digital Audio Output Off AVL Off Select 15 PCM Surround Sound Move TV MENU Exit Surround Right Speaker Meijer.com English Go to next step Please select your preferred language Select Move MENU Exit TV Setup Setup Wizard Menu Language Setup Wizard Time Zone Pacific Daylight Saving Time Off Time Format Go to next step 12-hour Select the time zone & Daylight saving time Select Move MENU Exit Air / Cable Air Go to next step OK. Select the antenna type then auto scan Select Move MENU Exit MENU Exit Setup Wizard Analog Digital RF CH Total Found : : : : -4 20 4 Initial Setup Wizard Setup Wizard 16 TV Setup Meijer.com Audio Parental Air/Cable TV Auto Scan Auto Scan Favorite Favorite Channel List Channel List Show/Hide Channel Number 2-0 Channel Label TV Channel Setup & Channel Auto Scan Move MENU Exit Parental Select TV 2-0 Channel Label Select OK Parental Air Show/Hide Channel Number Select Move TV Are you sure to Auto Scan? No No Yes Move MENU Parental 0 0 2 0 Exit MENU Exit Parental Are you sure to Auto Scan? Analog Digtal RF CH: Total Found: 17 Audio Air/Cable Cable Select TV Yes Move TV MENU Parental Analog Digtal RF CH: Total Found: 0 0 2 0 Exit TV Meijer.com Parental Picture Mode TV Standard Menu Adjustments SOFT Brightness Color Tint Sharpness Color Temperature Advanced Settings Select Move MENU Exit Picture Settings Contrast 18 Menu Adjustments Meijer.com Sound Mode, Audio Setting Modes: Parental Sound Mode Standard Bass Treble Audio Setting Balance 19 MTS Stereo Audio Language English Digital Audio Output PCM Surround Sound Off AVL Off Select Move MENU Exit TV Meijer.com Parental Sleep Timer Off Time Zone Pacific Daylight Saving Time Time Format Off 12-hour Auto Clock On 2013/01/01 12:14AM Select Move MENU Exit Date & Time Settins Clock TV Menu Adjustments Audio 20 Menu Adjustments Meijer.com Audio Menu Language Parental English 25% Transparent OSD Timeout 30Sec. Closed Caption On Over Scan Input Label Setup Settings Other settings 21 Restore Default Setup Wizard Select Press the ► arrow button to automatically set all adjustments back to their original settings. TV Move MENU Exit TV Meijer.com Audio CC Mode Parental CC Off Analog CC Digial CC CC1 Service1 Option Select Move MENU Exit Closed Captions Service1-6, Off. TV Menu Adjustments CC Off > CC On > CC On Mute. 22 PC Menu Adjustments Meijer.com Audio Menu Language Parental TV English 25% Transparent OSD Timeout 30Sec. Closed Caption Off Over Scan Input Label PC Settings Other zsettings Advanced Settings Restore Default 23 Select Move Audio MENU Exit Parental H-pos V-pos Clock Phase Auto Select Move MENU Exit TV Meijer.com Parental Audio TV Parental TV TV ---- MPAA Off US Rating Select Move MENU Parental Move MENU TV Exit Parental TV Chanage Password System Lock Off Input Block US Rating Canada Rating RRT Setting Reset RRT Press OK to Lock or unlock Select Move MENU Audio Exit Parental Select Move MENU Audio TV Exit Parental TV TV Chanage Password System Lock MPAA Off G Input Block US Rating Canada Rating PG PG-13 RRT Setting Reset RRT Select Move MENU Exit Select Move MENU Exit Parental Control - US Audio Select Exit Menu Adjustments Audio Enter Password NC-17 24 Parental Control -Canada Menu Adjustments Meijer.com 25 Audio Parental Canada English Off Canada French Off Select Move MENU Audio Off Canada French Off Select Exit Parental Canada English Move MENU TV Exit TV Meijer.com Parental TV Cable TV Parental TV Parental TV Auto Scan Favorite OK checkmark Channel List Show/Hide Channel Number 2-0 Channel Label 1/1 Select Move Audio MENU Exit Parental Air/Cable Select Press ‘OK’ Change TV Channel Label Cable Auto Scan OK Favorite Channel List Show/Hide Channel Number 2-0 Channel Label Select 1/1 Move Audio MENU Parental Air/Cable Select Exit Press ‘OK’ Change TV TV Settings Parental Channel Label Menu Adjustments Audio Air/Cable Cable Auto Scan Favorite Channel List Show/Hide Channel Number 2-0 Channel Label Select Move MENU Exit Select Move MENU Exit 26 Zoom Modes Meijer.com 27 WIDE Stretches certain 4:3 content and may reduce the black bars. Meijer.com ICONS USED ON DVDs Sample Icons The unit can play: NOTE When playing back a CD-G (Graphics) or CD EXTRA disc, the audio portion will be played, but the graphic images may not be shown. Language selections for audio Language selections for subtitles Screen aspect ratio Multiple camera angles Region code indicator REGION MANAGEMENTINFORMATION Region Management Information: This unit is designed and manufactured to respond to the Region Management Information that is encoded on DVDs. If the region number printed on the DVD does not correspond to the region number of this unit, this unit cannot play that disc. The region number of this equipment is DISC FUNCTION OR OPERATION THATIS NOTAVAILABLE When the "INVALID KEY" symbol appears on the screen, it indicates that the function or operation attempted is not available at that time. This occurs because the DVD manufacturer determines the specific functions. Certain functions may not be available on some discs. Be sure to read the documentation provided with the DVD. . Audio CDs are divided into "TRACKS". A "TRACK" is usually one song on an Audio CD. DISC Formats TITLES, CHAPTERS AND TRACKS . DVDs are divided into "TITLES" and "CHAPTERS" If the disc has more than one movie on it, each movie would be a separate "TITLE". "CHAPTERS" are sections of titles. DVD Settings NOTES ON COPYRIGHT It is forbidden by law to copy, broadcast, show, broadcast on cable, play in public or rent copyrighted material without permission. Apparatus Claims of U.S. Patent Nos. 6,836,549; 6,381,747; 7,050,698; 6,516,132; and 5,583,936 licensed for limited viewing uses only. DVDs are copy protected, and any recordings made from these discs will be distorted. This product incorporates copyright protection technology that is protected by method claims of certain U.S. patents and other intellectual property rights owned by Macrovision Corporation and other rights owners. Use of this copyright protection technology must be authorized by Macrovision Corporation, and is intended for home and other limited viewing uses only, unless otherwise authorized by Macrovision Corporation. Reverse engineering or disassembly is prohibited. NOTE Numbers identify each title, chapter and track on a disc. Most discs have these numbers record on them, but some do not. NOTESON UNAUTHORIZED DISCS You may not be able to playback some DVDs on this equipment if they were purchased from outside your geographic area or made for business purposes. 28 CD/DVD Operation DVD Settings Meijer.com This owner's manual explains the basic instructions of this unit. Some DVDs are produced with Limited operation during playback. For example, many DVDs do not allow users to skip government warnings, or in some cases previews or other features. This is not a defect in the unit. Refer to the instruction notes of discs. "INVALID KEY" may appear on the screen during operation. "INVALID KEY" means that the desired operation is not permitted by the unit or disc. BASIC OPERATIONS TURN ON AND OFF THE DVD FUNCTION Turn on the LCD TV and then press the SOURCE button repeatedly to select DVD mode. INSERT DISC TO DVD Insert the disc to the disc slot (mirror side of the disc has to face yourself), the player will load the disc automatically. There will have an on screen indication "CLOSE" then "READ". After loading the disc content, it will switch to play mode automatically. If the disc is already placed inside, the disc will be read automatically. NOTE: For some discs, after loading the content of the disc, need to press the ►;or select from the disc menu to start. Please make sure when inserting the Disc, the label side of the disc should be facing yourself when inserting the Disc incorrectly, you may damage the DVD mechanism. PLAYING A PICTURE FILE DISC This unit can play JPG files recorded on CD-R and CD-RW discs. 1. Hold the disc by its edge and gently push it into the door, with the label side facing yourself. 2. The unit will load the disc and automatically display the contents of the disc on the screen, while also beginning to play the picture file. Thesefiles will then be played back one by one 3. Press the ■ button to go to the folder list. 4. Press the ▲or ▼ button to highlight a file to play. Press the ►; button to start playback. PAUSING/PLAYING PLAYBACK Press the ►;button to switch between pausing and playing. 29 STOPPING PLAYBACK Press the ■ button at the location where you want to interrupt playback. To resume playback at the position where the disc was stopped, press the ►;button. If you press the ■ button twice, the unit's memory will be cleared and pressing the ►;button will reset the disc to the beginning. SKIP (PREVIOUS/NEXT) Press the 9 PREV button to go back to previous chapters/tracks. Press the : NEXT button to advance chapters/tracks. For an Audio CD, use the number buttons (remote control only) to jump directly to that track number. TITLE (for DVD disc only) Press the TITLE button, there will have an on screen indication "TITLE". Press the direction or numeric buttons to select your favorite title. VOLUME . Press the VOL-/VOL+ buttons to adjust the output volume. NOTE: Playback DVD discs in original code, is not adjustable. MUTE . Press the MUTE button to mute the audio output. There will have an on screen symbol indicate "MUTE". . Press again to cancel, or press the VOL+ button to cancel and adjust the volume. . In case there is no audio output, try to press the MUTE button to cancel mute. ZOOM . Press the ZOOM button to zoom in the picture. . There are 6 zoom modes, press the ZOOM button to toggle between different zoom modes in sequent. (zoom2 - zoom3 - zoom4 ) . In zoom2-4, you may use the ▲/▼/◄/►buttons to pan the picture for your favorite portion. PROGRAM . Press the PROGRAM button to display the program menu as shown. 01 02 03 04 05 TT: 01 CH: 01 TT: CH: TT: CH: TT: CH: TT: CH: Exit 06 07 08 09 10 Start TT: TT: TT: TT: TT: CH: CH: CH: CH: CH: NEXT . Using numeric keys to set the TT and CH, then move to the START button, press OK button to start. . While playing the program, you may press the PROGRAM button to display the program menu for edit. Meijer.com 01 02 03 04 05 TT: 01 CH: 01 TT: CH: TT: CH: TT: CH: TT: CH: Exit 06 07 08 09 10 Stop TT: TT: TT: TT: TT: CH: CH: CH: CH: CH: NEXT FAST FORWARD /FAST REVERSE 1. Press the ◄◄ or ►► button when a disc is playing. Each time the◄◄ or ►► button is pressed, the speed of fast scan changes in the following sequence. FORWARD X 2 ---> FORWARD X 4 ---> FORWARD X 8 ---> FORWARD X 16---> FORWARD X 32 --->PLAY BACKWARD X 2---> BACKWARD X 4---> BACKWARD X 8 ---> BACKWARDX 16---> BACKWARD X 32 --->PLAY 2. Press the ►;button to play when you reach the desired point to resume playback at normal speed. AUDIO SELECTION ( DVD) On some discs, the sound is recorded in two or more formats. Follow the directions below to select the preferred language and sound system. 1. While a disc is playing, press the AUDIO button to show the current audio format number. 2. Press the AUDIO button repeatedly to select the desired audio format. NOTE . If only one audio format is recorded, the number does not change. . About two seconds later, playback continues in the new audio format. ANGLE SELECTION ( DVD ) Some DVDs contain scenes which have been shot from a number of different angles. For these discs, the same scene can be viewed from each of these different angles. MP3/JPEG PLAYBACK After loading the MP3/JPEG disc, it will start to scan for the stored MP3/ JPEG folders. Then will firstly display the MP3 contents automatically and start to play the first file (highlighted file) Screen as follow: 00:00 035 / 057 00:00 \DVD \ A/V a01_div x 51b A/V a02_div x 505 A/V a03_div x 502 A/V a04_div x 412 A/V a05_div x 311 Use the ▲/▼ buttons to select the folder you want to play. NOTE: When playback MP3 files, there is no picture display, only audio output. Playing the JPEG discs, press the PROGRAM button to select slide effects. ) When play or pause with picture playback, you may use the navigation buttons to flip ] rotate the picture. ▲ button to flip horizontally. ▼ button to flip vertically. ◄ button to rotate left 90°. ►button to rotate right 90°. Press the9 /: buttons to select next / previous page or press numeric buttons to view the corresponding pictures. CD/DVD Operation SUBTITLE SELECTION ( DVD) 1. While a DVD is playing, press the SUBTITLE button to display the current the language setting, as shown in the example. 2. Press the SUBTITLE button repeatedly to select the desired subtitle language. NOTE . If only one language is recorded, the language does not change. . About two seconds later, playback continues with the new subtitle you selected. . If no button is pressed within a few seconds, playback continues without changing the current subtitle. . The number of languages recorded differs depending on the disc. . This function can only be used for discs on which subtitles have been recorded in multiple languages. 1. While you are playing a DVD with different angles recorded, press the ANGLE button to view the number of the current angle available. 2. Press the ANGLE button repeatedly to change the scene to the next angle in those recorded. . About two seconds later, playback continues from the new angle you selected. . If no button is pressed within 10 seconds, playback continues without changing the current angle. NOTE This function can only be used for discs on which scenes shot from multiple angles have been recorded. DVD Settings To stop the program by moving to STOP button, then press OK button to end the program. 30 CD/DVD Operation DVD Settings Meijer.com SPECIAL FUNCTIONS DISPLAY function (DVD) INFO Button Using INFO button, you can check the current settings of the following items: ANGLE, AUDIO and SUBTITLE. While the disc is playing, press the INFO button repeatedly to display information on operation status. LOCATING A SPECIFIC TITLE (DVD) If a DVD contains title numbers, you can locate a specific title by directly selecting a title number 1. Press the GOTO button. 2. Press the ◄or ► button to highlight a specific field and press the corresponding number button(s) for the title you want. 3. Press the OK button to confirm. The Unit will start playback about 3 seconds later. LOCATING A SPECIFIC CHAPTER /TRACK If you know the chapter / track number you want to play, you can locate a specific chapter / track by directly selecting a chapter/ track number. 1. Press the GOTO button to search for your desired chapter/track. 2.You can directly press 0-9 number button to highlight a chapter/ track. lf you want the chapters /tracks greater than 10, you can press the 10+ button and press the corresponding number button(s) for the chapter/track you want. 3. Press the OK button to confirm. Playback starts from the selected chapter /track. LOCATING A SPECIFIC TIME You can move to a specific location by entering its corresponding time (hours, minutes, seconds) 1. Press the GOTO button. 2. Press the ◄ or ► button to highlight time. 3. Press the corresponding number buttons for the setting point you want. 4. Press the OK button to confirm. The Unit will start playback about 3 seconds later. NOTE . Some discs may not respond to this process. . Some scenes may not be located as precisely as specified. . This method for accessing specific locations is available only within the current title of the DVD. DVD REPEATING 31 You can play a specific title or chapter repeatedly. (Title repeat, chapter repeat, A-B repeat) REPEATING A CHAPTER You can play the same chapter repeatedly. 1. While the disc is playing, press the REPEAT button until the indicator displays on the screen. The current chapter is played repeatedly. REPEATING A TITLE You can play the same title repeatedly. 2. While the disc is playing, press the REPEAT button until the indicator displays on the screen. The current title is played repeatedly. REPEATING ALL 3. While the disc is playing, press the REPEAT button until the indicator displays on the screen. CD REPEATING Chapter Title ALL Chapter Track Title A Chapter ALL AB Track Title A ALL Track AB Chapter A You can play a single track and whole disc repeatedly. Title AB REPEATING A SINGLE TRACK You can play the same track repeatedly. 1. While the disc is playing, press the REPEAT button until the indicator displays on the screen. The current track is played repeatedly. REPEATING A WHOLE DISC Chapter 2. While the disc is playing, press the REPEAT button until the Chapter indicator displays on the screen. Title The whole disc Title is played repeatedly. ALL ALL Track AChapter Title AB ALL Track A REPEATING AALL SPECIFIC SECTION (DVD) (CD) Track You can play a specific section repeatedly. AB Track A 1. While the disc is playing, press the A-B button at the beginning of the Chapter A section ( is displayed) you want to play repeatedly. AB is displayed) 2. Press the A-B button again at the end of the section ( Title 3. The Unit will AB immediately begin replaying your selection. ALL REPEATING A SINGLE TRACK 4. While the disc is playing, press the A-B button until the indicator displays on the screen. Track A NOTE AB . A-B repeat can only be used within the same title. If the start and end of the section to be repeated are in different titles, A-B repeat is cancelled. . The A-B repeat function does not operate in scenes where different camera angles are recorded. Meijer.com Press the SETUP button to enter setup menu. 1. Use the Left and Right buttons select GENERAL SETUP option. 2. Use the Up and Down buttons to highlight and individual GENERAL SETUP option. TV Display Cycles among TV Type modes:4:3 pan scan, 4:3 letter box, 16:9. OSD Lang You can choose the OSD Language to English, French or Spanish. Screen Saver This function is used to turn the screen saver On or Off. Last Memory This function to set the Last Memory to On or Off. Customizing the GENERAL Setup Settings The GENERAL SETUP menu includes the following options: DVD Settings Customizing the GENERAL SETUP Settings 32 DVD Settings Meijer.com Customizing the AUDIO SETUP Settings Press the SETUP button to enter setup menu. 1. Use the Left and Right buttons select AUDIO SETUP option. 2. Use the Up and Down buttons to highlight and individual AUDIO SETUP option. Customizing the AUDIO Setup Settings The AUDIO SETUP menu includes the following options: 33 Speaker Setup A disc recorded multi channel soundtrack, the output signal will be incorporated to left and right or stereo channel. Dual Mono This is used to select the Stereo, L-Mono, R-Mono and Mix- Mono. Dynamic This option is used to set the compression ratio in order to control the sound(volume)contrast. Meijer.com Press the SETUP button to enter setup menu. 1. Use the Left and Right buttons select PREFERENCE SETUP option. 2. Use the Up and Down buttons to highlight and individual PREFERENCE SETUP option. TV Type Cycles among TV Type modes: PAL, Multi, NTSC. Audio You can choose the Audio Language to English, French or Spanish. Subtitle You can choose the Subtitle Language to English, French, Spanish or Off. Disc Menu You can choose the Disc Menu Language to English, French or Spanish. Parental When playing disc with parental lock function, you may select an Age Control Grade according to grade of disc and your own preference. For example, if PG is selected, DVD Video disc rated higher than the PG grade can not be played. Password User can change the password that is required when the user wants to change the Age Control Grade in the Parental Lock function. (Default password is 123456) Default Setting the ‘Default’ function will reset all options and your personal settings to the factory default and all your personal settings will be erased. Customizing the PREFERENCE Setup Settings The PREFERENCE SETUP menu includes the following options: DVD Settings Customizing the PREFERENCE SETUP Settings 34 Meijer.com Specifications LED 250 9,000:1 43 29” (W) x 19.3” (H) x 8” (D) 13.4 lbs. 35 Troubleshooting Meijer.com 36 Meijer.com Warranty Limited North American Warranty SLE3032D For peace of mind and valuable services, please take a moment to register your product at www.kcpi.us Kith Consumer Products, Inc. (KCPI) expresses the following limited warranty on AFFINITY products. This warranty extends to a new television purchased from an authorized reseller/retailer within the U.S. by the original purchaser or consumer who received the product as a gift. Retain and provide the original bill of sale (or photocopy) as proof of purchase. It is also recommended that you retain original box and foam packaging. Limited One (1) Year Warranty on Parts and Labor KCPI warrants the parts in this product against defects in material or workmanship for a period of one (1) year from the date of original purchase from authorized retailers. Your Responsibility Warranty service shall be provided when a return authorization number (RMA#) is provided to you. Warranty extends to defects in materials or workmanship and does not cover cosmetic imperfections, damages incurred during shipment to KCPI, misuse, natural disasters or accidents. How to Obtain Warranty Service , call 888-777-0450 representative. Limitations As such, it is NOT a malfunction to view multiple non-performing pixels on your screen. All warranties implied by state law are expressly limited to the duration of the limited warranties set forth above with the exception of warranties implied by state law as hereby limited, the foregoing warranty is exclusive and in lieu of all other warranties, guarantees, agreements, etc., with respect to repair or replacement of any parts. KCPI shall not be liable for consequential or incidental damage. duration, exclusions or limitation of incidental or consequential damages, so the above may not apply.