1
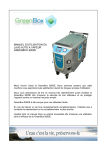
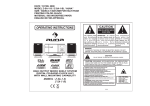
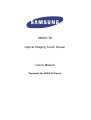
550EX-TS
Optical Imaging Touch Screen
User’s Manual
Document No: 550EX-TS User-A
General Notes:
Information in this document is subject to change without notice.
All trademarks or registered trademarks are the property of their respective
owners.
Details provided are believed to be accurate, but no liability in respect of
any information supplied is accepted.
For service and support in the UK please call the touch screen support
help desk Tel: (01480) 455114. Fax: (01480) 455124
User’s Manual
Document No: 550EX-TS User-A
Page 1 of 24
Contents
1.
Introduction
01
01
01
Using this manual
Features
2. Safety Precautions
Cleaning
01
03
3. Installation
Contents
Connecting the monitor
Touch screen cable connection
04
04
04
04
General
Calibration
Touch click operation
Buzzer tones
Configuration software
Operating the USB Configuration Program
05
05
05
05
06
06
07
4. Operation
5. Apple Mac Users
To Enable Apple Mac Mode
Calibration (Apple Mac)
Calibration Procedure (Apple Mac)
09
09
09
10
6. Dual Touch & Gestures on Windows 7
Set Up Procedure
11
11
7. Trouble Shooting
18
Uninstalling and Reinstalling the USB Device
Touch screen does not work on waking PC
How long can the USB cable be?
How do I turn the beeping sound off?
How do I disable right mouse click?
Working with Macromedia Flash buttons
User’s Manual
19
22
23
24
24
24
Document No: 550EX-TS User-A
Page 2 of 24
1. Introduction
Using this manual
We recommend that you take a few minutes to read through the user’s
manual before installing and switching on your touch screen monitor. It will
assist you when setting up your interactive monitor.
All chapter headings and subheadings are listed in the table of contents.
Features
NextWindow™ optical imaging touch technology
SAMSUNG 55” LED professional monitor
Supports dual touch (two finger touch)
Operates with any stylus
Stable, fast, drift free operation
USB HID touch controller – Plug & Play
Requires one-time calibration only
Supports Linux, MAC OS X, Windows XP, Vista and Windows 7
Robust metal bezel
3 years return to supplier warranty
2. Safety precautions
WARNING
If you notice anything abnormal while operating this product, such as smoke
or fumes, unplug the monitor and contact your supplier immediately. Further
use may be dangerous and could cause fire or electric shock.
DO NOT OBSTRUCT THE MONITOR
Do not obstruct or poke objects into the touch screen monitor as this may
cause fire, electric shock or damage.
PROTECT THE CABLES
Do not pull or bend the power cable and signal cable. Do not place the
monitor or any other heavy objects on the cables. If damaged, the cables may
cause fire or electric shock.
User’s Manual
Document No: 550EX-TS User-A
Page 3 of 24
ADVERSE WEATHER CONDITIONS
It is advisable not to operate the touch screen monitor during a heavy
thunderstorm as the continual breaks in power may cause malfunction. It is
also advised not to touch the plug in these circumstances as it may cause an
electric shock.
PRECAUTI NS
INSTALLATION LOCATION (GENERAL)
Do not install the touch screen monitor where sudden temperature changes
may occur, or in humid, dusty or smoky areas as it may cause fire, electric
shock or damage. You should also avoid areas where the sun shines directly
on the monitor.
DO NOT PLACE THE MONITOR IN A HAZARDOUS POSITION
Ensure that you do not place any heavy objects on the touch screen monitor,
and that all cables are routed to avoid possible injury.
MAINTAIN GOOD VENTILATION
Ventilation slots are provided to keep the touch screen monitor from
overheating. Covering the slots may cause fire. Allow a 10cm space between
the rear of the monitor chassis and rear enclosure wall or panel to allow
adequate air circulation.
DISCONNECT THE CABLES WHEN YOU MOVE THE MONITOR
When you move the touch screen monitor, turn off the power switch, unplug
the monitor and be sure the signal cable is disconnected. If you do not
disconnect them, it may cause fire or electric shock.
Cleaning
To protect the touch screen do not scratch or rub the screen with a hard
object.
Stains can be removed with a cloth lightly moistened with a mild detergent
solvent. Then wipe the cabinet with a soft dry cloth.
Periodic cleaning with a soft dry cloth is recommended.
User’s Manual
Document No: 550EX-TS User-A
Page 4 of 24
3. Installation
Contents
The following accessories are included. Check to see if they are enclosed with
your touch screen monitor. If anything is missing or damaged, please contact the
reseller you purchased your touch screen from.
•
•
•
Monitor accessories as listed in the User’s Manual supplied with the
monitor
USB touch screen cable
CD containing the USB Configuration Software and Window 7 Dual Touch
driver
* Remember to save your original box & packing material to transport or
ship the monitor.
Connecting the monitor
Connect the monitor to your video source as described in the User’s Manual
supplied with the monitor.
Touch Screen USB Cable Connection
The USB cable should be connected from the computer to the USB input on the
rear of the display.
User’s Manual
Document No: 550EX-TS User-A
Page 5 of 24
4. Operation
General
After connecting the touch screen monitor as described in section 3, the
computer will automatically detect the USB device (the touch screen) and install
the standard Windows driver.
For Apple Mac operation please see section 5.
Note: You do not need to install a software driver for standard touch screen
operation.
For Windows 7 dual touch driver operation please see section 6 guidance.
You can now calibrate the touch screen.
Calibration
Before you start calibration, you need to make sure that you have a clear desktop
on your computer. There are two options which you can choose to enter the
calibration mode:
1. Press [Scroll Lock] on the keyboard six times.
OR
2. Press the hardware calibration button located on the rear of the monitor
bezel.
The mouse pointer automatically moves to the top left hand corner of the display.
You should touch the mouse pointer on the screen with your finger or a stylus
until you hear a long beep. There are three further positions, follow the above
instruction another three times.
Make sure when removing your finger or stylus after hearing the long beep, you
lift it straight off the screen. To exit the calibration mode, you can press the
calibration button again or press [Scroll Lock] twice.
If the calibration is done correctly, the mouse pointer should follow your finger or
stylus closely as you run it across the screen. You can recalibrate if the
calibration is not satisfactory.
User’s Manual
Document No: 550EX-TS User-A
Page 6 of 24
Touch Click Operations
Note: All touch actions can be configured in the USB Configuration Utility.
•
•
•
Left Mouse Click - Single Touch down on the Display.
Double Left Mouse Click – Double Touch down.
Right Click – Single Touch and Hold Down.
Buzzer Tones
The touch screen monitor generates buzzer tones that are sounded when the
following actions occur.
Power Up
Touch
Double Touch
Touch and Hold
Fault
Enter Calibration
Exit Calibration
[Beep]
[Beep]
[Beep] [Highest Beep]
[Beep] [High Beep]
[Long Beep] [Long Beep] [Long Beep]
[Long Beep]
[Long Low Beep]
USB Configuration Software
As explained in section 4 you do not need to install a software driver for the
touch screen to function.
If you wish you can edit the operating configurations using the USB configuration
software. This software is provided on the DisplayLite CD supplied with the touch
screen monitor.
When you install the touch screen software, 5 programs are provided:
USB Configuration
parameters.
Allow you to change the default USB operating
*Serial Configuration
Allow you to configure serial communications and to
calibrate the touch screen in the serial model.
*Serial Runtime
Provides serial communications between the touch
screen and the computer.
Panel Design
Allows you to design an off screen touch panel.
User’s Manual
Document No: 550EX-TS User-A
Page 7 of 24
Panel Runtime
Runs the off-screen touch panel.
* Note: Not applicable to USB standard touch screen monitor
Operating the USB Configuration Program
The USB Configuration program allows you to change the default settings.
The program is arranged in tabs.
General
Calibration key settings and buzzer tones.
Mouse
Touch thresholds and delay times.
User’s Manual
Document No: 550EX-TS User-A
Page 8 of 24
Signal
A diagnostic program for checking the signals from
the optical sensors.
Serial
Baud rate and DVD touch settings.
Sensors
Sensor resolutions, synchronisation frequency and
threshold.
Info
Serial number, model number and firmware version of
the touch screen.
User’s Manual
Document No: 550EX-TS User-A
Page 9 of 24
5. Apple Mac Users
To operate with an Apple Mac computer, the touch screen must be in Apple Mac
mode. This is achieved by running the CalibrateNWTS utility program, which also
allows you to calibrate the touch screen.
You only need to run this program once when you first connect to an Apple Mac.
To Enable Apple Mac Mode
With the USB cable connected from the touch screen monitor to the computer,
run the utility program, CalibrateNWTS, which is available on the CD.
After a few seconds, the utility automatically puts the touch screen into Apple
Mac mode.
You then need to calibrate the touch screen before using it.
Calibration (Apple Mac)
There are two options that you can choose to enter the calibration mode when
connected to an Apple Mac computer,
1. The CalibrateNWTS program
OR
2. Press the recessed hardware Calibration button located on the right side
of the monitor bezel.
User’s Manual
Document No: 550EX-TS User-A
Page 10 of 24
Calibration Procedure (Apple Mac)
With a clear desktop on the computer:
Click the [Calibrate] button in the CalibrateNWTS program
(Or gently press the calibration button through the hole on the side of the unit
until you hear a beep.)
The mouse pointer automatically moves to a position at the top left of the screen
Touch and hold your finger on the screen at that position until you hear a long
beep. The pointer moves to three further positions in sequence. Touch each
point in turn until you hear the beep.
This completes the calibration procedure.
Test the calibration by moving your finger around the screen checking that the
mouse pointer follows it closely. If the calibration is not satisfactory, you can recalibrate.
The touch screen is now ready for use.
User’s Manual
Document No: 550EX-TS User-A
Page 11 of 24
6. Dual Touch & Gestures on Windows 7
First, insert the disk, provided by DisplayLite, into the CD Drive of the computer
the touch screen will be running. Please note that the computer must be running
Windows 7 Home Premium, Professional or Ultimate operating system to enable
dual touch to work.
Now, plug in the touch screen to one of the USB ports on your computer.
On the CD there are 4 folders.
Double click on Windows Software –
Advance Settings.
Next double click on
nwtouch29_inst.
User’s Manual
Document No: 550EX-TS User-A
Page 12 of 24
If agree with the
end user licence
agreement then
click ‘I Agree’
You are able to
select which
components of the
program you wish
to install. By
Default USB Config
is selected, so you
need to press Next.
User’s Manual
Document No: 550EX-TS User-A
Page 13 of 24
Now, you can choose which
directory the software is
installed to. By default this will
go to your program files where
all other installs are kept. Once
you have chosen the
destination folder, click Install.
The program will
now install.
Once the program is
installed, click Close.
Now you need to configure
USB Config for use with
multi touch.
User’s Manual
Document No: 550EX-TS User-A
Page 14 of 24
This is the USB Config program
where you are able to use the
advance settings on your touch
screen display.
First, we need to calibrate the
touch screen. To do this, click the
Calibrate button. You will have to
wait 3 seconds, and then the
mouse pointer will move to the top
left on the screen. You must touch
the mouse pointer. Once you have
touched the pointer, it will move to
a different position. Please
complete for the four calibration
points.
Once calibration has been carried
out, click on Save.
Once you have saved the
calibration, click on the Mouse tab.
User’s Manual
Document No: 550EX-TS User-A
Page 15 of 24
Now you need to setup the mouse
interface to USB Digitiser. To do
this, click the USB Digitiser box.
Also, you need to turn on multi
touch reporting. To do this, click
the Tick Box.
Now you must save these settings. By clicking File, then Save. Once you have
saved the settings, return to the software CD.
Now double click on the Windows 7
Dual Touch Software folder.
User’s Manual
Document No: 550EX-TS User-A
Page 16 of 24
Double click on Install to start the
installation.
Please read the license agreement
and click I agree.
Then Click Next.
User’s Manual
Document No: 550EX-TS User-A
Page 17 of 24
Now, choose a destination file for
where the software will be saved
to. By default the software will be
saved to Program Files.
Once you have decided the
destination file, press Next.
Press Next to Start the Installation.
The installation windows will automatically close when the installation is
complete.
You will now need to install the two touch application which you wish to run with
the touch screen.
User’s Manual
Document No: 550EX-TS User-A
Page 18 of 24
7. Trouble shooting
The following information provides guidance notes for trouble shooting.
If the problem persists, contact your provider for further advice.
Touch screen does not respond to touches
Make sure the USB cable is properly connected from the touch screen to the
computer.
Touch produces erratic responses on screen
This can occur if the touch screen has not been calibrated correctly. To fix the
problem, recalibrate the touch screen. See Calibration on page 5
Unable to calibrate the touch screen
If you have a problem with calibrating the touch screen, contact your provider for
assistance.
“USB not recognised” message appears on screen
Unplug the USB cable, and then plug it back in. If still not recognised, it may be
necessary to uninstall and reinstall the USB device as follows.
User’s Manual
Document No: 550EX-TS User-A
Page 19 of 24
Uninstalling and Reinstalling the USB Device
In Microsoft Windows 7, navigate to System/Device Manager via Control Panel
and then double-click Human Interface Devices.
User’s Manual
Document No: 550EX-TS User-A
Page 20 of 24
Right click on one of the USB Input Devices and choose [Properties].
In the Properties dialog, select the Details tab and then Hardware Ids in the dropdown list of properties.
Verify that the device refers to the touch screen. The touch screens have a VID
of 1926, as illustrated above.
Close the Properties dialog.
User’s Manual
Document No: 550EX-TS User-A
Page 21 of 24
Right click the USB Input Device and Uninstall.
This will remove the touch screen from the Hardware Device list.
Reinstall the USB device.
User’s Manual
Document No: 550EX-TS User-A
Page 22 of 24
Touch screen does not work on waking PC
This can occur due to the power management features of the PC.
To fix the problem in Microsoft Windows 7, proceed as follows:
In Device Manager, expand System Devices/Universal Serial bus controllers, and
display the properties of the USB Root Hub.
Display the Power Management tab.
Make sure that "Allow the computer to turn off the device to save power" is not
enabled.
Click [OK] to save the setting.
User’s Manual
Document No: 550EX-TS User-A
Page 23 of 24
How long can the USB cable be?
The touch screen interface uses USB version 1.1, which supports cable lengths
of up to 5 metres. For lengths greater than 5 metres, you can use a CAT5 USB
cable extender for up to 40 m (130 ft).
For this configuration, you need power sources at both ends of the extender in
order to ensure there is minimal voltage drop across the cable. The following
diagram shows the recommended configuration using a PC and a powered hub
as the power sources.
For cable lengths over 20 metres, make sure you use high-quality cable.
The following USB extender device has been tested with the touch screen:
Ranger 2101 USB Extender
User’s Manual
Document No: 550EX-TS User-A
Page 24 of 24
How do I turn the beeping sound off?
In USB Configuration go to the General tab and set the buzzer time to zero.
How do I disable right mouse click?
For some applications, such as kiosks, it may be necessary to disable the rightclick option so that users cannot access operating system functions.
To disable the right-click option, go to the Mouse tab in USB Configuration and
set Right Click Delay to zero.
Working with Macromedia Flash buttons
A Macromedia Flash application button sometimes has two states when used
with a normal mouse - a rollover state and a click. To make sure that a touch on
the touch screen is always interpreted as a click and not a rollover, you can
either remove the rollover state from your Flash application code, or set the drag
threshold of the touch screen to as low as possible (but not 0%).
To set the drag threshold, go to the Mouse tab in USB Configuration and set the
drag threshold to 0.5%.
Note: Macromedia Flash applications can also exhibit slow response to mouse
clicks.
User’s Manual
Document No: 550EX-TS User-A