1
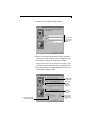
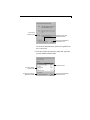
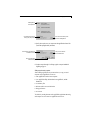
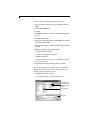
AppleWorks 5 Installation Manual Includes information about new features F O R W I N D O W S 9 5 / N T 4 . 0 K Apple Computer, Inc. © 1998 Apple Computer, Inc. All rights reserved. Under the copyright laws, this manual may not be copied, in whole or in part, without the written consent of Apple. Your rights to the software are governed by the accompanying software license agreement. The Apple logo is a trademark of Apple Computer, Inc., registered in the U.S. and other countries. Use of the “keyboard” Apple logo (Option-Shift-K) for commercial purposes without the prior written consent of Apple may constitute trademark infringement and unfair competition in violation of federal and state laws. Every effort has been made to ensure that the information in this manual is accurate. Apple is not responsible for printing or clerical errors. Apple Computer, Inc. 1 Infinite Loop Cupertino, CA 95014-2084 408-996-1010 http://www.apple.com Apple, the Apple logo, AppleWorks and the AppleWorks design are trademarks of Apple Computer, Inc., registered in the U.S. and other countries. Other company and product names mentioned herein are trademarks of their respective companies. Mention of third-party products is for informational purposes only and constitutes neither an endorsement nor a recommendation. Apple assumes no responsibility with regard to the performance or use of these products. Simultaneously published in the United States and Canada. Contents III Contents Chapter 1: Installing AppleWorks 5 What you need Customer support and registration Installing the AppleWorks 5 software Doing a typical or compact installation Doing a custom installation Uninstalling AppleWorks 5 Installation for network administrators Setting up for installation from a server Installing AppleWorks 5 on a network server 1-1 1-1 1-2 1-2 1-4 1-6 1-6 1-7 1-8 Chapter 2: New features in AppleWorks 5 New look and feel Button bars Text ruler Function button Internet features Link to a World Wide Web page Make your own Web page Make a document interactive Functionality enhancements Set a default font Add multimedia fields to database documents Enhance your graphics Create complex equations Use named cells Improved file compatibility 2-1 2-1 2-1 2-2 2-2 2-2 2-2 2-2 2-3 2-3 2-3 2-3 2-3 2-3 2-3 Chapter 1: Installing AppleWorks 5 This chapter provides step-by-step instructions for 1 installing the AppleWorks application and associated files 1 installing AppleWorks on a network server Important These instructions assume you’re familiar with standard Windows techniques such as using the mouse and locating files and directories. For more information, refer to the documentation that came with your computer. What you need To install and use AppleWorks, you need the following equipment and software: 1 the CD-ROM disc in the AppleWorks package 1 any IBM-PC or equivalent with an 80486/DX microprocessor running at 33 MHz or higher 1 at least 8 MB of RAM 1 a CD-ROM drive 1 Microsoft Windows 95 or Windows NT 4.0 system software Note If you don’t have a CD-ROM drive, you can purchase the application on floppy disks from Apple Computer, Inc. For more information, see the card that came with the AppleWorks package. Customer support and registration Please take the time to mail the product registration card included with AppleWorks or register your copy of AppleWorks at the following Web site: 1 http://www.applereg.com For information about customer support, see the Apple Service Directory included with your copy of AppleWorks or see the following Web site: 1 http://support.info.apple.com/support/supportoptions/ supportoptions.html For information about AppleWorks, see the following Web site: 1 http://www.apple.com/appleworks 1-2 AppleWorks 5 Installation Manual Installing the AppleWorks 5 software You have three options for installing AppleWorks on your hard disk: 1 Complete (typical) installation. The Installer installs the necessary AppleWorks files. 1 Minimum (compact) installation. The Installer installs the smallest number of files needed to run AppleWorks. You may want to use this option if you need to conserve space. 1 Partial (custom) installation. Use this option if you’re familiar with your computer and AppleWorks and you want to choose the files that you install. The Installer won’t remove earlier versions of ClarisWorks. Important You must use the Setup program to install AppleWorks. You can’t copy or drag the files to your hard drive because the files are compressed to fit on the installation disks. The Setup program decompresses the files during installation. Doing a typical or compact installation To do a typical or compact installation: 1. Start Microsoft Windows 95 or Windows NT 4.0. If Windows 95 or Windows NT 4.0 is already running, exit from all open applications. 2. Insert the CD-ROM disc (or 3.5-inch disk labeled Disk 1) into the appropriate drive. If you’re installing from floppy disks, lock the disks before installing by sliding the locking tab on each disk so the hole in the disk is open. When you insert the CD-ROM disc, the Installer automatically starts if your computer supports Autorun. If the Installer does not start automatically, double-click the icon for your CD-ROM drive. 3. Double-click the Setup icon. You see the AppleWorks Installer opening screen. 4. Click Next to display the Welcome screen. 5. Click Next to display the Software License Agreement dialog box. You see the software license agreement. 6. If you agree to the licensing terms, click Yes to continue the installation. You see the User Information dialog box. Installing AppleWorks 5 1-3 7. Personalize your copy of AppleWorks and then click Next. Type your information or press Tab to accept the entry and move to the next line 8. When you’re asked to confirm the information, click Yes if the information is correct. If you see a mistake, click No, press Tab to move through the boxes and buttons, and retype the information. Click Next when you’re finished. Check your typing carefully. You can’t change the name, company, or serial number after you complete the installation unless you reinstall AppleWorks. 9. In the Setup Type dialog box, select Typical or Compact, choose where you want to install AppleWorks, and then click Next. Installs AppleWorks and all optional files Installs only the AppleWorks application and dictionary files Installs only the AppleWorks files you select Drive and directory (folder) where AppleWorks will be installed Click if you want to install AppleWorks in a different folder or drive 1-4 AppleWorks 5 Installation Manual If the destination drive doesn’t have enough room, the Installer tells you. 10. Specify the Program Folder where you want the AppleWorks program icons to appear and then click Next. Accept the preset location or type a new folder name Or select a folder from the list The Installer begins copying files. 11. In the Setup Complete dialog box, indicate if you want to see the Readme file, which contains important last-minute information, and if you want an AppleWorks icon to appear on your desktop. Deselect I would like to view the Readme file now if you do not want to see the Readme file. You can see the Readme file anytime by choosing Programs from the Start menu, and then choosing AppleWorks 5 and Readme File. 12. Click Finish. If you selected the options in the Setup Complete dialog box, AppleWorks starts and the Readme file opens. Doing a custom installation To do a custom installation: 1. Follow steps 1 through 8 in “Doing a typical or compact installation” beginning on page 1-2. 2. In the Setup Type dialog box, select Custom, choose where you want to install AppleWorks, and then click Next. Installing AppleWorks 5 1-5 Click to install only components you select Drive and directory (folder) where AppleWorks will be installed Click if you want to install AppleWorks in a different folder or drive You can select the destination directory (folder) for the AppleWorks files here or in the next step. 3. Click to select or deselect the components you want to install, specify where you want to install them, and then click Next. Scroll to see more options Click to select or deselect a component to install Drive and directory (folder) where AppleWorks will be installed Click if you want to install AppleWorks in a different folder or drive 1-6 AppleWorks 5 Installation Manual 4. Specify where you want to store the AppleWorks reference files (such as the spelling dictionary and filters) and then click Next. Drive and directory (folder) where the files will be installed Click to install the files in a different location Click to accept the specified destination directory 5. Complete the installation by following steps 10 through 12 in “Doing a typical or compact installation” on page 1-4. Uninstalling AppleWorks 5 To remove all of the AppleWorks components from your system, use the Windows 95 or Windows NT 4.0 Add/Remove Programs utility. You don’t need to know where the AppleWorks files are stored or what they’re named. Note The Installer does not remove any documents from your computer. To uninstall the entire AppleWorks application: 1. Click the Start menu, choose Settings, and then choose Control Panel. 2. Double-click Add/Remove Programs. 3. Click the Install/Uninstall tab, select AppleWorks 5, and then click Add/Remove. Windows asks you to confirm your selection. 4. Click Yes to remove AppleWorks and all of its components from your computer. Installation for network administrators This section is for network administrators who want to set up the AppleWorks application for Windows 95 or Windows NT 4.0 on a server for multi-user access. You can set up AppleWorks for multiple users in either of the following ways: 1 Copy all the AppleWorks Installer files and folders on the AppleWorks 5 CD-ROM disc to a folder (directory) on the server. Then have users install AppleWorks from the server to their local hard drives. Installing AppleWorks 5 1-7 1 Install AppleWorks on a network server so that multiple users can run one copy of the application. Warning You may install AppleWorks on a network that is accessible by multiple computers only if you have either (1) installed software that locks out any concurrent users in excess of the number of licensed copies of AppleWorks, or (2) paid for an authorized, licensed copy of AppleWorks for each computer connected to the network. Contact Apple or an authorized Apple reseller if you need to license additional copies of AppleWorks. Setting up for installation from a server Once you set up the AppleWorks Installer on a server, users can install AppleWorks from the server onto their own computers. Setting up the Installer on a server To set up the Installer so users can install AppleWorks onto their own computers from a server: 1. On the server, create a folder named awinstal, or AppleWorks Installation, or some similar name. 2. Open the new folder, and then copy the AppleWorks Installer files to the new folder. 1 To set up server installation from a CD-ROM: put the CD-ROM disc into the CD-ROM drive. From the window that opens, drag all of the AppleWorks installation files into the folder. (If the window for the CD-ROM disc doesn’t open automatically, in My Computer or Windows Explorer, double-click the icon for the CD-ROM drive.) 1 To set up server installation from floppy disks: insert Disk 1 into the floppy disk drive. When the Disk 1 icon appears on the screen, drag it into the folder. This creates a folder named Disk 1 that contains the contents of the disk. Repeat this step for the rest of the Installer disks. The installation folder is now set up for users to install AppleWorks over the network. Your users can double-click the awinstal or Disk 1 folder to open it on the server, and then double-click the Setup.exe icon to start the installation. Installing AppleWorks 5 from a server Use one of the following procedures to install AppleWorks from the server onto users’ computers. 1-8 AppleWorks 5 Installation Manual To install the AppleWorks files using the Installer prompts and choices: 1. Start Windows 95 or Windows NT 4.0 on the user’s computer. If Windows 95 or Windows NT 4.0 is already running, exit from all open applications. 2. Use Windows Explorer to open the installation folder on the server. 3. Start the installation program by double-clicking Setup. 4. Follow steps 4 through 12 in “Doing a typical or compact installation” beginning on page 1-2. When you’re asked to specify a destination directory, specify a drive on the user’s computer. To install all the AppleWorks files and accept all the installation defaults, without seeing any prompts or choices (called silent installation): 1. Start Windows 95 or Windows NT 4.0 on the user’s computer. If Windows 95 or Windows NT 4.0 is already running, exit from all open applications. 2. Click the Start menu and choose Run. 3. In the Open text box, type the path to the folder holding the AppleWorks Installer files, and then type SETUP -S (where -S specifies silent installation). For example, the Run command might look like this: d:\AppleWorks Installation\SETUP -S. The Installer installs AppleWorks without displaying any prompts. Installing AppleWorks 5 on a network server You can install AppleWorks on a network server so that multiple users can run one copy of the application. Most AppleWorks files can reside on the server, but each user must have a personal user dictionary in a directory with read/write access. To set up AppleWorks so it can be run on a network server, you first install AppleWorks on the server and then you set up each user’s computer. Installing AppleWorks To install AppleWorks on a network server: 1. Follow steps 1 through 8 in “Doing a typical or compact installation” beginning on page 1-2. 2. In the Setup Type dialog box, select Custom, browse to the destination directory on the server where you want to install AppleWorks, and then click Next. Installing AppleWorks 5 1-9 Installs AppleWorks and all optional files The installer shows the drive and directory (folder) that you select Click to find the server directory where you want to install AppleWorks 3. Specify where on the server you want to store the AppleWorks reference files (such as the spelling dictionary and filters). Drive and directory where the files will be installed on the server Click if you want to install the files in a different location Click to accept the specified destination directory 4. Complete steps 10 through 12 in “Doing a typical or compact installation” beginning on page 1-4. Setting up each user’s computer After installing AppleWorks on your network server, set up your users’ computers to run AppleWorks so users can 1 start AppleWorks from their own computers 1 view AppleWorks Help, the Introduction to AppleWorks, and the Readme file 1 1 1 1 use stationery files add terms to their own user dictionaries change preferences save macros You do this by creating shortcuts to the AppleWorks application and setting each computer so users can access AppleWorks on the server. 1-10 AppleWorks 5 Installation Manual To create a shortcut to AppleWorks in each user’s Start menu: 1. On a user’s computer, click the Start menu, choose Settings, and then choose Taskbar. 2. Click the Start Menu Programs tab. 3. Click Add. 4. Click Browse, navigate to the server, and select the AppleWorks application on the server. 5. Click Open and then click Next. 6. Select a program folder for the shortcut, or click New Folder to create and name a new folder, and then click Next. 7. Type a name for the shortcut (for example, AppleWorks application) and then click Finish. 8. Repeat steps 3 through 7 for each of the following files: 1 AppleWorks Help (Clworks.hlp) 1 Introduction to AppleWorks (Cwintro.exe) 1 Readme (Readme.cwk) If you don’t see these files on the server, select Show All Files (*.*) from the Files of type pop-up menu. 9. Click OK in the Taskbar Properties dialog box when you’re finished. Next, you must set up each user’s computer to point to the AppleWorks folder on the network. You must also set up a place for each user’s user dictionary, preferences, and macros. To do so: 1. Start AppleWorks on the user’s computer. You see a dialog box asking you to locate the WMF.F32 file. Use the navigation icons to locate the WMF.F32 file in the AppleWorks 5 folder on the server Select the WMF.F32 file Then click Open Installing AppleWorks 5 1-11 2. Navigate to the AppleWorks directory on the server to find WMF.F32, click the filename, and then click Open. 3. In Windows Explorer, find or create a folder (directory) for the user dictionary. This can be on a local hard disk or in a private directory on the network where the user has read/write access. (You don’t have to reserve the user directory exclusively for AppleWorks files.) 4. Create a new AppleWorks word processing document, choose Writing Tools from the AppleWorks Edit menu, and then choose Select Dictionaries. 5. When the Select Dictionaries dialog box appears, choose User Dictionary (*.usp) from the Files of type pop-up menu. 6. Use the Look in pop-up menu to locate the directory you set up in step 3. 7. Type USER.USP in the File name box. 8. Click New. AppleWorks creates a new user dictionary and places it in the specified directory. As the user runs the application, AppleWorks stores the user preferences and macros in the same directory you created for the user dictionary. 9. Close AppleWorks. The user’s computer is now ready to run AppleWorks. Chapter 2: New features in AppleWorks 5 This chapter introduces the new features available in AppleWorks 5. New look and feel AppleWorks has a new look and feel and includes new ways to speed up your work. Button bars A button bar is a panel of buttons and other controls that provide quick access to over one hundred menu commands and tools. The button bar contains 1 buttons that provide shortcuts to AppleWorks tasks (for example, printing) 1 pop-up menus you can use to format selected text and objects When you start AppleWorks, you see the preset button bar (called the Default button bar) just below the menu bar. Default button bar for word processing documents AppleWorks comes with several ready-made button bars and buttons for nearly every AppleWorks function. You can customize a button bar for a document by adding buttons you use specifically in that document, and you can switch button bars to suit your needs. Text ruler In a word processing document, you see the text ruler across the top of the document window. The text ruler provides a quick, visual way to change paragraph formatting, such as justification and line spacing, and set tabs. You can also apply a label, such as number or bullet, to text from the text ruler. Text ruler 2-2 AppleWorks 5 Installation Manual Function button A function button now appears in the entry bar in a spreadsheet document. You can quickly choose spreadsheet functions from the Paste Function dialog box that appears when you click the button. Function button Internet features AppleWorks makes it easy for you to take full advantage of Internet and browser services. You can also make interactive AppleWorks documents that don’t connect to the Internet. Link to a World Wide Web page Any word processing, draw, or spreadsheet document can contain links, that, when clicked, start your browser and connect to a specific World Wide Web page. You can attach links to 1 1 1 1 1 selected text draw objects spreadsheet cells text, paint, or spreadsheet frames a selection in a paint image You can also create a custom button that starts your browser and connects to a specific Web page. Once you create the button, you can add it to any button bar. Make your own Web page Creating Web pages with AppleWorks is simple and quick. You create a word processing document and then use AppleWorks to translate the document so that it is readable by a browser. Make a document interactive You can make most AppleWorks documents interactive by formatting text or graphics as links to another part of the same document (called a book mark) or to another AppleWorks document (called a document link). You can’t create links in database and communications documents. New features in AppleWorks 5 2-3 Functionality enhancements New AppleWorks features make it easier to accomplish the work you do every day. Set a default font You can now specify a default font for word processing documents. Every time you create a new word processing documents, AppleWorks automatically uses the font you specify as the default font. Add multimedia fields to database documents You can now include graphics, frames, and movies in database fields. You define a field in a database document and select the Multimedia type. Enhance your graphics You can now add textures (multicolored fill patterns) to objects you’ve drawn, to text frames, to charts, or to database fields. Create complex equations The Equation Editor utility program from Design Science, Inc. is available within AppleWorks. Using the Equation Editor, you can create complex mathematical and scientific equations that you can insert into a word processing document or a text frame. Use named cells You can use ordinary, natural language in spreadsheet formulas. You can assign a name, such as Expenses or Fees, to a single cell or range of cells. Then you can use the cell name instead of the cell address to 1 help you remember the purpose of the data in a particular cell or cell range 1 search for cells by name 1 refer to cells by name in calculations and formulas Improved file compatibility AppleWorks now can read files created in Microsoft Office 95. AppleWorks can also save files in these and other formats. New filters include an improved HTML translator and new GIF and JPEG graphics filters.