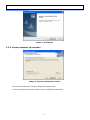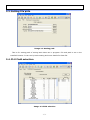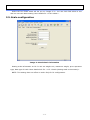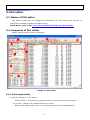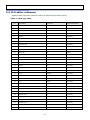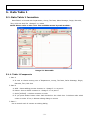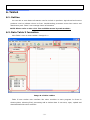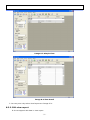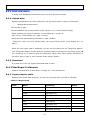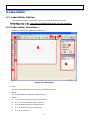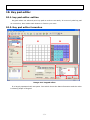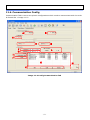
1
CL5000 Series
CL-Works Manual
(English)
Rev 2008.04.01
-1-
- Table of contents –
1. Install ............................................................................................................................ 7
1.1. Using this manual .................................................................................................... 7
1.2. How to install .......................................................................................................... 7
1.2.1. Preparing to install........................................................................................... 7
1.2.2. Input customer information............................................................................... 8
1.2.3. Finishing installation ...................................................................................... 10
1.2.4. Operation ..................................................................................................... 11
2. Starting the program ...................................................................................................... 12
2.1. Setting environment............................................................................................... 12
2.2. Setting communication ........................................................................................... 12
2.3. Setting file path..................................................................................................... 13
2.4. PLU Field selection ................................................................................................. 13
2.5. Scale configuration................................................................................................. 14
3. PLU editor ..................................................................................................................... 15
3.1. Basics of PLU editor................................................................................................ 15
3.2. Componts of PLU editor .......................................................................................... 15
3.2.1. Field explaination .......................................................................................... 15
3.3. Programing PLU editor ............................................................................................ 17
3.3.1. Opening new work in PLU editor ...................................................................... 17
3.3.2. Correct & add in PLU editor ............................................................................. 17
3.3.3. Save & open PLU data .................................................................................... 17
3.3.4. Excel file Import ............................................................................................ 18
3.3.5. Txt File Import .............................................................................................. 20
3.3.6. Dealing with Enter in PLU editor....................................................................... 23
3.3.7. Searching data .............................................................................................. 23
3.3.8. Viewing PLU type........................................................................................... 24
3.3.9. Upload PLU ................................................................................................... 24
3.3.10. Downloading PLU ......................................................................................... 24
3.3.11. Deleteing PLU.............................................................................................. 25
3.4. PLU editor reference............................................................................................... 26
4. Discount ....................................................................................................................... 28
4.1. Outline ................................................................................................................. 28
4.2. Discount formation................................................................................................. 28
4.2.1. Edit discount information components .............................................................. 29
4.3. Instruction ............................................................................................................ 29
4.3.1. Starting discount ........................................................................................... 30
4.3.2. Setting discount ............................................................................................ 30
-2-
4.3.3. Saving discount............................................................................................. 30
4.3.4. Upload data .................................................................................................. 30
4.3.5. Download data .............................................................................................. 31
4.4. Discount reference table ......................................................................................... 31
5. Data Table 1.................................................................................................................. 32
5.1. Data Table 1 formation ........................................................................................... 32
5.1.1. Table 1 Componets ........................................................................................ 32
5.2. Data Table 1 instruction .......................................................................................... 33
5.2.1. Starting new work ......................................................................................... 33
5.2.2. Edit & Add .................................................................................................... 33
5.2.3. Save data..................................................................................................... 34
5.2.4. Searching data .............................................................................................. 35
5.2.5. Delete data................................................................................................... 35
5.2.6. upload data .................................................................................................. 35
5.2.7. Download ..................................................................................................... 36
5.3. Assist information on Data Table 1 ........................................................................... 36
5.3.1. Input filed table............................................................................................. 36
5.3.2. Precautions................................................................................................... 37
6. Table2 .......................................................................................................................... 38
6.1. Outline ................................................................................................................. 38
6.2. Data Table 2 formation ........................................................................................... 38
6.2.1. Table 2 Componets ........................................................................................ 39
6.3. Instruction ............................................................................................................ 39
6.3.1. Starting Table 2 information ............................................................................ 40
6.3.2. Framing Table2 information ............................................................................. 40
6.3.3. Save............................................................................................................ 40
6.3.4. Upload data .................................................................................................. 40
6.3.5. Download data .............................................................................................. 40
6.4. Table 2 reference ................................................................................................... 41
6.4.1. Input property table....................................................................................... 41
6.4.2. Precaution .................................................................................................... 42
7. Store Data (PLU assist information III).............................................................................. 43
7.1. Store data formation .............................................................................................. 43
7.1.1. Explanation and name .................................................................................... 43
7.2. Store Data instruction ............................................................................................ 44
7.2.1. Starting a new work....................................................................................... 44
7.2.2. Edit & Add .................................................................................................... 44
7.2.3. Save............................................................................................................ 44
7.2.4. Delete.......................................................................................................... 45
-3-
7.2.5. Upload ......................................................................................................... 45
7.2.6. Download data .............................................................................................. 45
7.3. Store Data assist information .................................................................................. 46
7.3.1. Property table ............................................................................................... 46
7.3.2. Precautions................................................................................................... 47
8. Report .......................................................................................................................... 48
8.1. Outline ................................................................................................................. 48
8.2. Formation ............................................................................................................. 48
8.2.1. Names and Explaining .................................................................................... 49
8.3. Instruction ............................................................................................................ 50
8.3.1. Start seeing report ........................................................................................ 50
8.3.2. Edit view report............................................................................................. 51
8.3.3. Save view report ........................................................................................... 52
8.3.4. Upload data .................................................................................................. 52
8.3.5. Download ..................................................................................................... 52
8.4. View Report reference ............................................................................................ 52
8.4.1. Input property table....................................................................................... 52
9. Label Editor................................................................................................................... 54
9.1. Label Editor Outline................................................................................................ 54
9.2. Label editor formation ............................................................................................ 54
9.3. Label editor instruction ........................................................................................... 55
9.3.1. Starting label editor ....................................................................................... 55
9.3.2. Start new job in label editor ............................................................................ 56
9.3.3. Add default field item on label editor ................................................................ 56
9.3.4. Add fixed text item in label editor .................................................................... 56
9.3.5. Add barcode item in label editor ...................................................................... 56
9.3.6. Add image item on label editor ........................................................................ 56
9.3.7. Add box/line item on label editor ..................................................................... 57
9.3.8. change string item type.................................................................................. 57
9.3.9. change barcode item type............................................................................... 58
9.3.10. Changing image type.................................................................................... 58
9.3.11. Changing box, line type ................................................................................ 59
9.3.12. Select, make order, setting group, dismiss group .............................................. 59
9.3.13. Delete item ................................................................................................. 59
9.4. Label editor reference............................................................................................. 60
9.4.1. Label editor dialog image ................................................................................ 60
9.4.2. Attribute Table .............................................................................................. 64
9.4.3. Field list ....................................................................................................... 68
10. Key pad editor ............................................................................................................. 73
-4-
10.1. key pad editor outline ........................................................................................... 73
10.2. Key pad editor formation....................................................................................... 73
10.2.1. Name and explanation .................................................................................. 74
10.2.2. Edit print screen .......................................................................................... 74
10.2.3. Edit function key.......................................................................................... 75
10.2.4. Make new file .............................................................................................. 75
10.2.5. Save data ................................................................................................... 76
10.2.6. Delete file ................................................................................................... 76
10.2.7. Upload data ................................................................................................ 76
10.2.8. Download data ............................................................................................ 77
11. Config ........................................................................................................................ 78
11.1. Scale Configuration .............................................................................................. 78
11.1.1. Scale Tab Explainatoin .................................................................................. 78
11.2. Set Data File Path ................................................................................................ 80
11.2.1. Path Tab Explanation .................................................................................... 80
11.3. Field Select (PLU filed Config) ................................................................................ 81
11.3.1. Field Select Tab Explanation .......................................................................... 81
11.4. Communication Config .......................................................................................... 82
11.4.1. Communication Explanation .......................................................................... 83
12. Net Server .................................................................................................................. 85
12.1. 12.1 Net Server Outline ........................................................................................ 85
12.2. Net Server Formation ........................................................................................... 85
12.2.1. Name and Explanation .................................................................................. 85
12.3. Net Server Instruction .......................................................................................... 86
12.3.1. Explains about edit Net Server process control ................................................. 86
12.3.2. Explains about add and edit data ................................................................... 86
12.3.3. Delete Data................................................................................................. 87
12.3.4. Upload data ................................................................................................ 87
12.3.5. Download data ............................................................................................ 87
12.4. Net Server assist information................................................................................. 87
12.4.2. Precautions ................................................................................................. 87
13. Reference.................................................................................................................... 88
13.1. The available menus by scale models ...................................................................... 88
13.2. The available PLU items by scale models ................................................................. 89
13.3. The available Lable items by scale models ............................................................... 90
13.3.1. General Field List ......................................................................................... 90
13.3.2. Date Field List ............................................................................................. 93
13.3.3. Price field list .............................................................................................. 94
13.3.4. Weight Field List .......................................................................................... 94
-5-
13.4. The available report types by scale models .............................................................. 95
-6-
1. Install
1.1. Using this manual
This manual explains how to install and start CL-works PC program.
This program works with CL5000 series scale via Ethernet/RS232c protocol.
CL-works utilize the scale management.
1.2. How to install
Insert CL-works CD, It will install automatically. if it is not working poperty, go into CD
directory and double-click on setup file. <Image 1-1 CD-Rom>
Image 1-1 Content of CD-Rom
1.2.1. Preparing to install
When you insert CD or double-click on Setup file, it will starts copying necessary files and
prepares to install the CL-works program.
Image 1-2 Preparing to install
-7-
Image 1-3 Guidance
1.2.2. Input customer information
Image 1-4 Choose destination folder
The Chooser Destination Location dialog box appers with
“C drive\Program Files\CAS\CL5000” as the installation destination.
-8-
Image 1-5 Choose language
Image 1-6 Confirm choice
-9-
Image 1-7 Copying program
It begins to copy program, modules and basic components. After all it will registers to
windows; it makes CL-works Shortcut on desktop and starting program.
1.2.3. Finishing installation
Image 1-8 Install finish
Click finish button to complete installing. Use shortcut on tesktop or shortcut icon on folder
to start.
NOTE: Some of the windows versions like Windows 95 need to restart the computer.
-10-
1.2.4. Operation
Image 1-9 Starting program
When install is successfully finish. You can find CL-works folder and shortcut in both
windows starting program and desktop<Image 1-9 Starting program>. Click on shortcut
icon to start your program.
-11-
2. Starting the program
To use this program property, you need to go over basic setting processes.
Skipping this process may have some trouble to communicate with the scale. Please cheak
communication before use.
2.1. Setting environment
This chapter handles basic settings for using program. You can find specific details on
<11.configure>
2.2. Setting communication
Image 2-1 Setting communication
Click on config toolbar and choose communication you can see on <Image 2-1 Setting
communication>. Select TCP/IP(Ethernet cable) or RS232c(Serial cable)
-12-
2.3. Setting file path
Image 2-2 Setting path
This is for setting path of saving basic data use in program. File and path is set to the
installed location. It can use by basic setting and more details for Data file.
2.4. PLU Field selection
Image 2-3 Field selection
-13-
Select the PLU fileds which will list up on< Image 2-3>. You can click field select to see
and can use with basic setting. More details for <3.PLU editor>.
2.5. Scale configuration
Image 2-4 Scale basic information
Setting scale information on PC. It can set weight unit, maximum weight, price represent
type, date type of scale. More details look for <11.2.1 Scale (Setting scale environment)>.
NOTE: This setting does not effect on scale. Only for PC configuration.
-14-
3. PLU editor
3.1. Basics of PLU editor
This feature makes user to manage PLU information. You can register PLU yourself or
Import from editable programs like MS Excel file.
NOTE: Please refer to the <13.2 The available PLU items by scale models>
3.2. Componts of PLU editor
Explain naming and PLU editor information.
E
H
A
G
B
C
D
Image 3-1 PLU editor
3.2.1. Field explaination
1. A part of <Image 3-1. PLU editor>
Enter direction - It decides next direction also you can set grid setting condition.
A. Full view – Shows every default filed on PLU screen
NOTE: More details look for the <11.2.3.Field select (PLU field configuration) >
-15-
F
B. Price view – Showing Price view field on PLU screen
NOTE: More details look for the < 11.2.3.Filed select (PLU Filed configuration) >
2. B part of <Image 3-1. PLU editor>
A. Department – Choose PLU department which you want to reach
B. PLU No – Input PLU No. area which you want to search
C. Name – Input PLU name which you want to search
D. Find PLU – Press to start find PLU
E. More details look for the <3.3.3.Correct & add in PLU editor>.
3. C part of <Image 3-1. PLU editor>)
A. Dept No – Choose department No. which you want to work on
B. Add PLU – Add PLU on defaul list
C. Delete PLU – Delete selected PLU
D. Delete All – Delete All PLU
E. in Scale – Delete PLU in scale
4. D : (D part of <Image 3-1. PLU editor>
A. Status –It shows IP list and status using TCP/IP network
5. E : (E part of <Field 3-1 PLU editor>
A. Upload – Press when you want to get data from scale
B. Download – Press when you want to download data to scale
More details look for the <3.3.9.PLU Download>
6. F : F part of <Image 3-1 PLU editor>
A. Horizontal axis - Quick PLU list. Click name to line up
7. G : (G part of <Image 3-1 PLU editor>
A. Horizontal axis- PLU list)
B. A-You can choose PLU you want
C. Press column A to select all
8. H : (H part of <Image 3-1 PLU editor>
A. First icon- To open saved data
B. Second icon- To save reformed data
C. Third icon- To print
-16-
3.3. Programing PLU editor
Explain every process needed in PLU editing
3.3.1. Opening new work in PLU editor
1. Run Cl-works program
2. Select file menu
3. Click “New” and it’s ready for new work
3.3.2. Correct & add in PLU editor
Explains add & correct PLU
1. Additional process
A. Select “Dept No.” on <Image 3-1. PLU editor> part C
[Reference: Dept No need to add in <5.Data table I (PLU assist information I)> Press
add PLU button on <Image 3-1. PLU editor> part C
New data appears at the bottom of grid screen
B. Input informations. More details look for <2. Correct> below
[Reference: PLU is up to 4000 unit]
2. Correction
A. Choose the item you want to correct and press Enter or double-click it
B. It turns to editing input condition or list selected condition
Reference: there is two type of editing condition. Write down directly or choose from the
list. Items like Discount, Table I, Table II need to make up the data list first.
3.3.3. Save & open PLU data
Learn how to save, open, import and export PLU files.
1. Saving data
A. Click save icon on <Image 3-1 PLU editor> part H
[Reference: If display shows notice message. Click “OK” and fill up the rest of
information]
B. Data is saved
Reference: Saving refer to last open and saved file.
2. Saving in new name
A. Select “File” in <Image 3-1.PLU editor>
B. Choose Save as manu
C. Write new file name or select file to save
3. Opening data
A. Select “File” in <Image 3-1.PLU editor>
B. Choose Open menu
C. Write or select file to open
-17-
D. Press “OK” button
4. Exporting data
A. Select “File” in <Image 3-1.PLU editor>
B. Choose Export manu
C. Wirte or select file to export when dialogue appears
[Reference: It only saves same type of files]
D. Saving file is complete
5. Import data
CL-Works can import two file format types – Excel file format(.xls) and Text file format(.txt).
Reference: Import Excel<3.3.4> and Imprt Text<3.3.5>
3.3.4. Excel file Import
The file format which is the possibility of import is the Excel file(.xls) and the Text(.txt).
A. Select “File” in <Image 3-1.PLU editor>
B. Select “Import”
Image 3-2 Import - File open
C. Put the file name or select the Excel file to be imported <Image 3-2>
-18-
A
D
B
C
E
Image 3-3 Excel Import
D. Select the sheet to be imported when dialogue appears <Image 3-3>
E. Connection composition of the columns of Excel file(B) with the columns of CL-Works(C)
When after selecting the two columns(form B and C items) to be connected and click
‘>’ in D, the two items(column) will be connected.
-
‘>’ : Connect the selected columns
-
‘<’ : Cancel the connection of the selected columns
-
‘>>’ : Connect all columns
-
‘<<’ : Cancel the connction of all columns
-
‘Up’ : Connect the upper column
-
‘Dn’ : Connect the lower column
F. Connection Help Buttons
-
‘Default’: If the file to be imported is the basic file format which is exported form CLWorks, it comes to be connected by a ‘Default’ composition’
-
‘Save’: Save the current connection composition. It will be used in next import.
-
‘Reset’: Cancel the current connection composition.
-
‘OK’: Import file by the current connection composition.
-
‘Cancel’: Cancle import.
-19-
3.3.5. Txt File Import
CL-Works can import any Txt file format. <Image3-4> shows a example file by arbitrary
format.
Image 3-4 Txt File Sample
1. Field explaination
A
B
C
D
E
F
G
A. Start line number to import from Txt file.
B. Display a string which is selected line and the place which selects the loacation of each
-20-
field to use the mouse.
C. After selecting works from B, display the selected part in red color. This can prevent a
error from the selection work.
D. Display the current selected field from the list(F).
E. Display the selected data when selecting from B.
F. As PLU fields, when only the field which is necessary to select it is used.
G. Buttons
- Open: Open the selection work format saved.
- Save: Save the selection work format.
- Clear: Delete the information of the selected field.
- Clear All: Delete all of the selection information.
2. Import
A
Image 3-5 Step1 (Txt Import)
-21-
B
C
Image 3-6 Step2 (Txt Import)
A. Select field from field list (A of <Image 3-5>)
B. Indicate the selected area as the number of field selected by drag in Select Range(B of
<Image 3-6>). In this time, the start and the end location of the drag portion are
displayed(C of <Image 3-6>).
-22-
D
Image 3-7 Step3 (Txt Import)
C. As repeats the A and B with same way, connect all columns(D of <Image 3-5>).
D. Use save button to save the current status after finishing selection works.
E. From this time on, when advancing a same work to, uses the Open button and bring the
saved status.
F. The file can be imported by click the OK button after finishing the selection works.
3.3.6. Dealing with Enter in PLU editor
Explains how to manage Enter after input informations on editor dialog
1. Select NO in Enter Direction at < Image 3-1> part A. It just completes the input.
2. Select Right in Enter Direction at < Image 3-1> part A. It makes input complete and
move to right column
3. Select Down in Enter Direction at < Image 3-1> part A. It move to next line
3.3.7. Searching data
Explains how to find the data user want by factors
1. Explain control
A. (Department at <Image 3-1> part B: Choose searching conditoin of Department)
[Reference: It must registered on Table I to see on the list]
-23-
B. PLU No at <Iimage 3-1> part B: Input searching conditoin of PLU No area
C. PLU Name at <Iimage 3-1> part B: Input PLU name whicj you want to find
2. Instruction
A. Check all the conditions above 1(Expain controll). Clikck find PLU button at <Image 3-1>
part B. It show the PLU which satisfy the request.
[Reference: To see all PLU. Choose 00.All Dept at Department and click Finf PLU button.]
3.3.8. Viewing PLU type
Explain how to see PLU types. It can show up all the data grid type or some parts only
1. To view all data
Click Full View at <Image 3-1> part A
2. To view some parts
Click Price view at <I mage 3-1> part A
[Reference: It need to set up price view first. More details look for the <9.2.3.Field Select
(PLU Filed configuration>)
3.3.9. Upload PLU
Explains to bring data from the scale
1. First, check communication cable is connected
[Reference: refer to <11.2.4.Communication (communication configuration)]
2. Check communication setting is in oerder
[Reference: refer to <11.2.4.Communication (communication configuration)>]
3. Start program if above conditions are done
4. Click upload icon at <Image 3-1> part E
[Reference: You can press Cancel button to cacel it]
5. You can see the data from the scale on the screen
3.3.10. Downloading PLU
Explain how to download data to scale)
1. First, check communication cable is connected
[Reference: refer to <11.2.4.Communication (communication configuration)>]
2. Check communication setting is in oerder
[Reference: refer to <11.2.4.Communication (communication configuration)>]
3. Start program if above conditions are done
4. Open ro edit files which you want to download
5. Select PLU to download at <Image 3-1> part G
6. Click Download icon at <Image 3-1> part E
[Reference: You can press Cancel button to cacel it]
7. Click OK button to finish
-24-
3.3.11. Deleteing PLU
Explaining how to delete PLU process
1. Delete one by one
A. Start program
B. Open or edit data
C. Check the PLU you want to delete at the check box at <Image 3-1> part G
D. Click Delete PLU button at <Image 3-1> part C
E. Deleting complete
[Reference: It’s easy to find PLU using PLU search]
2. Delete scale PLU data only
A. Choose scale (LP5000) check box at <PLU editor image 3-1> part C
B. Click Delete PLU button box at <PLU editor image 3-1> part C
C. Deleting scale data
[Reference: It deletes only scale data]
3. Deleteing Department
A. Select Department you want to delete at <Image 3-1> part C in Dept No
B. Click Del button at <Image 3-1> part C
C. Every PLU you choosed in department deletes
-25-
3.4. PLU editor reference
Explains data input area using PLU editor & references like PLU type list
Table 3-1 PLU type table
No.
Type Name
Input area
Registered location
1
Department No.
99
Table I
2
PLU No.
999999
PLU Editor
3
PLU Type
4
PLU Editor
4
Name
40
PLU Editor
5
Name2
40
PLU Editor
6
Name3
40
PLU Editor
7
Group No.
99
Table I
8
Ext. Barcode
49
PLU Editor
9
Label No.
99
PLU Editor
10
Aux. Label No.
99
PLU Editor
11
Origin No.
500
Table I
12
Unit Weight
5
-
13
FixedWeight
99999
PLU Editor
14
Prefix
2
PLU Editor
15
ItemCode
999999
PLU Editor
16
Pieces
999
PLU Editor
18
Qty Unit No.
8
Table I
19
Use Fixed Price Type
1
PLU Editor
21
Price
999999
PLU Editor
22
SpecialPrice
999999
PLU Editor
23
TAX No.
9
Table I
24
Tare
99999
PLU Editor
25
Tare No.
99
Table I
26
%Tare
99999
PLU Editor
27
Tare % limit
99999
PLU Editor
27
Barcode No.
99
Table I
28
Barcode No2
99
PLU Editor
29
ProducedDate
999
PLU Editor
30
Packed Date
999
PLU Editor
31
Packed Time
99
PLU Editor
32
Sell By Date
9999
PLU Editor
33
Sell By Time
99
PLU Editor
-26-
34
CookByDate
9999
PLU Editor
35
Ingredient No.
999
Table II
36
Traceability No.
99
Table II
37
Bonus
999
PLU Editor
38
NutriFact No.
200
Table II
39
LabelMsg No.
99
Table II
40
Reference Dept
99
Table I
41
Reference PLU
999999
PLU Editor
42
Coupled Dept
99
Table I
43
Coupled PLU
999999
PLU Editor
44
# of LinkPLU
2
PLU Editor
45
Link Dept1
99
Table I
46
Link PLU1
999999
PLU Editor
47
Link Dept2
99
Table I
48
Direct Ingredient
300
PLU Editor
-27-
4. Discount
4.1. Outline
This chapter explains seting discount information on products. This program is able to add,
delete or edit discount information on products use by scale
Inputed information is goinig to save on data base & albe to upload or download to scale
NOTE: Please refer to the <13.1 The available menes by scale models>
4.2. Discount formation
Select Discount on main toolbar to use Discount information setting. When you start
Discount you can see <Image 4-2>
E
A
F
D
C
B
Image 4-1 Discount information
<Image 4-1> shows discount information list. You can add or delete data by press Add
button or Del button.
<Image 4-2>is data editing for each data.This specific data setting can use by press Add
button or dluble-click on the list
-28-
A
B
C
E
D
Image 4-2 Edit discount
4.2.1. Edit discount information components
1. Basic screen
A. It’s basic function for discount. Add, delete or edit discount information
B. Shows registered IP list and status when using TCP/IP network
C. It can select discount information contents you want. Click column A to select all contents
D. It shows present data saved on PC
E. Upload –Bring discount data to PC from the scale. It supports easy to edit data from the
scale using PC
F. Download –Download the editing data to connected scale
2. Edit discout information
A. It is to choose the department and show following PLU in it
B. PLU information can use in discount. It shows data registered in PLU editor. PLUs
alreaady registered in dicount information will not show up.
C. It is different in discount type according to PLU. Discount by % using weighting or
specific price in pieces
D. It shows detail discount information about when and how. Some PLU able to rediscount
E. This part is to set discount period like date, time and week. If you want to set the
discount period to always just check the ‘Always’ checkbox
4.3. Instruction
Discount information about selling list is saved in local PC’s data base. You can easily
access the entire list by using data base
-29-
4.3.1. Starting discount
Starting by click Discount on toolbar or Tool-Discount at menu
You can click Add button to input data or bring from connected scale
4.3.2. Setting discount
To input, press Add button <Image 4-1> at part A. <Image 4-2> will on the screen. Put
all the data in filed and click OK button to complete
1. Edit
Double-click list on <Image 4-1> at part D. <Image 4-2> will appear on the screen. Put
all the data in filed and click OK button to complete
2. Delete
A. Choose the list you want to delete in <Image 4-1> part C. press Del button to delete
B. You can delete some lists <Image 4-1> part C, in sametime
C. Beware. It can not recover once its deleted
4.3.3. Saving discount
Saving by clicking diskette icon on toolbar or Save in File
NOTE: Save regularly to prevent losing data by blackout or PC problems
4.3.4. Upload data
Explains uploading data from scale
☞ PC and scale need to connect in first place
1. Upload instruction
A. Check network conditions (set communication in Config menu)
B. Selete list you want to upload in <Image 4-1> part D
C. Click on arrow icon (part F) to start
D. Dialog box will appear and loading bar show uploading status.
NOTE: Only one scale must seleted when you using TCP/IP mode
-30-
4.3.5. Download data
Explains download present screen data to the scale.
1. How to download
A. Check network conditions
B. Select contents you want to download on <Image 4-1> at part A
C. Click on arrow(download)icon (part G) to start download
NOTE: You must select at least one to stat downloading
4.4. Discount reference table
Type of discount, Table 4-1
Discount type
PLU type
Object form
Price form
Unit price Discount
Weight
[ 0.000] kg
[ 0.000] $
Count
[
[
Weight
[ 0.000] kg
[ 0.000] %
Count
[
[
Weight
[ 0.000] kg
[ 0.000] $
Count
[
[
Weight
[ 0.000] kg
[ 0.000] %
Count
[
[
% Unit Price discount
Total price discount
% Total price discount
Fixed Price
] pcs
] pcs
] pcs
] pcs
]$
]%
]$
]%
Weight
Count
Free Item
Free addition
Total price by Total Price
% Total price by Total Price
Unit Price by Total price
Free addition by Total price
Weight
[ 0.000] $
Count
[
]$
Weight
[ 0.000] kg
[ 0.000] kg
Count
[
[
Weight
[ 0.000] $
[ 0.000] $
Count
[
[
Weight
[ 0.000] $
[ 0.000] %
Count
[
[
Weight
[ 0.000] $
[ 0.000] $
Count
[
[
Weight
[ 0.000] $
[ 0.000] kg
Count
[
[
-31-
] pcs
]$
]$
]$
]$
] pcs
]$
]%
]$
] pcs
Status
5. Data Table 1
5.1. Data Table 1 formation
Data Table I is formed with Department, Group, Tax Rate, Sales Message, Origin, Barcode,
Tare, PCS Unit look like <Image 5-1> below
NOTE: Please refer to the <13.1 The available menes by scale models>
Image 5-1 Data table
5.1.1. Table 1 Componets
1. Part A
A. It uses to choose among one of Department, Group, Tax Rate, Sales Message, Origin,
Barcode, Tare, PCS Unit
2. Part B
A. ADD - Starts adding process choosen in <Image 5-1> at part A
B. Delete –Use to delete contents in <Image 5-1> at part H
C. Scale [LP5000] –o delete contents on scale
D. If you press delete button when had checked on the check box. It deletes code which
exists on scale. If not, it deletes editing dialog on screen
3. Part C :
Use to search each of content on editing dialog
-32-
A. Search – Use to search data. Result will appear on display
B. Show All - It is to see all the data again after finishing searching
NOTE: It will not show up when selecting Tax Rate & PCS Unit
4. Part D :
A. Status –It shows IP list and ststus when using TCP/IP network
Note: It will not show up when you set to serial communication
5. Part E :
A. Save –Use to save or register data
6. Part F :
A. Upload –To bring data from scale to PC
7. Part G :
A. Download –Use to download data from PC to scale
8. Part H :
A. It shows seleted content data on display. This editing dialog can register or edit data
5.2. Data Table 1 instruction
Exlpains all about editing Data Table I
5.2.1. Starting new work
To start new work, follow the instruction below
1. Selete File in Menu
2. Choose New
3. Screen is ready for the new work
NOTE: It only applies to seleted content on at part A
5.2.2. Edit & Add
This chapter explains edit & adds data. If it is Barcode you want to work on.
1. Adding process
A. Select contents you want to work on the menu
B. Click ADD button on <Image 5-1>. New data will add in grid dialog below
C. Write detail information on data you want to add
2. Edit process
A. Select contents you want to edit and press Enter or double-click it
B. It turns to editing state like input state or choosing list state
C. When you finishing inputs, save the data
3. Add or edit barcode
A. Select Barcode on at part A
−
Click ADD button
−
When barcode input dialog appears like wirte barcode data in
-33-
−
When input is finished, press ADD button
−
Click EXIT button to finish adding process
Image 5-2 Add barcode dialog
B. Edit process
C. Select Barcode on at part A
−
Double-click the data you want to edit on <Image 5-1> at part H
−
Edit data when <Image 5-3> appears
−
Click OK to finish the editing
Image 5-3 Edit barcode dialog
5.2.3. Save data
1. Finish adding data & editing
2. Click disk(save) icon on <Image 5-1> or click Save on File Menu
NOTE : If informations are not in place, It will show caution message to fill in the data
-34-
3. If no caution message, saving is completed
NOTE : current data save in present database file. check from File Path in config
5.2.4. Searching data
How to find wanted among data
1. Instruction and control
A. Combo list on part C
It is the detail content lists of part A. Select the Filed you want to search
B. Searching dialog on part C
Insert keyword you want to search
C. Search button on part C
Results about searching keyword
NOTE : Use Enter key for searching result
5.2.5. Delete data
Explains how to delete data
1. Delete the file on PC
A. Select contents you want to delete in <Image 5-1> at part H
B. Click Delete button on <Image 5-1> at part B
The Scale [LP5000] box must not checked
C. Selected contents will delete and screen renews on <Image 5-1> at part H.
2. Delete scale data
A. Choose the content you want to delete on <Image 5-1> at part H
B. Check Scale [LP5000] box
C. Click Delete button on <Image 5-1> at part B
D. It will delete the data in scale if exist
[Reference: at least one contents is checked on <Image 5-1> at part D, if you are using
TCP/IP mode]
5.2.6. upload data
Explains how to upload data from scale.
1. upload instruction
A. Check conditions like communication mode, speed in setting communication in Config
[Reference: More details from 11.2.4. Commnication (Communicatin Config)
B. Selete contents you want to upload in <Image 5-1> at part A
C. Click download icon part F to start
D. Dialog box and upload status will shown in right condition
NOTE : must selet only one when you using TPC/IP mode
-35-
5.2.7. Download
How to download present screen data to the scale.
1. How to download
A. Check all the conditions like mode, speed in Config communication setting
B. Select contents you want to download on
C. Click download icon on part G to start download
D. When it works right, you can see the downloading dialog / status
NOTE : TCP/IP mode. You must select at least one
5.3. Assist information on Data Table 1
5.3.1. Input filed table
<Image 5-1> shows each fileds input area.
Table I property table, Table 5-1
Item
Filed name
Property
Status
Department
Code
1 ~ 99
Number
Speed Key
1~5
Number
Department Name
27
Character
Code
1 ~ 99
Number
Group Name
28
Character
Code
1~9
Number
Type
0~1
Number
Tax Rate (%)
0 ~ 9999
Number
Code
1 ~ 99
Number
Sales Message
30
Character
Code
1 ~ 500
Number
Origin Name
30
Character
Code
1 ~ 99
Number
Type
1 ~ 10
Number
Format Number
0~4
Number
Format
Ref. Table5-2 barcode Character
Group
Tax Rate
Sales Message
Origin
Barcode
format
Tare
PCS Unit
Description
19
Character
Code
1 ~ 99
Number
Type
1
Number
Value
Depens on scale
Number
Description
17
Character
Code
1~8
Number
-36-
PCS Unit
6
Character
roperty of each format barcode, Table 5-2
Barcode
Barcode Type
Input area
Status
EAN13
13
Character
EAN13A5
18
Character
EAN8
8
Character
I2OF5
24
Character
UPCA
12
Character
UPC13
13
Character
CODE39
24
Character
CODE93
24
Character
CODE128
24
Character
CODABAR
24
Character
5.3.2. Precautions
1. choosing another content on <Image 5-1> at part A, will make save on memories but not in
the file
Clicking Save icon will make all the memories to save in File. Before select the another
content on <Image 5-1> at part A, make sure the job is right
2. You must check communication status between PC and scale before upload, download or
delete data
3. There is two way to communicate with, serial communication and network dommunication.
Serial is fixed to one scale
It is to upload from one scale at the same time. So, must checked one scale on <Image 51> at part D
Data on present screen will disappear when starting upload. Do save the job before upload
-37-
6. Table2
6.1. Outline
You can edit or save basic information need to include in products. Agricultural and marine
products need to indicate where its from. Stockbreeding processes must show native and
distribution path. Table 2 can manage these informations
NOTE: Please refer to the <13.1 The available menes by scale models>
6.2. Data Table 2 formation
Click Table 2 icon on main toolbar <Image 6-1>
Image 6-1 Table 2 editor
Table 2 have similar user interface like other modules in main program. It forms in
showing data, selecting filed, processing add or delete data. It can save, open, upload and
download data like other modules
-38-
6.2.1. Table 2 Componets
1. <Image 6-1> part A
This part is to choose the data you want to edit among table 2 modules. You can select or
input data which albe to choose on table 2 editor. Data can edit is shown down below
A. Country
It puts basic information about country. It applays data which basically includes on counrty
in Table 2
If there is no basic data been inputed, it must be at first place to put in
B. Nutrifact
Input nutrition facts
C. Ingredient
Input Ingredient information
D. Slaughterhouse
It needed to input country and slaughterhouse information if it is stockbreeding processed
product
E. CuttingHall
Input country and cutting hall informaiton
F. Traceability
Input stockbreeding processed code like country, slaughterhouse, cutting hall. It should be
the last process from all above
2. Part B :
A. It is the basic funtion buttons. It can add, edit, delete data on the right list
3. Add new data on each input modules
A. Del –It is to delete selected data. Becareful when you delete data. It can not recall the
data after deleted
4. Part C :
A. Status –It shows IP list and ststus when using TCP/IP
5. Part D :
A. Vertical axis- PLU list
B. You can select PLU you want
C. To select all on the list, click column A
6. Part E :
A. It is the table which shows saved data on PC
6.3. Instruction
Data on table 2 is correlated information. If you change country on data, it will update to
new information to old data
-39-
When you first input data, it needs to input basic information first. Country information
should be first. Stockbreeding process information or product delivery information will follow
next. Every data must save to use in other processes
6.3.1. Starting Table 2 information
You can start input information about Table2 by click Table2 on toolbar. Once you click
Table2, input module is going to start and will shown on the screen
To input new data, it’s important to input information in following order. First input Country,
Slaughterhouse, Cutting hall and traceability information
6.3.2. Framing Table2 information
When you start a new job, you should input Country first. It has to put Country,
Slaughterhouse, Cutting Hall, and Traceability in order. Press save to update new data to
other parts
NOTE: Nutrifact and Ingredient will not get any influence by other data
6.3.3. Save
Click diskette icon or Save in File to save data
To prevent blackout or unexpected PC problems click save offen
6.3.4. Upload data
1. Upload instruction
Check network conditions like communication mode, speed in setting communication in
Config
A. Selete contents you want to upload in part D
B. Click icon on part F to start
C. Dialog box and upload status will shown in right cnodition
6.3.5. Download data
1. How to download
A. Select contents you want to download on <Image 6-1> at part A
B. Click icon on <Image 6-1> at part G to start download
C. When it works right, you can see the downloading dialog and status
-40-
6.4. Table 2 reference
6.4.1. Input property table
Table 2 Input property table, Table 6-1
Item
Filed name
Property
Status
Ingredient
Code
1 ~ 999
Number
Text
1 ~ 512
Character
Code
1 ~ 50
Number
Type
0~1
Number
Description
0 ~ 20
Character
Serving Size
0 ~ 20
Character
Serving Per
0 ~ 10
Character
Calories
0 ~ 255
Number
Calories From Fat
0 ~ 255
Number
Total Fat
0 ~ 255
Number
Saturated Fat
0 ~ 255
Number
Cholesterole
0 ~ 255
Number
Sodium
0 ~ 255
Number
Total Carbohydrate
0 ~ 255
Number
Dietary Fibers
0 ~ 255
Number
Sugars
0 ~ 255
Number
Protein
0 ~ 255
Number
Vitamin A
0 ~ 255
Number
Calcium
0 ~ 255
Number
Vitamin C
0 ~ 255
Number
Iron
0 ~ 255
Number
Etc
0 ~ 255
Number
Code
1 ~ 99
Number
Text
0 ~ 22
Character
Born Country
Ref. Country table
List
Bred Country
Ref. Country table
List
Slaughterhouse
Refer to Slaughterhouse table
List
Cutting Hall
Refer to Cuttinghall table
List
Code
1 ~ 250
Number
Country
62
Character
1 ~ 50
Number
Refer to Country table
List
Nutrifact
Traceability
Country
Slaughterhouse Code
Country
-41-
Cuttinghall
Text
99
Character
Code
1 ~ 250
Number
Country
Refer to Country table
List
Text
0 ~ 28
Character
6.4.2. Precaution
1. Choosing another content on <Image 6-1> at part A, will make save on memories but
not in the file
2. Clicking Save icon will make all the memories to save in File. Before select the another
content on <Image 6-1> at part A, make sure the job is right
3. You must check communication status between PC and scale before upload, download
or delete data
4. There is two way to communicate with, serial communication and network
dommunication. Serial is fixed to one scale
5. It can upload from one scale at the same time. When you using network communication
only one scale must selected at <Image 6-1>
Data on present screen will disappear when starting upload. Do save the job before upload
-42-
7. Store Data (PLU assist information III)
7.1. Store data formation
This program can register or edit information about store ,customer, and user himself
Store Data formed with Store Data, Customer, Scroll Message, User/Security and looks like <Image
7-1> at below
NOTE: Please refer to the <13.1 The available menes by scale models>
Image 7-1 Store Data
7.1.1. Explanation and name
1. Part A
It uses to choose among one of Store Data, Customer, Scroll Message, User/Security
1. Part B :
A. ADD - Starts adding process choosen in <Image 7-1>at part A
B. Delete –Use to delete contents in <Image 7-1> at part H
C. Scale –To delete contents on scale
If you press delete button when had checked on the check box. It deletes code which
-43-
exists on scale. If not, it deletes editing dialog on screen
2. Part D :
Status –It shows IP list and stastus when using TCP/IP network
3. Part E :
Save –Use to save or register data
4. Part F :
Upload –To bring data from scale to PC
5. Part G :
Download –Use to download data from PC to scale
6. Part H :
It shows seleted content data on <Image 7-1>. This editing dialog can register or edit data
7.2. Store Data instruction
7.2.1. Starting a new work
To start new work, follow the instruction below
1. Selete File in Menu
2. Choose New
3. Screen is ready for the new work
7.2.2. Edit & Add
1. Add process
A. Select contents you want to work on in <Image 7-1> at part A
B. Click ADD button. New data will add in grid dialog below
C. Write detail information on data you want to add
2. Edit process
A. Select contents you want to edit and press Enter or double-click
B. It turns to editing state (input state or choosing list state)
C. When you finishing inputs, save the data
7.2.3. Save
Explains about register or save edited data
A. Finish adding data & editing
B. Click E icon on <Image 7-1> or click Save on File Menu
[Reference: If basic informations are not in place, It will not save. When caution
message is appeared checks data and try again]
C. If no caution message is appeared, saving is completed
[Reference: Data is going to save in present database file. It can check from File Path in
Config program]
-44-
7.2.4. Delete
Explains how to delete data
1. Delete the file on PC
A. Select contents you want to delete in <Image 7-1> at part H
B. Click Delete button on <Image 7-1> at part B
[Reference: The Scale [LP5000] box must not checked]
C. Selected contents will delete and screen renews on <Image 7-1> at part H
2. Delete scale data
A. Choose the content you want to delete on <Image 7-1> at part H
B. Check Scale [LP5000] box
C. Click Delete button on <Image 7-1>
at part B
D. It will delete the data in scale if exist
[Reference: at least one contents is checked on <Image 7-1> at part D, if you are using
TCP/IP mode]
7.2.5. Upload
Explains upload data from scale [Reference: PC and scale need to connect in first place]
1. Upload instruction
A. Check scale is right
Check conditions like communication mode, speed in setting communication in Config
A.
[Reference:
More
details
look
for
the
<11.2.4.Communication
(communication
configuration)>]
B. Selete contents you want to upload in
Image 7-1> at part A
C. Click icon on <Image 7-1> part F to start
D. Dialog box and upload status will shown in right cnodition
[Reference: Only one must seleted when you using TPC/IP mode <Image 6-1> at part D]
7.2.6. Download data
Explains download present screen data to the scale. This funtion will work when PC and
scale is connected
1. How to download
A. Check scale is working right
B. Check all the conditions like mode, speed in Config Communication setting
[Reference: More details look for the <11.2.4. Commnication (Communication
Configuration)>]
C. Select contents you want to download on <Image 7-1> at part A
D. Click icon on <Image 7-1> at part G to start download
E.
When it works right, you can see the downloading dialog and status
[Reference: When you using the TCP/IP mode. You must select at least one on <Image 7-
-45-
1> at part D]
7.3. Store Data assist information
Explains characteristic of each data in <Image 7-1> and precautions
7.3.1. Property table
<Store Data, Image 7-1> shows each fileds input property. You can not overwrite when
you add or edit data
Store Data Input property table, Table 7-1
Item
Field name
Property
Status
Store Data
No.
1 ~ 10
Number
Name
26
Character
Tel.
20
Character
Text
80
Character
No.
1 ~ 99
Number
Name
32
Character
Tel.
24
Character
Credit Limit
0 ~ 9999999
Number
Address 1
50
Character
Address 2
50
Character
Address 3
50
Character
Scroll
No.
1~9
Number
Message
Effect
1~2
Number
Message
86
Character
Daily
0~1
Number
Week
0000000 ~ 1111111
-
Start Date
000000 ~ 991231
-
End Date
000000 ~ 991231
-
Start Time
000000 ~ 240000
-
End Time
000000 ~ 240000
-
1 ~ 95
Number
Name
24
Character
Nick name
8
Character
Password
8
Character
Level
0~3
Number
Scan Code
1~1999
Number
Mapping Code
13
Character
Department No
1~99
Number
Customer
User/Security No.
Scanner
-46-
PLU No
1~999999
Number
PLU Name/Remark
40
Character
7.3.2. Precautions
1.
Choosing another content on <Image 7-1> at part A, will make save on memories but not in
the file
Clicking Save icon will make all the memories to save in File. Before select the another
content on <Image 7-1> at part A, make sure the job is right
2.
You must check communication status between PC and scale before upload, download or
delete data
3.
There is two way to communicate with, serial communication and network dommunication.
Serial is fixed to one scale
It can upload from one scale at the same time. When you using network communication,
only one scale must selected at <Image 7-1>
Data on present screen will disappear when starting upload. Do save the job before upload
-47-
8. Report
8.1. Outline
This chapter explains seeing reports about sales data information which saved in scale.
This report is in PC and indicates newly update data from the scale
NOTE: Please refer to the <13.4 The available report types by scale models>
8.2. Formation
You can use to click Report on main toolbar and it will show up like <Image 8-1> below
E
A
B
C
D
Image 8-1 Seeing Reort
You can select the contents you want to see in <Image 8-1>. <8.3.1.Start seeing report>
explains seeing report contents
You can see the <Image 8-2> when you click Delete Data at <Image 8-1> part D.
Becareful when you delete the data, it can not recall the data once deleted
-48-
A
B
Image 8-2 Delete dialog
8.2.1. Names and Explaining
1. Normal screen
A. <Image 8-1> part A
-
Select the period of the report you want to see
-
Input form follows set up date form in Config
B. <Image 8-1> part B
-
This part decides how to see the report
-
Scale data contents 64 data filed and hard to find sales information at once
-
So, it decides to see insimple way or detail
C. <Image 8-1> part C
Report type you can see is down below
-
Scale –can see the report by each scale
-
PLU – can see the statistics saled by PLU
-
Group –It shows the statistics saled by PLU Group
-
Department –It shows PLU stastic which seperated by Department
-
Hourly –It shows hourly saled stastics
-
Clerk –It shows each clerk’s saled stastics
D. <Image 8-1> Part D : View Report - Use to see reports
-
It shows the report which set date in <Image 8-1> part A & decide in <Image 8-1>
part B
-
It might take long time to get report if you seet up Detial in <Image 8-1> part B
E. Delete Data –It use to delete data
-
<Image 8-1> will show up by clicking button. It can delete data saved in PC or Scale)
-49-
F. Discard Temp Report
-
Delete the temporary report just uploaded.
G. <Image 8-1> Part E :
-
Upload –It uploads data from scale to PC.
2. Delete Data
A. <Image 8-2> part A
-
Delete saved data in scale
-
Sales information saved on scale will delete by press Reset
-
Becareful to delete data by mistake
B. <Image 8-2> part B
-
Delete saved data in PC
-
Sales information saved on PC will delete by press Reset
-
It can not recall the deleted data
8.3. Instruction
It is made to see the report of contents stastic information which saled on scale. It can not
edit or download data
8.3.1. Start seeing report
Start by clicking Report at toolbar or Tool->Report in menu
To see reports follow the down below
1. Select period
A. To select the date, choose date at <Image 8-2>. Korea uses year-month-date basically.
If you want to change, go to 11.2.1.Scale (Scale Config). After you change date form,
input need to follow the form
B. It uses 2 units form in year. For example, if you want to see the spastics between 01-012004 ~ 12-30-2004, input 04-01-01 and 04-12-31
C. If you puts wrong in period or puts 00-00-00 in blank, it prints every statistic data saved
2. Select View type
A. Depends on reports, It had many informations on one sales information
B. For example, Scale information shows 64 data on each scale
C. It is hard to understand at seeing once
D. To solve this problem, this funtion use to view simple informations user want to see
-50-
Image 8-3 Simple View
Image 8-4 View detail
3. You can print it by select View Report at <Image 8-2>
8.3.2. Edit view report
It do not support edit data in view report
-51-
8.3.3. Save view report
It saves in PC database automatically even you don’t press save button
8.3.4. Upload data
Explains upload data from scale [Reference: PC and scale need to connect in first place
−
Upload(Upload instruction)
Check scale is right
Check conditions like communication mode, speed in 11.2.1.Scale (Scale Config)
Selete contents you want to upload in <View Report 8-1> at part D
Click icon on <View Report 8-1> part F to start
Dialog box and upload status will shown in right condition
[Reference: Only one must seleted when you using TPC/IP mode <View Report 8-1> at
part C]
When the new report data is uploaded, you can see the report title as “Temporary Report”.
This “Temporary Report” means that the uploaded report is not saved to the main report DB
yet. Therefore, if you want to save this temporarly report, click “Save” button. Otherwise, if
you don’t want to save it, click “Discard Temp. Report” button.
8.3.5. Download
It is read only. It do not support download data to scale
8.4. View Report reference
Explains characteristic of each data in <Image 8-1> and precautions
8.4.1. Input property table
Showing each fileds input property. You can not overwrite when you add or edit data
Table 8-1 Report field
Itme
Name
Explainnig
Scale
Scale ID
scale No
Item
sales history
Count
Aggregate unit
Volume
Aggregate volume
PLU
PLU No
Item
sales history
Count
Aggregate unit
Weight
Aggregate weight
Qty
Aggregate quantity
PLU
-52-
Status
Group
Volume
Aggregate volume
Group
Group No
Item
sales history
Count
Aggregate unit
Volume
Aggregate volume
Department Department
Hourly
Clerk
Tax
sales part
Item
sales history
Count
Aggregate unit
Volume
Aggregate volume
Hourly
Hourly condition
Item
sales history
Count
Aggregate unit
Volume
Aggregate volume
Clerk
sales person
Item
sales history
Count
Aggregate unit
Volume
Aggregate volume
Tax
Tax
Item
sales history
Count
Aggregate unit
Volume
Aggregate volume
-53-
9. Label Editor
9.1. Label Editor Outline
This chapter explains about label editor. It can make labels use in scale
NOTE: Please refer to the <13.2 The available label items by scale models>
9.2. Label editor formation
Explains names and formation of label editor
H
A
B
F
E
D
G
C
Image 9-1 Label Editor
1. Part A
It use to save label format or bring up saved label format
2. Part B :
Use to download the worked on label format
3. Part C :
A. 1st icon-move selected item to the bottom
B. 2nd icon-move selected item to the top
C. 3rd icon-make group to selected items
D. 4th icon-dismiss the selected group
E.
5th icon-It sets font
-54-
F.
6th icon-It set font bold
G. 7th icon-makes font bent
H. 8th icon-draw line on bottom
I.
9th icon-draw line in the middle
J.
10th icon-set line to the left
K. 11th icon-set line to the middle
L.
12th icon-set line to center
M. 13th icon-set line to the right
N. 14th icon-set line to the top
O. 15th icon-set line to the middle of downside
P.
16th icon-delete selected icon
4. Part D :
A. 1st icon-change to select item condition
B. 2nd icon-Add barcode
C. 3rd icon-Add image item
D. 4th icon-Add basic field item
E. 5th icon-Add field item related to price
F.
6th icon-Add field item relatd to weight
G. 7th icon-Add field item related to date and time
H. 8th icon-Add fixed text item
I.
9th icon-Add box item
J.
10th icon-Add line item
5. Part E :
This blank shows item
6. Part F :
It shows iem and mouse working information
7. Part G :
It shows scale list when using TCP/IP communication)
[Reference: It shows up when TCP/IP communication is set]
9.3. Label editor instruction
9.3.1. Starting label editor
1. Click Label button at <Image 9-1> part H
Another way to start
1. Click CL5000Manager on tesktop to start
It opens last data you worked with
2. Click Label button at <Image 9-1> part H
-55-
9.3.2. Start new job in label editor
After processed <Image 9-1>, you can move to new work
1.
Select file menu and go to new
9.3.3. Add default field item on label editor
Explains how to add basic filed item on new label form or existing label form
1.
Click 4th icon on <Image 9-1> at part D
2.
Click <Image 9-1> part E. default dialog will appear
3.
Select field in filed list on dialog
Reference: Refer to <Image 9-1>]
4.
Field item will add on label form
9.3.4. Add fixed text item in label editor
Explains how to add fixed text item on label form
1.
Click 8th icon on <Image 9-1> at part D
2.
Click <Image 9-1> at part E
3.
Fixed text item will shown
9.3.5. Add barcode item in label editor
Explains how to add barcode item to label form
1.
Click 2th icon on <Image 9-1> at part D
2.
Click <Image 9-1> at part E. Barcode dialog will appear and select the barcode type
[Reference: Refer to <Image 9-1>]
3.
Click OK button. Barcode will shown on label form
9.3.6. Add image item on label editor
Explains how to add image item on label editor
1.
Click 3th icon on <Image 9-1> at part D
2.
Click <Image 9-1> at part E. Image dialog will appear
[Reference: Refer to <Image 9-1>]
3.
Click image browser button on image file dialog
4.
Image browser dialog will show up in screen
[Reference: Refer to <Image 9-1>]
5.
Select image file and option
6.
Write image ID
7.
Click Ok button and browser dialog will disappear
8.
Click Ok once again
9.
Image will add
-56-
9.3.7. Add box/line item on label editor
Explains how to add box and line item
1.
Add box item instruction
2.
Click 9th icon on <Image 9-1> at part D
A. Click <Image 9-1> at part E. box dialog will appear
[Reference: Refer to <Image 9-1>]
B. Select box and line type and click OK button
C. Box item will add
3.
Add line item instruction
4.
Click 10th icon on <Image 9-1> at part D
A. Click <Image 9-1> at part E. Line dialog will appear
[Reference: Refer to <Image 9-1>]
B. Select line type and click OK button
C. Line item will add
9.3.8. change string item type
1.
change font type
Choose the item which you want to change font
A. Click 5th icon on <Image 9-1> at part D. Font dialog will appear. Select font and click OK
button
B. bold-Click 6th icon on <Image 9-1> at part C
C. italic-Click 7th icon on <Image 9-1> at part C
D. underlinie-Click 8th icon on <Image 9-1> at part C
E. throwline-Click 9th icon on <Image 9-1> at part C
F.
left line-Click 10th icon on <Image 9-1> at part C
G. middle line-Click 11th icon on <Image 9-1> at part C
H. left line-Click 12th icon on <Image 9-1> at part C
I.
top of downside-Click 13th icon on <Image 9-1> at part C
J.
middle of downside-Click 14th icon on <Image 9-1> at part C
[Reference: If many types of items been selected it changes only able ones]
2.
changing general form
A. change fixed text form
- First, doubleclick fixed text item
- fixed text dialog will appear
- Select General tab
- Edit text
- Click OK button
B. Changing filed form
- First, doubleclick field text
-57-
- Field text will appear
- Select General tab
- Select field in field list
- Click OK button
3.
Changing user detail form
A. First, doubleclick string item
B. dialog will appear
C. Choose Custom tab
D. Doubleclick form price you want
E. Input price when it changes to editor dialog
F.
Click OK button
[Reference: refer to < Iamge 9-1> about each attributes]
9.3.9. change barcode item type
Explaining about changing barcode type
1.
General type
A. Doubleclick barcode
B. Choose General tab
C. Select or input barcode type, barcode width and string
[Reference: Refer to <Image 9-1>]
D. Click OK button
[Reference: Refer to <Image 9-1> about the barcode type]
2.
Changing user detail form
A. First, doubleclick barcode
B. Choose Custom tab
C. Doubleclick form price you want
D. Input price when it changes to editor dialog
E. Click OK button
[Reference: refer to <Image 9-1> about each attributes]
9.3.10. Changing image type
Explains about changing image item
1.
changing image ID
A. doubleclick image item
B.
(Image dialog<Image 9-1> will appear)
C. Input image ID
D. Click OK button
[Reference: If no image ID is exist. General image will appear]
2.
changing image file
A. doubleclick image item
-58-
B. start File Searching Dialog<Image 9-1>
C. Select image file
D. name the image type
[Reference: Image had its own ID. Image ID use when you change Image in Image
dialog. It will overwrite when it has Image ID. Color image need to set print image
option to print out. Usable image size is 8kbyte.]
E. Click OK button
9.3.11. Changing box, line type
1.
General type
A. Doubleclick box or line item
B. Select General tab
C. Input or select box and line
[Reference: Refer to <Image 9-1>]
D. Click OK button
2.
Changing user detail form
A. Doubleclick box or line item
B. Select Custom tab
C. Doubleclick form price you want
D. Input price when it changes to editor dialog
E. Click OK button
[Reference: refer to <Image 9-1> about each attributes]
9.3.12. Select, make order, setting group, dismiss group
Explains about select item, setting group, dismiss group
1.
Select-you can select the item among the lable form which made up with many items
2.
Send itme to bottom- Select the items and click 1st icon at <Image 9-1> part C
[Reference: press tab key on keyboard to use in item order]
3.
Send item to top- Select the items and click 2nd icon at <Image 9-1> part C
4.
Seting group-Select the items and click 3rd icon at <Image 9-1> part C
[Reference: group can not include another group]
5.
Dismiss group- Select the items and click 4th icon at <Image 9-1> part C
9.3.13. Delete item
Explains how to delete item
1.
Using mouse to delete
A. Choose the item you want to delete
B. click last icon at <Image 9-1> part C
2.
using Keyboard to delete
A. select item you want to delete
-59-
B. press Del key on keyboard
9.4. Label editor reference
It arranges dialog image, attribution of items and contents user can refer in label editor
9.4.1. Label editor dialog image
Image 9-2 Default Field Dialog
-60-
Image 9-3 Price Field Dialog
Image 9-4 Weight/Quantity Field Dialog
-61-
Image 9-5 Date Field Dialog
Image 9-6 Barcode Dialog
-62-
Image 9-7 Image Editor
Image 9-8 Box Dialog
-63-
Image 9-9 Line Dialog
9.4.2. Attribute Table
Attribute table of each items
Barcode type, table 9-1
No
Type
Explaining
1
EAN-13
13digit
2
EAN13A5
13digit + 5digit
3
EAN-8
8 digit
4
I20F5
2~24 digit
5
UPCA
12 digit
6
UPC-13
13 digit
7
CODE39
8
CODE93
9
CODE128
10
CODABAR
Alphanumeric character, Format ‘T’, prints out the name of PLU.
Barcode Proprety Table, Table 9-2
No
Attribution name
Explanation
property
-
status
1
Field type
distinguish code
not in use
2
NumberData
sample number data which shown on -
Different
screen
according
to
the
barcode
-64-
type
3
Left
price of left item location
0~480
Different
4
Top
price of top item location
0~
according
to
the
label size
5
Rotation
rotation option
0~3
6
Opaque
transparent option
-
7
Barcode Type
select barcode type option
0~28
8
FullHeight
total height of barcode plus word
0~960
Different
9
BarHeight
height of barcode
0~960
according
10
CharHeight
height of word
0~960
to
not in use
the
label size
11
HRIPosition
word location
0~255
12
HRIPrint
word print option
0~1
13
HRICheck
checked barcode number word print 0~1
option
14
HRIStartStop
view start and top word option
0~1
15
MagY
narcode width option
0~19 : 0~4
20~28:
1~11
16
BarGuard
barcode guard print option
0~1
17
BearerBarWidth
barcode safety line option
0~1
18
UseOcr
Ocr font use option
0~1
19
CheckType
check sum type optoin
0~6
20
MagnitudeX
horizontal word size
-
different
21
MagnitudeY
vertical word size
-
according
to the bar
type
22
InterSpacing
adjust inter spacing
0~10
23
LineSpacing
ladjust line spacing
0~10
24
Justtification
line up words to horizontal
0~2
25
SingleFontID
1byte font (English font ect)select
-
different
26
DoubleFontID
2byte font (Korean font ect)select
-
according
to the font
file
27
FiexedWidth
use fixed width word
0~1
28
MirrorX
word line direction optoin
0~1
29
AutoShrink
auto shrink to word print property size
0~1
-65-
30
Vertical
line up word in vertical
0~1
31
CharRotation
word rotation option
0~3
String Property Table, Table 9-3
No
Name
Explanation
property
1
FieldType
field division code
0~250
2
Text
field example text
254자까지
text line
3
Left
price of left item location
0~480
different
4
Top
price of yop item location
0~960
according
5
Width
item width
0~480
to
6
Height
item height
0~640
size
7
Rotation
rotation option
0~3
8
Opaque
transparent option
0~1
9
WordWrap
last word unit coloum option
0~1
10
NoType
decide to use font option
0~1
11
Italic
font italic option
0~1
12
UnderLine
font underline option
0~1
13
LineThrough
font line thrugh option
0~1
14
Shadow
shadow option
0~1
15
Bold
font bold option
0~1
16
Reverse
reveres color
0~1
17
Dline
draw double line
0~1
18
Outline
font outline option
0~1
19
FontTable
select font option
0~1
20
MagnitudeX
magnify horizontal option
0~5
21
MagnitudeY
magnify vertical option
0~5
22
InterSpacing
input inter spacing option
0~10
23
LineSpacing
input line spacing option
0~10
24
Justification
set line to horizontal axis
0~2
25
SingleFontID
1byte font select option
3~6
26
DoubleFontID
2byte font select option
3~5
27
FixedWidth
use fixed width text
0~1
28
MirrorX
text line direction option
0~1
29
AutoShrink
auto shrink to print property size
0~1
30
Vertical
set liine to vertical axis
0~1
31
CharRotation
text rotation option
0~3
-66-
status
label
Box / Line Property Table, Table 9-4
No
Name
Explanation
property
status
1
Left
price of left item location
0~480
different
2
Top
price of yop item location
0~960
according
to
label
size
3
Opaque
transparent option
0~1
4
Type
box, line shape type
0~3
5
Color
select color option
0~1
6
Width
item width
0~480
different
7
Height
item height
0~960
according
to
size
8
Border
line size
1~8
-67-
label
9.4.3. Field list
Field table of each item
General Field List, table 9-5
No
List
code
Default
0
STATICSTRING
0
STATIC
1
Department Name
1
Bakery
2
Department Number
3
115
999
Group Number
9
999
4
PLU Number
2
999999
5
PLU Name(1,2,3 ALL)
10
French Bread
6
PLU Name1
29
French Bread
7
PLU Name2
30
With Popies
8
PLU Name3
31
Baked Fresh In-Store Daily
9
Additional Info 1
47
10
Additional Info 2
32
11
Additional Info 3
33
12
Additional Info 4
34
13
Additional Info 5
48
14
Item Code
11
99
15
Prefix Code
3
99
16
Unit Weight
5
1kg
17
Tax Rate
8
99.99
18
Pieces(by-PCS)
14
99
19
Quantity Symbol
15
pcs
20
Bonus Point
50
999
21
Origin
55
KOREA
22
Ingredient
25
Ingredient: Water, Enriched Flor …
23
Sales Message
90
This is a sales message.
24
Percent Tare
24
99.99
25
Percent Tare Limit
23
99.99
26
Label Serial Number
135
9999
27
Store Name
105
CAS Shop
28
Store Telephone
138
031-820-1100
29
Store Text
139
Best shop
30
Clerk Number
128
99
-68-
31
Clerk Name
106
Mark L
32
Customer Name
107
Micael
33
Customer Number
130
99
34
Scale Number
137
99
35
Day Of Week(Packed On)
117
MON
36
Currency Rate
119
1 $ = 0.785
37
(T)Traceability No
35
99
38
(T)Born in Country
36
999
39
(T)Bred in Country
37
999
40
(T)Slaughter House
38
99
41
(T)Slaughter Country
39
999
42
(T)Cutting Hall
40
99
43
(T)Cutting Country
41
999
44
(T)Reference
42
99
45
(T)Born in Country Number
43
999
46
(T)Bred in Country Number
44
999
47
(T)Slaughter House Number
45
99
48
(T)Cutting Hall Number
46
99
49
(N)Serving Size
140
1 Cup
50
(N)Servings Per
141
9
51
(N)Calories
142
999
52
(N)Calories From Fat
143
999
53
(N)Total Fat
144
999
54
(N)Saturated Fat
145
999
55
(N)Cholesterol
146
999
56
(N)Sodium
147
999
57
(N)Total Carbohydrates
148
999
58
(N)Dietary Fibers
149
999
59
(N)Sugars
150
999
60
(N)Protein
151
999
61
(N)Vitamin A
152
999
62
(N)Calcium
153
999
63
(N)Vitamin C
154
999
64
(N)Iron
155
999
65
(N)Total Fat DV
156
999
66
(N)Saturated Fat DV
157
999
67
(N)Cholesterol DV
158
999
-69-
69
(N)Sodium DV
159
999
70
(N)Total Carbohydrates DV
160
999
71
(N)Dietary Fibers DV
161
999
72
(N)Protein DV
162
999
73
(N)Trans Fat
163
999
74
(C)Total Price
170
TOTAL PRICE $
75
(C)Unit Price
171
UNIT PRICE $
76
(C)Weight
172
WEIGHT
77
(C)Tare
173
TARE
78
(C)Saved Price
174
SAVED PRICE
79
(C)Regular Price
175
REGULAR PRICE
80
(C)Tax Price
176
TAX PRICE
81
(C)Packed On Date
177
PACKED ON DATE
82
(C)Sell By Date
178
SELL BY DATE
83
(C)Cook By Date
179
COOK BY DATE
84
(C)Produced Date
180
PRODUCED DATE
85
(C)Packed On Time
181
PACKED ON TIME
86
(C)Sell By Time
182
SELL BY TIME
87
(C)Quantity
183
QUANTITY
88
(C)Reference
184
REFERENCE
89
(C)Born In
185
BORN IN
90
(C)Bred In
186
BRED IN
91
(C)Slaghtered In
187
SLAGHTERED IN
92
(C)Cut In
188
CUT IN
93
(C)Net Weight
189
NET WEIGHT
94
(C)Gross Weight
193
GROSS WEIGHT
95
(C)Percent Tare
194
% TARE
96
(C)Percent Tare Limit
195
% TARE LIMIT
97
(C)(TOTAL)Total Count
190
TOTAL COUNT
98
(C)(TOTAL)Payment Price
191
PAYMENT PRICE
99
(C)(TOTAL)Change Price
192
CHANGE PRICE
100
(C)(TOTAL)Total Price
196
TOTAL PRICE $
101
(C)(TOTAL)Total Tax
197
TOTAL TAX
102
(C)2nd Currency Total Price
198
TOTAL PRICE
103
(C)2nd Currency Unit Price
199
UNIT PRICE
104
(C)(TOTAL)2nd Currency Total Price
200
TOTAL PRICE
105
(C)(TOTAL)Void Count
169
VOID COUNT
-70-
106
(C)(TOTAL)Void Price
168
VOID PRICE
107
(TOTAL)Total Count
202
9999
108
(TOTAL)Void Count
204
9999
109
(C)(TOTAL)Total Weight
231
110
(C)(TOTAL)Total Quantity
232
111
(TOTAL)Total Title
215
112
Barcode
240
1234567890123
113
Image
250
Image
114
Prepack(Alpha Week)
121
115
(C)Ingredient
233
116
(C)PLU Number
234
Date Field List, table 9-6
No
list
code
Default
1
Sell By Date
16
2004-10-13
2
Sell By Time
17
13:30:39
3
Packed On Date
18
2004-10-13
4
Packed On Time
19
13:30:39
5
Produced Date
20
2004-10-13
6
Cook By Date
22
2004-10-13
7
(TOTAL)Current Date
103
2004-10-13
8
(TOTAL)Current Time
104
13:30:39
Price field list, table 9-7
No
list
1
Unit Price
2
code
default
6
999999
Discount Unit Price
113
999999
3
Discount Unit Price(Mark Down)
109
999999
4
Total Price
102
9999999
5
Discount Total Price
114
9999999
6
Discount Total Price(Mark Down)
110
9999999
7
Tax Price
111
9999999
8
Discount Saved Price
131
9999999
9
Second Currency Total Price
118
9999999
10
Second Currency Unit Price
120
999999
-71-
11
(TOTAL)Total Price
201
9999999
12
(TOTAL)Void Price
203
9999999
13
(TOTAL)Included Tax Amount
205
9999999
14
(TOTAL)Excluded Tax Amount
206
9999999
15
(TOTAL)Total Price(Exclude Tax)
207
9999999
16
(TOTAL)Total Price(Include Tax)
211
9999999
17
(TOTAL)Payment Price
208
9999999
18
(TOTAL)Change Price
209
9999999
19
(TOTAL)Total Tax Amount
210
9999999
20
(TOTAL)Second Currency Total Price
212
9999999
Weight Field List, Table 9-8
No
list
code
default
1
Weight
101
99999
2
Discount Weight
132
99999
3
Discount Weight(Mark Down)
108
99999
4
Quantity
112
99
5
Discount Quantity
133
99
6
Discount Quantity(Mark Down)
134
99
7
Tare Weight
8
13
99999
Reference Net Weight
100
99999
9
Reference Gross Weight
116
99999
10
(TOTAL)Total Weight
213
11
(TOTAL)Total Quantity
214
-72-
10. Key pad editor
10.1. key pad editor outline
Key pad editor can edit and print key pad on scale to use easily. It is not only edit key pad
on screen but, also makes each button to function you want
10.2. Key pad editor formation
A
G
B
H
C
E
D
F
I
Image 10-1 keypad editor
It is largely separated with two parts. One which shows the data information and the other
is showing shape of keypad.
-73-
10.2.1. Name and explanation
1. A: It is sales part.
2. B: It shows the generated key set.
3. C: It dicides whether keys edit on part G will use in function key or PLU call out key
4. D: This part is to edit the Key<10.2.2 Edit print screen>.
5. E: It lists the PLU or functions and selects the PLU or functions which to be assigned to
the keys.
6. F: It helps to assign PLUs to key easy by the PLU numbers.
7. G: This part is to edit on keypad editor module. It will print as same as on screen and
allocated PLU call out key or funtion key to every key
8. H: Funtion keys which already set on scale. It can’t edit here
9. I: Buttons
-
Apply: Apply the edited items to the key.
-
Remove: Remove the applied items from the key
10.2.2. Edit print screen
It shows keypad editor.
A
B
1 ○
2
○
3 ○
4 ○
5
○
6 ○
7 ○
8
○
C
D
E
Image 10-2 edit keypad
1. <Image 10-2> part A
It is preview screen. It shows how things will look like set on right pannel C & D
2. <Image 10-2> part B
It’s toolbar for editor. It can edit font and each keys paragraph
-74-
1 It sets background color
A. ○
2 It sets key’s font
B. ○
3 It sets line to the left
C. ○
4 It sets line to the middle
D. ○
5 It sets line to the right
E. ○
6 It sets line to the top
F. ○
7 It sets line to the center
G. ○
8 It sets line to the bottom
H. ○
3. <Image 10-2> part C
A. Edit key content. It can separate a Key to two circuit and albe to control ratio of each
part
4. <Image 10-2> part D
A. It decides whether to separate a key to two circuit. Normal price is 50%
5. <Image 10-2> part E
A. It can put image on key background. It supports Bmp, jpg, png, gif files
B. Press Attach to select and put image
C. Press Detach to remove image file
D. Press Strech Image to auto resize the image size if image is not fit with the key size
10.2.3. Edit function key
Image 10-3 Edit function key
If it selects the type of function in C of <Image 10-1>, the detail functions which
correspond to each function are listed in E of <Image 10-1>. It will select the function which
has become the list in each key and it will be able to apply.
10.2.4. Make new file
If you want to make a file, select File->New. You can see the same screen like <Image 104>. Select whether keypad is Stardard type, Pole type, hanging type or Selfkey type. Input
a file name and a description.
-75-
Image 10-4 Make new file
10.2.5. Save data
Explains about saving edited or added data
A. Finish add or edit process
B. Click Save on file menu
[Reference: If leading data is not in place, it will not save the data. In this situation the
caution message will appear. Check the data and retry]
C. When there is no caution message on screen, it saved the data
10.2.6. Delete file
You can delete file without going out to windows. Click Delete on <Image 10-1> part B to
delete saved file
10.2.7. Upload data
Explains upload data from scale
[Reference:PC and scale need to connect in first place]
1. Upload instruction
A. A. Check scale is right
Check conditions like communication mode, speed in setting communication in Config
[Reference: More details look for the <11.2.4. Communication (Communication
config)>]
2. Click Edit function key icon on <Image 10-1>part J to start. Dialog box and upload
status will shown in right condition
[Reference: Only one scale must seleted when you using TPC/IP mode]
-76-
10.2.8. Download data
Explains download present screen data to the scale. This funtion will work when PC and
scale is connected
1. 1. How to download
A. Check scale is working right
B. Check all the conditions like mode, speed in Config Communication setting
[Reference: More details look for the <11.2.4. Communication (Communication
config)>]
Click icon on <Image 10-1> at part J to start download
When it works right, you can see the downloading dialog and status)
[Reference: When you using the TCP/IP mode. You must select at least one Sclae]
-77-
11. Config
This program is to let user to register or edit store and customer data
Config formed with four tab heads. Scale, Path, filed Select and Communication
11.1. Scale Configuration
It use to set basic confi guration like capacity of scale or unit of weight
Basic form is like <Image 11-1>
1
2
3
4
5
6
7
8
Image 11-1 Config Scale Tab
11.1.1. Scale Tab Explainatoin
1. Price Length : ( choose one on 6,7,8,9 ) when you put data related to price, maximum
value will decide according to this setting
If Price Length is seven, the maximum value price is 9999999
2. Price Decimal Point :It sets price decimal point. Choose one among 0,1,2,3)
If price decimal point is two, the result comes out like 123.45
3. Weight Decimal Point : It sets weight decimal point. Choose among 0,1,2,3
If weight decimal point is three, the result comes out like 34.123
4. Weight Nutrition Point : It sets Nutrition decimal point. Choose among 0,1,2,3
If nutrition decimal point is three, the result comes out like 34.123
-78-
5. Date Format : It decides order of year, month, date
17th February, 2005 can indicate down below
In case of YY-MM-DD: 05-02-17
In case of MM-DD-YY: 02-17-05
In case of DD-MM-YY: 17-02-05
6. Currency – Primary Sign : It shows currency mark at the front of the price
7. Currency – Last Sign : It shows currency mark at the back of the price
8. Save button : Click to save and apply the edited data
“Save Complete” message will appear when it works right
-79-
11.2. Set Data File Path
Path tab is use to appoint file location use on each program
When each program starts. It brings up file from set up in Path tab
Basic form of <Image 11-2> is like down below
Image 11-2 Config Path Tab
11.2.1. Path Tab Explanation
1. DB File (A): set up data file location
This data file has the data use on each program. Register, edit, delete and start program
process are using this file. Becareful to decide the file loacation
2. Key Path (B): Sets key file folder on keypad program
Key file is information of the key & key path is folder location of the key file
3. Label Path (C): It sets label folder location which use on Label edit program
4. Report Path (D): It sets Report folder location which use on Report program
5. Font File (E): It sets Font folder location which use on Label Edit program
-80-
11.3. Field Select (PLU filed Config)
Filed Select Tab uses to set up Field on PLU Editor Program
It forms like <Image 11-3>
F
A
G
B
E
C
D
Image 11-3 Default Field
11.3.1. Field Select Tab Explanation
1. Default Field (A): Select to see all the field information
2. Price View Field (B): List up selected filed on <Default Field>
3. Field List (C): It shows filed list
4. Network list (D): Scale address list window when using TCP/IP communication
5. Save button (E): To save and apply the edited contents
6. Upload (F): It can bring up scale field information when <A.Default Field>is checked
7. Download (G): It can download scale field information when <A.Default Field>is
checked
-81-
11.4. Communication Config
Communication Tab is use to set up basic configurations which need to communicate with the scale
It formed like < Image 11-5>
B
A
C
D
E
F
G
L
I
J
H
M
K
Image 11-4 Config Communication Tab
-82-
11.4.1. Communication Explanation
1. RS232C (A): It is used to upload or download data using RS232C communication by
cheaking, <RS232C> group will active and able to input data
2. TCP/IP (B): It is used to upload or download data using TCP/IP communication by
cheaking, <TCP/IP> group will active and able to input data
3. Modem (C): Cheak this content when you want to use modem. This modem content will
active and able to input data when RS232C communication is cheaked
4. Port (D): It is used to set up comport for RS232C
5. Speed (E):It is used to set up communication speed for RS232C
6. Local IP (F): It shows IP of working computer
7. Gateway (G): It is used to input gateway to working computer
8. Scale List (H): It shows address list of scale need to communicate with
9. Connection Test button (I): It is used for connection test between PC and scales listed
10. Scan button (J): It is used to find scales connected with PC
11. Add, Edit, Delete button (K): Add, edit, delete scale address list
12. Save button (M): It is used to save set up contents
13. If communication mode is changed, “Must be restart” message will appear and you
must restart the program
14. ID of Scale (L): It is used to set up the scale indication mode to whether its IP or
name.
- Set by IP: It is dispayed as <Image 11-5>
- Set by Name: It is displayed as <Image 11-6> (It is neccesary to input name to
the ‘Name’ field in list (H))
-83-
A
Image 11-5 ID of Scale – IP
B
Image 11-6 ID of Sclae - Name
-84-
12. Net Server
12.1. 12.1 Net Server Outline
Net Server program provides to let other scales on the network to have edited PLU data
when you edit right on the scale. It sends data to all sclaes on the Network List
12.2. Net Server Formation
Net Server forms like <Image 12-1>
B
A
C
F
D
G
G
E
Image 12-1 Net Server
12.2.1. Name and Explanation
By clicking this button to confirm PLU list information and start Net Server program
[Reference: This button will not show in screen when you set serial communication at
Communication Setting on Config]
-85-
1. B: It use to let user download directly to the scale
2. C: It use to delete received PLU information list
3. C: It use to start/stop the Netserver function.
4. D: It use to delete received PLU information list
5. E: Status –It shows registered IP list and status when you using TCP/IP network
6. F: It is list window which simply shows received PLU information
A. Department No: Department number
B. PLU No: PLU number
C. Scale IP: Scale IP which had edited PLU and call out Server scale
D. Date: PLU edited date or date data received
E. Time: PLU edited time or time data received
7. G: Look for the detail information about PLU, doubleclick the data you want to see in
<Image 12-1> part F
A. IP: Scale address which send PLU
B. Time: Received PLU time and date
C. Field: Field Information
ID – Field Identification.
Field – Field name
Data – Field data
12.3. Net Server Instruction
12.3.1. Explains about edit Net Server process control
1. Start Net Server
2. Click CL5000Manager to start the program
3. Click ‘A’ button on <Image 12-1>to start
If there is existing received data it shows that list
4. Add, edit & save data
12.3.2. Explains about add and edit data
1. Adding process
A. Data adds when there is call out in client scale and PLU data saves automatically
B. Updated data will add at the top of the <Image 12-1> part F
2. Edit process
A. In Net Server you can not edit PLU data, If you want to edit use <3. PLU eidtor>
program
3. Saving data
A. PLU data saves automatically when it received from client scale
-86-
12.3.3. Delete Data
1. Explains about deleting data function
A. Click Delete All at <Image 12-1> part D
B. All contents will delete and screen turns new
[Reference: It can not delete some parts only]
12.3.4. Upload data
1. It don’t support data upload function
2. Use <3. PLU eidtor> program if you want to upload data
12.3.5. Download data
1. Explains about how to let down PLU data to the scale
2. PC and sclae need to connected in the first place
3. Download instruction
A. Check wether scale works right
B. Select the content you want to download at <Image 12-1> part F
C. Select the scale you want to download at <Image 12-1> part E
D. Start downloading by click icon B on <Image 12-1>
E. download dialog and download status will appear when it works right
12.4. Net Server assist information
1. Explains cautions when you perform Net Server function
12.4.2. Precautions
1. If you call out Server during upload or download in other program, executes
Broadcasting funtion when it is finish
2. It don’t support upload funtion
3. When you start downloading, PLU data which shown on <Image 12-1> part G is
going to download the data. PLU data which shown on <Image 12-1> part F is not
4. If communication setting is set to RS232, you can not see the A button at <Image
12-1>. You can not run the Net Server program
-87-
13. Reference
13.1. The available menus by scale models
Table1
Menu
CL5000
CL5000JR
PLU
O
O
Discount
O
X
Department
O
X
Group
O
X
Tax rate
O
X
Sales message
O
O
Orgin
O
O
Barcode
O
O
Tare
O
O
PCS unit
O
O
Ingredient
O
O
NutriFact
O
X
Traceability
O
X
Country
O
X
Slaughterhouse
O
X
Cutting hall
O
X
Store data
O
O
Customer
O
X
Scroll message
O
X
User/Security
O
X
Scale
O
X
PLU
O
O
Group
O
O
Deparment
O
O
Hourly
O
O
Clerk
O
X
Tax
O
X
Total
X
O
Label
O
O
Keypad
O
O
Config
O
O
NetSever
O
X
Table2
Store
Report
-88-
13.2. The available PLU items by scale models
번호
항목
CL5000
CL5000JR
1
Department No.
O
O
2
PLU No.
O
O
3
PLU Type
O
O
4
Name
O
O
5
Name2
O
O
6
Name3
O
O
12
Group No.
O
O
13
Ext. Barcode
O
X
14
Label No.
O
O
15
Aux. Label No.
O
O
16
Origin No.
O
O
17
Unit Weight
O
O
18
FixedWeight
O
O
19
Prefix
O
X
20
ItemCode
O
O
21
Pieces
O
O
22
Qty Unit No.
O
O
23
Use Fixed Price Type
O
O
24
Price
O
O
25
SpecialPrice
O
O
26
TAX No.
O
X
27
Tare
O
O
28
Tare No.
O
O
29
%Tare
O
X
30
Tare % limit
O
X
31
Barcode No.
O
O
32
Barcode No2
O
O
33
ProducedDate
O
X
34
Packed Date
O
O
35
Packed Time
O
O
36
Sell By Date
O
O
37
Sell By Time
O
O
38
CookByDate
O
X
39
Ingredient No.
O
O
40
Traceability No.
O
O
41
Bonus
O
X
-89-
42
NutriFact No.
O
O
43
LabelMsg No.
O
O
44
Reference Dept
O
X
45
Reference PLU
O
X
46
Coupled Dept
O
X
47
Coupled PLU
O
X
48
# of LinkPLU
O
X
49
Link Dept1
O
X
50
Link PLU1
O
X
51
Link Dept2
O
X
52
Direct Ingredient
O
O
13.3. The available Lable items by scale models
13.3.1. General Field List
No
List
CL5000
CL5000JR
0
STATICSTRING
O
X
1
Department Name
O
X
2
Department Number
O
O
3
Group Number
O
O
4
PLU Number
O
O
5
PLU Name(1,2,3 ALL)
O
X
6
PLU Name1
O
O
7
PLU Name2
O
O
8
PLU Name3
O
O
9
Additional Info 1
O
X
10
Additional Info 2
O
X
11
Additional Info 3
O
X
12
Additional Info 4
O
X
13
Additional Info 5
O
X
14
Item Code
O
O
15
Prefix Code
O
O
16
Unit Weight
O
O
17
Tax Rate
O
X
18
Pieces(by-PCS)
O
O
19
Quantity Symbol
O
O
-90-
20
Bonus Point
O
X
21
Origin
O
O
22
Ingredient
O
O
23
Sales Message
O
O
24
Percent Tare
O
O
25
Percent Tare Limit
O
X
26
Label Serial Number
O
O
27
Store Name
O
O
28
Store Telephone
O
O
29
Store Text
O
O
30
Clerk Number
O
X
31
Clerk Name
O
X
32
Customer Name
O
X
33
Customer Number
O
X
34
Scale Number
O
O
35
Day Of Week(Packed On)
O
X
36
Currency Rate
O
X
37
(T)Traceability No
O
X
38
(T)Born in Country
O
X
39
(T)Bred in Country
O
X
40
(T)Slaughter House
O
X
41
(T)Slaughter Country
O
X
42
(T)Cutting Hall
O
X
43
(T)Cutting Country
O
X
44
(T)Reference
O
X
45
(T)Born in Country Number
O
X
46
(T)Bred in Country Number
O
X
47
(T)Slaughter House Number
O
X
48
(T)Cutting Hall Number
O
X
49
(N)Serving Size
O
X
50
(N)Servings Per
O
X
51
(N)Calories
O
X
52
(N)Calories From Fat
O
X
53
(N)Total Fat
O
X
54
(N)Saturated Fat
O
X
55
(N)Cholesterol
O
X
56
(N)Sodium
O
X
-91-
57
(N)Total Carbohydrates
O
X
58
(N)Dietary Fibers
O
X
59
(N)Sugars
O
X
60
(N)Protein
O
X
61
(N)Vitamin A
O
X
62
(N)Calcium
O
X
63
(N)Vitamin C
O
X
64
(N)Iron
O
X
65
(N)Total Fat DV
O
X
66
(N)Saturated Fat DV
O
X
67
(N)Cholesterol DV
O
X
68
(N)Sodium DV
O
X
69
(N)Total Carbohydrates DV
O
X
70
(N)Dietary Fibers DV
O
X
71
(N)Protein DV
O
X
72
(N)Trans Fat
O
X
73
(N)Base Size
O
X
74
(C)Total Price
O
X
75
(C)Unit Price
O
X
76
(C)Weight
O
X
77
(C)Tare
O
X
78
(C)Saved Price
O
X
79
(C)Regular Price
O
X
80
(C)Tax Price
O
X
81
(C)Packed On Date
O
O
82
(C)Sell By Date
O
X
83
(C)Cook By Date
O
X
84
(C)Produced Date
O
O
85
(C)Packed On Time
O
X
86
(C)Sell By Time
O
X
87
(C)Quantity
O
X
88
(C)Reference
O
X
89
(C)Born In
O
X
90
(C)Bred In
O
X
91
(C)Slaghtered In
O
X
92
(C)Cut In
O
X
93
(C)Net Weight
O
X
-92-
94
(C)Gross Weight
O
X
95
(C)Percent Tare
O
X
96
(C)Percent Tare Limit
O
X
97
(C)(TOTAL)Total Count
O
O
98
(C)(TOTAL)Payment Price
O
X
99
(C)(TOTAL)Change Price
O
X
100
(C)(TOTAL)Total Price
O
O
101
(C)(TOTAL)Total Tax
O
X
102
(C)2nd Currency Total Price
O
X
103
(C)2nd Currency Unit Price
O
X
104
(C)(TOTAL)2nd Currency Total Price
O
X
105
(C)(TOTAL)Void Count
O
X
106
(C)(TOTAL)Void Price
O
X
107
(TOTAL)Total Count
O
O
108
(TOTAL)Void Count
O
X
109
(C)(TOTAL)Total Weight
O
O
110
(C)(TOTAL)Total Quantity
O
O
111
(TOTAL)Total Title
O
X
112
Barcode
O
X
113
Image
O
X
114
Prepack(Alpha Week)
O
O
115
(C)Ingredient
O
O
116
(C)PLU Number
O
O
13.3.2. Date Field List
No
list
CL5000
CL5000JR
1
Sell By Date
O
O
2
Sell By Time
O
O
3
Packed On Date
O
O
4
Packed On Time
O
O
5
Produced Date
O
O
6
Cook By Date
O
O
7
(TOTAL)Current Date
O
X
8
(TOTAL)Current Time
O
X
-93-
13.3.3. Price field list
No
list
CL5000
CL5000JR
1
Unit Price
O
O
2
Discount Unit Price
O
X
3
Discount Unit Price(Mark Down)
O
X
4
Total Price
O
O
5
Discount Total Price
O
X
6
Discount Total Price(Mark Down)
O
X
7
Tax Price
O
X
8
Discount Saved Price
O
X
9
Second Currency Total Price
O
X
10
Second Currency Unit Price
O
X
11
(TOTAL)Total Price
O
O
12
(TOTAL)Void Price
O
X
13
(TOTAL)Included Tax Amount
O
X
14
(TOTAL)Excluded Tax Amount
O
X
15
(TOTAL)Total Price(Exclude Tax)
O
X
16
(TOTAL)Total Price(Include Tax)
O
X
17
(TOTAL)Payment Price
O
X
18
(TOTAL)Change Price
O
X
19
(TOTAL)Total Tax Amount
O
X
20
(TOTAL)Second Currency Total Price
O
X
13.3.4. Weight Field List
No
list
CL5000
CL5000JR
1
Weight
O
O
2
Discount Weight
O
X
3
Discount Weight(Mark Down)
O
X
4
Quantity
O
O
5
Discount Quantity
O
X
6
Discount Quantity(Mark Down)
O
X
7
Tare Weight
O
O
8
Reference Net Weight
O
O
9
Reference Gross Weight
O
X
10
(TOTAL)Total Weight
O
O
11
(TOTAL)Total Quantity
O
O
-94-
13.4. The available report types by scale models
번호
항목
CL5000
CL5000JR
1
Scale
O
X
2
PLU
O
O
3
Group
O
O
4
Department
O
O
5
Hourly
O
O
6
Clerk
O
X
12
Tax
O
X
13
Total
X
O
-95-