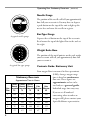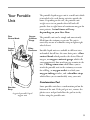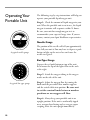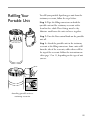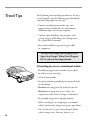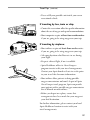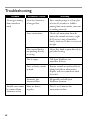
1
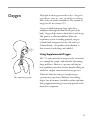
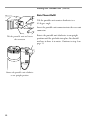
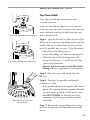
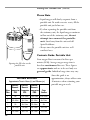
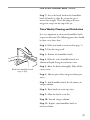
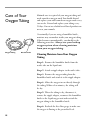
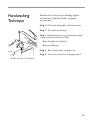
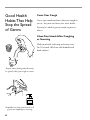
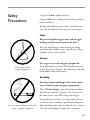
Pat i e n t I n s t ru c t i o n s
Liquid
Oxygen
Orientation
Checklist
Special instructions:
i
During orientation, the following information
will be discussed, demonstrated and, in return,
demonstrated by you.
Demonstrate the following:
■ How to set-up flow rate.
■ How to read contents gauge.
■ If used, how to fill the portable unit.
■ How to approximate supply time for stationary
and portable unit.
■ How to collect accumulated moisture
(stationary/portable).
■ If required, how to attach and remove humidifier
bottle.
■ If required, how to assemble and disassemble
humidifier bottle.
■ If required, how to clean the humidifier bottle.
Safety information:
■ Explain oxygen safety precautions.
■ Post “No Smoking” signs.
■ Explain approximate oxygen supply time based
on prescription.
■ Explain when more oxygen should be ordered.
■ Explain oxygen delivery schedule and ordering
procedure to patient/caregiver.
■ Explain importance of adequate ventilation to
prevent oxygen accumulation.
■ Explain effects of cold gas and liquid on skin
and eyes.
■ Explain Apria Healthcare’s recontact schedule.
■ Explain Liquid Oxygen Patient Instructions
booklet.
■ Give patient/caregiver Apria Healthcare’s
telephone number to call for routine and afterhours equipment problems.
■ Explain how to obtain help in a medical emergency.
02. Your Prescription . . . . . . . . . . . . . . . . . . .
03. Oxygen . . . . . . . . . . . . . . . . . . . . . . . . . .
04. Your Liquid Oxygen System . . . . . . . . . . . .
06. Operating Your Stationary Reservoir . . . . . .
07. Your Portable Unit . . . . . . . . . . . . . . . . . .
08. Operating Your Portable Unit . . . . . . . . . . .
09. Refilling Your Portable Unit . . . . . . . . . . . .
10. Maintaining Your Liquid Oxygen System . . .
11. Care of Your Humidifier Bottle. . . . . . . . . .
12. Care of Your Oxygen Tubing . . . . . . . . . . .
13. Reordering Oxygen . . . . . . . . . . . . . . . . .
14. Physical Problems . . . . . . . . . . . . . . . . . . .
15. Handwashing Technique . . . . . . . . . . . . . . .
16. Good Health Habits That Help Stop
the Spread of Germs . . . . . . . . . . . . . . . . .
The undersigned acknowledges
that he/she has received, been
instructed in, and understands
the subjects shown on this page
and covered in this booklet.
TEAR HERE
01. Orientation Checklist . . . . . . . . . . . . . . . .
05. Your Stationary Reservoir . . . . . . . . . . . . .
Liquid Oxygen Patient/Caregiver Acknowledgement: Remove and Return to Apria
TEAR HERE
Liquid Oxygen
Patient/Caregiver
Acknowledgement
Patient/Caregiver Signature
Please PRINT Name
RES-2002 Rev. 10/09
17. Safety Precautions . . . . . . . . . . . . . . . . . . .
18. Travel Tips . . . . . . . . . . . . . . . . . . . . . . . .
19. Troubleshooting . . . . . . . . . . . . . . . . . . . .
20. Feedback on Our Services . . . . . . . . . . . . .
Date
Apria Representative
Please PRINT Name
Date
Table of
Contents
i
Your Prescription . . . . . . . . . . . . . . . . . . . . . . . 2
Oxygen . . . . . . . . . . . . . . . . . . . . . . . . . . . . . . 3
Your Liquid Oxygen System . . . . . . . . . . . . . . . 4
Your Stationary Reservoir . . . . . . . . . . . . . . . . . 5
Operating Your Stationary Reservoir. . . . . . . . . . 6
Your Portable Unit . . . . . . . . . . . . . . . . . . . . . . 9
Operating Your Portable Unit . . . . . . . . . . . . . 10
Refilling Your Portable Unit . . . . . . . . . . . . . . 11
Maintaining Your Liquid Oxygen System . . . . . 15
Care of Your Humidifier Bottle . . . . . . . . . . . . 16
Care of Your Oxygen Tubing. . . . . . . . . . . . . . 18
Reordering Oxygen. . . . . . . . . . . . . . . . . . . . 19
Physical Problems . . . . . . . . . . . . . . . . . . . . . 20
Handwashing Technique . . . . . . . . . . . . . . . . . 21
Orientation Checklist . . . . . . . . . . . . . . . . . . . . .
Good Health Habits That Help Stop
the Spread of Germs . . . . . . . . . . . . . . . . . .
22
Safety Precautions . . . . . . . . . . . . . . . . . . . . . 23
Travel Tips . . . . . . . . . . . . . . . . . . . . . . . . . . 26
Troubleshooting . . . . . . . . . . . . . . . . . . . . . . 28
Feedback on Our Services . . . . . . . . . . . . . . . 30
©1997, 2001, 2003-2005, 2007-2009 Apria Healthcare, Inc.
Apria Healthcare with its accompanying logo is a registered trademark of Apria Healthcare Group Inc.
Your Prescription
Your physician has prescribed your oxygen to be
used in the following manner:
____ liters per minute during normal activity.
____ liters per minute during sleep.
____ liters per minute when exercising.
____ liters per minute continuously.
Please note that the information provided here is
meant to supplement, not replace, any special
directions provided by your physician.
Equipment and
Accessories
Part Number
2
Oxygen is a prescribed drug. Never increase
or decrease your oxygen flow rate without
the specific approval of your physician. If
your physician changes your oxygen flow rate or
hours of use, notify Apria Healthcare immediately.
Description
Oxygen
All people need oxygen in order to live. Oxygen is
a gas that we can’t see, taste, or smell, yet is always
there in the air which surrounds us. The amount of
oxygen in the air is always 21%.
Oxygen is inhaled into our lungs and is then
transported through the blood to all parts of the
body. Oxygen helps convert food to heat and energy.
This process is called metabolism. When the
respiratory system is working properly, oxygen
is inhaled and transported to the cells with ease.
Carbon dioxide, a by-product of metabolism, is
then returned to the lungs and exhaled.
Using Supplemental Oxygen
The 21% concentration of oxygen in the air around
us is enough for people with normally functioning
lungs and heart. However, a person with lung or
heart problems may often benefit from breathing air
which has a higher concentration of oxygen in it.
The respiratory system
When the body does not get enough oxygen,
a person may experience difficulty in breathing,
fatigue, loss of memory, headaches and/or confusion.
Using supplemental oxygen may help provide relief
from these symptoms.
3
Your Liquid
Oxygen System
When oxygen is cooled to a very low temperature
(around 300 degrees below zero Fahrenheit), it
becomes a liquid. In the liquid form, large amounts
of oxygen can be stored in a container at quite low
pressure. This provides not only a large storage
capacity, but also allows for filling and refilling of
a smaller unit from the large unit.
To remain in the liquid form, the oxygen must
continue to be kept very cold. Therefore, the units
in which the liquid oxygen is stored are insulated
canisters similar to large Thermos® bottles. As the
liquid oxygen leaves the container, it warms up to
room temperature and becomes a gas again.
A liquid oxygen system usually includes two units:
a stationary reservoir and a portable unit.
4
Your Stationary
Reservoir
Flow
Selector
Contents
Indicator
Filling
Connector
Nipple
A typical stationary reservoir
Flow
Selector
Contents
Indicator
Filling
Connector
The liquid oxygen stationary reservoir is a large unit.
The stationary reservoir can store over 75 pounds of
liquid oxygen. For most patients, this will last from
four to eight days.
Stationary reservoirs are available in different sizes
and models. However, all models have the same
basic parts: a contents indicator that shows
the amount of oxygen in the unit, a flow selector
that regulates the amount of oxygen you receive,
a filling connector that allows the portable unit
to be filled, and, if recommended by your physician,
a humidifier bottle.
The oxygen is delivered to you through a nasal
cannula or face mask. The tubing on the cannula
or mask is attached to the outlet nipple or, if
recommended by your physician, the humidifier
outlet bottle nipple. Sometimes, an extra length
of tubing may be attached. This will allow you
to move about at a farther distance from your
stationary reservoir.
Nipple
Humidifier Bottle
(if recommended)
Detail of stationary reservoir with
humidifier bottle
5
Operating
Your Stationary
Reservoir
The following step-by-step instructions will help you
operate your stationary reservoir. If your physician
has specified a humidifier with your stationary
reservoir, go to step 2.
Step 1: Attach a nipple valve to the reservoir outlet
tube and attach the oxygen tubing to the nipple outlet.
Step 2: If recommended, attach a filled humidifier
bottle.
• Center the threaded cap on the humidifier bottle
under the threaded outlet tube on the reservoir.
• Turn the cap on the humidifier bottle until it is
tightly screwed onto the outlet tube.
• Attach oxygen tubing to the nipple outlet on
the humidifier bottle lid.
Note: Humidifier bottles are generally
recommended only for patients using flow rates
greater than four liters per minute.
Step 3: Adjust the oxygen flow rate by turning
the liter control knob until the flow is at the
prescribed number.
Rotary Flow Control
Turn the dial until the prescribed liter number
appears and the switch clicks into position.
Adjusting oxygen flow rate using
a rotary flow control dial
6
Step 4: Fit the nasal cannula or the oxygen mask
to your face so it is comfortable. Follow the
instructions below for either the nasal cannula
or oxygen mask, depending on which one your
physician has prescribed.
Operating Your Stationary Reservoir
(continued)
Nasal Cannula
• Insert the two prongs of the cannula into your
nostrils. Make sure the prongs face upward and
curve into your nostrils.
• Slide the tubing over and behind each ear.
Adjusting nasal cannula
• Adjust the tubing to fit comfortably under your
chin by sliding the adjuster upward. Be careful
not to adjust it too tightly.
Note: Do not use an oxygen mask if your physician
prescribed a nasal cannula.
Oxygen Mask
• Place the oxygen mask over your mouth and nose.
• Slide the loose elastic strap over your head and
position it above your ears.
Adjusting oxygen mask
• Pull the end of the elastic on each side of the mask
until the mask fits comfortably. Pinch the metal
nose strap to fit snugly around your nose. This
will prevent oxygen from blowing into your eyes.
Note: Oxygen masks must only be used with liter
flow rates of five liters per minute or greater.
Step 5: You should use your oxygen for the number
of hours your physician has prescribed. When you
have finished using your oxygen, you should:
• Remove the nasal cannula or the oxygen mask.
• Turn the liter control knob off.
You should also check the amount of oxygen
remaining in your stationary reservoir daily so you
will know when to order a refill.
7
Operating Your Stationary Reservoir
(continued)
Needle Gauge
E
The position of the needle will tell you approximately
how full your reservoir is. You may have to depress
a push button on the top of the unit to light up the
meter face and cause the needle to register.
F
Bar-Type Gauge
A typical needle gauge
Depress the red button on the top of the reservoir.
Read across the top of the lighted bar to the scale at
the right.
–F
LOW
BATT
3
– /4
1
– /2
1
– /4
Weight Scale Base
The position of the metal pointer on the scale under
your reservoir will tell you approximately how full
your reservoir is.
–E
A typical bar-type gauge
Contents Guide: Stationary Unit
Your oxygen flow is measured in liters per minute
(LPM). Average oxygen usage
time is based on continuous
Stationary Reservoir
flow rate. These figures are
Approximate Time in Hours
approximate and are to be
Puritan- Puritan- Puritanused only as a general guide.
Bennett Bennett Bennett
Caire
Caire
Liter Companion Companion Companion Liberator Liberator
Individual usage time may vary.
Flow
8
21
31
41
30
45
1
288
425
562
333
483
2
144
212
281
166
242
3
96
141
187
111
161
4
72
106
140
83
121
5
57
85
112
67
97
If you are at all confused
concerning when to order an
oxygen refill, please contact your
Apria Healthcare representative.
Your Portable
Unit
Flow
Control Knob
Oxygen
Contents
Gauge
LO
W
–E
–1
/
4
–1
2/
–F
Filling
Connector
–3
/
4
Oxygen
Outlet
The portable liquid oxygen unit is a small unit which
is intended to be used during activities outside the
home. Depending on the size, the portable unit
weighs seven to ten pounds when full and will
provide four to eight hours of continuous oxygen for
most patients. Actual times will vary
depending on your liter flow.
The portable unit can be simply and conveniently
filled from the stationary reservoir. The unit is
carried by means of a shoulder strap or lightweight
wheeled cart.
Portable liquid units are available in different sizes
and models but all have the same basic parts: a flow
control knob which provides the desired flow of
oxygen, an oxygen contents gauge which tells
you approximately how much oxygen remains in the
unit, a filling connector which allows you to
attach the portable unit to the stationary reservoir
for refilling, an oxygen outlet to which your
oxygen tubing attaches, and a shoulder strap
which allows you to comfortably carry your unit.
Condensation Pad
Shoulder
Strap
A typical portable liquid
oxygen unit
Some portable units have a condensation pad on the
bottom of the unit. If the pad gets wet, remove the
plastic cover and pad and allow the pad to air dry
before using the portable unit.
9
Operating Your
Portable Unit
E
F
The following step-by-step instructions will help you
operate your portable liquid oxygen unit.
Step 1: Check the amount of liquid oxygen in your
unit. When the portable unit is not in use, the liquid
oxygen it contains will evaporate within 24 hours.
Be sure your unit has enough oxygen in it to
accommodate your expected usage time. If you are
unsure, contact your Apria Healthcare representative.
Needle Gauge
A typical needle gauge
The position of the needle will tell you approximately
how full your unit is.You may have to depress a push
button to light up the meter face and cause the
needle to register.
Bar-Type Gauge
–F
LOW
BATT
3
– /4
1
– /2
1
– /4
–E
A typical bar-type gauge
Depress the red push button on top of the unit.
Read across the top of the lighted bar to the scale
at the right.
Step 2: Attach the oxygen tubing to the oxygen
outlet on the side of the unit.
Step 3: Adjust the oxygen flow by turning the
knob until the prescribed liter number appears
and the switch clicks into position. Be sure not
to set the control knob between number
positions or no oxygen will flow.
Step 4: Always keep your portable unit in an
upright position. If the unit is accidentally tipped
over, you may hear hissing and see oxygen vapor
escaping. Place the unit upright immediately.
10
Refilling Your
Portable Unit
To refill your portable liquid oxygen unit from the
stationary reservoir, follow the steps below.
Step 1: Wipe the filling connectors on both the
portable unit and the stationary reservoir with a
clean lint-free cloth. These fittings must be dry.
Moisture could cause the units to freeze together.
Step 2: Turn the flow control knob on the portable
unit off.
Step 3: Attach the portable unit to the stationary
reservoir at the filling connectors. Some units refill
from the side of the reservoir, while others refill at
the top of the reservoir. Follow the instructions on
either page 12 or 13, depending on the type of unit
you use.
Attaching portable units to
stationary reservoirs
11
Refilling Your Portable Unit
(continued)
Side Mount Refill
Tilt the portable unit counter-clockwise to a
45 degree angle.
Insert the portable unit connector into the reservoir
connector.
Tilt the portable unit and insert
the connector
Rotate the portable unit clockwise
to an upright position
12
Rotate the portable unit clockwise to an upright
position until the pin locks into place.You should
not have to force it to rotate. Continue to step 4 on
page 13.
Refilling Your Portable Unit
(continued)
Top Mount Refill
Center the portable unit connector over the
reservoir connector.
Center the portable unit connector
Lower the portable unit and rotate
Lower the unit into the shaped recess or onto the
connector. Once the unit is resting on the connector,
rotate clockwise until the pin locks into place and
firm resistance is felt.
Step 4: Open the fill valve by either depressing the
fill button or using a key (depending on your specific
model). This valve is found either on the reservoir
or on the portable unit (see page 14 for illustration).
• This will start the filling process.
• As the unit is filling, you will hear a hissing noise.
• When the unit is full, the hissing noise will
change and you may see a small cloud of white
vapor at the connection.
• Always watch the units carefully while
filling. Fill time is approximately two minutes.
Step 5: When the unit is full, slowly close the
fill valve.
Opening the fill valve on
the reservoir
Step 6: Disengage the portable unit from the
stationary reservoir.
• If the portable unit does not separate easily, do not
force it. The units may be frozen together.Wait until
the units warm up and they will separate easily.
• DO NOT TOUCH any frosted parts of the
connectors. Liquid oxygen can cause frostbite
to the skin.
Step 7: Reattach the oxygen tubing to the oxygen
outlet on the portable unit.Your unit is now ready
for use.
13
Refilling Your Portable Unit
(continued)
Please Note
• Liquid oxygen will slowly evaporate from a
portable unit. To avoid excessive waste, fill the
portable unit just before use.
• If, when separating the portable unit from
the stationary unit, the liquid oxygen continues
to flow out of the stationary unit, do not
attempt to reconnect the portable
unit. Stand away from the unit and call
Apria Healthcare.
• Always store the portable unit in a wellventilated area.
Contents Guide: Portable Unit
Opening the fill valve on the
portable unit
Your oxygen flow is measured in liters per
minute (LPM). Average oxygen usage time is
based on continuous flow rate. These figures
are approximate and are to be used only as a
general guide. Individual usage time may vary.
Portable Reservoir
Approximate Time in Hours (h) and Minutes (m)
PuritanPuritanPuritanBennett
Bennett
Bennett
Liter Companion Companion Companion
Flow
500
550
1000
Caire
Stroller
1
9h
13h 30m
15h 30m 11h 45m
2
4h 40m
6h 30m
8h 30m
6h 20m
3
3h
6h 30m
5h 48m
4h
4
2h 12m
5h 6m
4h 18m
3h 15m
5
1h 48m
4h 12m
3h 24m
2h 40m
14
Since this guide is an
approximation, always add an extra
30 minutes when estimating your
portable oxygen needs.
Maintaining Your
Liquid Oxygen
System
Liquid oxygen units are durable pieces of equipment
and will continue to operate efficiently with proper
maintenance.
As necessary, you should wipe the outside of your
units with a clean damp cloth. Never use wax,
cleaning sprays or furniture polish. Many of these
products are flammable.
You should never open either of your own units or
attempt any repairs on them. Never use grease, oil
or other lubricants on your units. Many lubricants
are volatile and could cause a safety hazard.
Never use wax, cleaning sprays
or furniture polish on liquid
oxygen units
Should you have any problems with your liquid
oxygen system at any time, call Apria Healthcare
immediately. We are available 24 hours a day,
seven days a week for emergencies.
15
Care of Your
Humidifier Bottle
Cleaning and disinfection of respiratory therapy
equipment in the home is of major importance. To
prevent equipment contamination, a simple but
effective cleaning procedure must be carried out
on a routine basis. Do all cleaning and disinfecting
in a clean environment. Avoid doing it after
vacuuming, under an open window, or in dusty,
dirty, smoky areas.
If you are using a humidifier bottle with your
oxygen system, you will need to check the water
level in the jar frequently. When the water runs low
or the bubbling stops, you will need to refill the jar.
Always use your back up oxygen system
while refilling and cleaning your
humidifier bottle.
Refilling the Humidifier Bottle
Rinse bottle under a strong stream
of warm tap water
Step 1: Wash your hands as instructed on page 21.
Step 2: Turn your oxygen off.
Step 3: Unscrew the jar from the humidifier
bottle lid.
Step 4: Discard any water remaining in the jar.
Step 5: Rinse bottle under a strong stream of
warm tap water. Shake off the excess water.
Refill the jar with distilled water
16
Step 6: Refill the jar with distilled water to the
fill line. Do not overfill the bottle. Too much water
in the bottle will cause water to collect in your
oxygen tubing.
Care of Your Humidifier Bottle
(continued)
Step 7: Screw the bottle back on the humidifier
bottle lid until it is tight. Be certain the jar is
screwed on straight. Cross-threading will cause
oxygen to escape out the top of the jar.
Twice Weekly Cleaning and Disinfection
It is very important to clean your humidifier bottle
to prevent infection. The following procedure should
be done every three days:
Step 1: Wash your hands as instructed on page 21.
Step 2: Turn the oxygen off.
Step 3: Remove the humidifier bottle.
Step 4: Wash the entire humidifier bottle in a
solution of liquid detergent and warm water.
Wash the humidifier bottle
every 3 days
Step 5: Rinse the bottle thoroughly. Shake off the
excess water.
Step 6: Mix one part white vinegar and one part
water.
Step 7: Soak humidifier bottle for 30 minutes in
vinegar solution.
Step 8: Rinse bottle in warm tap water.
Step 9: Allow the bottle to air dry.
Step 10: Discard vinegar solution.
Step 11: Replace your humidifier bottle as
instructed above.
17
Care of Your
Oxygen Tubing
Minimal care is required of your oxygen tubing and
nasal cannula or oxygen mask.You should discard
and replace your nasal cannula or oxygen mask every
two weeks. Discard and replace your tubing every
90 days. Do not use alcohol or oil-based products on
or near your cannula.
Occasionally, if you are using a humidifier bottle,
moisture may accumulate inside your oxygen tubing.
If this becomes uncomfortable, you should try the
following procedure. Always use your backup
oxygen system when clearing moisture
from your oxygen tubing.
Oxygen Tubing
Nasal Cannula
Clearing Moisture from Your Oxygen
Tubing
Step 1: Remove the humidifier bottle from the
outlet tube on the liquid unit.
Step 2: Attach a nipple adapter to the outlet tube.
Step 3: Remove the oxygen tubing from the
humidifier bottle and attach it to the nipple adapter.
Step 4: Allow the oxygen to run directly through
the tubing. Within a few minutes, the tubing will
be dry.
Step 5: When the tubing is dry, disconnect it,
remove the nipple adapter, reconnect the humidifier
bottle to the liquid oxygen unit and reattach the
oxygen tubing to the humidifier bottle.
Step 6: Recheck the liter flow gauge to make sure
the oxygen is flowing at the prescribed level.
18
Reordering
Oxygen
Always be aware of the amount of oxygen remaining
in your stationary reservoir.
You will most likely be on an automatic redelivery
schedule, but always knowing how much oxygen you
have will prevent any worry of running out before
your next supply is delivered.
If you are not on an automatic delivery schedule,
reorder oxygen one to two days before your
stationary reservoir has been calculated to run out.
This will allow your Apria Healthcare location to
schedule your delivery without causing you to worry.
Consult the table on page 8 for guidelines on the
approximate time for use of your unit.
19
Physical Problems
If you experience any of the following problems,
call your physician.
• Fever or chills
• Increased wheezing
• Increased mucus production
• Mucus becomes thicker
• Change in mucus color
• Headaches
• Loss of appetite
• Increased shortness of breath
• Chest pain
• Increased cough
• Swelling in your ankles or around your eyes
• Weight gain overnight
• Feeling dizzy or sleepy
• Any change in physical sensation after taking
a new medication
If you are having trouble with your equipment
call Apria Healthcare.
If you experience any physical change, call
your physician.
If you experience severe physical problems,
call your local emergency services.
20
Handwashing
Technique
Hands must be clean prior to handling supplies
and solutions. Wash hands before beginning
any procedure.
Step 1: Wet hands thoroughly with warm water.
Step 2: Use antibacterial soap.
Step 3: Wash hands for one to two minutes using
a rotary motion and friction. Wash:
• Back and palm of each hand
• Between all fingers
Step 4: Rinse hands under running water.
Step 5: Dry on clean towel or with paper towel.
Wash hands for 1–2 minutes
21
Good Health
Habits That Help
Stop the Spread
of Germs
Cover Your Cough
Cover your mouth and nose when you cough or
sneeze. Put your used tissue in a waste basket.
You may be asked to put on a mask to protect
others.
Clean Your Hands After Coughing
or Sneezing
Wash your hands with soap and warm water
for 20 seconds OR clean with alcohol-based
hand sanitizer.
Protect others from germs that may
be spread when you cough or sneeze
Remember to clean your hands well
if you are coughing or sneezing
22
Safety
Precautions
Oxygen will not explode or burn.
Oxygen will cause anything that is burning to burn
hotter and faster.
By using the following safety rules, you will create a
very safe environment when you use your oxygen.
Heat
Keep the liquid oxygen unit and oxygen
tubing away from any source of heat.
Keep the liquid oxygen units and oxygen tubing
away from open flames, stoves, space heaters, large
windows or any source of heat.
Grease
Never grease or oil
oxygen equipment
Never grease or oil oxygen equipment.
Keep liquid units away from all flammable materials
such as oil, grease, Vaseline®, hair lubricants, face and
hand lotions, and aerosol sprays.
Smoking
Do not permit smoking in the same room
as you and/or your oxygen equipment.
Place “No Smoking” signs on the front and back
door of your residence and also at the entryway to
the room where you will be using your oxygen.
Do not permit smoking in the same
room as oxygen equipment
It is possible for you to be in a large room such as a
restaurant where smoking is permitted as long as no
lighted smoking materials are within five feet. Ask to
sit in the non-smoking section of the restaurant.
23
Safety Precautions
(continued)
Cooking
It is best to cook using only a microwave oven.
Cooking on a gas stove is not recommended.
Storage
Do not store your oxygen equipment in
a small storage area.
Do not place oxygen equipment in a storage area
such as a closet or car trunk. Any venting oxygen
could create a fire hazard.
Oil-Based Toiletries and Small Appliances
Never use oil-based face creams, a hair dryer
or an electric razor while using oxygen.
It is possible in certain conditions that the
combination of oxygen, oil-based face creams, and
a spark from an electric appliance could ignite and
cause burns to your face.
Always use water-based cosmetics or creams.
Frost Burns
Never touch the frosted connectors on the
liquid units.
Liquid oxygen is chilled to around 300 degrees
below zero Fahrenheit. If you touch one of the
frosted parts on your unit, it is possible that you
will receive a skin burn.
If contact occurs, generously flush with
cold water and call your physician.
24
Safety Precautions
(continued)
Moving Your System
Never move the stationary unit without
consulting with your Apria Healthcare
location.
Spillage
Keep the liquid unit upright at all times.
Keep the liquid unit upright
at all times
If your liquid unit falls over on its side, it is possible
for a stream of liquid oxygen to spill out of the
reservoir. To avoid spillage, keep the stationary unit
upright at all times. If a spill occurs, open doors
and windows to ventilate the area and call Apria
Healthcare immediately.
Make Sure Your Home Address Is Visible
Make sure your home address can be
easily seen from the street during both
day and night.
If you are expecting a night delivery or visit, turn
on the porch light. Check to see that your address
numbers are easy to spot and read from the street.
This will allow all Apria Healthcare and emergency
services to locate your residence easily.
Follow Emergency and Natural
Disaster Instructions
In the event of an emergency or natural disaster,
follow the radio or television instructions of your
local authorities.
25
Travel Tips
Early planning and careful preparation are the keys
to an enjoyable trip. The following tips should help
you plan and prepare for any trip.
• Contact your physician to make sure your
proposed trip is medically safe and to obtain
additional copies of your prescription.
• Contact Apria Healthcare for assistance with
getting oxygen refills along your driving route
or at your final destination.
• Have cash available to pay for oxygen refills
or equipment.
Visit us at www.Apria.com to request a free
Apria Great Escapes™ Patient Travel Program
Kit. Or, call your local Apria branch.
If traveling by car or recreational vehicle:
• Remind passengers not to smoke in the vehicle
in which you are traveling.
• Securely fasten tanks.
• Keep one window partially open to provide fresh
air circulation.
• Do not store oxygen in the trunk of your car.
• Do not store oxygen in an area where the
temperature will reach 120 degrees Fahrenheit.
• Keep liquid oxygen in an upright position.
• When traveling in, or occupying a recreational
vehicle, do not store oxygen near gas or open flame.
• Stay at least five feet away from all open flames,
such as camp stoves, lanterns, heaters, etc.
26
Travel Tips
(continued)
• Never refill your portable unit inside your car or
recreational vehicle.
If traveling by bus, train or ship:
• Contact the reservation office for specific information
about the use of oxygen and special accommodations.
• Most companies require at least two weeks notice
if you are going to be using oxygen on your trip.
If traveling by airplane:
• Most airlines require at least four weeks notice
if you are going to be using oxygen on your trip.
• Ask your physician what flow rate to use during
your flight.
• Request a direct flight, if one is available.
• Apria Healthcare offers its Great Escapes™
program to assist with your travel arrangements.
Contact your Apria branch at least six weeks prior
to your travel date for more information.
• Most airlines allow patients to bring portable
oxygen concentrators on board. As part of Apria
Great Escapes travel program, Apria can provide
most patients with a portable oxygen concentrator
that is allowed on most airlines.
• Before you depart on a plane, ensure that
arrangements have been made for your oxygen at
your final destination.
For further information, please contact your local
Apria Healthcare location to assist with your
travel arrangements.
27
Troubleshooting
Trouble
No oxygen coming
from cannula or
mask
Portable unit cannot
be removed from
stationary system
28
Probable Cause
Remedy
Decreased awareness
of oxygen flow
Place cannula prongs in a clean glass
of water. If you observe bubbles
coming from your cannula, your unit
is working correctly.
Loose connections
Check each connection from the
unit to the cannula to ensure a tight
fit. If you are using a humidifier
bottle, check to see that it is screwed
on tight.
Flow control knob is
not pointing directly
to setting
Adjust flow knob to point directly to
prescribed setting.
Unit is empty
Call Apria Healthcare for
immediate delivery.
Dirty or faulty cannula
or mask
Remove cannula or mask and check
tubing for kinks or obstructions.
Replace with new cannula or mask
if needed.
Stationary unit
obstructed flow
Fill portable and call Apria
Healthcare location.
Units are frozen
together
Wait 15 to 30 minutes for
connections to thaw.
Troubleshooting
Trouble
Probable Cause
(continued)
Remedy
Portable unit does
not last as long
as usual
Not fully filled
Review filling procedure. If problem
persists call Apria Healthcare.
White vapor
spewing out of
connector after
uncoupling
Fill valve stuck open
Immediately reconnect portable to
stationary while being careful not to
come into contact with the vapor.
Wait 15 to 30 minutes for ice to
thaw. Remove portable.
All other problems
or questions about
equipment
Call your Apria Healthcare location.
29
Feedback on
Our Services
Apria Healthcare is among America’s most
experienced and respected home respiratory care
providers, and our patient satisfaction scores are
consistently high. It is possible, however, that you
may have a concern and we welcome feedback.
To voice a concern, you should take these steps:
1. Call your local Apria branch and ask to speak
to the branch manager.
OR
2. Contact us by e-mail at:
[email protected]
OR
3. Visit our Web site at www.Apria.com
Satisfaction Survey Process
Our goal is to ensure your satisfaction.You
will likely receive an Apria patient satisfaction
questionnaire and we hope that you will take
a few minutes to fill it out and return it to us.
The postage is prepaid by Apria Healthcare.
30
Education
News
Articles
Services
www.Apria.com
RES-2002
R e v. 1 0 / 0 9