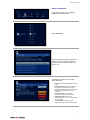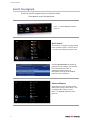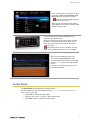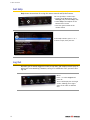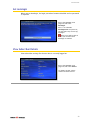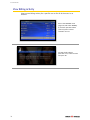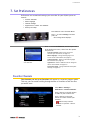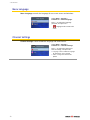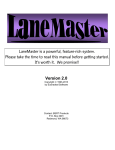
1
release 6.2 .3 THIS PAGE INTENTIONALLY LEFT BLANK Contents Contents Contents .............................................................................................i Introduction ..................................................................................... iii 1. Initial Startup ................................................................................1 Log In ................................................................................................................................................... 1 2. Basic TV Controls ...........................................................................2 Change the Channel ............................................................................................................................ 2 View Current Channel Information ..................................................................................................... 2 Set Favorites ........................................................................................................................................ 3 View the Channel Guide ...................................................................................................................... 3 Record a Program or Series ................................................................................................................. 4 Record a Program Once.................................................................................................................... 4 Record a Series ................................................................................................................................. 5 Autotune ............................................................................................................................................. 6 Search Autotunes ............................................................................................................................. 7 Search for programs ............................................................................................................................ 8 Quick Search ..................................................................................................................................... 8 Advanced Search .............................................................................................................................. 8 Access Menus ...................................................................................................................................... 9 Get Help ............................................................................................................................................ 10 Log Out .............................................................................................................................................. 10 3. Optional Menu Features ............................................................. 11 Weather ............................................................................................................................................ 11 Alerts ................................................................................................................................................. 11 4. My DVR ....................................................................................... 12 Set a Manual Recording .................................................................................................................... 12 View a Recorded Program ................................................................................................................. 13 View Recorded Program Folders .................................................................................................... 14 Whole Home Resume ..................................................................................................................... 15 Remove or Stop Recordings .............................................................................................................. 16 Manage My DVR................................................................................................................................ 17 Select Default DVR Settings ............................................................................................................ 17 Select Recording Priorities.............................................................................................................. 18 5. “My Services” Options ................................................................ 19 Telephony.......................................................................................................................................... 19 6. Account Services ........................................................................ 20 Access the Account Menu ................................................................................................................. 20 Change Password .............................................................................................................................. 21 Activate PIN Protection ..................................................................................................................... 21 Set Purchase PIN ............................................................................................................................ 21 Set Rating PIN ................................................................................................................................. 22 Create a User ..................................................................................................................................... 23 Set Parental Controls (Locks) ............................................................................................................ 25 Lock user out of TV for a set time................................................................................................... 25 Lock User Out of a Program/Channel ............................................................................................. 26 Lock User out of TV Indefinitely ..................................................................................................... 26 Manage Subscriptions ....................................................................................................................... 27 View Purchased Subscriptions ........................................................................................................ 27 Manage User Actions ........................................................................................................................ 28 Set Autologin ..................................................................................................................................... 29 View Subscriber Details ..................................................................................................................... 29 View Billing Activity ........................................................................................................................... 30 7. Set Preferences .......................................................................... 31 i Contents Favorite Channels .............................................................................................................................. 31 Menu Language ................................................................................................................................. 32 Channel Settings ................................................................................................................................ 32 Appearance ....................................................................................................................................... 33 Set-Top Box Setup ............................................................................................................................. 33 Index .............................................................................................. 34 Remote Control Functions .............................................................. 35 Technical Support ........................................................................... 37 ii Introduction The set-top box is your gateway to the Full-Service Content Delivery Network (fs|cdn®) interactive television service including Favorite Channels DVR Parental Locks Caller ID alert This manual is your guide to accessing these services through the remote control unit. Depending on optional fs|cdn® services available through your service provider, the following additional sections may also be applicable: My DVR. Applies to set top boxes equipped with hard drives. iii THIS PAGE INTENTIONALLY LEFT BLANK iv 1. Initial Startup 1. Initial Startup When you connect power to your set-top box for the first time, you’ll configure the set-top box and log in to fs|cdn. IMPORTANT: Do not disconnect power to the set-top box until Startup is complete. This will take up to 10 minutes. During this time the set-top box will shut down and start up again, lights may flash or blink, and messages will appear on your TV screen. Startup is complete when the Welcome screen on your TV screen prompts you for your password (see “Log In” on page 1). Follow the instructions below to set up your system. Log In Use number buttons on the remote control to enter your password ***** 1 To log in as a user other than the one displayed, press OK to select a different name. Be sure to use the manager user name and password when you sign in for the first time. 2 Enter the numeric password for the selected user (using the number keys). Press OK. The default password is 1 2 3 4. 1 2. Basic TV Controls 2. Basic TV Controls You can control all services from the remote control. Change the Channel Using Number buttons, enter the channel number. or On the CH (Channel) buttons, scroll up or down one channel at a time. View Current Channel Information Press INFO to see a description of the program you’re watching. 2 2. Basic TV Controls Set Favorites When you set Favorite channels, you create a separate program guide just for the channels you watch the most—your Favorites! Press GUIDE twice to see My Channels program guide. Use and buttons to select a channel you want to add to your Favorites program guide. Press the INFO button to see program information. With ‘Add to Favorites’ selected, press OK on the remote control. After you set up Favorite channels, press GUIDE three times to see the Favorites program guide. View the Channel Guide Press GUIDE once or twice to see the Channel Guides. My Channels (channels you subscribe to currently) Favorites (channels you’ve set as favorites). Refer to Set Favorites above to set up Favorite channels The Help Bar (below the guide) provides a key to the remote control buttons that navigate through channels and program times.* Buttons Function Arrows ( ) Scroll through channels and times ) Jump to previous/next block of channels Pg Back/Fwd ( ) Jump to previous/next times Rewind/FastFwd ( ) Jump to previous/next day Pg Up/Down ( * Help Bar appears only if activated. Refer to “Appearance” on page 33 for more information. In the Help Bar, “mine” denotes the Favorites guide. Press EXIT to close the channel guide. The Guide window times out after a period of inactivity. 3 2. Basic TV Controls The Channel Guide shows programming and a description of the selected program. Record a Program or Series The Recorded Programs feature lets you record programming to watch later. Use My DVR to view recorded programs. Press GUIDE to see your programs or Favorites. Use the arrow buttons to select the program you wish to record, and then press OK to see program information. From the Program Information window, you can set the program to be recorded—just one time, or several times if it’s a series. In this section: Record a Program Once Record a Series Set a Manual Recording Record a Program Once Either record a program you are currently watching by pressing the ‘Record’ button on the remote, or select a program in the channel guide and press the ‘Record’ button on the remote. To record the selected program only, select Record and press OK. To record a program you’re already watching, press the Record button on the remote control. Record the program one time After you set the recording … 4 In the Channel Guide, a Record icon indicates that the program is set to record. 2. Basic TV Controls Record a Series If you selected a series, you can record several episodes. Press to select Record series and then press OK. The Settings screen displays. Record several episodes of this series Use arrow buttons ( ) to navigate, and press OK to select options you want to use for recording the series: Once you schedule a program to Record, you can watch real-time TV—or even schedule another program to Record—without interrupting the recording process. To set DVR defaults, select Guide> My DVR > Default DVR Settings (see page 17). Start offset—Number of minutes to record before the program is scheduled to start End offset—Number of minutes to continue recording after program is scheduled to end Keep at least—Number of episodes to store Record episodes—Record only Ribbon episodes, or new episodes and reruns Select Record series and press OK. Press Exit to return to regular viewing mode. After you set the recording … In the Channel Guide, a Record icon indicates that the series is set to record. 5 2. Basic TV Controls Autotune Use the remote control to set your TV to tune to a later program automatically. Press GUIDE to see the Channel Guide. Press as many times as needed to see later programming. Highlight the program you want your TV to tune to later, then press OK. Press to select Autotune, then press OK. A message will then appear letting you know that the Autotune has been scheduled. Any subsequent instances of programming scheduled for Autotune in that time slot will override your original scheduling. In the Channel Guide, a clock icon indicates that the program is selected for Autotune. To cancel an Autotune selection, navigate to the program, press OK, select Cancel Autotune, and press OK again. 6 2. Basic TV Controls Search Autotunes To search Autotunes, select Search Guide from the Main Menu. Select Autotunes. A list of all programming scheduled for Autotune will then appear. Select the program you wish to view details and options for. The following options are available within Autotune: Record. Records the Autotune instance only. Record Series-like. Provides date and time options (including recurrent/ repetitive scheduling) for the recording of programming on the selected channel. Cancel Autotune. Cancels this particular scheduling of Autotune. Add to Favorites. Places this programming on a list for easy retrieval at a later time. View Channel. Displays current programming for the selected channel. 7 2. Basic TV Controls Search for programs Search for specific programming in the Channel Guide. Press MENU to access the Main Menu. Press to select Search, and then press OK. Quick Search To search for a category of programming (such as Movies, Sports, or Series) press to make your selection and press OK. View the Search Results of upcoming programs for the category you selected. Use arrow buttons to select an individual program and see its description at the top of the window. Press OK to see the options. Advanced Search Advanced Search lets you find specific programming using search filters—such as program title, channel, or day. Press to highlight Advanced, then press OK. 8 2. Basic TV Controls Press arrow buttons to select one or more categories: Genre, Type, Channel, Title, Day, From (start time), To (end time). Press OK to scroll through options in the fields on this screen. When you’ve entered the Search criteria, select Search in the Search Channel Guide window and press OK. If you search by Title, select the ABC button to access the pop-up keyboard. Spell the program title using arrow buttons to select the letters; press OK after each letter. When you’re done, select the check mark and press OK. (Partial spelling is okay.) If Cell-phone like text entry is enabled, you may enter text by pressing number keys on the remote. After you select Search and press OK, you’ll see the Search Results in a list. To see a program description, press arrow buttons ( ) to select the program from the list. Press OK on any selected program to see the available options. Access Menus The Main Menu is the gateway to most features. On the remote control, press arrow buttons ( ) to select the feature you want, and then press OK. Press MENU to access the Main Menu. Press the blue button to return to the previous menu. Press Exit to clear all menus from the screen. 9 2. Basic TV Controls Get Help Help shows instructions for using the remote control and fs|cdn features. You can get help in several ways: Starting at the Main Menu, select Settings [+OK] and then Help [+OK] Select Help in the Help Bar at the bottom of the screen Press the green button on the remote control In the Help Contents, press or to select a topic, then press OK. Log Out Normally you’ll remain logged in to the set-top box, and simply turn off your TV when you’re not watching. However, to log in as a different user, you must first log out. Press MENU to access the Main Menu. Press to select Logout and press OK. The TV will display the user login screen, allowing you to log in again as the same or different user. 10 3. Optional Menu Features 3. Optional Menu Features Along with standard features, the Main Menu lists optional features you can purchase from your service provider. Press MENU to access the Main Menu. Press to select the feature you want, then press OK. Features described below are: Weather Alerts Weather Select Weather from the Main Menu to display the 6-day forecast for available locations. Press to view alternate locations. Alerts Alerts lets you activate or deactivate on-screen notification for Telephony (Caller ID), Chat, and Message services, if you are a subscriber. Press to select a service. Press OK to deactivate/activate the service. A check mark indicates service is activated. Select OK and press OK. 11 Error! Reference source not found. 4. My DVR The Recorded Programs feature lets you record programming for repeated viewing or viewing at a later time. Use My DVR to view the programming you record. Set a Manual Recording Manual recordings let you specify a specific time, channel, and/or date to record without using the channel guide. For example, you could record one channel for an entire evening. In the Main Menu, select My DVR and then Set Manual Recording. Press buttons ( ) to select up or down arrows at each field, then press OK to scroll to the setting you want: Channel From/To—Start/end times Repeat—How often to record at these settings, such as Just Once, Weekdays only, Daily Period start—Date to start recording 12 Press to backspace your entries. For example, to change 9:30 to 9:00, press twice and then type 00. 4. My DVR 1. To name this settings group, click the Name tab. 2. In the pop-up keyboard, press arrow buttons to select letters. Press ok after each letter to spell the name, and then select the check mark or OK. If you don’t select a name, the system will assign one. You will see it when you check recording schedules at My DVR > Scheduled. 3. On the Set Manual Recording window, select Set and then press OK. Click OK in the confirmation window. 4. To view a list of programs you’ve scheduled, select My DVR > Scheduled. View a Recorded Program In the Main Menu, select My DVR, and then press OK. In the My DVR menu, press to scroll down to the item you want, then press OK. These menu options let you view recorded programming: Recorded—All programs recorded Scheduled—All programs scheduled to be recorded Series Folders—Series episodes recorded Manual Recordings—Manual recordings All…—All recordings for user logged in All users’ recordings—All recordings made or scheduled by all users on this set-top box For information about different types of recording, see “Record a Program or Series” starting on page 4. In the list that appears, press or to select a program and press ok. Information at the top of the window describes the selected program. Symbols show the status of each listing: Completed successfully Unsuccessful In progress Scheduled Interrupted 13 4. My DVR Select Start to start the program at the beginning, or select Resume to continue watching a program from where you stopped. Press OK. Navigate the program with Play, Stop, Pause, Rewind, or Fast Fwd. View Recorded Program Folders To view a recorded program folder within fs|cdn, select Series from the My DVR menu. Select the series you wish to view by highlighting it and pressing OK. The list of available episodes for that series will then appear. indicates that the episode has not aired yet and has been scheduled for recording. indicates that the episode has already aired and is available for viewing. indicates that the episode is airing currently. Select an episode with either adjacent to it. Press OK. 14 or 4. My DVR Highlight Start and press OK for the selected episode to play from the beginning. Whole Home Resume The Home House Resume feature allows viewers with multiple television sets to pause recorded programming on one set and resume it on any other household set without missing any of the content. The programming will automatically restart from the point at which it was paused. On the television you will no longer be viewing, press Pause () to pause the programming. To resume the program on another television set, locate the program, then highlight it and press OK. The program will then commence from exactly the point at which it was paused on the other television. 15 4. My DVR Remove or Stop Recordings In the Main Menu, select My DVR > Recorded, select to view recordings listed by date or by title, and press OK. From the list of programs, select the program you want to remove and press OK. Select the option you want and then press OK: Remove—Erase the selected program from the Recorded list Remove all—Erase all programs in the Recorded list Interrupt series—Keep the series already recorded, but stop recording future episodes The window includes other controls for the selected program: Start—Play the recording Cancel—Discontinue this action Resume—Continue to play the program if it has already been started Settings—Change recording preferences for the program (for more information about recording preferences, see “Select Default DVR Settings” on page 17.) 16 4. My DVR Manage My DVR Managing your recordings will optimize My DVR performance when you record programs for later viewing. This section describes how to set these controls: Default DVR Settings Recording Priorities Select Default DVR Settings Use this option to pre-set your recording preferences for different types of programs such as series, movies, and sports. In the Main Menu, select My DVR > Default DVR Settings. Use the arrow buttons ( ) to select up or down arrows at each field, then press OK to scroll to the setting you want (settings vary depending on the Type): Type—Type of recording, such as Series Recordings, Single series episodes, Movies, Shows, Sports, Manual Recordings Start offset—Number of minutes to start recording before the program is scheduled to start End offset—Number of minutes to continue recording after program is scheduled to end Keep until—How long to store recorded programs Keep at least—Number of episodes to store Record episodes—Record only new episodes, or new episodes and reruns Select Apply and press OK. 17 4. My DVR Manage My DVR Select Recording Priorities If the number of recordings scheduled at one time is more than allowed, use this option to choose which program to record. This is useful if you have scheduled a series, which records repeatedly and may conflict with other programs you schedule. In the Main Menu, select My DVR > Priorities. Programs scheduled for recording display in a list. The higher the program in the list, the higher its priority: To move a program higher or lower in the priority list, follow these steps: For higher priority—Select the program, then press OK For lower priority—Select the program, then press the Info/red button 18 9. “My Services” Options 5. “My Services” Options My Services are optional services you can purchase from your service provider. Find available service options on the Main Menu or by selecting My Services. Some services are described below: Vudu downloads Telephony Messages Chat Telephony Telephony service displays a Caller ID pop-up alert at the top of your TV screen when you have an incoming phone call. The alert shows phone numbers for the receiver and caller. When the call alert appears, simply wait for it to time out, or press OK on the remote control to close the alert. To activate Caller ID, refer to “Alerts” on page 11. 19 6. Account Services 6. Account Services Account setup may include some or all of these procedures, depending on the services you’ve ordered. Topics in this section: Access the Account Menu (page 20) Change Password (page 21) Activate PIN Protection (page 21) Create a User (page 23) Set Parental Controls (Locks) (page 25) Purchase Subscription Packages (page Error! Bookmark not defined.) Manage subscriptions (page 27) Manage User Actions (page 28) Set Autologin (page 29) View Subscriber Details (page 29) View Billing Activity (page 30) Access the Account Menu To set up or change your services, first access the Account menu. Press MENU to access the Main Menu. Press to select Settings and press OK. Select Account and press OK. From the Account menu, select the activity you want. Some account activities are described in this section: Change Password (page 21) Purchase PIN (page 21) Rating PIN (page 22) Manage Users (page 23 and 28) My Own Subscriptions (page 27) 20 6. Account Services Change Password These instructions will change the current user’s password. To change another user’s password, refer to “Manage User Actions” on page 28. Access the Account menu (page 20) and select Change Password. Complete the fields: Frame – Use number buttons to enter old password. New – Use number buttons to enter new password. Confirm – Enter the password numbers again. Press to select OK. Press OK. Activate PIN Protection fs|cdn features two types of optional personal identification numbers (PINs): Purchase PIN allows secure purchase of subscriptions or services, and Rating PIN allows parental controls. Set Purchase PIN When activated, a Purchase PIN is required to purchase subscriptions. Access the Account menu (page 20) and select Purchase PIN. Complete the fields: New PIN – Use number buttons to enter 4digit PIN. Confirm new PIN – Enter the PIN again. Password – Enter your 4-digit numeric password. Enable PIN Protection – Press OK to select Yes or No. (Will appear only if PIN Protection is activated.) Click Apply and press OK. 21 6. Account Services Set Rating PIN A Rating PIN allows a user to view programming with a higher rating than the rating specified when the user was created (see “Create a User” on page 23). The manager user may set Rating PINs. Access the Account menu (page 20) and select Rating PIN. Complete the fields: New PIN – Use number buttons to enter the 4-digit PIN. Confirm new PIN – Enter PIN again. Password – Enter your 4-digit numeric password. Enable PIN Protection – Press OK to select Yes or No. (Will appear only if PIN protection is activated.) If No, then this user cannot view programming with a higher rating under any circumstances. PIN Protected Rating – Press OK to select the highest rating user can view without a Rating PIN. Select Apply and press OK. Example: John is a 13-year-old user specified with a TV-14 rating. His parents also assigned John a PIN-protected rating of R. The following rules apply to John: 22 PIN-Protection enabled (option ‘Yes’) May view programming as high as TV-14 PIN-Protection disabled (option ‘No’) May view as high as TV-14 only without PIN May view R with PIN May not ever view higher than R 6. Account Services Create a User The Manager User for a subscriber account can create additional users. Access the Account menu (page 20) and select Manage Users. Select Create New and press OK. If you don’t see the Create New option, it’s because your account already has the maximum number of users. Contact Customer Service to add more users. With ABC selected, press OK. In the pop-up keyboard, press arrow buttons ( ) to select letters. Press OK after each letter to spell the new username. Select the check mark and press OK. 23 6. Account Services Complete the remaining fields: Password Press number buttons on the remote to enter a numeric password of your choice. [If you make a mistake, press Pg Back to erase. Refer to your remote control diagram at the beginning.] Confirm Enter the password numbers again. Rating Press OK to scroll through ratings. Stop at the highest rating level you want this user to view. Users will need a Rating PIN to view programming higher than the rating you specify here. Refer to page 22 for details. Sp.Limit Press number buttons to enter amount this user may spend per billing period (for VoD, PPV, etc.). Can(not) Subscribe Press OK to toggle between Can and Cannot Subscribe. Can Subscribe means this user will be able to add subscription services. Select OK and press 24 OK to save settings. 6. Account Services Set Parental Controls (Locks) The manager user can control user viewing in several ways: Lock user out of TV for a set time (page 25) Lock user out of a program / channel (page 26) Lock user out of TV indefinitely (page 26) For all Lock settings, access the Account menu (page 20) and select Manage Users. For all Lock settings, begin by selecting Manage Users, and then select the user you wish to control. Press OK. Select Locks and press OK. Continue with the instructions below for the action you want (lock user out of program, out of channel, or out of TV). Lock user out of TV for a set time Complete the From, Duration, and Daily fields by pressing OK to scroll through options. With the fields set, select Lock and press OK. 25 6. Account Services Lock User Out of a Program/Channel Select the user account as described above. Select Channel Locks and press OK. Select the program to lock, or any program in the channel to lock, and press OK. Select Lock Program or Lock Channel, and press OK. To unlock, repeat these steps, except select Unlock. The channel guide will show a padlock symbol to identify the program or channel as locked. Lock User out of TV Indefinitely Select the user account as described on page 25. Select Lock Now and press OK. This user will be blocked from logging in. To unlock the user, repeat these steps, except select Unlock Now. 26 6. Account Services Manage Subscriptions To purchase a subscription, refer to “Error! Reference source not ound.” on page Error! Bookmark not defined., or contact Customer Service. View Purchased Subscriptions View subscription bundles already purchased for the user logged in. Access the Account menu (page 20) and select My Own Subscriptions. Select a subscription and press OK. View the description of the subscription you chose above. 27 6. Account Services Manage User Actions From the main user account you can create or modify settings for additional users in the account. User settings include subscriptions, parental locks, password, and Autologin. Access the Account menu (page 20) and select Manage Users. Select the user name and press OK. Changes you make in the next screens will be for the user you select here. Select a User Action category to view or modify. Press OK. The manager user may take these actions for the selected user: Avail. Sub. 28 Follow steps in “Error! Reference source not found.Error! Reference source not found.” on page Error! Bookmark not defined.. My Own Sub. View current subscriptions for the selected user. Locks Activate/deactivate parental control for programs or channels. Follow steps in “Set parental control (Locks)” on page 25. Modify View or change user info including password and rating. Activity View billing activity. Autologin Set the user login so it doesn’t require a password. Delete Delete selected user. (Select Yes or No.) Cancel Discontinue 6. Account Services Set Autologin When you set Autologin, the login procedure becomes disabled and no password is required. Access the Account menu (page 20) and select Autologin. Press to select Set Autologin User and press OK. Use the same steps to turn off Autologin. Other users will be able to access your account when Autologin is enabled. View Subscriber Details View subscriber settings for the user who is currently logged on. Access the Account menu (page 20) and select Details. To change settings, please contact Customer Service. 29 6. Account Services View Billing Activity View current billing activity for a specific user or for all of the users in an account. Access the Account menu (page 20) and select Activity. If you have questions about your bill, please contact Customer Service. To view details about a particular item, select the item and press OK. 30 7. Set Preferences 7. Set Preferences Preferences are customized settings you can make for your fs|cdn system to control: Favorite channels Menu language Channel settings Appearance of menus and windows Set-top box setup Press MENU to access the Main Menu. Press to select Settings, and then press OK. The Settings menu displays. Press to select Preferences, and then press OK. In the Preferences menu, select from the options and press OK: Favorite Channels—Make it easy to see the channels you watch most (see page 31) Menu Language—Change the language in onscreen menus and windows (see page 32) To go to Preferences, select Settings in the Main Menu Channel Settings—Select an alternate language for broadcasts (see page 32) Appearance—Select a different color or design for menus and windows (see page 33) Set-top box Setup—Change advanced set-top box settings (see page 33) Favorite Channels The channels you set up as Favorites will appear in a separate program guide. This way, you can avoid scrolling through dozens of channels to find the ones you watch most. Select Menu > Settings > Preferences > Favorite Channels. Click a channel in the left column to add it to your Favorites list. Click a channel in the right column to remove it from your Favorites. Add as many Favorite channels as you like—there is no limit. 31 7. Set Preferences Menu Language Menu Language controls the language for on-screen menus and windows. Select Menu > Settings > Preferences > Menu Language. Press to select the language you want, and press OK. Language order remains the same. Channel Settings Channel Settings control broadcast language and audio format. Select Menu > Settings > Preferences > Channel Settings. Press to select the setting you want to change, and press OK: Language—Select a different language for broadcasts, when available Audio—Change the audio format options 32 7. Set Preferences Appearance Appearance controls the on-screen format for menus and windows. Select Menu > Settings > Preferences > Appearance. Press arrow buttons to move through the options. Press OK to make a selection. Menu Help Bar Channel Guide Help Bar Transparency Transparent–Current program shows through on-screen windows. Opaque–On-screen windows are opaque. Color Schemes View samples on next page. Font Size Type size in on-screen windows. Font Weight Bold or plain. GUI Type Ribbon or Frame. Help Bar (at left) When “on,” keys to shortcut buttons appear below Channel Guide and menus. Thumbnail Video When “on,” a small video image of your current program shows while you view the Channel Guide. With your selections made, arrow to Apply and press OK. Set-Top Box Setup Set-top box Setup controls advanced settings for your set-top box. Select Menu > Settings > Preferences > Set-top box Setup. Use the arrows to select the settings you want: Digital Audio Output—Off or on Component Output—SD (standard definition) or HD (high definition) Output Aspect Ratio—AUTO (automatic), 4/3, or 16/9 With your selections made, arrow to Apply and press OK. Changing set-top box settings may cause the set-top box to reboot. 33 7. Set Preferences Index Account menu, 20 account services, setup, 20 alerts, activate, 11 appearance, choosing, 33 audio format, 32 Autologin, 29 Autotune, 6 billing activity, 30 Caller ID, 19 change password, 21 user’s, 28 channel changing, 2 locks, 25 view information for, 2 channel guide quick search, 8 search for programs in, 2, 8 viewing, 3 channel settings, selecting, 32 color schemes, 33 DVR, 12 manage, 17 priorities, 18 settings, 17 exit fs|cdn, 10 Favorite channels, setting, 31 font, setting, 33 genre search for program by, 9 guide. See channel guide. Help Bar, 3 turning on, 33 language for broadcasts, 32 for menus and windows, 32 language for menus, 33 lock user out of a program, 26 out of TV, 25 out of TV indefinitely, 26 locks, program/channel, 25 log in, 1 log out, 10 Main Menu, accessing, 9 manager user actions, 28 manual recording, 12 menu accessing, 9 choosing appearance, 33 My DVR, 12 My Services. See services. parental control, 25 password change, 21 changing user’s, 28 default, 1 PIN activating, 21 34 protection, setting, 22 purchase, setting, 21 rating, setting, 22 preferences, setting, 31 programs quick search, 8 search for, 8 purchase PIN, 21 quick search, 8 rating PIN, setting, 22 ratings assign level to user, 24 definitions, 24 setting a PIN for, 22 recorded programs recording a program, 12 remove, 16 resume, 14 viewing, 13 Recorded Programs feature, 4 recording a program once, 4 default settings, 18 manual, 12 priorities, 18 series episodes, 5 search for programs, 8 series interrupt, 16 recording, 5 services activate alerts, 11 setup, 20 telephony, 19 set-top box exiting, 10 setup, 33 spend limit, 24 startup, 1 subscribe, assign privilege to user, 24 subscriber details, 29 subscriptions view purchased, 27 technical support, 37 telephony service, 19 thumbnail, turning on, 33 title search for program by, 9 TV basic controls, 2 user actions, manage, 28 create new, 23 modify settings for, 28 set program/channel locks for, 25 weather, 11 Remote Control Functions Remote Control Functions Universal Remote (model UR5L-9000L-IP) 35 7. Set Preferences 36 Technical Support This user manual is intended for use by Owner personnel and fs|cdn end users. If you have questions or problems please contact Southeast Nebraska Communications: phone: 402-245-4451 afterhours phone: 402-245-5999 e-mail: [email protected] website: http://www.sentco.net/ Information included in this document is correct at time of release. © 2011 Conklin Corporation, all rights reserved. Printed in the USA. fs|cdn and the Intelligent Personal|TV logo are registered trademarks of Conklin Corporation. All other trademarks are the properties of their respective owners. UM-CDNSTBC-6.2.3