1
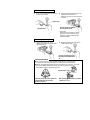
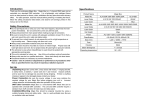
Troubleshooting Your Microphone may not require repair in cases such as those described below. Before contacting Sega’s Technical Support, please check the items described below. Symptom Description/Action Voice recognition does not work properly. ● Are you using software that supports the Microphone? → The Microphone will only work with compatible software. ● Is the Microphone inserted all of the way? → Push the Microphone all of the way into the Dreamcast controller expansion socket. ● Is there a good connection between the Microphone body and the Microphone stand? → Push the foam covered Microphone stand securely into the Microphone body. ● Is the Microphone or the connector that connect the Microphone to the Dreamcast controller clean? → Wipe any dirty portions clean with a dry, soft cloth. If you still cannot resolve the problem after checking the above items, turn the Dreamcast off, and unplug the power cord. Then, unplug the Dreamcast controller that the Microphone is connected to from the control port on the Dreamcast. Finally, remove the Microphone from the expansion socket of the Dreamcast controller. Contact Sega’s Technical Support at www.sega.com or 1-800-USA-SEGA. Sega of America, Inc. P.O. Box 7639, San Francisco, CA 94120-7639 1-800-USA-SEGA & www.sega.com • Please note that specifications and product exterior may change without notice. • Unauthorized reproduction of the contents of this document is prohibited. • SEGA, Dreamcast and the Dreamcast logo are either registered trademarks or trademarks of Sega Enterprises, Ltd. Export, use for profit, rental or leasing of this product is prohibited. Further, SEGA offers no warranty service or support outside of the U.S. and Canada. Japanese Patent No. 2,870,538 (Patents pending in U.S. and other countries). SEGA ENTERPRISES, LTD., 1999 670-14218A Microphone for Voice Recognition Input Instruction Manual Thank you very much for purchasing this Microphone. Before using the Microphone, please read this Instruction Manual as well as the Instruction Manual and Important Safety Instructions provided with the Dreamcast. Please keep this manual for future reference. Contents: Microphone body/Microphone stand (with foam cover)/Instruction Manual (this document) Compatible hardware: Dreamcast controller Compatible software: Dreamcast software that is compatible with the Microphone WARNING Failure to comply with these warnings may result in death or serious injury. If the Microphone will be used by a young child, adult supervision is required. Do not allow anyone, especially a child, to put the foam microphone cover in their mouth. Placing the foam microphone cover in your mouth is extremely dangerous and can cause choking or suffocation. CAUTION Failure to comply with these cautions may result in personal injury or property damage from electric shock or other accidents. ● Never attempt to disassemble or modify the Microphone. ● Grasp Microphone body firmly when unplugging/plugging the Microphone from/ into the Dreamcast controller. Never pull/push on the Microphone stand or the Microphone stand connector. ● Do not leave the Microphone on the floor. The Microphone may break if stepped on. Serious injury could result if someone trips on the Microphone. ● Do not insert metallic objects, etc., into Microphone body or the Microphone stand connector. Doing so could cause a short circuit. Usage Precautions Follow the precautions shown below when using the Microphone. Failure to follow these precautions may result in damage to or malfunction of the Microphone. ● Do not subject the Microphone to strong impacts. ● Do not apply strong force to or bend the Microphone stand in any way. ● Use only the microphone (Microphone stand) provided with this Microphone. Do not connect or use any other microphones. ● Do not swing or twirl the Dreamcast controller when peripherals like the Microphone are connected. Do not leave the Dreamcast controller unattended when the Microphone is connected. ● Before wiping dirt off the Microphone: 1. Turn off the Dreamcast, 2. Remove the Microphone from the expansion socket on the Dreamcast controller, 3. Clean the Microphone with a soft, dry cloth. ● Do not use or store the Microphone in an area that is very hot, cold, smoky, dusty, humid, or in an area where there is water, such as near a sink or a tub. ● If the Microphone is brought into a heated room from outside on a cold day, the sudden temperature change may cause condensation to form inside the Microphone. Always allow one hour for the Microphone to become acclimatized to a new environment when moving it from a cold to a warm environment. ● The Microphone should be used in the following environmental conditions: Temperature: 41°F to 95°F; humidity: 10% to 80% RH (with no condensation) FCC Warning This device complies with Part 15 of FCC Rules. Operation is subject to the following two conditions: (1) This device may not cause harmful interference (2) This device must accept any interference that may be received, including interference that may cause undesired operation. About the Microphone Please read the following explanation before connecting the Microphone to the expansion socket on the Dreamcast controller. ● The Microphone can only be used with supporting software. Also depending on the supporting software, some functions of the Microphone may not be available. Please refer to the instruction manual provided with the software for details. Notes ● The Microphone must be connected to the Dreamcast controller. The Microphone may malfunction or become damaged if it is connected to the expansion socket of a peripheral device that does not support it. The Arcade Stick and Racing controller are examples of non-supporting controllers. Do not connect the Microphone to one of these peripherals. ● The Microphone can be connected to either Expansion Socket 1 or Expansion Socket 2 on the Dreamcast controller. However, some software may require that the Microphone be connected to a particular socket. Please refer to the instruction manual provided with the software for details. ● When connecting the Microphone to the Dreamcast controller, make sure that you push it in all of the way in — until it locks into place with an audible click. If the Microphone is not correctly locked into place, it could fall out during use or possibly operate incorrectly. ● Grasp the Microphone body, not Microphone stand, when removing the Microphone from the Dreamcast controller. Grasping the Microphone stand when removing the Microphone from the Dreamcast controller could damage the Microphone. Connecting the Microphone 1 First, connect the Microphone stand to the Microphone body. 2 Insert the assembled Microphone into either Expansion Socket 1 or Expansion Socket 2 on the Dreamcast controller. Microphone stand Microphone body Push the Microphone all the way into the expansion socket. * Some software may require the Microphone be connected to a specific expansion socket. Please refer to the instruction manual provided with the software for details. Removing the Microphone 1 Pull the Microphone out of the Dreamcast controller by grasping the Microphone body. About the Microphone 2 Remove the Microphone stand from the Microphone body. Grasp the connecting plug on the Microphone stand and then pull it out. ● Use only the microphone provided with this Microphone. Using any other microphone could result in damage to or malfunction of the Microphone. ● Always use the Microphone with the foam microphone cover in place. Using the Microphone without the foam microphone cover may result in incorrect interpretation of voice recognition functions. Approximately 2" to 10" 45° Speak into the microphone from within a 45° field perpendicular to the front of the Dreamcast controller. When speaking into the Microphone, maintain a distance of 2" to 10".