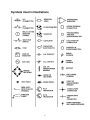
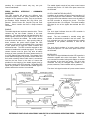
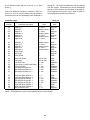
1
IM-110007-2004
C.E.S. Stamping Press Controller
INSTRUCTION MANUAL
(Revised 07/04)
DRIVE SOURCE INTERNATIONAL INC.
7900 Durand Avenue, P.O. Box 0361
Sturtevant, WI USA 53177
Toll Free: (800) 548-2169
Phone: (262) 554-7977 - Fax: (262) 554- 7041
Email: [email protected]
24 Hours Service: (262) 499-0437
DANGER HIGH VOLTAGE
Motor control equipment and controllers are connected
to hazardous line voltage. When servicing drives and
electronic controllers, there may be exposed
components with their cases and protrusions at or above
line potential. Extreme care should be taken to protect
against shock. Stand on an insulating pad and make it a
habit to use only one hand when checking Components.
Always work with another person In case an emergency
occurs. Disconnect power whenever possible to check
controllers or to perform maintenance.
Be sure
equipment is properly grounded. Wear safety glasses
whenever working on an electronic controller or electrical
rotating equipment.
CAUTION
Rotating shafts and above ground electrical potentials
can be hazardous.
Therefore, it is strongly
recommended that all electrical work conform to National
Electrical Codes and local regulations. Installation,
alignment and maintenance should be performed only by
qualified personnel.
Factory recommended test procedures, included in the
instruction manual, should be followed.
Always
disconnect electrical power before working on the unit
REFER TO OSHA RULES AND REGULATIONS.
PARAGRAPH
1910.219
FOR
GUARDS
ON
MECHANICAL POWER TRANSMISSION APPARATUS.
NOTE:
Since improvements are continually being made to
available equipment, the enclosed data is subject to
change without notice. Any drawings are for reference
only, unless certified. For additional information contact
your nearest Eddy Current Representative listed in the
Yellow pages under “Power Transmission Equipment”.
Or you can call DSI/Dynamatic® at 1-800/548-2169.
IMPORTANT NOTICE
The printed contents in this manual are to be used for
reference only. Due to periodic engineering design
changes and the addition of modifications, this material
is provided as a guide only.
Refer to engineering drawings for your specific unit. If
you do not have your units engineered drawings, please
contact the publications department at the factory.
For additional information regarding contents, direct your
request to one of the following areas:
Instruction Material
Technical/Operational Questions
Parts/Order Inquiry
Sales/Marketing
Engineering
Customer Service
This notice is provided to clarify the Intent of the
instruction book contents and to inform our customers
how to obtain appropriate technical assistance from the
proper source.
©Copyright DSI/Dynamatic®, 2002
TABLE OF CONTENTS
SECTION 1 - GENERAL INFORMATION
Introduction
Safety
Training
Receiving and Damage Claims
Warranty
Handling
Storage
Long Term Storage
Removing from Storage
Electrical Part Numbering System
Category Number and Description
Symbols Used in Illustrations
Page No.
5
5
5
5
5
5
6
6
6
6
6
8
SECTION 2 - GENERAL DESCRIPTION
Construction
CES Controller
Specifications
Power Circuitry
Keypad Programming
Field Adjustments
Light Emitting Diode (LED) Indicators
Press Speed Control
Angle Measurement
CES Digital Master Regulator (DMR)
Press Control Interface - Commands Accepted
Press Control Interface - Output Signals
Press Control Interface – Serial
Signals for Customer's Recorder
Analog Meters
Brake Contactor
Press Operating Modes
Press Control Parameters
9
9
9
9
10
10
10
10
10
11
12
13
14
14
14
14
14
20
SECTION 3 - OPERATION
Purpose
Constant Energy System
Stamping Press Operation
Eddy-Current Clutch and Brake
Variable Speed Press Drives
Power Amplifier
CES Logic Board
Logic Power Supply Inputs
Logic Control Lines
LEM Current Feedback Amplifiers
Fault Priority Encoder
Fault Codes
CES Controller Parameters
Keypad Programming
Optional Features
22
22
22
22
22
23
24
24
24
24
24
24
25
26
28
SECTION 4 - START-UP AND ADJUSTMENT
Power Conversion
Press Speed Control
Angle Measuring and Control Circuitry
Start-Up Procedure
Approximate Parameter Settings
31
31
31
31
34
SECTION 5 - MAINTENANCE AND TROUBLESHOOTING
Maintenance
Troubleshooting
Renewal Parts, and Service
List of Spare Parts Common to All CES/DR Controls
List of Spare Parts Unique to Controllers as Indicated
36
36
37
38
38
GENERAL INFORMATION
Training programs are an essential part of safe and
correct operation. Training provides the knowledge
necessary to obtain top performance from your
equipment. DSI/Dynamatic recognizes this fact and
conducts training schools to educate your plant
personnel in safe maintenance and operating
procedures.
INTRODUCTION
This instruction manual relates specifically to the CES
Stamping Press Controller. Instructions are in sequence
beginning with General Information and proceeding
through Receiving, Operation, Start-up and Maintenance
and renewal parts information.
Please be sure that you have your units board
schematics and connection diagrams, if you do not have
these drawings, contact the Publications Department at
the factory and request the drawing numbers by
providing the model number and serial number on the
nameplate of your unit.
Items on your drawings
supersede any items listed or referred to in this manual.
Please note that there may be charges incurred for
replacement manuals and/or drawings.
Training schools are held at company headquarters, in
Kenosha, Wisconsin. There is a nominal charge for this
service. If you are interested in scheduling a training
school, please contact the Marketing Department for
further information.
Special training schools structured around your specific
equipment may also be arranged.
If you have any questions regarding this controller
contact the DSI/Dynamatic.
DSI/Dynamatic has
distributors located throughout the United States and in
various other countries. If you do not know who your
distributor is, please call the factory at 1-800/548-2169,
fax 1-800/828-5072, E-mail: [email protected],
Web site: www.drivesourceusa.com
RECEIVING AND DAMAGE CLAIMS
Your CES Stamping Press Controller has been operated
and tested at the factory prior to shipment. Specific test
procedures are followed to assure the quality of your
controller. Carrier approved packing methods assure
safe shipment to your plant. Shipment is made F.O.B.
our factory, with the carrier assuming responsibility for
your unit. Therefore, it is essential that you carefully
inspect the shipment upon delivery to ensure that no
damage or lost items have occurred in transit. Loss or
damage is covered by the carrier, not by the product
warranty. File a claim immediately with the carrier if any
damage or loss is found. Should you require assistance
in settling your claim with the carrier, contact our nearest
sales office. You will need the unit model number, serial
number and your purchase order number for
identification.
SAFETY
With any electronic equipment or rotating electric
machinery, potential safety hazards are present
and
require safeguards and proper use. This equipment
must be installed properly, using safe procedures, and
meet the requirements of all applicable safety codes.
The wiring must be in-accordance with the National
Electrical Code and all other local codes and regulations.
Shaft guards as well as protection for operating and
maintenance personnel against high voltage and moving
machine parts is essential. Refer to OSHA rules and
regulations, paragraph 1910.219, for guards on
mechanical power transmission apparatus. Please heed
these safety instructions.
WARRANTY
Your new CES Stamping Press Controller is covered by
a one-year warranty against any manufacturing defect in
either material or workmanship. This warranty starts on
the date of shipment to your plant. Should the controller
fail within the one-year warranty period, contact the
factory for a Repair Instruction (RI) form. Fill in all
required information on the form and return the form with
the controller to our Repair Service Department in
Kenosha, WI for warranty repair. Freight charges both
ways are your responsibility.
DANGER,
WARNING,
CAUTION
and
special
INSTRUCTION labels are applied to the equipment to
remind you of the hazards that exist. Know your
equipment before handling or working on it.
DANGER - is used were an immediate hazard exists.
Failure to follow instructions could be fatal.
HANDLING
The CES Stamping Press Controller weighs about 600
pounds. Do not drop or subject the controller to
repeated shock or vibration. Do not stack heavy
material on the controller. The printed circuit boards,
components and electrical wiring may be easily
damaged.
WARNING - means a possibility of injury to personnel,
but not as severe as a Danger Warning.
CAUTION - is used to warn of potential hazards and
unsafe practices.
INSTRUCTION labels and notes are used when there is
a need for special instructions related to safety, proper
operation or maintenance.
STORAGE
Store electrical control equipment in a clean, dry location
with a non-corrosive atmosphere, protected from sudden
temperature changes, high levels of moisture, shock and
TRAINING
4
is abbreviated by dropping zeros, i.e., 15-825-1. The
number printed on the board and in the technical
instruction material is the abbreviated form. However,
the actual bill of material and order paper work for that
board would use, the complete number 15-000825-0001.
vibration. Electrical components are delicate and easily
damaged - provide adequate protection for them.
Ambient temperature should not exceed 25ºC. (77ºF.) on
a continuous basis or 40ºC. (104ºF.) on an intermittent
basis. The minimum temperature must remain above
freezing and above the dew point of ambient air. High
temperature, corrosive atmosphere and moisture are
detrimental to electrical control equipment.
CATEGORY NUMBER AND DESCRIPTION
(Reference first two digits and chart below)
14
Alarms
15
Assemblies
16
Bearings
17
Blocks
18
Blowers
19
Brackets
20
Cable
21
Cams & gears, cam switch assemblies
22
Cans
23
Capacitors
24
Chassis
25
Circuit breakers
26
Coils A coil assemblies
27
Connectors, plugs sockets
28
Control unit & parts
29
Counters
30
Dial plates & knobs
31
Enclosures
32
Fuses & fuse holders
33
Filters (radio interference)
34
Gaskets & gasket material
35
Generators
36
Hardware
37
Instruments
38
Insulators & Insulation
39
Lights & Fixtures
40
Motors
41
Motor starters & controls
44
Operator's panels
45
Panels
46
Phase Shifters
47
Photoelectric devices
48
Plates
49
Potentiometers
50
Power converters
51
Reactors
52
Regulators
53
Relays & contactors
54
Resistors
55
Semiconductors
56
Shock Mounting
57
Solenoids
58
Switches
59
Servo mechanisms
60
Terminals
61
Thermal devices-excluding motor starter heaters
62
Timers
63
Transducers
64
Transformers, chokes
65
Tube sockets
66
Valves
67
Wires
68
Wiring duct
69
Tubes
LONG TERM STORAGE
The manufacturer's warranty covers repair or
replacement of defective materials and rectification of
faulty workmanship. It does not cover damage and
deterioration transpired during storage period.
Some examples of deterioration due to storage are:
1. Corrosion of terminals and contacts.
2. Loss of capacitance of electrolytic capacitors.
3. Moisture
absorption
within
insulation
composition resistors.
and
These are not manufacturer's defects and will not be
covered by the warranty policy.
Refer questions to the Electrical
Department in Sturtevant, Wisconsin.
Engineering
REMOVING FROM STORAGE
Before returning the controller to service after long-term
storage, it will be necessary to carefully inspect it for any
signs of damage or deterioration.
Correct any
deficiency. Carefully inspect the controller for signs of
moisture, especially with respect to transformers and
composition resistors. If moist, the autotransformer will
require thorough drying.
Corrosion is an important factor. Inspect terminals,
plugs, sockets and contacts for signs of corrosion. If
detected, cleaning will be necessary.
Before applying power, make sure all connections are
tight.
The
suggested
procedures
given
are
only
recommendations offered to aid-our customers in
preserving stored equipment. We cannot guarantee
stored equipment, even if all procedures are followed;
damage or deterioration may still occur. Equipment
storage is not covered by warranty.
ELECTRICAL PART NUMBERING SYSTEM
The numbering system for electrical component and
assembly part numbers contains some useful data that
could be of value to the technician working with or
troubleshooting the controller. The number is twelve
digits, arranged in a two-six-four digit sequence with the
groups separated by dashes.
As an example, one
printed circuit board part number may be 15-0008250001. This twelve-digit number is the complete number,
as recognized by the computer. Frequently the number
5
70
71
72
73
74
75
Insulated mounting boards
Master bill of material
Engineering data sheets
Reworked or exchanged assemblies
The middle six digits describe a basic type of part, such
as physical or electrical characteristics of a group or
family of parts. As an example, a resistor family of 1/2
watt carbon resistors have the number 000045. The part
number of one specific resistor in this family is a 54000045-0102.
The last four digits describe a specific part within the
family and may be assigned in numerical sequence or
may describe the specific part value. The following table
lists those part categories where the last four digits have
a significant meaning to the technician.
Category
23
32
49
54
55
Part Name
Capacitor
Fuses
Potentiometer
Resistors
Power diodes
and SCR’s
Last 4 digits
2593
2592
2591
0250
0251
0252
0253
Numeric Value
.025
.25
2.5
25.
250.
2500.
25000.
Parameter Described
Capacitance
Ampere rating
Resistance
Resistance
Peak reverse voltage
6
7
CES STAMPING PRESS CONTROLLER DESCRIPTION
CONSTRUCTION
The CES Stamping Press Controller is a solid state,
closed loop velocity controller designed specifically for
use with Dynamatic® eddy-current press drives. The
controller is built with analog, digital and microprocessor
circuitry. All components of the CES Controller are
contained on a sub-panel, except for an autotransformer
that is mounted separately. The panel measures 74" by
31.25". Special sizes are made to order upon request.
POWER CIRCUITRY
The incoming three phase 480 VAC connects directly to
the circuit breaker or terminal block at the top of the
panel. 120 VAC power for control circuitry, I/O modules
and the power supply board is provided by transformer
T1. Fuses FU5 and FU6 protect T1 against short circuits
and internal grounds. Capacitors C3, C4 and C5, along
with the impedance of the autotransformer, serve to filter
the incoming power to prevent line noise from affecting
the controller and to reduce line disturbances by the
controller. The autotransformer steps up the line voltage
from 480 VAC to 600 VAC. FU1, FU2 and FU3 are fast
acting semiconductor fuses sized to prevent damage to
the SCR’s in the event of an output short circuit. All
three incoming lines are sensed at the clutch gate driver
board and fed back to the logic board for proper gate
signal synchronization, and ultimately to the DMR
(Digital Master Regulator) for the purpose of ensuring
safe limits. The line voltage may be read on the DMR
display to be discussed later.
CES CONTROLLER
The basic CES press drive controller has proven to be
readily adaptable to synchronization (position) control.
This system utilizes a position transducer (digital shaft
encoder) to measure press position (crank angle) and
compares this feedback information against a digital
position reference. All information is handled in parallel
digital form and has a minimum sample rate compatible
with the system.
The difference between the reference and the feedback
signal (position error) is translated to an analog signal in
a D-A converter. The analog signal is sent to the press
velocity control for final processing and power
amplification for press drive control.
Separate contactors for the brake and clutch sections
provide positive mechanical disconnects from the input
power.
Each section consists of a full converter
composed of six SCR’s capable of forcing the 300 VDC
rated coils to a peak value of 850 VDC, as well as
causing current flow to cease by inverting or by applying
a negative 850 VDC to the coils. Separate brake and
clutch gate driver boards supply the gate signals to the
appropriate SCR’s; they are located on the left side
bracket. Each SCR has di/dt protection from a series
choke and dv/dt protection from snubber networks
located on the circuit boards, which consist of series
resistors, capacitors and diodes connected in parallel
with the SCR. Also across each SCR is a Metal Oxide
Varistor (MOV) for transient voltage protection.
The CES controller is easily applied to single or multiple
action presses where speed control is desirable. The
system offers many unique features not available with
other press drive designs for use on draw presses,
banking presses, transfer presses and on synchronized
presses with automated handling equipment.
The
combination of the eddy-current package press drive
and the CES controller offers a simple, safe, low
maintenance and reliable drive system to do a wide
variety of the jobs required of modern production press
equipment.
Specifications
Mechanical
Unit
Input Current
Aac Max
Input Current
Aac Average
Clutch Current
ADC
Brake Current
ADC
49
63
137
42
91
42
72
37 32
54
98
65
53
40
26
180
120
96
72
48
90
60
48
48
24
21
35
A minimum resistive, or latching, load is provided with a
power resistor across each dc bus, identified as C1-C2
and B1-B2. Each bus also has an MOV suppressor to
clamp any high voltages arising due to the inductance of
the coil loads and to provide a current path for the short
period of time between interruption of current (such as a
contactor opening), and the establishment of current flow
in the C phase SCR's by the free wheel gates. Clutch
and brake voltages are fed back to the logic board
through the brake gate driver board. The output leads
are routed through L1 and L2, which are isolated current
feedback sensors with the current signals going directly
to the logic board. The output leads terminate inside
and near the bottom of the logic door.
Retrofit control for existing presses have different
specifications from those listed here.
Check your
specific unit or contact the factory.
The CES stamping press controller provides control for
the full range of Dynamatic® eddy-current press drives.
The power conversion circuitry operates from 480 VAC
input and provides a maximum of 850 VDC coil
excitation voltage.
Input Voltage: 480 VAC, +10%, -15%, 60Hz
Output Voltage: 850 VDC Field Forcing
Clutch Duty Cycle: 70%
Brake Duty Cycle: 30%
8
Clutch excitation provides up to 180 Amps peak at 70%
duty cycle. Brake excitation provides up to 90 Amps
peak at 30% duty cycle.
LOGIC INTERFACE INDICATOR PCB (15-242-57):
Refer to Figure 2-2 for the identification of the LEDs
found on this printed circuit board.
KEYPAD PROGRAMMING
The keypad is mounted integrally with the DMR. It is
connected to the main DMR through a ribbon cable and
is used for viewing and modifying various parameters
within the system. The module consists of the following:
a sealed 20-button, dome-contact type keypad; two
independent sets of 8-digit, 7-segment LED displays;
and a row of 8 individual status LED’s. The keypad can
accept the following entries: numbers 0 through 9. Top,
Bot, up arrow, down arrow, *, #, Ent, F1 & F2. Dat is a
non-functional key. All of the operating modes that are
included on the keypad programmer are shown in Figure
2-1. Each mode includes an LED to indicate when it is
in operation. For information on how to use the keypad,
refer to Operation, Section 3.
CLUTCH GATE DRIVER (15-565-27) AND BRAKE
GATE DRIVER (15-565-28) PCBs: Each LED represents
a phase that is firing when it is on. Refer to Figure 2-3,
for the identification of the LEDs found on these printed
circuit boards.
I/O PCB (15-6502-3001): Refer to Figure 2-4 for the
identification of the LEDs found on this printed circuit
board.
PRESS SPEED CONTROL
The press control provides a closed loop speed control
operation with inner current loops on both the clutch and
brake.
It provides adjustable acceleration and
deceleration. The reference data is modified by a press
angle measuring and control circuit that changes the
reference profile at adjustable angles, as shown in
Figure 2-5.
ANGLE MEASUREMENT
The press control provides a means of measuring press
angles by utilizing a position resolver mounted on the
output gearing of the press drive.
The position
information is then used to set a reference profile based
on stored data of up to 6 angles and 6 predetermined
speeds. Details are further described under "CES
Digital Master Regulator (DMR)" and "Press Operating
Modes."
FIELD ADJUSTMENTS
Some operator control adjustments can be made in the
field. Potentiometer R116 on the power supply can be
adjusted for +5 volts. Six adjustments can be made on
the main logic PCB (15-822-*) as follows: Clutch Velocity
Damping, Clutch Current Damping, Clutch Current Limit,
Brake Velocity Damping, Brake Current Damping and
Brake Current Limit. These adjustments are explained
in Section 4.
LIGHT EMITTING DIODE (LED) INDICATORS
In addition to the LED noted for the keypad programmer,
LED indicator lights are also located on the printed
circuit boards where operating circuit conditions need to
be known. The printed circuit boards that have LED’s
are described below.
9
operation of the CES controller. Parameters are scaled
in user units when applicable.
CES DIGITAL MASTER REGULATOR (DMR)
The DMR Controller is a microprocessor based solid
state electronic control system operating in conjunction
with a CES press drive controller. It provides the
interface with the press manufacturer's control. It also
provides the safety circuits necessary to ensure proper
Upon power-up in the field, the values will be set by the
factory. Some of these values will undoubtedly require
modification before the press will function properly. The
keypad must first be unlocked using the proper
password before these parameters may be changed.
See the instruction sheet for your particular EPROM to
learn how to unlock the keypad. The operator must next
present all of the operator alterable parameters from the
keypad programmer and/or they must be downloaded
from the serial interface. Once these values are set,
they are retained and need not be reentered unless the
values are to be changed or a new factory-programmed
NVRAM is installed. The NVRAM memory chip has a
battery internal to the chip that saves the information
stored in the memory during the powering down
situations of the control. This battery has a ten-year life.
However, the battery is only called upon to function
during periods where there is no power applied to the
control. Therefore, the life of the battery may greatly
exceed the ten-year period if there are no extensive
periods where the control is actually turned off. Once
the parameter values have been set, the system may be
run by activating the appropriate signals in the control
circuitry.
High voltage input and output signals for the
microprocessor are handled through optically isolated
solid state relay modules, which are mounted on an
auxiliary relay mounting rack. All 120 VAC control
signals are converted to 5 volt TTL-logic levels, which
interface with the DMR. There are status LED’s located
next to each relay on the mounting rack. These LEDs
light up to indicate active (closed contact) inputs and
outputs. Refer to the electrical diagrams for the various
control functions passing through this relay mounting
rack.
DMR Assemblies
Part Number
15-779-11
15-779-113, or -112
15-575-20
15-814-3
15-814-108
15-775-2
Function
Keypad Display
Resolver Interface
Main Controller PCB
Serial Interface
Dual D/A
First Fault Indicator
DMR Scaling PCBs
Part Number
Function
15-869-1
Ac Line Voltage (in)
15-869-1
Brake Current Feedback (in)
15-869-1
Clutch Current Feedback (in)
15-869-2
Manual Run Speed (in)
15-869-100
Speed Feedback (output)
The typical DMR, part number 15-820-33 to 37, consists
of the assemblies listed in Table 2-1 and the analog
scaling printed circuit boards listed in Table 2-2. The
10
The enable signals consist of two press control contact
closures that put the 115 VAC of the press control into
the I/O board.
numbers for a specific control may vary, see your
Control Data Master.
PRESS CONTROL INTERFACE - COMMANDS
ACCEPTED
The CES controller will accept nine different input
command signals from the press controller that are
available for the operator to make, They are as follows:
two Enables, Clutch Contactor ON, Inch, Micro Inch,
Reverse, Control Power ON, Stop-On-Top and Fault
Reset.
Some controls also have a Stop-on-bottom
command.
CLUTCH CONTACTOR ON (INPUT):
In addition to the enable, the press control provides 115
volts to energize the clutch contactor. This ensures that
the press control has absolute control over the ability of
the CES controller to energize the clutch. This input
signal monitors the 115 volt signal. The clutch contactor
ON signal is one of the signals that activate the CR1
relay.
INCH:
The inch signal indicates that the CES controller is
directed to operate at inch
ENABLE:
The enable signals are required to start the drive. These
contacts are the last contact closures in the start
sequence. The clutch contactor ON signal and the two
enable signals must all be given within 170 ms of one
another or a fault will be created. The enable contacts
must be closed in order to run. Upon opening either of
these contacts, the press control signals the CES
controller to stop the drive immediately with a command
to zero speed and to open the clutch contactor 450
milliseconds later. The CES controller responds to this
removal of enable with a normal stop signal. The enable
contact closures must be given only after all safety
features of press operation have been determined to be
in a "GO" status by the press control. The release of the
friction brake through the air pressure switch and/or the
limit switch showing friction brake travel is sometimes
used as the last event in the chain of events that
provides for the integrity of the enable signal given by
the press control to the CES controller. Redundant CES
inputs are provided to ensure that the enable signal is
present and that the receiver is not shorted.
speed. The inch command is needed, along with
enable, to activate the controller in the inch mode. The
inch command can only be changed when the enable
command is not present; otherwise, a fault will be
generated.
The inch signal consists of a press control contact
closure that puts the 115 VAC of the press control into
the I/O board.
MICRO INCH:
The micro inch signal indicates that the CES controller is
directed to operate at the micro inch speed. The micro
inch command is needed, along with enable, to activate
the controller in the micro inch mode. The micro inch
command can only be changed when enable is not
present; otherwise, a fault condition will be generated.
The micro inch signal consists of a press control contact
11
closure that puts the 115 VAC of the press control into
the I/O board.
Fault, Stop Now Fault, Stop-on-Top Fault, Control
Failure Fault, Clutch ON and TD Relay
REVERSE:
The reverse command is sent to the press control to
indicate that the press is to operate in the inch or micro
inch mode in the reverse direction. The CES controller
uses this information with other signals to establish
either the inch-reverse or micro inch-reverse mode. If
the reverse command is issued with any command other
than the inch or micro inch, a fault will be generated.
The reverse command cannot be changed when enable
is present; otherwise, a fault will be generated.
NORMAL STOP (OUTPUT):
The normal stop signal from, the CES controller
indicates that the press control is to execute a normal
stop. Receipt of this signal from the CES controller
indicates that the CES controller has commanded the
press drive to be at zero speed. Upon receipt of this
normal stop signal, the press control is directed to
remove the enable signal and set the friction brake. The
normal stop output will be cleared by the press control
giving the enable signal the next time it is desired to run.
The reverse signal consists of a press control contact
closure that puts the 115 VAC of the press control into
the I/O board.
The I/O board of the CES controller opens a solid state
relay contact for the normal stop signal to the press
control.
CONTROL POWER ON:
The control power on signal is provided by the press
control to activate the 115 VAC control power to the CES
controller. This will close a contact in the secondary of
the CES controller transformer.
STOP MAIN MOTOR FAULT (OUTPUT):
The stop main motor fault signal from the CES controller
to the press control requests an emergency stop
condition. The press control then stops the main motor,
sets the flywheel brake, sets the friction brake and
removes the enable signal. The CES controller is placed
in the fault mode.
STOP-ON-TOP:
The stop-on-top signal is issued by the press control to
indicate that the CES controller should execute a normal
stop-on-top, as described in detail in the section on
"Press Operating Modes." If the stop-on-top command is
present when the enable is received by the CES
controller, a single stroke of the press will take place.
The 1/0 board of the CES controller opens a solid state
relay contact for the stop motor fault signal to the press
control.
STOP NOW FAULT (OUTPUT):
The stop now fault signal is an output from the CES
controller. It indicates a second level of emergency stop
in which the press control is to immediately remove the
enable and set the friction brake The software programs
the reference to zero which applies the Eddy Current
Brake to help stop the press.
The stop-on-top signal consists of a press control
contact opening that removes the 115 VAC of the press
control to the I/O board.
FAULT RESET:
The fault reset command is a signal from the press
control to reset any fault condition in the CES controller,
allowing for continuation of operation. If the condition is
a result of a clutch current fault or a brake current fault, it
will be necessary to wait five to ten minutes (depending
on the setting of parameters No. 64 for the clutch and
No. 65 for the brake) before resetting; otherwise another
fault will be generated. This delay is necessary to allow
time for the coil to cool down. The time left to wait
before restarting can be displayed in parameter No. 18.
This time is in seconds.
The I/O board of the CES controller opens a solid state
relay contact for the stop now fault signal to the press
control.
STOP-ON-TOP FAULT:
The stop-on-top fault signal directs the press control to
complete the present cycle, and then execute a normal
stop-on-top, after which the CES controller is in the fault
mode.
The fault reset signal consists of a press control contact
closure that puts the 115 VAC of the CES controller into
the 1/0 board.
The I/O board of the CES controller opens a solid state
relay contact for the stop-on-top fault signal to the press
control.
PRESS CONTROL INTERFACE - OUTPUT SIGNALS
The CES controller provides seven different solid state
output signals that function as contact closures and
contact openings, according to the conditions called for.
The output signals that occur during different phases of
operation are as follows: Normal Stop, Stop Main Motor
CONTROL FAILURE FAULT (OUTPUT):
The control failure fault is generated by either of two
conditions. One is when the microprocessor watchdog
timer senses a microprocessor failure. The other is
when the power supply monitors sense a failure.
12
1.
2.
3.
4.
The I/O board of the CES controller opens a solid state
relay contact for the control failure fault signal to the
press control.
CLUTCH ON (SIGNAL):
The clutch ON is a 115 volt output that drives the CR1
relay. A NO CR1 relay contact is in series with the 115
VAC power provided by the press control and a TD
contact. Activating the CR1 relay and the TD relay will
allow the clutch contactor to pull in after the press control
has given the clutch ON command.
BRAKE CONTACTOR
A brake contactor is provided which will be closed under
simultaneous conditions of control power ON being
available and brake current fault not being present. The
brake contactor is opened 10 seconds after stopping on
top when a brake current fault is present.
The CR1 contactor is activated by the following
conditions:
1.
2.
3.
4.
Clutch ammeter
Brake ammeter
Speed indication (SPM)
Elapsed time for clutch ON time
PRESS OPERATING MODES
The CES controller includes 9 operating modes, as
described in detail below. Among these are the four
basic modes, employed in various combinations, as
follows: Run, Fault, Test and Ready.
Brake contactor is ON
Enable is present
No fault is present
Clutch contactor ON signal is present
I .RUN MODE (NORMAL)
The CES controller is in the run mode if the following
conditions exist:
Note: if the brake contactor drops out or clutch ON is
removed, CR1 drops out immediately. If the enable is
lost or either of the two emergency stop faults occurs, a
450 millisecond timer will be started, after which CR1 will
be dropped out.
CR1 is also dropped out 450
milliseconds after a normal stop.
1.
2.
3.
4.
5.
6.
7.
TD RELAY:
A TD relay contact is in series with the CR1 contact
closure to provide a redundant path for dropping out the
ac contactor with the loss of the enable signal. The TD
contact is closed when the enable input is present, and it
drops out 600 milliseconds after the loss of enable.
Enable signal is present
NO fault is present
Reverse is not present
Inch is not present
Micro inch is not present
Clutch contactor ON is present
Brake contactor is closed
When in the run mode, the CES controller functions in
the following manner.
PRESS CONTROL INTERFACE - SERIAL PORT
The serial interface assembly makes it possible for the
DMR to communicate with another microprocessor or a
main computer. This communication link is an RS-422
assembly that is mounted directly to the main DMR
printed circuit board and is connected to the main board
by a ribbon cable. It can be utilized to set references
(i.e., speeds and angles) and to communicate diagnostic
information, faults, etc.
A clutch ON command closes the clutch contactor.
Upon initiation of the run mode, the drive reference
signal ramps up from an initial value that is adjustable
from 0 to 3 strokes per minute, at the initial acceleration
rate, until the drive reference equals or exceeds the
programmed reference. After this, the controller uses
the operating acceleration/deceleration rates. The initial
value of 0 to 3 strokes per minutes is adjustable at the
keypad. It is parameter No. 48.
SIGNALS FOR CUSTOMER’S RECORDER
The CES controller provides four different buffered
signals at the terminals. They are as follows:
The operating accel and decel rates consist of three
separately adjustable rates to minimize overshoot and
undershoot of the slide speed. The first accel/decel
rates are programmed to start by selecting the proper
press angle. The second and third accel/decel rates are
programmed based on a delta stroke per minute from
the set point. The second rate is adjustable to start up to
25% of rated speed before the set point. The third rate
is adjustable to start up to 15% of rated speed before the
set point.
When in the run mode, the speed reference follows the
profile set by the angles and speeds stored in the
parameter locations as listed in Table 2-3 (also see
Figure 2-5). Every angle and every speed must have an
assigned value.
1.
2.
3.
4.
Clutch current
Brake current
Speed reference
Speed feedback
ANALOG METERS
The CES controller contains four analog meters to
provide the service engineer with necessary operating
parameters. They are as follows:
13
2.
3.
4.
5.
6.
7.
A setting of 360 degrees on any angle will cause the
control to skip the speed setting that immediately
follows.
Parameter Locations
Table 2-3
Parameter Number
Data
30
Angle No. 1
31
Speed No. 1 (manual)*
32
Angle No. 2
33
Speed No. 2
34
Angle No. 3
35
Speed No. 3
36
Angle No. 4
37
Speed No. 4
38
Angle No. 5
39
Speed No. 5
40
Angle No. 6
41
Speed No. 6
42
Creep Angle (α7)
43
Stop Angle (α8)
No fault is present
Reverse is not present
Inch is present
Micro inch is not present
Clutch contactor ON signal is present
Brake contactor is closed
Keypad Programming
Table 2-4
Parameter
Data
Number
44
Creep Speed
45
Micro Inch Speed
46
Inch Speed
47
Inch Accel Rate
48
Initial Value of Linear Accel Ramp
49
Initial Accel Rate (A1)
50
Operating Accel Rate No. 1
51
Operating Accel Rate No. 2
52
Operating Accel Rate No. 3
53
Accel Rate Delta SPM No. 1
54
Accel Rate Delta SPM No. 2
55
Operating Decel Rate No. 1
56
Operating Decel Rate No. 2
57
Operating Decel Rate No. 3
58
Decel Rate Delta SPM No. 1
59
Decel Rate Delta SPM No. 2
73
Baud Rate
75
Die Contact Angle
78
Gear Ratio
79
Pulses per Revolution
80
Pot Selector
81-Optional
Stop-on-Bottom – Creep Speed
Angle
82-Optional
Stop-on-Bottom – Apply Brake
Angle
83-Optional
Creep Speed Bottom
N0TE: *Parameter No. 31 will be the value of the
Manual Speed pot, if one is used.
While in the run mode, when the press control receives a
stop-on-top command, the CES controller will wait for
the creep angle. Upon reaching the creep angle, the
drive reference will decelerate to the creep speed and
remain at creep speed until the stopping angle is
reached. Upon reaching the stopping angle, the CES
controller will set the reference at 0 and issue a normal
stop signal to the press control. At the same time, the
CES controller will initiate a 450 millisecond timer at the
end, of which the clutch ON signal will be dropped,
dropping out the clutch contactor. Upon receipt of the
normal stop signal, the press control will enable the
friction brake and remove the enable signal. The press
control will remove the enable within 450 milliseconds;
otherwise a stop now fault will be generated.
When in the inch forward mode, the CES controller
functions in the following manner.
The 450 millisecond timer is included to ensure that
clutch control excitation is removed regardless of other
sequential operations in the event of some type of fault
or failure.
The clutch ON command closes the clutch contactor.
The reference ramps from 0 to the inch reference at the
inch acceleration rate. Upon removal of the enable, the
drive reference goes immediately to 0 and the drive
decelerates to zero speed. At the time the enable is
removed, the 450 millisecond clutch safety timer is
initiated. After 450 Milliseconds the clutch contactor is
dropped out by removing clutch ON. The enable signal
should be the last signal received to eliminate faults.
The drive may be jogged in the inch mode by toggling
the enable signal.
Certain parameters can only be programmed from the
keypad of the DMR. They are listed on Table 2-4.
The run mode will be indicated by the "Run" LED on the
keypad and display board. Some controls have a full
range manual Run Speed pot, others have a +/-5%
manual Run Speed trim pot, while still others function
without any speed pot. Both pots are effective when the
press starts up and after the press passes Angles No. 1.
The inch forward mode will be indicated by the "Inch"
LED on the keypad and display board.
II. INCH FORWARD MODE (RUN AT)
The CES controller will be in the inch forward mode if the
following conditions exist:
1. Enable signal is present
14
The micro inch forward mode will be indicated by the
"Micro Inch" LED on the keypad and display board.
III. INCH REVERSE MODE (RUN AT)
The CES controller will be in the inch reverse mode if the
following conditions exist:
V. MICRO INCH REVERSE MODE (RUN AT)
The CES controller will be in the micro inch reverse
mode if the following conditions exist:
1. Enable signal is present
2. No fault is present
3. Reverse is present
4. Inch is present
5. Micro inch is not present
6. Clutch contactor ON signal is present
7. Brake contactor is closed
8. The main motor is programmed to run in the reverse
direction
1.
2.
3.
4.
5.
6.
7.
8.
When in the inch reverse mode, the CES controller
functions in the following manner.
Enable signal is present
No fault is present
Reverse is present
Inch is not present
Micro inch is present
Clutch contactor ON signal is present
Brake contactor is closed
The main motor is programmed to run in the reverse
direction
When in the micro inch reverse mode, the CES
controller functions in the following manner.
The clutch ON command closes the clutch contactor.
The reference ramps from 0 to the inch reference at the
inch acceleration rate. Upon removal of the enable, the
drive reference goes immediately to 0 and the drive
decelerates to Zero speed. At the time the enable is
removed, the 450 millisecond clutch safety timer is
initiated. After 450 milliseconds, the clutch contactor is
dropped out by removing clutch ON. The enable signal
should be the last signal received to eliminate faults.
The drive may be jogged in the inch mode by toggling
the enable signal.
The clutch ON command closes the clutch contactor.
The reference ramps from 0 to the micro inch reference.
Upon removal of the enable, the drive reference goes
immediately to 0 and the drive decelerates to zero
speed. At the time the enable is removed, the 450
millisecond clutch safety timer is initiated. After 450
milliseconds, the clutch contactor is dropped out by
removing clutch ON. The enable signal should be the
last signal received to eliminate faults. The drive may be
jogged in the micro inch mode by toggling the enable
signal.
The inch reverse mode will be indicated by simultaneous
illumination of the "Inch" and “Reverse" LEDs on the
keypad and display board.
The micro inch reverse mode will be indicated by
simultaneous illumination of the "Micro Inch" and
"Reverse" LEDs on the keypad and display board.
IV. MICRO INCH FORWARD MODE (RUN AT)
The CES controller will be in the micro inch forward
mode if the following conditions exist:
VI. FAULT MODE
1.
2.
3.
4.
5.
6.
7.
Enable signal is present
No fault is present
Reverse is not present
Inch is not present
Micro inch is present
Clutch contactor ON signal is present
Brake contactor is closed
Two fault indicators designed into the controller are the
DMR Fault and First Fault (15-775-2).
The fault mode is entered if any fault is generated. Once
the fault mode has been entered by the initiation of a
fault, the CES controller remains in the fault mode until
the fault mode is remotely reset by the press control
issuing a fault reset command. The fault mode can be
reset locally from the CES controller keypad. Call up
Parameter 63, Clear Faults, and using the Down Arrow
(↓) reduce the faults to zero.
When in the micro inch forward mode, the CES
controller functions in the following manner,
The clutch ON command closes the clutch contactor.
The reference ramps from 0 to the micro inch reference.
There is no acceleration rate in micro inch. Upon
removal of the enable, the drive reference goes
immediately to 0 and the drive decelerates to zero
speed. At the time the enable is removed, the 450
millisecond clutch safety timer is initiated. After 450
milliseconds, the clutch contactor is dropped out by
removing clutch ON. The enable signal should be the
last signal received to eliminate faults. The drive should
be jogged in the micro inch mode by toggling the enable
signal.
In the fault mode, various faults are stored, indicated and
transmitted to the press control by the CES controller. In
the case of all faults, the press is stopped. There are
various levels of faults; and the urgency with which the
press is stopped differs with the different levels of faults.
The four faults that the CES controller will diagnose are
as follows: Stop Main Motor Fault, Stop Now Fault, StopOn-Top-Fault and Control Fault.
These are fully
described below. For quick reference during operation,
refer to Table 3-3 and/or 3-4.
15
When a level 0100, 0200 or 0300 fault exists it will be
indicated by an LED on the keypad and display board. A
control fault will be indicated by the absence of the
"control fault" LED on the I/O PCB.
0207
Loss of Line Fault - Loss of an input phase or
greater than 20% drop in ac line for a period of
100 milliseconds.
0208
Enable Without Clutch Contactor ON Fault Clutch contactor ON is not present within 170
milliseconds of receiving enable (see Fault No.
0226).
0209
Clutch Contactor ON After Clutch ON is Deenergized Fault - Clutch contactor ON input
signal is present 100 milliseconds after clutch
ON output is de-energized.
0210
Missing Enable Fault - The two enable signals
are not coincident for more than 170
milliseconds.
0211
Inch + Micro Inch + Enable Fault - The presence
of an inch and micro inch command with enable.
0212
Reverse Command Fault - The presence of a
reverse command without an inch or a micro
inch command.
0220
Enable Present After Normal Stop Fault - Enable
present 450 milliseconds after a normal stop is
issued.
0221
Clutch Contactor Not ON In Test Mode Fault Clutch contactor ON signal, not present while in
clutch test mode.
0222
Press Movement in Test Mode Fault - Press
movement of 2 degrees detected while in test
mode.
0223
Enable Present In Test Mode Fault - Enable
signal present while in test node.
0224
Stop-On-Top Not Performed Fault - The stopon-top function failed to stop the press in 1.5
times the cycle period.
0225
Clutch Contactor ON Removed without
removing enable fault or clutch contactor
removed during the 450 milliseconds required
before de-energizing the clutch contactor.
0226
Clutch Contactor ON Without Enable Fault Enable not present within 170 milliseconds of
receiving clutch contactor ON (see Fault No.
0208).
0227
Enable Before Cool Down Expired Fault Enabling the CES controller before the cool
down time period has expired following a clutch
current or a brake current fault.
Stop Main Motor Fault - There is only one fault that will
signal the stopping of the main motor in addition to
stopping the press. It is Fault No. 0101, Over-speed
Fault.
0101 Over-speed Fault - An over-speed condition is
defined as follows: If the tach feedback signal
exceeds the speed reference by a set percentage,
an over-speed condition exists. The time allowed
to be over-speed, before a fault is recognized, is
adjustable from 0 to 5 seconds. The over-speed
percentage is adjustable from 0 to 20%. The
reason the main motor is stopped in this case is
that it is considered to be in a runaway condition.
Set for minimum time and minimum over-speed
percent without causing nuisance tripping of fault.
When the over-speed fault is generated, the CES
controller functions in the following manner.
Upon sensing the over-speed fault, a stop motor fault
signal is sent to the press control to remove enable and
initiate the stopping sequence; this includes setting the
friction brake and removing enable from the CES
controller. Speed reference is set to zero. The clutch
converter is inhibited. The clutch contactor drop out
timer is initiated immediately upon detection of an overspeed fault. The timer will cause the clutch contactor to
drop out in 450 milliseconds by removing the clutch ON
command to the contactor. The brake will be energized
by the negative speed error, while the speed is above
zero, to provide decelerating torque.
Stop Now Faults - There are 18 stop now faults. They
require the press to be stopped immediately, but not the
main motor. Each of these faults is described as follows:
0202 Loss of Tach Fault - Loss of encoder pulses with
10% of clutch current for 200 milliseconds.
0203
Clutch Current Delay Fault - If 10% current is
present in the clutch coil when CR1 is deenergized, a clutch current delay fault will be
issued.
0206
Press Movement in Wrong Direction Fault Press movement detected to be in a direction
opposite of that commanded, based upon
degrees of opposite rotation after enabled. The
number of degrees of rotation before causing
this fault is adjustable from 0 to 10 degrees at
the keypad. Set for minimum degrees without
causing nuisance tripping.
16
0228
Creep Speed Not Reached Before Stop Angle
Fault - During a stop-on-top sequence, the creep
speed is not reached before the press reaches
the stop angle.
0318
Micro Inch Change Fault - If the micro inch
command is changed while enable is present, a
micro inch change fault will exist.
0319
Reverse Change Fault - If the reverse command
is changed while enable is present, a reverse
change fault will exist.
0329
Parameter Out of Limits Fault - If a downloaded
parameter is outside of established limits a
parameter out of limits fault will exist. When
commanded to use the new parameters that
contain a parameter that is outside of the
established limits, the controller will operate at
the established limit of the incorrect parameter
and create a stop-on-top fault.
When any stop now fault is generated, the CES
controller functions in the following manner.
A stop now fault will be issued to the press control
immediately upon sensing any of the above faults. The
press control should initiate an emergency stopping
sequence that includes setting the holding brake and
removing the enable from the CES controller (among
other items). Speed reference will be set to zero. The
clutch converter is inhibited. The clutch contactor drop
out timer is initiated immediately upon detection of a stop
now fault. The timer will cause the clutch contactor to
drop out in 450 milliseconds by removing the clutch ON
command to the contactor. The brake will be energized
by the negative speed error, while the speed is above
zero, to provide decelerating torque.
When any stop-on-top fault is generated, the CES
controller functions in the following manner:
A stop-on-top fault output is issued to the press control.
A normal stop sequence will be initiated (normal stop-ontop operation). At the completion of this sequence, the
drive will be in a fault mode condition and cannot be
restarted without resetting the fault. If the press does
not reach the stopping angle in 1.5 times the press cycle
period, the CES controller will issue a stop now fault.
Stop-On-Top Faults - There are 8 stop-on-top faults.
They will cause the CES controller to execute a normal
stop upon reaching the top of the press stroke. These
faults do not require an emergency stop, but should stop
the press at the top during the next cycle in order for the
problem to be investigated. Each of these faults is
described as follows:
0313
Under-speed Fault - If the tach signal is 3% less
than the speed reference, an under-speed fault
will exist. The time allowed to be under speed is
adjustable from 0 to 5 seconds. Reset at speed
error within 3%.
0314
Clutch and Brake Current Overlap - If clutch and
brake current are present at the same time, a
clutch and brake current overlap fault will exist.
The overlap time allowed is 0.5 second and the
amount of overlap allowable is 5%.
0315
Clutch Current Fault - If clutch current is present
for too long, a clutch current fault will exist. The
time allowed is adjustable from 3 to 20 seconds
and the current allowable is 20%. The CES
controller cannot be enabled until cool down
time has expired.
0316
Brake Current Fault - If brake current is present
for too long, a brake current fault will exist. The
time allowed is adjustable from 3 to 20 seconds
and the current allowable is 20%. The CES
controller cannot be enabled until cool down tine
has expired.
0317
Control Faults - A microprocessor watchdog timer
monitors the microprocessor and the power supply for
proper operation. The CES controller issues a control
failure fault any time either one fails or goes out of
tolerance. This type of fault will produce a Stop Now
stop.
FAULT PRIORITY ENCODER
Various conditions have been selected to be monitored
as faults. The faults, in order of priority, are as follows:
0
1
2
3
4
5
6
7
Run Signal is Present
Push Reset
External
Brake Free Wheel
Low Line
Brake Over-current
Clutch Free Wheel
Line/Microprocessor
Clutch Over-current
In order to read these faults accurately, a PWM Fault
Indicator board, No. 15-775-2, must be plugged into the
corresponding header on the DMR.
For a quick
reference during operation, refer to Table 3-3.
VII. SET-UP/TEST MODE
The test mode can only be accessed when the main
motor is OFF and press power is padlocked OFF. In
order to enter, use, and exit the test mode, the following
steps must be followed in the order given:
Inch Change Fault - If the inch command signal
is changed while enable is present, an inch
change fault will exist.
17
1.
2.
3.
4.
5.
6.
7.
8.
9.
10.
11.
12.
13.
14.
15.
16.
17.
1. Issuing a brake ON command
2. Setting reference to 0%
3. Setting feedback to 100%
CES controller power is applied
Enable is not present
No fault is present
Test mode parameter No. 60 is set to the ON
condition from the keypad and display board
CES circuit breaker opened to remove power
Main motor and press control power is OFF
Jumper across CR2 contacts 15 and 16 on TB14
Jumper across TD contacts 26 and 27 on TB14
Jumper control power across contacts 300 and 302
Incoming leads 320, 321 and 334 removed from
TB10. Tape ends
Jumper 115 volts from 302 to 320 and 301 to 334 on
TB10
CES circuit breaker closed to reapply power
Clutch test and/or brake test performed as required
CES circuit breaker opened to remove power
Remove jumpers and replace leads that were
changed in steps 7, 8, 9, 10 and 11 above
CES circuit breaker closed to reapply power
Exit test mode by setting parameter No. 60 to the
OFF condition from the keypad and display board
In the brake test mode, the brake is de-energized by
doing the following:
1. Setting parameter No. 62 to OFF (down arrow (↓)).
2. Exiting the test mode or
3. Entering the clutch test mode
De-energizing the brake test mode initiates the following:
1. Reference and feedback are set to 0%
Test Mode Faults - Receiving an enable in the test mode
will result in an enable in the test mode fault. Sensing
press movement in the test mode will initiate a press
movement in the test mode fault.
VIII. READY MODE
The CES controller will be in the ready mode if the
following conditions exist:
An LED located on the keypad and display board
indicates the test mode. The test mode is only deenergized by setting parameter No. 60 to OFF. The test
mode is stored in non-volatile memory.
1. CES control power is applied
2. It is not in the run, test or fault modes
The ready mode will be indicated by the "Ready" LED on
the keypad and display board.
Clutch Test Mode - In the test mode, the clutch test
mode can be entered by setting the clutch test mode
parameter to ON (parameter No. 61, up arrow (↑)).
IX. SPEED CONTROL REFERENCE CLAMP
The CES controller has a maximum speed setting. If the
press control sends a speed reference value that is
greater than this maximum speed to the CES controller,
the CES controller will clamp the reference at the
maximum speed. The "Referenced Clamped" LED will
light on the keypad and display board, indicating that the
reference is clamped.
The clutch will be engaged full ON with the DMR
automatically doing the following:
1.
2.
3.
4.
Issuing a clutch ON command
Setting reference to 100%
Setting feedback to 0%
Releasing the DMR inhibit
PRESS CONTROL PARAMETERS
The press control may have constraints on changing of
speeds and press drive parameters while the press is
running. The CES controller will change parameters as
directed by the press control.
In the clutch test mode, the clutch is de-energized by
doing the following:
1. Setting parameter No. 61 to OFF (down arrow (↓))
2. Exiting the test mode or
3. Entering the brake test mode
Press control parameters are sent by the press control in
a packet of bits representing ASCII characters. The first
two ASCII characters will be AA. The packet length is
68 characters. Space characters are used to complete
the 68-character packet.
Upon receiving an EE
command, the AA packet will be transmitted back to the
press control by the DMR for comparison to ensure its
accuracy. The AA will be changed to EE when sent
back.
De-energizing the clutch test mode initiates the following
sequence:
1. Reference and feedback are set to 0%
2. DMR inhibit is activated
3. The clutch ON command is dropped after 450
milliseconds
Fault data is sent by the CES controller upon request of
the press control. The two ASCII characters of the
"Request to Send Fault Data" will be BB. The packet
length of the request will be two characters. The DMR
will send the fault data in a packet of bits representing
ASCII characters. The first two ASCII characters will be
BB. The remaining characters will be four digit numbers,
Brake Test Mode - In the test mode, the brake test mode
can be entered by setting the brake test mode parameter
to ON (parameter No. 62, up arrow (↑)).
The brake will be engaged full ON with the DMR
automatically doing the following:
18
7. The press run data should have the format indicated
in Table 2-5.
which will represent faults corresponding to these
numbers. Zeros are used to complete the 68-character
packet.
Press Run Data Format
Table 2-5
Packet Number
Data
Par No.
1 through 2
AA
3 through 6
Angle No. 1
30
7 through 10
Speed No. 1
31
11 through 14
Angle No. 2
32
Monitor data will be sent by the DMR on request of the
press control. The two ASCII characters of the "Request
to Send Monitor Data" will be CC. The packet length of
the request will be two characters. The DMR will then
send the monitor data in a packet of bits representing
ASCII characters. The first two ASCII characters will be
CC. The remaining characters will contain the monitor
data. Zeros are used to complete the 68-character
packet. Numbers in the monitor data will be four digits
with an implied decimal point.
When ready, the press control will send a two-character
packet to the CES controller instructing the DMR to
execute the new parameters. The two ASCII, characters
in this packet of bits will be DD. All characters in the
packet will be 8 bit ASCII (the most significant bit being
zero) with one start, one stop and no parity.
In the run mode the new parameters will take effect at
the first angle after the press reaches the top of the
stroke after having received the DD command to
execute the new parameters. If the press is stopped, or
is operating in the inch or micro inch mode then the DD
command to execute the new parameters is given, the
new parameters will take effect immediately. There are
no termination characters for the packets.
15 through 18
19 through 22
23 through 26
27 through 30
Speed No. 2
Angle No. 3
Speed No. 3
Angle No. 4
33
34
35
36
31 through 34
35 through 38
39 through 42
43 through 46
Speed No. 4
Angle No. 5
Speed No. 5
Angle No. 6
37
38
39
40
47 through 50
51 through 54
55 through 58
59 through 68
Speed No. 6
Creep Angle
Stop Angle
Zeros
41
42
43
CES Monitor Data Format
Packet Number
Data
The press run data packet should contain the following
information, and in the order given:
1. ASCII characters AA.
2. Six independent angles and speeds defined in pairs.
The angles are in degrees and are defined in a
clockwise (CW) rotation with zero degrees at top
dead center. The speeds are in strokes per minute.
If it is desired to skip an angle, it may be
programmed to be 360.0 degrees and, since the
press will only accept angles from 0 to 359.9
degrees, it will skip the angle programmed for 360.0
degrees.
3. The seventh angle will be the angle that starts
slowing the press down to the creep speed after the
CES controller has received the stop-on-top contact
closure.
4. The eighth angle will be the angle to initiate the
contact that will allow the press control to set the
friction brake after the press has been at creep
speed and reaches this stop angle.
Table 2-6
1 through 2
3 through 6
7 through 10
11 through 14
CC
Inch Speed
Micro Inch Speed
Creep Speed
15 through 18
19 through 22
23 through 26
27 through 30
Operating acceleration rate No. 1
Operating acceleration rate No. 2
Operating acceleration rate No. 3
Acceleration rate delta SPM No. 1
31 through 34
35 through 38
39 through 42
43 through 46
Acceleration rate delta SPM No. 2
Operating deceleration rate No. 1
Operating deceleration rate No. 2
Operating deceleration rate No. 3
47 through 50
51 through 54
55 through 58
59 through 62
63 through 66
67 through 68
Deceleration rate delta SPM No. 1
Deceleration rate delta SPM No. 2
Initial acceleration rate
Average parts per minute
Speed Reference
Zeros
The CES monitor data packet will contain the following
information:
1. ASCII characters CC.
2. Acceleration and deceleration rates will be four
digits, with an implied decimal point, in tenths of a
stroke.
3. The speeds will be four digits, with an implied
decimal point, in hundredths of a stroke per minute.
4. The CES monitor data will have the format indicated
in
Table
2-6
per
minute
per
second.
5. The angles will be four digits with an implied decimal
point, in tenths of a degree ranging from 0 to 359.9
degrees.
6. The speeds will be four digits, with an implied
decimal point, in hundredths of a stroke per minute.
19
A typical program to run a press with a Manual Speed
pot and use the slowdown function to get good parts
would be set up as follows:
1.
2.
3.
4.
5.
6.
7.
8.
9.
10.
11.
12.
13.
14.
15.
Angle No. 1 = 180 degrees
Manual Speed pot = 16 SPM
Angle No. 2 = 115 degrees
Speed No. 2 = 10 SPM
Angle No. 3 = 360 degrees
Speed No. 3 = 10
Angle No. 4 = 360 degrees
Speed No. 4 = 10
Angle No. 5 = 360 degrees
Speed No. 5 = 10
Angle No. 6 = 360 degrees
Speed No. 6 = 10
Creep Angle = 305 degrees
Stop Angle = 356.5 degrees
On the keypad, enter:
Creep Speed = 3 SPM
20
OPERATION
PURPOSE
Driving torque is developed through an electromagnetic
The CES Stamping Press Controller is easy to operate.
force between the flywheel and clutch rotor. Braking
We believe that some knowledge of how the controller is
torque is developed through a similar force between the
supposed to function will help you obtain the best
stationary brake field assembly and the brake rotor.
performance with minimum down time. Knowing how it
Electromagnetic coils in the flywheel or brake field
works will also help you troubleshoot any problems that
assembly are energized to establish a magnetic field that
may arise. Before applying power to the controller, we
cuts through the surface of the clutch and brake rotors.
suggest that you read this section.
Relative motion between the clutch rotor and the clutch
field poles, or between the brake rotor and brake field
CONSTANT ENERGY SYSTEM
poles, causes a cutting action of the magnetic flux at the
The Constant Energy System (CES) is an advancement
rotor surface, which in turn generates eddy-currents in
in metal forming press drive systems employing an
the drum. Torque transmitting magnetic action is then
eddy-current clutch and brake in place of friction devices
induced between the clutch rotor and flywheel member,
and utilizing the eddy-current clutch as an adjustable
or between the brake rotor and brake field member. The
stroking rate drive. The name, Constant Energy System,
degree of clutching or braking action is controlled by
is derived from the physical arrangement of the
varying the magnitude of the current fed to the coils.
components of the system; the flywheel of the eddycurrent drive is coupled to a constant speed motor.
Since the eddy-current brake does not develop any
Therefore, constant kinetic energy is maintained in the
torque at zero rpm, a friction brake is used as a holding
flywheel. The CES press drive has proved itself capable
brake. This brake must be large enough to be capable
of speed controlling large stamping and draw presses
of stopping the press in an emergency, such as a power
over wide speed ranges. It is also readily adaptable to
failure.
synchronizing or position controlling several presses.
The CES control system is infinitely variable throughout
its speed range of 10:1. It is capable of precise position
control; such as in very slow inching for die setup. Input
flywheel size and motor horsepower affect system
performance at low output speeds and maximum loads.
Thus, proper sizing of the press drive for the specific
operating speed range of your press application is an
important factor.
VARIABLE SPEED PRESS DRIVES
The package press drive consists of an integral flywheel,
air-cooled, eddy-current clutch and brake in a
standardized, interchangeable package design. With the
advent of high power capability electronic components, it
became possible to build a high performance speed
control capable of maintaining set speed of the package
press drive anywhere within the mechanical press
drive's speed range. Since the flywheel is directly belted
to the main drive motor and run at a constant speed, it
has a fixed level of energy available for transmission to
the work through the eddy-current clutch.
STAMPING PRESS OPERATION
Stamping presses generally employ either 5 to 8% or 8
to 13% high slip ac motors belted to a flywheel, a friction
clutch and brake, and press gearing that drives the press
crank shaft. DC motors have also been used for this
purpose. One critical part of a modern mechanical press
is the overworked clutch and brake units. The function
of the clutch is to deliver torque from the flywheel to the
crankshaft for the working of metal. If the press is single
stroked, the clutch must accelerate the gears and other
rotating members from zero to full operating speed, and
also transmit the required working torque. The brake
must decelerate the rotating parts in order to stop the
slide. The many types of clutch and brake units built by
various press builders and their suppliers can all be
classified in one of the following categories: 1) Positive
clutch and brake; 2) Friction clutch and brake; and 3)
Eddy-current clutch and brake.
The press drive can be geared to the highest press
running speed. Since the primary mass is the flywheel,
and the output member has relatively low inertia, the
press drive is capable of varying its running speed
during different portions of a single stroke. The press
can approach the work at high speed, slow down just
prior to hitting the work, go at optimum metal working
speed and complete the stroke at high speed. The end
result is more parts per hour.
The heart of the CES stamping press controller is the
CES Controller. Its purpose is to provide high response
velocity control. It is adaptable also to position the slide
where line synchronization is desirable. The basic CES
controller is a high field forcing speed device using
closed loop control.
EDDY-CURRENT CLUTCH AND BRAKE
The eddy-current clutch and brake unit is basically a
press drive utilizing the eddy-current principle to transmit
and control the required crank torque. The drive
consists of a flywheel, belt driven by a high slip ac
induction motor, an eddy-current clutch rotor and a brake
rotor assembly directly connected to the press drive
shaft.
In a closed loop controller, a portion of the output signal
is fed to the feedback network and then to a summing
junction in opposition to a reference signal. If there is a
difference between the feedback and reference signals,
the resultant error signal is used for controlling the
output speed. One closed loop system is used for
21
velocity control and another one for current limit.
simple closed loop system is shown in Figure 3-1.
A
POWER AMPLIFIER
The power amplifier is a high current capacity SCR
power section capable of supplying four times rated
voltage (field forcing) to the clutch and brake coils. Field
forcing reduces the effective coil time constant. One
time constant is defined as the time required for the
current in a coil to reach 63% of its final value with a step
change in voltage. With a step change in voltage, the
current rises exponentially. Over-voltaging, or field
forcing, is a method for reducing the effective time
constant. A current feedback loop is used with the CES
controller to limit the current to its rated value by cutting
back on the voltage as 100% current is approached.
tachometer feedback voltage is reduced in direct
proportion to the reduction of the press speed until the
speed reference voltage equals the tachometer
feedback voltage. The brake then turns off. Thus,
changes in speed setting can be reacted to quickly with
either the clutch or brake being energized as required.
The current limit loop function is similar to the speed
control loop, except that current is sensed by an LEM in
series with the clutch and brake coils. This network acts
as a current limit to hold control current output to a safe
level while providing maximum voltage forcing for
response.
For proper operation of the press drive, a separation
must be maintained between the brake and clutch. If the
proper separation is not maintained, an overlap condition
can result which pre-loads the motor.
Separation
between clutch and brake action is necessary to ensure
against simultaneous braking and clutching.
CES LOGIC BOARD
The primary function of the logic board is to issue
properly timed output gate signals to the brake and
clutch gate driver circuit boards that are based upon the
following four inputs: reference signal input from the
digital main regulator (DMR); coil current feedback from
the LEM sensors; amplitude and phasing of the ac lines;
and speed feedback from the DMR. The abbreviations,
"DFE" and "CDB" which were used previously for Digital
Front End and Computer Digital Board respectively, may
be interchanged with "DMR" in this manual and
elsewhere.
When the speed reference is increased, a positive
voltage is applied at the positive input of the clutch error
amplifier to turn the clutch power amplifier on. This
same voltage is applied to the negative input of the
brake error amplifier to turn the brake power amplifier
off. The clutch remains on until the voltage output from
the tachometer feedback equals the speed reference
voltage. At that time, the error amplifier instantly turns to
a zero volt output to the power amplifier thereby
discontinuing power to the clutch.
In addition, other logic conditions determine whether
clutch phase up is permitted, such as run signal and
DMR inhibit. Coil voltage is sensed and used in
separate circuits to generate free wheel gate commands.
If the speed reference voltage is reduced, the opposite
effect takes place. The tachometer feedback voltage
then exceeds the reference and the clutch error amplifier
drives the clutch power amplifier off. This puts a positive
input on the brake error amplifier, driving the brake
power amplifier on. By braking to slower speeds, the
The reference and feedback voltages are processed
separately for the clutch and brake, including separate
microprocessor full converter phase shifters.
This
provides a clear separation of signals and functions.
22
85% rated line voltage or missing phase. For the brake,
it can be caused by the brake contactor not being pulled
in; 120% rated brake coil current; or 85% rated line
voltage or missing phase.
The link with the DMR is a 26-line ribbon cable. This
cable also connects to the interface indicator board;
however, this board is not required in order to run. A
separate 8-pin cable, PL-Fault, connects to the DMR
and converts various logic state conditions. Six other
connections that are used are as follows:
LEM CURRENT FEEDBACK AMPLIFIERS
Both clutch and brake Hall effect current feedback
transducers are connected to the logic board at PL-LEM
(on the Logic PCB). The values of R5 and the number
of LEM turns are selected at the factory to produce an
output of approximately 7 V at rated current. The same
is true for the value of R131 (also on the Logic PCB) and
its related number of LEM turns. This is necessary to
avoid having to change over-current trip points and other
current dependent scalers for different size press drives.
See Table 3-1 for values normally specified for each size
press drive.
PL-LEM - A 6-pin connection to the current sensors.
PL-PS - A 7-pin cable. Five of the wires bring the power
supply voltages to the logic board with two of the wires
looped through to the DMR.
PL-FP - Connections to the front panel terminals.
PL-MTR - Connections to the meters and CR2 relay.
PL-CLUTCH A 16-pin dip ribbon connector to the clutch
gate driver board.
PL-BRAKE - A 16-pin dip connection to the brake gate
driver.
There are only six adjustments to the logic board, and
they are as follows: Clutch Current Limit, Clutch Current
Damping, Clutch Velocity Damping, Brake Current Limit,
Brake Current Damping and Brake Velocity Damping.
The clutch and brake are operated similarly, but
separately, with each having its own error and control
amplifiers. Therefore, in the following discussions where
reference is made only to the clutch, it will be equally
applicable to the brake; when there are differences,
specific references are made to the brake.
LOGIC POWER SUPPLY INPUTS
Power supply voltages connected at PL-PS are as
follows: +5 V, +12 V, -12 V, +24 V, power COM
(common) and signal COM. C20 through C27 provide
noise filtering. ZD1 is a precision voltage reference
zener diode that provides a stable +2.5 V for the onboard comparators. Test points J10 through J15 are
available for checking the supply voltages: J10 = +5 V;
J11 = +2.5 V; J12 = +12 V; J13 = COM; J14 +24 V; J15
= -12 V. The +12 V and COM are routed to the interface
indicator board through the 26-pin logic to DMR-23 and
DMR-26. Dual inputs for + 12 V, -12 V and signal COM
are for continuation of wiring to the DMR.
LEM Current Feedback Values
Mechanical
I (CL)
LEM
Unit
I (BK)
nT
49-63
180 A
1
90 A
2
Table 3-1
R5
R131
28.7K
28.7K
49-42
120 A
60 A
1
2
60.4K
60.4K
37-42
96 A
48 A
1
2
84.5K
84.5K
37-32
72 A
48 A
2
2
124.0K
84.5K
37-21
48 A
24 A
2
4
84.5K
84.5K
FAULT PRIORITY ENCODER
Various conditions have been selected to be monitored
as faults. The faults, in order of priority, are listed in
Table 3-3 under "Fault Indicator."
In order to read these faults accurately, a PWM Fault
Indicator board, No. 15-775-2, must be plugged into the
corresponding header on the DMR.
FAULT CODES
A list of all fault numbers is included in Table 3-3 and 3-4
to serve as a quick reference during operation. For a
more complete explanation of these numbers, refer to
Section 2. The only stop main motor fault number is
0101. Stop now fault numbers range from 0202 through
0228. Stop-on-top fault numbers range from 0313
through 0329.
LOGIC CONTROL LINES
Coordination between clutch and brake is accomplished
by the comparator U1-C, which compares the reference
input from the DMR and speed feedback. It prevents the
clutch and brake from being energized simultaneously,
in order to prevent overlap, by producing a high on the
control line.
Any high on the control line inhibits
further operation.
CES CONTROLLER PARAMETERS
Parameter values are set either from the keypad or
through the serial interface. The last value set from
either method is maintained in nonvolatile memory.
Keypad parameters are set by entering the parameter
number through the keypad and incrementing the value
A high on the control line can also be caused by other
factors. For the clutch, it can be caused by the absence
of a run signal input; clutch contactor not pulled in; DMR
inhibit signal present; 120% rated clutch coil current; or
23
through 25. The remaining parameters can be modified
from the keypad. Parameters that can be downloaded
through a serial interface are numbered 30 through 43.
Some parameters have built in limits. Refer to Table 3-2
for the parameter numbers have limits set.
to the desired number with the up arrow (↑) or down
arrow (↓).
A list of all parameter numbers is included in Table 3-3
and 3-4 to serve as a quick reference during operation.
Parameters that can only be displayed are numbered 01
Parameter Limits
Parameter
Number
Parameter Description
26
Maximum Speed
30*
Angle No. 1
31*
Speed No. 1
32*
Angle No. 2
33*
Speed No. 2
34*
Angle No. 3
35*
Speed No. 3
36*
Angle No. 4
Table 3-2
Limits
Speed of press
0 - 359.9
Speed of press
0 - 359.9
Speed of press
0 - 359.9
Speed of press
0 - 359.9
Units
SPM
Degrees
SPM
Degrees
SPM
Degrees
SPM
Degrees
Speed of press
0 - 359.9
Speed of press
0 - 359.9
Speed of press
37*
38*
39*
40*
41*
42*
43*
44
Speed No. 4
Angle No. 5
Speed No. 5
Angle No. 6
Speed No. 6
Creep Angle
Stop Angle
Creep Speed
5
5
SPM
Degrees
SPM
Degrees
SPM
Degrees
Degrees
SPM
45
46
47
48
49
50
51
52
Micro Inch Speed
Inch Speed
Inch Accel Rate
Initial Value of Linear Accel Ramp
Initial Accel Rate
Operating Accel Rate No. 1
Operating Accel Rate No. 2
Operating Accel Rate No. 3
25% of max.
50% of max.
1 - 100
0-3
1 - 100
1 - 100
1 - 100
1 - 100
SPM
SPM
SPM/Sec.
SPM
SPM/Sec.
SPM/Sec.
SPM/Sec.
SPM/Sec.
53
54
55
56
57
58
59
70
Accel Rate Delta SPM No. 1
Accel Rate Delta SPM No. 2
Operating Decel Rate No. 1
Operating Decel Rate No. 2
Operating Decel Rate No. 3
Decel Rate Delta SPM No. 1
Decel Rate Delta SPM No. 2
Wrong Direction Limit
1-5
1-5
1 - 100
1 - 100
1 - 100
1-5
1-5
0 - 10
SPM
SPM
SPM/Sec.
SPM/Sec.
SPM/Sec.
SPM
SPM
Degrees
NOTE: *These parameters can be downloaded through a serial interface.
24
78 Gear box ratio
79 Tach pulses per revolution
80 Pot selector
KEYPAD PROGRAMMING
The keypad is mounted integrally with the DMR. It is
connected to the main DMR through a ribbon cable and
is used for viewing and modifying various parameters
within the systems.
The module consists of the
following: a 20-button keypad; two independent sets of
8-digit, 7-segment LED displays; and a row of 8
individual status LEDs. The keypad is illustrated in
Figure 2-1.
Parameters are selected for viewing by first selecting
either the top or bottom display window (called the active
display), and then entering the 2-digit code for that
parameter in the parameter number field. The top
display windows are selected by pressing the Top button
on the keypad, and similarly the bottom display windows
are selected by pressing the Bot key. When the display
windows become active, the two decimal point LEDs in
the parameter number field will light, indicating that it is
the active display. The opposite set of display windows
will then become inactive (decimal points off), and will
continue to display the value of the last parameter
number that was entered. Thus, by selecting the top
display and entering one code number, and then
selecting the bottom display and entering a different
code number, it is possible to obtain a continuous
readout of any two parameters in the system.
Each of the 8-digit LED displays is arranged in two
separate fields: a 2-digit parameter number, followed by
a 6-digit parameter value. Different parameters in the
system may be viewed by entering their particular code
number into the first field. The current value of that
parameter will automatically be displayed in the second
field, the parameter value field. Any two parameters
may be viewed simultaneously on the display panel.
A keypad lock/unlock feature has been added to make
data entry easier and more versatile. Parameters that
had previously been set and locked in at the factory will
now be programmed in the field. All parameters are
protected from inadvertent change except running
speeds, angles, Inch and Micro Inch speeds. These are
parameters 30 thru 41, 45 and 46. To change any of the
protected parameters, unlock the key pad by pressing
the following keys in the order listed within five seconds
of one another: F1, F2, ENTER. Use the up or down
arrow until the word “UNLOCK” is displayed on the
DMR. You will have fifteen minutes to change any of the
protected parameters. At the end of this timed interval,
the DMR will automatically return to the locked
configuration. (The LOCK/UNLOCK feature may be
disabled by selecting DSBL).
Parameters that may be displayed are broken down into
two, categories, non-alterable parameters; and operatoralterable parameters. Non-alterable parameters are for
display only, and cannot be modified by the operator.
Operator-alterable parameters are variables that are
accessible for modification in order to set-up and adjust
the system performance. Refer to CES Controller
Parameters on the previous page for an explanation of
which parameter numbers are for display only and which
ones are operator-alterable. All parameters are listed in
Table 3-3 and 3-4.
In order to modify an operator-alterable parameter, the
code for that particular parameter must be entered into
the parameter number field of the active display, which
will then display its current value in the parameter value
field.
Some parameters must be set up before the press will
function properly. These should be set at the initial startup of the control/press. Some of these are as follows:
Pressing the Up arrow (↑) button on the keypad will
increment that parameter value by one unit for each
keystroke. Similarly, pressing the Down arrow button (↓)
will decrement the value by one unit per keystroke.
Pressing and holding the Up or Down arrow button (↑↓)
down for longer than one second will invoke a keystroke
auto-repeat function, which will continue to increment or
decrement the parameter value for as long as the button
is held down. The auto-repeat rate of the button is
controlled by the display panel update time parameter
and can thus vary from 0.1 to 0.5 second per stroke.
42 Stop-on-top creep speed angle
43 Stop-on-top apply brake angle
44 Creed speed-top
45 Micro inch speed
46 Inch speed
81 Stop-on-bottom creep speed angle
82 Stop-on-bottom apply brake angle
83 Creep speed-bottom
Certain parameter are unique to each press as the
mechanical requirements change from one unit to
another. The table below lists the set parameters and
must be programmed to insure proper press operation.
26
27
28
29
72
73
In order to allow for more rapid parameter changes, a
fast up/down function is available, which will alter the
value by 10 units per increment. This is obtained by first
pressing the Asterisk button (*) and then either the Up
arrow (↑) or the Down arrow button to increment or
decrement the parameter by 10 units per keystroke.
Maximum speed
Line voltage
Clutch current
Brake current
No. of speed feedback periods averaged
Baud rate
25
Fast auto-repeat is also accomplished by pressing the
Asterisk button and then pressing and holding one of the
arrow buttons down. After releasing the arrow button (↓)
for a period longer than one second, the up/down
function will revert back to normal speed of operation. A
faster up/down function is also available. By first
pressing the (#) key and then either the Up or Down
arrow button (↑↓), the increment of change will be by 100
units per increment. Any attempt to change a nonalterable display parameter will be ignored.
26
OPTIONAL FEATURES
OPERATING THE PRESS-ON-HOP
This term is used in reference to a press that is basically
operating in the single stroke mode. When the press is
about to stop, if all limit switches and sensing devices
indicate that the mechanical handling equipment is in a
GO condition, the press is told not to stop but to continue
running.
Speed into the next stroke. This is the equivalent of the
continuous mode of operation. If the signal is not
present at this point, the press will go to Creep Speed. If
after being programmed to Creep Speed, the signal is
present when the press reaches the set Stop Angle, the
press will return to Run Speed at this point. If it is not
present, the press will stop.
In the following paragraphs, the word "signal" means the
signal that requires the press to continue to run instead
of stopping on top.
The software of the DMR is programmed to function in
the above manner as long as the press control sends
and removes the signal at the proper times. Also, it is
the press control that must make the determination if the
press and parts are in fact proper to allow the press to
operate On-the-Hop.
The signal is a level type rather than an edge type. If the
signal is removed before the press reaches the
set Creep Angle, the press will go to creep speed and
will be commanded for Normal Stop upon reaching the
set Stop Angle and the press will in fact Stop-On-Top.
This is the equivalent of single stroking the press.
STOP-ON-BOTTOM
A software program has been developed that is helpful
in die setting. It is a feature that allows the press to stopon-the-bottom of the stroke, the place where the die
would be clamped or unclamped during die changes.
If the signal is removed and returned before the press
reaches the Creep Angle, the press will continue to run
at the preset Run Speed through the angles where it
would otherwise have stopped on top.
Some other subtle changes must be accepted if this
option is requested. When in the Inch or micro inch
mode, the press will always Stop-On-Top. When in the
Inch or micro inch modes, 115 volts applied to terminal
318 will result in a Stop-On-Bottom function.
If the signal is removed and returned before the press
reaches the set Creep Angle, the press will go to the
Creep Speed. If the signal is returned before the press
reaches the set Stop Angle, the press will continue at the
Creep Speed until it reaches the Stop Angle. At this
point, the press will continue with the next stroke of the
press.
Additional parameters are provided for Stop-On-Bottom
Creep Angle, Stop-On-Bottom Apply Brake Angie, and
Stop-On-Bottom Creep Speed.
When in the Run mode, 115 volts applied to terminal 318
will result in a continuous operation type of function.
If the signal is removed again before the press reaches
the set Stop Angle the press will Stop-On-Top.
Parameters 42, 43 and 44 will be used in the Run, Inch
and Micro Inch modes to effect the Stop-On-Top
function.
In other words; if the signal is present when the set
Creep Angle is reached, the press will continue at Run
27
Typical DMR Parameter and Fault Number Reference Chart
PARAMETER
NUMBER
00
01
02
03
04
05
06
07
08
09
10
11
12
13
14
15
16
17
18
19
20
21
22
23
24
25
26
27
28
29
30
31
32
33
34
35
36
37
38
39
40
41
42
43
44
45
46
47
48
49
50
51
52
53
54
55
56
57
58
59
60
61
62
63
64
65
66
67
68
69
70
71
PARAMETER
Not Used
Average Speed Feedback - SPM
Speed Reference - SPM
Average Speed Error (+/-) - SPM
Effective Resolver Position
AC Line Voltage - Volts
Not Used
Not Used
Clutch Current Feedback - Amps
Brake Current Feedback - Amps
EPROM
Part Number
Speed at Die Contact Angle - SPM
Serial Interface Data Received
Analog Speed Reference
Average Parts per Minute
Clutch Current Timer – SEC
Brake Current Timer - SEC
CL-BR Coil Cool Down - SEC
Under-speed Timer - SEC
Over-speed Timer - SEC
Not Used
Actual Resolver Position
Main Program Loop Ctr.
Present Pr. Fault Codes
Previous Pr. Fault Codes
Max. Pr. Run Sp. – SPM
Max AC Line Voltage
Max. Cl. Cur. Scaling Factor – Amps
Max. Br. Cur. Scaling Factor – Amps
Angle 1 - DEG
Speed 1 - SPM
Angle 2 - DEG
Speed 2 - SPM
Angle 3 - DEG
Speed 3 - SPM
Angle 4 - DEG
Speed 4 - SPM
Angle 5 - DEG
Speed 5 - SPM
Angle 6 - DEG
Speed 6 - SPM
Stop-On-Top Creep Sp. Angle - DEG
Stop-On-Top Apply Br. Angle - DEG
Creep Speed-Top - SPM
Micro Inch Speed - SPM
Inch Speed - SPM
Inch Accel Rate – SPM/SEC
Initial Accel Step – SPM
Initial Accel Rate – SPM/SEC
Run Accel Rate 1 – SPM/SEC
Run Accel Rate 2 – SPM/SEC
Run Accel Rate 3 – SPM/SEC
Run Accel Delta 1 – SPM/SEC
Run Accel Delta 2 – SPM/SEC
Run Decel Rate 1 – SPM/SEC
Run Decel Rate 2 - SPM/SEC
Run Decel Rate 3 - SPM/SEC
Run Decel Delta 1 – SPM/SEC
Run Decel Delta 2 – SPM/SEC
Test Mode
Clutch Test Mode
Brake Test Mode
Clear Faults
Cl. Cur. On too Long Timer - SEC
Br. Cur. On too Long Timer - SEC
Cl/Br Coil Cool Down Timer - SEC
Under-speed Timer - SEC
Over-speed Timer - SEC
% Over-speed - %
Wrong Direction Limit - DEG
Display Update Time - SEC
PARAMETER
NUMBER
72
73
74
75
76
77
78
79
80
FAULT NUMBER
0101
0202
0208
0206
0207
0208
0209
0210
0211
0212
0220
0221
0222
0223
0224
0225
0226
0227
0228
0313
0314
0315
0316
0317
0318
0319
0329
SIGNALS FOR CHART
RECORDER
TERMINAL
337
338
339
340
341
FAULT INDICATOR
NUMBER
0
1
2
3
4
5
6
7
28
Table 3-3
PARAMETER
No. Of Speed Feedback Periods
Serial Interface Baud Rate
Under-speed % Limit
Die Contact Angle
Resolver Direction Selection
Resolver Offset Angle
Gear Ratio
Pulses per Rev.
Pot. Selector
FAULT
Over-speed
Loss of Tach
Clutch Current Delay
Press Movement in Wrong Direction
Loss of Line
Enable without Clutch On
Cl. Contactor On After Cl. On De-energized
Missing Enable
Inch + Micro Inch + Enable
Reverse Command
Enable Present After Normal Stop
Clutch Contactor Not On in Test Mode
Press Movement in Test Mode
Enable Present in Test Mode
Stop-On-Top Not Performed
Cl. Contactor On Removed w/o Removing
Enable or During 450 ms Time Delay
Clutch Contactor On w/o Enable
Enable Before Cool Down Expired
Creep Sp. Not Reached Before Stop Angle
Under-speed
Clutch and Brake Current Overlap
Clutch Current
Brake Current
Inch Change
Micro Inch Change
Reverse Change
Parameter Out of Limits
FUNCTION
Common
Speed Reference
Clutch Current
Brake Current
Speed Feedback
FAULT
Run Signal is Present
Push Reset
External
Brake Free Wheel
Low Line
Brake Over-current
Clutch Free Wheel
Line/Microprocessor
Clutch Over-current
Special DMR Parameter and Fault Number Reference Chart for DMR with Stop-On-Bottom Feature Table 3-4
PARAMETER
NUMBER
00
01
02
03
04
05
06
07
08
09
10
11
12
13
14
15
16
17
18
19
20
21
22
23
24
25
26
27
28
29
30
31
32
33
34
35
36
37
38
39
40
41
42
43
44
45
46
47
48
49
50
51
52
53
54
55
56
57
58
59
60
61
62
63
64
65
66
67
68
69
70
71
PARAMETER
Not Used
Average Speed Feedback - SPM
Speed Reference - SPM
Average Speed Error (+/-) - SPM
Effective Resolver Position
AC Line Voltage - Volts
Not Used
Not Used
Clutch Current Feedback - Amps
Brake Current Feedback - Amps
EPROM
Part Number
Speed at Die Contact Angle - SPM
Serial Interface Data Received
Analog Speed Reference
Average Parts per Minute
Clutch Current Timer - SEC
Brake Current Timer - SEC
CL-BR Coil Cool Down - SEC
Under-speed Timer - SEC
Over-speed Timer - SEC
Not Used
Actual Resolver Position
Main Program Loop Ctr.
Present Pr. Fault Codes
Previous Pr. Fault Codes
Max. Pr. Run Sp. – SPM
Max AC Line Voltage
Max. Cl. Cur. Scaling Factor – Amps
Max. Br. Cur. Scaling Factor – Amps
Angle 1 - DEG
Speed 1 - SPM
Angle 2 - DEG
Speed 2 - SPM
Angle 3 - DEG
Speed 3 - SPM
Angle 4 - DEG
Speed 4 - SPM
Angle 5 - DEG
Speed 5 - SPM
Angle 6 - DEG
Speed 6 - SPM
Stop-On-Top Creep Sp. Angle - DEG
Stop-On-Top Apply Br. Angle - DEG
Creep Speed-Top - SPM
Micro Inch Speed - SPM
Inch Speed - SPM
Inch Accel Rate – SPM/SEC
Initial Accel Step – SPM
Initial Accel Rate – SPM/SEC
Run Accel Rate 1 – SPM/SEC
Run Accel Rate 2 – SPM/SEC
Run Accel Rate 3 – SPM/SEC
Run Accel Delta 1 – SPM/SEC
Run Accel Delta 2 – SPM/SEC
Run Decel Rate 1 – SPM/SEC
Run Decel Rate 2 - SPM/SEC
Run Decel Rate 3 - SPM/SEC
Run Decel Delta 1 – SPM/SEC
Run Decel Delta 2 – SPM/SEC
Test Mode
Clutch Test Mode
Brake Test Mode
Clear Faults
Cl. Cur. On too Long Timer - SEC
Br. Cur. On too Long Timer - SEC
Cl/Br Coil Cool Down Timer - SEC
Under-speed Timer - SEC
Over-speed Timer - SEC
% Over-speed - %
Wrong Direction Limit - DEG
Display Update Time - SEC
PARAMETER
NUMBER
72
73
74
75
76
77
78
79
80
81
82
83
FAULT NUMBER
0101
0202
0208
0206
0207
0208
0209
0210
0211
0212
0220
0221
0222
0223
0224
0225
0226
0227
0228
0313
0314
0315
0316
0317
0318
0319
0329
SIGNALS FOR CHART
RECORDER
TERMINAL
337
338
339
340
341
FAULT INDICATOR
NUMBER
0
1
2
3
4
5
6
7
29
PARAMETER
No. Of Speed Feedback Periods
Serial Interface Baud Rate
Under-speed % Limit
Die Contact Angle
Resolver Direction Selection
Resolver Offset Angle
Gear Ratio
Pulses per Rev.
Pot. Selector
Stop-On-Bottom Creep Speed Angle - DEG
Stop-On- Bottom Apply Brake Angle - DEG
Creep Speed-Bottom - SPM
FAULT
Over-speed
Loss of Tach
Clutch Current Delay
Press Movement in Wrong Direction
Loss of Line
Enable without Clutch On
Cl. Contactor On After Cl. On De-energized
Missing Enable
Inch + Micro Inch + Enable
Reverse Command
Enable Present After Normal Stop
Clutch Contactor Not On in Test Mode
Press Movement in Test Mode
Enable Present in Test Mode
Stop-On-Top Not Performed
Cl. Contactor On Removed w/o Removing
Enable or During 450 ms Time Delay
Clutch Contactor On w/o Enable
Enable Before Cool Down Expired
Creep Sp. Not Reached Before Stop Angle
Under-speed
Clutch and Brake Current Overlap
Clutch Current
Brake Current
Inch Change
Micro Inch Change
Reverse Change
Parameter Out of Limits
FUNCTION
Common
Speed Reference
Clutch Current
Brake Current
Speed Feedback
FAULT
Run Signal is Present
Push Reset
External
Brake Free Wheel
Low Line
Brake Over-current
Clutch Free Wheel
Line/Microprocessor
Clutch Over-current
START-UP AND ADJUSTMENT
6. Provides clutch "free wheel" command signals to
prevent damage to the clutch SCRs.
7. Provides brake "free wheel" command signals to
prevent damage to the brake SCRs
8. Control amplifiers that compare the clutch and brake
current reference signals to current feedback
signals.
9. Phase shifter microprocessors in the clutch and
brake circuit, which control the firing angles of the
clutch and brake amplifier SCRs.
This controller replaces the present Dynamatic Analog
CES Press Control in all aspects and adds numerous
diagnostic features.
This design replaces discrete
analog and digital control circuitry with microprocessor
based operation where advantageous.
POWER CONVERSION
The CES Press Control provides control for the full
range of Dynamatic press drives The power conversion
circuitry operates from 480 volts (+10%, -15 %) input
and provides a maximum of 850 volts dc coil excitation
voltage. The following maximum current levels are
available:
ANGLE MEASURING AND CONTROL CIRCUITRY
The CES press control provides a means of measuring
press angles by utilizing a position resolver mounted on
the output press gearing (the crank shaft of the slide).
The position information is used to set a reference profile
based on stored data of up to 6 angles and 6
predetermined speeds.
1. Clutch Excitation - provides 180 amps at 70% duty
cycle.
2. Brake Excitation - provides 90amps at 30% duty
cycle.
The control digital board is a microprocessor-based solid
state control system capable of receiving data from the
press control, storing it, and then using it to provide
reference speed signals to the CES control.
Refer to the power schematic for your press drive for the
following discussion. Both the clutch and the brake
power-sections consist of rectifier circuits to convert the
ac line power to dc power. Each circuit employs a full
wave bridge rectifier consisting of six SCRs and resistorcapacitor networks for suppression. There is a clutch
contactor and a brake contactor for electromechanically
disconnecting the clutch and brake respectively. There
are three line fuses and a circuit breaker for over-current
protection. An autotransformer steps the 480 volt line
voltage up to 600 volts for the required forcing voltage.
The clutch gate driver and brake gate driver printed
circuit boards provide isolation and amplification of the
SCR firing pulses.
START-UP PROCEDURE
Use a digital multimeter (such as a Fluke 8010A) with
1% or better accuracy for all measurements required
during start-up.
1. Turn the circuit breaker to the OFF position. Turn all
incoming signals OFF.
a.
b.
c.
d.
PRESS SPEED CONTROL
The press control provides closed loop speed control
operation with inner current loops on both the clutch and
brake.
It provides adjustable acceleration and
deceleration. The reference data is modified by a press
angle measuring and control circuit function that will
change the reference at adjustable angles.
Check all terminal screws for tightness.
Make certain that All plugs are properly seated.
Check for loose connections.
Set potentiometers as follows.
1)
2)
3)
4)
Clutch Velocity Damping 50%.
Clutch Current Damping 50%.
Brake Velocity Damping 50%.
Brake Current Damping 50%.
e. Install a jumper from 300 to 302. This will allow
115 volts to be present in the CES press control
when the circuit breaker is placed in the ON
position.
The logic circuitry is located on printed circuit board
assembly number 15-822-1, through 15-822-10,
depending on the size of the mechanical unit. This
board has circuitry that performs the following functions:
2. Turn the circuit breaker to the ON position.
1. Compares the reference voltage to the speed
velocity voltage. The difference is used to fire the
SCRs that provide the power required to maintain
the set speed.
2. Limits the clutch current to a value equal to the
rating of the mechanical unit.
3. Limits the brake current to a value equal to the rating
of the mechanical unit.
4. Provides adjustable velocity damping to the clutch
circuitry.
5. Provides adjustable velocity damping to the brake
circuitry.
a. Check for the presence of 115 volts on the
secondary of the control transformer.
b. Check the power supplies for their voltages (+/0.5%) of -12 VDC, +24 VDC, +12 VDC α +5
VDC.
c. Check the line voltages LA-LB-LC for the
presence of 600 volts, +/- 10%.
30
i.
3A. Older controls have two EPROM’s provided with
each control.
The test mode will be indicated by the "Test"
LED on the keypad and display board.
5. Enter the clutch test mode.
a. One EPROM protects certain parameters that
are adjustable from the keypad from accidental
changes. These parameters are:
26
Maximum Speed
27
Line Voltage
28
Clutch Current
29
Brake Current
72
Number of Speed Feedback Periods
73
Baud Rate
78
Gear Box Ratio
79
Tach Pulses Per Revolution
80
Potentiometer Selector
b. One EPROM allows the above parameters to be
changed in the field if necessary. Each of the
above parameters should be verified as correct
for a particular installation and changed if found
to be incorrect.
a. While in the test mode, the clutch test mode can
be entered by setting the clutch test mode
parameter No. 61 to "ON". Proceed as follows:
1) Press the Bot key. This will activate the
bottom row of the display.
2) Press the "6" and the "1" keys for parameter
No. 61.
3) "61 c1 OFF" will appear in the bottom row
of the display
4) Press the up arrow (↑).
5) "61
c1 ON" will appear in the bottom row,
indicating that the clutch test mode has been
activated.
b. The clutch current will go to its maximum value
as set by the Current Limit potentiometer.
c. Verify
that
the
Clutch
Current
Limit
potentiometer limits the clutch current to the
proper value for the size of the mechanical unit.
Adjust the Current Limit potentiometer only if
necessary for the proper amps, +/-1amp.
d. To return the current to zero:
3B. Newer controls have but one EPROM that protects
all changeable parameters except those from 30
through 41, 45 and 46. To change any of the
protected parameters the keypad must first be
unlocked using the password provided in separate
instructions.
4. Note that resolver must be connected when in test
mode or you will get a 222 fault. Enter the test
mode of the DMR by proceeding as follows:
1) Press the down arrow (↓).
2) "61 cl OFF" will appear in the bottom row
of the display.
a. Padlock the main motor of the press in the OFF
position.
b. Turn the Press Control OFF.
c. On the DMR keypad, enter the test mode as
follows:
WARNING: Note that if the clutch current is left
ON for more than the setting of the Clutch
Current On Too Long Fault, a clutch current fault
will result and it will take ten minutes before the
fault can be reset. The clutch current fault is
adjustable from 3 to 20 seconds.
1) Press the Top key. This will activate the top
row of the display.
2) Press the "6" and the "0" keys for parameter
No. 60.
3) "60" and "OFF" will appear in the top row of
display.
4) Press the up arrow (↑)
5) “60" and "ON" will appear in the top row of
display, indicating the test mode has been
activated.
e. Leave the clutch test mode by entering the
brake test mode.
6. Enter the brake test mode.
a. While in the clutch test OFF node set the brake
test mode parameter No. 62 to ON. Proceed as
follows:
d. Turn the CES circuit breaker to the OFF
position.
e. Remove the following incoming leads from the
terminal block and tape ends: 320, 321, 334,
302, 319 and 348.
f. Install the following jumpers: 302 to 320, 301 to
334 (to put 115 volts across the clutch contactor
ON signal), 15 to 16 (across CR2) and 26 to 27
(across the TD contact).
g. Turn the CES circuit breaker to the ON position.
h. The DMR will remember that it is in the test
mode. "60
On” will reappear in the top
row of display.
1) Press the "6" and the "2" keys for parameter
No. 62.
2) "62
br
OFF" will appear in the bottom
row of the display.
3) Press the up arrow (↑).
4) "62
br
ON" will appear in the bottom
row, indicating that the brake test mode has
been activated
b. The brake current will go to its maximum value,
as set by the Brake Current Limit potentiometer.
c. Verify that the Brake Current Limit potentiometer
limits the brake current to the proper value for
31
rotating, it will not get to the creep angle or
the stop angle; therefore, a stop now fault
will be generated. Check this LED on the
1/0 board.
6) Send the clutch contactor ON signal without
the enable signal. A stop now fault will be
generated.
7) Send the enable signal without the clutch
contactor ON signal. A stop now fault will be
generated.
the size of the mechanical unit, +/-1 amp. Adjust
the Brake Current Limit potentiometer only if
necessary for the proper Amps.
d. To return the brake current to zero:
1) Press the down arrow (↓).
br
OFF" will appear in the bottom
2) "62
row of the display.
WARNING: Note that if the brake current is left
ON for more than the setting of the Brake
Current On Too Long Fault, a brake current fault
will result and it will take ten minutes before the
fault can be reset
10. Run the Press in the Inch Mode.
a. Set the DMR parameter to the inch mode.
b. Enter five strokes per minutes
c. Set the DMR parameter to inch accel rate,
parameter No. 47. Enter the proper rate.
d. Jog the press through one or more strokes,
checking clearances, mechanical interference,
etc.
e. Use the Inch pushbutton for the jog function.
7. Note the following test mode faults:
a. Receiving an enable in the test mode will result
in an enable in the test mode fault.
b. Sensing press movement in the test mode will
initiate a press movement in the test mode fault.
11. Resolver Adjustment
8. Turn the CES circuit breaker OFF.
a. Select the top display area and select parameter
No. 04.
b. Select the bottom display area and select
parameter No. 77. Using the Down arrow set to
zero degrees (0º).
a. Remove all of the jumpers added during this setup. The main motor should remain OFF.
9. Turn the CES circuit breaker ON.
a. The DMR will be in the test mode.
b. To exit the test mode:
c.
In the bottom area, select parameter No. 76 and
set for forward direction. Inch the press. If a
206 fault results, change parameter to REV. If
no fault, proceed to the next step.
d. Position the press to some known angle,
typically Bottom Dead Center (180º).
e. Select parameter No. 77 in the bottom area.
Using up or down arrows, adjust this parameter
until parameter No. 04 reads the position of the
press. This completes the setup of the resolver.
1) Press the Top key. This will activate the top
row of the display.
2) "60 ON" will appear in the top row of the
display.
3) Press the down arrow.
4) "60 OFF" will appear in the top row of the
display.
c.
Send the following signals from the press control
to the CES controller. Remove the signal after
making the prescribed check. When faults are
simulated, send the fault reset signal from the
press control to reset the CES controller.
12. Operate the Press in the Run Mode.
a. Set the DMR to the run parameter.
b. Enter a profile of run speeds:
1) Enter degrees for six angles, parameters 30,
32, 34, 36, 38 and 40. If an angle is not
used, set it to the "skip angle" this is 360
degrees.
2) Enter strokes-per-minute for six speeds,
parameters 31, 33, 35, 37, 39 and 41.
3) Enter Operating Accel Rates, Nos. 1, 2 and
3, parameters 50, 51 and 52.
4) Enter Accel Rate Delta SPM, Nos. 1 and 2,
parameters 53 and 54.
5) Enter Operating Decel Rates, Nos. 1, 2 and
3, parameters 55, 56 and 57.
6) Enter Decel Rate Delta SPM, Nos. 1 and 2,
parameters 58 and 59.
7) Enter Initial Value of Linear Accel Ramp,
parameter 48.
1) Inch - Check for presence of LED on I/O
board and on the keypad and display board.
2) Micro Inch - Check for presence of LED on
I/O board and on the keypad and display
board.
3) Reverse – Check for presence of LED on
I/O board and on the keypad and display
board.
4) Stop-On-Top - Check for presence of LED
on the I/O board
5) Clutch Contactor ON and Enable - Check for
presence of comparable LEDs on the I/O
board. Since the motor is not running, an
under-speed fault will result and a stop-ontop fault will be generated. Check this LED
on the I/O board. Since the press is not
32
8)
9)
10)
11)
12)
13)
Enter Creep Angle, parameter 42.
Enter Stop Angle, parameter 43.
Enter Creep Speed, parameter 44.
Enter Max Speed, parameter 26.
Enter Initial Accel Rate, parameter 49.
Enter the Wrong Direction Limit, parameter 70.
APPROXIMATE PARAMETER SETTINGS
Approximate parameter settings, which are furnished for
trial only, are indicated in Table 4-1. Actual settings will
be determined during the press set-up. If, for security
reasons, the customer removes the ribbon cable
connecting the keypad to the DMR, care must be
exercised in removing the power to the DMR when
removing or replacing the cable. Otherwise, damage
may result to the unit.
c. Run the press through several cycles.
d. Use the stop-on-top function to stop the press.
Readjust the creep speed, creep angle, and stop
angle, if necessary, to attain the proper stopping
on top.
A resume of serial interface commands from the press
control to the DMR is as follows:
AA
BB
CC
DD
13. Run the Press in the Micro Inch Mode.
a. Enter the Micro Inch Speed, parameter 45.
b. Jog the press through one or more strokes.
c. Use the Inch pushbutton for this jog function.
EE
14. Check the Remaining Faults.
33
Accept downloaded parameters that follow.
Send fault codes
Send monitor data.
Begin using parameters down loaded with last AA
commands
Echo back last AA parameters.
Typical Parameter Settings
Parameter Number
26
27
28
29
30
31
32
83
34
35
36
37
38
39
40
41
42
43
44
45
46
47
48
49
50
51
52
58
54
55
56
57
58
59
60
61
62
63
64
65
66
67
68
69
70
71
72
73
74
75
76
77
78
79
80
81
82
83
Table 4-1
Value
Max press speed
480.00
Same as CL Meter
Same as BR Meter
180.0
20.0*
90.0
10.0
170.0
20.0
360.0
20.0
360.0
20.0
360.0
20.0
300.0
354.0
5.0
5.0
10.0
100.0
3.0
100.0
100.0
100.0
100.0
5.0
5.0
100.0
100.0
100.0
5.5
5.5
Off
Off
Off
Clear
10.0
10.0
300.0
2.0
2.0
10.0
3.0
.1
1.0
9600.0
10.0
120.0
See resolver adjustments under Start-Up Section
See resolver adjustments under Start-Up Section
See press specifications
See speed reference section
Self Explanatory
150.0
170.0
3.0
34
*NOTE: Parameter No. 31 will be
altered by either the Trim Speed
pot or the Manual Speed pot,
depending on which is used.
MAINTENANCE AND TROUBLE SHOOTING
the factory for the coil resistance. Resistance to ground
should be about 20 megohms. When using a megger,
make sure both coil leads are disconnected from the
controller. Do not megger any portion of the controller.
MAINTENANCE
Very little maintenance is required to keep the CES
stamping press controller in service. Periodically, we
suggest that you check the controller to make sure all
terminal screws and other connections are tight. Look
for signs of trouble, such as burn spots on the boards,
loose parts, worn out switches, pushbuttons or LEDs,
and any other abnormal condition.
Correct any
deficiency found.
If you have a question, call
DSI/Dynamatic at 1-800-548-2169, fax 262-554-7041 or
E-mail [email protected].
If the drive is erratic or hunts, we suggest you check for
loose connections, proper brush seating, a good slip ring
surface and load pulsations that can reflect erratic load
to the controller. If no external cause is found, replace
the main PCB assembly.
Generator: The approximate generator coil resistance
for the 37 series of press drive mechanical units to 94
ohms and for the 49 series is 22 ohms.
The relays in the controller have a definite life, as do
potentiometers and switches. They are designed for
many years of average use; however, if your operation
calls for more frequent switching, we suggest you stock
replacements based on your type of operation. If you
need help in deciding which parts to stock, our Renewal
Parts Department will help you. A Master Parts List, with
recommended spare parts noted, is included on page 52 for your specific controller. This is based on average
conditions.
There are two generator coils on each mechanical unit.
If one in ever lost, the other one may be connected in its
place. The connection diagram calls for both generator
coils to be connected to the terminal block in the control
enclosure. Therefore, the second coil leads should be
readily available should a failure occur.
INTERCHANGING ASSEMBLIES
The DMR assemblies (15-820-*) are similar to one
another. The EPROM’s are programmed differently and
the Absolute Position Resolver board on the DMR
assembly may be a 15-779-112 or a 15-779-113. It will
vary depending on whether the power to the resolver is
provided by Dynamatic (15-779-113) or is provided by
others (15-779-112).
The only difference is the
presence or absence of the W7 jumper on this board. If
Dynamatic is providing the power, it is required. If not, it
must be removed with this in mind one DMR assembly
may be used as a back up for more than one press.
TROUBLESHOOTING
The possibility of a component failure or other problem
always exists. This section of the manual is provided to
assist you in finding the fault and expediting the repair.
Our design philosophy is based on assembly
replacement. Trying to find a component failure on a
printed circuit board is not economical when you
compare the cost of labor and down time with the cost of
a replacement PCB assembly. Therefore, this manual
limits troubleshooting to the sub-assembly level. Always
check the obvious. Are the plug and switches in the
right position and the power ON?
When making any substitution of the DMR assembly, the
following items must be checked:
CAUTION: Turn ac power to the Motor and controller
OFF before making tests, except when voltage
measurements are necessary. Only qualified
personnel acquainted with proper safety
procedures should service this equipment.
1. The contact that calls for either single stroke or
continuous running of the press must be closed to
cause the press to run continuous and open to
cause the press to run in single stroke. That way an
open wire or a poor contact connection will cause
the press to single stroke.
2. The EPROM located in the DMR assembly has
several parameters that are programmable. These
must be properly programmed before operating the
press after changing DMR’s. Therefore, before
removing the defective DMR, record all of the
variable parameters. It is advisable to record this
data when the press is first put into operation for,
depending on what the problem is in the defective
DMR, this data may be lost when the DMR first
becomes defective.
3. In the typical DMR the following parameters must be
programmed:
26 Maximum Speed
27 Line Voltage
28 Clutch Current
If the press drive will not run, we suggest you complete
the following tests to check out the controller operation.
With ac power removed, connect your multimeter set on
500 VAC range. Measure controller terminals 1L1, 1L2
and 1L3. With power OFF you should read zero volts.
Do not proceed until a zero reading is obtained. Then
pull fuses FU1, FU2 and FU3 (on the main PCB
assembly) and check for blown fuses. Replace if
required and re-install FU1, FU2 and FU3 in the
controller.
If a fuse blows on a cold start, there may be a short or
ground in the coil lead wires. Disconnect both leads at
the controller terminal strip and check the resistance of
the coil and resistance to ground. Check the drive
nameplate or contact the Field Service Department at
35
29
72
73
78
79
80
Brake Current
No. of Speed Feedback Periods Averaged
Baud Rate
Gear Box Ratio
Tach Pulses Per Revolution
Pot Selector
RENEWAL PARTS AND SERVICE
Some renewal parts for the CES Stamping Press
Controller are stocked at the factory. We suggest you
stock renewal parts to minimize down time. You alone
can evaluate the cost of down time compared to the cost
of stocking spares. If you need help in establishing an
appropriate list and stock levels, contact your local sales
office.
In some controls the following additional parameters
must be programmed:
81 Stop-On-Bottom Creep Speed Angle
82 Stop-On-Bottom Apply Brake Angle
83 Creep Speed-Bottom
4. If the parameter information that is protected is lost,
contact the factory, it may be available for your particular
press.
Warranty controller failure will be handled by
replacement. Technical assistance is available over the
telephone, and field service engineers are available for
start-up, troubleshooting and training. You may inquire
about rates and scheduling from the factory.
The company maintains a Repair Service Department
and work is done on a time and material basis. All
replacement boards will carry a new factory warranty.
The logic PCB assemblies (15-822-*) are identical
except for R5 and R131. Therefore, one assembly can
be used as a backup for different -* numbers in case of a
failure provided R5 and R131 are changed according to
the chart that follows: (Note the 15-822-* replaces the
older 15-815-* assembly).
PCB ASSEMBLY
NUMBER
15-822-1
15-822-2
15-822-3
15-822-4
15-822-5
15-822-6
15-822-7
15-822-8
15-822-9
15-822-10
RESISTANCE
R5
90.9 K
48.7 K
124.0 K
71.5 K
115.0 K
28.7 K
60.4 K
84.5 K
124.0 K
84.5 K
Refer to Tables 2-1 and 2-2 for DMR assemblies and
scaling PCBs.
(Ohms)
R131
90.9 K
48.7 K
124.0 K
124.0 K
115.0 K
28.7 K
60.4 K
84.5 K
84.5 K
84.5 K
List of Spare Parts Common to All CES/DR Controls
Recommended Dynamatic Part
Description
Qty.
Number
1
15-242-57
CES logic interface indicator PCB assembly
1
15-358-502
Control station pot assembly
1
15-565-27
CES press drive clutch gate driver, 600 V
1
16-565-28
CES press drive brake gate driver, 600 V
3
15-825-1
CES press drive suppressor
1
15-6502-3001
Modified 15-6502-3000 PCB assembly
1
15-6504-6
Power supply assembly
3
23-298-180
Capacitor, 18 mfd. 660 VAC, w/mtg. brackets
3
32-48-4591
Fuse, 4.5 A, 250 V
3
32-101-1591
Fuse, time delay, 1.5 A, 500 V
6
32-105-121
Fuse, 125 A, 600 V
3
33-1-101
RF filter, 100 ohm resistor, 0.25 mfd. capacitor
1
37-162-1104
Voltmeter assembly, 1-10 VDC; to specify scale
1
53-133-0
Relay, 4dpt, 115 VAC, 50/60 Hz.
1
53-289-0
Relay 4p, 120/110 VAC, 50/60 Hz.
1
53-407-1
Relay, time delay
1
53-534-1
Contactor, Size 2
1
53-570-4
Contactor, Size 3
2
55-396-661
Varistor, 660 V rms
2
55-422-1
Input module, 90 to 140 VAC
.2
55-422-7
Output module, 12 to 140 VAC
12
55-589-182
Double SCR package, 1800 V, 90 A
1
64-175-14
Transformer, 500 VAD, 50/60 Hz, 230/460 V Primary
36
Symbol
C3, 4, 5
FU4
FU5, FU6
FU1, 2, 3
RC
MTR1, 2, 3
CR2
CR1
TD
BR
CL
Q3, 4
For I/O
For I/O
SCR1-12
T1
DRIVE SOURCE INTERNATIONAL INC.
7900 Durand Avenue, P.O. Box 0361
Sturtevant, WI USA 53177
Toll Free: (800) 548-2169
Phone: (262) 554-7977 - Fax: (262) 554- 7041
Email: [email protected]
24 Hours Service: (262) 499-0437
IM-110007-2004, 07/04
CES Press Drive Control