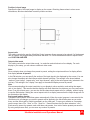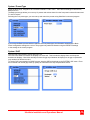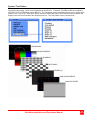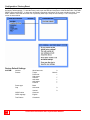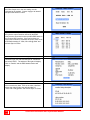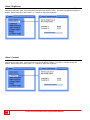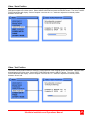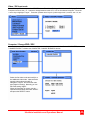
1
UltraVista ™ MultiViewer/Video wall INSTALLATION AND OPERATIONS MANUAL 10707 Stancliff Road Houston, Texas 77099 Phone: (281) 933-7673 www.rose.com LIMITED WARRANTY Rose Electronics® warrants the UltraVista™ to be in good working order for one year from the date of purchase from Rose Electronics or an authorized dealer. Should this product fail to be in good working order at any time during this one-year warranty period, Rose Electronics will, at its option, repair or replace the Unit as set forth below. Repair parts and replacement units will be either reconditioned or new. All replaced parts become the property of Rose Electronics. This limited warranty does not include service to repair damage to the Unit resulting from accident, disaster, abuse, or unauthorized modification of the Unit, including static discharge and power surges. Limited Warranty service may be obtained by delivering this unit during the one-year warranty period to Rose Electronics or an authorized repair center providing a proof of purchase date. If this Unit is delivered by mail, you agree to insure the Unit or assume the risk of loss or damage in transit, to prepay shipping charges to the warranty service location, and to use the original shipping container or its equivalent. You must call for a return authorization number first. Under no circumstances will a unit be accepted without a return authorization number. Contact an authorized repair center or Rose Electronics for further information. ALL EXPRESS AND IMPLIED WARRANTIES FOR THIS PRODUCT INCLUDING THE WARRANTIES OF MERCHANTABILITY AND FITNESS FOR A PARTICULAR PURPOSE, ARE LIMITED IN DURATION TO A PERIOD OF ONE YEAR FROM THE DATE OF PURCHASE, AND NO WARRANTIES, WHETHER EXPRESS OR IMPLIED, WILL APPLY AFTER THIS PERIOD. SOME STATES DO NOT ALLOW LIMITATIONS ON HOW LONG AN IMPLIED WARRANTY LASTS, SO THE ABOVE LIMITATION MAY NOT APPLY TO YOU. IF THIS PRODUCT IS NOT IN GOOD WORKING ORDER AS WARRANTIED ABOVE, YOUR SOLE REMEDY SHALL BE REPLACEMENT OR REPAIR AS PROVIDED ABOVE. IN NO EVENT WILL ROSE ELECTRONICS BE LIABLE TO YOU FOR ANY DAMAGES INCLUDING ANY LOST PROFITS, LOST SAVINGS OR OTHER INCIDENTAL OR CONSEQUENTIAL DAMAGES ARISING OUT OF THE USE OF OR THE INABILITY TO USE SUCH PRODUCT, EVEN IF ROSE ELECTRONICS OR AN AUTHORIZED DEALER HAS BEEN ADVISED OF THE POSSIBILITY OF SUCH DAMAGES, OR FOR ANY CLAIM BY ANY OTHER PARTY. SOME STATES DO NOT ALLOW THE EXCLUSION OR LIMITATION OF INCIDENTAL OR CONSEQUENTIAL DAMAGES FOR CONSUMER PRODUCTS, SO THE ABOVE MAY NOT APPLY TO YOU. THIS WARRANTY GIVES YOU SPECIFIC LEGAL RIGHTS AND YOU MAY ALSO HAVE OTHER RIGHTS WHICH MAY VARY FROM STATE TO STATE. NOTE: This equipment has been tested and found to comply with the limits for a Class B digital device, pursuant to Part 15 of the FCC Rules. These limits are designed to provide reasonable protection against harmful interference when the equipment is operated in a commercial environment. This equipment generates, uses, and can radiate radio frequency energy and, if not installed and used in accordance with the instruction manual, may cause harmful interference to radio communications. Operation of this equipment in a residential area is likely to cause harmful interference in which case the user will be required to correct the interference at his own expense. IBM, AT, and PS/2 are trademarks of International Business Machines Corp. Microsoft and Microsoft Windows are registered trademarks of Microsoft Corp. Any other trademarks mentioned in this manual are acknowledged to be the property of the trademark owner. Copyright Rose Electronics 2008. All rights reserved. No part of this manual may be reproduced, stored in a retrieval system, or transcribed in any form or any means, electronic or mechanical, including photocopying and recording, without the prior written permission of Rose Electronics. Rose Electronics Part # MAN-UViW Printed In the United States of America - Revision DECLARATION of CONFORMITY Declaration of Conformity Declaration of Conformity This declaration is valid for the following product: Equipment: Video, Keyboard, Mouse Switching System Type: UltraVista Hereby the equipment is confirmed to comply with the requirements set out in the Council Directive on the Approximation of the Laws of the Member States relating to Electromagnetic Compatibility (89/336/EEC) and the Council Directive relating to Low Voltage (73/23/EEC). For the evaluation of the above mentioned Council Directive for Electromagnetic Compatibility and for Low Voltage, the following standards were consulted: EN 55022 class A: EN 61000-3-2: EN 61000-3-3: EN 61000-6-2: EN 61000-4-2: EN 61000-4-3: EN 61000-4-4: EN 61000-4-5: EN 61000-4-6: EN 61000-4-11: 1998 + Corrigendum: 2001 + A1:2000 (Emission) 2000 (Harmonic current emissions) 1995 + Corrigendum: 1997 + A1:2001 (Flicker) 2001 (Immunity) 1995 + A1:1998 + A2:2001 2002 1995 + A1:2001 + A2:2001 1995 + A1:2001 1996 + A1:2001 1994 + A1:2001 TABLE of CONTENTS Contents Page # System Introduction......................................................................................................................................................... 1 Features .......................................................................................................................................................................... 1 Product Registration........................................................................................................................................................ 1 Package contents ............................................................................................................................................................ 1 Rose Electronics web site ............................................................................................................................................... 2 About this manual............................................................................................................................................................ 2 Disclaimer........................................................................................................................................................................ 2 Models ............................................................................................................................................................................. 3 Main Unit – Front Panel Controls .................................................................................................................................... 3 Main / Extension Unit – Rear Panel Connectors............................................................................................................. 4 Installation ....................................................................................................................................................................... 5 Installation – 1 Video Source ....................................................................................................................................... 5 Installation – 2 Video Sources ..................................................................................................................................... 7 Basic Preset Set-up......................................................................................................................................................... 9 Advanced “BASIC” preset set-up .............................................................................................................................. 10 Gap compensation..................................................................................................................................................... 11 Setting the gap width ................................................................................................................................................. 11 Free Presets .................................................................................................................................................................. 13 UltraVista Control screen .............................................................................................................................................. 13 Control program toolbar............................................................................................................................................. 14 Service Information ....................................................................................................................................................... 35 Maintenance and Repair............................................................................................................................................ 35 Technical Support...................................................................................................................................................... 35 Safety ............................................................................................................................................................................ 36 Figures Page # Figure 1. Front View........................................................................................................................................................ 3 Figure 2. Rear View ........................................................................................................................................................ 4 Figure 3. Single Video source installation....................................................................................................................... 5 Figure 4. Dual Video source installation ......................................................................................................................... 7 Figure 5. Video Matrix + 4 Video sources ....................................................................................................................... 8 Figure 6. Configure Presets (Basic) ................................................................................................................................ 9 Figure 7. 3x3 Video wall set-up..................................................................................................................................... 10 Figure 8. 3x2-1x3 dual video sources ........................................................................................................................... 10 Figure 9. OSD - Video output........................................................................................................................................ 11 Figure 10. Gap compensation menu............................................................................................................................. 12 Figure 11. Preset Type – Free ...................................................................................................................................... 13 Figure 12. UltraVista Control screen ............................................................................................................................. 13 Figure 13. Control program toolbar ............................................................................................................................... 14 Figure 14. Settings ........................................................................................................................................................ 16 Appendices Page # Appendix A – OSD Menus ............................................................................................................................................ 37 Main Menu ................................................................................................................................................................. 37 System / Initialize....................................................................................................................................................... 38 System / Preset ......................................................................................................................................................... 38 System / Preset Type ................................................................................................................................................ 39 System / GAP ............................................................................................................................................................ 39 System / OSD Position .............................................................................................................................................. 40 System / OSD Language........................................................................................................................................... 40 System / Test Pattern ................................................................................................................................................ 41 Configuration / Factory Reset.................................................................................................................................... 42 Console / Video Output ............................................................................................................................................. 43 Video / Video Input .................................................................................................................................................... 45 Video / Brightness ..................................................................................................................................................... 46 Video / Contrast ......................................................................................................................................................... 46 Video / Horiz Position ................................................................................................................................................ 47 Video / Vert Position .................................................................................................................................................. 47 Video / Screen width.................................................................................................................................................. 48 Video / Phase ............................................................................................................................................................ 48 Video / DVI Input mode ............................................................................................................................................. 49 Computer / Change EDID / DDC............................................................................................................................... 49 Appendix B – Specifications.......................................................................................................................................... 51 INTRODUCTION System Introduction Thank you for choosing the Rose Electronics UltraVista™. The UltraVista is the result of Rose Electronics commitment to providing state-of-the-art switching solutions for today’s demanding workplace. The UltraVista has proven to be a valuable investment for any business or office that has a need to display, manipulate, switch, or control multiple video displays. You can switch multiple presets to produce a wide range of video effects. The UltraVista, Multi-Viewer/Video Wall represents the latest in video displaying technology. The advanced design of the UltraVista can display signals from any video source with a DVI or VGA output. This can be from PCs, media players, DVD players, TV receivers, VCRs, and HD/SD-DSI signals used in professional video production. The flexibility of UltraVista allows for expansion to any needed installation display size. The UltraVista can be controlled several ways: Using the front panel buttons to select presets, sub-presets, or the OSD Use the UltraVista control program, A control program running on an external PC Configuration tool on an external PC The serial connection Be more productive, creative and organized with the dynamic new UltraVista Multi-Viewer/Video wall unit from Rose Electronics. Features Accepts HDTV, Analog or Digital input signals Accepts a variety of video sources such as a media player, DVD player, or a computer Display a video source across multiple displays One video source on one display and another video source across multiple displays Select a portion of a display and display it across multiple displays. Easily expandable to increase the display area Four configurable presets for fast switching between different configurations Two sub-preset settings for a maximum of 12 presets available from the front panel Multiple video sources can be connected Position and enlarge the video source Modular technology allows expansion at any time Zoom function can select any portion of a video source and enlarge it across any selected display area. On-Screen display for setting-up or editing presets, adjusting the gap between displays, setting the output resolution, OSD position and language, and other configuration options Product Registration Take advantage of the following when you register your Rose Electronics products online at www.rose.com/htm/warranty.htm: Rose Standard Warranty Plus... Free Lifetime Firmware Updates Free Lifetime Technical Support 30 Day Money Back Guarantee Priority “First-in-Line” Status for Tech Support Package contents The package contents consist of the following: UltraVista main unit and extension unit Power cords Rackmount kit Installation and operations manual If the package contents are not correct, contact Rose Electronics or your reseller, so the problem can be quickly resolved. UltraVista Installation and Operations Manual 1 Rose Electronics web site Visit out web site at www.rose.com for additional information on other products that are designed for data center applications, classroom environments and other applications. About this manual This manual covers the installation and operation of UltraVista. Disclaimer While every precaution has been taken in the preparation of this manual, the manufacturer assumes no responsibility for errors or omissions. Neither does the manufacturer assume any liability for damages resulting from the use of the information contained herein. The manufacturer reserves the right to change the specifications, functions, or circuitry of the product without notice. The manufacturer cannot accept liability for damages due to misuse of the product or other circumstances outside the manufacturer’s control. The manufacturer will not be responsible for any loss, damage, or injury arising directly or indirectly from the use of this product. 2 UltraVista Installation and Operations Manual MODELS Models Extension Unit Main Unit Figure 1. Front View Main Unit – Front Panel Controls Button Function Exit + Select Activates the On-screen display (Hold both for 3 seconds) 1–4 Select presets 1 – 4 F1*, F2* Activate a sub-preset for the current selected preset Navigate up or down within the OSD menu system - + Change a selected value Exit Close the OSD and return to standard operation Select Enter a menu or sub-menu, confirm an action * Sub-presets can be used to change details of a particular preset, or used as independent presets. When sub-presets are used as independent presets, the max number of presets accessible from the front panel is 12. To define more than 12, use UltraVista’s control program. UltraVista Installation and Operations Manual 3 Extension Unit Main Unit Figure 2. Rear View Main / Extension Unit – Rear Panel Connectors Each UltraVista unit (main and extension) consists of two (2) video boards, A and B. Video board “A” connects two video sources to a video output Video board “B” connects two video sources to a video output Serial Output (Video board A) Serial Output (Video board B) Input 2 Input 2 Input 1 Input 1 Connector Description (Video Board A and Video Board B) Input 1 Video source #1 Input 2 Video source #2 Output Video output Serial External connection from equipment capable of sending serial commands Run the UltraVista Control program Externally execute the OSD Power Universal 110 – 240 VAC 50-60 Hz – 40 Watt 4 UltraVista Installation and Operations Manual INSTALLATION Installation Installation – 1 Video Source The modular design of UltraVista allows for multiple extensions units to be added and the flexibility to adapt to any video wall installation size. Figure 3 shows a typical example of a 2 x 2 video wall with a single video source. Connect all UltraVista units together with the enclosed short serial cables. Connect the lower serial port (board B) of the main unit to the upper serial port (board A) of the first extension unit. When installing more than one extension unit, connect all the units by connecting the “B” serial port of one unit to the “A” port of the next. Connect the video source to a video splitter, and connect the splitter’s outputs to the channel 1 inputs (labeled “1”) on all UltraVista main and extension unit. If you want to use two video sources, connect the second video source in the same manor to the channel 2 inputs from a second DVI/VGA splitter. (See Figure 4) Connect the monitor outputs on the main and extension unit to the displays. Main A board Channel 1 Wall width 2 Wall height 2 Position 1 Main A Main B board Channel 1 Wall width 2 wall height 2 Position 2 Main Unit Main B 1 to 4 Video splitter Serial cable Extension Unit Extension A Extension A board Channel 1 Wall width 2 Wall height 2 Position 3 Extension B Extension B board Channel 1 Wall width 2 wall height 2 Position 4 Figure 3. Single Video source installation UltraVista Installation and Operations Manual 5 When all connections have been made, the system must be first initialized. The initialization process sets up the communication between the UltraVista main and all extension units. When applying power to the system, apply power to video splitters first before turning on the video sources. This enables the video sources to read the UltraVista units’ EDID (display information) data. To initialize the system, open the OSD menu by pressing the SELECT and EXIT buttons on the front panel of the UltraVista main unit until the OSD menu displays (approximately 3 seconds) Enter the SYSTEM menu, by pressing the SELECT button. Then enter the INITIALIZE sub-menu. Press SELECT to initialize the system. The system will then detect the units connected, and initialize the communication between units. After a few seconds, the menu will display the number of detected units. Use the buttons to select SYSTEM and press the SELECT button Press exit and select to display the OSD If the number of connected units detected does not match the number of units in the system, verify that all cabling and connections are in place, all units are powered on, and then initialize the system again. Once initialized, the configuration and presets can be set-up to produce the desired display layout and effects. 6 UltraVista Installation and Operations Manual INSTALLATION Installation – 2 Video Sources Installation of two video sources is the same procedure as installing a single video source. First install video source one as described in the Installation – one video source. Next install the second video source as shown in Figure 4. Connect the video source to a second video splitter, and connect the splitter’s outputs to the channel 2 inputs (labeled “2”) on all UltraVista main and extension unit. With all connections made, initialize the system as described on page 6. 1 to 4 Video splitter Main Unit 1 to 4 Video splitter Extension Unit Figure 4. Dual Video source installation The UltraVista main unit provides the video signal for the first two displays. The extension units provide the video signal for the other displays If more than two video sources need to be connected to UltraVista, you can use a video matrix instead of a video splitter. The following example shows four video sources connected to a 4 x 8 video matrix. Main - A Main - B Main - A Main - B Extn 1-A Extn 1-A Extn 1 - B Extn 1-B Extn 2 - A Extn 2 - B Extn 3-A Extn 3 - B Extn 4 - A 2 x 2 Video Wall Display 3 x 3 Video Wall Display UltraVista Installation and Operations Manual 7 UltraVista offers two types of presets, basic and free. Basic presets are used where the display of a video source is arranged in a regular grid and setup is performed using the OSD. Free presets offer the greatest flexibility for creating eye catching displays. You can freely position the displays and use different display types like CRT’s, flat panel displays or projectors. The free presets are set-up using UltraVista’s control program. The example below shows one way to display four video sources. PC’s / Media Player Control PC Figure 5. Video Matrix + 4 Video sources The example above shows the flexibility of using UltraVista, the control program, and a video switch. 8 UltraVista Installation and Operations Manual Basic Preset Set-up Basic presets are used for creating a video wall with displays of the same type and size arranged in a grid pattern where all gaps (horizontal and vertical) between the displays are equal. To define the Basic presets, call up the OSD by pressing the “EXIT” and “SELECT” buttons simultaneously for 3 seconds. When the OSD displays, use the buttons to select (highlight) “SYSTEM” and press the select button. The system menu will display as shown below. Select “PRESET TYPE” and from that menu, select “BASIC”. Next select “PRESET” and define the parameters for each preset (1 – 4) and sub-presets (F1 or F2 if needed). NOTE: THE SYSTEM MUST FIRST BE INITIALIZED PRIOR TO DEFINING THE PRESETS. To define a basic preset, set the Preset parameters for each screen. Target: Preset No; Sub preset: Channel: Wall size: Position Video board the preset is applied to: 1, 2, 3, or 4 F1 or F2 The input channel this display shows (1 or 2) The width and height of the video wall (x by y) Position of the display on the video wall (1-n) Figure 6. Configure Presets (Basic) UltraVista Installation and Operations Manual 9 Advanced “BASIC” preset set-up Below is an example of a BASIC 3x3 video wall and a single video source connected to channel 1. The presets would be set-up for Channel 1, wall size 3x3, and position 1-9 depending on the wall position. Main-A Main-B Extn-1A Main – A Position 1 Position 2 Position 3 Extn-1B Extn-2A Extn-2B 1x 9 Video splitter or Video matrix Main – B Extn – 1A Extn – 1B Extn – 2A Position 4 Position 5 Position 6 Extn-3A Extn-3B Extn-4A Extn – 2B Extn – 3A Extn – 3B Extn – 4A Position 7 Position 8 Position 9 Figure 7. 3x3 Video wall set-up To create the below effect using two video sources, program Extn – 3A, 3B, and 4A for channel 2, and a wall size of 1 x 3. Place video from 3A in position 1, 3B in position 2, and 4A in position 3. Main-A Main-B Video source #1 Extn-1A Main – A Position 1 Position 2 Position 3 Extn-1B Extn-2A Extn-2B Position 4 Position 5 Position 6 Extn-3A Extn-3B Extn-4A Main – B Extn – 1A Extn – 1B Extn – 2A Extn – 2B Extn – 3A Video source #2 Extn – 3B Extn – 4A Position 1 Position 2 Position 3 Figure 8. 3x2-1x3 dual video sources Using different setups, you can design very creative layouts. By defining Extn-1A as a 1 x 1, you get the full video in position 3 giving a Picture-in Picture effect. As you can see, you can design a simple video wall, design arches, zigzags, or other unique video wall designs. Different monitor sizes or types and multiple video sources also can produce interesting effects. By selecting a wall size that is larger than the actual video wall, you get a zoom effect. Video wall presentations using UltraVista makes creating these and other video effects simple and easy. 10 UltraVista Installation and Operations Manual Gap compensation When laying out and assembling a video wall, there are usually gaps between the different displays. Usually the horizontal and vertical gap between displays is the same but in some cases, they are different. UltraVista’s design can compensate for these gaps to produce a smooth natural transition from one display to the next. Setting the gap compensation will hide some parts of the input image. If the entire image needs to be displayed, leave the gap width settings at 0. If the display area needs to be made larger simply increase the distance between the displays and compensate the gap settings to produce a natural and distortion-free display. Equal gaps Larger Vertical gap Larger Horizontal gap Setting the gap width To calculate and set the gap width, first determine UltraVista’s video output resolution. To determine this, call up the OSD (Press “EXIT and SELECT” buttons). Select “CONSOLE” from the menu and press “SELECT”. From the Console menu, select “VIDEO OUTPUT” and press “SELECT”. The OSD will display the output resolution as shown below. In this example, the resolution is 1920 x 1200. Figure 9. OSD - Video output Next measure the visible width and height of the actual output image of the display. For example, the image width is 49.5 cm and the image height is 31 cm. Calculate the horizontal pixel density by dividing the horizontal resolution (1920) by the image width (49.5 cm) and the vertical pixel density by dividing the vertical resolution (1200) by the image height (31cm). 1920 1200 Horizontal pixel density = ------- = 38.8 px/cm Vertical pixel density = ------- = 38.7 px/cm 49.5 31 In most cases, the horizontal and vertical pixel density will be equal. This calculation is an approximant value so round the value off and use a pixel density of 39 px/cm. You can fine tune the gap settings if needed. Next measure the gap between the two adjacent images. In this example, the vertical gap is 3.6 cm and the horizontal gap is 4.0 cm. UltraVista Installation and Operations Manual 11 Next determine the number of pixels between the adjacent images by multiplying the gap by the pixel density. Horizontal gap pixels = 4.0 cm X 39 px/cm = 156 px Vertical gap pixels = 3.6 cm X 39 px/cm = 140.4 px Since these values are close approximations, round the numbers off to 156 and 140. To set the gap width, press the “Select” and “Exit” buttons to open the OSD. Use the buttons and select “System” and press the select button. From the “System” menu, select “GAP” and press the select button to display the Gap compensation menu as shown below. Select Horizontal and enter the determined value then select Vertical and enter this value. In this example the values would be 156 and 140. Figure 10. Gap compensation menu An easy way to verify the gap settings is use a picture with a diagonal line and display the line image across two adjacent displays. Use a ruler or other straight object to check if the lines are aligned. If not, adjust the gap to align the two images. Jump between screens (Line should follow the dotted line) No jump between screens (Compensating for the gap, the transition from screen to screen is a straight line) 12 UltraVista Installation and Operations Manual Free Presets Using the Free Preset feature of UltraVista offers the greatest flexibility in designing a unique video wall. Your display can be a mix of any type of display, flat panel, CTRs, LCD TVs, or video projector. The displays can be any screen size, resolution, aspect ratio, digital or analog. The UltraVista control program must be used to define the free presets. To use the free preset feature, set the “SYSTEM, PRESET TYPE” in the OSD menu to “Free”. Figure 11. Preset Type – Free Install the UltraVista Control program supplied on the CD on a windows PC. To install UltraVista Control, just copy the “Control Program” folder from the CD to your hard disk. The Control programs will take up approximately 500k of disk space. UltraVista Control screen To use the UltraVista Control program, connect the Windows PC the control program was installed on to UltraVista using the supplied serial cable. Connect the DB9F end of the serial cable to the PC’s COM port (1, 2, etc). You can design the video wall using the control program without connecting the PC to UltraVista. Once designed, it can be saved and when you connect the PC to UltraVista, the saved design is automatically transferred to UltraVista as soon as the program is connected. Start the UltraVista Control program by executing the Control program, “UltraVistaControl.exe”. Figure 12 shows an example of the UltraVista Control program. Figure 12. UltraVista Control screen UltraVista Installation and Operations Manual 13 Control program toolbar Figure 13 shows the control program’s toolbar. Following is a description of the toolbar items. Figure 13. Control program toolbar Toolbar item (Top) New Create / design a new video wall t Open Save Open an existing design Save the design to the same file name as the one opened Save as Settings Print Print preview Print setup Recent files Saves the design to a user choice file name Selects the COM port to communicate to UltraVista Prints the design layout Previews the print design layout Setup the destination printer Lists the recent file names opened Exit Closes the Control program Undo Redo Cut Copy Undo the last change Redo the last change Remove the selected item and place in the clipboard Copy the selected item and place in the clipboard Edit Paste Edit selected Paste the clipboard item Edit the selected display settings for: X and Y position X and Y size Aspect ratio Input channel Display Resolution View Turn on or off the toolbar or status bar Video Set the aspect ratio for channel 1 or 2, select a background picture for channel 1 or 2 File Communication Debug Help 14 Description Connect or disconnect from UltraVista Displays the activity log Provides help topics UltraVista Installation and Operations Manual Toolbar item (Bottom) Preset 1 Channel 1 Description Select the active preset design to display or create Select input channel Create a new UltraVista command session Open an existing design Save the design to the same file name as opened Cut the selected area and place in the clipboard Copy the selected area and place in the clipboard Paste the clipboard contents Print the design to the default printer Displays UltraVista version level Question mark help, click on the ICON, then click on an area for help on the selection Disconnect the program from UltraVista Connect the program to UltraVista Displays the connection status (not connected, connecting…, or connected) UltraVista Installation and Operations Manual 15 The first item to perform is set up the communication between the controlling PC and UltraVista. Click on “File”, then “Settings” and the below settings window will display. Click on the down arrow and select the COM port the serial cable will be connected to. If you want the program to automatically connect to UltraVista when the program starts, check the box “Connect to UltraVista at startup”. Figure 14. Settings 16 UltraVista Installation and Operations Manual Left-clicking on a screen selects that screen. Right-clicking on a screen opens a context menu which allows you to change the aspect ratio, input channel, and other properties of that screen. The Preset Edit View displays one input channel at a time. You can switch the displayed input channel with the Channel drop down menu. In the Preset Edit View, the displays are shown as rectangles, with the display name in the upper left corner. Display names show the UltraVista unit and board the display is connected to. If you want to use both input channels in the same preset, use the Channel drop down to switch between the views of the two channels. Set the sizes for all displays showing input channel 1 in channel 1, and all displays showing the second channel in channel 2. Preset Edit View The Preset Edit View lets you change the position and size of the section of the input image each screen displays. Use the mouse to drag and resize the sections. Changing position and size this way, you can quickly configure presets to achieve an approximation of the preset you want to create. Preset with two channels UltraVista Installation and Operations Manual 17 Using the Preset Edit View you can change the position and size of the section of the input image that each screen displays. Use the mouse to drag and resize the sections. Using this method, you can quickly configure presets. Right clicking on a screen (in the Display List of the Preset View) will open the below menu. This menu allows you to add or remove screens, open the Edit window, and choose the input channel the display shows. After you have created an approximation of your preset using the Preset Edit View, fine tune each preset as described below. 18 UltraVista Installation and Operations Manual Input channel settings First, configure the settings for the input channels according to your video sources. To change input channel settings, go to “Video Input Channels.” in the main menu. In this menu, you can choose the input aspect ratio, and change the picture that is displayed as a background image. Setting the correct aspect ratio ensures distortion-free display on your video wall.Four aspect ratios are commonly used: Aspect ratio Resolution 4:3 640 x 480 800 x 600 1024 x 768 1280 x 960 1600 x 1200 5:4 1280 x 1024 16:9 1366 x 768 HDTV (1920 x 1080) 16:10 1680 x 1050 1920 x 1200 Common aspect ratios and resolutions UltraVista Installation and Operations Manual 19 Set the input aspect ratio according to the resolution of your video sources. A background image that shows the content to display on the video wall will make creating presets easier by giving you a realistic preview in the Preset Edit View. We recommend you import a frame from your video, or a screenshot of the computer you want to show on the video wall. The background image must be a Bitmap file (with extension “.bmp”). After configuring the input channels, set the values for your displays. Editing display parameters For each output screen connected to the system, there are a number of parameters that control what is displayed on the screen. These settings can have different values from preset to preset. Use the Edit window to control these settings. The item Edit... in the context menu of the displays opens the Edit Window. The below settings can be selected per preset for each display: Position and Size Aspect Ratio Input Channel Output position 20 Position and size of the section of the input image this display shows. These values are in coordinate system units ranging from 0 to 9999. Optional; a fixed aspect ratio which the program will maintain. This prevents distortion of the image by ensuring the section from the input image always has the correct aspect ratio Which input channel to display The output resolution UltraVista Installation and Operations Manual Position in input image Specifies the part of the input image to display on the screen. Obtaining these values involves some calculations, which are described in section position and size. Aspect ratio This setting controls the way the UltraVista Control program allows screens to be resized. If a fixed aspect ratio is chosen, the program always maintains that ratio. For a more detailed discussion of aspect ratios, see POSITION AND SIZE Output video mode This setting controls the output video mode, i.e. resolution and refresh rate of one display. For each display in your setup, you can choose a different video mode. Note: Since a display does not change from preset to preset, setting the output resolution of a display affects that display across all presets. In the Edit window, you can specify the section of the input signal to be displayed by the screen. You can also change the aspect ratio and choose which channel to display. The settings in the boxes labeled “section in input image”, “aspect ratio”, and “input channel” apply to the active preset only (selected in the tool bar). The settings in the “display” box apply to the selected display across all presets. Note We recommend setting the output resolution to your display’s native resolution, and setting the aspect ratio to “as display”. This ensures that the displays will show distortion-free video as you move and resize them. From the context menu, you can also set the channel and aspect ratio for a display, without having to use the Edit window. Setting the correct aspect ratio for a display ensures that the output image will not be distorted on that display. Saving and loading presets Presets are stored on the UltraVista system automatically. When the control program is connected to the UltraVista units, all changes you make to presets will be applied to the UltraVista system as you make them, and the effects will be visible immediately on the video wall. To save your presets on a computer, use the menu items “File . Save” or “File . Save As...”.Saved files have the file name extension “.vmc”. Each save file stores four presets, each with three sub-presets, for a total of twelve presets per save file. By using multiple save files, you can save any number of presets. UltraVista Installation and Operations Manual 21 To load a preset, choose “File . Load...” from the main menu. When the control program is connected to the UltraVista system, the loaded presets will be stored on the UltraVista system immediately after loading. Size and position are specified in relative units. This means that the units do not directly correspond to pixel values, they are relative to the width of the input image. A width of 9999 is exactly as wide as the input image. Because displays are not quadratic, but rectangular, the height of the input image in units depends on the input video mode. Aspect ratio Minimum X value Maximum X value Width Height Minimum Y value Maximum Y value 5:4 0 9,999 9,999 8,000 1,000 8,999 4:3 0 9,999 9,999 7,500 1,250 8,749 16:9 0 9,999 9,999 5,625 2,187 7,811 16:10 0 9,999 9,999 6,250 1,875 8,124 The input image is vertically centered in the coordinate system, which means that the visible portion of the image will begin at a y-value greater than 0. The exact value depends on the aspect ratio. This way, if the input video mode changes, the displays will remain centered on the input image. The advantage of this system is that it is resolution-independent. A preset for a UXGA (1600x1200) input signal will work equally with input signals in XGA (1024x768), SVGA (800x600), or VGA (640x480). Even if the input aspect ratio changes, the same preset will still result in a viewable image, although possibly with black borders at the top and bottom. 22 UltraVista Installation and Operations Manual Note The units are equal in the vertical and horizontal directions, and are relative to the horizontal resolution. For example, if the input signal has a resolution of 1920x1200, then a width of 9999 U will be 1920 pixels (a height of 9999 U will be also be 1920 pixels, resulting in black borders at the top and bottom of the image). The simplest analogy for the units is to think about them as percentage values of the input signal width. 5000 U would be 50% of the input image width, for example, or 7278 U would be 72.78%. Note The values for size and position specify the coordinates of the section from the input image a display shows. This means that reducing the width and height of a rectangle in the Edit View will cause the display to zoom in and show a smaller portion SETTING UP A VIDEO WALL – FREE PRESETS To set up a video wall with a free setup, follow the steps below. When you have decided the video wall layout, that is, the size and location of the displays, connect all components, including input sources, UltraVista units, displays, and the external control PC with the UltraVista Control program. 1. Set input aspect ratio. Find out the aspect ratio of input channels 1 and 2. Refer to section Input channel settings for a table of common resolutions and their aspect ratios. In the UltraVista Control program, go to “Video . Input Channels...” in the main menu. In the window, set the aspect ratios for the input channels. 2. Set output resolution for each display. Find out the native resolution for your displays. Open the Edit window from the context menu for each display, and set the output resolution to the native resolution of your display. 3. Measure physical video wall size. Measure the width and height of your video wall. Measure from the edge of the leftmost display to the edge of the rightmost display, and from the top edge of the topmost display to the bottom of the display at the bottom. When measuring, take care to measure only the visible section of the screens, that is, exclude the frames around the displays at the video wall’s edges. Calculate your video wall’s aspect ratio to help you define the section of the input image you want to display on your video wall. Usually, the ratio will differ from the input aspect ratio. Note: Up to this point, the settings you have obtained apply to the video wall, and are the same for all presets you will create for that particular wall. Steps 4-8 apply to one particular preset. Repeat these steps for each preset you want to set up. 4. Define size of input image section to display This step describes settings to show as much as possible of the input image on a video wall, without black bars at the sides or top and bottom. First, compare the aspect ratio of your video wall to the aspect ratio of the input image. The fastest way to do this is to divide the width by the height for the video wall and for the input image, and compare the results. If the resulting value for the video wall is higher than the input image, the video wall is wider than the input image. In this case, choose the width of the input image section as 9000 units. The input image section is intentionally smaller than the full width of 9999 units, to leave some space for corrections. If the aspect ratio of the video wall is less than that of the input image, the video wall is higher than the input image. In this case, look up the height of the input image in units in the table in section Units . UltraVista Installation and Operations Manual 23 Subtract 10%, to leave space around the edges for fine-tuning. The result is the height of the input image section. Refer to the following table as a quick guide to help you decide the video wall size. ww width of the video wall hw height of the video wall wi width of the input image hi height of the input image Input Image Section ww / hw > wi / hi ? Yes Width = 9000 U No: Input aspect ratio 5:4 Height = 7200 U 4:3 Height = 6750 U 16:9 Height = 5100 U 16:10 Height = 5625 U 5. Calculate units per centimeter Now, calculate how many units your video wall has per centimeter. Doing this depends on whether you have set the height or the width in the previous step. If you set the width in step 4, take the video wall width in centimeters from step 3, and the width of the input image section in units from step 4. If you set the height, simply use the height values instead of the widths. Divide the input image section width by the video wall width. The result is how many units your video wall has per centimeter. WU Wcm D width of the input image section (in units) width of the wall (in cm) Density, units per cm of the preset HU Hcm D height of the input image section (in units) height of the wall (in cm) Density, units per cm of the preset step 3 step 4 result D = Wu / Wcm step 3 step 4 result D = Hu / Hcm 6. Measure size for each display Measure the size of each display. Remember to measure the visible portion of the displays only. Convert the size in centimeters to units by multiplying with the value for units per centimeter from step 5. D Wcm wU hcm hU Density, units per cm of the preset width of the display (in cm) width of the display (in units) height of the display (in cm) height of the display (in units) wu = wcm . D hu = hcm . D Note down the size of each display. step 5 measured result measured result Note If you have more than one display of the same type, you only have to measure the size once, and use the same values for width and height 24 UltraVista Installation and Operations Manual 7. Place displays Next, use the Edit View in the UltraVista Control program to drag the displays in the same arrangement as the displays in your video wall. The best way to do this is with the input video source already connected, so you can verify if the image on the video wall looks correct. Use this step to get a rough impression of the arrangement of the displays, and to preview where the parts of the input image appear on your screen. The screens need not be perfectly aligned in this step – you will compute exact coordinates in the next step. When you are satisfied with the way the content is displayed on the video wall, go to the next step. 8. Measure coordinates for each display To obtain the x coordinate for a display, measure the distance of the left edge of the display from the left edge of the video wall, that is, the left edge of the leftmost display. For the y coordinate, measure from the top of the topmost display. Convert the values measured from centimeters to units by multiplying with the density D in units per centimeter, and adding the x coordinate of the leftmost display (for the x coordinate), or the x coordinate of the topmost display as offset. For each display, enter the values for position and size (from step 6) in the Edit window in the UltraVista Control program. 9. Fine-tune After you have entered all values for all the displays, you may see some misalignment on your video wall. This is due to small errors in measurement, and can be corrected by fine-tuning. To fine-tune, connect a test PC to the UltraVista system as an input source. Create a test image to display on the video wall. The test image should have two kinds of lines. Straight horizontal and vertical lines help you fine-tune the size and alignment of displays. Diagonal lines that cross display boundaries help you fine-tune the distance between displays. Choose one of the displays as a starting point, and use it as a reference to fine-tune the location of the other displays one by one. 10. Save Use the menu item “File . Save” to save your preset. UltraVista Installation and Operations Manual 25 26 UltraVista Installation and Operations Manual UltraVista Installation and Operations Manual 27 Example: 28 UltraVista Installation and Operations Manual Step 1: Set input aspect ratio The output resolution of our PC is 1920x1080, which has an aspect ratio of 16:9. Step 2: Set output resolution for each display Determine the native resolution for each display, and set it in the Edit window. Step 3: Measure physical video wall size Next measure the width and height of our video wall. Measure from the edge of the leftmost display to the edge of the rightmost display, and from the top edge of the topmost display to the bottom of the display at the bottom. Take care to measure only the visible section of the screens, that is, exclude the frames around the displays at the video wall’s edges. UltraVista Installation and Operations Manual 29 Step 4: Define size of input image section to display The visible area of the monitor wall has an aspect ratio of 220 cm : 120 cm, or 16.5 : 9. To compare the aspect ratios of the input image and the video wall, we divide the width by the height. 120 cm / 220 cm = 1.8333 Video wall: Input Image: 16 / 9 = 1.7778 This means the video wall is a little wider than our 16:9 input image. We choose the width of the video wall to be equivalent to 9000 units. Step 5: Calculate units per centimeter Divide the width of the input image section, 9000 U, by the width of the wall, 220 cm, to get the density of our video wall, 9000 U / 220 cm = 40.909 U/cm , 40.909 units per cm. Step 6: Measure size for each display To calculate the sizes for all displays, we need to measure the physical size of the displays in the Taking the center display as an example, we measure the width (76.5 cm) and height (43 cm) of the display. Take care to always measure the active part of the screen, not the frame. The pixel density of the video wall is 40.909 U/cm, so we can transform the physical size into coordinates by multiplying with the density. width: 76.5 cm . 40.909 U/cm = 3129.54 U≈3130 U 30 UltraVista Installation and Operations Manual The display’s native resolution (HDTVp, 1920x1080), so we do not need to calculate the height of the screen. When you enter the output resolution and set the aspect ratio to “as display”, the program will automatically adjust the height of the section according to the width and aspect ratio. Next set the values in the Edit window. Repeat for all displays. UltraVista Installation and Operations Manual 31 Step 7: Place displays Now all displays have the correct size, place the displays by drag and drop in the Edit view until there is an approximation of the image to show on our video wall. Note the x-coordinate of the leftmost display, and the y-coordinate of the topmost display. These coordinates will be the offset values we have to add to our measurements. The offset values are X:253 units and y: 2387 units Step 8: Measure coordinates for each display Next, measure the distance from the topmost and leftmost displays for each display in the video wall. 32 UltraVista Installation and Operations Manual Convert the coordinates by multiplying the values with the density of the video wall, 40.909 U/cm. Add the offsets obtained in the previous step to the coordinates. x-coordinate: 54 cm . 40.909 U/cm + 253 U = 2209.086 U + 253 U≈2462U y-coordinate: 36 cm . 40.909 U/cm + 2387 U = 1472.424 U + 2387 U ≈ 3859 U Enter the coordinates for this display in the Edit window. Repeat for all displays. Step 9: Fine-tune Finally, create a test image, and fine-tune all displays. Example of the test images could look like this: This image is created in a way that ensures at least two horizontal and two vertical lines are on each display. UltraVista Installation and Operations Manual 33 On this image, every edge between two displays has one diagonal line crossing it. 34 UltraVista Installation and Operations Manual Service and support Service Information Maintenance and Repair This Unit does not contain any internal user-serviceable parts. In the event a Unit needs repair or maintenance, you must first obtain a Return Authorization (RA) number from Rose Electronics or an authorized repair center. This Return Authorization number must appear on the outside of the shipping container. See Limited Warranty for more information. When returning a Unit, it should be double-packed in the original container or equivalent, insured and shipped to: Rose Electronics Attn: RA__________ 10707 Stancliff Road Houston, Texas 77099 USA Technical Support If you are experiencing problems, or need assistance in setting up, configuring or operating your QuadraVista, consult the appropriate sections of this manual. If, however, you require additional information or assistance, please contact the Rose Electronics Technical Support Department at: Phone: (281) 933-7673 E-Mail: [email protected] Web: www.rose.com Technical Support hours are from: 8:00 am to 6:00 pm CST (USA), Monday through Friday. Please report any malfunctions in the operation of this Unit or any discrepancies in this manual to the Rose Electronics Technical Support Department. UltraVista Installation and Operations Manual 35 SAFETY Safety The UltraVista has been tested for conformance to safety regulations and requirements, and has been certified for international use. Like all electronic equipment, the UltraVista should be used with care. To protect yourself from possible injury and to minimize the risk of damage to the Unit, read and follow these safety instructions. Follow all instructions and warnings marked on this Unit. Except where explained in this manual, do not attempt to service this Unit yourself. Do not use this Unit near water. Assure that the placement of this Unit is on a stable surface. Provide proper ventilation and air circulation. Keep connection cables clear of obstructions that might cause damage to them. Use only power cords, power adapter and connection cables designed for this Unit. Keep objects that might damage this Unit and liquids that may spill, clear from this Unit. Liquids and foreign objects might come in contact with voltage points that could create a risk of fire or electrical shock. Do not use liquid or aerosol cleaners to clean this Unit. Always unplug this Unit from its electrical outlet before cleaning. Unplug this Unit refer servicing to a qualified service center if any of the following conditions occur: The connection cables are damaged or frayed. The Unit has been exposed to any liquids. The Unit does not operate normally when all operating instructions have been followed. The Unit has been dropped or the case has been damaged. The Unit exhibits a distinct change in performance, indicating a need for service. 36 UltraVista Installation and Operations Manual Appendices Appendix A – OSD Menus Main Menu To open UltraVista’s OSD, press and hold the exit and select buttons for approximately 3 seconds until the OSD opens on the display connected to board A on the main unit. When the OSD displays, the front panel buttons perform the designated functions as shown below. Open OSD Button Symbol 1 2 3 4 F1 F2 Function Navigate down in the menu Navigate up in the menu Select value above Select value below Exit the menu / close OSD Enter a menu / confirm selection + Exit Select Menu Item Description System Initialize Presets Preset type Gap OSD Position OSD Language Test Pattern Sets up and detects all connected units Configures the preset parameters Select Basic or Free Compensate for gaps between displays Position of the OSD window Select German / English / Spanish Select 1 of 7 test patterns for testing and alignment Configuration Factory Reset Resets UltraVista to factory default settings Console Video output EDID Video resolution and frequency Read / display EDID data of monitor Video Video Input Brightness Contrast Horiz position Vert Position Screen width Phase DVI input mode Displays computers’ video input resolution Adjusts brightness for analog input signals Adjusts contrast for analog input signals Horizontal screen position Vertical screen position Sets the screen width for analog input signals Adjusts the phase for analog input signals Computer Change EDID/DDC Program input EDID Help About Contact Displays the revision level of the firmware / hardware Displays contact information for additional information / help UltraVista Installation and Operations Manual 37 System / Initialize The initialization process must be performed prior to configuring any of UltraVista’s parameters. This process detects the number of units in the system and modifies the needed OSD menus to accommodate all units. Open the OSD and navigate to the system menu. Select Initialize and press select. The initialization process will detect and display the total number of units in the system. If the UltraVista Units detected does not match the number of units in the system, verify that all units are connected, cabling is correct and secure, and all units are switched on. Then retry initializing the system by pressing the “SELECT” button. Press the EXIT button to return to the SYSTEM menu. System / Preset The front panel buttons numbered 1, 2, 3, and 4 select which pre-defined preset to activate and display. When you initialize the unit, the “Target” will adjust to show all connected units. If your system has the Main unit and 2 Extension units, the Target field will show main-A, main-B, extn 1-A, extn 1-B, extn 2-A, and extn 2-B. Each target can be configured with up to 12 preset settings. Target Use the PLUS / MINUS buttons to select the targets of the connected units UltraVista main supports the output ports main-A and main-B, UltraVista extn 1 the output ports extn 1-A and extn 1-B, UltraVista extn 2 the output ports extn 2-A and extn 2-B Preset No / Sub preset In front panel you select the Preset Number by pressing the buttons numbered 1, 2, 3, 4 and optional sub preset F1 or F2. Selecting preset you can define up to 12 preset groups. For more than 12 presets, use UltraVista Command program. Channel Choose one of the two video sources connected to the UltraVista input channel 1 and input channel 2 Wall width / Wall height Wall width is the number of horizontal displays, wall height is the vertical number of displays Position Determines the wall position left to right, top to bottom (top left = 1) 38 UltraVista Installation and Operations Manual System / Preset Type Using the arrow keys, navigate to the “SYSTEM / PRESET TYPE” menu. There are two settings to choose from, Basic and Free. The Basic preset type allows you to set-up 12 presets and activate them from the front panel numbered buttons and F1 and F2 buttons. Selecting the Free preset type, you must set-up and control the presets using UltraVista’s command program If you set-up the Basic presets and then switch to the Free preset type, the information entered for the Basic Preset configuration settings are not lost. The program only switches between using the PRESETS settings or the settings in the control program. System / GAP (See the Gap Compensation section and Figure 10) The GAP is the distance between the displays in a video wall. This includes the display frame and the space between two displays. Most video wall layouts have the gap equal between all displays so the gap compensation only needs to be defined one time. To set the GAP compensation for BASIC presets, start the OSD and navigate to the SYSTEM / GAP menu. Enter the horizontal and vertical gap values (in pixels) as calculated in the Gap compensation section. UltraVista Installation and Operations Manual 39 System / OSD Position The OSD position on the display connected to the main-A board can be moved to any position on the screen. To reposition the OSD menu, start the OSD and navigate to SYSTEM / OSD POSITION and press SELECT. The Set OSD POSITION screen will display allowing you to move the OSD using the arrow keys. The OSD POSITION screen is shown below. System / OSD Language The OSD language can be modified to display the information in English, German, or Spanish. To change the OSD language, start the OSD and navigate to SYSTEM / OSD LANGUAGE and press SELECT. The OSD LANGUAGE screen will display allowing you to choose which language is needed. Use the up / down arrow keys to select the desired language. The OSD Language screen is shown below 40 UltraVista Installation and Operations Manual System / Test Pattern The test pattern menu allows you to check the monitor quality (pixel errors, contrast, etc) and the functionality of the UltraVista’s video output. There are 9 test patterns to choose from. To start the Text Pattern OSD and navigate to SYSTEM / TEST PATTEERN and press SELECT. The Test pattern screen will display allowing you to choose which pattern to use. Use the up / down arrow keys to select the desired test pattern. Once selected, that test pattern will display on the monitor connected to the UltraVista main unit. The Test pattern screen is shown below CROSSHAIRS COLOR GRADIENT RHOMBUS RECTANGLE STRIPES (3) RGB CONVERGENCE MANUFACTURER UltraVista Installation and Operations Manual 41 Configuration / Factory Reset The Factory Reset function will reset all parameters to the factory default settings and reboot the UltraVista with the factory default settings. To start the factory reset, open the OSD and navigate to CONFIGURATION / FACTORY RESET and press SELECT. A dialog box will display requesting confirmation of the reset to default request. Press Enter / Select to reset and reboot the unit or press any other key to keep the user settings. The Factory Reset screen is shown below. Factory Default Settings SYSTEM 42 Initialize UltraVista units : Presets Target: Preset No: Sub preset: Channel: wall width: wall height: Position: Preset type Basic Gap Horizontal: 0 Vertical: 0 OSD Position Centered OSD Language English Test Pattern Crosshairs 0 Main-A 1 1 1 1 1 UltraVista Installation and Operations Manual Factory Default Settings (continued) CONSOLE VIDEO OUT Auto VIDEO VIDEO INPUT BRIGHTNESS CONTRAST HORIZ POSITION VERT POSITION SCREEN WIDTH PHASE DVI INPUT MODE DVI / VGA (all channels) 58.2% (all channels) 63.5% (all channels) auto (all channels) auto (all channels) +0 (all channels) +0 (all channels) ? Console / Video Output The “Console / Video Output” menu is used to choose an output resolution that the monitors support. Open the OSD and navigate to CONSOLE / VIDEO OUTPUT and press SELECT. The CONSOLE / VIDEO OUTPUT window will display as shown below. Press the “SELECT” button to enter the VIDEO OUTPUT / MODE section. Use the arrow buttons to select the desired mode from the list shown below and press SELECT to view the new format. A confirmation box will display that will test the newly chosen resolution for 10 seconds. Press the SELECT button within 10 seconds to accept the setting or press any other key to abort the selection and keep the original settings. Mode Horoz auto VGA 640 VGA 640 VGA 640 SVGA 800 SVGA 800 SVGA 800 XGA 1024 XGA 1024 XGA 1024 XGA 1024 SXGA 1280 SXGA 1280 SXGA 1280 SXGA+ 1400 UXGA 1600 UXGA 1600 Continued Vert x x x x x x x x x x x x x x x x 480 480 480 600 600 600 768 768 768 768 1024 1024 1024 1050 1200 1200 Hz 60 75 85 60 75 85 60 70 75 85 50 60 75 60 50 60 Mode UXGAr UXGAr XGA/B UWXGA UWXGA SUN WXGA WXGA WSXGA WUXGA WUXGA WUXGA HDTVp HDTVp HDTVp HDTVp HDTVp Horoz 1600 1600 1152 1280 1280 1152 1250 1366 1680 1920 1920 1920 1280 1280 1920 1920 1920 x x x x x x x x x x x x x x x x x Vert 1200 1200 864 960 960 900 768 768 1050 1200 1200 1200 720 720 1080 1080 1080 UltraVista Installation and Operations Manual Hz 50 60 75 60 85 66 60 60 60 40 50 60 50 60 24 50 60 43 After you have made a new selection and before exiting the Video Output menu, the new setting must be replicated to all monitors. Choose “Apply to all boards” and press the SELECT button. If you select the output mode of “auto”, UltraVista will use the optimum output resolution offered by the EDID. Verify that the connected monitor provides EDID data via the monitors DDC interface. If the monitor does not supply this information, UltraVista will set the video mode to the default setting of “VGA, 640 x 480 @ 60Hz” and activate Sync on Green. To verify if the monitor can supply EDID data to the UltraVista, open the OSD and navigate to “CONSOLE” and select “EDID”. The window to the right will display. Click on “Details” and the EDID details window will display. If the monitor does not supply EDID data, this window will not contain any data. If this is the case, UltraVista will set the video mode to the default setting of: “VGA, 640 x 480 @ 60Hz” and activate Sync on Green. 44 UltraVista Installation and Operations Manual Video / Video Input The input resolution at the video inputs is automatic. UltraVista will detect the input video and display the modes in the Video/Video input window. The upper section of the VIDEO INPUT window shows the resolutions detected at both video inputs. Navigate to “Select Input Signal:” and select which video input signal (DVI or VGA) will be displayed. If the selection is both DVI and VGA, UltraVista will first check the first input signal (DVI or VGA). If there is no signal detected at this input, the second signal input will be checked. s = signal a = analog d = digital g = sync on green c = composite The below table lists all the video formats that UltraVista supports at the input ports. Display Resolution Sync- Frame Rate Mode (Pixel) Polarity analog digital HxV H/V Hz Hz Display Mode Resolution (Pixel) HxV CGA CGA EGA EGA VGA VGA VGA VGA SVGA SVGA SVGA SVGA SVGA XGA XGA XGA XGA XGA/B SUN HDTVp HDTVp WXGA UWXGA UWXGA SXGA SXGA SXGA SXGA SXGA WXGAp SGI UXGA UXGA UXGAr UXGAr HDTVp HDTVp HDTVp WUXGA WUXGA 1280 x 768 1280 x 960 1280 x 960 1280 x 1024 1280 x 1024 1280 x 1024 1280 x 1024 1280 x 1024 1366 x 768 1600 x 1024 1600 x 1200 1600 x 1200 1600 x 1200 1600 x 1200 1920 x 1080 1920 x 1080 1920 x 1080 1920 x 1200 1920 x 1200 640 x 350 640 x 400 720 x 400 720 x 400 640 x 480 640 x 480 640 x 480 640 x 480 800 x 600 800 x 600 800 x 600 800 x 600 800 x 600 1024 x 768 1024 x 768 1024 x 768 1024 x 768 1152 x 864 1152 x 900 1280 x 720 1280 x 720 +/-/+ +/+ -/+ -/-/-/-/+/+ +/+ +/+ +/+ +/+ -/-/+/+ +/+ +/+ +/+ +/+ +/+ 85 85 70 85 60 72 75 85 56 60 72 75 85 60 70 75 85 75 66 ----- 85 85 70 85 22 - 60 72 75 85 22 - 56 60 72 75 85 - 180 22 - 60 70 75 85 75 66 22 - 50 60 Sync- Frame Rate Polarity analog digital H/V Hz Hz -/+ +/+ +/+ g +/+ g +/+ +/+ +/+ +/+ +/+ +/+ +/+ +/+ +/+ +/+ +/+ +/+ +/+ 60 60 85 50 60 72 75 85 --60 50 60 50 60 ----------- 60 60 85 50 60 72 75 85 22 - 60 60 50 60 50 60 22 - 24 50 60 22 - 50 60 Table 1. Supported Video Modes UltraVista Installation and Operations Manual 45 Video / Brightness The Video Brightness feature is used to adjust the brightness of an analog video input signal. Open the OSD and navigate to the Video menu. Select Brightness and press the SELECT button. The Video / Brightness window will display. Select Computer x and use the + or – buttons to adjust the brightness. Video / Contrast The Video Contrast feature is used to adjust the contrast of an analog video input signal. Open the OSD and navigate to the Video menu. Select Contrast and press the SELECT button. The Video / Contrast window will display. Select Computer x and use the + or – buttons to adjust the brightness. 46 UltraVista Installation and Operations Manual Video / Horiz Position The Video Horizontal position feature is used if the horizontal position of the computer screen is incorrect. Open the OSD and navigate to the Video menu. Select HORIZ POSITION and press the SELECT button. The Video / HORIZ POSITION window will display. Select Computer x and use the + or – buttons to adjust the horizontal position between -20 and +20. Video / Vert Position The Video Vertical position feature is used if the vertical position of the computer screen is incorrect. Open the OSD and navigate to the Video menu. Select VERT POSITION and press the SELECT button. The Video / VERT POSITION window will display. Select Computer x and use the + or – buttons to adjust the horizontal position between -40 and +40. UltraVista Installation and Operations Manual 47 Video / Screen width The Video screen width feature is used to adjust the width of the displayed video. Normally this setting is defined by the VESA standard. if the screen appears blurred, change this setting to improve the screen quality. Select SCREEN WIDTH and press the SELECT button. The Video / Screen width window will display. Select Computer x and use the + or – buttons to adjust the screen width. Video / Phase If blurring, bad contrast, or poor legibility is observed, the clock phase may need adjusting. Use this setting to adjust the clock phase for the best image. Select PHASE and press the SELECT button. The Video / Phase window will display. Select Computer x and use the + or – buttons to adjust the clock phase for the selected computer. 48 UltraVista Installation and Operations Manual Video / DVI Input mode Select DVI Input mode and press the SELECT button. The Video / DVI Input Mode window will display. Select Computer x and use the + or – buttons to change between mode A, B, or C for the selected computer. Press the arrow key to highlight “Target:”. Press the up/down arrow keys to cycle through main A, main B, extn 1-A, etc. Computer / Change EDID / DDC You can add two freely selectable video modes to the list of video modes available. Select “COMPUTER”, then “CHANGE EDI/DDC” to display the COMPUTER / CHANGE EDID/DDC window. Select the first video mode and modify it to the additional video mode. Next select the second video mode and modify it. Navigate to “Signal:” and select the video type (digital or analog). Normally you can leave the setting “digital”. When all information is correct, use the up/down arrow buttons and select “WRITE” and press the SELECT button. UltraVista Installation and Operations Manual 49 When you select “WRITE” the system is ready to read and save the added EDID/DDC information. Disconnect the monitor from the video output connector and the video input connector. Connect a DVI cable from the video output connector to the video input connector. When the cable is in place, press the “ENTER / SELECT” button twice. This will program the unit with the additional EDID data. This procedure is performed blindly since the output monitor has been disconnected. Wait a few seconds, and then remove the DVI cable from the video output and video input connectors. Reconnect the video input cable from the video source and the video output monitor cable. The video monitor should display the “CHANGE EDID/DDC/EDID” window with successful displayed and shown below. If “successful” is displayed, the selected video input has been successfully programmed. Repeat this procedure for the other video input in needed. The configuration program “CONFDEV” can also be used to program the EDID information. This program runs externally on a connected “Windows” computer connected to UltraVista. This method allows you to monitor the programming on the monitor. 50 UltraVista Installation and Operations Manual Appendix B – Specifications Dimensions 17.2W x 9.21D x 1.75H (in) 436W x 234D x 44H (mm) Weight 7.1lbs / 3.2kg Resolution VGA – 1600 x 1200 @ 60Hz DVI – 1920 x 1200 @ 60 Hz HDTV –1920 x 1080p @ 60 Hz Connectors Power – IEC320 Video in – DVI-I (analog and digital) Video out – DVI-I (analog and digital) Power 100 – 240 VAC, auto-switching 50/60 Hz, 40 Watts Resolution Up to 1900 x 1200 @ 60 Hz (DVI 1600 x 1200 @ 60 Hz (VGA) Controls Power on/off switch Preset selector switches (4) Temperature operating 5°C – 45°C / 41°F – 113°F storage -10°C – 60°C / 14°F – 140°F Humidity Approvals 0% –80% RH non-condensing CE, RoHS compliant UltraVista Installation and Operations Manual 51 〒103-0014 東京都中央区日本橋蛎殻町 1-16-11 TEL:03-3668-8089 FAX:03-3668-9872 URL:http://www.cybernetech.co.jp