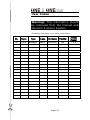
1
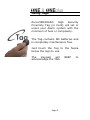
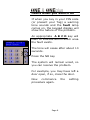
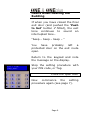
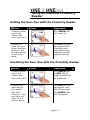
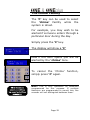
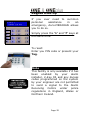
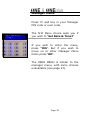
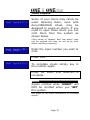
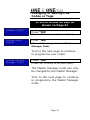
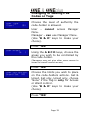
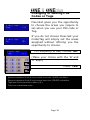
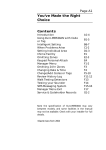
User
Manual
For use with end station 28, MSX 44
MSX 76, MSX 280 software:
Version 6.00 or above
RINS1020-6
You’ve Made the Right Choice
Contents
Introduction
Using Euro-MERiDIAN with Code or
Tag
Intelligent Setting
When Problems Arise
Setting Individual Areas
Chime Facility
Omitting Zones
Keypad Hold Up/Personal Attack
Manager Menu
Omitting 24 hr Zones
Changing Date & Time
Change/Add Codes or Tags
Review History Log
SMS Phonebook
Walk Testing Detectors
Testing your Sounder
SMS Messaging System
Dial Out Menu
Allow Engineer Menu
Block Remote Set
Perform Anti-Code Reset
Service & Codeholder Records
SMS Disclaimer
1-5
6-10
12-13
15-17
18-21
22
23-24
25
27-28
30
29
31-35
36
38
39
40
41-42
43
44
45
46
50-51
52
Note the specification of Euro-MERiDIAN ONE
and ONE plus panels may vary between
models, and some facilities in the manual may
not be available. Check with your installer for
full details. This equipment may be used in
systems installed to a lower grade, which will
be agreed with your installation company.
There are no user serviceable parts contained
in this product.
© Castle Care-Tech 2008 (RINS1020) Issue 4
Page 1
You’ve Made the Right Choice
Using your Euro-MERiDIAN Alarm System
just couldn’t be easier!
This is the Keypad from where you
control your Alarm System*
Note:
For your security, the keypad becomes
disabled for 90 seconds after 30 incorrect
key-presses, or after 6 attempts to present
invalid tags. It will subsequently be
disabled again after 7 further incorrect
key-presses or after another invalid tag is
presented. Once a correct code or tag has
been registered, the keypad is returned to
normal operation.
*Please note that Keypad design may differ from that shown.
Page 2
The Euro Keypad
MAINS FAIL
The
display
gives
you
any
important messages. It will alert
you if you need to call your alarm
installation engineer.
The 10 digit numeric keypad is
where you use your PIN code.
Euro 1
Time: 15:02
The A B C D keys help simplify use,
and will illuminate to highlight your
choice of security cover, or flash if
there is a problem.
This is where you present your
Tag.
Page 3
Warning Indications
All setting points (Keypads or Tag
Readers) have lamps to clearly
indicate what is happening.
Alert
Alarm
Tamper
Fault
Unset
The ‘Alert’ lamp will flash if there is
information available to you. Enter your
code to see the information. After a code
has been entered, one of the following
lamps will light: Alarm, tamper or fault.
The relevant detail of the problem will be
shown on the display. To clear the display,
press the ‘Yes’ key (or the display will
clear automatically after 3 minutes.)
The ‘Alarm’ lamp will flash after code
entry if an alarm occurs.
The ‘Tamper’ lamp will flash after code
entry if the wiring or equipment is
tampered with.
The ‘Fault’ lamp will light after code entry
to indicate if a technical fault occurs.
The ‘Unset’ lamp will light for 5 seconds if
the panel is completely Unset (steady) or if
some areas remain Set (flashing). It will
also light during the setting procedure,
going off once set.
Page 4
Using Tags
Euro-MERiDIAN’s
High
Security
Proximity Tag (or Card) will set or
unset your Alarm system with the
minimum of fuss or complexity.
The Tag contains NO batteries and
is completely maintenance free.
Just touch the Tag to the fascia
below the logo to use.
The
Keypad
will
acknowledge the TAG.
Page 5
BEEP
to
Security Checks
Before you set your system:
You must ensure all doors and
windows are securely closed and
any pets or people are excluded
from areas protected by movement
sensors.
Close Windows
Close Doors
Exclude Pets & People
Page 6
Leaving the Building
Euro 1
Time: 15:02
If you are leaving the building, go
to Keypad and key in your PIN
code, or present your Tag.
Exit tone Starts
The appropriate area (ABCD) keys
will illuminate.
(If flexi-set is enabled you will be able to
choose which areas you set, see page 19)
Leave by agreed Exit Route
SETTING [009]
OFFICE
If your exit is timed,
you will see the above
screen.
If you use a Push-toSet button, or finaldoor-set, you will see
the screen below.
Close and Lock the Final Exit
Door
Finally, press the ‘Push to Set’
button (if fitted) that is mounted
externally by the final exit door.
Exit tone will cease
Leave via
Exit Route
Euro-MERiDIAN is now SET
Page 7
Faults when you Switch On
If when you key in your PIN code
(or present your Tag) a warning
tone sounds and the fault lamp
comes on, the keypad display will
show the nature of the problem.
UNABLE TO SET
BACK DOOR
An appropriate A B C D key will
flash to indicate within which area
the fault exists.
The tone will cease after about 10
seconds.
Press the NO key
The system will remain unset, so
you can resolve the problem.
For example, you may have left a
door open, if so, close the door.
Now
commence
procedure again.
Page 8
the
setting
Faults when Leaving the
Building
If when you have closed the final
exit door (and pushed the ‘Push
to Set’ button if fitted), the exit
tone continues to sound an
interrupted tone…
“beep – beep – beep – “
You
have
probably
left
a
protected door on the exit route
open.
Return to the keypad and note
the message on the display.
EXIT VIA
HALLWAY
Stop the setting procedure with
your PIN code, or Tag.
Close the open door
Now
commence
the
setting
procedure again (see page 7).
Page 9
Entering the Building
To enter the building you must
use the agreed entry route and
go straight to the keypad.
ENTRY
TIME
[020]
Entry tone will be sounding
“beep – beep – beep –“
ENTRY
[010]
TIME
**
Key in your PIN code, or present
your Tag.
Entry tone will cease
To indicate that the system has
unset, the unset lamp will
illuminate for five seconds.
Euro-MERiDIAN is now UNSET
Page 10
Using an External Proximity
Reader
Setting the Euro One with the Proximity Reader
Action
Visual
Sequence
Present a valid
tag to the
reader and
then remove it.
The GREEN LED
will come on
Present the
same tag to the
reader, and then
remove it. The
exit time will start
on the control
panel.
The RED LED may
be programmed to
illuminate under
certain actions (for
example when the
system is armed)
Unsetting the Euro One with the Proximity Reader
Action
Visual
Sequence
Present a valid
tag to the
reader and
then remove it.
The GREEN LED
or RED LED (if
programmed) will
be displayed
Present the
same tag to
the reader,
and then
remove it. The
exit time will
start on the
control panel.
The RED LED will
extinguish, and
after 25 seconds
the GREEN LED
will extinguish.
Page 11
Part Setting the System
Intelligent Set (if programmed)
If you wish to set Euro-MERiDIAN
and stay in the building (eg set
the alarm at night), the EuroMERiDIAN’s intelligent operating
system will realise which level of
security you require and will set
only part of the system.
You will NOT need to press a
Push-to-Set button if you set
only part of a system.
If intelligent set is not installed on
your system, you may part set
the system as described on Pages
18-19.
Page 12
Using an External Proximity
Reader
Intelligent Set
To Part Set Euro-MERiDIAN go to
the keypad and enter your PIN
code or present your Tag.
The appropriate A B C D keys will
illuminate
Exit tone will start
Leave the protected area and
retire to the un-protected area
(eg upstairs).
Euro-MERiDIAN will detect you
have gone upstairs and set the
appropriate areas accordingly.
After a preset time the exit tone
will cease.
Euro-MERiDIAN is now Part
Set
Page 13
Using an External Proximity
Reader
When
Problems
Arise, Just
Key in your
PIN Code or
present your
Page 14
Silencing Alarms
If an Alarm tone sounds, the Alert
lamp will flash:
Just key in your PIN code or
Present your Tag.
The Alarm will stop sounding
Alarm Silenced
Low Volts
The display
problem.
will
indicate
the
Press the ‘YES’ Key
Call Engineer
Low Volts
Euro-MERiDIAN will advise you on
any action that is needed. If the
‘Alert’ LED indication remains lit,
there is additional information
available. Enter your PIN or
present your Tag to view.
Page 15
Engineer Reset
Quote G19867
Anti-Code Needed
When an alarm has been cancelled and
the Police have been notified by the
Alarm Receiving Centre, you will see the
following screen when you try to use the
system.
It is usually necessary for an engineer
from your installation company to check
the installation and reset the system for
further use. But if you have caused
the alarm in error your Alarm
Receiving Centre or Alarm Installation
Company may permit you to reset the
system without an engineer present.
Quote G19867
Anti-Code Needed
Euro 1
Time:15:15
Enter your Code
[*
]
Engineer Restore
Performed
You will be required to quote a 6-digit
code by telephone (advise them that the
system is a Castle Euro-MERiDIAN). You
will then be given a special code which
will reset the system for that one
occasion only.
Press ‘NO’
Enter the anti-code given to you by your
installation company.
You alarm in now restored and ready to
use.
This 6-digit code is also displayed in the
‘user menu’ – see page 46.
Page 16
Automatic Inhibit
Euro-MERiDIAN is designed to
automatically
disable
certain
functionality. The factory default
settings are as shown below:
Intruder
Alarm
Signal
Tamper
Alarm
Signal
Keypad
After 3* unconfirmed alarms
in the same area or 1
confirmed alarm.
After 3* unconfirmed alarms
in the same area or 1
confirmed alarm.
After 30 keypresses without
entering a valid code, keys are
disabled for 90 seconds. After
reinstatement, this will be
repeated after each 7
keypresses until a valid code is
entered.
Tag Reader After 6 presentations of an
(or Tag at a invalid tag, the reader will be
keypad)
disabled for 90 seconds. After
reinstatement, this will be
repeated for each invalid tag
until a valid tag is used.
*This figure is programmable by the installing company
Page 17
The A B C D Keys
Euro 1
Time:15:20
Sometimes your security needs
will be a little more complex and
you will need to use the A B C D
keys.
Your Installer can also give
names to all four of the A B C D
areas, so that you can easily
identify them.
Euro 1
Time:15:21
SETTING
ALL AREAS
For example:
A=Reception
B=Warehouse
C=Office
D=Storeroom
or
All Set
Bedtime Set
Cat in Lounge
Dog in Study
In addition, names can be given to
the whole system
‘ALL AREAS’
These will be displayed when
setting the system.
Page 18
Codes with Flexi-Set
SET AREAS
[ABCD]
For greater flexibility in setting
parts of your system, you can
make a choice at the keypad.
Key in your PIN code or present
your Tag.
If you do not wish to set all the
areas assigned to your code/Tag,
simply select the areas you wish to
Set by pressing the relevant
A B C D key(s).
To change your mind, press the
relevant A B C D key(s) again.
Press the Yes key to accept
SETTING
ALL AREAS
Setting areas will now be displayed,
with the corresponding area keys
being lit.
Euro-MERiDIAN will now Set
the selected areas.
Page 19
Flexi-UnSet
Euro 1
Time:15:25
When Euro-MERiDIAN is already set
and you wish to unset:
Key in your PIN code or present
your Tag.
If entry timer has started:
All areas for which the Tag or PIN is valid
will be Unset. Any areas set for which the
code is not valid will remain set, eg if A
and B are set:
If an ‘A’ Tag is presented, only area A will
be unset.
If an ‘A B’ Tag is presented, both A & B
will be unset.
An ‘A B C’ Tag will unset A & B, leaving C
unset.
If entry timer is not running:
You will be asked if you wish to set any
areas currently not set. Press ‘YES’ to do
so, or press ‘NO’ to unset the system.
If there are NO areas set for which the
code is valid, the system will SET as
described on page 19.
Note: Your alarm installing company may have
programmed keypads to set and unset certain
areas only.
Page 20
Flexi-UnSet
If your codes have been set up with
Flexi-Unset
enabled,
you
will
always have a choice of what areas
you would like to set or unset,
regardless of whether the entry
timer is running or not – providing
you have a code valid for the
relevant areas.
This function can only be enabled
by your alarm installing company,
and will not be permitted if your
system is designed to comply with
clause 6.4.5 of DD243:2004.
Page 21
The Chime Facility
The ‘C’ key can be used to select
the ‘chime’ facility while the
system is Unset.
For example, you may wish to be
alerted if someone enters through a
particular door during the day.
Simply press the ‘C’ key.
Euro 1
Time: 15:31
Euro 1
Time: 15:32
The display will show a ‘C’
c
Now if the door opens you will be
alerted by the ‘chime’ tone.
To cancel the ‘Chime’
simply press ‘C’ again.
function,
Note: This is only operative on detectors
programmed for this purpose. If multiple
detectors are programmed to permit this, the
sounder will not distinguish between them.
Page 22
Deliberately omitting an
Input when leaving the
Building
In a domestic setting you may wish to
ignore a window you have deliberately
left open in the summer time. There
may be another fault on the system
which you want to ignore when you set
the system.
Enter your PIN code or present your
Tag.
The display will ask if you wish to set
with the fault.
Set with Fault?
Bedroom Window
To omit the fault, Press ‘YES’ (or ‘NO’ if
you don’t!)
The system will then set as normal.
The fault will be omitted for this one
arming period only.
NOTE iiiiiiiiiiiiiiiiiiiiiiiiiiiiiiiiiiiiiiiiiiiiiii iiii
Only doors or windows already open
can be omitted in this way.
The system may be programmed to be
able to set with certain types of fault
(eg mains fail) but not others (eg
telephone line fault).
Page 23
Deliberately omitting an
Input when leaving the
Building
OMIT INPUT?
At some time you may wish to
isolate a detector if a room is
occupied.
Enter your PIN code or Tag.
While the exit tone is sounding
press the ‘YES’ key.
When the ‘OMIT INPUT’ menu is
displayed:
Key in the number of the zone you
wish to omit and press ‘YES’.
(Always use a leading zero, eg 02 is input
2. On larger systems 002 is input 2)
If it has been accepted it will be
displayed on the screen.
Repeat for any other zones that
need to be omitted.
After 10 seconds EuroMERiDIAN will begin to set
These zones will be omitted
for this one period only.
Page 24
Keypad Hold-Up
Euro 1
Time:15:40
If you ever need to summon
personal
assistance
in
an
emergency, Euro-MERiDIAN allows
you to do so.
Simply press the ‘1’ and ‘7’ keys at
the same time.
To reset:
Enter you PIN code or present your
Tag.
Note ghgfiiiiiiiiiiiiiiiiiiiiiiiiiiiiiii
This facility is only available if it has
been enabled by your alarm
installer. 2-Key PA and any duress
codes programmed on the system
by your engineer are not permitted
to send a signal to the Alarm
Receiving Centre under police
regulations in England, Wales or
Northern Ireland.
Page 25
Manager Menu
To enter Manager Menu, press ‘D’
and then key in your code or
present your Tag. The screen will
display any relevant information;
simply press ‘No’ to move into
Manager Menu.
We recommend that your system is
fully disarmed to use Manager
Menu functions.
Page 26
Manager Menu
Euro 1
Time: 15:45
The manager menu is accessed by
pressing ‘D’ and then keying in your
Manager PIN code.
You then have a choice of:
SIREN TEST?
Set Date & Time? (see page 29)
Omit Inputs? (see page 30)
Change Code(s)? * (see page 31)
Review Logs? * (see page 36)
Phone Book? (see page 38)
Walk Test? * (see page 39)
Siren Test? * (see page 40)
Test CHC Communications? (see page 41)
Dial Out Menu? * (see page 42)
Allow Engineer Menu? * (see page 44)
Block Remote Set? (see page 45)
Block UDL? (see page 46)
Enter Anti-Code?* (see page 47)
Exit Manager Menu? (see page 49)
* These features can also be accessed with a
standard user code.
Pressing the ‘NO’ key will take you
from one Menu to the next (as well as
‘Escaping’ from within a menu).
Pressing the ‘YES’ key will take you
into a menu (as well as ‘Accepting’ a
choice within a menu).
Page 27
Manager Menu
Press ‘D’ and key in your Manager
PIN code or user code.
SET DATE &
TIME?
The first Menu choice asks you if
you wish to ‘Set Date & Time?’
If you wish to enter the menu,
press ‘YES’. But if you wish to
move on to other Manager Menu
items press ‘NO’.
The USER MENU is similar to the
manager menu, with some choices
unavailable (see page 27).
Page 28
Set Date and Time
SET DATE & TIME?
Press ‘NO’ to move to next menu.
Press ‘YES’
(Press ‘NO’ to move to the next menu)
YEAR
MONTH
(00-99)
[06]
(1-12)
[08]
Enter Year (eg 06=2006)
Press ‘YES’
Enter Month
Press ‘YES’
DAY
(1-31)
[12]
Enter Day
Press ‘YES’
HOURS
(00-23)
[13]
Enter Hours (24 hour clock)
Press ‘YES’
MINUTES
(0-59)
[45]
Enter Minutes
Press ‘YES’
To go to the next menu, press ‘NO’
again.
Press ‘YES’
(Press ‘NO’ to move to the next Menu)
Page 29
Omit Inputs
Omit Inputs[--]
Some of your doors may rarely be
used. Opening them, even with
Euro-MERiDIAN Unset, may be
designed to cause an alarm. If you
need to open these doors you can
omit them from the system as
shown below.
(Only zones of ‘tamper’ and ‘day alarm’ type
can be omitted this way, as set up by your
alarm installing company).
Omit Inputs[06]
FIRE DOORS
Enter the input number you wish to
omit.
Press ‘YES’
Omit Inputs[--]
To reinstate inputs simply key in
the number again.
Press ‘No’ when your selection is
complete
Noteiiiiiiiiiiiiiiiiiiiiiiiiiiiiiiiiiiiiiiii
Inputs omitted while ‘UNSET’ will
NOT be omitted when you ‘SET’
the system.
See page 24 for more information on omitting
inputs.
Page 30
Changing or Adding PIN
Codes or Tags
A record should be kept as
shown on Page 51
CHANGE CODES?
Press ‘YES’
(Press ‘NO’ to move to the next Menu)
Change User
Codes?
Press ‘YES’
(Press ‘NO’ to programme the Master
Manager Code)
Turn to the next page to continue
to programme user codes.
Change Master
Manager Code?
Press ‘YES’
(Press ‘NO’ to move to the next menu)
The Master Manager Code can only
be changed by the Master Manager.
Turn to the next page to continue
to programme the Master Manager
Code.
Page 31
Changing or Adding PIN
Codes or Tags
USER NUMBER
[02]
Euro-MERiDIAN identifies each user
by a different ‘User Number’. Eg
‘John’ would be user 01 – ‘Jane’
would be user 02 etc.
Now key in the ‘User Number’
whose PIN code/Tag you wish to
add or change.
Press ‘YES’
ENTER USER CODE
[****]
Key in the new 4,5 or 6 digit PIN
code you require or present the
new Tag.
To delete a code or Tag press ‘C’.
Press ‘YES’
Note: ‘EN Grade 3’
alarm systems will only
accept 5 or 6 digit
codes, or tags
Euro-MERiDIAN will not allow you
to programme in codes that are
already in use by the system.
Standard users can only edit their
own code.
Managers can only programme new
users with access to the same
areas as he/she has access.
Page 32
Changing or Adding PIN
Codes or Tags
User Type
(User)
[0]
Choose the level of authority the
code-holder is allowed.
User – cannot access Manager
Menu.
Manager – can use Manager Menu.
(Use ‘B & D’ keys to make your
choice).
Press ‘YES’
User Areas
[A
]
Using the A B C D keys, choose the
areas you wish to be controlled by
the code-holder.
(Managers may not give other users access to
areas he himself cannot access)
Press ‘YES’
User Set Option
Unset/Set [0]
Choose the limits you wish to place
on the code-holders actions. Set &
Unset, Set only, Unset only, choose
‘None’ if the Tag is only for Access
or Ward control.
(Use ‘B & D’ keys to make your
choice)
Press ‘YES’
Page 33
Changing or Adding PIN
Codes or Tags
Flexi Set
Yes
Flexi Set
No
[1]
[0]
Flexi Set
Yes
[1]
Flexi-Set gives you the opportunity
to choose the areas you require to
set when you use your PIN code or
Tag.
If you do not choose Flexi-Set your
Code/Tag will simply set the areas
assigned without offering you the
opportunity to choose.
For simplicity of use, choose ‘NO’
(Make your choice with the ‘B’ and
‘D’ keys)
Press ‘YES’
Systems installed to Grade 2 requirements must have 10,000 code differs.
Systems installed to Grade 3 requirements have must 100,000 code differs.
Tags have 2.8 thousand billion differs (16 ).
There are no disallowed codes.
12
Page 34
Changing or Adding PIN
Codes or Tags
Using the numeric keys, you can
enter a user name, similar to typing
a text message on a mobile phone.
Use ‘0’ key for space.
The A B C D keys on the keypad
are used as follows:
‘A’ – capital letters
‘B’ – moves cursor left
‘C’ – Clears Character, creates a
space
‘D’ – Cursor moves right
eg to write ‘Ben’ simply press the
‘2’ key twice
‘A’ key for capital
‘D’ move cursor right
‘3’ key twice
‘D’ move cursor right
‘6’ key twice
Press ‘Yes’
When you have finished and wish
to go to the next menu, press ‘NO’.
Page 35
Review History Log
REVIEW LOG?
Press ‘YES’
(Press ‘NO’ to move to the next menu)
Panel Log?
Press ‘YES’
To advance through the logs:
Date & Time
<EVENT>
Press ‘D’
For added information:
<Area Involved>
<User Involved>
Press ‘C’
To move
events:
backward
to
previous
Press ‘B’
To stop review:
Press ‘NO’
To move to the next menu, press
‘NO’ again.
Page 36
Review History Log
If Access Control Facility is in use, a
separate log is available dedicated
to events using this function.
Follow the same procedure as
described on page 36, but press
‘NO’ to choose between ‘PANEL
LOG’ and ‘ACCESS LOG’.
Access Control is available if your
panel is fitted with an MSX-44,
MSX-76 or MSX-280 card.
Page 37
SMS Phone Book
Press ‘YES’
PHONEBOOK?
(Press ‘NO’ to move to the next Menu)
SMS Numbers
[1]
Use the ‘D’ key to scroll to which
SMS telephone number you wish to
change (1-4).
Press ‘YES’
Mobile No. 07
951_
Using the numeric keys, type in the
new telephone number (do not
leave any spaces). You can move
the cursor back with the ‘B’ key and
forward with the ‘D’ key. Use the
‘C’ key to delete a character.
Press ‘YES’
SMS Numbers
[1]
Select the next mobile telephone
number you wish to change, or
Press ‘NO’ to move to the next
menu.
Page 38
Walk Test
WALK TEST?
Press ‘YES’
(Press ‘NO’ to move to the next Menu)
Choose the area(s) you wish to test
by pressing the appropriate ABCD
keys.
Walk Test Zone
Front Door
Press ‘YES’
All detectors waiting to be tested
will scroll in the display.
Walk around the building
trigger all of the detectors.
and
The system will ‘chime’ each time
a detector responds.
Walk Test
Completed
WALK TEST?
When all detectors have been
activated and are working, the
display will show ‘Walk Test
Completed’.
To move to the next menu, press
‘No’.
Page 39
Testing your Sounders
WALK TEST?
Press ‘YES’
(Press ‘NO’ to move to the next Menu)
Testing Siren
Press ‘YES’
Siren will sound, Strobe will flash
SIREN TEST?
Press ‘NO’ to move to next menu.
Page 40
Test CHC Communications
Your system may have been configured to
send messages to a mobile telephone.
If so, the system will call the appropriate
messaging bureau and forward the message
to your mobile telephone whenever an even
occurs that is important to you.
Message calls are charged at the normal
network rate current at the time of the call.
The fee for routine checking is collected
automatically via a premium rate number
when the Euro-MERiDIAN makes its regular
authorisation and routing call to the
messaging computer.
Should this call fail, the display will show
‘CHC Test Fail’ until the next time that the call
is made successfully (see next page for
making test calls to the CHC). This acts as a
reminder that SMS Message signalling may
not be operational, but will not interfere with
this, or any other aspect of the alarm system.
If you wish to change the information sent to
your mobile telephone, or the mobile
telephone number, please contact your alarm
system installation company.
Page 41
Test CHC Communications
It is recommended that this test is
only
undertaken
under
the
supervision
of
your
alarm
installation engineer.
TEST CHC
COMMUNICATIONS?
Press ‘NO’ to move to the next menu
Press Y if using
PABX or N if not
If your alarm panel is connected to
an internal telephone network
(PABX system) which requires a ‘9’
for an outside line, press ‘YES’,
otherwise press ‘NO’.
(Press ‘YES’ to make the test (under the
direction of an alarm engineer), the test
call will be via a premium rate number)
Testing to CHC.
Please Wait
Test sent to CHC
Test Complete
Once test is complete, press ‘YES’.
Please note that all CHC calls are
50p per call.
Page 42
Dial Out Menu
DIAL OUT MENU?
Your
alarm
system
may
be
configured so that you can control
the system via a PC. If you wish to
continue…
Press ‘YES’
(Press ‘NO’ to move to the next menu)
Select PC to
dial
[1]
Select Operation
Data to PC
[4]
Select Operation
Diagnostics [5]
Calling Remote
PC
Use the ‘D’ key to select the
required PC from the list (1-4) and
Press ‘Yes’.
Use the ‘D’ key to select the
operation you require:
Data to PC: View the system
history on your PC, where it can be
searched and printed.
Diagnostics: Sends electrical and
diagnostic data to your PC where it
can be printed if needed.
Press ‘YES’
The Euro-One panel does not have
options to choose which PC it will dial,
it will automatically call PC 1.
Page 43
Allow Engineer Menu
ALLOW ENGINEER
MENU?
When
your
alarm
installation
engineer comes to your premises
for a maintenance visit or to correct
a fault after an alarm he will
require access to the programming
of the system.
Press ‘YES’
Allow Engr Menu?
Yes
[1]
Use ‘B & D’ keys to make your
choice.
Press ‘YES’
After the engineer has finished on
site, you may return this setting to
‘NO’.
Page 44
Block Remote Set
BLOCK REMOTE
SET?
Your
alarm
system
may
be
configured so that your alarm
installation company or company
manager can set or unset the
system remotely via PC. Should
you wish to block this access you
can do so through this menu.
Press ‘YES’
Block Remote Set
No
[0]
Make your choice with the ‘B’ and
‘D’ keys.
This option is not available on the
Euro ONE 28.
Page 45
Block UDL
If you wish that your alarm
company can only dial into your
system with their PC whilst their
engineer is on site, this can be set
up through the ‘Block UDL’ menu.
Page 46
Anti-Code Restore
Note, this item will ONLY appear if engineer restore is
required and will appear first in the user menu
Your Alarm Receiving Centre or
Alarm Installation Company may
permit you to reset the system
without an engineer present.
ENTER ANTICODE?
Press ‘YES’
Eng Restore
Required G15234
Enter your
Code [
]
You will be required to quote this
6-digit code by telephone (advise
them that the system is a Castle
Euro-MERiDIAN). You will then be
given a special code which will
reset the system for that one
occasion only.
Press ‘YES’
After entering the correct anti-code
you may continue using your
system normally.
Page 47
User Programmable
Functions
Persons holding Manager codes to
Euro-MERiDIAN have access to the
following programming options:
Set Date & Time (page 28)
Change User Codes (page 31)
Change Mobile Telephone Numbers
(page 38)
Allow Engineer Access (page 44)
Inhibit (omit) Zones from the system
(page 29)
Allow Remote Set (page 45)
To do so, press ‘D’ and enter your
Manager PIN code or Tag.
Every user has access to the
following programming options:
Change his own code (page 31)
Allow Remote Set (page 45)
Allow Engineer Access (page 44)
To do so, press ‘D’ and enter your
User PIN code or Tag.
Page 48
Menu Exit
EXIT MANAGER
MENU?
To exit from Manager Menu and
return to normal mode.
Press ‘YES’
If you wish to select any of the
Manager Menu items again press
the ‘NO’ key until your choice is
displayed (see page 32).
Page 49
Service Information
We are sure that you will be
delighted with your Euro-MERiDIAN
Alarm installation.
For your personal reference here is a
record of the relevant service
information.
Service Company
Date of Installation
Day
Month
Year
Site Reference
24hr Service Number
Keyholders
Tel:
Name
Tel:
Name
Tel:
Panel Type
Software Version
Installed to Grade
(See below)
Environmental Class 2
Euro-ONE panels are suitable for use in
installations designed to meet the requirements
of Grade 2, Euro-ONEPLUS and MSX upgraded
panels meet the requirements of Grade 3.
External set/unset readers and access control
readers
meet
the
requirements
of
environmental class 4.
Page 50
User Codes
Warning: This information should
be removed from the manual and
stored in a secure location.
Photocopy this page if you have more users.
No.
Name
Type
Areas
Attributes
FlexiSet
00
John
Manager
ABCD
Set/Unset
NO
Page 51
Access
Reader
128
Disclaimer
Euro-MERiDIAN includes the facility to send electronic
signals to an Alarm Receiving Centre (ARC), and also to
send SMS text messages to mobile telephones.
Alarm, etc. signals may be transmitted via a PSTN link,
using a variety of formats, to suitable receiving
equipment located at the premises of an independently
operated Alarm Receiving Centre.
Provision is also made for the use of third-party device
to transmit signals to an Alarm Receiving Centre by
means of the PSTN, GSM, IP or other network.
The SMS facility uses a PSTN connection to a special
SMS Centre, where the information is transferred to the
GSM network for delivery to the client's designated
mobile telephone(s).
The SMSC services are provided by GSM network
operators or other reputable companies, whose
operation is outside of the control or influence of Castle
Care-Tech Ltd.
Castle Control Panels have an embedded premium rate
telephone number that is used to contact a Castle host
computer prior to commissioning, in order to download
the SMSC details and appropriate call routing
authorisation. The control panel will continue to contact
this CHC at regular intervals, to verify the operation and
update and confirm the routing information and
authorisation as appropriate. The charge for this service
is raised by the use of the "premium rate" telephone
number. Please check with your installer for exact
charges.
Whilst we will use our best endeavours to resolve any
issues relating to these uses of equipment manufactured
by us, Castle Care-Tech are in no way responsible for
the operation of the PSTN or other transmission media,
the Alarm Receiving Centre or the SMSC - or for the
end-to-end security and delivery of information and
messages involved.
Page 52
No
Areas
A
B
Descriptions
C
D
0
1
2
3
1
2
3
4
5
6
7
8
9
10
11
12
13
14
15
16
17
18
19
20
21
22
23
24
25
26
27
28
29
30
31
32
33
34
35
36
37
38
39
40
41
42
43
44
45
46
47
48
49
50
Page 53
No
Areas
A
B
Descriptions
C
D
0
1
2
3
51
52
53
54
55
56
57
58
59
60
61
62
63
64
65
66
67
68
69
70
71
72
73
74
75
76
77
78
79
80
81
82
83
84
85
86
87
88
89
90
91
92
93
94
95
96
97
98
99
100
Page 54
Page 55
Page 56