1
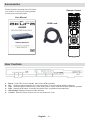
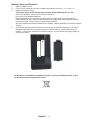
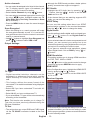
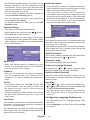
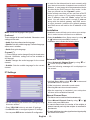
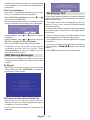
AVX665 High Definition Digital Set Top Box Customer Help Line : 0845 293 7698 Website : www.ekey.co.uk Contents Safety Information .................................................. 2 Safety Instructions .................................................. 3 Digital Switchover ................................................... 3 Accessories ............................................................ 4 User Controls.......................................................... 4 Remote Control ...................................................... 5 Connections............................................................ 7 Power On - Off........................................................ 8 First Time Installation.............................................. 9 Changing Channels ................................................ 9 Adjusting the Volume .............................................. 9 Mute .................................................................... 9 On-Screen Information ......................................... 10 Menu System........................................................ 10 Viewing the Main Menu .................................... 10 Information Banner ........................................... 10 Managing Stations: Channel List .......................... 10 Selecting a Specific Channel ............................ 10 Operating the Channel List ................................11 Moving a Channel ..............................................11 Deleting Channels ............................................11 Renaming Channels .........................................11 Adding Locks to Channels ................................11 Setting Favourites .............................................11 Viewing Electronic Programme Guide (EPG) ....... 12 Event Options ................................................... 12 Select Channel & Exit ................................... 12 Configuring Settings: Setup Menu....................................12 Configuration .................................................... 12 Active channels ............................................. 13 Scan Encrypted ............................................ 13 Output Settings ............................................. 13 TV Type ..................................................13 TV Out ....................................................13 AC3 Audio ..............................................13 SPDIF Delay ...........................................13 Digital Audio ...........................................13 HDMI Resolution ....................................13 HDMI HDCP ...........................................13 Receiver Upgrade ......................................... 13 Parental Settings .......................................... 14 Menu Lock ..............................................14 Guidance ................................................14 Set Pin ....................................................14 Low Power .................................................... 14 Audio Description .......................................... 14 Low Power ..............................................14 Audio Description ...................................14 Available Langs. .....................................14 Preferred Language (Optional) ...............14 Relative Volume (Optional) .....................14 Auto Sleep .................................................... 14 Configuring Language Preferences .................. 14 Preferred ....................................................... 15 Current (*) ..................................................... 15 IP Settings ........................................................ 15 Installation......................................................... 15 Automatic Channel Scan .............................. 15 Manual Channel Scan .................................. 15 First Time Installation .................................... 16 OSD Warning Messages ........................................ 16 No Signal .......................................................... 16 No Channels Have Been Added Yet ................. 16 Displaying Text ..................................................... 16 Trouble Shooting Guide ........................................ 17 General Characteristics ........................................ 18 Hardware Configuration........................................ 18 Digital Capabilities ............................................... 18 Remote Control .................................................... 18 Tuners .................................................................. 18 Front Panel ........................................................... 18 Audio .................................................................... 19 Digital Audio.......................................................... 19 A / V & Data In / Out ............................................. 19 TV Scart .............................................................. 19 English - 1 - Safety Information The lightning flash with arrowhead symbol, within an equilateral triangle, is intended to alert the user to the presence of un-insulated “dangerous voltage” within the products enclosure that may be of sufficient magnitude to constitute a risk of electric shock to the persons. The exclamation point within an equilateral triangle is intend to alert the user to the presence of important operating and maintenance (servicing) instructions in the literature accompanying the appliance. Correct disposal of this Product (Waste Electrical & Electronic Equipment (WEEE) The crossed out “Wheelie bin” is intended to show that this appliance must not be placed with ordinary household waste at the end of its useful life. To prevent possible harm to the environment or human health from uncontrolled waste disposal, please keep separate from other household waste and recycle it responsibly to promote the sustainable reuse of material resources. Household users should contact either the retailer where you purchased the product, or their local government office for details of where and how you can take this item for environmentally safe re-cycling. Business users should contact their supplier and check the terms and conditions of the purchase contract. This product must not be mixed with other commercial wastes for disposal This appliance complies with European Safety and Electrical directives 2 English - 2 - Safety Instructions CAUTION. PLEASE READ AND OBSERVE ALL WARNINGS AND INSTRUCTIONS GIVEN IN THIS USER MANUAL AND MARKED ON THE APPLIANCE. RETAIN THIS BOOKLET FOR FUTURE USE. This set has been designed and manufactured to assure your personal safety. Improper use can result in Electric shock or Fire hazard. The safeguards in this appliance will protect you if you observe the correct procedures for installation, servicing and operation. There are NO user parts inside. DO NOT REMOVE THE CASE OR OTHER COVERS OR YOU MAY BE EXPOSED TO DANGEROUS VOLTAGES AND WILL INVALIDATE YOUR WARRANTY. REFER ALL SERVICING TO QUALIFIED SERVICE PERSONNEL. Unpacking and Handling. Open the carton carefully and remove the polyfoam packing. Carefully lift the STB and place onto a firm stable surface. Lift off the Poly bag and retain all packaging for future use. Keep all packaging away from small children and animals. Ventilation and Heat Sources. Do not place material over the ventilation slots, this will cause the STB to overheat and fail. Do not place the STB in direct sunlight or near heat sources such as radiators or fires. Ventilation slots. Do not allow objects to be dropped inside the ventilation slot, this could cause a short circuit and a possible fire. Do not allow chains to be dangled into the STB. Candles and Open flames. Do not place lighted candles (“T” Lights) on the top or at the sides of the STB, or any other naked flame near the STB cabinet. Connections. When connecting the STB to external sources and the mains supply, do not place wires that can be tripped over. Do not trap or place heavy objects on the mains lead or adaptor. Dis-connection Device. The mains plug is the Disconnection device and MUST be accessible at all times Moisture. Do not place the STB in wet or damp conditions, such as steamy kitchens, basements or other damp places. Do not allow water or other fluids to enter the STB. Do not touch the Mains plug or adaptor with wet hands. Should moisture enter the STB, disconnect from the supply and call the customer help line. Cleaning. Disconnect the STB from the mains supply. Use a soft dry cloth, for stubborn stains use a soft moist cloth with a dilute mild detergent.. Do NOT use petrol based fluids or abrasive materials. Lightning. During a thunderstorm or when leaving the appliance for long periods such as holidays, disconnect the aerial input (if external aerial) and remove the mains plug, This is to prevent power surges damaging the apparatus Digital Switchover DIGITAL SWITCH OVER AND YOUR STB. WHAT YOU NEED TO DO TO ENJOY WATCHING TV DURING AND FOLLOWING DIGITAL SWITCH OVER. Starting in 2008 and ending in 2012, television services will go completely digital, TV region by TV region. To continue using this STB during and following the digital switchover, you will need to “reset” your digital TV channels. Users of this STB must reset on at least 2 different occasions, normally 1 month apart when your switchover happens. Digital UK, the body leading the digital switchover, and broadcasters, will advise you when to reset your digital channels on each occasion. If you do not reset your digital channels, you risk loosing some or all of your TV services during and following switchover. Please refer to this instruction manual to retune the Digital TV services. Do NOT use “ADD” channels, you MUST “AUTO TUNE” and allow a complete retune. (See page 15) For more information please contact the “Customer Help Line” (Page 16) or visit www.digitaluk.co.uk English - 3 - Accessories Please check the contents of the TV before you continue. If any item is missing please contact your point of purchase. Remote Control User Manual HDMI Lead User Controls 1. Power. Turns STB On from standby. Also returns STB to standby 2. CH - Reduces channel selection by 1 with each press. In menu mode will shift the selection 3. CH + Increases channel selection by 1 with each press. In menu mode will shift the selection upwards 4. LED. Displays STB status. In standby illuminates Red, in operation illuminates Blue. 5. LED Display. Displays Channel number selected. 6. I R Lens. Remote control receiver lens. Do not obstruct or cover. English - 4 - Remote Control 1. INFRA RED WINDOW. Transmits optical signal to receiver box 3. COLOURED BUTTONS. Access to Interactive services. 5. MENU. Press to display “On screen Menu 7. NAVIGATION BUTTONS. Allows navigation of menus. 9. SUBT. Switches the subtitle mode On and Off. 11. LANG/(AD). Selects Audio Languages “if transmitted”, Selects Subtitle language “if transmitted”. 13. MUTE. Press once to Mute sound, Press again to restore sound 15. GUIDE. Selects the EPG “Electronic Programme Guide”. 17. V+/V-.Adjusts volume level. 1 2 3 6 4 8 17 18 13 15 14 16 7 2. POWER. Press to bring box out of standby. Press again to return box to standby 4. REC. Selects display screen size. Selects 16 : 9 or 4 : 3 6. 0 – 9 Alpha-Numeric buttons. Direct entry of channel numbers. Enters text letters in Programme edit mode 8. “I”. Displays programme information 10. EXIT. Press to exit any menu mode. 12. OK. Press to confirm any menu selection. 14. FAV. Press to display FAV “Favourite” channels selected. 16. TEXT. Press to display Teletex. Also press to return to TV mode from Teletext or “Red Button” operations 18. CH+ CH- Increases or decreases channel selection. 12 5 10 11 9 Note :- All buttons not listed have NO operation with this product. English - 5 - Battery Fitting and Disposal 1. 2. 3. 4. Open the battery cover Fit two “AAA” batteries. Ensure the battery polarities are correct i.e + to + and – to -. Replace the battery cover To prevent injury, do NOT break open or throw exhausted batteries in a fire. Do not mix batteries, old and new, Carbon or Alkaline. Do not use re chargeable batteries. Remove batteries if not using the remote control for long periods to prevent leakage. If the batteries do leak, clean the compartment with soapy water and scrape any residue from the contacts. To NOT touch or ingest battery residue. Should you swallow chemicals leaked from a battery, please URGENTLY consult a medical adviser. In the event that the remote control does not function, please check that the + VE end of the battery terminals are in contact with the connection spring. Some batteries have a smaller + VE terminal and may not reach the spring. You can stretch the spring slightly to ensure connection Do Not place used batteries in domestic waste, consult your battery retailer or your local waste disposal company for advice.”. 6 English - 6 - Connections IMPORTANT. When making connections ensure the STB is disconnected from the DC supply input, and that the appliance being connected is also disconnected from the mains supply. ANTENNA INPUT. RF input from TV aerial or cable source.( 1 m/V @ 75 ) typical. RF LOOP THROUGH. RF Loop through to other apparatus (TV) ETHERNET. Input from Internet. (Firmware upgrades only) Not for general use HDMI OUTPUT. Connects to HD Display (TV) SCART. Audio /Video output. (General quality). OPTICAL AUDIO. Output to Audio amplifier. SPDIF encoded Digital Audio. DC INPUT. 12V DC supply. Only use Mains Adaptor provided. Typical connections HDMI. (Supplied) Antenna or cable Connect HDMI output to TV. Re connect mains supply to both TV and source. If using HDMI the SCART connection is not necessary. SCART. Connect SCART plug to the TV. (not supplied). IF using HDMI this connection is not necessary. Mains Adaptor. Do not connect mains supply until the adaptor is connected to the STB. 7 English - 7 - TV Loop Through. Connect to Aerial input of TV, Female to Male lead. (not supplied) Ethernet Connection. This connection is used ONLY for Service Technician Upgrade use. DO NOT CONNECT TO ANY ETHERNET CONNECTION Digital Audio (Optical Connection). (not supplied) Connect to a suitable Audio Amplifier Power On - Off After plugging the Mains Adaptor and connecting to the Mains supply, a Red light will be seen on the front panel (Standby Mode). Wait a few moments (60 seconds) while the box is initialised. Press the Standby” button on the Remote control or the STB. The Red light will change to Blue and the LED Display will be shown on the STB. (Power On mode). Power Saving Due to new EC Power Saving Regulations this STB will switch to Power Saving Mode (Standby) if NO button on either the Remote Control or the Manual buttons are used after 3 hours. If you have set a Recorder to record using a Timer on the recorder and the STB as the signal source, please be advised that the STB will switch to standby after 3 hours of “inactivity” and the recording may not occur. To turn this feature “OFF” enter the “SETUP” menu and Select “Configuration”. Select “AUTO SLEEP” and with the ►button set to “OFF”. The STB will not now go to Standby after 3 Hours. English - 8 - First Time Installation IMPORTANT: Ensure that the aerial is connected before switching on the set top box for the first installation. • When the set-top-box is operated for the first time, installation wizard will guide you through the process. First, TV Type selection on-screen menu will be displayed: • Select Yes or No by using “ ”/“ ” button and press OK to continue and the following message will be displayed on the screen: • To start installation process, select Yes by using “ ”/“ ” buttons and then press the OK button. • The box will start to search available stations. The progress bar will move along the line. You should allow the set-top-box to complete the search to store all available stations. • Select the TV Type by using “ ”/“ ” buttons and press OK button to continue. • Afterwards, HDMI resoulution selection menu OSD will be displayed: Note: You can press MENU button to cancel. Changing Channels • You can change channels with the following methods. • You can press the numeric buttons (0–9) to directly enter the channel number. You can press numeric buttons consecutively to enter two or more digits. • Press the PR +/ PR - buttons to move up or down to the next available channel. Note: You can press OK button to display the channel list. • If your display is connected via HDMI connector, you can use BLUE button to define HDMI resolution automatically. • You can select the desired resolution by pressing “ ”/“ ” button. • Press GREEN button to apply changes and use OK button to continue. • If you do not set a resolution, the following message will be displayed: Adjusting the Volume Mute • You can press to mute the sound of your settop-box. The sound will be muted once this button is pressed. • To cancel mute, you can press use the V +/- buttons. English - 9 - button again or Volume Up / Down • You can increase or decrease the volume by using V+ / V- buttons. • To exit from a menu screen, you can press MENU button. • The following items are located in the main menu screen: • The volume level selected will remain set, even when the receiver is turned off and on again, until you change volume again. • The audio volume adjustment for the receiver is independent of the volume control on your TV set. IMPORTANT: You should be careful that both volume controls are kept within reasonable levels so that when switching on, or when first turning on your TV set, the sound level is not too high. On-Screen Information • You can press button to display on-screen information. Details of the station and current programme will be displayed on the information screen. • Particularly; current event name, next event name, and starting and ending time, duration bar, programme mode, channel number and name will be displayed on the information screen (if available). Information Banner • Information banner will be displayed at the bottom of the menu screen in all menus. • Available functions that can be used in the current menu are displayed in the information banner. Managing Stations: Channel List • The set-top-box sorts all stored stations in the Channel List. • You can edit this channel list, set favourites or sort channels by using the Channel List options. • Press MENU button to view main menu. Select Channel List item by using “ ”/“ button. Press OK to view menu contents. Note: You can direclty press OK button to view channel list. Menu System Viewing the Main Menu • Press the MENU button to view main menu. • You can move between menus by using the / ) buttons on the remote navigation ( / / control. • You can enter, select or confirm a menu option by using OK button. • In some sub-menus, you can use BACK button to return to a previous menu screen. Selecting a Specific Channel • Select option should be highlighted by using “ ”/“ ” button. • To watch a specific channel, you should highlight the desired channel using “ ”/“ ” button and press OK button. Selected channel will be displayed. English - 10 - • If the selected channel is password protected, parental lock password will be asked. If the correct code is entered, selected channel can be watched. Operating the Channel List • Press “ ”/“ ” button to select the channel that will be processed. • Press “ ”/“ ” button to select a function on Channel List menu. • Use P+/P- buttons to move page up or down. • Press BLUE button to view filtering options. current character, i.e., ‘b’ character becomes ‘a’ by pressing “ ” and ‘c’ by pressing “ ”. • Pressing the numeric buttons ‘0...9’ replaces the highlighted character with the characters printed above the button one by one as the button is pressed. • Press MENU to cancel editing. • When finished, press OK button to save the new name. Adding Locks to Channels • Select the channel that you want to lock and select Lock option using “ ”/“ ” button. Press OK button to continue. • Press MENU button to exit. • Use INFO button to view more information. Moving a Channel • First select the desired channel to be moved by using “ ”/“ button. • Select Move option in the channel list by using “ ”/“ ” button and press OK button. • Edit Number screen will be displayed. Enter the new channel number by using the numeric buttons on the remote control. • You will be asked to enter parental control PIN code. Default PIN is set as 0000. Enter the PIN number. • Press OK button when the desired channel is highlighted to lock/unlock the channel. Lock symbol will be displayed next to the selected channel. You can repeat the same operation to cancel the lock. Note: Default PIN code is 0000 and it can be changed using the Configuration Menu. • If there is a previously stored channel on that number, a warning screen will be displayed. Select Yes if you want to move the channel and press OK. Setting Favourites • Press OK button to process. Selected channel is now moved. • You can set various channels as favourites so that only the favourite channels are navigated. • Select Favourites to manage favourite list. Use “ ”/“ ” and OK buttons to select Favourites. Note: In some countries, the order of the channels is arranged automatically by the broadcaster. This is called logical channel number (LCN). If the selected country has LCN support, the channels will be enumerated one by one, beginning from number ‘1’. You cannot move any programme to a position after the last saved one. If you try to do this, both programmes will change their places. If LCN support is not available, you can move the channels between 1-999. Deleting Channels • Select the channel that you want to delete and select Delete option using “ ”/“ ” button . Press OK button to continue. • A message will be displayed to confirm your decision. Select YES to delete the selected channel, select NO to cancel. Press OK button to continue. • Select a channel by using ”/“ ” button. Press OK button to add selected channel to the favourites list. • Selected channel will be deleted if you select YES. The operation will be cancelled if you select NO. • F icon indicates that the selected channel is added to the favourites list. Renaming Channels • You can press OK button again to remove the selected channel from the list. • Select the channel that you want to rename and select Edit Name option using “ ”/“ ” button. Press OK button to continue. • Pressing “ ”/“ ” button moves to the previous/ next character. Pressing “ ”/“ ” button toggles the Button Functions: • OK: Adds/removes a station. • BLUE: Displays filtering options. English - 11 - Viewing Electronic Programme Guide (EPG) Event Options In EPG menu, press the OK button to enter the “Programme Options” menu. You can view the electronic programme guide (EPG) to view information about available programmes. Select Programme Guide from the main menu by using “ ”/“ ” buttons. Press OK to continue. HINT: You can also press GUIDE button to view the EPG menu. • Press “ ”/“ ” buttons to navigate through channels. • Press “ ”/“ ” buttons to navigate through the programme list. • EPG menu displays available information on all channels. • Please note that event information is updated automatically. If there are no event information data available for channels, EPG will be displayed with blanks. Select Channel & Exit • Using this option, you can switch to the selected programme or exit. Configuring Settings: Setup Menu • Detailed settings can be configured to suit your personal preferences. • Select Setup from the main menu by using “ ”/“ ” buttons and press OK button to display Setup menu. Red button (Prev Day): Displays the programmes of previous day. Green button (Next day): Displays the programmes of the next day. Yellow button (Zoom): Expands programme information. Blue button (Filter): Views filtering options. INFO (Details): Displays the programmes in detail. Configuration • You can configure main settings of your set top box using configuration screen. • Select Configuration from Setup menu and press OK to continue. • You can press BACK button to exit Numeric buttons (Jump): Jumps to the preferred channel directly via numeric buttons. OK (Options): Displays programme options including “Select Channel” option. P<P: Scrolls page left. Fav: Scrolls page right. Text (Search): Displays “Guide Search” menu. (Now) : Shows the current programme. English - 12 - Active channels • You can select broadcasts to be listed in the channel list. To display specific types of broadcast, you should use Active channel list setting. • Select Active Channels by using “ ”/“ ” button. • You can select a broadcast type option from the list by using “ ”/“ ” button. Available modes are: TV Only, Radio Only, Text Only, Favourites or Show All (if available). • Press the MENU button to save the recent changes and exit. Scan Encrypted • When this setting is on, search process will locate the encrypted channels as well. If it is set as Off, encrypted channels will not be located in automatic search or manual search. • Use“ ”/“ ” buttons to highlight Scan Encrypted and press “ ”/“ ” buttons to select YES or NO. Output Settings • Although the RGB format provides a better picture quality, some devices might not support it. AC3 Audio • Highlight the AC3 Audio item by pressing “ ”/“ ” buttons. Use the “ ”/“ ” buttons to set the AC3 Audio as On or Off. • If the channel that you are watching supports AC3 Audio, you can turn this setting on. SPDIF Delay You can use this setting when there is an SPDIF synchronization problem in the received broadcast. Press the “ ” or “ ” butto to change the delay. Digital Audio • Use this setting to define digital audio out signal type. • Use “ ” or “ ” buttons to set Digital Audio as Bitstream or PCM. • If your selected channel includes compressed sound stream, you can connect your set-top box to an external equipment by using digital audio out of your set-top box for enabling the sound output. • If you have no external sound equipment, please select Digital Audio Out as PCM by using “ ” or “ ” button. HDMI Resolution • This setting enables you to change HDMI resolution as 576P, 720P, 1080i or 1080P. • Use “ ”/ “ ” button on the remote control to change resolution and press GREEN button to apply. HDMI HDCP • In the Configuration menu, highlight the HDMI HDCP item by pressing “ ” or “ ” buttons. TV Type • Digital terrestrial television channels can be broadcast in a widescreen format which must be output differently to normal and widescreen TV sets. • Use the “ ” or “ ” button to set the HDMI HDCP as On or Off. Receiver Upgrade • This function defines the screen format of the connected TV to enable broadcasts’ being displayed correctly. • Select 4:3 if you have a standard TV set with 4:3 aspect ratio. • Select 16:9 if you have a widescreen TV. • If you select Auto, TV type will be set automatically according to the broadcast. Note: This function also enables you to change TV Type that you have previously selected during the first time installation. TV Out • The set-top-box can output RGB and CVBS signal via the TV SCART connector located on the rear panel. • To ensure that your set-top-box always has the most update information, you can use this setting. In order for the proper operation, please ensure that the box is set to standby mode. English - 13 - • The STB automatically powers up at 3.00 A.M. every day and searches for any new software that may be broadcast. If found, the box will download new software automatically. This operation will normally take approximately 30 minutes. • You can enable or disable automatic upgrade by setting Automatic Scanning option. • You can manually search for new software by selecting Scan for upgrade. • To upgrade software via USB, you can use USB Upgrade setting. Audio Description • Audio description refers to an additional narration track for blind and visually impaired viewers of visual media, including television and movies. • The description narrator talks through the presentation, describing what is happening on the screen during the natural pauses in the audio (and sometimes during dialogue, if deemed necessary). • You can use this feature, only if the broadcaster supports that additional narration track. Parental Settings • This setting configures parental settings. • Select Parental Lock option by using “ ”/“ ” buttons. • Press OK button to enter the menu. • To display parental lock menu options, PIN number should be entered. Factory default PIN number is 0000. After coding the correct PIN number, parental settings menu will be displayed: Low Power If you enable low power option, low power mode will be activated. In low power mode the power consumption is less then 1W (in standby). If you disable low power option, the power consumption will be higher than 1W in standby mode however the opening time will be shorter. Audio Description This function enables or disables the audio description feature by pressing the “ ” or “ ” buttons. Available Langs. Menu Lock • Menu lock setting enables or disables the menu access. You can disable access to the installation menu or the whole menu system. Guidance • When set, this option gets the maturity information from the broadcast and if this maturity level is disabled, the TV will not display the related videoaudio. Set available language options (if available) Preferred Language (Optional) By pressing the “ ” or “ ” buttons, preferred audio description language is changed (if available). Relative Volume (Optional) Using this option, Audio Description volume level can be increased or decrased relatively, according to the general volume. Set Pin Auto Sleep • Press OK to display the “Set PIN” window. Use numeric buttons to enter the new pin number. You will need to input your new pin a second time for verification purposes. • Press “ ” or “ ” button to select Auto Sleep. Use “ ” or “ ” button to set the Auto Sleep to Active, Off or set to a customised time period. • The factory default pin number is 0000. If you change the pin number make sure you write it down and keep it safe. Low Power If you enable low power option, low power mode will be activated. In low power mode the power consumption is less then 1W (in standby). • You can set the timeout value of auto off feature. After the timeout value is reached, the box will switch off. Configuring Language Preferences • You can operate the TV’s language settings using this menu. • Select Language from Setup menu and press OK to continue. If you disable low power option the power consumption will be higher than 1W in standby mode however the opening time will be shorter. English - 14 - • In order for the ethernet host to work correctly with your internet connection it needs to have a unique IP address. In most cases all of the parameters can be provided by the DHCP server in their router. In this case you should use the “Dynamic” option. • In the unlikely event that you dou not have a DHCP server in your router or if you prefer to assign your own IP address, then the “Static” option can be used. You will need to enter a unique IP address along with the default gateway and DNS server. In most domestic networks the default gateway and DNS server will both be the IP address of the router. Installation Menu: shows the language of the system. Preferred • Installation menu will help you to retune your set-topbox in order to store new services or stations. These settings will be used if available. Otherwise current settings will be used. • Select Installation from Setup menu by using “ ” or “ ” buttons and press OK to continue. • Audio: Sets the preferred audio language. • Installation menu includes the following items: • Subtitle: Sets the subtitle language. Selected language will be seen in subtitles. • Guide: Sets guide language. Current (*) (*) These settings can be changed if only the broadcaster supports. Otherwise, settings will not be available to be changed. • Audio: Changes the audio language for the current channel. • Subtitle: Sets the subtitle language for the current channel. Automatic Channel Scan • Select Automatic Channel Scan by using “ ” or “ ” button and press OK button. • Then the following message will be displayed on the screen: IP Settings • Highlight Yes or No by using “ ” or “ ” buttons and press OK button to confirm. • If Yes is selected, automatic search starts. • Selecting No cancels automatic search. • After the scanning is completed, your set-top-box will store all the available channels. Manual Channel Scan • This feature can be used for direct broadcast entry. • You can configure your receiver’s IP settings by using this menu screen. • Press YELLOW button to set static IP settings. • Use BLUE button to configure dynamic IP settings. • You can press RED button to disable IP configuration. • Select Manual Channel Scan by using “ ” or “ ” button and press OK button. • In manual channel scan, the number of the multiplex is entered manually and only that multiplex is searched for the channels. • For each valid channel number, signal level and signal quality are shown on the screen. English - 15 - • In both manual and auto search, any existing channel in the database is not re-stored to avoid duplicates of that channel. First Time Installation • If you want to load default settings of your set-topbox, you can perform first time installation. • Select First Time Installation by using “ ” or “ ” button and press OK button. • The following message, asking you whether or not to delete all channels and settings, will be displayed. Displaying Text • Many digital terrestrial television channels broadcast pages of information on the programmes, the weather, news and other topics. • This digital teletext can be displayed by your settop-box. Indeed, some channels broadcast teletext information entirely. • When such a channel is selected, it will usually display the opening page of information automatically, after a short break, . • Highlight No by using “ ” or “ ” button to cancel installation. • Some channels mostly have digital teletext pages broadcast along with the television programme. • Highlight Yes by using “ ” or “ ” button and press OK button to start first time installation. • Press TEXT button to activate digital teletext pages (if available). • After you select Yes, factory settings will be loaded. • You can move through the information channels by using navigation (“ ”/“ ”/“ ”/“ ”), OK and coloured buttons. • Installation wizard will guide you through the installation process. See the section, “First Time Installation” in previous chapters for more information on this process. • Press TEXT button again to exit teletext mode. OSD Warning Messages • Some warning messages may appear on the screen indicating that a related function may not be working properly. No Signal • When the box receives no signal (e.g. the antenna cable is disconnected), “NO SIGNAL” message will be displayed on the screen. No Channels Have Been Added Yet • When there are no channels stored in the box, Channel List menu will not be displayed and channel navigation will not be available. • In such cases, the following error message will be displayed. English - 16 - Trouble Shooting Guide No Red or Blue panel light lit. Check DC Mains adaptor is connected and power is turned on. TV Shows no picture or sound. The STB output may not have been selected by the TV. Check your TV user guide. If using HDMI, select HDMI Input on the TV. Otherwise use the SCART connection and select SCART. If you are still having difficulty please call the Technical help line. Ring 0845 293 7698 (Normal rates apply). Opening hours Mon-Fri 8 am – 8pm. Sat 9 am – 4pm. Sun 11am – 4pm “Bank holidays as Sun” Or try our website :- www.ekey.co.uk (24Hr) Emails should be responded to within 3 - 4 hours should the consumer have difficulty getting through. Screen displays NO SIGNAL. Check the Aerial is connected correctly. Indoor aerials are generally NOT suitable unless very near the transmitter. STB is not installed correctly, re tune as from page 9. Pictures breaking up or freezing. This may occur when the STB is in a marginal signal area. Have the aerial and leads tested by a competent engineer. Not receiving some channels. This may occur when the STB is in a marginal signal area. Have the aerial and leads tested by a competent engineer. Not receiving HD channels. Not all areas are being supplied at present. Visit the Digital UK web site www.digitaluk.co.uk. Until 2012 some areas may have intermittent HD services. No Audio from the Optical connector. A special “optical” lead is required. It must be inserted correctly and connected to an Audio amplifier that is able to process SPDIF and AC3 signals. No Remote Control functions. Replace the batteries in the Remote control approximately each 6 months. Ensure nothing is blocking the Infrared signal Box switching to Standby. If there is no 'Button activity after 3 hours, the STB will revent to Standby. If you are using the STB to be a source for "Timer" recording, the recording may fail if the STB "Times out". To turn this feature "OFF" see page 8. English - 17 - General Characteristics Supply Voltage for set-top box: 12 V DC Supply Voltage for DC Adaptor : 220 - 240 V AC ~ 50Hz Input Frequency 470Mhz-862Mhz Maximum Power consumption 15 W Typical Power consumption 8W Standby Low Power Consumption <1 W USB (optional) Current Limit 500mA Operating temperature 5ºC to +40ºC Storage temperature -20ºC to +70ºC Humidity 25 to 75 % rel Physical dimensions 295 x 170 x 40 mm Weight 900 g Hardware Configuration Main Processor MPEG Decoder NEC EMMA3SL/HD Flash Memory 8MB NOR BGA DDRRAM 2x128MB DDR2(HD Decoding for HD Mpeg4 Receiver) Digital Capabilities Transmission Standards: DVB-T, MPEG2 MPEG4 DVB-T2, MPEG4 Demodulation: • Combined DVB-T2, DVB-T demodulator that conforms to the ETSI EN 302-755 (second generation Terrestrial) and ETSI EN 300-744 (Terrestrial) standards. • Symbol rate: COFDM with 2k, 4k, 8k, 16k, 32k FFT mode • Modulation: 16QAM, 64QAM, 256QAM FEC for all DVB modes (automatically found) VIDEO • H.264 (MPEG-4 part 10) main and high profile level 4.1/MPEG-2 MP@HL video decoder. • HD display multi format capable (1080p, 1080i, 720p, 576p) • Analogue SD output: RGB and CVBS AUDIO • MPEG-1 layer I/II, MPEG-2 layer II, MPEG-2 AAC, MPEG-4 AAC • Sampling frequencies supported are 32, 44.1 & 48 kHz Remote Control Operating Distance 10 m Max. Batteries 2x1.5V Micro (R-03/AAA) Tuners 1 xRF In IEC-type, female (75Ohm) 1 x RF Out (loop through) IEC-type, male (75Ohm) Front Panel Display : 7 segment led display Remote Control Keys Standby, PR+ / PR- English - 18 - Audio Output 2 Vrms, 0 dBfs / Z = 10 kohm Digital Audio Output Optical SPDIF A / V & Data In / Out Scart TV scart RGB Video Output TV scart CVBS Video Output TV scart Analog Audio Output TV scart Digital Audio Output Optical output HDMI Output HDMI USB Input USB 2.0 High Speed (Optional) (For service use only.) NOTE: The USB port is used for software upgrading only. USB connector does not have any other functions such as playing audio or picture files. It is only used for software upgrading. TV Scart Video output : Composite video signal; 1 Vp-p±3dB/75 ohm Audio output : 2 Vrms / Z = 10kW Function switching : 12V / 6V for 4:3 / 16:9 / Z = 10kW Technical Specifications are subject to change without notice. Errors and omissions are exempted. Information for Users on Disposal of Old Equipment and Batteries [European Union only] These symbols indicate that equipment with these symbols should not be disposed of as general household waste. If you want to dispose of the product or battery, please consider the collection systems or facilities for appropriate recycling. Battery Notice: The sign Pb below the symbol for batteries indicates that this battery contains lead English - 19 -