1
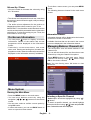
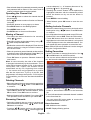
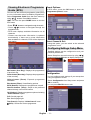
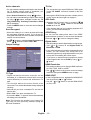
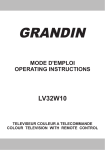
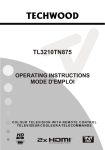
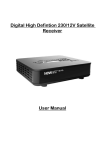
STBHDV2010 Digital TV Receiver For assistance, please call our Tesco Electrical Helpline on 0845 4566767 USER MANUAL Contents Accessories ............................................................ 2 Introduction ............................................................. 2 Safety Precautions ................................................. 2 Overview of the Remote Control ............................ 4 Viewing Controls and Connections of the Set-TopBox ......................................................................... 5 Front Panel ......................................................... 5 Rear Panel .......................................................... 5 Inserting Batteries in the Remote Control............... 6 Connecting the Set-Top Box to a TV Set ................ 6 Antenna Connection ............................................... 7 Power On-Off.......................................................... 7 First Time Installation.............................................. 8 Changing Channels ................................................ 8 Adjusting the Volume .............................................. 8 Mute .................................................................... 8 On-Screen Information ........................................... 9 Menu System.......................................................... 9 Viewing the Main Menu ...................................... 9 Information Banner ............................................. 9 Selecting a Specic Channel .............................. 9 Operating the Channel List ............................... 10 Moving a Channel ............................................. 10 Deleting Channels ........................................... 10 Renaming Channels ........................................ 10 Adding Locks to Channels ............................... 10 Setting Favourites ............................................ 10 Event Options ....................................................11 Select Channel & Exit ....................................11 Conguration .....................................................11 Active channels ............................................. 12 Scan Encrypted ............................................ 12 Output Settings ............................................. 12 TV Type ..................................................12 TV Out ....................................................12 AC3 Audio ..............................................12 SPDIF Delay ...........................................12 Digital Audio ...........................................12 HDMI Resolution ....................................12 HDMI HDCP ...........................................12 Receiver Upgrade ......................................... 13 Parental Settings .......................................... 13 Menu Lock ..............................................13 Guidance ................................................13 Set Pin ....................................................13 Low Power .................................................... 13 Audio Description .......................................... 13 Low Power ..............................................13 Audio Description ...................................13 Available Langs. .....................................13 Preferred Language (Optional) ...............14 Relative Volume (Optional) .....................14 Auto Sleep .................................................... 14 Conguring Language Preferences .................. 14 Preferred ....................................................... 14 Current (*) ..................................................... 14 IP Settings ........................................................ 14 Installation......................................................... 14 Automatic Channel Scan .............................. 14 Manual Channel Scan .................................. 15 First Time Installation .................................... 15 OSD Warning Messages ........................................ 15 No Signal .......................................................... 15 No Channels Have Been Added Yet ................. 15 Displaying Text ..................................................... 15 General Characteristics ........................................ 17 Hardware Conguration........................................ 17 Digital Capabilities ............................................... 17 Remote Control .................................................... 17 Tuners .................................................................. 17 Front Panel ........................................................... 17 Audio .................................................................... 18 Digital Audio.......................................................... 18 A / V & Data In / Out ............................................. 18 Tv Scart .............................................................. 18 English - 1 - Features • DVB and VBI teletext. • 200 channel.s • DVB 7 days event information (7-days EPG). • TV scart (with RGB and CVBS support). • Before operating the set-top-box, please read this manual thoroughly. Please do keep this manual in a safe place for future references. Read the corresponding instructions of this handbook prior to the rst usage of the device, even when the usage of electronic devices is familiar to you. • Notice especially the chapter SAFETY PRECAUTIONS and INFORMATION. Carefully keep the handbook as future reference. When selling the device or giving it away, absolutely give these direction for use. • HDMI output. • Automatic tuning. • Favourite list. Safety Precautions • Parental lock options. • DVB-T2 compliant. POWER: The receiver should be plugged into a 220240 V AC 50Hz supply only. • Manual and automatic search options. LEADS: Ensure the power supply lead, and all other leads, are positioned so they are not likely to be walked on or pinched by things placed on or against them. Pay particular attention to the power lead, where it enters the mains plug and where it comes out of the receiver. Do not connect or adjust leads when the receiver is plugged in. • On-Screen-Display. • Automatic day light saving time updating. • Decoding & Video Out: PAL. • Multi-format audio decoder. • Multi language audio support (up to 10). • Audio mute and volume control. Accessories Please make sure that the following items are included with your device. TEMPERATURE AND MOISTURE: Do not leave or use the receiver in a hot, cold or humid area. Do not allow the receiver to get wet - from drips or splashes - as this may be dangerous. Do not place water-lled objects such as ower vases, on top of the receiver. VENTILATION: Slots and openings in the receiver’s cover are for ventilation. Do not cover or block them as this could lead to overheating. CLEANING: Unplug the receiver before it is cleaned. Use a lightly dampened cloth only. Do not use liquid or aerosol cleaners. HEAT AND FLAMES: The receiver should not be placed near to naked ames or sources of intense heat, such as an electric re. Ensure that no naked ames sources, such as lighted candles, are placed on top of the Receiver. Batteries Remote Controller 2 X AAA LIGHTNING: Before a storm and lightning or when going on holiday, disconnect the AC adapter and aerial lead from the wall sockets.. Instruction Book RF lead REPLACEMENT PARTS: If your receiver needs a replacement part, ensure the person undertaking the repair uses parts which are specied by the manufacturer or have the same specications as the original part. Other parts may cause a re, electric shock or other hazards. HDMI lead SCART lead Introduction • Thank you for choosing this product. This manual will guide you for the proper operation of your settop-box. BATTERY DISPOSAL: Batteries, including those which are heavy metalfree, should not be disposed of with household waste. Please dispose of used batteries in an environment friendly manner. Find out about the legal regulations which apply in your area. English - 2 - Important Safety information Mains supply Mains lead Symbols Safe use and care of your equipment Read Protect the mains lead. Avoid harsh conditions Never To save power, Don't Pull This product is designed for domestic use only. Commercial or any other use may invalidate the guarantee and might be dangerous. Ventilation Cleaning Important Safety warnings To prevent electric shock, do not remove any cover. If anything goes wrong, don't try and fix it yourself, get a qualified service agent to look at the product. Do not expose this equipment to dripping or splashing or place any objects filled with liquids, such as vases, on the equipment. Never put a naked flame source such as lighted candles on or near this equipment. Small parts. Do not let young children play with the equipment. English - 3 - Overview of the Remote Control English - 4 - Viewing Controls and Connections of the Set-Top-Box Front Panel Rear Panel 1. ANTENNA IN : You can connect antenna to aerial input of the box. 2. TV OUT : You can use aerial TV out to connect aerial to your TV. 3. ETHERNET: Use this to connect the box to an active LAN connection. 4. HDMI OUTPUT : You connect the box to your TV’s HDMI input (if available) by using HDMI connection cable. 5. TV SCART : If your TV has a scart connector, you can connect the box to your TV using a scart cable. 6. OPTICAL AUDIO : You can use this connector to output the digital audio to an external device. See your audio system instruction book for further information. 7. POWER SUPPLY : DC IN (12V) power connection. Make sure that you connect all cables and connections before you plug the unit into the mains supply. After you connect the unit to the mains supply, the LED light located on the front panel will be red (Standby mode). English - 5 - Inserting Batteries in the Remote Control • Remove the battery cover located on the back of the remote control by gently pulling backwards from the indicated part. • Insert two AAA/R3 (2 X 1.5Volt) or equivalent type batteries inside. Place the batteries in the right directions observing the polarity symbols (+/-) and replace the battery cover. • While using the remote control, you should direct it towards the front panel of the receiver. Remote range is approximately 7m/23ft. • If your receiver no longer responds to the remote control. it is probable that the batteries are exhausted. If so you can still use the local buttons of the receiver. You can replace batteries after they are exhausted. Please use only the leak proof batteries. Note : Remove the batteries from the remote control when it is not to be used for a long period. Otherwise it can be damaged due to any leakage of batteries. Connecting the Set-Top Box to a TV Set You can connect your set top box to a TV by using the following methods: 1. HDMI connection: If your TV has an HDMI input, you can simply connect the set top box to your TV by using an HDMI cable between the HDMI OUT connector on your Set-Top Box and the HDMI INPUT connector on your TV. HDMI connection provides a better picture/sound quality. 2. SCART connection: You can also connect the set top box to your TV by using the scart socket. Use a scart cable to connect the set-top-box to your TV. English - 6 - Power Connection IMPORTANT: The set-top box is designed to operate on 12V DC. For this, an adaptor is used which supplies a 12V DC voltage. Connect this adaptor to a mains socket that supplies 220-240V AC,50Hz. • After unpacking, allow the set-top box to reach the ambient room temperature before you plug in to the mains for the rst time. Antenna Connection This illustration shows how to connect an antenna. • Use ANTENNA IN to connect to an antenna system. • You can also use TV OUT to connect antenna to your TV through the set-top-box with an appropriate antenna cable, Power On-Off • After plugging the set-top-box into the mains supply, a light will be seen on the front panel (Standby mode). • When the set-top-box is rst powered up please wait until the box is initialised. This will take a few seconds. • Afterwards, you can switch on your digital set-top box by pressing the standby button on the remote control. You will see that the light on the front panel will go out (Power on mode). English - 7 - First Time Installation IMPORTANT: Ensure that the aerial is connected before switching on the set top box for the rst installation. • When the set-top-box is operated for the rst time, installation wizard will guide you through the process. First, TV Type selection on-screen menu will be displayed: • Select Yes or No by using “ ”/“ ” button and press OK to continue and the following message will be displayed on the screen: • To start installation process, select Yes by using “ ”/“ ” buttons and then press the OK button. • The box will start to search available stations. The progress bar will move along the line. You should allow the set-top-box to complete the search to store all available stations. • Select the TV Type by using “ ”/“ ” buttons and press OK button to continue. • Afterwards, HDMI resoulution selection menu OSD will be displayed: Note: You can press MENU button to cancel. Changing Channels • You can change channels with the following methods. • You can press the numeric buttons (0–9) to directly enter the channel number. You can press numeric buttons consecutively to enter two or more digits. • Press the PR +/ PR - buttons to move up or down to the next available channel. Note: You can press OK button to display the channel list. Adjusting the Volume • If your display is connected via HDMI connector, you can use BLUE button to dene HDMI resolution automatically. • You can select the desired resolution by pressing “ ”/“ ” button. Mute to mute the sound of your set• You can press top-box. The sound will be muted once this button is pressed. • Press GREEN button to apply changes and use OK button to continue. • If you do not set a resolution, the following message will be displayed: • To cancel mute, you can press use the V +/- buttons. English - 8 - button again or Volume Up / Down • You can increase or decrease the volume by using V+ / V- buttons. • To exit from a menu screen, you can press MENU button. • The following items are located in the main menu screen: • The volume level selected will remain set, even when the receiver is turned off and on again, until you change volume again. • The audio volume adjustment for the receiver is independent of the volume control on your TV set. IMPORTANT: You should be careful that both volume controls are kept within reasonable levels so that when switching on, or when rst turning on your TV set, the sound level is not too high. On-Screen Information • You can press button to display on-screen information. Details of the station and current programme will be displayed on the information screen. • Particularly; current event name, next event name, and starting and ending time, duration bar, programme mode, channel number and name will be displayed on the information screen (if available). Information Banner • Information banner will be displayed at the bottom of the menu screen in all menus. • Available functions that can be used in the current menu are displayed in the information banner. Managing Stations: Channel List • The set-top-box sorts all stored stations in the Channel List. • You can edit this channel list, set favourites or sort channels by using the Channel List options. • Press MENU button to view main menu. Select Channel List item by using “ ”/“ button. Press OK to view menu contents. Note: You can direclty press OK button to view channel list. Menu System Viewing the Main Menu • Press the MENU button to view main menu. • You can move between menus by using the navigation ( / / / ) buttons on the remote control. • You can enter, select or conrm a menu option by using OK button. • In some sub-menus, you can use BACK button to return to a previous menu screen. Selecting a Specic Channel • Select option should be highlighted by using “ ”/“ ” button. • To watch a specic channel, you should highlight the desired channel using “ ”/“ ” button and press OK button. Selected channel will be displayed. English - 9 - • If the selected channel is password protected, parental lock password will be asked. If the correct code is entered, selected channel can be watched. Operating the Channel List • Press “ ”/“ ” button to select the channel that will be processed. • Press “ ”/“ ” button to select a function on Channel List menu. • Use P+/P- buttons to move page up or down. • Press BLUE button to view ltering options. current character, i.e., ‘b’ character becomes ‘a’ by pressing “ ” and ‘c’ by pressing “ ”. • Pressing the numeric buttons ‘0...9’ replaces the highlighted character with the characters printed above the button one by one as the button is pressed. • Press MENU to cancel editing. • When nished, press OK button to save the new name. Adding Locks to Channels • Select the channel that you want to lock and select Lock option using “ ”/“ ” button. Press OK button to continue. • Press MENU button to exit. • Use INFO button to view more information. Moving a Channel • First select the desired channel to be moved by using “ ”/“ button. • Select Move option in the channel list by using “ ”/“ ” button and press OK button. • Edit Number screen will be displayed. Enter the new channel number by using the numeric buttons on the remote control. • You will be asked to enter parental control PIN code. Default PIN is set as 0000. Enter the PIN number. • Press OK button when the desired channel is highlighted to lock/unlock the channel. Lock symbol will be displayed next to the selected channel. You can repeat the same operation to cancel the lock. Note: Default PIN code is 0000 and it can be changed using the Conguration Menu. Setting Favourites • If there is a previously stored channel on that number, a warning screen will be displayed. Select Yes if you want to move the channel and press OK. • Select Favourites to manage favourite list. Use “ ”/“ ” and OK buttons to select Favourites. • Press OK button to process. Selected channel is now moved. • You can set various channels as favourites so that only the favourite channels are navigated. Note: In some countries, the order of the channels is arranged automatically by the broadcaster. This is called logical channel number (LCN). If the selected country has LCN support, the channels will be enumerated one by one, beginning from number ‘1’. You cannot move any programme to a position after the last saved one. If you try to do this, both programmes will change their places. If LCN support is not available, you can move the channels between 1-999. Deleting Channels • Select the channel that you want to delete and select Delete option using “ ”/“ ” button . Press OK button to continue. • A message will be displayed to conrm your decision. Select YES to delete the selected channel, select NO to cancel. Press OK button to continue. • Select a channel by using ”/“ ” button. Press OK button to add selected channel to the favourites list. • Selected channel will be deleted if you select YES. The operation will be cancelled if you select NO. • F icon indicates that the selected channel is added to the favourites list. Renaming Channels • You can press OK button again to remove the selected channel from the list. • Select the channel that you want to rename and select Edit Name option using “ ”/“ ” button. Press OK button to continue. • Pressing “ ”/“ ” button moves to the previous/ next character. Pressing “ ”/“ ” button toggles the Button Functions: • OK: Adds/removes a station. • BLUE: Displays ltering options. English - 10 - Viewing Electronic Programme Guide (EPG) Event Options In EPG menu, press the OK button to enter the “Programme Options” menu. You can view the electronic programme guide (EPG) to view information about available programmes. Select Programme Guide from the main menu by using “ ”/“ ” buttons. Press OK to continue. HINT: You can also press GUIDE button to view the EPG menu. • Press “ ”/“ ” buttons to navigate through channels. • Press “ ”/“ ” buttons to navigate through the programme list. • EPG menu displays available information on all channels. • Please note that event information is updated automatically. If there are no event information data available for channels, EPG will be displayed with blanks. Select Channel & Exit • Using this option, you can switch to the selected programme or exit. Conguring Settings: Setup Menu • Detailed settings can be congured to suit your personal preferences. • Select Setup from the main menu by using “ ”/“ ” buttons and press OK button to display Setup menu. Red button (Prev Day): Displays the programmes of previous day. Green button (Next day): Displays the programmes of the next day. Yellow button (Zoom): Expands programme information. Blue button (Filter): Views ltering options. INFO (Details): Displays the programmes in detail. Conguration • You can congure main settings of your set top box using conguration screen. • Select Conguration from Setup menu and press OK to continue. • You can press BACK button to exit Numeric buttons (Jump): Jumps to the preferred channel directly via numeric buttons. OK (Options): Displays programme options including “Select Channel” option. P<P: Scrolls page left. Fav: Scrolls page right. Text (Search): Displays “Guide Search” menu. (Now) : Shows the current programme. English - 11 - Active channels TV Out • You can select broadcasts to be listed in the channel list. To display specic types of broadcast, you should use Active channel list setting. • The set-top-box can output RGB and CVBS signal via the TV SCART connector located on the rear panel. • Select Active Channels by using “ ”/“ ” button. • Although the RGB format provides a better picture quality, some devices might not support it. • You can select a broadcast type option from the list by using “ ”/“ ” button. Available modes are: TV Only, Radio Only, Text Only, Favourites or Show All (if available). • Press the MENU button to save the recent changes and exit. Scan Encrypted • When this setting is on, search process will locate the encrypted channels as well. If it is set as Off, encrypted channels will not be located in automatic search or manual search. • Use“ ”/“ ” buttons to highlight Scan Encrypted and press “ ”/“ ” buttons to select YES or NO. Output Settings AC3 Audio • Highlight the AC3 Audio item by pressing “ ”/“ ” buttons. Use the “ ”/“ ” buttons to set the AC3 Audio as On or Off. • If the channel that you are watching supports AC3 Audio, you can turn this setting on. SPDIF Delay You can use this setting when there is an SPDIF synchronization problem in the received broadcast. Press the “ ” or “ ” butto to change the delay. Digital Audio • Use this setting to dene digital audio out signal type. • Use “ ” or “ ” buttons to set Digital Audio as Bitstream or PCM. • If your selected channel includes compressed sound stream, you can connect your set-top box to an external equipment by using digital audio out of your set-top box for enabling the sound output. • If you have no external sound equipment, please select Digital Audio Out as PCM by using “ ” or “ ” button. HDMI Resolution • This setting enables you to change HDMI resolution as 576P, 720P, 1080i or 1080P. • Use “ ”/ “ ” button on the remote control to change resolution and press GREEN button to apply. TV Type • Digital terrestrial television channels can be broadcast in a widescreen format which must be output differently to normal and widescreen TV sets. • This function defines the screen format of the connected TV to enable broadcasts’ being displayed correctly. HDMI HDCP • In the Conguration menu, highlight the HDMI HDCP item by pressing “ ” or “ ” buttons. • Use the “ ” or “ ” button to set the HDMI HDCP as On or Off. • Select 4:3 if you have a standard TV set with 4:3 aspect ratio. • Select 16:9 if you have a widescreen TV. • If you select Auto, TV type will be set automatically according to the broadcast. Note: This function also enables you to change TV Type that you have previously selected during the rst time installation. English - 12 - Receiver Upgrade Guidance • When set, this option gets the maturity information from the broadcast and if this maturity level is disabled, the TV will not display the related videoaudio. Set Pin • Press OK to display the “Set PIN” window. Use numeric buttons to enter the new pin number. You will need to input your new pin a second time for verication purposes. • The factory default pin number is 0000. If you change the pin number make sure you write it down and keep it safe. • To ensure that your set-top-box always has the most update information, you can use this setting. In order for the proper operation, please ensure that the box is set to standby mode. • The STB automatically powers up at 3.00 A.M. every day and searches for any new software that may be broadcast. If found, the box will download new software automatically. This operation will normally take approximately 30 minutes. • You can enable or disable automatic upgrade by setting Automatic Scanning option. • You can manually search for new software by selecting Scan for upgrade. • To upgrade software via USB, you can use USB Upgrade setting. Parental Settings Low Power If you enable low power option, low power mode will be activated. In low power mode the power consumption is less then 1W (in standby). If you disable low power option the power consumption will be higher than 1W in standby mode however the opening time will be shorter. Audio Description • Audio description refers to an additional narration track for blind and visually impaired viewers of visual media, including television and movies. • The description narrator talks through the presentation, describing what is happening on the screen during the natural pauses in the audio (and sometimes during dialogue, if deemed necessary). • You can use this feature, only if the broadcaster supports that additional narration track. • This setting congures parental settings. • Select Parental Lock option by using “ ”/“ ” buttons. • Press OK button to enter the menu. • To display parental lock menu options, PIN number should be entered. Factory default PIN number is 0000. After coding the correct PIN number, parental settings menu will be displayed: Low Power If you enable low power option, low power mode will be activated. In low power mode the power consumption is less then 1W (in standby). If you disable low power option, the power consumption will be higher than 1W in standby mode however the opening time will be shorter. Audio Description Menu Lock • Menu lock setting enables or disables the menu access. You can disable access to the installation menu or the whole menu system. This function enables or disables the audio description feature by pressing the “ ” or “ ” buttons. Available Langs. Set available language options (if available) English - 13 - IP Settings Preferred Language (Optional) By pressing the “ ” or “ ” buttons, preferred audio description language is changed (if available). Relative Volume (Optional) Using this option, Audio Description volume level can be increased or decrased relatively, according to the general volume. Auto Sleep • Press “ ” or “ ” button to select Auto Sleep. Use “ ” or “ ” button to set the Auto Sleep to Active, Off or set to a customised time period. • You can set the timeout value of auto off feature. After the timeout value is reached, the box will switch off. Conguring Language Preferences • You can operate the TV’s language settings using this menu. • Select Language from Setup menu and press OK to continue. • You can congure your receiver’s IP settings by using this menu screen. • Press YELLOW button to set static IP settings. • Use BLUE button to congure dynamic IP settings. • You can press RED button to disable IP conguration. • In order for the ethernet host to work correctly with your internet connection it needs to have a unique IP address. In most cases all of the parameters can be provided by the DHCP server in their router. In this case you should use the “Dynamic” option. • In the unlikely event that you dou not have a DHCP server in your router or if you prefer to assign your own IP address, then the “Static” option can be used. You will need to enter a unique IP address along with the default gateway and DNS server. In most domestic networks the default gateway and DNS server will both be the IP address of the router. Installation • Installation menu will help you to retune your set-topbox in order to store new services or stations. Menu: shows the language of the system. Preferred These settings will be used if available. Otherwise current settings will be used. • Select Installation from Setup menu by using “ ” or “ ” buttons and press OK to continue. • Installation menu includes the following items: • Audio: Sets the preferred audio language. • Subtitle: Sets the subtitle language. Selected language will be seen in subtitles. • Guide: Sets guide language. Current (*) (*) These settings can be changed if only the broadcaster supports. Otherwise, settings will not be available to be changed. • Audio: Changes the audio language for the current channel. • Subtitle: Sets the subtitle language for the current channel. Automatic Channel Scan • Select Automatic Channel Scan by using “ ” or “ ” button and press OK button. • Then the following message will be displayed on the screen: English - 14 - No Signal • When the box receives no signal (e.g. the antenna cable is disconnected), “NO SIGNAL” message will be displayed on the screen. • Highlight Yes or No by using “ ” or “ ” buttons and press OK button to conrm. • If Yes is selected, automatic search starts. • Selecting No cancels automatic search. • After the scanning is completed, your set-top-box will store all the available channels. Manual Channel Scan • This feature can be used for direct broadcast entry. • Select Manual Channel Scan by using “ ” or “ ” button and press OK button. • In manual channel scan, the number of the multiplex is entered manually and only that multiplex is searched for the channels. • For each valid channel number, signal level and signal quality are shown on the screen. • In both manual and auto search, any existing channel in the database is not re-stored to avoid duplicates of that channel. No Channels Have Been Added Yet • When there are no channels stored in the box, Channel List menu will not be displayed and channel navigation will not be available. • In such cases, the following error message will be displayed. First Time Installation • If you want to load default settings of your set-topbox, you can perform rst time installation. • Select First Time Installation by using “ ” or “ ” button and press OK button. • The following message, asking you whether or not to delete all channels and settings, will be displayed. Displaying Text • Many digital terrestrial television channels broadcast pages of information on the programmes, the weather, news and other topics. • This digital teletext can be displayed by your settop-box. Indeed, some channels broadcast teletext information entirely. • Highlight No by using “ ” or “ ” button to cancel installation. • When such a channel is selected, it will usually display the opening page of information automatically, after a short break, . • Highlight Yes by using “ ” or “ ” button and press OK button to start rst time installation. • Some channels mostly have digital teletext pages broadcast along with the television programme. • After you select Yes, factory settings will be loaded. • Press TEXT button to activate digital teletext pages (if available). • Installation wizard will guide you through the installation process. See the section, “First Time Installation” in previous chapters for more information on this process. • You can move through the information channels by using navigation (“ ”/“ ”/“ ”/“ ”), OK and coloured buttons. • Press TEXT button again to exit teletext mode. OSD Warning Messages • Some warning messages may appear on the screen indicating that a related function may not be working properly. English - 15 - Troubleshooting Problem Possible Reasons What To Do The LED indicator does not glow. Power Adaptor is not connected. Check if the mains cable is plugged into the power socket. No picture or sound. No signal or weak signal. Check the aerial and video connections (scart/HDMI). The set-top-box was unplugged Make sure that the box is in Changes in the settings have not without rst switching to standby standby mode before unplugging taken effect. it from the mains. mode. • Press the STANDBY button. The remote control is not working. • The set-top-box is in standby. • Remote control is out of range. • Batteries are exhausted. • Check that the remote control range is clear. • Replace the batteries with new ones. Contact the Tesco Electrical Helpdesk. Password is forgotten. Information for Users on Disposal of Old Equipment and Batteries [European Union only] These symbols indicate that equipment with these symbols should not be disposed of as general household waste. If you want to dispose of the product or battery, please consider the collection systems or facilities for appropriate recycling. Battery Notice: The sign Pb below the symbol for batteries indicates that this battery contains lead English - 16 - General Characteristics Supply Voltage for set-top box: 12 V DC Supply Voltage for DC Adaptor : 220 - 240 V AC ~ 50Hz Input Frequency 470Mhz-862Mhz Maximum Power consumption 15 W Typical Power consumption 8W Standby Low Power Consumption <1 W USB (optional) Current Limit 500mA Operating temperature 5ºC to +40ºC Storage temperature -20ºC to +70ºC Humidity 25 to 75 % rel Physical dimensions 295 x 170 x 40 mm Weight 900 g Hardware Conguration Main Processor MPEG Decoder NEC EMMA3SL/HD Flash Memory 8MB NOR BGA DDRRAM 2x128MB DDR2(HD Decoding for HD Mpeg4 Receiver) Digital Capabilities Transmission Standards: DVB-T, MPEG2 MPEG4 DVB-T2, MPEG4 Demodulation: • Combined DVB-T2, DVB-T demodulator that conforms to the ETSI EN 302-755 (second generation Terrestrial) and ETSI EN 300-744 (Terrestrial) standards. • Symbol rate: COFDM with 2k, 4k, 8k, 16k, 32k FFT mode • Modulation: 16QAM, 64QAM, 256QAM FEC for all DVB modes (automatically found) VIDEO • H.264 (MPEG-4 part 10) main and high prole level 4.1/MPEG-2 MP@HL video decoder. • HD display multi format capable (1080p, 1080i, 720p, 576p) • Analogue SD output: RGB and CVBS AUDIO • MPEG-1 layer I/II, MPEG-2 layer II, MPEG-2 AAC, MPEG-4 AAC • Sampling frequencies supported are 32, 44.1 & 48 kHz Remote Control Operating Distance 10 m Max. Batteries 2x1.5V Micro (R-03/AAA) Tuners 1 xRF In IEC-type, female (75Ohm) 1 x RF Out (loop through) IEC-type, male (75Ohm) Front Panel Display : 7 segment led display Remote Control Keys Standby, PR+ / PR- English - 17 - Audio Output 2 Vrms, 0 dBfs / Z = 10 kohm Digital Audio Output Optical SPDIF A / V & Data In / Out Scart TV scart RGB Video Output TV scart CVBS Video Output TV scart Analog Audio Output TV scart Digital Audio Output Optical output HDMI Output HDMI USB Input USB 2.0 High Speed (Optional) (For service use only.) NOTE: The USB port is used for software upgrading only. USB connector does not have any other functions such as playing audio or picture les. It is only used for software upgrading. Tv Scart Video output : Composite video signal; 1 Vp-p±3dB/75 ohm Audio output : 2 Vrms / Z = 10kW Function switching : 12V / 6V for 4:3 / 16:9 / Z = 10kW English - 18 - Following information is only for EU-member states: The use of the symbol indicates that this product may not be treated as household waste. By ensuring this product is disposed of correctly, you will help prevent potential negative consequences for the environment and human health, which could otherwise be caused by inappropriate waste handling of this product. For more detailed information about recycling of this product, please contact your local city office, your household waste disposal service or the shop where you purchased the product.