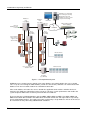
1
Access Control
Design Guide
An engineer's guide for planning and installing a Symmetry™
Access Control System using M2150 Controllers
MAN-M2150/ENG
(9600-0420)
© G4S Technology 2009
All rights reserved. No part of this publication may be reproduced in any form without the written permission of
G4S Technology Limited.
G4S Technology Limited cannot be held liable for technical and editorial omissions or errors made herein; nor
for incidental or consequential damages resulting from the furnishing, performance or use of this material.
NOTE: This equipment has been tested and found to comply with the limits for a Class A digital device,
pursuant to part 15 of the FCC Rules. These limits are designed to provide reasonable protection against
harmful interference when the equipment is operated in a commercial environment. This equipment
generates, uses and can radiate radio frequency energy and, if not installed and used in accordance with
the instruction manual, may cause harmful interference to radio communications.
Operation of this equipment in a residential area is likely to cause harmful interference. In which case, the
user will be required to correct the interference at his own expense.
Access Control Design Guide
MAN-M2150/ENG
(9600-0420)
st
Issue 1.4 – 1 November 2010
All trademarks acknowledged.
ENVS and Symmetry are trademarks of G4S Technology Limited.
MIFARE is a registered trademark of NXP Semiconductors.
HID is a registered trademark of HID Corporation.
Texas Instruments is a trademark of Texas Instruments Incorporated.
iCLASS is a trademark of HID Corporation.
Contents
1
Preface ................................................................................................. v
About this Guide ............................................................................................................................ v
Underwrites Laboratories (UL) Compliance .................................................................................. v
M2150 Installation Instructions ...................................................................................................... v
1
Chapter 1: Introduction to Symmetry and M2150 ................................. 1
About Symmetry .............................................................................................................. 1
Symmetry M2150.............................................................................................................. 1
Summary of M2150 Components ................................................................................................. 3
Examples of Equipment Use ......................................................................................................... 7
2
Chapter 2: Designing and Planning an M2150 System......................... 8
About this Chapter ........................................................................................................... 8
Starting a Site Schematic ................................................................................................ 8
Selecting the Database Units and Controllers............................................................... 8
Using Chains for System Expansion ............................................................................................. 9
Monitor Points, Auxiliary Outputs and Alarms Controllers ............................................................. 9
Planning the Location of Database Units and Controllers ........................................................... 10
Specifying the Address of a Door or Alarms Controller ............................................................... 11
Specifying the Database Unit Communications Options (Port Usage) ....................................... 11
Planning for Elevator Control ....................................................................................... 14
Siting of Elevator Nodes .............................................................................................................. 14
Enable All and Enable Select Modes .......................................................................................... 14
Cable Requirements.................................................................................................................... 15
Free/Secure Relay....................................................................................................................... 16
Tenant Security ........................................................................................................................... 16
Fireman's Switch ......................................................................................................................... 16
Coordination with other Contractors ............................................................................................ 16
Safety .......................................................................................................................................... 17
Federal Fire Code ....................................................................................................................... 17
Power for Readers and Free/Secure Indicator ............................................................................ 17
Choosing the Cabinets .................................................................................................. 18
ENC3/CAB3A .............................................................................................................................. 18
ENC4/CAB4A .............................................................................................................................. 18
CAB5 ........................................................................................................................................... 18
ENC-1L ........................................................................................................................................ 19
ENC-1.......................................................................................................................................... 19
RAK3 ........................................................................................................................................... 19
Elevator Node Cabinet ................................................................................................................ 19
Batteries ...................................................................................................................................... 19
Planning Antipassback.................................................................................................. 20
Timed Antipassback .................................................................................................................... 20
Zonal Antipassback ..................................................................................................................... 20
Selecting the Readers ................................................................................................... 22
Ordering WIM Modules (Wiegand Readers) ............................................................................... 22
Planning the Reader Locations ................................................................................................... 23
Using RS485 Readers ................................................................................................................. 23
Using Two Readers at One Door ................................................................................................ 23
Access Control Design Guide
iii
Contents
Specifying the Door Furniture ...................................................................................... 24
Power for Door Releases ............................................................................................................ 24
Using Noise Suppression ............................................................................................................ 24
Choosing Cable Supervision ....................................................................................................... 25
Using an Edge Network Video Server (ENVS) ............................................................. 26
Considering the Power and Ground Requirements .................................................... 27
Introduction ................................................................................................................................. 27
Checking the Current Available for External Devices ................................................................. 27
AC Monitor .................................................................................................................................. 28
Information for Expert Planners .................................................................................................. 28
Determining the Cable and Wiring Requirements ....................................................... 30
Cable Supervision ....................................................................................................................... 31
Planning the SMS Software and PC Requirements ..................................................... 33
Selecting the SMS Software Edition............................................................................................ 33
Selecting the Client Software ...................................................................................................... 35
Software Sentinels Required ....................................................................................................... 36
Determining the PC Requirements ............................................................................................. 36
Installation Requirements ............................................................................................. 37
UL Requirements ........................................................................................................................ 37
Shielded Cable (Screens) ........................................................................................................... 37
Electrical Codes .......................................................................................................................... 37
Cable Clips .................................................................................................................................. 37
Preparing for the Site Visit .......................................................................................................... 37
A
Appendix A Maintenance and Test Procedures .................................. 38
General Procedures ....................................................................................................... 38
LED Operation................................................................................................................ 38
Fuse Ratings .................................................................................................................. 44
Performing a Warm or Cold Reset................................................................................ 45
Updating Firmware ........................................................................................................ 45
B
Appendix B Underwriters Laboratories (UL) Compliance .................... 54
C
Appendix C: M2150 Specifications...................................................... 56
D
Appendix D: Site Schematic Check List .............................................. 59
E
Index ...................................................................................................... i
iv
Access Control Design Guide
1 Preface
About this Guide
This guide is a document for people who need to design or install Symmetry M2150 systems. The manual
gives:
•
An overview of Symmetry and the M2150 hardware.
•
Design, planning and installation advice.
•
Test and maintenance procedures.
•
System specifications.
It is recommended people new to M2150 read this guide.
It is assumed that you understand the basic concepts of security management and access control,
including the purpose of components such as card readers, monitor points, auxiliary outputs and door
releases. If you do not have this knowledge, read the introductory chapter of the Security Management
System User's Guide first.
In most cases, experienced installers should be able to install the M2150 equipment using only the
separate single-sheet installation instructions provided with each cabinet, board and module. However, this
document may also be needed to gain information about non-standard features.
It is assumed that installers are competent and understand general hardware installation practices.
Underwrites Laboratories (UL) Compliance
Please refer to Appendix B Underwriters Laboratories Compliance on page 54 for information regarding
UL294 listed equipment and requirements.
M2150 Installation Instructions
This guide does not include detailed connection information. Such information is available in the installation
instructions. The following installation instructions are available (supplied in the box with the item):
8DBC Installation Instructions (9600-0421) (UL LISTED)
4DBC Installation Instructions (9600-0485) (UL LISTED)
2DBC Installation Instructions (9600-0486) (UL LISTED)
DBU Installation Instructions (9600-0460) (UL LISTED)
8DC Installation Instructions (9600-0422) (UL LISTED)
4DC Installation Instructions (9600-0467) (UL LISTED)
4DCN Installation Instructions (9600-0501) (NOT EVALUATED BY UL)
2DC Installation Instructions (9600-0466) (UL LISTED)
Symmetry RAK3 Installation Instructions (9600-0478) (NOT EVALUATED BY UL)
M2150 CAB3A Installation Instructions (9600-0418) (UL LISTED)
M2150 CAB4A Installation Instructions (9600-0419) (UL LISTED)
M2150 CAB5 Installation Instructions (9600-0483) (NOT EVALUATED BY UL)
M2150 ENC-1L Installation Instructions (9600-0494) (NOT EVALUATED BY UL)
Access Control Design Guide
v
Preface
M2150 ENC1 Installation Instructions (9600-0493) (NOT EVALUATED BY UL)
M2150 ENC3 Installation Instructions (9600-0495) (NOT EVALUATED BY UL)
M2150 ENC4 Installation Instructions (9600-0496) (NOT EVALUATED BY UL)
ENVS Installation Instructions (9600-0431) (NOT EVALUATED BY UL)
AC24/4 Alarms controller Installation Instructions (24IN-4OUT) (9600-0492) (UL LISTED)
OC4/24 Alarms controller Installation Instructions (4IN-24OUT) (9600-0465) (UL LISTED)
Elevator Controller (Master Unit) Installation Instructions (9600-0482) (UL LISTED)
Elevator Node (Slave Unit) Installation Instructions (9600-0337) (UL LISTED)
Power Supply Board Installation Instructions (MN-PSU-6A) (9600-0423) (UL LISTED)
Power Supply Board Installation Instructions (MN-PSU-2+2) (9600-0481) (NOT EVALUATED BY UL)
Power Supply Board Installation Instructions (MN-PSU-KIT 7000-5283) (9600-0316) (UL LISTED)
Dual RS485 Reader Interface Module Installation Instructions (9600-0322) (NOT EVALUATED BY UL)
Quad RS485 Reader Interface Module Installation Instructions (9600-0323) (NOT EVALUATED BY UL)
NIC4 Installation Instructions (9600-0424) (UL LISTED)
NIC-WI Installation Instructions (9600-0455) (NOT EVALUATED BY UL)
One-Port RS232 Module (MN-232-1) Installation Instructions (9600-0461) (NOT EVALUATED BY UL)
OC4/8 IO Module Installation Instructions (9600-0468) (UL LISTED)
AC8/4 IO (MN-I/O) Module Installation Instructions (9600-0326) (UL LISTED)
RS232-to-20mA Converter Installation Instructions (9600-0321) (NOT EVALUATED BY UL)
SMS Software Installation Manual (9600-0427) (UL LISTED)
The Digital Video Design Guide (9600-0435) provides an introduction to digital video systems and factors
that need to be considered before installing a system that includes an ENVS (NOT EVALUATED BY UL).
The SMS Software Installation Manual (9600-0427) gives the SMS PC hardware and software
requirements.
vi
Access Control Design Guide
1 Chapter 1:
Introduction to Symmetry
and M2150
About Symmetry
Symmetry is a security management system that provides a single integrated solution for all key elements
of site security, including access control, intruder detection, guard patrolling, intercom management, CCTV
monitoring, video recording and video playback. Symmetry is able to match the requirements of any size of
organization, from a small office requiring just a few access-control readers, to a large company requiring
the full range of automated security systems spread over multiple sites and countries.
Symmetry has a modular approach to system design, which allows the hardware and software components
to be selected to match the exact needs of the site. As the organization grows or requirements change,
additional components can be easily added to extend the capabilities and size of the system.
A key feature of Symmetry is that it brings together all key elements of site security within a single fullyintegrated solution. This allows the different components to work together to enhance site security. For
example, video recordings can be started automatically by intrusion alarms, lights can be switched on by
access-control transactions, and doors can be automatically unlocked by a fire alarm. Integration is often a
key business requirement, not only to improve the capabilities of the system, but also to enhance operator
efficiency.
Symmetry is supplied with the Security Management System software (SMS software), which can run on a
standalone PC, or in a client/server networked architecture. The software enables an operator to configure
the system, enter card holder details, design and print badges, view video, manage visitors, operate
hardware, view alarms, produce reports, manage the system, and much, much more. The SMS software
provides single user interface, irrespective of the modules included. Features such as alarm management,
graphics display and report generation are common across all modules, allowing operators to monitor and
control all equipment from a single user interface.
Symmetry M2150
Symmetry M2150 is a range of database units, controllers and other hardware components. The M2150
hardware provides all the necessary connections for card readers and door furniture, including release
devices, bypass circuits, door monitors and exit-request buttons. The M2150 hardware carries out a wide
range of tasks, such as granting or denying access, running scheduled and trigger commands, logging
transactions and monitoring sensors. An example of an M2150 system is shown in Figure 1-1.
Access Control Design Guide
1
Introduction to Symmetry and M2150
Standalone or networked
PCs running the Security
Management System
Software (used for system
setup and monitoring).
Database
Unit
(e.g. 4DBC)
Database
Unit
(e.g. DBU)
Up to 32
database units
in chain
Wired or
wireless
comms
Edge Network Video
Server (ENVS)
LAN/WAN
Door
Controller
(e.g. 2DC)
Door
Controller
(e.g. 2DC)
Door furniture
(door release,
bypass and
door monitor)
Auxiliary Outputs
Monitor Points
Up to 16 readers per
database unit
Monitor Points
Alarms
Controller
(e.g. AC24/4)
Figure 1-1: Example M2150 System
All M2150 access control systems contain at least one database unit, which contains the access control
rules set up at a PC running the SMS software (version 6.1 SP2 or later). SMS PCs can communicate with
database units over a network, modem or serial RS232 connection.
Since each database unit stores the access control rules applicable to the readers and other devices it
manages, this distributes and localizes processing tasks, enhances system performance and enables the
system to operate without the need for a permanent link to an SMS PC.
There are four types of M2150 database unit: the 2DBC, 4DBC, 8DBC and DBU. The 2DBC, 4DBC and
8DBC have built-in door controllers that allow direct connection of two, four and eight readers respectively,
and associated door furniture. The number of readers managed by a single database unit can be increased
to a maximum of 16 by connecting additional door controllers.
2
Access Control Design Guide
Introduction to Symmetry and M2150
A database unit and all the controllers that are connected to it is collectively known as a "node".
An elevator node is available that can control access to 64 elevator floors and four cabs. The node
contains an Elevator Interface Board, which is a controller that enables the elevator readers and other
hardware, such as floor buttons, to be connected.
Monitor points and auxiliary outputs are provided by fitting I/O module(s) to a database unit, or by
connecting separate alarms controllers. Monitor points enable the current state of digital devices such as
alarm sensors to be monitored. Auxiliary outputs are relays that allow external devices such as sirens or
indicators to be switched on or off manually from the SMS software, automatically at predefined times
during the day, or in response to an event such as a door opening. A single database unit can control up to
96 monitor points or auxiliary outputs, depending on the boards used (see page 7).
If more than 16 readers are needed, or additional auxiliary outputs or monitor points are required, the
system can be expanded by adding additional database units. Each database unit can communicate
independently with an SMS PC (e.g. over a network). Alternatively, a chain of up to 32 database units can
be used by connecting the COM B port of one database unit to the COM A port of the next; this requires
only the database unit at the head of the chain to communicate with an SMS PC, as shown in Figure 1-1.
1
Depending on the license purchased, each SMS PC can support up to 512 LAN chains and/or 16 dialup/serial hardwired chains. With up to 32 database units per chain, this gives great flexibility to extend the
system to meet the needs of any size of organization.
Summary of M2150 Components
M2150 has a flexible approach to the system hardware. If required, the hardware can be purchased as a
"kit of parts", which enables the boards, modules and cabinets to be selected to match the exact needs of
the installation and to reduce the overall cost of the system. Alternatively, to simplify installation, "off-theshelf" solutions are available, consisting of the most common board combinations already fitted inside a
cabinet.
Table 1-1 summarizes the main boards and devices available for M2150 systems.
Table 1-2 summarizes the optional modules.
Note: Any equipment that has not passed UL294 must not be installed at sites that require UL
conformance. Please refer to Appendix B on page 54 if you are installing equipment at a site that requires
UL294 compliance.
1
System maximum of 1024 LAN chains.
Access Control Design Guide
3
Introduction to Symmetry and M2150
Table 1-1: Summary of M2150 Main Boards
Device
DBU
Picture
Purpose
A database unit that allows autonomous operation of up to 16 readers.
Readers, monitor points and auxiliary outputs connect using separate door
and/or alarms controllers.
The unit can be fitted with an optional NIC-4 or NIC-WI module, which
allows LAN or wireless access from an SMS PC for system configuration,
monitoring and reporting. If required, two NIC-4 modules can be fitted to
provide resilience against network interruptions. An integrated RS232 port
is provided if serial or modem communications with the SMS PC is
preferred.
A one-port RS232 module can be fitted for integration with an optional
serial device such as an ENVS when the integrated RS232 port is already
in use.
An on-board 3.6V battery maintains system configuration in the event of a
power disruption.
A DBU is also used in an elevator node to control access to elevator
floors.
2DBC
This is a combined database unit and door controller. It includes the same
features as a DBU, but has an integrated door controller that allows direct
connection of up to two readers and associated door furniture (release
device, bypass, door monitor and exit request button).
20mA multiNODE Current Loop Protocol (MCLP), Wiegand or RS485
readers can be connected (Wiegand readers require the WIM-2 module;
RS485 readers require the Dual RS485 Reader module).
An optional I/O module can be fitted to enable connection of auxiliary
outputs and monitor points.
Additional readers, monitor points and auxiliary outputs can connect using
separate door and/or alarms controllers. The 2DBC can manage up to 16
readers.
4DBC
This is a combined database unit and door controller for up to four readers
and associated door furniture (release device, bypass, door monitor and
exit request button).
20mA (MCLP), Wiegand or RS485 readers can be connected (Wiegand
readers require the WIM-4 module; RS485 readers require the Quad
RS485 Reader module).
Up to two optional I/O modules can be fitted to enable connection of
auxiliary outputs and monitor points.
Additional readers, monitor points and auxiliary outputs can connect using
separate door and/or alarms controllers. The 4DBC can manage up to 16
readers.
4
Access Control Design Guide
Introduction to Symmetry and M2150
8DBC
This is a combined database unit and door controller for up to eight
readers and associated door furniture (release device, bypass, door
monitor and exit request button).
20mA (MCLP) or Wiegand readers can be connected (Wiegand readers
require the WIM-8 module).
An optional I/O module can be fitted to enable connection of auxiliary
outputs and monitor points.
Additional readers, monitor points and auxiliary outputs can connect using
separate door and/or alarms controllers. The 8DBC can manage up to 16
readers.
2DC
A two-door controller for connection of up to two readers and associated
door furniture. Door controllers can be sited up to 3000ft (1km) from the
database unit.
A port is provided for an optional I/O module, which allows connection of
auxiliary outputs and monitor points.
20mA (MCLP), Wiegand or RS485 readers can be connected (Wiegand
readers require the WIM-2 module; RS485 readers require the Dual
RS485 Reader module).
4DC
A four-door controller, with two ports for optional I/O modules.
20mA (MCLP), Wiegand or RS485 readers can be connected (Wiegand
readers require the WIM-4 module; RS485 readers require the Quad
RS485 Reader module).
4DCN
8DC
This is the same as a 4DC, but with the same shape and footprint as a
4DBC. The 4DCN is available only in certain markets.
An eight-door controller, with one port for an optional I/O module.
20mA (MCLP) or Wiegand readers can be connected (Wiegand readers
require the WIM-8 module).
AC24/4
An alarms controller that provides 24 monitor points and four auxiliary
outputs. The controller can be sited up to 3000ft (1km) from the database
unit.
OC4/24
An alarms controller that provides four monitor points and 24 auxiliary
outputs.
Access Control Design Guide
5
Introduction to Symmetry and M2150
A four-camera digital video server (see page 26).
ENVS
Table 1-2: M2150 Optional Modules
Device
One-Port
RS232
module
Picture
Purpose
A module (MN-232-1) that mounts onto a database unit to enable use of a
fall-back modem, bi-directional communications with an SMS PC, or
communications with a serial device such as an ENVS. The module is
necessary only if the integrated RS232 port is in use.
NIC4
module
A module that mounts onto a database unit to enable wired Ethernet
communications with an SMS PC. Encrypted and non-encrypted
communications versions are available.
NIC-WI
module
A module that mounts onto a database unit to enable wireless
communications with an SMS PC. The module supports 802.11b 128-bit
WEP and WPA encryption.
A separate aerial is provided with a magnetic base for placement on the
outside of the cabinet.
6
WIM
module
A module that mounts onto an 8DBC, 4DBC or 2DBC or door controller to
enable the use of Wiegand-interfaced readers. WIM-8, WIM-4 and WIM-2
variants are available.
Dual
RS485
module
A reader-interface module that mounts onto a 2DC or 2DBC to enable up
to two RS485 readers to be connected.
Quad
RS485
module
A reader-interface module that mounts onto a 4DC, 4DCN or 4DBC to
enable up to four RS485 readers to be connected.
8IN-4OUT
I/O
module
A module (known as the AC8/4 or MN-I/O) that mounts onto an 8DBC,
4DBC or 2DBC or door controller to enable connection to up to eight
monitor points and four auxiliary outputs.
4IN-8OUT
I/O
module
A module (known as the OC4/8) that mounts onto an 8DBC, 4DBC or
2DBC or door controller to enable connection to up to four monitor points
and eight auxiliary outputs.
Access Control Design Guide
Introduction to Symmetry and M2150
Examples of Equipment Use
Table 1-3 gives examples of the maximum number of readers, auxiliary outputs and monitor points that are
available with different combinations of equipment. The table shows a small sample of possible
configurations.
Table 1-3: Examples of Equipment Use
Readers
Monitor
Points
Auxiliary
Outputs
DBU + Two 8DCs, each fitted with AC8/4 I/O Module (8IN-4OUT)
16
16
8
8DBC + 8DC fitted with OC4/8 I/O Module (4IN-8OUT)
16
4
8
8DBC + 2DC fitted with AC8/4 I/O Module (8IN-4OUT)
10
8
4
DBU + 4DC fitted with OC4/8 I/O Module (4IN-8OUT)
4
4
8
Devices
DBU + Four AC24/4 Alarms Controllers (24IN-4OUT)
0
96
16
DBU + Four OC4/24 Alarms Controllers (4IN-24OUT)
0
16
96
8DBC fitted with AC8/4 I/O Module + Two AC24/4 Alarms
Controllers
8
56
12
Access Control Design Guide
7
2 Chapter 2:
Designing and Planning an
M2150 System
About this Chapter
This chapter explains the issues to consider during system design, planning and installation.
Starting a Site Schematic
Design of an M2150 access control system should include a Site Schematic, which is a plan of the building
that indicates all key information that the installation team will require, such as the locations of card readers
and doors, the types and locations of hardware to use, cable routing paths, antipassback zones, etc. When
planning a system, it is recommended that you mark all relevant information on the Site Schematic. You
should begin by marking the positions of all doors to be access controlled.
A checklist is provided on page 59. It is recommended that you print the checklist and mark off each
relevant item as you work through this chapter.
Selecting the Database Units and Controllers
Begin the design of the system by determining the number of readers required, and from that, the number
of database units and door controllers that are needed. Consider whether it is appropriate to incorporate a
degree of contingency to allow additional readers to be added at a later date without major changes to
system hardware.
The range of M2150 database units and door controllers is given in Table 1-1 on page 4. Note, however,
that RS485 readers (page 23) cannot connect to an 8DBC or 8DC, since these devices do not have a port
for an RS485 module. It is normal to use 20mA (MCLP) readers (as described on page 22).
Remember that each database unit can control up to 16 readers by connecting additional door controllers.
You can use this feature to minimize the hardware cost, since it is cheaper to add a door controller than to
use another database unit that has an integrated controller.
You can also minimize hardware cost by choosing combinations that reduce the number of cabinets,
boards and power supplies required. For example, a cost-effective solution for a 16-reader system is an
8DBC and 8DC in a single CAB5 cabinet. The section on page 18 provides details of which combinations
of boards fit in each cabinet, and it is important to refer to this section when you are making your choices.
In some cases, it may be more cost effective to use a larger number of separate cabinets than is strictly
necessary. For example, a 2DBC and three 2DCs, rather than a single 8DBC. The cost saving occurs,
since it allows door controllers to be sited closer to the relevant doors, which can reduce the length of
8
Access Control Design Guide
Designing and Planning an M2150 System
cables to readers and door furniture and therefore the cost of installing the equipment. When choosing the
number and type of database units and door controllers, consider the locations of the readers and the total
cost of installing the equipment, not just the cost of the hardware.
Using Chains for System Expansion
When more than one database unit is required, a common practice is to fit a NIC module to each database
unit. This allows each database unit to connect independently to the network. If network sockets are
provided throughout a building, this may be a convenient method of enabling communications between the
database units and the PCs running the SMS software. However, a more cost-effective solution may be to
use a "chain" of database units.
In a chain, a cable of up to 3000ft (1km) connects each database unit to the next (the COM B port
connects to the COM A port of the next database unit in the chain). Only the first database unit in the chain
requires a network or serial communications link to an SMS PC. For network communications, this means
that only one NIC module needs to be purchased, and only one IP address needs to be used. For serial
communications, the benefit is that additional COM ports do not need to be provided at SMS PCs.
A chain can contain up to 32 database units. Each database unit requires a unique address in the range 1
to 32, which is set using bit switches on the PCB.
You can connect an M2150 database unit to an existing multiNODE chain. It cannot be connected to a
legacy Micronode chain. A multiNODE-2 or M2000 cannot be connected to a newly-defined M2150 chain.
Symmetry has a limit of 1024 LAN chains. The chains must contain more than one database unit in large
installations that require more than 1024 LAN-connected database units.
Monitor Points, Auxiliary Outputs and Alarms Controllers
Determine the number of any monitor points and auxiliary outputs that are required, mark this information
on the Site Schematic, then consider how to provide them. There are two choices: using I/O modules or
alarms controllers.
An I/O module normally gives a cost-effective method of providing monitor points and auxiliary outputs,
since the module simply slots into a socket on the PCB of a database unit or door controller. This means
that no separate cabinet or power supply is needed. Most database units and door controllers have at least
one socket for an I/O module – refer to Table 1-1 on page 4 for details.
An I/O module provides up to eight monitor points and four auxiliary outputs, or four monitor points and
eight auxiliary outputs, depending on the module selected (see Table 1-2 on page 6).
If there is a requirement for a large number of monitor points or auxiliary outputs, connecting separate
alarms controllers to the database unit may be a better solution. However, each alarms controller reduces
the number of readers that the database unit can manage by four.
There are two alarms controllers: the AC24/4 has 24 monitor points and four auxiliary outputs, and the
OC4/24 has four monitor points and 24 auxiliary outputs.
Alarms controllers connect to a database unit or other controller in exactly the same way as a door
controller. Therefore, multidrop and star connection topology can be used, with the same maximum length
of cable. Any combination of door and/or alarm controllers can connect to a database unit, providing the
number of controller addresses used does not exceed eight.
Access Control Design Guide
9
Designing and Planning an M2150 System
Power for Auxiliary Outputs
In most cases, power for auxiliary outputs can be sourced from the controller's internal power supply unit.
You will need to make sure that the power supply is able to provide sufficient current for all required
devices. The section on page 27 explains how to do this.
If additional current is needed, you will need to order separate power supplies, but note that for sites
requiring UL compliance, all additional power supplies used must be power limited, UL Listed for Access
Control Systems and Accessories.
Cable Supervision for Monitor Points
Monitor points connected to any device other than an ENVS can be supervised for short circuits, open
circuits and tamper conditions, as described on page 31.
Determine the level of cable supervision that is required, mark this on the Site Schematic, and make sure
that the correct resistors are available to the installer.
Planning the Location of Database Units and Controllers
Decide where to install each database unit and controller, and mark this on the Site Schematic. The
devices must be positioned in a location that is accessible for maintenance purposes, and away from
excessive levels of moisture, dust, vibration, heat or electromagnetic interference. Wall-mount and rackmount cabinets are available (see page 18).
The section on page 30 gives the maximum cable lengths for all M2150 devices. Carefully plan all cable
routes to database units, controllers, readers, monitor points and auxiliary outputs. Mark the routes on the
Site Schematic, with the cable type to use.
Before finalizing your choices of which database units and controllers to use, check whether there are any
mounting or space limitations that will prevent the use of the larger cabinets and therefore certain
combinations, such as an 8DBC and 8DC in a CAB5.
The first database unit in a chain requires a network, serial or modem connection to an SMS PC. The
proximity of a network socket, telephone socket or PC may influence the location chosen for this database
unit. The maximum length for an RS232 serial cable is 45ft (15m).
An important feature of controllers is that they can connect to a database unit using a multidrop or star
connection architecture, as shown in Figure 2-1. The maximum distance from a database unit to any
controller must not exceed 3000ft (1km), which means that if the star architecture is used, the distance
between any two controllers could be up to 6000ft (2km). While planning the system, determine suitable
locations for the database units and controllers to keep cable lengths below the maximum allowed.
Star connections
Door/Alarms
Controller
Door/Alarms
Controller
Multidrop connections
Database
Unit
Door/Alarms
Controller
Door/Alarms
Controller
Door/Alarms
Controller
Database
Unit
Figure 2-1: Controller Connection Architecture
10
Access Control Design Guide
Designing and Planning an M2150 System
Note:
•
Antipassback can have an impact on the number of database units required. If the site is to use
antipassback rules, please refer to the section on page 20.
•
Each elevator to be access controlled requires a separate DBU in an elevator node (see page 14).
Specifying the Address of a Door or Alarms Controller
Each door and alarms controller connected to the same database unit must have a unique address, which
should be marked on the Site Schematic. The installation instructions for the door and alarms controllers
describe how to set the controller address.
The door/alarms controller address can be:
•
Between 1 and 8 when connected to a DBU.
•
Between 2 and 8 when connected to a 2DBC (integrated controller occupies address 1).
•
Between 3 and 8 when connected to a 4DBC (integrated controller occupies addresses 1 and 2).
•
Between 5 and 8 when connected to a 8DBC (integrated controller occupies addresses 1, 2, 3 and
4).
The number of addresses occupied by each controller is as follows:
•
AC24/4 or OC4/24 – 2 addresses. If, for example, you set an AC24/4 to address 5, it occupies
addresses 5 and 6. This device can have address 1, 3, 5 or 7 only (depending on the database unit).
•
2DC – 1 address.
•
4DC/4DCN – 2 addresses. This device can have address 1, 3, 5 or 7 only (depending on the
database unit).
•
8DC – 4 addresses. This device can have address 1 or 5 only.
Specifying the Database Unit Communications Options (Port Usage)
This section explains how to specify the communications method that each database unit will use to
communicate with an SMS PC and other optional devices.
Each database unit has an integrated RS232 port (COM C) for communications with the SMS PC, ENVS
or other serial device controlled by the SMS software. There are two additional ports (COM D and COM E),
each of which can be fitted with a NIC4, NIC-WI or one-port RS232 module. The NIC4 module allows wired
network communications to the SMS PC; the NIC-WI is used for wireless network communications, and
the one-port RS232 module allows connection to an SMS PC or serial device in the event that the on-board
RS232 port is already used. The port usage is set using bit-switches on the PCB.
For each database unit you have selected, choose one column from Table 2-1 to specify the database
unit's port usage, and mark the switch settings on the Site Schematic. For example, choose the first
column in the main body of the table (i.e. COM C = RS232/Modem to PC, and COM D = Serial Device) if
the database unit is the first in the chain and communicates with an SMS PC using serial communications.
If only LAN communications is used, either of the next three columns can be selected (either choice is
valid).
Refer to the following sections if you need further information about the communications options.
Access Control Design Guide
11
Designing and Planning an M2150 System
Table 2-1: Port Usage Configurations
First (or only) database unit in chain
2
3
4
5
Database
units
between
first and
last5
COM C
RS232/
Modem to
PC
Fall-back
2
modem
Serial
1
Device
Serial
1
Device
Bi-directional
RS232
4
Comms
Serial
1
Device
Serial
1
Device
COM D
Serial
1
Device
LAN (NIC 4
or NIC-WI to
PC)
LAN (NIC 4
or NIC-WI to
PC)
LAN (NIC 4
or to PC)
Serial
1
Device
Bi-directional
RS232
4
Comms
-
COM E
-
Serial
1
Device
Fall-back
2
modem
LAN (NIC 4
3
or to PC)
-
-
-
Switch
Settings
1
Last database unit in
chain (when there is
more than one
database unit)
P3 = OFF
P4 = ON
P5 = OFF
P6 = OFF
P7 = ON
P8 = ON
P3 = OFF
P4 = OFF
P5 = ON
P6 = ON
P7 = OFF
P8 = ON
P3 = ON
P4 = ON
P5 = OFF
P6 = OFF
P7 = OFF
P8 = ON
P3 = ON
P4 = ON
P5 = ON
P6 = ON
P7 = ON
P8 = ON
P3 = ON
P4 = OFF
P5 = OFF
P6 = OFF
P7 = ON
P8 = ON
P3 = ON
P4 = ON
P5 = OFF
P6 = OFF
P7 = ON
P8 = OFF
P3 = ON
P4 = ON
P5 = OFF
P6 = OFF
P7 = ON
P8 = ON
Optional. The port can connect to a serial device such as an ENVS.
Connecting an optional modem allows the database unit to use fall-back modem communications to the SMS PC if an
Ethernet comms failure is detected on COM D.
This gives dual NIC4 comms, and allows the secondary NIC4 module on COM E to be used if the network to the primary
fails.
This is used only for a direct RS232 connection between the last node of the chain and an SMS PC (for bidirectional
communications).
And for the first or last database unit in the chain if it uses an RS232-to-20mA converter.
Note: COM A and COM B are used for chains; COM B connects to COM A on the next database unit in the
chain.
LAN, Wireless or Serial Communications from First Database Unit
The first database unit in a chain can use wired or wireless network communications to the SMS
software. A NIC4 module must be used for wired LAN communications, or a NIC-WI for wireless
communications. The built-in RS232 port can be used if serial or modem communications with the
SMS PC is preferred.
There are two versions of the NIC4: one that does not use encrypted communications, and the other
that uses Rijndael (AES) encryped LAN communications (the US government approved encryption
standard). The NIC-WI module is a wireless version of the NIC4 and supports 802.11b 128-bit WEP
and WPA encryption.
Specify an IP address for each NIC4 and NIC-WI module. This is configured using the PC-based
configuration tool supplied with the SMS software, as described in the NIC Module Configuration
Guide.
Dual NIC4 LAN Communications
The M2150 range of controllers support the use of two NIC4 modules in a single database unit. The
secondary NIC module is used if the network connection to the primary fails.
12
Access Control Design Guide
Designing and Planning an M2150 System
Determine whether this level of communications security is necessary. The decision may be based
on any history of network interruptions and whether the network architecture could accommodate two
network paths to SMS PCs.
The feature is not applicable to other NIC modules, such as the NIC-WI. Each NIC4 module requires
a separate IP address.
Note: Only one LAN chain needs to be defined in the SMS software. The main tab of the LAN
Chains Definition screen is used to specify the IP address settings for the primary NIC module. A
Secondary option enables the IP address settings to be specified for the secondary NIC module.
Both NIC modules must communicate with the same SMS PC.
Fall-Back Communications
The on-board RS232 port or a one-port RS232 module can be connected to a modem for fall-back
communications to an SMS PC. Fall-back communications is used if the database unit is fitted with a
NIC4 or NIC-WI module for normal communications to an SMS PC and an Ethernet communications
failure is detected. Again, the client should be consulted to determine whether this feature is needed.
Serial Communications with an SMS PC using an RS232-to-20mA converter
An external RS232-to-20mA converter can be connected between the PC's serial port and the COM
A (20mA) port on the first database unit in the chain. The converter is useful if you want to use
RS232 communications from the PC, but the PC is located more than 45ft (15m) from the database
unit.
If bi-directional communications is used (see below), an RS232-to-20mA converter can also be
connected to the COM B port of the last database unit in the chain.
If an RS232-to-20mA converter is used, the port settings for the first and/or last database unit in the
chain must be set as for "database units between first and last" (see Table 2-1).
Communications to a Serial Device
The database unit can communicate with a serial device, such as an ENVS (which would allow the
database unit to trigger video recordings at an ENVS without the need for a connection to the SMS
software). The built-in serial port can be used for this purpose, or if the port is already in use, an
optional one-port RS232 module can be used instead. Only one port in a database unit can connect
to a serial device.
Bi-directional Communications
A chain can use bi-directional communications, where both the first and last database units in the
chain are connected to different RS232 ports at an SMS PC. In the event that communication
through the primary port fails, the secondary port is used instead.
If you require the chain to use bi-directional communications, each database unit at either end of the
chain must use RS232 communications to the PC, or must connect via separate RS232-to-20mA
converters. It is allowable for one end to communicate via the on-board RS232 (COM C) port or a
one-port RS232 module (COM D), and the other to use an RS232-to-20mA converter connected to
COM A or COM B as appropriate.
The port used for bi-directional communications at the last database unit in the chain must have its
port usage set to "Bi-directional RS232 Comms" if there is a direct serial connection to the PC, or to
the same settings as for "database units between first and last" (see Table 2-1) if an RS232-to-20mA
converter is used.
Access Control Design Guide
13
Designing and Planning an M2150 System
Planning for Elevator Control
The elevator controller is an M2150 node that can be used to control access to elevator floors. The node
interfaces with the elevator control system and floor-selection panel to ensure that the card holder is
delivered only to authorized floors.
The node supports up to:
•
64 floors for a single-cab system. For more than 32 floors, a slave unit is also required.
•
32 floors for a two-cab system (32 floors per cab). If more than 16 floors is required for either cab, a
slave unit is also required.
•
16 floors for a three-cab or four-cab system (16 floors per cab). A slave unit is also required for this
configuration.
The node contains a power supply, DBU, elevator interface board and two relay boards. The slave unit is
contained in its own cabinet, with an RS485 communications link to the master.
Each cab is fitted with a separate access control reader (20mA or RS485). All readers connected to the
same node must be the same type. Wiegand readers can be used if a 650 Mullion Reader Interface (MRI)
is fitted between the reader and the elevator controller.
Note: Only 20mA readers have been evaluated for use in UL Listed Systems.
The following sections explain additional issues that you should consider.
Siting of Elevator Nodes
Determine where each elevator node is to be sited, and mark this on the Site Schematic:
•
On top of the elevator car?
•
In the elevator equipment room?
Note: For ease of servicing, it is recommended that an elevator node is NOT installed on the top of the
elevator car. Every service call for the node will require coordination with the elevator manufacturer, which
may be costly and time-consuming.
Enable All and Enable Select Modes
You need to determine whether to use Enable Select or Enable All mode for each elevator node:
Enable Select Mode
With Enable Select Mode, the node monitors each floor button to recognize which button is
pressed. This enables the SMS software to log the floor that the card holder selects and to generate
alarms when, for example, an invalid card is used or an unauthorized floor button selected (as
determined by the card holder's access rights).
To implement Enable Select mode, there must be two pairs of contacts for each floor-selection
button: one set for connection to the elevator interface board, and the other set for connection to the
elevator controller and/or elevator control system.
After a valid access-control transaction at the elevator reader, the card holder is given four seconds
to select a floor button. The elevator node determines which button has been selected, and if the
14
Access Control Design Guide
Designing and Planning an M2150 System
floor is in the card holder's access rights, the appropriate floor relay in the node is de-energized
(COM to NC contacts made) and further transactions are inhibited for the length of time specified by
the reader's Floor Selection Time.
Note: In the SMS Software, the elevator node Floor Selection option must be set to Individual to
activate Enable Select mode.
Enable All Mode
Enable All Mode requires no wiring between the elevator interface board and floor buttons, but since
the node cannot know which floor button was selected, it reports only that the card holder was
granted access at the elevator reader.
After a valid access-control transaction, the elevator node de-energizes all floor relays that
correspond to the floors in the card holder's access rights. The relays are de-energized (COM to NC
contacts made) and further card transactions are inhibited for the length of time specified by the
Floor Selection Time option in the elevator reader's Reader Definitions screen in the SMS software.
Note: In the SMS Software, the elevator node Floor Selection option must be set to None to
activate Enable All mode.
Cable Requirements
Plan the cable requirements carefully. In particular, determine the length and number of cables needed in
the traveling cable – refer to Table 2-2.
Table 2-5 on page 30 gives the maximum distances for cabling. Make sure these distances will not be
exceeded, then mark on the Site Schematic the routes to be taken by cables to the elevator nodes.
Table 2-2: Cables Required for the Traveling Cable
Cables Required in Traveling Cable?
Description
Elevator Node in Equipment
Room
Elevator Node on Elevator
Cab
Reader connections
Yes
No
Node power
No
Site dependent
Node communications
No
Yes
Floor buttons
Yes
(1)
No
Floor relays
Yes
Site dependent
Fireman's Switch
No
Yes
(1)
Enable Select mode only; not used in Enable All operation.
Access Control Design Guide
15
Designing and Planning an M2150 System
Free/Secure Relay
Each relay board in the elevator node includes a free/secure relay, which is energized if any of the floors
controlled by that relay board is in Secure Access mode. The relay is deenergized when all floors are in
Free Access mode. This could be used by an external device to indicate the current access status. During
system planning, determine whether this feature is required.
What are Secure and Free Access Modes?
Under normal access-controlled conditions, the card holder must present his/her card before
being able to select the relevant floor button. The card holder will only be able to gain access to
those floors that are in his/her access rights. This is known as Secure Access mode.
However, the operator of the SMS software can generate a manual or timed command to place
a group of floors in Free Access mode (and back again into Secure Access mode when
required). When a floor is in Free Access mode, the appropriate floor relay in the node is deenergized, which enables the elevator passenger to select the associated floor button and to be
delivered to the relevant floor without a card.
Note: For fire safety reasons, if the node has a total loss of power, all floor relays are deenergized, and therefore all floor-selection buttons are automatically placed in Free Access
mode.
The free/secure relay on each relay board acts independently. The status of a floor on one relay board
does not affect the status of the free/secure relay on the another relay board.
Tenant Security
Tenant Security is a feature provided by some elevator control system manufacturers to control the use of
floor buttons. Each floor button has a corresponding two-wire Tenant Security input at the elevator control
system (a third-party item of equipment). When the input is shorted, the matching floor button is disabled.
Determine whether Tenant Security is required. The decision affects how the relays are wired on the Relay
Boards, as shown in the M2150 MULTICAB Elevator Controller (Master Unit) Installation Instructions.
Fireman's Switch
A optional "Fireman's Switch" can be connected to the Elevator Interface Board. When the switch is open
circuit, all relays on the relay board(s) are de-energized, giving free access to all floors. Determine whether
a Fireman's Switch is required.
Coordination with other Contractors
Installation of the elevator node requires close coordination between the installer of the elevator node and
the reader and elevator manufacturers. The responsibilities of each should be clearly understood by both
parties before any work begins.
16
Access Control Design Guide
Designing and Planning an M2150 System
Safety
The elevator node may have mains electricity connected to the floor relays. Power to the floor relays must
be disconnected before carrying out any installation or servicing work. Make sure that installers are aware
of this safety issue.
Mains wiring must be carried out only by a competent installer. The equipment must be grounded.
In some localities, there are union affiliations or certifications required to work on elevator systems.
Federal Fire Code
For installations in the USA, please consult NFPA 72 National Fire Alarm Code, NFPA 101 Life Safety
Code and the local Authority Having Jurisdiction (AHJ) prior to installing access control readers and locking
mechanisms to any portal in an egress path.
Power for Readers and Free/Secure Indicator
In most cases, power for readers or a free/secure indicator can be sourced from the node's internal 12Vdc
power supply unit. You will need to make sure that the power supply is able to provide sufficient current for
all required devices. The section on page 27 explains how to do this.
Access Control Design Guide
17
Designing and Planning an M2150 System
Choosing the Cabinets
This section explains the standard cabinets/enclosures available for M2150 systems.
There are two main cabinet types: ones that have a hinged door (CAB3A, CAB4A and CAB5 ), and others
that have a removable lid (ENC-1, ENC3 and ENC4). There is also a RAK3, which is a 19" rack-mountable
cabinet.
Note: Only the CAB3A and CAB4A can be used for installations that require compliance with UL294.
If required, the hinged door on the CAB3A, CAB4A and CAB5 can be removed to make it easier to mount
the cabinet and connect the terminal blocks.
Appendix C gives cabinet dimensions. The cabinet installation instructions show the cabinet and board
mounting positions.
Cable knock-outs are provided along the sides and back of each cabinet. To protect against sharp edges,
a rubber grommet (gland) needs to be fitted to each hole. These are not supplied with the equipment and
therefore must be provided separately. The main power supply cable must use a separate hole from all
other cables.
ENC3/CAB3A
The ENC3 and CAB3A can contain any of the following, with a 6.5A (MN-PSU-6A) or 3.0A (MN-PSU-KIT;
7000-5283) 12Vdc power supply unit:
•
DBU, optionally with any one of the following: AC24/4, OC4/24, 4DC or 2DC.
•
One, or any two of the following: 2DC, 4DC, AC24/4, OC4/24 or ENVS.
•
Any one of the following: 8DBC, 8DC, 4DBC or 2DBC.
ENC4/CAB4A
The ENC4 and CAB4A can contain any of the following, with a 6.5A (MN-PSU-6A) or 3.0A (MN-PSU-KIT;
7000-5283) 12Vdc power supply unit:
•
DBU, optionally with one or any two of the following: AC24/4, OC4/24, 4DC, 2DC or ENVS.
•
8DBC, 8DC, 4DBC or 2DBC, optionally with any one of the following: AC24/4, OC4/24, 4DC or
ENVS.
•
One 4DC, AC24/4 or OC4/24, optionally with up to two 2DCs.
CAB5
The CAB5 can contain the following, with a 6.5A (MN-PSU-6A) 12Vdc power supply unit:
•
18
One, or any two of the following: 8DBC or 8DC.
Access Control Design Guide
Designing and Planning an M2150 System
ENC-1L
The ENC-1L is available only for certain markets. It can contain a 32Vac power supply unit (MN-PSU-2+2),
two 12Vdc backup batteries and the following:
•
One 8DBC, 4DBC, 2DBC, 4DCN, 4DC, AC24/4 or OC4/24
•
One or two 2DCs.
ENC-1
The ENC-1 can contain any of the following, with a 3.0A (MN-PSU-KIT; 7000-5283) 12Vdc power supply
unit:
•
One ENVS, 8DBC, 4DBC, 2DBC, 4DCN, 4DC, AC24/4 or OC4/24
•
One or two 2DCs.
RAK3
The RAK3 is a 19" 2U enclosure that can contain any of the following, with a built-in 3.5A 12Vdc power
supply (100 to 240 Vac input):
•
DBU, optionally with any one of the following: AC24/4, OC4/24, 4DC or 2DC.
•
One, or any two of the following: 4DC, AC24/4 or OC4/24 (insufficient height for ENVS).
•
One or two 2DCs.
•
Any one of the following: 8DBC, 8DC, 4DBC or 2DBC.
Elevator Node Cabinet
The cabinet used for an elevator node contains the following:
•
•
•
•
•
DBU (master unit only).
Elevator Interface Board (master and slave versions are different).
One or two relay boards.
3.0A 12Vdc power supply unit (MN-PSU-KIT; 7000-5283).
NIC-4 (master unit only).
Batteries
All standard cabinets except the RAK3 have space for a 12V 7AH maintenance-free rechargeable battery,
which maintains operation if normal power is disconnected. Determine whether the building has its own
Uninterruptible Power Supply (UPS) system, and whether that can be used. If not, make sure that a battery
is ordered for each cabinet. The MN-PSU-2+2 contains two batteries.
An on-board battery on the database unit ensures that card and system data are not lost in the event of a
battery failure. A bit switch must be set to ON to connect the on-board battery.
Access Control Design Guide
19
Designing and Planning an M2150 System
Planning Antipassback
Note: You need to read this section only if the site requires antipassback rules. Installation and planning is
made easier if antipassback is not required.
If antipassback is required, consider the type of antipassback required: zonal or timed. Timed is easier to
set up, but is not quite as secure as zonal. Timed antipassback is normally used to control antipassback
around the periphery of a single area, whereas zonal antipassback can have nested antipassback areas.
Each antipassback reader must be nominated as either a hard antipassback reader or a soft antipassback
reader. The only difference is that a hard antipassback reader logs an antipassback violation as an alarm
or event and does not grant access, whereas a soft antipassback reader logs an alarm or event, but does
grant access.
In order for antipassback to be totally effective, it should be used in conjunction with a turnstile (rather than
an ordinary door) to ensure that only one person at a time can enter.
Timed Antipassback
The principle of timed antipassback is simple: once a card has been used at a timed antipassback reader,
the card causes an antipassback violation if it is used again at the same or another timed antipassback
reader within a predefined period of time. The exception to this rule is when the antipassback reader has
been defined to be for an exit route. In this case, the card can be used at any time without causing an
alarm or event. This allows for situations where a person enters an antipassback-protected area, then
wishes to exit and re-enter the area quickly.
If timed antipassback is required, specify the required passback timeout period in the range 0 to 63
minutes (zero for an exit reader).
A timed antipassback scheme cannot include readers controlled by different database units; readers
controlled by separate database units are in separate schemes.
Zonal Antipassback
In the case of zonal antipassback, the building needs to be partitioned into zones (Figure 2-2). For
example, zone 1 may be the main lobby, zone 2 the computer room, etc.
Figure 2-2: A Possible Zone Arrangement for Zonal Antipassback
For each reader that is defined as a zonal antipassback reader, you can specify which zone of the building
the card is going from and which zone it is going to. For example, the reader may allow a card to go from
zone 1 (e.g. main lobby) to zone 2 (e.g. computer room).
20
Access Control Design Guide
Designing and Planning an M2150 System
The system remembers which zone each card is in and updates this information whenever the card is used
at a zonal antipassback reader. An antipassback alarm or event is generated if the reader's from zone
does not match the card's currently-recorded zone. For example, an alarm or event is generated if the from
zone of the reader is zone 3, but the card is currently recorded as being in zone 1.
Doors should be controlled by entry and exit readers to enable the system to know which zone a card is in.
The "two readers at one door" feature can be used for this purpose (see page 23).
Commands are available in the SMS software to reset a card's zone if the currently-recorded zone gets out
of step with its actual zone (e.g. because the person has passed through a fire exit during a fire drill).
If zonal antipassback is required, specify each reader's "to" and "from" zone, in the range 1 to 63.
Zonal Antipassback Partitioning
For each zonal antipassback reader, it is essential to consider the database unit that will manage the
reader, and the chain that the database unit is in, since different database units or chains can create totally
independent zonal antipassback schemes. Partitioning may be desirable to simplify system management in
large systems, or to prevent the need to keep SMS PCs online, as described next.
The partitioning of zonal antipassback depends on the type of communications used between the SMS
software and the database units:
•
LAN communications – If a LAN is used to communicate with database units, the SMS software
uses a single, system-wide, zonal antipassback scheme if the Zonal (Global System) option is
selected in the Install/Chains/LAN screen. If two or more schemes are needed, Zonal (Global
Client) should be selected. In this case, readers in LAN chains that communicate with the same
SMS client are in the same antipassback scheme. Therefore, if different zonal antipassback
schemes are required, you will need to make sure that the system design includes one SMS client
PC for each scheme, and that the readers are in the appropriate chains. Each SMS client PC can
manage up to 16 LAN chains containing zonal antipassback readers.
A factor to consider is that if readers in the same antipassback scheme are on different database
units, it is important for the SMS client that manages communication to the LAN chain to remain
switched on, as well as the server. SMS clients manage antipassback messaging within a chain, and
the SMS server manages antipassback messaging across chains. A preferable design is to ensure
that all readers in the same scheme are connected to the same database unit, if possible.
•
Serial communications – If serial communications is used between SMS clients and the database
units, separate zonal antipassback schemes exist for each chain or for each database unit,
depending on whether Zonal (Chain) or Zonal (Local) is selected in the Install/Access Control/Node
screen. You cannot have system-wide zonal antipassback when using serial communications.
Preferably, Zonal (Chain) should be used only if there are more readers than can be managed by a
single database unit (16). If Zonal (Chain) is used and readers in the same antipassback scheme
connect to different database units, it is important for the SMS client that is connected to the chain to
remain switched on to handle antipassback messaging.
It is not possible to have a mix of Zonal (Chain) and Zonal (Local) settings for the same chain.
If modem communication is used to a chain on a remote site, Zonal (Local) is the only choice.
During system design, consider the database unit that each reader needs to connect to. If you do not
plan this carefully, you may not be able to achieve the desired antipassback scheme.
Access Control Design Guide
21
Designing and Planning an M2150 System
Selecting the Readers
Select the type of reader to be used for
each access-controlled door. Magnetic
stripe, proximity, smart card and
fingerprint readers are available. All are
easy to use and install, and are available
in a number of attractive designs.
M2150 supports 20mA multiNODE Current Loop Protocol (MCLP), Wiegand and RS485 readers. For sites
requiring compliance with UL294, only the readers listed in Appendix B on page 54 can be used, or any
other UL-approved third-party Wiegand reader. RS485 readers must not be used on sites requiring
compliance with UL294.
20mA (MCLP) readers are normally the best choice. Unlike traditional Wiegand interface readers, which
are susceptible to undetected tampering, 20mA readers use supervised communications. This enables
alarms to be generated if the reader or cable is tampered with or communications is lost.
®
Some 20mA readers, such as the 843 and 844, are compatible with MIFARE DESfire smart cards, which
could be used not only for access control, but also for applications such as identity checking, e-purse and
government applications. The 844 can read contactless smart cards, including Personal Identity
Verification (PIV) cards (APL listed) used by the U.S. government. Please refer to the reader data sheets
for further information.
Although a mixture of 20mA, Wiegand and RS485 readers can be used, it is normally preferable to use the
same reader type and the minimum number of reader models throughout a site. This will simplify operation
and support, and should result in the need for only one card type.
Note: Elevator nodes (see page 14) can use 20mA or RS485 readers only. All readers must be the same
type in an elevator node.
20mA and Wiegand readers can connect directly to a door controller (including the integrated controller in
a 2DBC, 4DBC or 8DBC). Except in elevator nodes, RS485 readers require an RS485 module to be fitted
(see page 23).
Ordering WIM Modules (Wiegand Readers)
If Wiegand readers are selected, a WIM module must be ordered for each 8DBC, 4DBC, 2DBC or door
controller that connects to a Wiegand reader. There are three types of WIM module:
•
WIM-8 – for an 8DC or 8DBC
•
WIM-4 – for a 4DC, 4DCN or 4DBC
•
WIM-2 – for a 2DC or 2DBC
You will therefore need to consider the number of WIM modules required, and the controllers that they
need to be fitted to.
If you are using a mixture of Wiegand and 20mA/RS485 readers, the most cost-effective solution is to
ensure that the Wiegand readers connect to the minimum number of controllers to reduce the total cost of
the WIM modules.
22
Access Control Design Guide
Designing and Planning an M2150 System
Planning the Reader Locations
Specify the type, model and location of each reader, the door it is to control and the cable routing path
between the reader and door controller. Check the locations during a site survey.
Readers need to be located on the unhinged side of the door, and away from desks or other items that
could make access difficult. Specify the position and height of each reader. The normal height for standard
card readers is approximately 5' (1.55m), measured from floor level to the top of the reader. Fingerprint
readers should be mounted at a height of 3'7" to 3'11" (1.1m to 1.2m).
Using RS485 Readers
For sites not requiring UL compliance, supported RS485 readers can be used by fitting a Dual RS485
Reader Interface Module to a 2DC or 2DBC, or a Quad RS485 Reader Interface Module to a 4DBC, 4DCN
or 4DC. The readers connect to the module, rather than directly to the main board. RS485 Reader
Interface Modules are not available for 8DBCs or 8DCs.
If you are using RS485 readers, make sure that the correct number and type of RS485 Reader Interface
Modules are purchased. Only selected RS485 readers are supported; please ask for a list of supported
readers. General-purpose RS485 readers are not supported.
If you are using a mixture of reader types, the most cost-effective solution is to ensure that the RS485
readers connect to the minimum number of controllers.
Note:
•
Elevator nodes have integrated ports for RS485 readers (all readers must be the same type in an
elevator node).
•
If, for example, the reader is connected to the "Reader 2" port on the module, the door furniture must
connect to the "Door 2" port on the door controller.
•
If you fit an RS485 Reader Interface Module but do not use all RS485 reader ports, you can connect
20mA or Wiegand readers to the spare ports on the controller. However, you must ensure that the
RS485 readers use the highest-numbered ports. For example, if you wish to connect only one RS485
reader to a 4DC, you must connect it to reader port four on the module; you can then connect up to
three 20mA or Wiegand readers to reader ports one, two and three on the 4DC.
Using Two Readers at One Door
Two readers, one for entry and the other for exit, can be used at a single door. This may be used in highersecurity establishments or for zonal antipassback (page 20).
To use two readers at one door, an odd-numbered reader port must be used for the entry reader and the
next even-numbered reader port must be used for the exit reader. The odd-numbered door port is then
used for connection to the door furniture. For example, if you connect the entry reader to reader port one,
connect the exit reader to reader port two and the door furniture to door port one.
Connections are not required to the even-numbered door terminals, although it recommended to link the
door monitor terminals on the even-numbered door to prevent a "Door Forced" alarm during a data
download to the database unit.
Note: The Two Readers At one Door option must be selected for the odd-numbered reader in the
Install/Access Control/Reader screen of the SMS software.
Access Control Design Guide
23
Designing and Planning an M2150 System
Specifying the Door Furniture
The door furniture (Figure 2-3) can consist of a release device, door monitor, exit-request button/sensor
and bypass circuit. The exit-request button and bypass circuit are optional. The bypass circuit enables a
device such as an alarm sensor to be automatically bypassed while the lock is released.
Figure 2-3: Door Furniture
Determine whether exit-request and bypass circuits are required, the position of any exit-request button
and the cable routing path between the door controller and door furniture. The path may be the same or
similar to the path used for the reader.
Power for Door Releases
In most cases, power for door releases (and auxiliary outputs) can be sourced from the controller's internal
power supply unit. Make sure that the power supply is able to provide sufficient current for all required
devices. The section on page 27 explains how to do this.
If additional current is needed, you will need to order separate power supplies, but note that for sites
requiring UL compliance, all additional power supplies used must be power limited, UL Listed for Access
Control Systems and Accessories.
Using Noise Suppression
Door releases or other inductive loads (including relays) must contain noise suppression circuitry. Some
locks (e.g. Abloy Magneguard) already contain a metal-oxide varistor (MOV) to suppress noise. In this
case, no additional circuitry should be fitted, or the lock may fail. In all other cases, an IN4004 suppression
diode must be fitted across the coil connections (cathode bar to positive), as shown in Figure 2-4.
Determine whether any door releases need separate noise suppression circuitry, and if so, order the
correct components.
24
Access Control Design Guide
Designing and Planning an M2150 System
Inductive load, e.g. electric lock or
striking plate
Cathode
IN4004
Anode
Figure 2-4: Connecting a Noise Suppression Diode
Choosing Cable Supervision
The cables to the door monitors and exit-request buttons can be supervised for short and open circuits, as
described on page 31. Determine the level of cable supervision that the customer requires, and make sure
that the correct resistors will be available to the installer.
Access Control Design Guide
25
Designing and Planning an M2150 System
Using an Edge Network Video Server (ENVS)
An ENVS is a network device for recording and streaming video from up to four connected cameras. An
ENVS can be fitted inside the same cabinet as a database unit or controller, or can be a standalone or
rack-mounted device.
When the optional hard disk is fitted, a store-and-forward function allows video to be recorded locally, then
forwarded over a network to a storage location during out-of-hours times. The ENVS is designed for use
with the SMS Digital Video Management Module, which enables the pictures to be controlled, viewed,
recorded and replayed from any SMS client PC.
Note: The ENVS must not connect to any M2150 equipment or be installed in the same cabinet as M2150
devices when compliance with UL294 is required. An ENVS can be used as a standalone device
connected to the network.
The Digital Video Design Guide provides an introduction to digital video systems and advice on the design
of systems that include digital video.
Key hardware features of the ENVS include:
•
Four composite video inputs (models with a single channel also available).
•
Optional 80GB or 160GB hard drive for video recordings.
•
Built-in 10\100Mbit Ethernet port (supplied with a 4-port unmanaged switch when integrated with
access-control panels).
Note: The switch uses predefined priorities for each Ethernet port. The LAN, ENVS and accesscontrol database unit must connect to the switch as described in the ENVS Installation Instructions.
26
•
Four monitor point inputs and two auxiliary relay outputs.
•
Pan-Tilt-Zoom (PTZ) controller port, using RS232/422/485 connection.
•
Serial port – enables external equipment to action trigger commands independently, such as to
switch on ENVS recording at predefined times of the day or in response to an alarm condition.
Examples of equipment that connect to this port include an M2150 database unit and HISEC Video
Terminal Interface (VTI).
Access Control Design Guide
Designing and Planning an M2150 System
Considering the Power and Ground Requirements
Introduction
Power can be provided by an power supply mounted in the cabinet, as follows:
•
For ENC3, ENC4, CAB3A, CAB4A and CAB5: Two power supplies are available:
−
MN-PSU-6A. This can supply a maximum of 6.5A @ 12Vdc. 6A is available to power the board,
readers, etc. A separate output provides up to 500mA for battery recharge. For installations that
require UL294 compliance, the MN-TRANS-150-UL 130VA transformer must be used with this
power supply (110Vac to 19Vac).
For non-UL installations, this power supply (if used) can be powered by 24Vdc, or by 19/20Vac
from an appropriate 150VA transformer (such as the MN-TRANS-150 or MN-TRANS-150-230).
−
MN-PSU-KIT (7000-5283)(not for CAB5). This can supply a maximum of 3.0A @ 12Vdc. For
installations that require UL294 compliance, the MN-TRANS-75-UL 75VA transformer must be
used with this power supply (110Vac to 18Vac).
For non-UL installations, this power supply (if used) can be powered by 24Vdc, or by 18Vac
from an appropriate 75VA transformer (such as the MN-TRANS-75-230).
For installations that require UL294 compliance, the transformer must be mounted external to the
cabinet.
•
For the RAK3 cabinet (not for UL installations): Built-in power supply; 100/240Vac input, 12Vdc
output. This provides a maximum of 3.5A @12Vdc.
•
For the ENC-1L cabinet (not for UL installations): MN-PSU-2+2; 32Vac input, with 12Vdc and
24Vdc outputs. The 24Vdc output provides up to 2A for door releases. The 12Vdc output provides a
maximum of 2A. A separate output provides up to 500mA to recharge a 24Vdc battery (two 12Vdc
batteries in series).
•
For ENC-1 and elevator node (not for UL installations): MN-PSU-KIT (7000-5283); 18Vac-to-12Vdc
power supply. This can supply a maximum of 3.0A @ 12Vdc. 2.5A is available to power the board,
readers, etc. 500mA is available for battery recharge. The power supply (if used) can be powered by
24Vdc, or by 18Vac from an appropriate 75VA transformer (such as the MN-TRANS-75-230).
All cabinets MUST be grounded. Make sure that the grounding points have been identified before
installation.
Checking the Current Available for External Devices
In most cases, power for readers, ENVS, door releases and auxiliary outputs can be sourced from the
power supply provided. Table 2-3 shows the minimum current that is available to power such devices.
These are worst-case figures calculated as described on page 28. They include a battery recharge current
of 500mA for the battery (not available for RAK3), and assume that the power supply is powering only one
of the boards listed.
Access Control Design Guide
27
Designing and Planning an M2150 System
Table 2-3: 12Vdc Current Available for Readers, ENVS, Door Releases and Auxiliary Outputs
Device
8DBC
4DBC
2DBC
8DC
4DC
4DCN
2DC
AC24/4 Alarms controller (24IN-4OUT)
OC4/24 Alarms controller (4IN-24OUT)
Elevator node
12Vdc Available Current (mA)
2
1
6.5A PSU
3.5A PSU
3.0A PSU
2.0A PSU
(RAK3)
(ENC-1L)
5090
2590
1590
1090
5090
2590
1590
1080
5350
2850
1850
1350
5410
2910
1910
5380
2880
1880
1380
5320
2820
1820
1320
5670
3170
2170
1670
5805
3305
2305
1805
5445
2945
1945
1445
450
2
1
The available current for the 2.0A PSU is for readers and auxiliary outputs. The 24Vdc output is used for release devices. A
separate output is provided for battery recharge.
2
500mA reserved for battery recharge.
If additional power is required, door releases or auxiliary outputs will require a separate external power
supply. For sites that require UL compliance, all additional power supplies used must be power limited, UL
Listed for Access Control Systems and Accessories.
AC Monitor
All database units, door controllers and alarms controllers have an AC monitor input, which enables the
system to generate an alarm or event if power fails.
Information for Expert Planners
This section explains how the figures in Table 2-3 have been calculated, which is useful if you want to recalculate the available current for door releases or auxiliary outputs if, for example, the unit does not
contain a NIC4 module or a backup battery. The values have been calculated from the data shown in Table
2-4. For example, for a cabinet fitted with an 8DBC, the current available for readers, ENVS, door releases
and auxiliary outputs is as follows.
8DBC
2 x NIC4 Module
8 door bypass relays
8 door release relays
I/O Module
8 auxiliary output relays on 4IN-8OUT I/O Module
TOTAL CURRENT TAKEN
Power Supply Board max 12Vdc output (excluding battery)
AVAILABLE CURRENT (using 6.5A power supply)
120mA
300mA
160mA
160mA
10mA
160mA
910mA
6000mA
5090mA
Remove any items that are not used, and re-calculate the available current.
28
Access Control Design Guide
Designing and Planning an M2150 System
Table 2-4: Device-Level Power Consumption
Device
8DBC PCB, excluding relays
4DBC PCB, excluding relays
2DBC PCB, excluding relays
DBU PCB
AC24/4 Alarms controller (24IN-4OUT), excluding relays
OC4/24 Alarms controller (4IN-24OUT), excluding relays
8DC PCB, excluding relays
4DC PCB, excluding relays
4DCN PCB, excluding relays
2DC PCB, excluding relays
8IN-4OUT I/O Module PCB
4IN-8OUT I/O Module PCB
Each energized
On 8IN-4OUT I/O module and AC24/4
auxiliary output,
Alarms Controller.
door release or
On 4IN-8OUT I/O module, OC4/24 Alarms
door bypass relay. Controller, 4DC, 4DCN, 4DBC, 2DC, 8DC
and 8DBC boards.
NIC4 Module
NIC-WI Module
One-port RS232 module
Memory card for DBU/8DBC
ENVS PCB including hard disk, excluding relays
4-way network switch
Dual RS485 Reader Interface Module PCB
Quad RS485 Reader Interface Module PCB
Elevator Interface Board PCB (Master Unit)
Elevator Interface Board PCB (Slave Unit)
Elevator node Relay Board PCB
Each relay on the elevator node Relay Board
Free/secure relay on elevator node Relay Board
Current Consumption @12Vdc
120mA
90mA
80mA
100mA
75mA
75mA
100mA
90mA
150mA
60mA
10mA
10mA
30mA
20mA
150mA (note 1)
200mA (note 1)
10mA (note 1)
Insignificant
1040mA
2 ports used: 115mA
3 ports used: 150mA
4 ports used: 185mA
20mA
30mA
120mA
70mA
Insignificant
45mA
45mA
Note 1: This device uses a 5Vdc supply. The figure quoted is the current from the 12Vdc PSU to power the device.
Current consumption figures for popular readers are given on page 57.
Access Control Design Guide
29
Designing and Planning an M2150 System
Determining the Cable and Wiring Requirements
Table 2-5 shows the recommended cable types and maximum distances. It is important to check that the
planned cable routes will not cause these distances to be exceeded.
Table 2-5: Cable Types and Maximum Distances
Item to be Connected
Max. Length of Cable
Cable
20mA (MCLP) reader
450ft (150m)
900ft (300m) by doubling power cores
3000ft (1km) powered locally
225ft (75m)
450ft (150m) by doubling power cores
Belden 9503
Belden 9504
Belden 9502
Belden 9537
Belden 9539
RS485 reader
3000ft (1km) if locally powered. This is the
maximum communications distance.
Belden 9503
Database unit to RS232-to-20mA
converter
3000ft (1km)
Belden 9502
Comms: Database unit to
Database unit
3000ft (1km)
Belden 9502
Comms: Database unit to
controller
3000ft (1km)
Belden 9502
PC, serial device or modem
(from RS232 port/module)
45ft (15m)
Belden 9535
Monitor point
1500ft (500m)
2 cores
24 AWG
Auxiliary output
Depends on minimum operating voltage of
device and voltage drop along cable
2 cores
Bypass device
Depends on minimum operating voltage of
device and voltage drop along cable
2 cores
Door monitor
1500ft (500m)
2 cores
24 AWG
Exit request
1500ft (500m)
2 cores
24 AWG
Door release
Maximum distance and cable choice is
dependent on the specific lock current and its
minimum operating voltage.
2 cores
Elevator node master to slave
3000ft (1km)
Belden 9502
Elevator node to fireman's switch
1500ft (500m)
Belden 9502
Elevator node to floor buttons
(Enable Select mode)
1500ft (500m)
Elevator node relays to external
equipment
Dependent on maximum allowed loop
resistance. Refer to elevator system manual.
Wiegand reader
20Vac power
30
8A rating
Access Control Design Guide
Designing and Planning an M2150 System
Cable Supervision
Determine the level of cable supervision required for cables to door monitors, exit-request buttons and
monitor points. This allows short-circuit, open-circuit and tamper conditions to be detected, depending on
the termination resistors added to the end of the cable (i.e. as near as possible to the monitor-point
contact, etc.). The SMS software can generate an alarm or event for any cable fault or tamper condition.
There are two-state, three-state, four-state and six-state supervision levels, as described next. The level of
supervision can be different for each contact used, and must be configured in the Install screens of the
SMS software.
Note: Monitor points connected to an ENVS can use only two-state supervision.
Two-State Supervision
The term "two-state supervision" means that the cable is not monitored for faults. No additional resistors
are used at the end of the cables, as shown in Figure 2-5.
Figure 2-5: Two-State Supervision
Three-State Supervision
Three-state supervision uses the cable termination shown in Figure 2-6. If three-state supervision is used
and the contact is normally open, only an open circuit on the cable can be detected. If the contact is
normally closed, only a short-circuit can be detected.
Figure 2-6: Three-State Supervision
Four-State Supervision
Four-state supervision uses the cable termination shown in Figure 2-7. In the case of four-state
supervision, both short-circuits and open-circuits on the cable can be detected.
Figure 2-7: Four-State Supervision
Access Control Design Guide
31
Designing and Planning an M2150 System
Six-State Supervision
Six-state supervision is applicable to monitor points connected to:
•
Alarms controllers.
•
4in-8out or 8in-4out I/O modules fitted to M2150 controllers/database units with v3.0 or later
firmware.
Six-state supervision allows the status of a sensor tamper switch to be monitored, as well as both shortcircuits and open-circuits on the cable. Six-state supervision uses the cable termination shown in Figure
2-8.
Figure 2-8: Six-State Supervision
32
Access Control Design Guide
Designing and Planning an M2150 System
Planning the SMS Software and PC Requirements
Selecting the SMS Software Edition
It is necessary to select one of four editions of the SMS software to use: Business, Professional, Enterprise
or Global, as described in the following sections. The software edition selected must be appropriate for the
size and requirements of the system being installed.
Version 6.1 SP2 or later of the SMS software must be used.
Business
The Business edition of the SMS software is a true client/server system suitable for use on a customer
network, but limited to a maximum configuration of three client computers, 64 card readers and 2000
cards. If required, all software can be installed on a single PC.
The Business edition can use SQL Server databases managed by the Microsoft Data Engine (MSDE).
With its maximum database size of 2GB, MSDE has been designed and optimized for use with smaller
systems.
Professional
The Professional edition of the SMS software builds on the capabilities of the Business edition to provide a
maximum of nine client computers and between 32 and 512 card readers, depending on the package
purchased. The Professional edition can use MSDE.
Small systems using the Professional edition can use the server also as a client. However, for improved
performance in larger systems, a dedicated server is recommended for management of the system
database.
Enterprise
The Enterprise edition provides all the features of the Professional edition system, but utilizes the full
Microsoft SQL Server 2000/2005 relational database management system, which meets the needs of high
performance and scalability. This configuration uses a dedicated server and supports unrestricted
expansion for large systems.
The Enterprise edition also supports "clustering" (see the Cluster Installation Manual), where two
independent servers are seen as a single server by the SMS software. If one server in the cluster should
fail, the other automatically steps in to continue normal operation.
Global
The Global edition builds on the Enterprise edition to provide enhanced capabilities for remote
management of multiple systems spread over a number of geographically separate sites. A Global edition
system consists of a "head office" and a number of "regions" (Figure 2-9). Access-control equipment can
be connected to each regional system.
Access Control Design Guide
33
Designing and Planning an M2150 System
Region 0 (Head Office)
Server (holds local databases)
Access-control equipment is
connected to each regional
system in the normal way.
Global Client
Networked Clients
Region 1
Region 2
Server
(holds local databases)
Server
(holds local databases)
Networked Clients
Networked Clients
Figure 2-9: Example Global Edition System, with Global Clients
Global edition supports "Global Clients", which can connect to the head office or any region and log on as if
they were a local client of that site. This gives true remote management of sites, allowing full access
(dependent upon operator permissions) for history reporting, card administration and control of readers,
doors and monitor points. Global Clients have no attached access-control hardware.
Optionally, Global Clients can also be provided with alarms-handling capabilities. This allows the head
office or regions to communicate alarms to the Global Client for centralized alarm notification and
management. Alarms can be routed to Global Clients at specified periods of the day, such as during out-ofhours periods.
A further option of the Global edition system provides central card handling (Figure 2-10). This allows card
holders to be defined centrally, assigned to one or more sites, then automatically imported to each site.
This facility not only provides a multi-site organization with the improved efficiency of central card
management, but also provides the ideal solution when persons require access to more than one site,
since one operation adds cards to all the required locations.
34
Access Control Design Guide
Designing and Planning an M2150 System
The Global edition architecture provides the ultimate resilience for multi-site applications. Any failure of the
corporate network links still allows autonomous systems to continue operating fully at a local level.
The Central Card Handler database can be located on the head office server or on another machine.
Region 0 (Head Office)
Networked Clients
Central Card
Handler Client
Server - holds
local databases
and optionally the
central card
handler database
Region 1
Server
(holds local databases)
Networked Clients
Region 2
Server
(holds local databases)
Networked Clients
Figure 2-10: Example Global Edition System, with Central Card Handling
Selecting the Client Software
SMS clients are used for administrative purposes, such as to produce reports, add cards and display
alarms. When planning an SMS installation, it is necessary to determine the number of client PCs required.
The customer may, for example, require different clients for different tasks or areas of the building. The
overall cost of the system may be affected by the number of clients required.
Access Control Design Guide
35
Designing and Planning an M2150 System
Most installations use the standard Administration Client software, which gives access to all screens of
the SMS software (depending on operator permissions and the options purchased). However, for specialist
purposes, the following client types are also available:
•
Alarm Client – An Enterprise or Global edition client that can be used only to display the
View/Alarms screen for acknowledgment and clearing of alarms.
•
Web Client – Allows a client to use the SMS software remotely over the Internet or Intranet. Web
Clients require no client installation software, but a "Web Server" needs to be set up, as described in
the Web Access Installation and User Guide.
•
Central Card Handler Client – A Global edition client, which allows a central database of card
holders to be maintained and imported by the individual regional systems.
•
Global Client – A client for Global edition systems that can connect to any regional system and log
on as if it were a local client of that site for true remote management of sites. Alarms from regional
systems are displayed for alarm acknowledgment.
Each client supports up to four hardwired and dial-up chains.
Note: A single PC can be installed with the Central Card Handler Client software and the Global Client
software. In all other cases, the same PC cannot be used to support more than one client type.
Software Sentinels Required
Software sentinels (otherwise known as dongles) are required to operate the SMS software.
Business, Professional and Enterprise systems require:
•
A base sentinel on the SMS server.
•
An options sentinel on the server for any chargeable options purchased.
•
A Web Access sentinel on the web server if the optional Web Access module is purchased.
Enterprise systems also require:
•
A sentinel for each client PC.
Global systems also require:
•
A sentinel for each client PC.
•
A "Global Client" sentinel for each Global Client.
•
The "Global HO Base/Unrestricted" base sentinel on the head office server.
•
The "Global Region Base" base sentinel on each regional server.
•
An options sentinel on the head office and regional server for any chargeable options purchased.
•
A "Global Central Card Handler" sentinel on the Central Card Handler database machine (if used).
Determining the PC Requirements
Please refer to the Software Installation Manual for details of the PC hardware and software requirements.
36
Access Control Design Guide
Designing and Planning an M2150 System
Installation Requirements
Before installing an M2150 system, all installers should be made aware of the following.
UL Requirements
Ensure that all installers are familiar with UL installation requirements, as given in Appendix B on page 54.
Shielded Cable (Screens)
To avoid multiple paths to ground, cable shields must be connected only as shown in the installation
instructions. If the shield is shown unconnected at one end of the cable, it must be insulated to prevent
accidental shorting to the case, PCB tracks, etc. Each cabinet must connect to ground.
Electrical Codes
All cables and wiring must be completed in accordance with appropriate codes of practice, e.g. the US
National Electrical Code, NFPA 70, and any local authority requirements.
Cable Clips
All wiring should be routed neatly to the relevant terminal blocks and fixed in position using cable clips. The
cable clips can be fixed to the base or sides of the cabinet.
Preparing for the Site Visit
Before visiting the site, installers should make sure that:
•
The appropriate Installation instructions and Access Control Design Guide are available. The latest
versions of these publications can be obtained from the AMAG web site. See page v for a list of
publications.
•
All appropriate equipment specified on the Site Schematic is available.
•
The SMS software and sentinels are available for installation, if appropriate.
•
Other contractors have completed any work that is required before installation can begin (for
example, installation of auxiliary equipment).
•
A standard set of tools is available. No specialist tools are required.
•
Suitable supplies of the following are available:
Cable.
Cable clips.
Minitrunking or plastic tubing.
Sleeving for shields (screens).
Grommets (glands) for entry of cables into the cabinet.
Door furniture (door-monitor contacts, exit-request push buttons and door releases).
Screws and wall plugs.
Spare fuses (see page 44).
9-way or 25-way connectors for connections to PC or modems, if required.
Ethernet cable for RJ-45 connection to NIC module, if required.
Termination resistors and enclosures for cable supervision (see page 31), if required.
Crimp connectors for grounding.
Access Control Design Guide
37
A Appendix A Maintenance and Test
Procedures
General Procedures
The only item that requires regular testing and maintenance is the 7AH backup battery (not available for
RAK3). It is recommended that the battery in each unit is tested at least once a year by disconnecting its
external power supply and checking that the unit continues to operate normally for the period of time
specified in the Service Contract.
This equipment is to be installed indoors only (except readers that specify otherwise). Impaired operation
will result if the equipment is subject to excessive humidity or temperature, or in the event of prolonged
power loss.
LED Operation
This section explains the meaning of each LED on the M2150 boards, which may be useful when testing
system operation or during fault-finding.
LEDs on the 2DBC
LED2/1 (RDR 1/2) – Illuminated when the reader is connected properly.
LED3 (DC COMMS) – Illuminated when an external door or alarms controller is connected.
LED 6 (CLB) – Flashes to indicate HOST COMMS B (COM B) port usage. 2 flashes = port in use; 5
flashes = port not used (RS232, NIC1 or NIC2 port set to Bidirectional Comms port usage).
LED 7 (CLA) – Flashes to indicate HOST COMMS A (COM A) port usage. 1 flash = port in use; 5 flashes =
port not used (RS232, NIC1 or NIC2 port set to Normal Comms port usage).
LED8/5/4 (RS232/NIC1/NIC2) – Indicates the Port Usage configuration setting for COM ports C, D and E
(as described in the 2DBC Installation Instructions). 1 flash = Normal Comms (indicates primary port when
two NIC4s fitted); 2 flashes = Bidirectional Comms; 3 flashes = Fall-Back Comms; 4 flashes = Serial
Device; 5 flashes = port off (another port has been set to the same setting); 6 flashes = Secondary port
when two NIC4s fitted.
LED9 (OK) – When the 2DBC is functioning correctly, this should flash once per second.
LED10 (3V) – Illuminated when the on-board 3Vdc supply is operating.
LED11 (5V) – Illuminated when the on-board 5Vdc supply is operating.
38
Access Control Design Guide
Maintenance and Test Procedures
LED12 (12V) – Illuminated when the 12Vdc supply is connected.
LED13/17 (RX) – Illuminated when receiving data from a 20mA reader (off for Wiegand).
LED14/18 (TX) – Illuminated when transmitting data to a 20mA reader (off for Wiegand).
LED15/19 (BY) – Illuminated when the bypass relay is energized.
LED16/20 (RL) – Illuminated when the release relay is energized.
LED21 (NIC2 Tx) – Illuminated when transmitting data to the plug-in COM E port.
LED22 (NIC2 Rx) – Illuminated when receiving data from the plug-in COM E port.
LED23 (NIC1 Tx) – Illuminated when transmitting data to the plug-in COM D port.
LED24 (NIC1 Rx) – Illuminated when receiving data from the plug-in COM D port.
LED25/27 (COMA/B TX) – Flashes when there is a database unit connected to the COM A/B port.
Otherwise, the LED is not illuminated.
LED26/28 (COMA/B RX) – Flashes when there is a database unit connected to the COM A/B port.
Otherwise, the LED is permanently illuminated.
LED29 (RS232 TX) – Flashes when the on-board RS232 port (TB13) is transmitting data. Otherwise, the
LED is not illuminated.
LED30 (RS232 RX) – Flashes when the on-board RS232 port (TB13) is receiving data. Otherwise, the LED
is not illuminated.
LED31 (RS485 TX) – Illuminated when transmitting data to an external door or alarms controller.
LED32 (RS485 RX) – Illuminated when receiving data from an external door or alarms controller.
LEDs on the 4DBC
LED1 (12V) – Illuminated when the 12Vdc supply is connected.
LED2 (5V) – Illuminated when the on-board 5Vdc supply is operating.
LED3 (3V) – Illuminated when the on-board 3Vdc supply is operating.
LED4 (OK) – When the 4DBC is functioning correctly, this should flash once per second.
LED5/8/9 (RS232/NIC1/NIC2) – Indicates the Port Usage configuration setting for COM ports C, D and E
(as described in the 4DBC Installation Instructions). 1 flash = Normal Comms (indicates primary port when
two NIC4s fitted); 2 flashes = Bidirectional Comms; 3 flashes = Fall-Back Comms; 4 flashes = Serial
Device; 5 flashes = port off (another port has been set to the same setting); 6 flashes = Secondary port
when two NIC4s fitted.
LED 6 (CLA) – Flashes to indicate HOST COMMS A (COM A) port usage. 1 flash = port in use; 5 flashes =
port not used (RS232, NIC1 or NIC2 port set to Normal Comms port usage).
LED 7 (CLB) – Flashes to indicate HOST COMMS B (COM B) port usage. 2 flashes = port in use; 5
flashes = port not used (RS232, NIC1 or NIC2 port set to Bidirectional Comms port usage).
Access Control Design Guide
39
Maintenance and Test Procedures
LED10 (DC COMMS) – Illuminated when an external door or alarms controller is connected.
LED11/12/13/14 (RDR 1/2/3/4) – Illuminated when the reader is connected properly.
LED19 (NIC1 Rx) – Illuminated when receiving data from the plug-in COM D port.
LED20 (NIC1 Tx) – Illuminated when transmitting data to the plug-in COM D port.
LED21 (NIC2 Rx) – Illuminated when receiving data from the plug-in COM E port.
LED22 (NIC2 Tx) – Illuminated when transmitting data to the plug-in COM E port.
LED15/23/27/39 (RX) – Illuminated when receiving data from a 20mA reader (off for Wiegand).
LED16/24/28/40 (BY) – Illuminated when the bypass relay is energized.
LED17/25/29/41 (TX) – Illuminated when transmitting data to a 20mA reader (off for Wiegand).
LED18/26/30/42 (RL) – Illuminated when the release relay is energized.
LED31/33 (COMA/B TX) – Flashes when there is a database unit connected to the COM A/B port.
Otherwise, the LED is not illuminated.
LED32/34 (COMA/B RX) – Flashes when there is a database unit connected to the COM A/B port.
Otherwise, the LED is permanently illuminated.
LED35 (RS232 TX) – Flashes when the on-board RS232 port (TB13) is transmitting data. Otherwise, the
LED is not illuminated.
LED36 (RS232 RX) – Flashes when the on-board RS232 port (TB13) is receiving data. Otherwise, the LED
is not illuminated.
LED37 (RS485 TX) – Illuminated when transmitting data to an external door or alarms controller.
LED38 (RS485 RX) – Illuminated when receiving data from an external door or alarms controller.
LEDs on the 8DBC and 8DC
LED1/5/9/13/39/43/55/59 (RECEIVE or RX) – Illuminated when receiving data from a 20mA reader (off for
Wiegand).
LED2/6/10/14/40/44/56/60 (TRANSMIT or TX) – Illuminated when transmitting data to a 20mA reader (off
for Wiegand).
LED3/7/11/15/41/45/57/61 (BYPASS or BY) – Illuminated when the bypass relay is energized.
LED4/8/12/16/42/46/58/62 (RELEASE or RL) – Illuminated when the release relay is energized.
LED47/49 (COMA/B TX) – Flashes when there is a database unit connected to the COM A/B port.
Otherwise, the LED is not illuminated.
LED48/50 (COMA/B RX) – Flashes when there is a database unit connected to the COM A/B port.
Otherwise, the LED is permanently illuminated.
LED51 (RS232 TX) – Flashes when the on-board RS232 port (TB15) is transmitting data. Otherwise, the
LED is not illuminated.
40
Access Control Design Guide
Maintenance and Test Procedures
LED52 (RS232 RX) – Flashes when the on-board RS232 port (TB15) is receiving data. Otherwise, the LED
is not illuminated.
LED53 (RS485 TX) – Illuminated when transmitting data to an external door or alarms controller.
LED54 (RS485 RX) – Illuminated when receiving data from an external door or alarms controller.
LED17/19 (COM D/E RX) – Illuminated when receiving data from the plug-in COM D/E port.
LED18/20 (COM D/E TX) – Illuminated when transmitting data to the plug-in COM D/E port.
LED21 (12V) – Illuminated when the 12Vdc supply is connected.
LED22 (DC COMMS) – Illuminated when an external door or alarms controller is connected.
LED23 (5V) – Illuminated when the on-board 5Vdc supply is operating.
LED24/26/28/30/32/34/36/38 (READER 1/2/3/4/5/6/7/8) – Illuminated when the reader is connected
properly.
LED25 (3V) – Illuminated when the on-board 3Vdc supply is operating.
LED27 (OK) – When the 8DBC is functioning correctly, this should flash once per second.
LED29/35/37 (COM C/COM D/COM E) – Indicates the Port Usage configuration setting for COM ports C,
D and E (as described in the 8DBC Installation Instructions). 1 flash = Normal Comms (indicates primary
port when two NIC4s fitted); 2 flashes = Bidirectional Comms; 3 flashes = Fall-Back Comms; 4 flashes =
Serial Device; 5 flashes = port off (another port has been set to the same setting); 6 flashes = Secondary
port when two NIC4s fitted.
LED 31 (COM A) – Flashes to indicate COM A port usage. 1 flash = port in use; 5 flashes = port not used
(RS232, NIC1 or NIC2 port set to Normal Comms port usage).
LED 33 (COM B) – Flashes to indicate COM B port usage. 2 flashes = port in use; 5 flashes = port not
used (RS232, NIC1 or NIC2 port set to Bidirectional Comms port usage).
LEDs on the 2DC
LED9/10 (RDR 1/2) – Illuminated when the reader is connected properly.
LED3/7 (Rx) – Illuminated when receiving data from a 20mA reader (off for Wiegand).
LED1/5 (Tx) – Illuminated when transmitting data to a 20mA reader (off for Wiegand).
LED4/8 (BY) – Illuminated when the bypass relay is energized.
LED2/6 (RL) – Illuminated when the release relay is energized.
LED11 (RxD) – Illuminated when receiving data from a database unit.
LED12 (TxD) – Illuminated when transmitting data to a database unit.
LED13 (DC COMMS) – Illuminated when the door controller comms to the database unit is active.
LED14 (OK) – When the controller is functioning correctly, this should flash at two-second intervals (one
second on and one second off).
Access Control Design Guide
41
Maintenance and Test Procedures
LED15 (12V) – Illuminated when the 12Vdc supply is connected.
LED16 (5V) – Illuminated when the on-board 5Vdc supply is operating.
LED17 (3V) – Illuminated when the on-board 3Vdc supply is operating.
LEDs on the 4DC
LED1/2/3/4 (READERS OK 2/3/1/4) – Illuminated when the reader is connected properly.
LED5/11/20/26 (Rx) – Illuminated when receiving data from a 20mA reader (off for Wiegand).
LED6/12/21/27 (Tx) – Illuminated when transmitting data to a 20mA reader (off for Wiegand).
LED7/9/22/24 (BY) – Illuminated when the bypass relay is energized.
LED8/10/23/25 (RL) – Illuminated when the release relay is energized.
LED13 (Rx DATA) – Illuminated when receiving data from a database unit.
LED14 (Tx DATA) – Illuminated when transmitting data to a database unit.
LED15 (COMMS) – Illuminated when the door controller comms to the database unit is active.
LED16 (OK) – When the controller is functioning correctly, this should flash at two-second intervals (one
second on and one second off).
LED17 (12V) – Illuminated when the 12Vdc supply is connected.
LED18 (5V) – Illuminated when the on-board 5Vdc supply is operating.
LED19 (3V) – Illuminated when the on-board 3Vdc supply is operating.
LEDs on the OC4/24 Alarms Controller
LED1-24 (OPn) – Illuminated when the auxiliary output relay is energized.
LED25 (Rx) – Illuminated when receiving data from a database unit.
LED26 (Tx) – Illuminated when transmitting data to a database unit.
LED27 (OK) – When the controller is functioning correctly, this should flash at two-second intervals (one
second on and one second off).
LED28 (3V) – Illuminated when the on-board 3Vdc supply is operating.
LED29 (5V) – Illuminated when the on-board 5Vdc supply is operating.
LED30 (12V) – Illuminated when the 12Vdc supply is connected.
42
Access Control Design Guide
Maintenance and Test Procedures
LEDs on the AC24/4 Alarms Controller
LED1 (OK) – When the controller is functioning correctly, this should flash at two-second intervals (one
second on and one second off).
LED2 (DATA Tx) – Illuminated when transmitting data to a database unit.
LED3 (DATA Rx) – Illuminated when receiving data from a database unit.
LED4 (POWER) – Lit steadily while power is applied.
LEDs on the DBU
LED1/3 (COMA/B RX) – Flashes when there is a database unit connected to the COM A/B port. Otherwise,
the LED is permanently illuminated.
LED2/4 (COMA/B TX) – Flashes when there is a database unit connected to the COM A/B port. Otherwise,
the LED is not illuminated.
LED5 (COM C RX) – Flashes when the on-board RS232 port (TB4) is receiving data. Otherwise, the LED
is not illuminated.
LED6 (COM C TX) – Flashes when the on-board RS232 port (TB4) is transmitting data. Otherwise, the
LED is not illuminated.
LED7/9 (COM D/E RX) – Illuminated when receiving data from the plug-in COM D/E port (NIC1/NIC2).
LED8/10 (COM D/E TX) – Illuminated when transmitting data to the plug-in COM D/E port (NIC1/NIC2).
LED11 (DC RX) – Illuminated when receiving data from an external door or alarms controller.
LED12 (DC TX) – Illuminated when transmitting data to an external door or alarms controller.
LED13/14/17 (COM D/COM E/COM C) – Indicates the Port Usage configuration setting for COM ports C,
D and E (as described in the DBU Installation Instructions). 1 flash = Normal Comms (indicates primary
port when two NIC4s fitted); 2 flashes = Bidirectional Comms; 3 flashes = Fall-Back Comms; 4 flashes =
Serial Device; 5 flashes = port off (another port has been set to the same setting); 6 flashes = Secondary
port when two NIC4s fitted.
LED 15 (COM B) – Flashes to indicate COM B (HOST COMMS B) port usage. 2 flashes = port in use; 5
flashes = port not used (RS232, NIC1 or NIC2 port set to Bidirectional Comms port usage).
LED 16 (COM A) – Flashes to indicate COM A (HOST COMMS A) port usage. 1 flash = port in use; 5
flashes = port not used (RS232, NIC1 or NIC2 port set to Normal Comms port usage).
LED18 (DC COMMS) – Illuminated when an external door or alarms controller is connected.
LED19 (OK) – When the DBU is functioning correctly, this should flash once per second.
LED20 (12V) – Illuminated when the 12Vdc supply is connected.
LED21 (5V) – Illuminated when the on-board 5Vdc supply is operating.
LED22 (3V) – Illuminated when the on-board 3Vdc supply is operating.
Access Control Design Guide
43
Maintenance and Test Procedures
LEDs on the Elevator Interface Board
LED1 (OK) – When the board is functioning correctly, this should flash at two-second intervals (one second
on and one second off).
LED2 (Data Tx) – Illuminated when transmitting data.
LED3 (Data Rx) – Illuminated when receiving data.
LED4 (PWR) – Lit steadily while power is applied.
LED5/7/9/11 (Reader 1/2/3/4 Tx) – Illuminated when transmitting data to a 20mA reader (not applicable to
slave unit).
LED6/8/10/12 (Reader 1/2/3/4 Rx) – Illuminated when receiving data from a 20mA reader (not applicable to
slave unit).
Fuse Ratings
WARNING FOR ELEVATOR NODES - ELECTRICAL SHOCK HAZARD!
DISCONNECT AND ISOLATE ALL POWER TO THE EQUIPMENT, INCLUDING
TO THE FLOOR RELAYS, BEFORE REPLACING A FUSE.
It is always good practice to disconnect supply and battery power before replacing a fuse.
Note: An automatically-resettable fuse rated at 1A is provided for each reader on a 2DBC, 4DBC, 8DBC,
2DC, 4DC, 4DCN and 8DC. If an automatically resettable fuse trips, you must remove the load completely
before the fuse resets.
Power supply board: Refer to Power Supply Board Installation Instructions.
Elevator Interface board (slave unit): F1 (input fuse), 2.5A Fast.
44
AC 24/4:
FS1 (input fuse), 1A Fast.
OC 4/24:
F1 (input fuse), 1.6A Slow.
2DC:
F1 (input fuse), 1A Fast.
4DC:
F1 (input fuse), 2A Fast.
8DC:
F1 (input fuse), 6.3A Slow.
4DCN:
F1 (input fuse), 3.15A Slow.
2DBC:
F1 (input fuse), 1.6A Slow.
4DBC:
F1 (input fuse), 3.15A Slow.
8DBC:
F1 (input fuse), 6.3A Slow.
DBU:
F1 (input fuse), 4A Fast.
F2 4DCU-1 (not used, output from PL1), 2.5A Slow.
F3 4DCU-2 (not used, output from PL2), 2.5A Slow.
Access Control Design Guide
Maintenance and Test Procedures
Performing a Warm or Cold Reset
If an operational problem is encountered, a warm reset of a database unit can be achieved by pressing
then immediately releasing the reset button. A warm reset restarts the processor. It does not clear data
from the database unit, such as card and other data that has been downloaded from the SMS software.
A cold reset can be achieved by pressing then holding down the reset button for five seconds. The system
takes approximately 30 seconds to restart after you have taken your finger off the reset button. A cold start
clears the database unit's memory to factory-set defaults and should be performed only as a last resort.
Under normal circumstances, there should be no need to perform a warm or cold reset.
Updating Firmware
Firmware is resident in Flash memory in the database units and controllers. The firmware can be updated
by using the Flash2100 utility running on a PC.
Note: For UL294 systems, only UL Listed firmware versions are allowed. Installing non-UL Listed firmware
will void UL Listing. Please contact your support representative before updating firmware in equipment that
requires UL compliance.
The Renesas™ Flash Development Toolkit can be used for the 2DBC, 2DC, 4DC, 4DBC, 4DCN or
OC4/24 only. The Flash2100 software can be used for all boards.
The Renesas Flash Development Toolkit allows direct downloading of firmware from a portable PC. The
toolkit uses a device known as a "programming interface", which connects between a serial (RS232) port
of the PC and a connector on the unit.
Flash2100 is a slower tool, but allows upgrading to take place from any PC if the database units are
connected via a LAN. No software installation is required for Flash2100.
Using the Renesas Flash Development Toolkit (v3.07)
The Renesas Flash Development Toolkit is software from Renesas Technology Corp., which can be
downloaded as a trial version from their web site. The Renesas Flash Development Toolkit allows firmware
to be updated quickly, but requires direct physical access to the database unit/controller, and the use of a
portable computer.
To use the Renesas Flash Development Toolkit, an "M2150 Programming Interface" must be connected
between a serial (RS232) port of your PC and the following socket on the database unit/controller:
SK7 on the 4DBC or 4DCN
SK9 on the OC4/24
SK5 on 2DC
PL3 on 2DBC
SK6 on 4DC
The "M2150 Programming Interface" can be obtained from your M2150 distributor.
Access Control Design Guide
45
Maintenance and Test Procedures
Installing the Renesas Flash Development Toolkit
To install the Renesas Flash Development Toolkit:
1.
Go to www.renesas.com, and select your region.
2.
Enter the search string "Flash Development Toolkit" and click the first result.
3.
Click Downloads.
4.
Search for the evaluation version of the Flash Development Toolkit, v3.07, and download it to your
computer.
5.
Double-click the downloaded exe file, and follow the prompts. Accept all defaults.
You may be requested to perform an automatic update to v4.00. It is recommended that you do not
perform the upgrade; the procedure documented in this guide has been tested against v3.07 only.
Configuring the Flash Development Toolkit
The toolkit must be configured the first time it is used, as follows:
1.
Connect one end of the programming interface to a serial port of your PC. Connect the other end to
the 6-way socket on the database unit/controller (see page 45). You will need to remove the overlay
to access the socket. The red wire must connect to pin 1; this is marked by the removed corner from
the box drawn around the socket on the silkscreen.
2.
Switch on the database unit/controller (if it is not already switched on).
Note: There is no need to disconnect the network or serial port at a database unit, since the upgrade
process will reset communications.
3.
From the Windows Start menu, start Flash Development Toolkit 3.07 Basic.
4.
Follow the prompts:
Select Generic BOOT
Device.
46
Access Control Design Guide
Maintenance and Test Procedures
Select the COM port
that the programming
device is connected
to.
Click OK.
Make sure Selecting Device shows
HD64F2378, then click OK when all
sections have a check mark.
Access Control Design Guide
47
Maintenance and Test Procedures
Change the CPU
crystal frequency
setting to 20.
Change the
multiplier
setting to 1.
Remove the checkmark.
Select 57600 from the
drop-down list.
48
Access Control Design Guide
Maintenance and Test Procedures
Keep the defaults.
Select the options shown here.
You are now ready to download
a firmware file, as described
next.
Access Control Design Guide
49
Maintenance and Test Procedures
Updating Firmware Using the Flash Development Toolkit
Once the toolkit has been configured, it can be used to download a firmware file to the database
unit/controller. If the FDT Simple Interface dialog is not already displayed, select Flash Development
Toolkit 3.07 Basic from the Windows Start menu.
Place a checkmark in
the User/Data Area
checkbox, then
select the firmware
file to download using
the Browse button.
Once you have
selected the file, click
Program Flash to
begin the download.
Feedback is provided in
this panel.
Wait until "Disconnected" is displayed, then click Exit and remove the programming interface; the board
will restart.
If required, you can program another database unit/controller by connecting the programming interface to
another board and clicking Program Flash.
Using Flash2100 to Update Firmware
Although firmware downloading takes a lot longer using Flash2100 than using the Flash Development
Toolkit (10 to 20 minutes), Flash2100 has the advantage of not requiring direct access to a database unit
or its controllers if the database unit is connected to a LAN. Instead, any PC connected to the LAN can be
used to download new firmware to the database unit/controller.
If the database unit uses serial communications (i.e. it is on an SMS hardwired chain), you must use
Flash2100 at the PC that the database unit is connected to. If the database unit uses a modem, you can
use any PC that has access to a modem.
Note: You cannot download firmware to a database unit or its controllers if it is not the first database unit in
the chain. If you want to download firmware to all database unit at the site, each must be on a separate
chain.
50
Access Control Design Guide
Maintenance and Test Procedures
To use Flash2100:
1.
If you are going to use Flash2100 at an SMS client PC, shut down the SMS service named SMS
Client Services at the PC. You can do this as follows:
a) Check whether the SMS Service Monitor icon is displayed in the System Tray (normally, in the
bottom-right corner of the screen):
b) If the icon is displayed, double-click the icon, select SMS Client Services, and click Stop.
c) If the icon is not displayed, open Administrative Tools in the Windows Control Panel, double-click
the Services applet, select SMS Client Services, and click Stop.
2.
Double-click the supplied Flash2100.exe file (you may prefer to set up a desktop shortcut to this
file). The following is displayed
3.
Click the Config. button in the toolbar. The following is displayed.
Access Control Design Guide
51
Maintenance and Test Procedures
4.
Select the communications settings to the database unit. If you are using serial communications, the
Baud rate must be the same as set at the database unit (normally 9600). Leave Other Options at
the default settings (as shown in the picture).
5.
Click Search, then select the DCU radio button. The following shows an example of the information
displayed.
The tree on the left side of the screen lists each database unit and controller found. The tree has the
following features:
This represents the "node". That is, the database unit and its controllers. The
address of the database unit is shown here.
This represents the door controller section of a database unit such as a 4DBC.
52
Access Control Design Guide
Maintenance and Test Procedures
This shows the cumulative total number of controller addresses used.
This represents a door controller.
This represents an alarms controller.
The right side of the screen lists the firmware and current status of each database unit/controller.
The status information will change when you begin a firmware download.
6.
Select the device you want to download firmware to by selecting the appropriate item on the right
side of the screen. The device is highlighted in the tree.
Note: Selecting either
or
will download the firmware to the database unit.
7.
Click Browse. Make sure you see the following dialog.
8.
Click the Browse button in this dialog, and choose the folder containing the firmware file.
9.
The firmware files for the selected device are listed. Select the file and click Select.
10.
Click Start to begin the firmware download. (The Download Complete File option in the Options
menu should remain unselected.)
11.
Select Cascade from the Window menu, and maximize the screen. The download is complete when
data has stopped scrolling in the communications window, the Standalone Mode window has
refreshed and the Start button has ungrayed.
12.
Close Flash2100.
13.
If you previously stopped SMS Client Services, restart it.
Access Control Design Guide
53
B Appendix B Underwriters Laboratories
(UL) Compliance
Installers and sales representatives should familiarize themselves with the requirements of this section in
order to form a better understanding of the requirements for installing this equipment in a UL Listed
environment. The requirement for such listed installations will generally be driven by the local codes,
statutes and regulations, and in all cases the local Authority Having Jurisdiction (AHJ) should be consulted
to be certain that the requirements are known and understood before installing this equipment. UL requires
that controllers, power supplies and the like are installed within the protected area.
Any equipment that has not passed UL294 must not be installed at sites that require conformance with
UL294.
Firmware Updates
For UL294 systems, only UL Listed firmware versions are allowed. Installing non-UL Listed firmware will
void UL Listing. Please contact your support representative before updating firmware in equipment that
requires UL compliance.
Supported Reader Types
At the time of publishing this guide, the following readers have been tested by Underwriters Laboratories
for use with this equipment (please refer to page 57 for current consumption figures):
•
S820 - 20mA proximity reader without keypad. Capable of reading 125kHz HID-formatted cards.
•
S821 - 20mA contactless smart-card reader without keypad, able to read Texas Instruments™ (ISO
15693) smart cards, and the card serial number on MIFARE smart cards.
•
S830 - Small footprint version of S820.
•
S831 - Small footprint version of S821.
•
S840 - 20mA contactless smart-card reader with keypad, able to read HID format cards.
•
S841 - 20mA contactless smart-card reader with LCD and keypad, able to read Texas Instruments
(ISO 15693) smart cards, and the card serial number on MIFARE smart cards.
•
S843 MKII - 20mA contactless smart-card reader with LCD and keypad, able to read MIFARE,
MIFARE DESfire, CAC-NG and PIV type A cards.
•
S853 - 20mA combined contact and contactless smart-card reader, with LCD and keypad. The S853
is able to read MIFARE, MIFARE DESfire, CAC-NG and PIV type A cards.
Interconnecting Devices
All interconnecting devices must be UL Listed.
54
Access Control Design Guide
Underwriters Laboratories (UL) Compliance
Power-Limited Wiring
UL compliance requires power-limited and non-power-limited wiring to be separated by at least 0.25”
(7mm). Any additional power supply used (e.g. for door releases and auxiliary outputs) must be power
limited, UL Listed for Access Control Systems and Accessories. The recommended cable routing diagrams
in the cabinet installation instructions show power-limited and non-power limited wiring.
Strain Relief
All cables leaving the cabinet must be in conduit/trunking, or must employ a UL-listed strain relief device.
Minimum Requirements for Computer Accessory Equipment
The PC running the SMS software must be ITE UL Listed to UL 60950.
Please refer to the Software Installation Manual for details of the minimum hardware and software
requirements.
Transient Suppressors
Transient protection must meet or exceed the following UL standards for equipment safety:
•
Communications circuits & network components; UL497A: Standard for Secondary Protectors for
Communications Circuits (UL274 27.2f).
•
Signal Line Transients; UL497B: Standard for Protectors for Data Communications and Fire Alarm
Circuits, maximum rating of 50 volts (UL294 27.2e).
•
Supply Line Transients; UL1449 Standard for Transient Voltage Surge Suppressors (UL294 27.2d).
Environmental
If the computer accessory equipment is to be installed in a temperature-controlled environment, 24 hours
of standby power supply must be provided for the Heating Ventilation and Control (HVAC) system, which
must maintain the environment between 55 and 95 degrees F (13-35 degrees C). The standby power
system for the HVAC system must be supplied by an engine-driven generator alone. A standby battery is
not required to be used (UL294 27.2g).
Emergency Egress and System Failure Mode
Locking mechanisms must be installed to allow fail-safe egress, such as during a total loss of main and
backup power. Consult the local Authority Having Jurisdiction (AHJ) when installing access control readers
and locking mechanisms to any portal in an egress path.
A system failure, such as loss of the system program, system lock-up or total failure, does not allow
unauthorized access, although a partial loss of operation may occur.
Access Control Design Guide
55
C Appendix C: M2150 Specifications
Electrical
MN-PSU-6A power supply: Input is 19-20Vac or 24Vdc @ 150VA max. Output is 6.5A @12Vdc max (6A
for system power and 500mA for battery). Use only MN-TRANS-150-UL 19Vac transformer for UL294
applications.
MN-PSU-KIT (7000-5283) power supply: Input is 18Vac or 24Vdc @ 75VA max. Output is 3.0A @12Vdc
max (2.5A for system power and 500mA for battery). Use only MN-TRANS-75-UL 18Vac transformer for
UL294 applications. (Not approved for use with the 8DBC or 8DC controllers.)
RAK3 power supply: Input is 100-240Vac 50/60Hz. Output is 3.5A @12Vdc max.
MN-PSU-2+2: Input is 32Vac 50/60Hz, 150VA max. The 24Vdc output provides up to 2A for door
releases. The 12Vdc output provides a maximum of 2A. A separate 24Vdc output provides up to 500mA
for battery recharge.
Backup battery (not available for RAK3): 12V 7AH lead-acid. Battery capacity for emergency standby is at
least 1 hour.
On-board battery on DBU/2DBC/4DBC/8DBC: 3.6V 150mAHr NiCad battery; maintains data for 120 hours
during supply and backup battery power failure.
Reader port: Nominally 12Vdc supply, range 8.89-13.49Vdc, maximum of 500mA per reader port.
Door-release relays: rated at 28Vdc, 3A maximum.
Bypass relays: rated at 28Vdc, 3A maximum.
I/O module auxiliary-output relays: rated at 28Vdc, 3A maximum.
All elevator node relays: FORM C contacts, maximum load is 5A @ 250Vac, or 5A @ 30Vdc.
Maximum cable distances: see Table 2-5 on page 30.
Device-level maximum 12Vdc current consumption from Power Supply Board: See page 29.
Standards
EN50133, 1999/5/EC, UL294.
Physical
Cabinet dimensions
ENC3: 21 5/8" (550mm) height, 16 3/4" (425mm) width, 3 3/4" (95mm) depth.
ENC4: 22 1/8" (562mm) height, 20" (508mm) width, 4 1/8" (105mm) depth.
RAK3: For 19" racking systems. 3 1/8" (80mm) height.
CAB3A: 21 13/16" (554mm) height, 16 3/4" (425mm) width, 3 3/4" (95mm) depth.
CAB4A: 22" (560mm) height, 19 3/4" (500mm) width, 4 1/8" (105mm) depth.
CAB5: 27 3/4" (704mm) height, 22 1/16" (560mm) width, 4 1/8" (105mm) depth.
ENC-1: 13 3/4" (352mm) height, 17 1/4" (440mm) width, 3 3/8" (85mm) depth.
56
Access Control Design Guide
M2150 Specifications
Elevator Node: 20" (508mm) height, 20" (508mm) width, 6.6" (168mm) depth.
ENC-1L: 15 3/4" (400mm) height, 19.1/8" (485mm) width, 4 1/8" (106mm) depth.
Key type for CAB3A/CAB4A/RAK3/CAB5: Standard "service" key.
PCB dimensions
AC24/4: 12 5/8" (320mm) x 6 7/8" (175mm)
OC4/24: 12 5/8" (320mm) x 6 7/8" (175mm)
4DC: 12 5/8" (320mm) x 6 7/8" (175mm)
2DC: 11" (280mm) x 4 5/8" (117mm)
8DBC: 11" (280mm) x 10 1/4" (260mm)
8DC: 11" (280mm) x 10 1/4" (260mm)
DBU: 9 7/16" (240mm) x 6 5/16" (160mm)
ENVS: 8 5/8" (220mm) x 6 11/16" (170mm)
2DBC: 9 1/8" (233mm) x 8 11/16" (220mm)
4DBC: 11" (280mm) x 10 1/4" (260mm)
4DCN: 11" (280mm) x 10 1/4" (260mm)
Environmental
Operating temperature for database unit and controller hardware: 14 to 131°F (-10 to 55°C).
Operating humidity: 15% to 90% humidity, non-condensing.
All equipment is for indoor use only, except readers whose specifications state otherwise.
System Limits
Database units per chain: maximum of 32.
Devices per database unit: maximum of 16 readers, 96 auxiliary outputs and 96 monitor points (hardware
and configuration dependent).
Devices per elevator node: maximum of four readers and 64 floors (hardware and configuration
dependent).
Card capacities and maximum offline buffered transactions: See the following table.
Table A-1: Card and Transaction Limits
Memory Card
Memory
On-board
2MB
4MB
8MB
Card Limit
20,000
50,000
100,000
250,000
Transactions
65,000
65,000
65,000
65,000
Card Readers
Table A-2 lists popular readers that are used with M2150. The table gives each reader's current
consumption and indicates whether the reader has been UL evaluated. Please refer to the appropriate
reader installation instructions for details of current consumption for readers not listed below.
Access Control Design Guide
57
M2150 Specifications
Table A-2: Reader Currents
Reader Model
S620
Current Consumption at
8.89-13.49Vdc
100mA
S635
100mA
S640
50mA
S670
100mA
S671
100mA
S680
100mA
S682
100mA
S710
150mA
S711
150mA
S820
100mA
S821
110mA
S822
210mA
S830
85mA
S831
100mA
S840
100mA
S841
150mA
S842
280mA
S843 MKII
190mA
S844
180mA
S853
195mA
Evaluated by UL
Note: The mark indicates that the model is suitable for use with M2150 UL294 applications. The mark indicates that the model is not suitable for use with M2150 UL294 applications.
58
Access Control Design Guide
D Appendix D: Site Schematic Check List
This appendix lists the items that should be marked on the Site Schematic (see page 8).
General
Mark the following:
The locations of any doors or elevators to be access controlled
The locations of any monitor points or auxiliary output devices
Walls and any other relevant building features
If appropriate for drilling or mounting, the construction of any relevant walls or floors
Database Units and Controllers
Mark the following:
The type and location of each database unit and controller
The cabinet types to be used, and details of the boards that share the same cabinet
The cable types and routing paths to readers, door furniture, controllers, other database units in the
same chain, the SMS PC, monitor points and auxiliary outputs
The location of the network socket, telephone socket (for modem communications) or PC (for serial
communications), as appropriate for the first database unit in a chain
The address of each database unit (one to 32) and controller (one to 8)
The communications method to be used for communications from the first database unit in the chain to
an SMS PC
The IP address of each NIC-4 and NIC-WI (if applicable)
The port usage bit-switch settings
The modules required:
NIC-4 – specify encryption or non-encryption model, and the port (COM D or COM E)
NIC-WI – specify the port (COM D or COM E)
One-port RS232 – specify the port (COM D or COM E)
WIM
I/O Module
RS485 Module
The power source for each cabinet
Access Control Design Guide
59
Site Schematic Check List
The backup power source for each cabinet (normally a 12V 7AH battery)
Where to ground each cabinet
Cable supervision level for monitor points
Details of any additional power supplies required for auxiliary outputs
Elevator Nodes (if used)
For each elevator node, mark the following:
The locations of the master and slave units.
Cable requirements and routes
Any conditions required by the Federal Fire Code or other local regulations
Whether Enable All or Enable Select Mode is to be used
Whether the Free/Secure relay is required
Whether Tenant Security is required
Whether a Fireman's Switch is required
The address of the database unit (one to 32)
If the node is the first in a chain:
The communications method to an SMS PC
The location of the network socket, telephone socket (for modem communications) or PC (for
serial communications), as appropriate
The IP address of each NIC-4 and NIC-WI (if applicable)
The port usage bit-switch settings
The power source
The backup power source (normally a 12V 7AH battery)
Where to ground the cabinet
Details of any additional power supplies required for external devices
Antipassback (if used)
If antipassback is used, mark the following:
Whether Timed or Zonal antipassback is to be used
Which database units belong to the same antipassback scheme (for zonal antipassback)
The to and from zone (one to 63) for each antipassback reader (for zonal antipassback)
The timeout period for each antipassback reader (for timed antipassback)
Readers
For each reader, mark the following:
60
Reader type
Mounting location and height
Access Control Design Guide
Site Schematic Check List
The door/elevator it is to control
Cable type and routing path to the controller
The port to be used for an RS485 reader (if applicable)
Two readers at one door: the location of the paired reader (if applicable), and the port number to use
at the door controller
Door Furniture
For each access-controlled door, mark the following:
Position of any required exit-request button
Whether a bypass circuit is needed
Details of any special noise-suppression circuitry
Details of any additional power supplies required for door releases
Cable type and routing path to controller
Cable supervision level for exit request and door monitor circuits
Additional Power Supplies (if necessary)
For any additional power supply, mark the following:
The purpose of the power supply
The output current and voltage specifications
The required location
The cable type and routing path
The main power source
The grounding point
The backup power source (normally a 12V 7AH battery)
SMS Software and PC Requirements
Specify the following:
The SMS software Edition to use (e.g. Professional)
The type and location of each SMS client
The sentinels to fit to the server(s)
Refer to the Software Installation Manual for PC requirements
Refer to the Digital Video Design Guide to plan digital video systems (if used)
Access Control Design Guide
61
E Index
2
2DBC ......................................................................................................................................... See Database unit
2DC .......................................................................................................................................... See Door controller
4
4DBC ......................................................................................................................................... See Database unit
4DC .......................................................................................................................................... See Door controller
8
8DBC ......................................................................................................................................... See Database unit
8DC .......................................................................................................................................... See Door controller
A
AC monitor .......................................................................................................................................................... 29
AC24/4 ................................................................................................................................. See Alarms controller
Address
Door/alarms controllers ................................................................................................................................... 11
Alarms controller
Addressing ...................................................................................................................................................... 11
Connection architectures................................................................................................................................. 10
Selecting............................................................................................................................................................ 8
Types of ............................................................................................................................................................. 5
Using ................................................................................................................................................................. 9
Antipassback ....................................................................................................................................................... 21
Auxiliary outputs
Introduction to.................................................................................................................................................... 3
Power for ......................................................................................................................................................... 28
Using ................................................................................................................................................................. 9
B
Batteries .............................................................................................................................................................. 20
Bi-directional communications ............................................................................................................................ 13
Business Edition .................................................................................................................................................. 34
C
CAB3 ................................................................................................................................................... See Cabinet
CAB4A ................................................................................................................................................. See Cabinet
CAB5 ................................................................................................................................................... See Cabinet
Cabinet
Dimensions...................................................................................................................................................... 58
Types ............................................................................................................................................................... 19
Cable
Faults............................................................................................................................................................... 32
National Electrical Code .................................................................................................................................. 38
Requirements for elevator nodes .................................................................................................................... 16
Supervision ...................................................................................................................................................... 32
Types and distances ....................................................................................................................................... 31
Card Handling ..................................................................................................................................................... 35
Chain ................................................................................................................................................................. 3, 9
Client types .......................................................................................................................................................... 36
Clustering ............................................................................................................................................................ 34
Cold reset ............................................................................................................................................................ 47
Communications
Bi-directional .................................................................................................................................................... 13
Access Control Design Guide
i
Index
Fall-back.......................................................................................................................................................... 13
Ports ................................................................................................................................................................ 11
Primary/secondary .......................................................................................................................................... 13
Serial device .................................................................................................................................................... 13
Current
Consumption ................................................................................................................................................... 29
D
Daisy-chain connections ..................................................................................................................................... 10
Database unit
Communications ............................................................................................................................................. 11
Positioning ....................................................................................................................................................... 10
Reset ............................................................................................................................................................... 47
Selecting ........................................................................................................................................................... 8
Types of ............................................................................................................................................................ 4
Dimensions ......................................................................................................................................................... 58
Dongles ............................................................................................................................................................... 37
Door controller
Addressing ...................................................................................................................................................... 11
Connection architectures ................................................................................................................................ 10
Selecting ........................................................................................................................................................... 8
Types of ............................................................................................................................................................ 5
Door monitor
Cable supervision ............................................................................................................................................ 32
Door release
Noise suppression........................................................................................................................................... 25
Power ........................................................................................................................................................ 10, 25
Power for ......................................................................................................................................................... 28
Dual RS485 reader interface module
Introduction to ................................................................................................................................................... 6
E
Electrical specifications ....................................................................................................................................... 58
Elevator node
Cable requirements ......................................................................................................................................... 16
Enable Select/All mode ................................................................................................................................... 15
Features and Planning .................................................................................................................................... 15
Fireman's switch ............................................................................................................................................. 17
Free/secure relay ............................................................................................................................................ 17
Power .............................................................................................................................................................. 18
Safety .............................................................................................................................................................. 18
Siting ............................................................................................................................................................... 15
Tenant security................................................................................................................................................ 17
Enable All ............................................................................................................................................................ 16
Enable Select ...................................................................................................................................................... 15
ENC-1/1L ............................................................................................................................................ See Cabinet
ENC3 ................................................................................................................................................... See Cabinet
ENC4 ................................................................................................................................................... See Cabinet
Enterprise Edition ................................................................................................................................................ 34
ENVS
Installation ....................................................................................................................................................... 27
Introduction to ................................................................................................................................................... 6
Power for ......................................................................................................................................................... 28
Ethernet ............................................................................................................................................................... 12
Ethernet switch .................................................................................................................................................... 27
Exit request
Cable supervision ............................................................................................................................................ 32
ii
Access Control Design Guide
Index
F
Fall-back communications................................................................................................................................... 13
Fireman's switch.................................................................................................................................................. 17
Firmware ............................................................................................................................................................. 47
Flash2100...................................................................................................................................................... 47, 52
Free Access mode .............................................................................................................................................. 17
Free/secure relay ................................................................................................................................................ 17
Fuses................................................................................................................................................................... 46
G
Globa
Client ............................................................................................................................................................... 35
Global
Edition ............................................................................................................................................................. 34
I
I/O module
Introduction to.................................................................................................................................................... 6
Using ................................................................................................................................................................. 9
Impaired operation .............................................................................................................................................. 40
Installation
Instructions ........................................................................................................................................................ v
Requirements .................................................................................................................................................. 38
L
LEDs .................................................................................................................................................................... 40
M
M2150
Boards ............................................................................................................................................................... 3
Cabinets .......................................................................................................................................................... 19
Installation Instructions ...................................................................................................................................... v
Introduction to.................................................................................................................................................... 1
Modules ......................................................................................................................................................... 3, 6
Specifications .................................................................................................................................................. 58
Maintenance procedures ..................................................................................................................................... 40
MCLP .................................................................................................................................................................. 23
Monitor point
Cable supervision ............................................................................................................................................ 32
Introduction to.................................................................................................................................................... 3
Using ................................................................................................................................................................. 9
MSDE .................................................................................................................................................................. 34
Multidrop connections ......................................................................................................................................... 10
N
National Electrical Code ...................................................................................................................................... 38
National Fire Alarm Code .................................................................................................................................... 18
NFPA ................................................................................................................................................................... 18
NFPA 70 .............................................................................................................................................................. 38
NIC4 module
Dual ................................................................................................................................................................. 13
Introduction to.................................................................................................................................................... 6
Using ............................................................................................................................................................... 12
NIC-WI module
Introduction to.................................................................................................................................................... 6
Using ............................................................................................................................................................... 12
Node ...................................................................................................................................................................... 3
Noise Suppression .............................................................................................................................................. 25
O
OC4/24 ................................................................................................................................. See Alarms controller
Access Control Design Guide
iii
Index
OC4/8 ............................................................................................................................................. See I/O module
Optional modules .............................................................................................................................................. 3, 6
P
Pan, tilt, zoom ..................................................................................................................................................... 27
PC requirements ................................................................................................................................................. 37
Port usage ........................................................................................................................................................... 11
Power
Device-level current consumption ................................................................................................................... 29
Requirements .................................................................................................................................................. 28
Supplies .......................................................................................................................................................... 28
Power-limited wiring ............................................................................................................................................ 57
Preface .................................................................................................................................................................. v
Primary/secondary communications ................................................................................................................... 13
Professional Edition ............................................................................................................................................ 34
Q
Quad RS485 reader interface module
Introduction to ................................................................................................................................................... 6
R
RAK3 ................................................................................................................................................... See Cabinet
Reader
20mA (MCLP) ................................................................................................................................................. 23
Current consumption ....................................................................................................................................... 59
Location ........................................................................................................................................................... 24
Power for ......................................................................................................................................................... 28
RS485 ............................................................................................................................................................. 24
Selecting ......................................................................................................................................................... 23
Supported types .............................................................................................................................................. 59
Two Readers at one door................................................................................................................................ 24
UL tested ......................................................................................................................................................... 56
Wiegand .......................................................................................................................................................... 23
Renesas .............................................................................................................................................................. 47
Reset
Database unit .................................................................................................................................................. 47
RS232 module
Introduction to ................................................................................................................................................... 6
RS232-to-20mA converter .................................................................................................................................. 13
RS485 reader ...................................................................................................................................................... 24
S
Screens ............................................................................................................................................................... 38
Secondary communications ................................................................................................................................ 13
Secure Access mode .......................................................................................................................................... 17
Sentinels ............................................................................................................................................................. 37
Serial device ........................................................................................................................................................ 13
Shields ................................................................................................................................................................ 38
Site schematic ................................................................................................................................................. 8, 61
Site visit ............................................................................................................................................................... 38
SMS software
Editions ........................................................................................................................................................... 34
Introduction to ................................................................................................................................................... 1
Requirements .................................................................................................................................................. 37
Specifications ...................................................................................................................................................... 58
SQL Server ......................................................................................................................................................... 34
Star connections ................................................................................................................................................. 10
Strain relief .......................................................................................................................................................... 57
Supervision ......................................................................................................................................................... 32
Switch .................................................................................................................................................................. 27
iv
Access Control Design Guide
Index
Symmetry .............................................................................................................................................................. 1
T
Tamper ................................................................................................................................................................ 32
Tenant security .................................................................................................................................................... 17
Test procedures .................................................................................................................................................. 40
Two readers at one door ..................................................................................................................................... 24
U
UL
Power supplies ................................................................................................................................................ 29
Readers ........................................................................................................................................................... 59
Underwriters Laboratories (UL) ........................................................................................................................... 56
Uninterruptible Power Supply .............................................................................................................................. 20
V
Video ................................................................................................................................................................... 27
W
Warm reset ......................................................................................................................................................... 47
Web client ........................................................................................................................................................... 37
Wiegand .............................................................................................................................................................. 23
WIM module
Introduction to.................................................................................................................................................... 6
Ordering .......................................................................................................................................................... 23
Wiring ..................................................................................................................................................... See Cable
Access Control Design Guide
v