1
PROFESSIONAL MULTIMEDIA DJ PLAYER
MANUAL DE USUARIO
USER MANUAL
DECK2
PRECAUCIÓN
A- PARA EVITAR RIESGO DE ELECTROCUCIÓN ASEGÚRESE DE QUE EN CASO DE NO USAR UNA CONEXIÓN AC CON TOMA DE
TIERRA LOS CONECTORES DE TOMA DE TIERRA DEL ENCHUFE DEL EQUIPO NO QUEDEN EXPUESTOS.
B- PARA EVITAR RIESGO DE ELECTROCUCIÓN ASEGÚRESE DE NO EXPONER EL EQUIPO A SUSTANCIAS LIQUIDAS DE NINGÚN
TIPO. ASÍ COMO EMPLAZAR EL EQUIPO EN LUGARES HÚMEDOS.
CAUTION
RISK OF ELECTRIC SHOCK
DO NOT OPEN
ATENCIÓN: para reducir el riesgo de electrocución, no manipule el interior del equipo. En el equipo no existen
componentes que deban ser supervisados por el usuario.
Para realizar el mantenimiento del equipo póngase en contacto con el personal cualificado
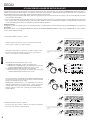
Esta señal indica la presencia de componentes del equipo que
precisan de mantenimiento. Para más información sobre éstos lea el
manual.
Esta señal indica la presencia de lugares donde habiendo un
elevado voltaje no presentan aislamiento y por tanto constituye un
claro riesgo de electrocución.
INSTRUCCIONES DE SEGURIDAD E INFORMACIÓN DE LA GARANTÍA
1. Lea detenidamente este manual antes de utilizar su equipo.
2. Mantenga el manual a su disposición para su uso en el futuro.
3. Siga las advertencias que se le proporcionan en este manual.
4. Siga las instrucciones consignadas en este manual, un uso indebido
podría dejar sin efecto la garantía.
5. Agua y humedad. No utilice el equipo cerca del agua o en lugares
muy húmedos (fregadero, lavadora, etc.) para evitar riesgos de
descarga eléctrica o fuego.
6.Transporte del equipo. Transporte el equipo con mucho cuidado.
Los golpes o las vibraciones fuertes pueden dañarlo
mecánicamente.
ESPAÑOL
7. Fuentes de calor. Tenga cuidado de no colocar el equipo cerca de
fuentes de calor (Ej. Radiadores, estufas, amplificadores)
8. Líquidos y objetos extraños. En caso de que algún fluido o
pequeñas partículas sólidas sean derramadas sobre el aparato y
se introduzcan en los circuitos apague el aparato y llévelo a su
distribuidor.
9. Daños en el quipo que precisen reparación. El equipo deberá ser
reparado o revisado por personal cualificado en caso de:
A. Objetos o líquidos se han introducido en el equipo.
B. El aparato ha sido expuesto a la lluvia.
C. El equipo no parece funcionar o lo hace de modo poco usual.
D. El aparato ha caído al suelo o presenta deterioros en su caja
exterior.
10. Mantenimiento. Según estipulan las directivas Europeas no
está permitido realizar ninguna modificación al aparato. No
abra el equipo para labores de mantenimiento pues en este
aparato no hay piezas que necesiten manutención. En caso de
que abriendo el equipo sea éste dañado o lo sea la persona que
lo manipula la empresa no tomará ninguna responsabilidad por
este servicio de mantenimiento no autorizado. Además en este
caso la garantía perdería su vigencia.
11. Ventilación. El aparato está provisto de hendiduras de ventilación,
es importante no cubrirlas o bloquearlas. La ventilación del
aparato podría verse comprometida resultando en un
sobrecalentamiento que podría dañar el equipo. Tenga siempre en
cuenta que colocar el aparato en un lugar sin ventilación puede
producir un sobrecalentamiento de éste.
12. Nunca utilice accesorios o modificaciones no autorizados por
el fabricante. Ello puede afectar la seguridad del aparato y el
fabricante no tendrá ninguna responsabilidad en este caso.
13. Accesorios. No deposite o instale el equipo sobre superficies o
estructuras inestables. El aparato podría precipitarse y causar
lesiones a las personas en las proximidades de éste. Cualquier
montaje o instalación del equipo deberá ser realizado
siguiendo las instrucciones o recomendaciones dadas en este
manual o por el fabricante directamente.
1
14. Precaución durante tormentas. Durante una tormenta desconecte el equipo
de la red para evitar que los posibles picos de corriente dañen el equipo.
15. Durante cualquier manipulación del equipo, para mantener todas las
cualidades de éste tanto en prestaciones como en seguridad para el
operante es necesario utilizar sólo recambios originales.
Consecuentemente asegúrese de que la empresa que realice el
mantenimiento esté autorizada por el fabricante o importador.
16. Utilice sólo cables conforme a la regulación vigente. Pregunte a su
distribuidor al respecto del particular.
17. No utilice su equipo inmediatamente en caso de haberlo trasladado
súbitamente de un ambiente muy frío a un ambiente caliente.
18. Limpieza. Nunca utilice sprays de limpieza en la zona del equipo donde
están los controles (botones, faders, conectores, etc.). Utilice un trapo
húmedo.
19. Audio ON. Cuando termine de instalar el equipo y esté listo para
comenzar a reproducir música asegúrese antes de situar el control de
volumen tanto general como de auriculares al mínimo.
20. Comprobación de seguridad. Una vez realizada una reparación o
servicio del equipo pida al personal cualificado que realice una
comprobación para asegurarse de que el equipo le es devuelto en
perfectas condiciones de uso.
21. Control de seguridad. La diferencia de potencial entre la toma de
corriente de la pared y cualquier pieza metálica del equipo debe ser de
al menos 100.000 ohmios.
CONDICIONES DE USO
Este equipo ha sido concebido y fabricado para ser utilizado como
reproductor de discos compactos y memorias flash. Cualquier uso
alternativo anularía la garantía.
El aparato viene con un número de serie. No lo arranque pues podría perder
sus derechos de garantía.
PRECAUCIÓN “LASER RADIATION”!
Su reproductor DECK2 está equipado con diodos Laser Clase 1.
Para su seguridad no desmonte el equipo o intente acceder a su interior.
Este reproductor no contiene componentes que necesiten operaciones de
manutención. En caso de fallo del aparato deberá contactar con
AKIYAMA o el comercio donde compró el aparato para que le
proporcionen el centro de asistencia técnica más próximo a su localidad.
CARACTERÍSTICAS PRINCIPALES
- Auto Cue.
- Reproducción archivos MP3.
- Reproducción Simple / Continua.
- Memoria anti choque ( Anti-shock Playback).
- Búsqueda de pistas de 10 en 10.
- Pitch Control & Pitch Display.
- Rango de Pitch: +/- 4%, +/- 8%, +/- 16% and 100% (CDDA*)
- Selección de visualización de tiempo en pantalla entre
“elapsed” (tiempo de reproducción), “remain” (tiempo restante
De reproducción) y Total.
DECK2
- Búsqueda por “frames” a 1/75 de segundo.
- Seamless Loop.
- 4 velocidades de búsqueda.
- Protección durante el transporte.
- Fuente de alimentación conmutada.
- Arranque reproducción por “Fader Start”
- Reproducción alternada entre ambos Deck
CDDA* Compact Disc Digital Audio
NOTAS PARA EL USO DEL EQUIPO
Si instala el equipo en un rack habilite suficiente espacio para una correcta refrigeración.
- Manipule el cable de tensión/corriente con cuidado
- Al desenchufar el equipo hágalo tirando del conector, no del cable de tensión/corriente
- Mantenga el equipo apartado de lugares con polvo, humedad, agua, etc.
- Desconecte el equipo de la toma de tensión en caso de no utilizarlo por un período de tiempo largo.
- No obstruya las rejillas de ventilación.
- No introduzca objetos en el interior del equipo.
- Asegúrese de no poner el contacto el equipo con insecticidas, benceno y disolventes.
- Nunca desmonte o modifique el aparato.
MANIPULACIÓN DE LOS COMPACT DISC
ESPAÑOL
- Siempre coloque los discos en la bandeja correspondiente con la marca impresa hacia arriba. Los discos sólo se pueden reproducir de un lado.
- Para extraer un disco de su estuche, presione firmemente el centro del disco, sujetándolo por los extremos y retírelo firmemente sin tocar el centro.
- Las marcas dejadas por los dedos así como el polvo pueden ser retirados de la superficie de los discos, limpiando la cara de lectura con un paño
suave y seco.
- Nunca trate de limpiar los discos compactos con líquidos limpiadores de acetatos, sprays antiestáticos, disolventes diversos o químicos, al hacer
esto expone los discos a un daño irreparable en la capa protectora de plástico.
- Los discos deben ser colocados nuevamente en su lugar después de haber sido reproducidos para evitar que sufran rayones que pudieran causar
"saltos" a la hora de reproducirlos.
- No exponer los discos a los rayos directos del sol, la humedad o temperaturas extremas por largos periodos de tiempo. Demasiado calor puede
provocar que los discos se dañen o se deformen.
PREPARACIONES
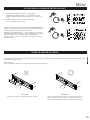
Al revisar el contenido de la caja debemos encontrar:
(1)
Unidad Principal
1pc
(2)
Unidad de Control
1pc
(3)
Manual de Instrucciones
1pc
(4)
Cable de 8 Pin acodado
1pc
(5)
2 x Cable RCA(L/R)
2pc
(6)
CableAuto-start
2pc
(7)
CableAC de conexión a red 1pc
(8)
CDRom Db Builder
1pc
PRECAUCIÓN:
- El aparato funcionará correctamente cuando esté montado con
el panel frontal a 15 grados de la vertical. Si el equipo está
excesivamente inclinado los discos pueden no funcionar
correctamente.
Conexiones
(1) Desconectar el interruptor de encendido, “Power”.
(2) Conectar el cable RCAa la entada del mezclador.
(3) Conectar la unidad principal con la unidad de control.
Instalación del equipo
(1) Instalar el equipo sobre una superficie horizontal.
(2) Asegúrese de que el reproductor se instala en una zona ventilada
y no expuesta a rayos solares directos, extrema humedad o alta
temperatura.
(3) Posicione el equipo lo más lejos posible de televisores y aparatos
de radio.
- La pantalla luminosa LCD de la unidad está diseñada para verse
claramente desde cierto ángulo. Ajuste la posición del equipo
para que la visualización de la pantalla luminosa LCD sea
óptima.
ATENCIÓN:
- Asegúrese de usar los cables que le suministramos. Utilizar
cualquier otro cable puede dañar el equipo. Asegúrese de
desconectar el equipo antes de conectar los cables, de otro
modo podría dañar el equipo.
2
DECK2
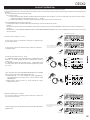
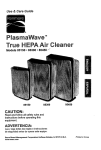
LOCALIZACIÓN Y DESCRIPCIÓN DE LOS CONTROLES
1
5
2
3
6
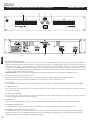
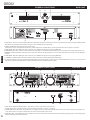
UNIDAD PRINCIPAL
4
7
8
ESPAÑOL
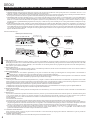
1- BANDEJAPORTADISCOS.
Para abrir y cerrar la bandeja de Discos. Presione el botón 2, CD1/CD2 (OPEN/CLOSE) del equipo para que abra la bandeja. El
display indicará OPEN. La bandeja de discos se deslizará hacia afuera. La bandeja de los discos no puede abrirse durante la
reproducción de la música, de esta forma si presionara accidentalmente el botón OPEN/CLOSE no se abriría deteniendo la
sesión que está reproduciendo. Si quiere abrirla: primero, presionar el botón PLAY/PAUSE y luego el botón Open / Close de la
bandeja. Coloque cuidadosamente el disco deseado con la cara del rótulo hacia arriba. El disco debe quedar colocado en base a
los anillos que están dibujados en la bandeja.
PRECAUCIÓN: No cierre la bandeja empujándola, podría dañar el mecanismo. Utilice el botón OPEN/CLOSE.
2- OPEN/CLOSE (Transport Tray Open/ Close).
Para abrir y cerrar la bandeja de Discos presione el botone OPEN/CLOSE del equipo para que abra la bandeja.
Nota: Cuando un disco está cargado no podrá abrir la bandeja excepto en modo PAUSAo CUE.
3- USB 1 PORT.
Conecte aquí su dispositivo de almacenamiento de datos USB “Pen Drive” o HDD (Disco Duro) para reproducir pistas MP3.
4- POWER SWITCH.
Éste conmutador se utiliza para poner el equipo en marcha. El LED situado encima del conmutador se ilumina cuando el
equipo está activado.
5- POWER CONNECTOR.
Es el conector de la toma de tensión. Utilice únicamente el cable suministrado con el equipo. El uso de otro cable no
homologado podría causar desperfectos al equipo.
6- USB 2 PORT.
En éste conector USB conecte el segundo dispositivo de almacenamiento de datos USB para reproducir ficheros MP3.
7- CONTROL CONNECTOR.
Utilice el cable más conector suministrado mini-DIN8 para conectar la unidad principal con la unidad de control.
8- SALIDASAUDIO R & L para Deck 1 y Deck 2.
Las salidas Deck 1 y Deck 2 comprenden un par de conectores RCA no balanceados. Utilice este cable para conectar la señal de
salida a un mezclador o un amplificador integrado. El color rojo representa el canal derecho y el color negro el canal izquierdo.
Akiyama aconseja conectar las salidas a un mezclador estéreo.
3
DECK2
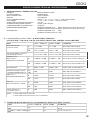
LOCALIZACIÓN Y DESCRIPCIÓN DE LOS CONTROLES
1
2
3
18
4
17
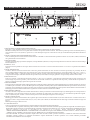
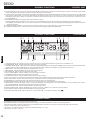
UNIDAD CONTROL
5
16 15 14 13
6
12
7
11
20
10 9 8
19
ESPAÑOL
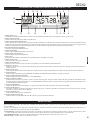
1- BOTÓN OPEN/CLOSE BANDEJAPORTADISCOS.
Para abrir y cerrar la bandeja de Discos presione el botón OPEN/CLOSE para que abra la bandeja.
NOTA: La bandeja de los discos no puede abrirse durante la reproducción de la música. Para abrirla: primero presione el botón Play/Pause y
luego el botón CD1 o CD2, (botón 2, Open/Close, de la unidad principal). De esta forma se evita que accidentalmente pueda abrirla durante la
sesión.
2- SELECCIÓN DE FUENTE PARAREPRODUCCIÓN.
Utilice el botón para seleccionar entre las distintas fuentes CD/USB. Los LED le indicarán qué fuente está activa (CD, USB 1, USB 2). Este botón
sólo podrá utilizarse en modo Pausa.
3- BOTÓN TIEMPO.
Cambia el modo Tiempo reproducido (Elapsed) / Tiempo Restante (Remain) / Tiempo total reproducido. Por defecto estamos en modo Tiempo
Restante (Remain).
4- DISPLAY / LCD.
Se dispone de una pantalla de LCD que indica las funciones tal como se van activando desactivando. Los iconos se explicarán más adelante
(Pág.6).
5- SELECTOR DE PITCH.
Cuando la función Pitch está activada este control nos permite determinar el valor de Pitch en modo de porcentaje. El porcentaje de Pitch
seleccionado permanecerá hasta que seleccionemos otro valor o desactivemos la función Pitch. Los valores disponibles son +/-8%, +/-10% +/16% para MP3 y hasta +/-100% para CDDA. El ajuste de Pitch se puede realizar aun no habiendo ninguna fuente (CD o USB) en el lector y su
valor permanece aunque cambiemos la fuente de reproducción (CD o USB). En el display podemos ver el porcentaje de Pitch seleccionado.
6- BOTÓN SGL/CTN.
SGL es por “Single“ o reproducción de una sola canción. “CTN“ es por “Continuous” o reproducción continua de todas las pistas o canciones. En
modo “Single” la pista se reproduce y entra en modo CUE. En modo continuo se reproducen todas las pistas y cuando acabe de reproducir la
última, se parará. En el display aparecerá la opción seleccionada.
7- BOTÓN TAP BPM.
Se dispone de un analizador digital de Beat Automático. También podemos determinar el Beat manualmente presionando el botón en sincronía
con el Beat que escuchamos. El valor del Beat aparecerá en pantalla. También podrá ajustar el BPM manualmente presionando el botón TAP y
girando el control TRACK para realizar un ajuste de precisión del valor decimal de BPM. Nota: Para pasar de modo manual a modo automático
mantenga presionado el botón TAP durante 2 segundos. Por defecto estamos en modoAUTO BPM.
8- BOTONES PITCH BEND.
Acelera o decelera la reproducción mientras mantenemos el botón presionado. En función del tiempo que mantengamos el botón apretado se
incrementará el valor de Pitch. Se dispone de cuatro velocidades en cada sentido. Al soltarlo vuelve a su velocidad de reproducción original.
Utilice esta función para “cuadrar” o sincronizar dos pistas. El % de Pitch aplicado aparecerá en el display.
9- SELECCIÓN DE PITCH.
Mantenga presionado el botón durante dos segundos para activar/desactivar la función PITCH, el LED “PITCH ON” se ilumina. Presione el
botón para variar el rango de Pitch desde 4%, 8%, 16%, 100% (sólo CDDA). El LED indicador de cada rango se ilumina cuando el rango está
activo.
Nota: El porcentaje por defecto es 8%.
10- CONTROLTRACK.
Utilice el control para seleccionar una pista o carpeta en función de los dos modos de uso disponibles:
- En modo TRACK, nos permite seleccionar pistas. Girando el control hacia la derecha avanzamos pistas girando a la izquierda retrocedemos pistas.
Realizando la misma operación con el botón TRACK presionado avanzamos/retrocedemos de 10 en 10 pistas. Presionando repetidamente el botón
TRACK podemos seleccionar la información que aparecerá en el display; Folder Name/FILE NAME/TITLE
/ARTIST/ALBUM/GENRE/BITRATE. “FOLDER NAME” es el nombre de la carpeta, “FILE NAME“es el nombre de archivo, “TITLE“ es el título,
“ARTIST“ el autor, “GENRE“ el tipo de género musical, “BITRATE“ es la velocidad de transmisión de datos.
- En modo FOLDER, nos permite seleccionar carpetas. Para entrar en modo “Folder” presione el botón (15). Girando el control hacia la derecha
avanzamos carpetas girando a la izquierda retrocedemos carpetas. Realizando la misma operación con el botón TRACK presionado
avanzamos/retrocedemos de 10 en 10 carpetas.
4
DECK2
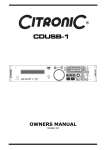
LOCALIZACIÓN Y DESCRIPCIÓN DE LOS CONTROLES
UNIDAD CONTROL
11- BOTONES SEAMLESS LOOP.
a. BOTON LOOP IN Este botón nos permite crear un punto CUE sin pausar la reproducción. Este tipo de punto Cue se suele llamar “hot cue” o “Cue
on the fly”.Además, simultáneamente determina el punto de inicio de un Loop.
b. BOTON LOOP OUT Este botón se utiliza para determinar el punto final de un Loop. El punto de inicio del Loop se realiza presionando el botón IN.
En Loop seleccionado de este modo se repetirá continuamente hasta que presionemos OUT una segunda vez
c. BOTON RELOOP Si hemos realizado un Loop y no lo estamos reproduciendo (los botones IN/OUT están iluminados), al presionar RELOOP el
Loop comenzará su reproducción instantáneamente (los botones IN/OUT parpadean). Para salir del Loop y continuar la reproducción presione el
botón OUT. Cuando la función RELOOP esté disponible (tenemos un Loop almacenado); en el Display leeremos LOOP. Cuando el Loop esté
reproduciéndose, la palabra RELOOP parpadeará en el Display. Cuando el Loop se ha realizado pero no está reproduciéndose LOOP aparecerá fijo
en el Display.
d. EDICION INICIO/FIN LOOP Estando en modo LOOP, mantenga presionado el botón RELOOP, el botón OUT parpadeará y en el display se
indicará el tiempo del fin de Loop. Para modificar el punto temporal de fin de Loop manipule la rueda (Jog-Wheel). A continuación presione el botón
OUT o RELOOP para salir del modo de edición. Para editar el punto temporal del inicio del Loop presione el botón RELOOP, el botón IN parpadeará
y en el display se indicará “IN EDIT”. Manipule la rueda (Jog-Wheel) para establecer un nuevo punto temporal de inicio de Loop. Presione el botón
IN para salir del modo de edición.
Ilustración Edición Loop:
Edición punto Final de Loop:
tiempo del fin el Loop
Modo Loop (RELOOP ON)
Seleccione un nuevo punto fin de Loop
2
1
3
Fin modo edición
Parpadea
HOLD
PRESS
PRESS
O..
Edición punto Inicio de Loop:
(RELOOP OFF)
1
Seleccione un nuevo punto inicio de Loop
2
3
Fin modo edición
Parpadea
HOLD
PRESS
IN EDIT
ESPAÑOL
5
12- RELAY BUTTON.
Disponga los dos reproductores en modo “Single” y presione el botón RELAY. Las pistas de ambos reproductores se reproducirán alternativamente
hasta que presionemos otra vez el botón RELAY. Durante la reproducción en modo RELAY podrá poner una nueva fuente de reproducción (CD, USB)
que permanezca a la espera, en modo “Standby”, de ser utilizada . De este modo podrá crear un programa de reproducción sin fin. Ideal para bares y
Pub´s donde se precisa música ambiente.
13- BOTÓN KEY LOCK.
Con el KEY Lock activado podemos cambiar el Pitch (velocidad de reproducción) de una canción sin modificar las notas. De este modo evitamos el
efecto “voz Mickey Mouse” al acelerar la reproducción.
14- BOTONES SEARCH:
Botón SEARCH retrocedemos rápidamente por la pista. En función del tiempo que mantengamos el botón apretado se incrementará la
velocidad de retroceso. Se dispone de cuatro velocidades que aparecen representadas en el display.
Botón SEARCH avanzamos rápidamente por la pista. En función del tiempo que mantengamos el botón apretado se incrementará la velocidad
de avance. Se dispone de cuatro velocidades que aparecen representadas en el display.
15- BOTÓN FOLDER.
Utilícelo para conmutar entre modos de búsqueda de Pistas y Carpetas. Cuando el LED del botón Folder está iluminado, el reproductor está en modo
Folder (Carpeta). En caso contrario el reproductor está en modo Pista o Track. **En modo Pista o Track al seleccionar una pista aparece el nombre de
ésta en pantalla. En modo Carpeta o Folder al seleccionar una Carpeta aparece el nombre de ésta en pantalla.
Mantenga el botón Folder presionado durante 2 segundos para activar/desactivar la función REPEAT.
i. REPEAT on: Todas las pistas del Folder o Carpeta se repetirán hasta desactivar el modo REPEAT. En el display aparece la palabra REPEAT.
ii. REPEAT off: Las pistas del dispositivo CD/USB se reproducirán normalmente.
16- BOTÓN PLAY/PAUSE.
Cada vez que presione este botón pasará de modo Reproducción a modo Pausa y viceversa. En modo PLAY el LED se ilumina. En modo PAUSE el
LED parpadea.
17- BOTÓN CUE.
Al presionar CUE durante la reproducción entramos en Pausa y el lector se posiciona donde establecimos el último punto Cue. Estando en modo pausa
y con el lector situado en el punto Cue, presionar el botón CUE para reproducir la pista desde el punto Cue, al soltar el botón CUE el punto de
reproducción vuelve a éste y entra en modo Pausa. El LED de Cue se iluminará cuando el lector está posicionado en el punto Cue.
18- JOG WHEEL.
La rueda realiza dos funciones:
a. En modo VYNIL: la rueda nos permite realizar el efecto Scratch. Para realizar el efecto Scratch debemos tocar la parte superior de la rueda.
b. En modo CDJ: estando en PAUSE o CUE la rueda nos permite realizar una búsqueda de precisión. Al mover la rueda avanzamos/retrocedemos en
pequeños fragmentos de canción de una duración de 1/75 segundos. A esto lo llamamos búsqueda por “frames”. Este modo es ideal para seleccionar
puntos Cue con gran precisión. Para memorizar un punto Cue utilice la rueda para buscar el punto y presione el botón PLAY/PAUSE.
c. En modo CDJ: durante la reproducción la rueda puede funcionar como un “Pitch Bend”. En modo PLAY o reproducción moviendo la rueda
aceleramos/deceleramos la reproducción hasta en un porcentaje de +100%/-100% (CDDA) y +/-8, +/-10, +/-16 para MP3. La velocidad con la que
giramos la rueda determina la velocidad con la que avanzamos/retrocedemos.
19- CONTROL START SOCKET.
Estos conectores jack de 3.5mm sirven para conectar su DECK 2 con un mezclador que disponga de la función “Fader Start” lo que nos permite un
arranque remoto de la reproducción.
20- CONNECTOR CONTROL.
Utilice el cable mini-DIN8 para conectar la unida Principal con la unidad de Control.
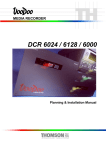
LOCALIZACIÓN Y DESCRIPCIÓN DE LOS CONTROLES : LCD
1
2
16 12
15
14
3
4 6
5
7
10
9
DECK2
18
17
16
13
11
8
ESPAÑOL
1- INDICADOR CUE.
El indicador se ilumina cuando estamos en modo CUE. El indicador parpadea cada vez que editamos un nuevo punto CUE.
2- INDICADOR FOLDER.
Indica el número del Carpeta o Folder en reproducción.
3- INDICADOR BARRATEMPORAL.
Indica visualmente en forma de barra horizontal el tiempo reproducido o restante de pista en función del modo seleccionado mediante el botón
TIME. La barra horizontal parpadeará unos instantes antes de terminar la reproducción de la pista. La referencia visual que nos proporciona la
barra horizontal puede ser de gran utilidad para conocer en cada momento en que punto de la pista estamos reproduciendo.
4- ESTADO DE INDICADOR BPM.
Indica que el modoAuto BPM está activo.
5- INDICADOR BPM.
Indica el valor de BPM de la pista en reproducción.
6- INDICADOR VALOR PITCH.
Informa del porcentaje de Pitch aplicado.
7- KEY LOCK.
Indica que la función Key Lock está activa. En pantalla aparece el símbolo “Key Lock”
8- INDICADOR LOOP.
Indica que la función Loop está activada.
9- INDICADOR RELOOP.
Indica que se ha creado un Loop (bucle). Este Loop puede ser activado mediante el botón RELOOP.
10- MODOAUTO CUE:
Indica si el modo Auto Cue está activado. Mantenga presionado el botón SGL/CNT durante más de un segundo para activar/desactivar la
funciónAuto Cue.
11- INDICADOR “KEY”:
Indica cuando la parte superior de la rueda, que es sensible al tacto, puede ser utilizada para el control de la reproducción o el efecto Scratch.
12- TIME DISPLAY.
Indica el tiempo del modo escogido (REMAIN, ELAPSED, TOTAL REMAIN) en minutos, segundos y “frames”.
13- INDICADOR INFORMACION MP3.
Indica el nombre de la pista, el del archivo y el “Sampling Rate”.
14- INDICADOR DE TIEMPO.
Indica el tiempo en minutos, segundos, “frames” según el modo escogido. “Elapsed” indica el tiempo de pista reproducido. “REMAIN” indica
el tiempo de pista restante de reproducion. “TOTAL REMAIN” (sólo CD) indica el tiempo restante de reproducción del total del CD. Utilice
el boton TIME para cambiar de modo.
15- INDICADOR REPEAT.
Indica si la unidad está en modo “Repeat”, se repite la reproducción de todas las pistas de una carpeta o FOLDER.
16- INDICADOR SINGLE.
Nos indica si estamos en modo de reproducción Single (una pista) o Continuo (reproducción de todas las pistas). En caso de estar en modo
Continuo no veremos indicación en el display.
17- INDICADOR TRACK.
Indica el número de la pista en reproducción.
18- INDICADOR PLAY/PAUSE.
Indica si estamos en modo Reproducción “►” o Pausa “ ”׀ ׀en función de los símbolos.
MENU INTERNO
Mantenga presionado el botón TIME durante 3 segundos para entrar en el menú interno de su equipo.
Gire el control TRACK o la rueda para visualizar los distintos menús y presione el control TRACK para entrar en el submenú
correspondiente.
Gire el control TRACK o la rueda para visualizar/cargar y cambiar los distintos submenús. Presione el botón TIME para memorizar los
parámetros definidos en un submenú y salir del modo MENU.
1. Modo Playlist. Determina la información sobre una pista que se mostrará en el display: Normal / Título / Artista / Álbum/ Género. Para
acceder a los distintos submenús Normal / Título /Artista / Álbum/ Género presione repetidamente el control TRACK.
2. Sensibilidad de rueda. Ajusta la sensibilidad al tacto de la parte plana de la rueda en un rango de -20~+20
3. Modo “Sleep”. Desactivado /Activado de 5 a 120 min
6
DECK2
MENU INTERNO
4. Modo Línea. Determina como se mostrará la información en el display.
MODE 1-3 (existen tres modos distintos de mostrar la línea de texto):
- Mode1 = el texto “recorre la línea” y se para un tiempo determinado (el usuario puede fijar el tiempo) antes de volver a repetir el m o v i m i e n t o
continuamente.
- Mode 2 = el texto “recorre la línea” una vez y se para.
- Mode 3 = el texto “recorre la línea” continuamente.
DIS: Estando en Modo 1,2 ó 3, gire la rueda. En el display aparecerá “DIS”. Establece el tiempo en que el texto permanece fijo. Gire el control
TRACK para seleccionar el tiempo que el texto permanece fijo. El rango de tiempo a escoger es de 0.5~12.0 segundos.
RUN: Estando en Modo 1,2 ó 3, gire la rueda. En el display aparecerá “RUN”. Determina la velocidad con la que el texto se desplaza por la línea.
Gire el control TRACK para seleccionar el tiempo en un rango de 50~2000 milisegundos.
En un lapso de tiempo programado las letras se desplazan hacia la izquierda
DIS determina el tiempo que el texto permance parado
RUN determina la velocidad con la que el texto se desplaza
ESPAÑOL
5. Bit rate. Display ON/OFF. Podemos especificar si queremos que se indique en Display el “Bit Rate” de la pista reproducida. Para ello gire el
control TRACK o la rueda para selecciona ON/OFF (lo verá en el display). Para realizar la selección presione el control TRACK.
6. Versión CON: XX (versión de Control MIDI)
DSP: XX (versión de DSP)
SER: XX (versión de Servo)
7. Load Default. Le permite volver a cargar en su reproductor los “settings” o parámetros originales por defecto (realizados de fábrica). Estando en el
menú “LOAD DEFAULT” presione el control TRACK y los parámetros por defecto serán cargados. En el display aparece “Load OK”.
Exit & Save En caso de haber modificado los parámetros de su equipo mediante el menú interno y desee guardarlos para otra sesión sitúese en el menú
“EXIT & SAVE”. Presione el control TRACK y los parámetros editados por usuario serán guardados. En el display aparecerá “Saving”.
Nota:Acontinuación se proporciona la lista de controles que es posible editar y almacenar (Save) y el valor por defecto de dichos controles (Default).
SLEEP TIME: EL reproductor de CD apagará el sistema de adquisición de datos (LASER) después de estar 15 minutos en modo PAUSA o CUE. De
este modo alargará la vida útil del sistema LASER. Estando en modo Sleep en el display aparece la palabra “SLEEP”. Para reiniciar el equipo
simplemente presione PLAY o CUE, el display vuelve a su modo normal y está listo para recibir instrucciones. Entrando en el Menú SLEEP MODE
podrá determinar el tiempo en un rango de 5~120 minutos.
SAVE: Los parámetros que se guardarán son:
PITCH ON/OFF, PITCH RANGE, SGL/CTN, AUTO CUE, TIME MODE, KEY LOCK, DISPLAY/RUN TIME/ BIT RATE, REPEAT MODE,
PLAYLIST, SLEEPTIME, LINE SETUP.
DEFAULTS: Los valores de los parámetros por defecto (de fábrica) son: PITCH (ON), PITCH RANGE (8%), PLAY MODE(CTN), AUTO CUE(ON),
TIME MODE (REMAIN), KEY LOCK(OFF), BIT RATE(Disp. ON), REPEAT MODE (OFF), PLAYLIST (NORMAL), SLEEP TIME (15 min),
LINE SETUP(model 1), DISPLAY(1 sec),RUN TIME(150msec).
INSTALACIÓN BASE DE DATOS
Para Windows
Requerimientos mínimos:
CPU: Procesador Intel Pentium 4, 1GHz o superior, Intel Centrino Mobile Technology 1.6GHz
RAM: 512MB RAM
ESPACIO EN DISCO HDD: 100MB libres para la aplicación.
Sistemas operativos: Microsoft Windows XPSP3, Vista SP2
Su equipo dispone de un Software “DB Builder” para PC que le permitirá, en su computador, ordenar las pistas y carpetas de su dispositivo USB en función
de los distintos Submenús (Normal / Title/Artist /Album/ Genre) del menú PLAYLIST.
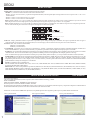
Instalación:Acceda al archivo DB Builder. Ejecútelo, en su pantalla aparecerán los siguientes gráficos que le ayudarán durante la instalación.
Paso 1, presione NEXT
7
Paso 2, presione NEXT
Paso 3, presione INSTALL
DECK2
Para Windows
INSTALACIÓN BASE DE DATOS
Paso 4, presione PROCESSING
Paso 5, presione FINISH
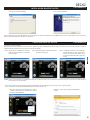
Una vez instalado el programa DB Builder conecte su dispositivo USB en su ordenador y ejecute DB Builder sobre éste. A continuación vea un conjunto de
gráficos que le indicarán cómo se realiza esta operación.
Para Windows
CREACIÓN BASE DE DATOS
- Escanear y crear base de datos:
Siga las instrucciones explicadas en cada uno de los gráficos que irça encontrando durante la creación de la base de datos. La base de datos creada le
simplificará la búsqueda de pistas a través de los controles de DECK 1.
Paso 1: Seleccione en su ordenador el dispositivo
USB que desea ordenar para su posterior
uso en su equipo
Paso 2: Automáticamente comenzará el proceso
de análisis (Processing)
ESPAÑOL
Paso 3: Al finalizar el análisis, en la ventana del
creador de Base de Datos aparecerá un
informe del análisis. Esto indica que la
creación de la Base de Datos ya ha sido
creada.
NOTA: cada vez que modifique el contenido de su dispositivo USB es necesario volver a realizar el proceso descrito para crear una nueva Base de Datos
acorde con los nuevos contenidos.
- Solución de problemas de instalación del Software DB Builder: Si utiliza Windows Vista puede ocurrir el siguiente fallo:
1. No se instalará correctamente DB Builder debido a la limitación de UAC.
2.Solución: presione el botón derecho del “mouse”
y utilice la opción”Run as “administrator” para la
instalación de DB Builder.
3.Permita “Allow” que el programa DB Builder
trabaje.
8
DECK2
UTILIZACIÓN DE LA BASE DE DATOS (PLAYLIST)
Es importante conocer el funcionamiento del sistema de búsqueda de pistas proporcionado por el programa DB BUILDER. En un “Pen Drive” o
“HDD” usted puede tener miles de pistas y un rápido acceso a éstas es muy oportuno. Para determinar el tipo de búsqueda entre “Normal/ Title/
Artist/Album/ Genere (sólo para USB), las dos operaciones básicas a realizar son:
1. Mantenga presionado el botón TIME “Hold” durante 3 segundos para entrar en el menú interno de su equipo. Gire el control TRACK para entrar
en el submenú 1.PLAYLIST.
2. Una vez seleccionado el submenú PLAYLIST (lo verá en display) primero presione y a continuación gire el control TRACK para seleccionar
entre “Normal/ Title/ Artist/ Album/ Genre” (sólo para USB)”. Según su elección se realizará la búsqueda en su equipo DECK 1. Presione otra
vez el botón TIME para memorizar los parámetros y salir del modo menú interno.
Ejemplo práctico:
En el gráfico se muestra el método para la selección de pistas una vez realizada la base de datos mediante el programa DB Builder. Se mostrará con
un ejemplo:
Buscamos la Pista > Artist: PROPELLERHEADS Album: DECK&DRUMS&ROCK&ROLL Title (pista): SPYBREAK en modo “Playlist/
Artist” y modo “Playlist/Album”.
1- Búsqueda en Modo 1.Playlist > “Artist”:
Selección de modo de búsqueda en Menu Interno:
En primer lugar seleccionamos “Artist” como modo de búsqueda.
Verá los pasos a realizar en el gráfico adjunto.
En la línea de texto aparece el artista cuyo nombre comience con la
letra del abecedario más próxima al inicio de éste, por ejemplo la
letra “A” o las siguientes en orden alfabético.
Presione 3 seg.
Primero presione el botón TRACK y a
continuación gírelo hasta que aparezca
“Artist”
ESPAÑOL
Presione TIME
otra vez
La búsqueda podrá realizarla de dos modos,Ay B
A. 1. PRESIONAR FOLDER > Entramos en modo Folder.
2. PRESIONAR y GIRAR TRACK > Nos desplazamos por los Folder
ordenados alfabéticamente en función de los “Artist”. O bien
B. 1. PRESIONAR FOLDER > Entramos en modo Folder
2. Presionar TRACK y girar la Rueda. Nos desplazamos por los Folder
ordenados alfabéticamente en función de los “Artist”.
A
2
ARTIST>
1
ARTIST>
2
ARTIST>
B
ARTIST>
Una vez encontramos el nombre del artista (PROPELLERHEADS) al
que pertenece la pista que buscamos presionamos el botón FOLDER
para pasar a modo Pista. El LED se apaga.
PRESIONAR y GIRAR TRACK > Nos desplazamos por los Pistas,
ordenadas alfabéticamente, que pertenecen al “Artist” seleccionado
en modo Folder. Hasta seleccionar la pista buscada (SPYBREAK).
También podemos realizar esta operación presionando TRACK y
girando la Rueda.
A
2
TITLE>
1
2
TITLE>
TITLE>
B
TITLE>
Selección de modo de búsqueda en Menu Interno:
Presione 3 seg.
2- Búsqueda en Modo 1.Playlist > “Album”:
En primer lugar seleccionamos “Album” como modo de búsqueda.
Verá los pasos a realizar en el grafico adjunto.
Primero presione el botón TRACK y a
continuación y gírelo hasta que aparezca
“Album”
Presione TIME
otra vez
9
DECK2
UTILIZACIÓN DE LA BASE DE DATOS (PLAYLIST)
A
A. 1.PRESIONAR FOLDER > Entramos en modo Folder
2.PRESIONAR y GIRAR TRACK > Nos desplazamos por los
Folder ordenados alfabéticamente en función de los “Album”. O
bien
B.1.PRESIONAR FOLDER > Entramos en modo Folder
2. Presionar TRACK y girar la Rueda.
Una vez encontramos el nombre del Álbum (DECK&DRUMS&ROCK
&ROLL) al que pertenece la pista que buscamos presionamos el botón
FOLDER para pasar a modo Pista. El LED se apaga.
PRESIONAR y GIRAR TRACK > Nos desplazamos por los Pistas,
ordenadas alfabéticamente, que pertenecen al “Album” seleccionado en
modo Folder. Hasta seleccionar la pista buscada (SPYBREAK).
También podemos realizar esta operación presionando TRACK y
girando la Rueda.
2
ALBUM>
1
ALBUM>
2
ALBUM>
B
ALBUM>
A
2
TITLE>
1
TITLE>
2
TITLE>
B
TITLE>
ANTES DE APAGAR EL EQUIPO
PRECAUCIÓN:
No cierre la bandeja porta discos presionándola cuando el equipo ha sido apagado.
POWER OFF
No apague el equipo con la bandeja porta discos abierta.
ESPAÑOL
Cuando finalice el uso de su equipo (en modo CD), antes de apagar el equipo mediante el botón POWER asegúrese de que la bandeja del disco está cerrada,
utilice el botón OPEN/CLOSE.
POWER OFF
Para evitar desperfectos en su equipo no lo apague hasta que en el
display aparece el texto “No Disc” or “time code” después de
haber cerrado la bandeja porta discos con el botón OPEN/CLOSE
10
DECK2
WARNING
TO PREVENT FIRE OR SHOCK HAZARD. DO NOT USE THIS PLUG WITH AN EXTENSION CORD, RECEPTACLE OR OTHER OUTLET
UNLESS THE BLADES CAN BE FULLY INSERTED TO PRESENT BLADE TO PREVENT FIRE OR SHOCK HAZARD. DO NOT EXPOSE THIS
APPLIANCE TO RAIN OR MOISTURE. TO PRVENT ELECTRICAL SHOCK, MATCH WIDE BLADE PLUG TO WIDE SLOT FULLY INSERT.
CAUTION
RISK OF ELECTRIC SHOCK
DO NOT OPEN
CAUTION: To reduce the risk of electric shock, do not remove any cover. No user-serviceable
parts inside. Refer servicing to qualified service personnel only.
The exclamation point within the equilateral triangle is intended to
alert the user to the presence of important operation and maintenance
(servicing) instructions in the literature accompanying this
appliance.
1. Read Instructions. All the safety and operating instructions
should be read before this product is operated.
2. Retain Instructions. The safety and operating instructions should
be retained for future reference.
3. Heed Warnings. All warnings on the appliance and in the
operating instructions should be adhered to.
4. Follow Instructions. All operating and use instructions should
be followed.
5. Water and Moisture. The appliance should not be used near
water - for example, near a bathtub, washbowl, kitchen sink,
laundry tub, in a wet basement, or near a swimming pool, and
the like.
ENGLISH
6. Carts and Stands . The appliance should be used
only with a cart or stand that is recommended
by the manufacturer. An appliance and cart
combination should be moved with care. Quick
stops, excessive force, and uneven surfaces
may cause the appliance and cart combination
to overturn.
7. Wall or Ceiling Mounting. The product should be mounted to a
wall or ceiling only as recommended by the manufacturer.
14. Non-use Periods. The power cord of the appliance should be unplugged
from the outlet when left unused for a long period of time.
15. Object and Liquid Entry. Care should be taken so that objects do not fall
and liquids are not spilled into the enclosure through openings.
16. Damage Requiring Service. The appliance should be serviced by
qualified service personnel when:
A: The power-supply cord or the plug has been damaged; or
B: Objects have fallen, or liquid has been spilled into the appliance; or
C: The appliance has been exposed to rain; or
D:The appliance does not appear to operate normally or exhibits a
marked change in performance; or
E: The appliance has been dropped, or the enclosure damaged.
17. Servicing. The user should not attempt any service to the appliance
beyond that described in the operating instructions. All other
servicing should be referred to qualified service personnel.
18. Ventilation Slots and openings in the cabinet are provided for
ventilation and to ensure reliable operation of the product and to
protect it from overheating, and these openings must not be blocked or
covered. The openings should never be blocked by placing the
product on a bed, sofa, rug, or other similar surface. This product
should not be placed in a built-in installation such as a bookcase or
rack unless proper ventilation is the manufacturer's instructions have
been adhered to.
8. Heat. The appliance should be situated away from heat sources
such as radiators, heat registers, stoves, or other appliances
(including amplifiers) that produce heat.
19. Attachments do not use attachments not recommended by the product
manufacturer as they may cause hazards.
9. Power Sources. This product should be operated only from the
type of power source indicated on the rating label. If you are
not sure of the type of power supply to your home, consult your
product dealer or local power company. For products intended
to operate from battery power, or other sources, refer the
operating instructions.
20. Accessories Do not place this product on an unstable cart, stand,
tripod, bracket, or table. The product may fall, causing serious injury
to a child or adult, and serious damage to the product. Use only with a
cart, stand, tripod, bracket, or table recommended by the
manufacturer, or sold with the product. Any mounting of the product
should follow the manufacturer's instructions, and should use a
mounting accessory recommended by the manufacturer.
10. Grounding or Polarization. This product may be equipped with
a polarized alternation-current line plug (a plug having one
blade wider than the other). This plug will fit into the power
outlet only one way. This is a safety feature. If you are unable
to insert the plug fully into the outlet, try reversing the plug. If
the plug should still fail to fit, contact your electrician to
replace your obsolete outlet. Do not defeat the safety purpose
of the polarized plug.
11. Power. Cord Protection. Power-supply cords should be routed
so that they are not likely to be walked on or pinched by items
placed upon or against them, paying particular attention to the
cord in correspondence of plugs, convenience receptacles, and
the point where they exit from the appliance.
12. Cleaning. The appliance should be cleaned only as
recommended by the manufacturer. Clean by wiping with a
cloth slightly damp with water. Avoid getting water inside the
appliance.
13. For AC line powered units - Before returning repaired unit to
user, use an ohm-meter to measure from both AC plug blades
to all exposed metallic parts. The resistance should be more
than 100,000 ohms.
11
The lightning flash with arrowhead symbol within the equilateral
triangle is intended to alert the use to the presence of un-insulated
“dangerous voltage” within
21. Lightning For added protection for this product during a lightning
storm, or when it is left unattended and unused for long periods of
time, unplug it from the wall outlet and disconnect the antenna or
cable system. This will prevent damage to the product due to lightning
and power-line surges.
22. Replacement Parts When replacement parts are required, be sure the
service technician has used replacement parts specified by the
manufacturer or have the same characteristics as the original part.
Unauthorized substitutions may result in fire, electric shock, or other
hazards.
23. Safety Check Upon completion of any service or repairs to this
product, ask the service technician to perform safety checks to
determine that the product is in proper operating condition.
CAUTION LASER RADIATION!
This device is equipped with Class 1 laser
diodes. To ensure a safe operation do not
remove any covers or try to access the
inside of the equipment. The inside of the
device does not contain any parts which
are subject to maintenance. Maintenance
must only be carried out by qualified staff.
MAIN FEATURES
DECK2
- Relay play allow consecutive playback during two decks.
- Frame Search.
- Seamless Loop.
- 4 fast search mode.
- Transport protection.
- +10 Track skip search
- Pitch Control & Pitch Display.
- Auto Cue.
- MP3 Playback.
- Single / Continuous Playback.
- Anti-shock Playback.
- Fader Start Playback.
- Switching power supply.
- Pitch range: +/-4%, +/-8%, +/-16% and 100% (CDDA).
- Selectable elapsed, remain and total remain time display.
CDDA* Compact Disc Digital Audio
NOTE ON USAGE
Allow for sufficient heat dispersion when installed on a rack.
- Handle the power cord carefully.
- Hold the plug when unplugging the cord.
- Keep the appliance free from moisture, water, and dust.
- Unplug the power cord when not using the appliance for long periods of time.
- Do not obstruct the ventilation holes. (For units with ventilation holes)
- Do not drop foreign objects into the unit.
- Do not let insecticides, benzene, and thinner come in contact with the set.
- Never disassemble or modify the set in any way.
COMPACT DISC
2. Precaution on storage
-After playing a disc, always unload it from the player.
-Always store the disc in the jewel case to protect from dirt or
damage.
- Do not place discs in the following areas:
(1)Areas exposed to directs sunlight for a considerable time.
(2)Areas subject to accumulation of dust or high humidity.
(3)Areas are affected by heat from indoor heaters, etc..
ENGLISH
1. Precautions on handling compact discs
-Do not allow fingerprints, oil or dust to get on the surface of the disc.
- If the disc is dirty, wipe it off with a soft dry cloth.
-Do not use benzene, thinner, water, record spray, electrostatic-proof
chemicals, or silicone-treated cloths to clean discs.
-Always handle discs carefully to prevent damaging the surface; in
particular when removing a disc from its case or returning it.
-Do not bend the disc.
-Do not apply heat.
-Do not enlarge the hole in the center of the disc.
-Do not write on the label (printed side) with a hard-tipped implement
such as a pencil or ball point pen.
-Condensation will form if a disc is brought into a warm area from a
colder one, such as outdoors in winter.
-Do not attempt to dry the disc with a hair dryer, etc..
PREPARATIONS
Check that the carton contains the following items:
(1) Main Unit
1pc
(2) Controller Unit
1pc
(3) Operating Instructions
1pc
(4) 8P cable right angle
1pc
(5) 2P RCApath cord (L/R)
2pc
(6) Auto-Start cable
2pc
(7) AC power cord
1pc
(8) DB Builder CDRoom
1pc
CAUTION:
- The unit will work normally when the unit is mounted with the front
panel at within 15 degrees of the vertical plane. If the unit is tilted
excessively, discs may not be loaded or unloaded properly.
CONNECTIONS:
(1) Turn off the POWER switch
(2) Connect the RCApath cord to the input on your mixer.
Installing the Units
(1)Place your unit on a flat surface or mount it in a secure rack mount
case.
(2)Be sure the unit is mounted in a well-ventilated area where it will not
be exposed to direct sunlight, high temperatures, or high humidity.
(3)Try to place the unit as far as possible from TVs and tuners, as the unit
may cause undesirable interference.
- The unit's LCD is designed to be clearly visible within the angles.
Mount the unit so that the visual angle is within this range.
CAUTION:
- Be sure to use the supplied cables. Otherwise the unit may not work
properly.
- Be sure the power is off when connecting the control cords. Otherwise
it may result in damage.
12
DECK2
GENERAL FUNCTIONS
1
2
5
3
MAIN UNIT
4
6
7
8
ENGLISH
1. DISC TRAY. This tray is used to load and unload a compact disc into the drive mechanism. The tray is opened and closed by pressing the OPEN/CLOSE
BUTTON. Never attempt to force the disc tray open or close when the power is turned off.
2. OPEN/CLOSE BUTTON (Transport Tray Open/ Close).
This button is used to open and close the disc tray. NOTE: When a disc is loaded, the tray will not open unless the unit is in pause or cue mode.
3. USB 1 PORT.This is the USB 1 port where you insert your USB mass storage device for playing MP3 files.
4. POWER SWITCH.This switch is used to control the unit's main power.ALED directly above the power switch will glow to indicate main power is on.
5. POWER CONNECTOR.This is the main power connection. Only use the supplied power cord. Use of any other power may result in severe damages to
the unit.
6. USB 2 PORT.This is the USB 2 port where you insert your USB mass storage device for playing MP3 files.
7. CONTROL CONNECTOR.Connect this connector to the control unit using the supplied mini-DIN8 cable.
8. AUDIO OUT R & L.These jacks send a left and right analog mono output signal. Use these jacks to send standard audio to a mixer or receiver. The red
colored jack represents the right channel output and white jack represents the left channels output.
GENERAL FUNCTIONS
1
2
3
18
4
17
5
16 15 14 13
CONTROL UNIT
6
12
7
11
20
10 9 8
19
1. DISC TRAY OPEN/CLOSE BUTTON. This button is used to open and close the disc tray.
NOTE: When a disc is loaded, the tray will not open unless the unit is in pause or cue mode.
2. SOURCE SELECT BUTTON. This button lets you toggle between CD tray and USB Ports which music source device will play. The LEDs will
verify which source is activated. The function can only be selected under pause mode.
3. TIME BUTTON. The TIME button will switch the time value described in the time meter between track elapsed playing time, track remaining time,
and total remaining time of entire CD disc.
13
DECK2
GENERAL FUNCTIONS
CONTROL UNIT
ENGLISH
4. LCD DISPLAY. This high quality LCD display indicates all the functions, as they are occurring. This display is viewable at several comfortable
angles.
5. PITCH SLIDER. This slider is used to adjust the playback pitch percentage when the PITCH function is activated. The slider is a set adjustment and
will remain set until the pitch slider is moved or the PITCH function has been turned off. The maximum pitch range of the slider is +/-100%. This
adjustment can be made with or without a music source device (USB stick or CD) in the player.
6. SGL/CTN BUTTON. This button allows the play mode to change between Single and Continuous. In single mode the unit will play a single track and
return to cue mode. In continuous mode the unit continues to play track by track.
7. TAP BPM BUTTON. This button is used to override and manually set a track BPM. Occasionally the built-in BPM meter may not function as desired.
To manually set the BPMs; tap this button a few times to a tracks heavy down beat, the unit will automatically calculate your tapping and translate it into
a tracks BPMs. The BPM READOUT is then displayed in the LCD.
You can also hold the TAP BPM button, turn the TRACK knob to adjust BPM value, hold down and turn track knob to adjust the decimal BPM value.
Note: To return to the automatic BPM counter, hold down the TAP BUTTON at least 2 seconds and then release. The default setting isAUTO BPM.
8. PITCH BEND BUTTONS. The speed rises while the “+button” is pressed and returns to the original pitch when the button is released. The speed drops
when the “-button” is pressed and returns to the original pitch when the button is released. These buttons can be used to synchronize the beats of 2
tracks.
9. PITCH PERCENTAGE BUTTON. Hold this button down at least 2 seconds to turn the pitch slider function on and off. When the function is active the
corresponding LED “PITCH ON” glows. Press this button to choose any pitch range percentages of 4%, 8%, 16%, and 100%. When the pitch range of
+/-100 %(CDDAonly) is selected, the 4%, 8% and 16% LEDs will be illuminated.
Note: The default setting is 8%.
10. TRACK KNOB. Use this knob to select track or folder, depending on these two different modes as below.
- In TRACK mode, use to select a track. Turning track knob will navigate between tracks. Holding down and turning track knob will rapidly forward /
backward skip through the tracks by 10 tracks per click.
You can also switch between displaying File Name/Title/Artist/Album/Genre for easy searching by each pressing the Track knob you want to keep.
- In FOLDER mode, turning track knob will forward /backward skip between folders. Holding down and turning track knob will rapidly forward / back
skip through the folders by 10 folders per click.
11. SEAMLESS LOOP BUTTONS.
- LOOP IN BUTTON This function allows you to set the starting point of a loop.
-LOOP OUT BUTTON This button is used to set the ending point of a loop. A loop is started by pressing the IN BUTTON, pressing the OUT
BUTTON sets the loop ending point. The loop will continue to play until the OUT BUTTON is pressed once again.
- RELOOP BUTTON If a LOOP has been made, but the Player is not active in LOOP mode (a loop is not playing), pressing the RELOOP BUTTON
will instantly reactivate the LOOP mode. To exit the loop, press the LOOP OUT BUTTON. You can also tap the RELOOP button to create a
STUTTER EFFECT.
- IN/OUT POINT EDIT
In the LOOP mode, hold RELOOP button, LED of OUT will flash and display will show the loop-out point time, now you can turn the jog wheel to
edit OUT point. Then press the OUT button to exit editing; or press the RELOOP button again, LED of IN will flash and “IN EDIT” will be indicated
on the LCD, now you can turn the jog wheel to edit IN point. Then press the IN button to exit editing.
End Loop Edition:
End Loop time
Loop Mode (RELOOP ON)
Select new Loop End point
2
1
3
Exit Edit Mode
Blinks
HOLD
PRESS
PRESS
Or..
Beginning Loop Edition:
(RELOOP OFF)
1
Select new Loop Start point
2
3
Exit Edit Mode
Blinks
HOLD
PRESS
IN EDIT
12. RELAY BUTTON. Set both sides of the player to single mode and switch the Relay function on, alternately a track will be played from both players
until the relay function is deactivated. You can always put a new music source in the device that is waiting in standby mode. In this way you can create
an endless program. Perfect for use in pubs etc.
13. KEY LOCK BUTTON. This button is used to choose the key lock mode and the pitch control mode. Key lock mode allows speeding up or slow down
playback speed without altering the tonality of music.
14. SEARCH BUTTON.
SEARCH BUTTON. This search button allow you to quickly scan backward through a track.
SEARCH BUTTON. This search button allow you to quickly scan forward through a track.
You will scan forward or reverse at 4 different speeds depending on how long you hold these buttons down.
15. FOLDER BUTTON. Use to switch between FOLDER and TRACK search modes. When the LED of FOLDER button is lit, the player is in the
FOLDER search mode, otherwise it is in TRACK search mode. **File name is the first display when select a track; and Folder name is the first display
when select a folder.
Note: Hold FOLDER button down at least 2 second to activate and to deactivate REPEAT function.
EREPEAT on:All the tracks in the current folder will play track by track until the repeat function is inactive.
EREPEAT off: All the tracks in the music source device will play in the normal mode.
14
DECK2
GENERAL FUNCTIONS
CONTROL UNIT
16. PLAY/PAUSE BUTTON. Each press of the PLAY/PAUSE BUTTON causes the operation to change from play to pause or from pause to play. While
in play mode the play LED will glow, and while in pause mode the play LED will flash.
17. CUE BUTTON. Pressing the CUE button during playback immediately pause playback and return the track to the last set cue point. The CUE BUTTON
LED will glow when the unit is in cue mode. The LED will also flash every time a new CUE POINT is set. The CUE button can also be held down to
momentarily play the music. When you release the CUE button it instantly returns to the last set CUE POINT. You can also tap the CUE button to create a
STUTTER EFFECT.
18. JOG MODE BUTTONS. The jog wheel has 2 effect functions as below:
EVINYL MODE When wheel mode is set to VINYL, use the JOG WHEEL to activate the scratch effect by touching the surface of Jog Wheel.
ECDJ MODE When wheel mode is set to CDJ, scratch mode is exit, JOG WHEEL can be used to pitch bend during playback and be used to frame
search in pause mode.
19. CONTROL START SOCKET. These sockets are to connect to a mixer using a 3.5mm jack plug to give remote start capability.
20. CONTROL CONNECTOR. Connect this connector to the main unit using the supplied mini-DIN8 cable.
GENERAL FUNCTIONS
ENGLISH
18 1
2
17
3
16
15 12 14
13
LCD DISPLAY
4 6
5
7
11 8
10
9
1. CUE INDICATOR. This indicator will glow when the device is in CUE mode and will flash every time a new CUE POINT is set.
2. FOLDER INDICATOR. Indicates the number of the currently playing folder.
3. TIME BAR INDICATOR. Shows either time remaining or elapsed depending on the setting of the TIME BUTTON. This bar will begin to flash shortly
before the end of a track. The flashing bar is a great visual reminder a track is about to end regardless of which time mode the unit is.
4. BPM STATUS. This will indicate that theAUTO BPM counter is active.
5. BPM METER. Indicates the BPM value of the currently playing track.
6. PITCH METER. Indicates the percentage of a track's pitch.
7. KEY LOCK SYMBOL. Indicates if the key lock is activated (lock symbol).
8. LOOP INDICATOR. Indicates if LOOP function is activated.
9. RELOOP INDICATOR. Indicates that the LOOP is ready to be played again..
10.AUTO CUE STATUS. The indicator will flash when a LOOP is played and the indicator will disappear when a LOOP is inactivated.
11.KEY INDICATOR. Indicates when the touch sensitive wheel can be used to control playback or scratch effects.
12.TIME DISPLAY. Indicates the time of the chosen Time mode in minutes, seconds and frames.
13.MP3 INFORMATION INDICATOR. Indicates the current name of the track, of the folder and the sampling rate.
14.TIME MODE. Indicates the elapsed time of a track ("ELAPSED"), the remaining time of a track ("REMAIN") or the remaining time of entire
disc(TOTAL REMAIN). Change between these modes with the Time button.
15.REPEAT INDICATOR. Indicates whether the unit is in repeated play mode.
16.SINGLE INDICATOR. Indicates whether the play mode is set to single ("SINGLE") or continuous mode (no display).
17.TRACK INDICATOR. Indicates the number of the currently playing track.
18.PLAY/PAUSE INDICATOR. Indicates the device is in play mode ("►"), or the player is in pause mode (")" ׀ ׀.
INTERNAL MENU
Hold TIME BUTTON for 3 seconds to enter the internal menu.
Turn TRACK KNOB to scroll through the different menus and press the TRACK KNOB to enter the corresponding submenu.
Turn TRACK KNOB to change the submenus and press TIME BUTTON to memorize your settings in any operating mode and exit the menu.
1. Playlist Normal / Title/Artist /Album/ Genre
2. Sensitivity Touch Wheel SensitivityAdjustment (Adjustment range is -20~+20.)
3. Sleep Time No sleep, 5~120 min
15
DECK2
INTERNAL MENU
4. Line Setup Determines how the information will be depicted at display.
- MODE= 1-3 (there are 3 different modes for text)
- Mode1 = text “runs” to the left and stops for a time (user selectable) before start moving again. This loop is played continuously.
- Mode 2 = text “runs” to the left once and stops
- Mode 3 = text “runs” to the left continuously
- Dis: being in Mode 1,2 or 3, turn the wheel. At display we will read “DIS”; sets the time that the text will remain fixed. Turn TRACK control to
select time. Time range for selection is 0.5~12.0 seconds.
- Run: being in Mode 1,2 or 3, turn the wheel. At display we will read “RUN”; sets the speed the text will scroll through the line. Turn TRACK
control to select speed from a range of 50~2000 milliseconds.
Text line
In a programmed time lapse the text runs to the left
DIS; sets the time the text remains still
RUN; set the speed of the text movement
DATABASE BUILDER
ENGLISH
5. Bit rate Display ON/OFF
6. Version
CON:XX (Control version)
DSP:XX (DSP version)
SER:XX (Servo version)
7. Load Default Press TRACK Knob to enter load defaults. (LCD displays “Load OK”.)
8. Exit & Save Exit & Save setting to next power on (LCD displays “Saving”.)
Press the TRACK knob to fast exit & save in any operating mode.
NOTE:
- SLEEP TIME: The CD player automatically shuts off the transport and laser after about 15 minutes when in pause or cue mode). This extends the life
of your motor drive and laser. During sleep mode the display shows the word “SLEEP”. To wake up the player, just press the cue or play button, the
display turns to normal and is ready to receive instructions. You can enter the Sleep Time menu to adjust sleep time, range is 5~120 minutes.
- SAVE: PITCH ON/OFF, PITCH RANGE, SGL/CTN, AUTO CUE, TIME MODE, KEY LOCK, SENSITIVITY, DISPLAY/SCROLL TIME/JOG
MODE.
-DEFAULTS: PITCH (ON), PITCH RANGE (8%), PLAY MODE(CTN), AUTO CUE(ON), TIME MODE (REMAIN), KEY LOCK(OFF),
SENSITIVITY(0), BIT RATE(Disp. ON), REPEAT MODE (OFF), PLAYLIST (NORMAL), SLEEP TIME (15 min), LINE SETUP(model 1),
DISPLAY(1 sec),RUN TIME(150msec)
For Windows
Minimum Hardware Requirements:
CPU: Intel Pentium 4, 1GHz processor or above, Intel Centrino Mobile Technology 1.6GHz
RAM: 512MB RAM
DISK SPACE: 100MB of free disk space need
OS: Microsoft Windows XP SP3, Vista SP2
The unit includes a database management software enables you to search for your files by Title,Artist,Album, and Genre.
- Installation:
Refer to the following figures for installing database management software on your computer.
STEP 1: click Next >
STEP 2: click Next >
STEP 3: click Install
16
DECK2
For Windows
DATABASE BUILDER
STEP 4: processing
STEP 5: click Finish
The database builder will scan your USB hard drive and create database files to locate the files in your music library in your favor.
For Windows
BUILD DATABASE
- Scan and Create:
Refer to the following figures to process scanning and creating database.
STEP 1: select the desired USB hard drive and
click Build.
STEP 2: processing
STEP 3: complete
ENGLISH
NOTE:
Please re-create the database builder whenever you change the contents of your USB device.
The root cause for customer failed to run DB builder in Windows
1. User will fail to run db builder in Windows because the UAC limitation.
2. User should press the right button of mouse to run
the db builder with the option of Run as
administrator.
17
3. Allow the DB builder to run.
DECK2
PLAYLIST OPERATION
1. Hold the TIME button down for 3 seconds to enter the internal menu and turn TRACK knob to search PLAYLIST.
2. Turn the Track knob to select “Normal/ Title/ Artist/ Album/ Genre” (for USB only). And press the Time button again to memorize your setting and exit
the menu.
EUse FOLDER button to switch to Folder mode.
Ex: to select “Artist”
(a). Hold and turn the TRACK knob or hold the TRACK knob and turn outer Jog wheel, you can select the folder you like by first letter of Artist,
and theArtist alphabet is arranged in order (A, B, C….in order)
(b).Turn the TRACK knob; or hold the TRACK knob and turn inner Jog wheel to select next “Artist”.
EUse FOLDER button to switch to Track mode.
Turn the TRACK knob; or hold the TRACK knob and turn Jog wheel to select the track you like.
Example:
We will show with draws the selection method for selecting tracks once they are processed by DB Builder software. We will show it with a practical
Example:
Searched track > Artist: PROPELLERHEADS Album: DECK&DRUMS&ROCK&ROLL Title (track): SPYBREAK in mode “Playlist/ Artist” and
“Playlist/Album”.
Internal Menu search mode.
1- Search in mode 1.Playlist > “Artist”:
Pres 3 seg.
First we select “Artist” as search mode. At the draw we depict the steps
to perform this search.
At the text line appears the artist that begins with the first character
on alphabet order.
First press TRACK control and then we
turn it until the searched “Artist”
appears on the Text line.
Press TME again
A
2
ARTIST>
1
ARTIST>
2
ENGLISH
The search can be done two ways: Aor B
A. 1. PRESS FOLDER > We enter Folder mode. 2. PRESS and TURN
TRACK > we scroll through the Folders alphabetically sorted by
“Artist”. Or…
B. 1. PRESS FOLDER > We enter Folder mode. 2. Hold TRACK and
turn outer wheel. We scroll through the Folders alphabetically sorted
by “Artist”.
ARTIST>
B
ARTIST>
Once we find the artist name (PROPELLERHEADS) press FOLDER
buton to select Track Mode. The FOLDER LED is off.
(1).TURN TRACK > we scroll through the Tracks alphabetically
sorted belonging to the selected “Artist” until we find the Track
(SPYBREAK).
(2).Hold TRACK and turn wheel. we scroll through the Tracks
alphabetically sorted.
A
2
TITLE>
1
2
TITLE>
TITLE>
B
TITLE>
Internal Menu search mode.
2- Search in mode Playlist > “Album”:
First we select “Album” as searching mode. At the draw we depict the
steps to perform this search.
Press 3 seg.
At the text line appears the Album that begins with the first character on
alphabet order.
First press TRACK control and then we
turn it until the searched “Album” appears
on the Text line.
Press TME again
18
DECK2
UTILIZACIÓN PLAYLIST
DE LA BASE
OPERATION
DE DATOS (PLAYLIST)
A. 1. PRESS FOLDER > We enter Folder mode. 2. PRESS and TURN
TRACK > we scroll through the Folders alphabetically sorted by
“Album”. Or…
B. 1. PRESS FOLDER > We enter Folder mode. 2. Hold TRACK and
turn outer wheel. we scroll through the Folders alphabetically sorted
by “Album”.
A
2
ALBUM>
1
ALBUM>
2
ALBUM>
B
ALBUM>
Once we find the Album name (DECK&DRUMS&ROCK&ROLL)
press FOLDER button to select Track Mode. The FOLDER LED is off.
TURN TRACK > we scroll through the Tracks alphabetically sorted
belonging to the selected “Album” until we find the searched Track
(SPYBREAK).
Also we can Hold TRACK and TURN WHEEL. We scroll through the
Tracks alphabetically sorted.
A
2
TITLE>
1
2
TITLE>
TITLE>
B
TITLE>
BEFORE SWITCHING OFF THE POWER
ENGLISH
When you have finished using the CD player, before switching off the power, be sure that the disc tray had been closed with the OPEN/CLOSE button.
CAUTION:
Do not forcibly close the disc holder when the power is off.
POWER OFF
Do not switch off the power when the disc holder is open.
19
POWER OFF
To avoid damage, please don't switch off the power until “No
Disc” or “time code” is showed on the LCD after the disc
holder has been closed with the Open/Close button.
ESPECIFICACIONES TÉCNICAS // SPECIFICATIONS
1.
DECK2
SECCION GENERAL / GENERAL SECTION
PRODUCT
DIGITAL MEDIA PLAYER
PLAYBACK MEDIA
CD\USB drives
DISC LOADING TYPE
TRAY LOADING
DISPLAY
LCD DISPLAY
PITCH CONTROL RANGE
Rango +/- 4%, +/- 8%, +/- 16%; +/- 100% for/para CDDA
PITCH BEND
+/- 4%, +/- 8%, +/- 16%; +/- 100% for CDDA
AJUSTE DE PITCH/PITCH ACCURACY
+/-0.15%
ALIMENTACION/POWER SOURCE
AC100 - 240V, 50/60Hz
CONSUMO/POWER CONSUMPTION
16 WATTS
DIMENSIONES/DIMENSIONS
Unidad Principal/Main Unit:
482mm (W) X 267mm (D) X 88.8 mm (H)
Unidad de control/Control Unit:482mm (W) X 91.2mm (D) X 94 mm (H)
PESO/WEIGHT
Unidad Principal/Main Unit:
4.6kg
Unidad de control/Control Unit:1.7kg
2. CARACTERÍSTICAS DE AUDIO / AUDIO CHARACTERISTICS
(CD TEST DISC: TCD-782 & TCD-781; USB TEST FORMAT: MP3, 128KBPS; LOAD=100KOHM)
ITEM
NIVEL DE SALIDA
/OUTPUT LEVEL
LÍMITE / LIMIT
CONDITION
CD
2V +/-0.5dB
2V +/-1dB
1KHz, 0dB (TCD782,TRK2)
USB
1.85V +/-0.5dB
1.85V +/-1dB
1KHz, 0dB (TCD782,TRK2)
ENTRE/ WITHIN
1dB 1KHz, 0dB (TCD782,TRK2)
ENTRE/ WITHIN
0.2dB
17-20KHz +/-0.4dB
17-20KHz +/-1dB
0dB OUTPUT (TCD782,TRK2/3/7)
USB
17-16KHz +/-0.2dB
17-16KHz +/-1dB
0dB OUTPUT(TCD781,TRK1/4/16)
DE-EMPHASIS
CD
-20dB+/-0.2dB
-20dB+/-1dB
16KHz,-20dB (TCD782,TRK2/14)
SEPARACION ENTRE CANALES
CD/
93dB
85dB
1KHz, 0dB (TCD782,TRK9/11)
0.008%
0.015%
1KHz, 0dB (TCD782,TRK2)
0.007%
0.015%
1KHz, 0dB (TCD782,TRK2)
126dB
90dB
1KHZ, 0dB (TCD782,TRK2/8)
USB
85dB
80dB
1KHZ, 0dB (TCD782,TRK2/8)
CD
92dB
88dB
1KHz, -60dB (TCD782,TRK18)
/ CHANNEL SEPARATION (*2) USB
THD+N (*1) /
CD
DISTORSION HARMONICA
USB
S/N (*2) /
CD
RELACION SEÑAL - RUIDO
RANGO DINÁMICO /
DYNAMIC RANGE (*2)
NOTE:
ENGLISH
BALANCE ENTRE CANALES
/ CHANNEL BALANCE
REPUESTA EN
CD
FRECUENCIA
/FREQUENCY RESPONSE
ESPAÑOL
TÍPICO / TYPICAL
*1: WITH 20KHz LOW PASS FILTER.
*2: WITH 20KHz LOW PASS FILTER, "IHF-A" WEIGHTED.
3. TIEMPO DE BUSQUEDA DEL CD / CD SEARCHING TIME: (TEST DISC: TCD-792)
ITEM
TÍPICO / TYPICAL LÍMITE / LIMIT
(1) RAPIDO / SHORT ACCESS
2Sec
TIME
(2) LENTO / LONG ACCESS
4Sec
TIME
CONDITION
4Sec
REPRODUCIR PROXIMA PISTA / PLAY NEXT
TRACK
6Sec
TRACK 1 TO 20,20 TO 1
20
DECK2
ESPECIFICACIONES TÉCNICAS // SPECIFICATIONS
4. CD PLAYABILITY:
ITEM
TYPICAL
LIMIT
CONDITION
(1) INTERRUPTION
1mm
0.7mm
TCD-725
(2) BLACK DOT
1mm
0.6mm
TCD-725
(3) FINGER PRINTS
75um
65um
TCD-725
(4) ECCENTRICITY
140um
140um
TCD-712 W/O TRACK JUMP
(5) VERTICAL
1mm
DEVIATION
0.5mm
TCD-731R
(6) SCRATCH
1.2mm
TCD-721 W/O TRACK JUMP
2mm
5. MP3 FORMAT
Formato de Disco /
Disc Format
ESPAÑOL
Formato USB /
USB Format
ENGLISH
Formato MP3 /
MP3 Format
Método escritura Disc /
Disc Writing Method
Applicable file extensions
ISO9660
Joliet
CD-ROM sector format
Max. number of Folders
Max. number of files
File System
Applicable file extensions
Max. number of Folders
Max. number of files
MPEG 1 Layer 3 standard (ISO/IEC 111723), which provides for single channel
(‘mono’) and two-channel (‘stereo’) coding
at sampling rates of 32, 44.1 and 48kHz.
MPEG 2 Layer 3 standard (ISO/IEC 138183), which provides for similar coding at
sampling rates of 16, 22.05 and 24 kHz.
MPEG 2.5 Layer 3 standard, which provides
for similar coding at sampling rates of 8,
11.025 and 12 kHz.
Disc at Once and Track at Once
Multi Session
mp3. MP3. mP3. Mp3
Max. 63 characters
Max. 63 characters
mode-1 only
255
Max. 999 files (* note #1)
FAT 12/16/32
mp3. MP3. mP3. Mp3
999
Max. 999 files
32/40/48/56/80/96/112/128/160/192/
224/256/320 kbps
Xing/VBRI VBR
32/40/48/56/64/80/96/112/144/160 Kbps
Xing/VBRI VBR
32/40/48/56/64/80/96/112/144/160 Kbps
Xing/VBRI VBR
If the 1st session is CDDA, you can playback
Only CDDA track, If the 1st session is MP3,
you can playback only MP3 file.
Note #1: max.255 files each folder
6. NOTES
(1) The specifications are subject to change to any improvement by negotiations in advance.
(2) The parts are subject to change to any improvement within the range of the specifications.
(1) Las especificaciones están sujetas a cambios relacionados con la evolución y mejora del equipo.
(2) Los componentes están sujetos a cambios relacionados con la evolución y mejora del equipo dentro
de las especificaciones.
21
C/ Praga nº11. Pol. Ind. Cova Solera
08191 Rubí . Barcelona (SPAIN)
www.akiyamadj.com
[email protected]