1
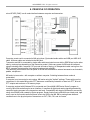
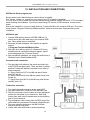
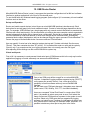
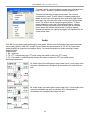
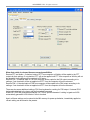
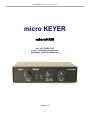
microHAM © 2004 All rights reserved micro KEYER microHAM fax. +421 2 4594 5100 e-mail : [email protected] homepage : www.microham.com release 1.0 1 microHAM © 2004 All rights reserved TABLE OF CONTENTS Chapter Page 1. 2. 3. 4. 5. 6. 7. 8. 9. 10. 11. 12. 3 4 5 6 7 7 8 9 10 13 15 17 Warranty ........................................................................................................... Packing ............................................................................................................. Important warnings ............................................................................................ Quick start ......................................................................................................... Parameters ............................................................ ............................................ Requirements ............................................................ ........................................ Features and functions ..................................................................... ................. Principle of operation ............................................................ ............................. Panel description ............................................................................................... Installation and conections ...................................................................... ........... Audio settings .................................................................................................... USB Device Router ............................................................................................ 2 microHAM © 2004 All rights reserved 1. WARRANTY microHAM offers for this product 3 years time warranty and 30 day full money back less shipping. The product must not be modified in any way, except configuration, otherwise the warranty voids. microHAM assumes no responsibility for damages on other devices or injuries on persons, as a consequence of using our products. 3 microHAM © 2004 All rights reserved 2. PACKING The product includes micro KEYER, USB cable 1pc, sound card cables 3pcs, microHAM USB Device Router program on a CD-ROM. Please check the content of the shipment against this list. If the shipment is incomplete, please contact us at the following address: [email protected] or fax : +421 2 4594 5100, or by mail to : microHAM Matúškovo 709 92501 Slovakia 4 microHAM © 2004 All rights reserved 3. IMPORTANT WARNINGS NEVER FORGET !!! If you plan to use micro KEYER with more than one and not identical transceivers ALWAYS change original microphone plugged to the micro KEYER RJ45 jack BEFORE changing DB37 RADIO cable If you power micro KEYER from external power supply ALWAYS check polarity of the external 13.8 V supply 5 microHAM © 2004 All rights reserved 4. QUICK START w w w w w w w w w w w Insert CR-ROM to the CD drive Run "urouter_release_xx_xx.exe" (xx_xx is version) from CD to start the installation and launch Router. Connect USB cable to the micro KEYER. Other cables left unconnected Plug second end of the USB cable to the computer USB port and install USB driver from location: C:\Program Files\microHAM\driver\d2xx You should see tab with micro KEYER statement with yellow X mark Plug audio cables to the sound card and to the micro KEYER rear panel jacks. Computer Line Out to micro KEYER Line Out, computer Line In to MK Line In and computer Mic In to MK Mic In. Turn OFF your radio Plug DB37 radio cable to the micro KEYER and other ends of the radio cable to the appropriate radio jacks. Turn radio ON. Within three second you should see single flash of green FSK Led at the MK front panel and a few seconds you should see Green OK mark at Router software next micro KEYER statement tab. Congratulation ! You can start playing with micro KEYER, but better read this manual now :-) 6 microHAM © 2004 All rights reserved 5. PARAMETERS USB: USB 2.0 Full speed , USB 1.1 compatible Power consumption: USB side - up to 100mA; Transceiver side up to 200mA at 13.8V (max. 16V) Radio Port: RXD, TXD, (RTS, CTS) max. 19200 Bd - levels: TTL, inverted TTL, open collector bus, RS232 CW: open collector, max 30V/400mA FSK: open collector, max 30V/400mA - supported 5/6/7/8bit data length, 1/1.5/2 stop bit, up to 300 Bd PTT1: open collector, max 30V/100mA PTT2: open collector, max 30V/400mA PA PTT: selectable by rear panel switch - open collector, max. 48V/1.5A - relay contact, max. 125VAC/2A 60VDC/2A Foot Switch: input, active when closed to ground, max. 5 mA Radio AF OUT: 600 Ohm, max 1Vpp 3dB bandwidth: 0.2 - 6KHz typically Insertion loss: 9dB typically (4-6dB attenuator) Computer LINE OUT: 600 Ohm, max 1Vpp 3dB bandwidth: 0.2 - 6KHz typically Insertion loss: 9dB typically (4-6dB attenuator) Computer MIC IN: signal and signal ground directly switchable to the MICROPHONE input (jumper selectable preamplifier for dynamic microphones) Radio MIC IN: signal and signal ground directly switchable to the MICROPHONE input. All others wires are routed from RJ45 to the radio microphone input. Microphone works with all his functions as if were plugged straight to the radio. Dimensions: W 175mm (6.89") x H 44mm (1.73") x D 85mm (3.35") Weight: 1100g (2.43lbs) 6. REQUIREMENTS Minimal PC compatible computer with Win98SE, 48MB RAM, sound card, CD-ROM, USB1.1 port, transceiver, logger or control software Recommended PC compatible computer with WinXP Home or higher, 256MB RAM, sound Card, CD-ROM, USB2.0 port, transceiver with computer port, FSK port, CW paddle, PS/2 keypad, logger or control software 7 microHAM © 2004 All rights reserved 7. FEATURES AND FUNCTIONS w w w w w w w w w w w w w w w w w No COM nor LPT port necessary, just one USB port and sound card Complete "Computer <-> Radio" electrical isolation - bidirectional transformer isolation of sound card and rig - optical isolation of ALL digital signals -> Radio Control, CW, 2xPTT, FSK, PA from USB port Compatible with most standard MS Windows based logging or control software - special microHAM "USB Device Router" program creates as many virtual COM ports as needed for full functionality with your favorite programs - customizable presets to instantly change micro KEYER parameters for the various requirements of different programs Integrated computer control port for all radios CI-V, FIF-232, IF-232, RS-232 - fully supported Icom, Kenwood, Ten Tec, Yaesu and other radios Integrated superior K1EL WinKey™ chip with extended capabilities for superior CW - front panel speed knob - nine (9) user programmable memories - PS/2 keyboard/keypad support for direct CW sending - PS/2 keyboard/keypad support for instant CW message playback and function handling PS/2 keyboard or keypad CW works without computer connection - auto PTT - selectable side tone - all parameters are stored inside the micro KEYER memory and reloaded after power up FSK keying output - capable of sending 5/6/7/8 bits and 1/1.5/2 stop bits - support for PS/2 keyboard for direct RTTY typing without computer connection Unique Mic/Sound Card/Radio audio switching - configurable audio priority microphone routing for SSB/Contest/SSTV - two audio outputs, one for radio front MIC IN and second for rear LINE IN - front panel audio level control knobs for setting both the computer and radio levels Independent keying buffer for Power Amplifier - extended range solid state output for modern PA or QSK - relay isolated output capable to key vintage PA with negative keying Footswitch input with programmable functions - programmable PTT assertion delay in 1ms steps - selectable muting of CW and/or FSK when footswitch is closed Second programmable PTT output for extended keying capabilities - PTT2 output for digital modes with "muted mic" Hot Switch protection with user defined timing - T/R sequencer for PTT keying outputs No external power adapter - Computer part is powered from USB - Radio part is powered from transceiver or transceiver power supply Strong RFI immunity - integrated chokes and filters for best RFI immunity - advanced shielding and circuit design for RFI product suppression Quick change connectors - Computer USB, Sound Card 3 x 3.5mm (1/8") RJ45 microphone, Radio DB37 - Radio DB37, Microphone RJ45 - Paddle - 1/4", PS/2 - MiniDIN6, Footswitch - RCA, Amplifier keying - RCA Dual color LEDs for easy visual feedback of CW/FSK and PTT1/PTT2 Metal/Aluminum case, powder coated and silk screened Free firmware/software upgrades via Internet 8 microHAM © 2004 All rights reserved 8. PRINCIPLE OF OPERATION micro KEYER ("MK") is a all mode interface between computer and transceiver. Computer sound card is connected to MK using three (3) standard audio cables and USB port USB A-B cable. All these cables are included to the MK pack. Transceiver and MK is connected by single radio cable terminated on one side by DB37M and on the other side by various plugs depending on the transceiver model. Cable carry power for MK and all interfaced signals including audio, computer CAT port and all kinds of keying. An independent cable coming from the DB37 connects the transceiver front panel microphone jack and MK. The remaining connectors at the rear panel of the MK are dedicated for external accessories as footswitch, paddle, microphone ... MK works in two modes - with computer or without computer. Switching between these modes is automatical. If computer is not connected or not running, MK works using the "default" settings. Those setting can be customized. In this mode MK provide PTT sequencer controlled by footswitch or hand mic PTT, drive all PTT outputs and works as a CW memory keyer. If computer equiped with Windows OS is connected and "microHAM USB Device Router" program is running, MK works as before plus as an Interface. It transfers all digital and analog signals generated by computer logging program to the transceiver and back. Compatibility with logging softwares is ensured by using virtual serial ports created by Router program. Router continuously monitors these virtual ports, logs every event on them and transfers all these events via USB to the MK. MK is parsing these data and resends them to the physical ports of transceiver as CAT, FSK, CW, and vice versa. 9 microHAM © 2004 All rights reserved 9. PANEL DESCRIPTION All connectors for connecting computer, radio and accessories are situated on the rear panel of MK. Rear Panel (1) - RADIO DB37F connector for radio interconnections. Detailed description you can find at Appendix A (2) - RE/SS Output keying mode switch for PA output. RE - Relay contact SS - Transistor collector If the slide switch is in SS position, open collector of the switching transistor is wired to the PAPTT output jack. Transistor can switch load max. 48V/1.5A. This position is dedicated for all modern Power Amplifiers with electronic keying. Check manual of your PA if grounding of key input will switch PA to the TX state. Check also power rating of this input if it does not exceed transistor rating. Otherwise move slider switch to the RE position. This position hardwires relay contact to the PA PTT RCA with rating max. 125VAC/2A 60VDC/2A. (3) - PA PTT PTT output for Power Amplifier. Output depends on RE/SS switch position. RCA jack TIP - Signal SHELL - GND (4) - REMOTE MiniDIN6 for PS/2 keyboard or PS/2 keypad. Second function of this connector is to provide an interface for future SO2R Extension box. 10 microHAM © 2004 All rights reserved (5) - USB USB B connector for computer connection. Standard USB A-B cable can be plugged here. (6) - MIC EXT 3.5mm (1/8") connector for external microphone input. TIP - Microphone input RING - NC SHELL - Microphone Ground Note: When is plugged, RJ45 microphone input is muted, but all microphone controls (buttons) works. (7) - MIC RJ45 jack for microphone. If your original radio microphone is terminated by a connector different from RJ45 plug, use adapter from cable set. All signals are in parallel to signals at DB37 Radio connector (pins 12-15 and 30-33) (8) - LINE IN 3.5mm (1/8") phono jack for sound card Line In TIP - Signal RING - NC SHELL - Signal Ground (9) - LINE OUT 3.5mm (1/8") connector for sound card Line Out TIP - Signal RING - NC SHELL - Signal Ground (10) - MIC IN 3.5mm (1/8") connector for sound card Mic In TIP - Signal SHELL - Signal Ground (11) - PADDLE 6.3mm (1/4") stereo female for paddle input. TIP - DIT RING - DAH SHELL - GND Paddle can be swapped by Router settings (12) - FOOTSWITCH RCA foot switch input. Active when is closed to ground. TIP - Signal SHELL - GND 11 microHAM © 2004 All rights reserved Front Panel (1) - SPEED CW Keyer Speed knob. Ranges (MIN, MAX) are defined by software (2) - CW/FSK LED RED color indicates when CW keying line is active GREEN color indicates when FSK keying line is active (3) - PTT1/PTT2 RED color indicates when PTT1 keying line is active GREEN color indicates when PTT2 keying line is active YELLOW color indicates when both PTT1 + PTT2 keying line are active (4) - COMPUTER Driving level knob for adjusting computer sound card LINE IN level (5) - RADIO Driving level knob for adjusting transceiver AF IN or Microphone input level 12 microHAM © 2004 All rights reserved 10. INSTALLATION AND CONNECTIONS USB Device Router program part Router needs to be installed before any device driver is installed. Run "urouter_release_xx_xx.exe" (xx_xx is version) from CD to start the installation. If a VCP driver of a microHAM USB interface was previously installed, installer will launch "FTDI Uninstaller" before finishing the installation. If you want to keep using VCP drivers of USB interfaces, choose cancel button. After router installation it is time to install the driver. Connect the MK to the computer USB port. Then enter driver location "\Program Files\microHAM\drivers\d2xx" where driver files were unpacked during router installation. USB driver part 1. Connect USB cable to the micro KEYER USB jack (5), second end of the USB cable plug to the computer USB port. Other cables leave unconnected. 2. Automatic Wizard will appear, click Install from specific location C:\Program Files\microHAM\driver\d2xx 3. Wait until driver will be copied. On Windows XP during installation driver certification dialog will appear. Ignore this message and click "Continue Anyway" 4. After successfull installation you should see a MK driver in Windows Control Panel/Hardware/USB Computer audio connection 1. Plug provided audio cables to the sound card and to the micro KEYER rear panel jacks. There are three (3) cables attached. Cables are identical, important is only order of interconnections: A - Sound Card Line OUT to the MK rear panel Sound card OUT jack (8) B - Sound Card Line IN to the MK rear panel Sound card IN jack (9) C - Sound Card Line MIC IN to the MK rear panel Sound card MIC jack (10) Transceiver connection 1. Turn transceiver and transceiver power supply OFF 2. Plug radio cable DB37 connector to the MK DB37 jack 3. Plug ALL connectors from the cable set to the appropriate jacks at the rear panel of your transceiver. Each plug coming from radio cable is marked same as the matching jack on your transceiver 4. Plug microphone cable coming from the DB37 plug of the radio cable to the transceiver front panel microphone jack 5. Plug your original microphone to the MK RJ45 jack located at the MK rear panel 6. If radio cable ends with leads for external powering 13 microHAM © 2004 All rights reserved connect these leads to power supply +13.5 and GND terminals. Take care of polarity. 7. Turn transceiver power supply and transceiver ON. Within 2 seconds green FSK LED shortly blink. It means that the all MK parameters has been loaded from its memory and MK is ready to operate. Accessories connection 1. Plug a paddle to the PADDLE jack (11) If the paddle is reversed you can correct it by settings on USB Device Router program described below. 2. Plug footswitch to the FOOTSWITCH jack (12) 3. Plug Power Amplifier keying line to the PAPTT jack (3) Be sure that you have correctly moved RE/SS (2) slide switch described at page 10 4. Plug PS/2 keyboard or PS/2 keypad to the REMOTE (4) jack. EXTERNAL KEYBOARD MK offers the possibility to generate FSK and CW signals from directly connected PS2 keyboard. For playing back stored CW messages the numeric PS/2 keypad is sufficient. Keyboard input has two modes, CW and RTTY. Power up default mode is CW. User can switch between modes using the "CAPS LOCK" key. CW mode allows to play the characters, play/record messages from/to internal memories, set the WPM speed, tune function and the side tone. It has two submodes for playing and recording. During recording mode it is possible to record characters written on the keyboard or played on the paddle. Key functions in CW playing mode: Num Lock Num [1- 9] Num Del Num + Num Num Enter Num * Num / Num 0 Esc F1 - F9 Caps Lock - Start CW recording mode - Play message stored in memory (key number means memory index). If number immediately follows the key "num del" it redefines the repeat interval - Repeat message (default interval is 1 second, it can be changed by pressing the number ie. 1.3 means MEM 1 in cycle 3 second) - Increase WPM speed (step is defined in configuration from USB Device Router) - Decrease WPM speed (step is defined in configuration from USB Device Router) - Retrieve WPM speed according to speed pot - Tune (can be canceled by keys NUM 0 or ESC, also by paddle) - Change side tone frequency - The same as ESC - Abort played message (clears buffer) - The same as Num 1 - Num 9 - Start RTTY mode Key functions in CW recording mode: Num Lock Num [1-9] Num 0 Esc F1 - F9 Caps Lock - Stop CW recording mode and store the message to memory - Set memory index (used when memory is stored at the end of recording mode) - The same as ESC - Abort recording mode without storing the message - The same as Num 1 - Num 9 - Start RTTY mode 14 microHAM © 2004 All rights reserved 11. AUDIO SETTINGS There are three parts of audio settings: 1. Computer sound card mixer settings How the sound card is handled depends on logger programs capabilities. Some loggers can directly drive sound mixer controls and settings, several also in conjunction of current state of operation. In general keep this advices: PLAYBACK 1. Open Windows Mixer settings and choose Playback settings 2. Check "Volume Control" and "Wave" 3. Move sliders to the one half of way 4. Be sure that the controls are not muted. RECORDING 1. Open Windows Mixer settings and choose Recording settings 2. Check "Line In" and "Microphone" 3. Move sliders to the one half of way 4. Select Line In 2. USB Device Router Audio Switching MK is very strong in audio handling and switching between computer and transceiver. For description please look at chapter 12, USB Device router / Audio. 3. MK and transceiver level settings There are two knobs for adjusting audio driving levels. 1. First marked as "COMPUTER" serve for adjusting audio signal level coming to computer Line In input. 2. Second marked as "RADIO" serve for adjusting audio signal level coming to transceiver AF IN or MIC IN input. Because transceiver AF IN and MIC IN inputs handles different levels, correctly attenuated level for MIC IN must be adjusted by special "trimmer". On the bottom PCB at the right side next to the 15 microHAM © 2004 All rights reserved transformer there is a small white "screw driver" trimmer. You can access this trimmer by a small hole located at the right side of the top cover. With this trimmer you can select a portion of the audio level from main MK front panel RADIO pot for radio MIC IN. This portion of level is applied when audio routing "C" is selected in the Router - Audio Switching tab. Following approach is recommended: a) Select MK RADIO pot to about three o'clock possition. b) Select routing "B" for transmiting from computer (audio goes to rig AF IN) and using windows mixer sliders adjust appropriate (not overdrived) level. c) Select routing "C" for transmiting from computer (audio goes to rig MIC IN) and using trimmer and transceiver MIC GAIN adjust appropriate (not overdrived) level. This approach allow you to use front MK RADIO pot for both routing B and C and have always enough margins when you change bands, modes (compressor ON/OFF) etc ... without needs to change windows mixer settings or trimmer position. 3. Inside the MK on the top PCB, on the left side, two jumpers are located for selecting integrated preamplifier inserted between attached microphone to RJ45 MIC jack or EXT MIC jack and computer MIC IN input. Turning preamp ON is not neccessary for electret microphones as are used with Icoms radios. Turn this preamplifier ON for Kenwoods and Yeasus original dynamic microphones (also Heil). By default factory settings, this preamplifier is bypassed. 16 microHAM © 2004 All rights reserved 12. USB Device Router MicroHAM USB Device Router (router) is a program that provides configuration tool for MK and software interface to another applications in the form of virtual serial ports. To use the MK with any Windows based logging program (and configure it) it is necessary to have installed its driver and run the router. Set up and Operation Router can handle several devices (micro Keyers or microHAM USB interfaces) simultaneously. Each device has its own tab (page) in the main notebook control. Content of a device page depends on device type. For example, USB interface has a simple page with only several controls that allows to associate the interface with virtual serial port(s). On the other hand, micro Keyer has more complex controls organized in several subpages that allows also to change keyer configuration. Device tab is created when a device is first time detected by router and remains in router even though device is disconnected. Automaticaly generated device name (displayed on tab) can be changed using the menu command "Device/Rename". To remove the page of disconnected device use menu command "Device/Delete". User can specify if router has to be started at system start-up and if it starts minimized. See the menu "Router". This menu contains also item "RT priority". If it is checked the router run with real time priority. Check it only if you experience that your logging program does not correctly pass the CW signal. After adjusting all the settings use the router minimized to system tray. Virtual serial ports First of all it is necessary to create several virtual serial ports (COM) because this is the only way how the applications (logging or control softwares) can access microHAM devices. One or two COM ports will be enough for one microHAM USB interface. It depends if logging software supports keying (CW/PTT) on the same port as radio control. If not, router give you the possibility to use this software with only one microHAM USB interface. MK will need more COM ports because it integrates more channels (radio control, FSK, WinKey, CW, PTT, foot switch feedback). Use menu command "Virtual Port/Create" to create virtual COM ports. It is possible to select more ports at once. Don't select the name of some real COM port that is present in the system to avoid conflicts. Select only COM ports that are supported by logging software you intend to use. Creating of virtual port may take a long time (several tens of seconds) on Windows 98/ME, be patient. It is possible to delete any virtual port at any time in the future. 17 microHAM © 2004 All rights reserved Routing Once virtual ports are created they can by associated with some device channels (e.g. FSK channel in MK). Use subpage "Ports" of MK page or device page of USB interface for this purpose. These "routing" settings need to correspond to settings of logging software. USB interface has four channels: - serial channel for radio control (uses serial data signals RX and TX) - output signal CW (uses DTR) - output signal PTT (uses RTS) - input signal Foot Switch feedback (uses CTS) All these channels can share the same COM port, because they use different serial port signals. MK has six channels: - serial channel for Radio control (uses serial data signals RX and TX) - serial channel for FSK (uses serial TX data) - serial channel for WinKey (uses serial data signals RX and TX) - output signal CW (uses DTR or RTS) - output signal PTT (uses DTR or RTS) - input signal Foot Switch feedback (uses one of CTS, DCD, DSR or RING) Serial channels (radio control, FSK and WinKey) have to be associated with different COM ports but I/O signals (CW, PTT, Foot Switch) can share the COM port with any of them. 18 microHAM © 2004 All rights reserved Device Settings MK contains internal configuration. Default configuration is loaded from internal non-volatile (EEPROM) memory. These settings cannot be changed without connection to the computer. When MK is connected to the computer (with running router), settings are overridden by settings from the router. Any changes of these settings on subpages "Audio", "PTT/FSK", "CW/WinKey" are applied immediately to MK. Default settings stored in EEPROM are not altered in this way. It means that if micro Keyer will be next time powered without connection to computer it will use the old settings stored in EEPROM. To change these default settings use button "Store as Default" placed on all related subpages or use menu command "Device/Store Settings as Default". Last subpage "Messages" allows to set the WinKey messages that can be stored to EEPROM of micro Keyer. These messages can be used in operation without computer. They can be played (and modified) using external keyboard or num pad. Messages are NOT a part of the settings that are applied automaticaly. To store them use buttons "Store" or "Store All". Settings and messages of individual devices can be stored to file too. Use menu commands "Device/Save Settings to File" and "Device/Load Settings from File". Settings are described in detail bellow. Firmware Thanks to the FLASH core technology of the internal CPU, changing firmware is as easy as installing new version of the computer software. You will not need any special HW or SW, firmware can be downloaded from our website and changed directly from the router. MK firmware can be upgraded using menu command "Device/Upload Firmware". Presets Requirements of the logging or control programs are different and it is hard to find universal settings for all your favorite loggers. One is good for SSB contesting, another is better for digital modes another for FSK RTTY etc. For easy switching between loggers, router has built-in configurable presets. You can store different keyer settings to these presets, rename each preset and switch between presets in a second simply by touching the preset button. Each preset contains settings of all devices (without messages of micro Keyers) and routing settings (assignment of COM ports to device channels) too. 19 microHAM © 2004 All rights reserved To create, modify, rename or delete a preset use commands from menu "Preset". Number of presets is limited to twelve (12). There are several ways to apply some preset. You can use command from menu "Preset" where all created presets were added as menu item. Also pop-up menu invoked by right click on the system tray icon when the router is minimized contains these items. The another way is to push the preset button. To show preset buttons the menu item "Preset/Show Buttons" must be checked. Buttons are placed above the status bar and contain control lamps that indicate which preset is currently applied. Presets are stored to the registry at program exit together with the current router state. Audio With MK you can define audio switching for each preset. MK can route three audio lines from/to computer sound card (LINE IN, LINE OUT and MIC IN) and three lines for transceiver AF IN, AF OUT (radio rear panel) and MIC IN (radio front microphone input). You can define position of audio switching for each operation state. States can be: 1. RX = receiving 2. TX - PTT = transmitting (any PTT event except foot switch or hand mic PTT event) 3. TX - Foot switch = transmitting with pressed foot switch or hand mic PTT (foot switch event) Switching positions are: A - Audio output from radio goes to sound card Line In. Audio output from computer is disabled and microphone is connected to the radio front mic jack. B - Audio output from radio goes to sound card Line In. Audio output from computer is enabled and goes to rear radio AF In. Microphone is connected to the computer sound card mic jack. 20 microHAM © 2004 All rights reserved C - Audio output from radio goes to sound card Line In. Audio output from computer is enabled and goes to radio front mic jack. Microphone is connected to the computer sound card mic jack. All states of the audio switching can be stored into the MK memory. This setting will be applied after power up. If you change some settings, new will be applied immediately for each state without storing to the MK memory. Of course setting can be stored to any preset and recalled by touching preset button. PTT / FSK In this tab you can configure how the PTT and FSK will work. In the Ports tabs you have defined which virtual COM port will carry these signals. Now you need to define behavior of this signals with coexistence of the foot switch or hand microphone PTT. PTT: MK has three (3) PTT outputs: PTT1, PTT2 and PA PTT. PTT1 and PTT2 are present at DB37 Radio Port connector and are designed to switch the radio to TX state. PTT1 is always wired to the radio front panel mic jack and means "all time PTT" regardless of mode. PTT2 is wired to the radio accessory jack and can be used with Kenwood and Yaesu radios for PTT with muted front microphone input for digital modes AFSK or SSB voice keyer contesting. On radios which do not support this function, PTT2 can be used as general purpose PTT output, and microphone mute you must select by correct audio switching setting and/or computer mic mute function if your logger and sound card allow this. PA PTT is present at the MK rear panel RCA and is designed for power amplifier switching. PTT input event can be PTT from serial port, PTT from foot switch (same as PTT from hand mic) and PTT from WinKey. With combo boxes you can define which PTT output will be switched if PTT event will appear. You can define PTT1, PTT2 or both or nothing for each PTT event source. PA PTT check box will close PA PTT output if checked and if any PTT event will appear. FOOT SWITCH: When foot switch is pressed, keyer can modify output signals. It means not only audio switching (described in Audio tab), but can affect CW, PTT and FSK output lines. First of all you can define delay for PTT1 and PTT2 lines going to the radio. This T/R sequencer removes all hot-switching, because PA PTT is switched immediately and the radio is switched after a defined delay. Select delay little bit more than is T/R delay of your power amplifier. Mute computer CW = if checked, CW generated from the computer on CW port will be suppressed while foot switch is pressed. Mute computer FSK = if checked, FSK generated from the computer on FSK port will be suppressed while foot switch is pressed. 21 microHAM © 2004 All rights reserved When foot switch is released there are several possibilities: Restore PTT and Audio = if checked, state of PTT from computer or WinKey will be copied to the PTT outputs by their settings. If not checked, PTT will not be applied until PTT from computer or WinKey will not be released. Audio settings will be restored to RX state. Restore CW = if checked state of CW from computer will be copied to the CW output according to its settings. If not checked it will be not applied until PTT from the computer will not be released. Restore FSK = if checked state of FSK from computer will be copied to the FSK output according to its settings. If not checked it will be not applied until PTT from the computer will not be released. There are also some additional settings. FSK from keyboard is a setting for FSK output. If external PS/2 keyboard is attached to the keyer and the foot switch is pressed: Diddle LETTERS will generates periodically "LETTERS" special character if nothing is typed and UOS automatically generates UOS function if box is checked. Again, all these settings can be stored to the MK memory for power up behavior, immediately applied or current setting can be stored to the presets. 22 microHAM © 2004 All rights reserved CW / WinKey In this tab you can configure internal CW keyer based on K1EL WinKey chip. Thanks to Steve, K1EL for the great product. Full WinKey manual is available at http://k1el.tripod.com/wkinfo.html. CW output is wired in parallel with CW output from computer. Mode = WinKey mode, Iambic A, Iambic B, Ultimatic and Bug Keyer Paddle set point = level when the paddle should be closed Swap paddles = swap paddle means reverse paddles for left handed or reverse wired paddle Auto space = keyer generates automatic character space CT space = keyer generates shorter automatic character space Speed pot min/max = min/max value of the front panel speed knob (5 to 99 WPM range) DIT / DAH = 100 / = Dit/Dah ratio from 1:2 to 1:4. Accepted number is from 200 to 400. Weighting = weighting in percentage (from 10 to 90%) 1st extension = extension of the first dit or dah in milliseconds (QSK) Keying compensation = extension of each dit and dah in milliseconds (QSK) PTT lead in/tail = lead and tail delays of automatic PTT. PTT from WinKey must be allowed in PTT / FSK tab. 23 microHAM © 2004 All rights reserved You can select frequency of CW side tone generated by internal speaker. Side tone is generated by main micro KEYER CPU, not by pin.5 of WinKey. This pin is reserved always for the PTT or for second CW output for second radio. (Useful with feature SO2R Extension box). There are four selections for frequencies (1350, 675, 450, 338 Hz) and none. Speed step defines step in WPM by pressing +/- on attached keypad. All setting can be stored to the keyer memory for power up behavior or can be immediately applied. Presets switching has no effect to WinKey settings. Several settings can be changed and/or stored using external keypad or keyboard. Look at the External Keyboard chapter. Messages In this tab you can define CW memories for WinKey. Up to 9 memories, each up to 50 characters long can be stored to the keyer memory. Each memory can have delayed loop back or can be chained to another memory. There are some special commands which can be applied during memory playback. Set PTT = force PTT event as WinKey PTT event Clear PTT = forcing release PTT event as WinKey PTT event Merge = merge two characters together ( [M]AS will sound AS .-...) 24 microHAM © 2004 All rights reserved Set WPM = force WPM to selected speed regardless of position of speed knob Cancel WPM = cancel selected forced WPM Set Key = close CW output for selected time in seconds Set Wait = wait selected seconds during playback For looping or chaining messages the "Jump to" combo box is reserved. Delay can be set in the delay box. You can test typed message by pressing "Test" button or store it to the keyer memory by pressing "Store" button. All messages can be stored at once by pressing "Store All" button. Messages can be stored and replayed also using attached external keyboard or keypad. (1-9 keys on numerical keyboard or F1 - F9). Presets re-switching has no effect on messages. 25 microHAM © 2004 All rights reserved Appendix A - DB37 Radio Connector Pin # Label Description 1 Power +13.5V 12 - 16V DC input 20 RS232 RTS RS232 radio port RTS output 2 RS232 CTS RS232 radio port CTS input 21 IF-FIF iface matrix* 3 IF IN iface matrix* 22 FIF IN iface matrix* 4 RS-TTL OUT iface matrix* 23 FILTER OUT iface matrix* 5 CI-V IN iface matrix* 24 RS232 IN iface matrix* 6 CI-V OUT CI-V bus output "open collector" 25 RS232 OUT RS232 TXD output 7 FIF OUT FIF-232 TXD output "TTL" 26 IF OUT IF-232 TXD output "TTL" 8 FILTER IN RXD input for all interfaces 27 PTT1 PTT1 output "open collector" generally used as front panel MIC PTT 9 PTT2 PTT2 output "open collector" generally used as rear panel digital modes PTT 28 CW OUT CW output "open collector" 10 PULL UP +5V through a 10K resistor 29 FSK OUT FSK output "open collector" 11 FSW IN Hand Mic PTT input 30 MIC #1 RJ45 Microphone jack pin #1 12 MIC #2 RJ45 Microphone jack pin #2 31 MIC #3 RJ45 Microphone jack pin #3 13 MIC #4 RJ45 Microphone jack pin #4 32 MIC #5 RJ45 Microphone jack pin #5 14 MIC #6 RJ45 Microphone jack pin #6 33 MIC #7 RJ45 Microphone jack pin #7 15 MIC #8 RJ45 Microphone jack pin #8 34 MIC GND Microphone ground 16 MIC Microphone signal 35 RADIO MIC IN GND Radio MIC ground 17 RADIO MIC IN Radio MIC signal 36 RADIO AF IN GND Radio AUDIO input ground 28 RADIO AF IN Radio AUDIO input signal 37 RADIO AF OUT GND Radio AUDIO output ground 19 RADIO AF OUT Radio AUDIO output signal SHELL GND Radio and power GND iface matrix* - used for cross wiring desired levels for radio CAT interface. 26