1
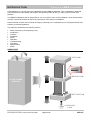
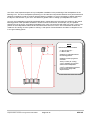
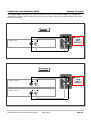
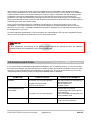
Caspian
FR-5
M series -1
Full Range Loudspeaker
U S E R
M A N U A L
ROKSAN AUDIO LIMITED
6 NORTHFIELD INDUSTRIAL ESTATE
BERESFORD AVENUE
ALPERTON
MIDDLESEX HA0 1NW
ENGLAND
TEL.
FAX.
+44 (0)208 900 6801
+44 (0)208 900 6802
+44 (0)208 900 0734
www.roksan.co.uk
email [email protected]
C a s p i a n FR-5 Loudspeaker
INTRODUCTION
Congratulations on your purchase of the ROKSAN Caspian FR-5 Loudspeaker. This Loudspeaker is designed
and manufactured to the highest specification and rigorously tested to offer you many years of trouble-free
pleasure.
Your FR-5 Loudspeakers are an integral part of your hi-fi system. Their correct installation, set-up and operation
will have a profound influence on the sonic performance of the entire hi-fi installation.
Please read the contents of this manual thoroughly. It will help you to understand your hi-fi equipment better and
enhance your listening pleasure.
This manual is divided into the following sections:
•
•
•
•
•
•
•
•
•
•
Safety Instructions (Accompanying card)
Introduction
Cautions
Installation
Setup
Operation
Troubleshooting
Guarantee
Specifications
Notes
UNPACKING
TOP FOAM
CAREFULL!
DRIVE UNITS
MIDDLE FOAM
OUTER & INNER
CARTONS
BOTTOM FOAM
ACCESSORY
PACK
Roksan Audio ltd
Caspian FR-5 Loudspeaker User Manual
CLASSIFICATION: General Use
All specifications are liable to change without notice. E&OE
Version: 1.07
Page 2 of 12
ENGLISH
Included in the packing of your Caspian FR-5 Loudspeakers you will find:
•
•
One spike accessory pack and spirit level in one marked loudspeaker carton
One information pack and warranty card
After unpacking please retain all packing materials. Correct packing is necessary for future transportation of your
Caspian FR-5 Loudspeakers.
MAINTENANCE
To maintain the appearance of the FR-5 loudspeaker as new, occasionally wipe the cabinet surface with a lightly
dampened soft cloth or chamois leather. Quality wax based furniture polish may be used but you should
experiment with the least obvious surface such as the back vertical plane (where the terminal panel is) to avoid
any potential damage to the high quality finish.
1
DO NOT
wipe or press on the tweeter dome or the woofer cone as
this may cause permanent damage to the drive units
1
Avoid use of abrasives or solvents
CAUTIONS
C a s p i a n FR-5 Loudspeaker
Your Caspian FR-5 Loudspeakers are high quality audio devices, therefore care must always be taken to
transport, position and operate the units correctly.
DO NOT expose the loudspeakers to extreme climatic conditions such as excessive cold, heat, sunlight, rain
humidity or water etc…
DO NOT attempt to install the loudspeakers until you have read and understood all the necessary operational
parameters and installation instructions regarding your Caspian FR-5 Loudspeakers.
DO NOT make any connections between the amplifier and the loudspeakers while the amplifier is on. (Always
refer to the amplifier user manual)
Caspian FR-5 Loudspeakers contain no user serviceable parts. Do Not remove any drive units/panels or
attempt to service the loudspeakers yourself. Unauthorised servicing will void the warranty.
Roksan Audio ltd
Caspian FR-5 Loudspeaker User Manual
CLASSIFICATION: General Use
All specifications are liable to change without notice. E&OE
Version: 1.07
Page 3 of 12
ENGLISH
C a s p i a n FR-5 Loudspeaker
INSTALLATION
ROKSAN Caspian FR-5 Loudspeaker - Front & Rear View
1
2
3
5
6
4
7
ROKSAN
8
1.
2.
3.
4.
High frequency Tweeter
Low frequency Woofer (one)
Low frequency Woofer (two)
Loudspeaker Grille
5.
6.
7.
8.
Rear firing Port
Product label
Speaker terminal panel
Speaker Plinth
ROKSAN Caspian FR-5 Loudspeaker – Speaker Terminal View
1.
2.
3.
4.
5.
6.
Tweeter Input terminal (+ve)
Tweeter Input terminal (-ve)
Woofer Input terminal (+ve)
Woofer Input terminal (-ve)
Tweeter / Woofer +ve ‘Jump-bar’ (removable)
Tweeter / Woofer -ve ‘Jump-bar’ (removable)
Roksan Audio ltd
2
5
6
3
4
Caspian FR-5 Loudspeaker User Manual
CLASSIFICATION: General Use
All specifications are liable to change without notice. E&OE
1
Version: 1.07
Page 4 of 12
ENGLISH
One of the most important aspects of any loudspeaker installation is the positioning of the loudspeakers in the
listening room. The art of loudspeaker positioning is to find the best compromise between sonic performance and
domestic constraints in order to achieve optimum listening conditions. It may be necessary to slightly rearrange
the layout of the furniture in your room. See below for general rules on setting up loudspeakers in a room.
As a rule, the loudspeakers should be positioned about 2 metres apart and symmetrical in relation to the central
listening position. Both speakers should be in similar acoustic environment, for example, only one speaker
should not be in an alcove. Avoid placing speakers in the room corners as this will result in a ‘boomy’ sound. The
position of the loudspeakers relative to the rear wall and the amount of ‘toe-in’ are covered later as these are
matters for fine tuning once the system is working. A rear space of around 200mm and about 15 degrees of ‘toein’ are good starting points.
A
NOTE
Best results are achieved when:
b
a = A/3, A/5, A/7, A/9, …
b = B/5, B/7, B/9, …
a
Speakers are symmetrical about
the listening position.
Speakers are back up against a
solid wall.
B
There is a small (10 – 20 deg.
‘Toe-in’ depending on room and
distance from loudspeakers.
‘Toe-in’ is adjusted and fine tuned
for best stereo image width,
depth and focus.
Roksan Audio ltd
Caspian FR-5 Loudspeaker User Manual
CLASSIFICATION: General Use
All specifications are liable to change without notice. E&OE
Version: 1.07
Page 5 of 12
ENGLISH
C a s p i a n FR-5 Loudspeaker
SETUP
1
NOTE:
To assist setup, do not fit the speaker spikes yet. This will be done after the optimum
position/location of the speakers in the room is established.
CONNECTING LOUDSPEAKER CABLES
Conventional
Please refer to rear terminal panel view on Page 4. There are two sets of terminals the upper set corresponds to
the tweeter and the lower to the woofers. There is a small illustration printed on the rear label for your reference.
The Caspian FR-5 Loudspeaker comes supplied with a set of two removable ‘jump-bars’ already connected. To
connect the loudspeaker conventionally, simply attach your speaker cable to the lower set of terminals marked
‘woofer’. Make sure that both loudspeakers of the pair are connected in the correct polarity with respect to the
output terminals of your amplifier:
RIGHT
and
LEFT
RED
Ä
Ä
RED
and
+ve
Ä
+ve
and
RIGHT
and
or
1
LEFT
BLACK
Ä
Ä
-ve
Ä
-ve
BLACK
IMPORTANT NOTE:
Always switch the Amplifiers OFF before attempting to connect or disconnect the speaker cables
to/from your loudspeakers. Failure to do this may cause permanent damage to the amplifier and/or
the loudspeakers.
Conventional
1 NOTE:
‘Jumpbars’
Connected
AMPLIFIER
1
NOTE:
For optimum performance it is recommended to use high quality cables such as ROKSAN HDC02S High Definition Speaker Cable. Many speaker cables such as the ROKSAN HDC-02S are
directional. Please observe this directionality. DO NOT use speaker cable with conductor size less
than 16 AWG (1.6mm Diameter). The Binding posts accept conductor sizes up to 12 AWG.
Roksan Audio ltd
Caspian FR-5 Loudspeaker User Manual
CLASSIFICATION: General Use
All specifications are liable to change without notice. E&OE
Version: 1.07
Page 6 of 12
ENGLISH
CONNECTING LOUDSPEAKER CABLES
Bi-wiring / Bi-amping
Your Caspian FR-5 Loudspeaker can easily be adapted to employ one loudspeaker cable for the tweeter and
another for the woofers. This is achieved by removing the ‘jump-bars’ from the terminals and utilising each set of
terminals accordingly:
Bi-wiring
1 NOTE:
‘Jumpbars’
Removed
AMPLIFIER
Bi-amping
1 NOTE:
‘Jumpbars’
Removed
AMPLIFIER (1)
AMPLIFIER (2)
Roksan Audio ltd
Caspian FR-5 Loudspeaker User Manual
CLASSIFICATION: General Use
All specifications are liable to change without notice. E&OE
Version: 1.07
Page 7 of 12
ENGLISH
LOUDSPEAKER SPIKES
In order to realise the full potential of your Caspian FR-5 Loudspeaker system, it is necessary to locate each of
the loudspeakers as rigidly as possible on the ground. Using the supplied set of spike feet, image stability,
transparency, definition and attack of the sound will improve as the loudspeakers are rigidly coupled to ground.
Three most common setups are described below.
Concrete Floor
If you have a carpeted floor on concrete, the spikes
should be used with their pointed end facing downwards,
piercing the carpet and making contact with the concrete
surface. Adjust the spikes so that the loudspeaker is level
with respect to the floor. (horizontally & vertically) Use the
supplied spirit level for accurate levelling of the FR-5
loudspeakers. Try to ensure that both loudspeakers are
aligned to more or less the same height. Check the
loudspeaker is not ‘rocking’ by pushing down on opposite
corners of the top of the loudspeaker. Adjust the
corresponding spike on the bottom to prevent any
‘rocking’. Once you are satisfied with the rigidity and level,
tighten up the lock-nuts.
NOTE:
1Please
note there are NO items such as electrical
cables, piping etc. immediately under the
carpet/floor where the spike positions are.
LOCKNUT
SPIKE
CARPET
CONCRETE
Carpeted Floor Boards
The procedure for carpeted room with floor boards is the
same as for concrete floor. However, a more rigid
mounting can be achieved by the following procedure.
After the speaker has been on the carpet for a little while,
the spikes would make an impression on the surface of
the carpet. By carefully removing the loudspeaker from its
position without disturbing the spike impression on the
carpet, four ‘cross-head’ wood screws can be fitted, one in
each of these impressions. Remember to use large
enough size screws to ensure good final rigidity of the
loudspeaker cabinet relative to the floor boards.
1
NOTE:
Please note the screws should NOT be too long as
these could go through the floor board and cause
serious damage to any cable, structure or piping
under the floor boards. It is equally important to
ensure there are NO other items, electrical cables
etc. under the carpet where the spike positions are.
LOCKNUT
SPIKE
WOOD SCREW
CARPET
FLOOR BOARD
Adjust the spikes and level the speakers as outlined
above.
Roksan Audio ltd
Caspian FR-5 Loudspeaker User Manual
CLASSIFICATION: General Use
All specifications are liable to change without notice. E&OE
Version: 1.07
Page 8 of 12
ENGLISH
Plain Floor Boards
To avoid any damage to the surface of plain floors
(Marble, Wood flooring etc.), use the supplied spike
shoes (rests). Place these on the floor surface with the
spike point recess on top. Carefully place/position the
spikes into the recesses and adjust the position of the
speakers accordingly.
Adjust the spikes and level the speakers as outlined
above.
LOCKNUT
SPIKE
SPIKE SHOE
FLOOR BOARD
C a s p i a n FR-5 Loudspeaker
OPERATION
When all the connections to the loudspeakers have been made correctly, you can switch on your amplifier(s).
Always ensure that the volume setting is at minimum before playing any music through your loudspeakers.
Check if there is any audible ‘hum’ in the system by listening to the loudspeakers with out any music playing and
gradually increasing the volume. If there is any ‘hum’ or ‘buzz’ consult your appointed ROKSAN dealer or
distributor.
FINAL POSITIONING
When setting-up or testing your Caspian FR-5 Loudspeaker system, choose the music material that you know
well and sit in the central listening position. Do not be surprised if initially the music sounds different to what you
have been used to.
NOTE:
Your Caspian FR-5 Loudspeaker system requires at least 48 hours of continuous music
programme at reasonable volume to allow the various moving parts of the drive units and other
component to ‘burn-in’. After this period has elapsed, the bass will increase in weight, definition,
extension speed and articulation whilst the treble will sound more open, coherent and tactile.
The FR-5 Loudspeaker system will continue to improve in performance over the first few weeks of use and it is at
this time you should finalise the placement of your loudspeakers.
Roksan Audio ltd
Caspian FR-5 Loudspeaker User Manual
CLASSIFICATION: General Use
All specifications are liable to change without notice. E&OE
Version: 1.07
Page 9 of 12
ENGLISH
At this stage try to analyse the sound objectively by listening to the overall balance and separation between
various music instruments and voices, and to the stability of the ‘sonic image’ of your favourite music material or
a good test album. After you have been listening for some time, begin to experiment with the positioning of the
loudspeakers. Moving the loudspeakers away from the rear wall and more into the room will reduce the
prominence of the low frequencies (bass) and improve the focus and the 3-dimensionality of the stereo image.
Moving the loudspeakers closer to the rear wall will increase the prominence of the bass at the possible expense
of degrading the focus of the stereo image.
Once you have found the position for a satisfactory tonal balance, try altering the angle of ‘toe-in’ of the
loudspeakers. This will also affect the focus of the stereo image but it is highly dependent upon the acoustic
environment of your room. The FR-5 Loudspeakers will begin to ‘disappear’ as you approach the ideal position of
the loudspeakers in your room.
For best results keep experimenting. This will increase your understanding of the way the loudspeakers interact
with your room and improve the performance of your entire audio system.
1
NOTE:
A final adjustment and leveling of the speakers/spikes should be carried out after the optimum
position/location of the speakers in the room is established.
C a s p i a n FR-5 Loudspeaker
TROUBLESHOOTING
If you suspect that your ROKSAN Caspian FR-5 Loudspeakers are not operating properly, you should check all
the connections carefully. Pay particular attention to speaker phasing and channel connections. Below are some
commonly encountered problems with suggestions for possible cure. The list is not exhaustive: If you have any
unresolved problems, please consult your appointed ROKSAN dealer or distributor.
SYMPTOM
No sound from one or both
speakers
Poor stereo image (not
focused/defined) and/or
lack of Bass
LIKELY CAUSE
SUGGESTED REMEDY
Speaker cables not connected properly
‘Jump-bars’ not connected properly
Ensure proper connection of cables
Check all connections and tighten the
terminal binding posts
Switch amplifier ON
Increase volume
Check speaker and amplifier speaker
terminals are connected to
corresponding cable (check colours
and/or markings)
Check all connections and tighten the
terminal binding posts
Amplifier not switched ON
Volume set at minimum
Speaker cable connected out of phase
‘Jump-bars’ not connected properly
Hum from speakers
Incorrect Grounding
Roksan Audio ltd
Caspian FR-5 Loudspeaker User Manual
CLASSIFICATION: General Use
All specifications are liable to change without notice. E&OE
Check Mains polarity and grounding
on all connected equipment
Version: 1.07
Page 10 of 12
ENGLISH
C a s p i a n FR-5 Loudspeaker
GUARANTEE
There are no user-serviceable parts inside your Caspian FR-5 Loudspeakers. If a fault should develop, refer any servicing to
your appointed ROKSAN dealer, distributor or ROKSAN approved service agent.
Your ROKSAN Caspian FR-5 Loudspeakers are guaranteed against any defect in materials and workmanship for a period of
two years from the date of purchase.
This guarantee only becomes effective if the warranty card is validated by the ROKSAN retailer from whom the equipment
was purchased and returned to ROKSAN within 28 days of purchase.
This guarantee excludes:
1. Damage caused due to accident, misuse, neglect and incorrect installation, adjustment or repair.
2. Liability for damage or loss during transit from the retailer or purchaser to ROKSAN or its authorised distributor for the
purposes of repair or inspection.
Carriage costs to ROKSAN shall be borne by the consignor.
All claims under this guarantee must be made through an authorised ROKSAN retailer.
If equipment returned for repair to ROKSAN is found on inspection to comply with the product specification ROKSAN
reserves the right to make a charge for examination and return carriage.
Unauthorised servicing will void this guarantee.
C a s p i a n FR-5 Loudspeaker
SPECIFICATIONS
Tweeter
25mm Coated Fabric Dome
Magnetically Shielded & Ferro Fluid-cooled
Woofer
130mm Coated Paper (x2)
Magnetically Shielded with 25mm Voice Coil
Input Sensitivity (1W, 1m)
87dB
Nominal Impedance
> 4Ω
Frequency response
32Hz – 20kHz (In Room Response)
43Hz – 20kHz (-6dB)
Nominal Power Handling
85 Watts
135 Watts
Peak Power Handling
Dimension
200 x 250 x 1000 (W x D x H) mm
250 x 315 x 1000 (with base)
Weight
35 Kg (each)
C a s p i a n FR-5 Loudspeaker
NOTES
Caspian FR-5 Loudspeaker System
Serial Number:
Serial Number:
…………………………
…………………………
Purchase Date
Day .…… Month …….. Year
ROKSAN Retailer
Name:
Location:
………..
…………………………………
………………………………
Please keep a record for future reference
Roksan Audio ltd
Caspian FR-5 Loudspeaker User Manual
CLASSIFICATION: General Use
All specifications are liable to change without notice. E&OE
Version: 1.07
Page 11 of 12
ENGLISH
www.roksan.co.uk
email [email protected]
Roksan Audio ltd
Caspian FR-5 Loudspeaker User Manual
CLASSIFICATION: General Use
All specifications are liable to change without notice. E&OE
Version: 1.07
Page 12 of 12
ENGLISH