1
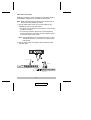
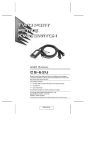
User Manual
CV-131A / CV131B
Read this guide thoroughly and follow the installation and operation
procedures carefully in order to prevent any damage to the CV-131A /
CV-131B and/or any devices that connect to it.
This package contains:
M 1CV-131A or CV-131B SUN Signal Converter Cable
M 1User Manual
If anything is damaged or missing, contact your dealer.
© Copyright 2004 ATEN® International Co., Ltd.
Manual Part No. PAPE - 1253-100
Printed in China 12/2004
All brand names and trademarks are the registered property of their respective owners.
2004-12-17
Note: This equipment has been tested and found to comply with the limits for
a Class B digital device, pursuant to Part 15 of the FCC Rules. These limits
are designed to provide reasonable protection against harmful interference in
a residential installation. This equipment generates, uses and can radiate
radio frequency energy, and if not installed and used in accordance with the
instruction manual, may cause interference to radio communications.
However, there is no guarantee that interference will not occur in a particular
installation. If this equipment does cause harmful interference to radio or
television reception, which can be determined by turning the equipment off
and on, the user is encouraged to try to correct the interference by one or
more of the following measures:
M
Reorient or relocate the receiving antenna;
M
Increase the separation between the equipment and receiver;
M
Connect the equipment into an outlet on a circuit different from that which
the receiver is connected;
M
Consult the dealer or an experienced radio/television technician for help.
Limited Warranty
IN NO EVENT SHALL THE DIRECT VENDOR’S LIABILITY EXCEED THE PRICE
PAID FOR THE PRODUCT FROM THE DIRECT, INDIRECT, SPECIAL,
INCIDENTAL OR CONSEQUENTIAL DAMAGES RESULTING FROM THE USE
OF THE PRODUCT, DISK OR ITS DOCUMENTATION.
The direct vendor makes no warranty or representation, expressed, implied, or
statutory with respect to the contents or use of this documentation, and specially
disclaims its quality, performance, merchantability, or fitness for any particular
purpose.
The direct vendor also reserves the right to revise or update the device or
documentation without obligation to notify any individual or entity of such revisions,
or update. For further inquires please contact your direct vendor.
2004-12-17
Overview
The CV-131A and CV-131B are PS/2 to SUN interface
converters. They translate PS/2 keyboard, PS/2 mouse signals
to Sun keyboard and mouse signals, allowing you to easily and
conveniently integrate Sun servers into an IBM compatible
KVM (keyboard, video, mouse) installation. All computers on
the installation can be controlled from a single PC style console.
The CV-131A / CV-131B fully supports ATEN PS/2 KVM
switches. ATEN KVM switches are designed in two basic types:
Those that use specially designed 15 pin Special High Density
connectors (SPHD-15) to transmit the KVM date between the
switch to the computers; and those that use statndard PS/2 and
VGA connectors.
The CV-131A and CV-131B are identical in their functions,
except that the CV-131A is for use with SPHD-15 switches,
whereas the CV-131B is designed for PS/2-VGA switches.
The CV-131A / CV-131B both take advantage of the USB bus
to transfer keyboard and mouse input to the SUN system. This
provides fast, reliable, data transfers, and makes for a neat and
tidy installation.
Mulitiple keyboard language support (American English,
Japanese, French) is built in. Hotkeys, rather than complicated
DIP switches, are used to set up the keyboand language
configuration.
-1-
2004-12-17
Features
M Compatible with Sun Systems
M Composite Sync Video support
M Hotkey keyboard language selection
M Bus powered - external power adapter not required
M Easy installation - no software required
M Keyboard and mouse emulation - computers boot even
when the KVM focus is elsewhere
M Supports PS/2 mice and Microsoft Intelimouse
M Supports hot plugging of KVM switch ports
M Supports high resolution video - including Sun 1152 x 900,
1280 x 1024, and 1600 x 1200
System Requirements
M Sun Blade Server 2000/100 (Sun Solaris 8)
M HDB-15 (PC style) video port installed on the system
M USB Host Controller installed on the system
-2-
2004-12-17
Installation
Installation is simply a matter of plugging in the cables. Refer to
the installation diagram as you perform the steps below.
Note: Make sure that all the equipment to be connected up is
powered Off and properly grounded.
1. Plug the KVM switch end of the converter cable into any
available CPU port on the KVM switch.
M For SPHD-15 type switches, plug in the CV-131A’s single
SPHD-15 connector.
M For PS/2 type switches, plug the CV-131B’s keyboard,
monitor, and mouse connectors into their respective ports
in the CPU section of the switch.
Note: SUN workstations use a three button mouse. To fully
emulate its functions, you need to use a three button
PS/2 mouse.
2. Plug the other end of the cable into the Sun station’s USB
and video ports.
2
CV-131A
1
1
CV-131B
SPHD-15 Switch
PS/2 Switch
-3-
2004-12-17
Hotkey Operation
Hotkeys are used to select the keyboard layout, reset the USB,
select the CV-131A / CV-131B’s operating platform, and obtain
system setting information.
The Hotkey entry method is as follows:
1. Press and hold either Ctrl key
2. Press and release the F12 Function key
3. Press and release the appropriate hotkey (see below)
4. Release the Ctrl key
Note: 1. After changing the keyboard language layout, you
must restart your system.
2. Be sure that a text editor is running before using
the system setting information hotkey.
The following table shows the Hotkeys and their functions:
Hotkey
Function
Ctrl + F12, 3, 3
Selects the American English keyboard layout
Ctrl + F12, 0, 8
Selects the French keyboard layout
Ctrl + F12, 1, 5
Selects the Japanese keyboard layout
Ctrl + F12, F5
USB reset
Ctrl + F12, F3
Selects the Sun system platform
Ctrl + F12, F4
Provides system setting information
The system setting information hotkey returns a code that looks
similar to the example, below:
O 03 L 33
Where O 03 represents the Sun operating platform, and L 33
represents the American English keyboard language.
-4-
2004-12-17
Sun Keyboard Emulation
The PS/2 (101/104) key keyboard can emulate the functions of
the SUN keyboard when the Control key (Ctrl) is used in
conjunction with other keys. The corresponding functions are
shown in the table below.
Note: When using Control Key ([Ctrl]) combinatons, press and
release the Control key, then press and release the
activation key.
PS/2
SUN
[Ctrl] [T]
Stop
[Ctrl] [F2]
Again
[Ctrl] [F3]
Props
[Ctrl] [F4]
Undo
[Ctrl] [F5]
Front
[Ctrl] [F6]
Copy
[Ctrl] [F7]
Open
[Ctrl] [F8]
Paste
[Ctrl] [F9]
Find
[Ctrl] [F10]
Cut
[Ctrl] [1]
[Ctrl] [2]
-
[Ctrl] [3]
+
[Ctrl] [4]
[Ctrl] [H]
Help
-5-
2004-12-17
Troubleshooting
Problem
Cause
Action
Wake up function
doesn’t work.
System not
responding to
mouse or
keyboard input.
Press the POWER key ([Ctrl] [4]). If the
system still fails to respond, Click the
left and right mouse buttons at the
same time or press [Esc].
Keyboard and
mouse stop
responding after
hot plugging USB
devices
USB needs to be
reset.
There are two methods that can be
used to reset the USB:
1. Unplug and replug the USB cable
from the computer’s
USB port;
2. Press the USB Reset Hotkey
combination (see p. 4).
Video problems.
Wrong display
resolution for
monitor.
Some monitors cannot support a
display resolution of 1152 x 900. Set
the resolution to either 1280 x 1024, or
1024 x 768.
Specifications
Function
Connectors
CV-131A
To Switch
1 x SPHD -15 M
To Sun
1 X HDB-15 M
1 x USB Type A M
CV-131B
2 x 6 pin mini DIN M
1 x HDB-15 F
LEDs
1 Power
Emulation
Sun Keyboard and Mouse
Resolution
Sun specific 1152 x 900; 1280 x 1024; 1600 x
1200
Environment
Operating Temperature: 0 - 50o C
Storage Temperature: -20 - 60o C
Humidity: 0 - 80% RH Noncondensing
Cable Length
1.8m
Housing
Plastic; 10.65 x 4.2 x 2.31 cm
Weight
0.2kg
0.24kg
-6-
2004-12-17