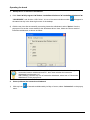
1
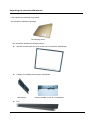
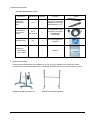
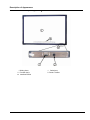
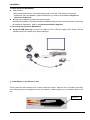
USER GUIDE LEADERBOARD INTERACTIVE WHITE BOARD MODEL LB77H USER GUIDE DUKANE AUDIO VISUAL PRODUCTS DIVISION Thank you for purchasing the Dukane interactive whiteboard. This Guide will assist you with installation and operation of the board. We welcome your feedback and are ready to assist you. Please forward you comments and suggestions to: Dukane AV Division 2900 Dukane Drive St Charles, IL 60174 Or call 1-800-676-2487 Email: [email protected] 401-LB77H-00 0 Legends Instruction: additional instruction for software operations. Note: Special items that may require your attention during use of the board. Warning: This symbol indicates information that if ignored could possibly result in personal injury or major damage to the product. Caution Note z z To avoid electric shock, please do not install the interactive whiteboard in wet or very humid locations. After the interactive whiteboard is installed, do not touch the power cable or data cable! z Keep the interactive whiteboard away from fire and direct sunlight! z The interactive whiteboard should be professionally installed, test to be sure the whiteboard is firmly fixed! When the interactive whiteboard is used together with a projector, do not look directly into the light from the projector. 1 Important Note z Only erasable interactive whiteboards can be written on with dry erase colored pens. For some boards use only electronic pens. z To remove accidental permanent marker on the board, write over the marker with a dry erase pen and then wipe off with a cloth. The dry erase ink acts as a removal agent for the permanent ink. z Please make sure the whiteboard is correctly connected to the computer, and the power cable is connected. It is preferable that the connection and power cables be hidden to prevent the cables from being disconnected. General Note: z Do not scratch the surface or frame of the board with sharp or hard objects. z Environment; Do not place the board in any intense magnetic fields. z Wall mounting: mount the board firmly to the wall. z When writing on the board with the electronic pen, please keep the pen upright to the board and write lightly. z If the interactive whiteboard is mounted on the wall surface, it must be vertical. If the wall surface is made of metal or magnetic materials, a space of 10cm must be maintained between the electronic whiteboard and the wall surface. 2 Contents LEGENDS ............................................................................................................................................................................. 1 CAUTION NOTE .................................................................................................................................................................. 1 CONTENTS........................................................................................................................................................................... 3 INTRODUCTION .................................................................................................................................................................. 4 INTRODUCTION .................................................................................................................................................................... 4 FEATURES ............................................................................................................................................................................ 4 TOPOLOGICAL DIAGRAM ..................................................................................................................................................... 4 SYSTEM REQUIREMENTS ...................................................................................................................................................... 4 UNPACKING THE INTERACTIVE WHITEBOARD........................................................................................................ 5 1. THE INTERACTIVE WHITEBOARD COMPONENTS:............................................................................................................... 5 2. STANDARD ACCESSORIES ................................................................................................................................................. 6 3. OPTIONAL ACCESSORIES ................................................................................................................................................. 6 DESCRIPTION OF APPEARANCE .................................................................................................................................. 7 INSTALLATION .................................................................................................................................................................... 8 1. INSTALL INTERACTIVE WHITEBOARD .............................................................................................................................. 8 2. CONNECTING THE INTERACTIVE WHITEBOARD ............................................................................................................... 8 3.INSTALL BATTERY IN THE ELECTRONIC PEN ................................................................................................................... 8 4、INSTALL LEADERBOARD SOFTWARE ......................................................................................................................... 9 5、UNINSTALL LEADERBOARD SOFTWARE ( NOT FOR THE INSTALLATION) .................................................................. 10 6、INSTALL USB-RS232 CONNECTION CABLE DRIVER .................................................................................................. 11 OPERATING THE BOARD............................................................................................................................................... 13 SOFTWARE OPERATION ............................................................................................................................................... 15 FUNCTION KEYS (ACROSS BOTTOM OF BOARD) ................................................................................................. 16 TROUBLE SHOOTING ..................................................................................................................................................... 17 SPECIFICATIONS FOR THE PC AND BOARD ........................................................................................................... 19 SERVICE ............................................................................................................................................................................. 19 3 Introduction Introduction The Interactive whiteboard is a combination of electronic, software, and Internet technologies. It is a revolution replacing the old blackboard-and-chalk that has lasted for hundreds of years. Interactive whiteboard is a computer based input device, which, when connected with projector can provide functions such as writing, annotating, drawing, editing, printing and storage. It‘s expected that the interactive whiteboard will be used for teaching, meetings, remote education and information exchange. Features z z z z z z z z The board uses electromagnetic induction and digital locating to establish the position of the pen. This provides an interactive environment for teaching and demonstration when connected with a PC and projector. The electronic pen can control the PC in place of the mouse. Using electronic pen, you can write, note, erase, copy, clone, replay and save files. Placing the pen above a button will generate a preview of the buttons function. The software provides functions such as magnifying, editing, searchlight, replaying, calligraphy effect, camera, screen and customized template. The board provides high tracking accuracy, quick response and sensitive operation. The advanced processing algorithm adopted in this device results much better response speed and the operation sensitivity compared to pressure sensitive whiteboard and infrared-ultrasonic whiteboards. It also provides a low reflection, high wear-proof surface for a suitable projected image. The long-life board surface can endure over 10 million pen strokes. The board resolution is up to 4096×4096 which permits the writing and drawing of fine lines. Topological Diagram System Requirements Hardware Configuration Software configuration Minimal configuration PII 450MHz 128 MB RAM Windows SE, ME, 2000, XP Microsoft Internet Explorer 6.0.0 Suggested Configuration PIII 800MHz or more 256 MB RAM or more Windows2000, XP Microsoft Internet Explorer 6.0.0 4 Unpacking the Interactive Whiteboard 1. The interactive whiteboard components: One interactive whiteboard package: The shipping carton. One Interactive whiteboard package contains: z Interactive white board set (such as the LB77H Interactive WhiteBoard ) z Hangers for installing the interactive whiteboard Wall hanger z Hanger installed on the rim of whiteboard Tray 5 2. Standard Accessories Standard Accessories include: Description Specification Quantity Purpose Electronic whiteboard pen Pen 3 The pen for interactive whiteboard, with Type AAA batteries (1.5V). USB-RS232 connecting cable 33 FT. (10 meters) 1 The dedicated cable connecting computer and interactive whiteboard CD 1 Drive and application software 1 Manual Software Disc Interactive Whiteboard User Guide picture 3. Optional Accessories If the interactive whiteboard is not installed on a wall, it may be installed on a mobile floor stand. A mobile floor stand includes side beam, crossbeam, lift board and screws. See the following figure. Mobile floor Stand components Mobile floor Stand assembled 6 Description of Appearance z WhiteBoard with USB port Supply Power: Writing Area; II Function keys; III Interface Board 1. Serial port; 2. Power Socket I 7 Installation 1. Install Interactive WhiteBoard z Wall mounted Select proper wall location, and install hanger parts on the wall. Then hang the interactive whiteboard. (Prior to installation, please install the tray). Refer to the Installation Diagram of Interactive whiteboard. z Bracket type installation( brackets are optional parts) Assembly the brackets according to Bracket installation Diagram found with the brackets. Then hang the interactive whiteboard. Refer to the Bracket Installation Diagram>. 2. Connecting the Interactive WhiteBoard z Using the USB cable only; Connect it to USB port of PC, USB can supply the DC Power. The red indicator lamp on the board input plate should light. 3.Install Battery in the Electronic Pen Turn the rear cap of the electronic pen counter-clockwise to open it, load one AAA 1.5V battery according to the following figure, then tighten the rear cap clockwise. Battery positive (+) is toward the back of the pen. PEN TIP 8 4、Install LEADERBOARD Software a) Insert 《LEADERBOARD Install Software》 CD disc; b) Click program logo c) Enter the LEADERBOARD setup wizard page: d) Click; 5) Select install remote: 9 6) Select install type: 7) Select “Launch the Program” and then “Finish” the installation. For a XP installation the program may display the login screen with boxes for the “User Name” and “Password”. If this appears, click on the “Login” box leaving the “User Name” and “Password” blank. 5、Uninstall LEADERBOARD software ( Not for the installation) Open Add or Delete program window, select LB Software, Click button for Change or Delete program(or insert 《LEADERBOARD Install Software》 Disk to CD-ROM, and double click installation” ”→ “ ”→ of software) to enter guide for Uninstall, then follow prompt of setup wizard step by step. 10 6、Install USB-RS232 connection cable Driver If USB-RS232 connection cable is used, the corresponding driver must be installed. If a serial port cable is exclusively employed, it is not necessary to install the driver for the USB cable. When USB-RS232 connection cable is used to connect the electronic whiteboard to the computer (as shown in the following figure), the driver for USB-RS232 connection cable should be installed. 1) Insert 《LEADERBOARD Software》Disc; 2) Insert The USB-RS232 USB-RS232 connection cable to the computer’s USB port。 Click installation program logo: 3) Click ,As shown in the following figure 11 4) Click This will Install the USB-RS232 connection cable driver. 5) Once connected correctly, in My Computer-Device Manager, you will see the device “CP210X USB to UART Bridge Controller,” as shown in the following figure: When USB-RS232 connection cable is used to connect the electronic whiteboard to the computer, the driver for USB-RS232 connection cable must be installed. Otherwise, the data communication between the interactive whiteboard and the computer can’t be realized. 12 Operating the board 1. Startup driver of interactive whiteboard 1) Click “Start"→"All programs"→”Dukane LeaderBoard Software"→"LeaderBoard Software"→ "USB DRIVER", and click the “USB Driver”. A icon of the communication module the status bar tray in the lower-right corner of the desktop. will appear in 2) Click the tray icon after successfully connecting interactive whiteboard, select "Option" from the popup menu to set the correct model for the whiteboard driver. Next, select the correct model of interactive whiteboard, as shown as follow: If it shows "Communication with board failed", please check whether there is a good connection between whiteboard and PC", then check whether the interactive whiteboard has the power “on”. After checking, click the tray icon of interactive whiteboard; select item of "Reconnect Whiteboard" on the popup menu. 2. Orient (calibrate) the interactive whiteboard 1) Click tray icon menu. of interactive whiteboard by left key of mouse; select “Orientation" on the popup 13 2) Left click "Re-orientation", it will produce a popup window for Orientation. Then click the central position of the flashing "cross " using the electronic pen. Follow the prompts (there are six orientation points, left up, right up, right down, left down, top up and middle) as shown below: Please select "Re-orientation" when installing the interactive whiteboard for the first time or when the position of the hardware (projector and interactive whiteboard) has been changed. A fast orientation is possible by selecting "Previous re-orientation record", if there are no hardware changes since last time. When there has been no change from the last session, please select "default orientation". 3. Application software 1) Click "Start"→"All programs "→" Dukane LeaderBoard Software"→"LeaderBoard Software"→ "LB77H SOFTWARE", this will produce a Logon window as shown below; 14 2) Key-in user name and password, then click "Login". (or leave both blank and click on click "Login".) A default administrator is “Administrator”, and the password is “123”, and it must match for upper/lower case. 3) The board will enter the software control mode. Ensure that the connection between interactive whiteboard and PC is good and the driver of interactive whiteboard is installed before starting the application software. If not, application program will not startup correctly. If the PC is turned on and the USB cable to the board had been disconnected a message such as “Failed to verify the LB Board, the program can’t run further” Go to the Icon in the tray and right click for the menu. Select “Orient” and then “Default orientation”. The board should then begin normal operation. SOFTWARE OPERATION The software operation and functions are described in the “Help” section which can be accessed from the main menu found by using START/ALL PROGRAMS/DUKANE LEADERBOARD SOFTWARE/HELP. 15 Function Keys (Across bottom of board) Function keys Definition Control Mode MOUSE Window Mode Annotation Mode PEN PEN Orientation Orientation Orientation Orientation Control Mode No Effect Switch mode Annotation Mode Switch to annotation mode Switch to annotation mode No Effect Window Mode No Effect Top Page Top Page Create a blank page Create a blank page Create page Page Up No Effect Page Up Page Up Page Down No Effect Page Down Page Down Normal Pen Switch to annotation mode and use Normal Pen Normal Pen Normal Pen Transparent Pen Switch to annotation mode and use Transparent Pen Transparent Pen Transparent Pen Eraser Eraser Eraser Eraser Replay Replay Pages Replay Pages Replay Pages Print Print Print Print to a control blank Switch mode to control Create a blank page Exiting the LeaderBoard; • Click on the lower icon for the “Pop Menu” Go to “EXIT” and click. A “Save this Session?” box appears. Make the selection. • If the menus are on the top go to “FILE” and then to “EXIT”. Opening the LeaderBoard • Go to “START” / “ALL SOFTWARE” / “DUKANE LEADREBOARD SOFTWARE” / LEADERBOARD / LB77H SOFTWARE • Or create a Desktop Icon by right clicking to “CREATE SHORTCUT” on the “LB77H SOFTWARE “. 16 Trouble Shooting If message appears " Failed to verify the IPBOARD, the program can't run further!", please check whether there is a good connection between whiteboard and PC.” 1. z Please check if cable is connected on both ends. z Check if the whiteboard has power. ( red indicator on) z Check if a serial port from COM1 to COM4 has been assigned to the board. One serial port from COM1 to COM4 for must be assigned to the whiteboard. z Check if the driver of whiteboard has been setup correctly. z Go to the Icon to the lower right tray and right click for the menu. Select “Orient” and then ”Default Orientation”. The board should then begin normal operation. 2. If during the software startup, the message appears “Error happen when Loading XML File”. Check the version of Internet Explorer, upgrade IE to version 6.0 if it is 5.0 or lower. 3. Only part of whiteboard can be written on. z z 4. Check if the model of whiteboard is correctly set. Check if the orientation of whiteboard is correct. Some orientation points do not appear when orienting the whiteboard. Check if the lateral deviation and vertical offset of projector are correct. Ensure the all the content on PC screen is projected to the whiteboard. 5. Electronic pen does not write normally. z z z z z 6. Check selected mode of operation. Writing is possible only under the “Draw Mode” or the “Annotation Mode”, and not when in the “Control Mode”. Do not press the button on the electronic pen when writing. Please keep the neb of electronic pen vertical to the whiteboard. Do not press the electronic pen hard against the board. Check if the battery in the pen needs to be replaced. How to exit from software of whiteboard? z Click the lower icon button ("Pop Menu") on the Floating Tool Bar, then click "Exit" in the menu. z Or click “File”( on top menu)→“Exit”. 7. How to correct the image shape. z z The projector may not be level. (like, the front is higher than the back or the back is higher than the front). , Generally, it can be adjusted by using the “keystone correction” or adjusting the height of the projector. For details, please refer to the projector user's manual. Trapezoid 8. Rectangle What type of projector is needed with the interactive whiteboard? 17 The projector should have the following three properties: 1) Front projector 2) Support resolution of the PC 3) The luminous output should be more than 500 lumens. 9. Hookup when the serial port is occupied. Both table model and notebook PCs allow added serial ports: z Install a serial port card on PC (note: generally, PCMCIA serial port card for notebook PC) z Using"USB2.0 to RS232C plus the special cable. 10. Can 25-pin serial port replace 9-pin serial port? Yes, but only with an adapter from 25 to 9 pins on the PC. 11. What to do if a permanent marker (un-erasable pen) is used on the whiteboard. Take a dry erase color pen and write over the permanent ink. Then wipe off the board. The dry erase ink acts as a release agent for the permanent ink. Test a small area to be sure this works. Clean inked area lightly using absorbent cotton dipped with alcohol. 12. How to clean the panel of IPBOARD? Clean the board lightly using a piece of clean water damping cloth. Attention: wring out the cloth so there is no flowing water. Water must not enter the sides of the board. If this happens let the board dry before use. 18 Specifications for the PC and Board Hardware Platform Common PC, notebook PC Operation System WinMe/2000/XP/2003 Transmission RS-232C/USB Interface Resolution 4096×4096 Data-signaling rate 19200Baud Rate Operating Principle Wireless electromagnetic induction Operating Modes Control Mode/ Window Mode / Annotation Mode. USB Power Supply DC 5V 100mA Service life of battery Different service life for different battery, common alkaline of electronic pen battery can last over three months. Working Temperature -20C to +55C Power capability < 2W Service If there are any problems or suggestion please contact the Service Dept; Dukane Corp. Audio Visual Products 2900 Dukane Drive St Charles, IL 60174 Service Dept; 800-676-2487 Fax; 630-584-5156 Email; [email protected] Sales dept ; [email protected] Product Manuals and software updates at the web site; www.dukcorp.com/av 19