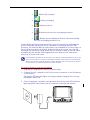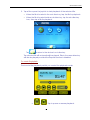
1
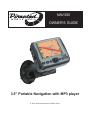
NAV350
OWNER’S GUIDE
3.5” Portable Navigation with MP3 player
© 2006 Directed Electronics, N95350 03-06
Table of Contents
NAV 350 FEATURE HIGHLIGHTS .......................................................................................................................................2
FIRST THINGS FIRST .....................................................................................................................................................4
SYSTEM TOUR ...................................................................................................................................................................4
PERIPHERALS TOUR ...........................................................................................................................................................8
NAV 350 SETUP ................................................................................................................................................................8
NAV 350 FUNDAMENTALS ..........................................................................................................................................15
HARDWARE INTERFACE ..................................................................................................................................................15
COMMAND INTERFACE ....................................................................................................................................................24
CONTACTS MANAGEMENT.......................................................................................................................................26
CONTACTS ......................................................................................................................................................................27
CONTACTS MANAGER .....................................................................................................................................................32
ACTIVESYNC ..................................................................................................................................................................35
MULTIMEDIA MODE....................................................................................................................................................37
MULTIMEDIA MODE OVERVIEW.......................................................................................................................................37
MP3................................................................................................................................................................................37
PHOTO.............................................................................................................................................................................42
SYSTEM CONFIGURATION ........................................................................................................................................45
SYSTEM SETTINGS OVERVIEW .........................................................................................................................................45
CUSTOMIZING USER PREFERENCES ..................................................................................................................................46
SYSTEM MAINTENANCE AND USER SUPPORT....................................................................................................51
USING YOUR NAV 350 SAFELY.......................................................................................................................................51
CLEANING THE NAV 350................................................................................................................................................54
TROUBLESHOOTING THE NAV 350 .................................................................................................................................54
FAQS ..............................................................................................................................................................................58
CUSTOMER SUPPORT .......................................................................................................................................................60
SYSTEM SPECIFICATIONS.........................................................................................................................................63
HARDWARE FEATURES ....................................................................................................................................................63
GPS SPECIFICATIONS ......................................................................................................................................................64
SOFTWARE SPECIFICATIONS ............................................................................................................................................65
DESIGN AND ERGONOMICS ..............................................................................................................................................66
ENVIRONMENTAL SPECIFICATIONS..................................................................................................................................67
REGULATORY INFORMATION...........................................................................................................................................67
INDEX .............................................................................................................................................................................68
i
NAV 350
NAV 350 feature highlights
Powerful system
•
Microsoft Windows CE .NET 4.2 operating system
•
Samsung S3C2410 266 MHz application processor
•
SiRF Star II LP chipset with Xtrac v2 firmware
•
High-density rechargeable 2200 mAh Lithium Ion battery
Wide and accurate GPS coverage
•
NAVTEQ digital map database
•
Integrated patch antenna for optimum satellite pick up at
every angle
•
Compact and lightweight body makes it easy for users to
carry it anywhere while driving or hiking
•
Car mount kit for multi-vehicle usage (windshield or
dashboard mounting)
•
On-the-road recharging options via the car charger
Mobile design
2
NAV 350 feature highlights
Ergonomic features
•
3.5-inch 200-nit QVGA TMR LCD touch-sensitive screen
•
Accessible control hot keys with backlight illumination
•
Simple, easy-to-use user interface with large icons and
command buttons
•
Multi-language support for user interface
•
Advanced power-saving options
•
MP3 for musical entertainment
•
Photo for digital pictures
Multimedia programs
Contacts management programs
•
Contacts for managing contact information on the device
•
NAV 350 Contacts Manager for managing contact
information on your computer
•
Microsoft ActiveSync for synchronizing contact information
3
First things first
This chapter describes the hardware interface of the NAV 350 and its
peripherals. Instructions for setting up the device and some basic system
operations are also discussed.
System tour
This section describes operation of the device hardware interface.
Rear and front panels
1
2
9
8
7
6
No.
1
5
Icon
4
3
Component
Power status LED
indicator
Description
Indicates the battery power status.
•
Green – Battery is fully charged; the
device is running on battery power.
•
Orange – Battery charging
•
Red – Battery charge is near depletion
level. You need to recharge your
device.
4
No.
Icon
2
Component
Description
Touch screen
Displays the applications, data, and map
images available on your device. It is
touch-sensitive and responds to finger taps.
3
MENU
Main Menu hot key
Displays the Main Menu panel; also called
the Home panel.
4
MAP
Navigation hot key
Displays the Navigation panel.
Zoom in hot key
When in navigation mode, zooms in on the
center of a map.
5
When in full screen mode in Photo, zooms in
on the displayed image.
6
Multi-directional
joystick
Move in a left-right or up-down direction to
scroll through displayed items.
Press to open (if it’s a file icon) or launch (if it
is a program or settings icon) a selected
item.
7
Zoom out hot key
When in navigation mode, zooms out from
the center of a map.
When in full screen mode in Photo, zooms out
on the displayed image.
8
Volume up hot key
Press to increase volume.
9
Volume down hot key
Press to decrease volume.
10
Speaker
Emits system sounds.
Note: For more information on how to use your NAV 350 in navigation mode, refer to the
Destinator OP Quick Start Guide or the Destinator OP User’s Guide (located in the
Destinator OP CD).
5
Right and left panels
15
12
11
13
14
No.
Icon
Component
Description
11
SD/MMC slot
Accepts SD and MMC storage cards,
allowing you to use audio, image, and
map files stored in it for use with internal
applications. You can also use it to back up
data from your device.
12
Earphone jack
Connects to audio line-out devices
(earphones/headphones).
13
USB port
Connects the device to computer running
on the Microsoft Windows platform.
14
Power connector
Connects the device to an AC power
outlet.
15
External antenna
interface
Interface for an external GPS aerial
6
Top and bottom views
17
No.
16
Icon
16
Component
Power button/
backlight control
Description
As a power button:
•
If the device is off, press the button to
turn it on. The power LED indicator on
the front panel lights up green.
•
If the device is on, press the button to
turn it off. The power LED indicator also
turns off.
As a backlight control:
•
17
Soft reset button
Press and hold to activate or
deactivate the screen backlight.
Press to perform a soft reset if the device
freezes (i.e., device no longer responds to
the buttons on the screen).
7
Peripherals tour
This section describes of the peripherals bundled with the NAV 350.
Car charger
NAV 350 setup
Using the new NAV 350 is a snap. Unpack, mount, turn on, and it’s ready to
go. Perform the following easy installation tasks to start using the device
straight out of the box:
1. Unpack the device.
2. Set up the device on a vehicle.
3. Turn on and configure the device.
8
Setup the NAV 350 on a vehicle
The NAV 350 comes with a car mount kit and a car charger with which you
can set up the device on a vehicle. Choose a position for the car mount kit
on the windshield using the suction cup, or on the dashboard using the
self-adhesive power disc connector.
Some countries prohibit the mounting of any electronic device in any location on the
vehicle dashboard. Be sure to check your local laws for acceptable mounting areas
before installing the car mount bracket.
Some newer vehicle models may have a heat reflective shield embedded in the
windshield. This may in some cases obstruct the GPS signal reception. If you encounter
this problem in your vehicle, you need to purchase an external GPS antenna.
Car mount installation reminders
Install the car mount on the surface of a vehicle:
•
That is smooth, flat and free of dirt and oil
•
Where the driver can easily view/reach it without taking
his/her eyes off too far from the road
•
Where the device will not obscure car controls nor restrict
the driver's view of the road
•
Far from the air bag deployment area
To set up the device on a vehicle:
This section shows how to install the car mount kit in a vehicle’s windshield
using the suction cup. For dashboard installation procedures using the
self-adhesive power disc connector refer to the NAV 350 Portable Navigator
Starter Guide.
1. Clean the mounting surface with a glass cleaner and a clean cotton cloth.
2. If the ambient temperature is below +15°C (60°F) warm the mounting area
and the suction cup (e.g. with a hair dryer) to ensure a strong suction bond.
3. Install the car mount on the selected area.
a.
Fix the suction cup to the selected area with the locking lever facing
up.
b.
Flip the locking lever away from you to create a vacuum between
the suction cup and the mounting surface.
9
c.
Make sure that the suction bond is strong enough before proceeding
to the next step.
d.
Insert the pegs on the car mount’s cradle plate to the holes on the
back of the cradle, and then move the cradle downwards until both
parts are engaged.
4. Insert the Destinator OP SD card into the device.
5. Dock the device on the cradle.
10
4. Adjust the car mount for the best viewing angle.
5. After setting up the device on the car mount, connect the car charger.
If the car engine is turned off, you may be required to switch the vehicle ignition
back into the Accessories position. Consult your vehicle owner’s manual.
e.
Connect the car charger to the power connector on the cradle.
f.
Plug the other end of the car charger to your vehicle’s cigarette
lighter.
g.
The power LED indicator lights up orange during charging. The hot
keys backlight is also lit up.
The device comes with the battery pre-charged to at least 30% capacity. You can
start using it once it is mounted in your vehicle and connected to the cigarette
lighter. However, for maximum usage time you need to charge your device to full
capacity. Go to the “Recharging the device” section for instructions.
Start up the NAV 350
After mounting the NAV 350 on a vehicle it is ready to be used. Turn it on to
calibrate the screen. After screen calibration, proceed to system settings
configuration.
To turn on and calibrate the device:
Turn on the device by pressing the power button
on the top right
panel of the device. The Main Menu panel displays. This is also referred to
as the Home panel.
11
To configure system settings:
If you intend to start using NAV 350 at once, we recommend configuring the
language and date/time settings first. The rest of the user preferences can be
set up later.
1. Tap
On the Main Menu panel.
2. To set the system language settings, tap
12
.
h.
Tap
/
under the Text and Voice settings until the language
of your choice is displayed.
i.
Tap
to apply the changes made.
3. To set the system date and time, tap
4. Tap Date.
13
.
j.
Tap
/
under the Year, Month, and Day settings to set the
date values.
k.
Tap
to apply the changes made.
5. Tap Time.
l.
a. Tap
/
under the Hour and Minute settings to set the time
values.
m. Tap
to apply the changes made.
14
6. Tap Time Zone.
n.
Tap
for the time zone of your choice.
o.
Tap
to apply the changes made.
7. Tap
twice to apply the changes made, and return to the Main
Menu panel.
For more information on the rest of the system configuration options, go to
“System configuration”.
Congratulations! Your new NAV 350 is now ready for use. Proceed to
“NAV 350 fundamentals” for more information on the device’s user
interface to start using the device in navigation mode.
NAV 350 fundamentals
This chapter describes basic hardware procedures in using the NAV 350.
Information on the device’s command interface is also discussed.
Hardware interface
Using the touch screen backlight
Under some lighting conditions, viewing the information on the device may
be difficult. If this is the case use the backlight to illuminate the touch screen.
15
To activate the touch screen backlight:
•
Press and hold the power button
on.
until the backlight turns
To turn off the touch screen backlight:
•
Press and hold the power button
off.
until the backlight turns
Using the SD/MMC slot
NAV 350 has an SD/MMC slot compatible with a range of SD and MMC
storage cards that you can use to back up or transfer files and data.
Also, the NAV 350’s GPS navigation system has its core on the Destinator OP
program. Using this program requires that users load the digital maps
available in the Destinator OP SD card included with the device.
16
To insert a storage card:
•
Hold the device securely, and then push the card into the
slot until you hear an audible system sound; this will signal
that the card is already properly seated within the slot. The
card is secure when it is not protruding from the slot.
To remove a storage card:
1. Hold the device securely, and then push against the top of the card, as if
you were pushing it further into the slot, letting the card spring out. An
audible system sound will signal that the card has been released.
2. Gently remove the card from the slot.
Establishing device-PC connection
The USB cable that comes with the device enables connection of the device
to a computer. File Explorer displays the NAV 350 as a USB mass storage
device, with the SD/MMC card shown as a sub-folder. Once connected, you
can:
•
Use File Explorer to copy digital music and image files into
the device’s SD/MMC card and access them when in
Multimedia mode.
It is advisable to organize files into subfolders. This will served as playlists
and albums when you access the files from your device.
To enable access of multimedia files from your device, it should be located on the
SD/MMC card, not on the device’s memory.
Go to “ Multimedia mode” for more information on how to work in
Multimedia mode.
•
Use NAV 350 Contacts Manager to import/export contact
information between your device and your computer
•
Use ActiveSync to synchronize contact information located
on the device and the computer
Refer to “Contacts management” for more information on contact
information import/export as well as synchronization.
Installing Microsoft ActiveSync
Use Microsoft ActiveSync to exchange information between the NAV 350 and
a computer running on the Microsoft Windows platform.
17
If you have a previous version of the Microsoft ActiveSync installed in your computer,
uninstall it first before installing the latest Microsoft ActiveSync version.
You can download ActiveSync from Microsoft website.
Minimum installation requirements:
•
Microsoft Windows XP, 2000, ME, and 98 SE
•
Microsoft Outlook 2000 or later required for Contacts
synchronization
•
Microsoft Internet Explorer 5.0 or later
•
Hard disk drive with 12 to 65 MB of available hard disk space
•
Available USB port
•
VGA graphics card or compatible video graphics adapter
at 256 color or higher
18
Installing NAV 350 Contacts Manager
Use Contacts Manager to manage the contact information located on the
device and on the computer. This PC program shares the same contact
database as the Contacts component of Microsoft Outlook. It only has an
import/export function; you still have to create contact entries in Microsoft
Outlook Contacts.
To install Contacts Manager:
1. Insert the companion CD into PC ROM driver, select one language from
the following languages: English, Francais, Espanol, Portugues.
b. After selecting language, one of the following pictures will appear:
19
1. Click Install Contacts Manager on the Please select your task screen.
The installation wizard will automatically begin.
4. Follow the on-screen instructions.
5. Click Finish after the installation process is completed.
20
Creating a partnership
After completing the installation procedures, set up a partnership between
the NAV 350 and the computer with the help of the New Partnership setup
wizard.
Once you’ve created a partnership, you will be able to synchronize contact
information using ActiveSync. Refer to the “Synchronizing contacts” section
for more information.
To create a partnership:
1. If you want to upload files into an SD/MMC card for use with your NAV
350, insert the card to the device.
2. Connect the device to a computer using the bundled USB cable.
on the left
a.
Plug the cable’s smaller connector to the USB port
panel of the device.
b.
Plug the USB client connector into an available USB port on the
computer.
The New Partnership setup wizard will automatically start on your
computer screen.
3. Follow the onscreen instructions.
4. When prompted to select the items to be synchronized, select only
ContactSync.
21
5. Click Finish on the Setup Complete dialog box.
The initial synchronization process will automatically begin when finish
using the wizard. After the initial synchronization, information you've stored
in Microsoft Outlook Contacts on the computer will now be available on
the NAV 350 without having to type a word.
6. Disconnect the device from the computer and you're ready to go.
Once you have completed the first synchronization process, you can initiate
synchronization from your device anytime, using the USB cable.
Recharging the NAV 350
NAV 350 uses a high-density rechargeable 2200 mAh Lithium Ion battery. The
status icon located on the top right corner of the Main Menu panel indicates
the level of the device’s battery power.
22
•
•
– Battery full charged
– Battery charging
•
– Battery level low
•
– Battery level very low, recharging required
•
– Battery power depleted, device will automatically
turn off; recharging required. You
If the battery level becomes low in the course of normal use, recharge the
device. Normally, please use the AC adapter to recharge the NAV 350.
However, this may be difficult when there’s no available AC power outlet on
hand. When the device battery is drained while on the road, you can still
recharge the device by using either the car charger cable or the USB cable
bundled with the device. Recharging time from empty to full capacity is
about six (6) hours in all cases.
If the battery level reaches very low status, the device will automatically turn off. In this
case, you have about 12 hours to recharge your device after which you risk losing all
data on the device's internal memory. In case all data is lost, the next time you power
on the device you will be prompted to restore the data.
To recharge the device using the AC adapter:
1. Plug the AC adapter into any AC current outlet.
2. Connect the AC adapter cord to the power connector on the left panel
of the device.
The power LED indicator lights up orange during charging. The hot keys
backlight is also lit up.
3. Once charging is complete, as indicated when the power LED indicator
lights up green, disconnect the AC adapter cord from the device.
23
To recharge the device using the car charger:
Use the car charger to recharge the device while it is mounted on the
vehicle. Perform step 7 of the “To set up the device on your vehicle” section
for instructions.
Command interface
Using the hot keys
The hot keys on the NAV 350 allow users to:
•
/
•
/
- Control the volume level of system sounds
- Control the magnification level of images
•
MAP-Launch the Navigation panel
•
MENU- Launch the Main Menu panel
24
All six hot keys light up when pressed for easier operation under low light
conditions.
The function of the hot keys may be disabled in some screens. For example, the
magnification level hot keys are inactive when viewing the MP3 directory.
Using the joystick
The multi-directional joystick controls actions and scroll through functions in
the device, and at the same time act as an Enter key when pressed.
The function of the joystick may be disabled in some screens. For example, the
up/down direction is inactive when in MP3 playback mode.
Using the NAV 350 touch screen
The NAV 350 touch sensitive screen allows for a more natural way of entering
information into the device using fingers instead of a stylus—no more wasted
time finding a lost stylus or fumbling with an awkwardly shaped one! In this
Guide, the tap and hold-and-drag actions are done by:
•
Tap - Touch the screen once with your finger to open items
and select options.
•
Hold and drag – Tap a slider icon and drag it across the
screen. In Photo’s Full Screen mode, hold and drag the
image to pan it in different directions.
•
Return – Tap to apply any changes made and/or revert to
the previous screen.
Using the Main menu panel
When the device turned on for the first time each day, you'll see the Main
Menu panel, also called the Home panel. From any other screen, you can
revert to it by pressing the Main Menu hot key MENU.
25
The panel’s title bar displays the current time (with 24-hour notation), the
panel name, and the battery power level status icon. Go to the “Recharging
the device” section for more information on this status icon.
There are six program icons on the Main Menu panel.
•
– Tap to launch MP3 for music mode operation. Go
to “ Multimedia mode” for more information.
•
– Tap to display the Navigation panel. Refer to the
Destinator OP User’s Guide for more information on how to
use the device in navigation mode.
•
– Tap to launch Photo for picture mode operation.
Go to “Multimedia mode” for more information.
•
– Tap to launch the Contacts program to access
your contacts list. Refer to the Destinator OP Quick Starter
Guide or the Destinator OP User’s Guide for more
information on how to use this program.
•
– Tap to open the System panel to configure the
device’s user preferences. Go to “System configuration” for
more information.
Contacts management
26
This chapter discusses the basic functions of Contacts in the device. Details
on how to perform contacts management tasks from a computer are also
provided.
Contact files imported/exported to the device and computer is saved in .fs format.
Contacts
Contacts maintains a list of your friends’ and colleagues’ contact
information. These include email address, street address, multiple phone
numbers, and other related information, such as birthday or anniversary date.
Contacts maintains a list of your friends’ and colleagues’ contact address.
You can enter multiple address entries for each contact. This program is
integrated with Destinator OP enabling users to treat all address entries as
possible destination points in navigation mode.
Using Contacts
To open Contacts:
•
Tap
on the Main Menu panel.
The Contacts control pad displays.
The control pad displays the list of contacts and several command buttons
for performing various Contacts tasks.
Creating a new contact
1. Tap New.
27
2. Enter the related information for the new contact.
3. Tap Save to save the new contact.
Editing contact information
1. In the Contacts control pad, tap the contact you wish to edit.
2. Tap Edit.
3. Enter the new information for the contact.
4. Tap Save to save the new contact.
28
Navigating to a contacts address
1. In the Contacts control pad, tap the contact whose address you want to
navigate to.
2. Tap Navigate.
Address entries for the selected contact appears.
3. Tap the address you want to navigate to.
4. Tap Navigate.
Destinator OP plans your route. The calculated route is shown on the map
as a blue line from your current GPS position.
For more information on how to work in navigation mode, refer to the
Destinator OP Quick Starter Guide or the Destinator OP User’s Guide
(located in the Destinator OP CD).
Exporting contacts from your NAV 350
1. Insert an SD or MMC storage card into the device.
Exported contact file(s) will be saved to this storage card for later access
from your computer.
2. Tap
in the Contacts control pad.
29
3. Select whether to export all contacts, or just the currently selected one.
Selected contact(s) will be exported to the SD/MMC card installed in your
device.
4. Click OK on the completion dialog box.
Use Contacts Manager to import this contact file to your computer. Refer
to the “Importing contacts from your NAV 350” section.
Importing contacts from your NAV 350:
1. Insert the SD or MMC storage card containing the contact file(s) you wish
to import into the device.
Use Contacts Manager to export contact file(s) from your computer. Refer
to the “Exporting contacts from your NAV 350” section.
2. Tap
in the Contacts control pad.
3. Tap the contact file you wish to import into your device.
4. Tap Import.
5. Click OK on the completion dialog box.
Selected contact file will be added to the Contacts list.
Deleting a contact
1. In the Contacts control pad, tap the contact you wish to delete.
30
2. Tap Delete.
3. Tap Yes to confirm the deletion.
31
Contacts Manager
Use NAV 350 Contacts Manager to manage the contact information located
on your device and on your computer. This PC program shares the same
contact database as the Contacts component of Microsoft Outlook. It only
has an import/export function; you still have to create contact entries in
Microsoft Outlook Contacts.
For more information on how to use Microsoft Outlook Contacts on your
computer, open Microsoft Outlook, press F1, type ‘Using Contacts’, then press
Enter.
For instructions on how to install Contacts Manager on your computer, go to
the “To install Contacts Manager” section.
Using Contacts Manager
Use Contacts Manager to export and import contact information between
your NAV 350 and your computer.
To open Contacts Manager:
•
Click Start > Programs > NAV 350 > Contacts Manager
The Contacts Manager main window displays.
32
Exporting contacts from your computer
1. Insert an SD or MMC storage card into the device.
Exported contact file(s) will be saved to this storage card for later access
from your device.
2. Connect the device to your computer using the bundled USB cable.
3. Open File Explorer to check that the device is now displayed as a USB
mass storage device.
4. Click Selected Only on the Contacts Manager window.
5. Click the contact(s) you want to export.
6. Click Export.
7. Select the drive name corresponding to the NAV 350.
8. Type a filename for the contact file.
9. Click OK.
Selected contacts will be exported to the SD/MMC card installed in your
device.
10. Click OK on the completion dialog box.
33
Importing contacts from your NAV 350
1. Insert the SD or MMC storage card containing the contact file(s) you wish
to import into the device.
2. Perform steps 2 through 4 of the previous section.
3. Click Import.
4. Select the drive name corresponding to the NAV 350.
5. Select the contact entries you want to import.
6. Click OK.
Contacts will now be imported to your computer.
7. Click OK on the completion dialog box.
Imported contact information will be added to your Microsoft Outlook
Contacts list and be shared with Contacts Manager.
34
ActiveSync
Use ActiveSync to synchronize the contact information located on your
NAV100 and your computer. Each time you synchronize, ActiveSync
compares the information on your device with the information on your
computer and updates both locations. This means you’ll always have the
most up-to-date contacts list wherever you are.
For instructions on how to install ActiveSync on your computer, go to the
“Installing Microsoft ActiveSync” section.
Synchronizing contacts
Follow the instructions below to synchronize contact information located on
your NAV 350 and your computer.
1. Perform steps 1 and 2 of the “Exporting contacts from your computer”
section.
2. Double-click the ActiveSync icon
on your computer’s system tray.
If the wizard does not automatically appear, launch ActiveSync on your
computer by clicking on its icon from Start, then Programs.
3. Click Options
, then the Rules tab to configure synchronization settings.
35
4. Select your preferred settings for the Conflict Resolution and File
Conversion options.
5. Click OK.
The settings you’ve selected would apply to all future contacts
synchronizations.
6. Click Sync
to start contacts synchronization.
Contact information located on the NAV 350 and the computer will now
be synchronized.
36
Multimedia mode
This chapter describes the multimedia programs bundled with your NAV 350.
The device’s multimedia programs—MP3 and Photo—are not available in navigation
mode. This is for safety reasons so as not to distract the driver’s attention from the road.
Multimedia mode overview
In addition to its navigating function, the NAV 350 is also a mobile
entertainment device that lets you enjoy the digital music and image
collection on the road. MP3 and Photo extend the device’s function to the
multimedia scene.
To enable access of multimedia files from the device, it should be located on
the SD/MMC card, not on the device’s memory. Do this either by:
•
Using the USB cable to connect the device, with the
SD/MMC card inside, to a computer, and then use File
Explorer to copy digital music and image files into the
device’s SD/MMC card folder.
•
Using a compatible card reader to directly copy digital
music and image files to the SD/MMC card.
It is advisable to organize files into subfolders. This will served as playlists and albums
when you access the files from your device.
MP3
Enjoy your favorite music on the road. The program features:
•
Support for MP3, and WAV files
•
Auto-scanning of supported files in the device’s SD/MMC
card
•
Separate volume control enabling you to adjust the
playback sound level while retaining the volume level set for
system sounds
37
Multimedia mode
•
Hot key function for volume control
•
Playlist support based on sub-directory contents
Each sub-directory containing compatible music files is treated as an
individual playlist. For a more organized file search, it is advisable to
named sub-directories based on genre or listening preferences. To
illustrate, a sub-directory containing music you listen to when traveling
can be named “Journey favorites”; or “Top alternative” for a sub-directory
consisting of your favorite alternative songs.
•
Shuffle and repeat playback functions
•
Tap
Using MP3
To open MP3:
on the Main Menu panel.
The MP3 playback pad displays.
To open files for playback:
1. Tap OPEN.
The program will automatically scan the device SD/MMC card for
supported digital files. Only sub-directories containing compatible music
files will be displayed.
2. Search for the file you want to play.
Tap
/
or use the joystick to scroll through all available files.
38
Multimedia mode s
3. Tap a file or press the joystick to start playback of the selected file.
o
When the file is located in the root directory, tap the file for playback.
o
When the file is located inside a sub-directory, tap the sub-directory
icon, then tap a file for playback.
Tap
to return to the device’s root directory.
The selected file will automatically be played. Files in the same directory
will also be played provided the Repeat function is disabled.
To control file playback:
The icons in the playback pad let you control the playback mode.
•
/
– Tap to pause or resume playback.
39
Multimedia mode
•
– Tap to stop playback.
•
– Hold and drag the slider of the progress bar to adjust
the progress of the current track.
•
– Tap to skip backward to the previous track. If the
current file is the first track in the list, the last track will be
played.
•
– Tap to skip forward to the next available track. If the
current file is the last track in the list, the first track will be
played.
You can also move the joystick left/right to skip to the previous/next track. Pressing
the joystick during file playback will revert the screen to the Main Menu panel.
To rearrange the playback sequence:
Each directory containing supported music files is considered a playlist. You
can choose to shuffle the playback sequence to play files in random order.
•
To enable the Shuffle mode, tap
.
An enabled Shuffle mode is indicated by the word ‘Random’ on the
playback display pad, and a fade-out Random icon.
•
Tapping
To disable the Shuffle mode, tap the fade-out
will automatically disable the Shuffle mode.
40
button.
Multimedia mode s
To enable/disable the Repeat mode:
The Repeat mode lets you play the current track in a loop. The same track will
be played over and over again until you disable the Repeat mode.
•
To enable the Repeat mode, tap
.
An enabled Repeat mode is indicated by the word ‘Repeat’ on the
playback display pad, and a fade-out Repeat icon.
•
Tapping
To disable the Shuffle mode, tap the fade-out
button.
will automatically disable the Repeat mode.
To control the playback volume:
To adjust the playback volume, you can use either the MP3 volume control
slider or the volume control hot keys.
•
Hold and drag the slider of the volume progress bar
This will only affect the volume of the track playback.
•
Press the volume hot keys+/- will adjust the sound level for
the device’s system sounds.
41
.
Multimedia mode
Photo
These days every mobile gaDestinator OPet seems to be equipped with a
digital camera, better for capturing that spontaneous moment. With NAV 350
you can keep these images of your favorite moments as mobile as you are
by using Photo. The program features:
•
Support for JPEG and BMP (1-, 4-, 8-, and 24-bit) files
•
Auto-scanning of supported files in the device’s SD/MMC
card.
•
Three viewing modes: Thumbnail, Full Screen, and Slide Show
•
Album support based on sub-directory contents
Each sub-directory containing compatible image files is treated as an
individual album. For a more organized file search, it is advisable to sort
image files into sub-directories based on something, such as a particular
event or a certain period. To illustrate, a sub-directory containing pictures
from your daughter’s birthday can be named “Cassie’s 10th birthday”; or
“May 11 to June 24 log” for a sub-directory consisting of pictures taken
during that period.
Using Photo
To open Photo:
•
Tap
on the Main Menu panel.
The program will automatically scan the device’s SD/MMC card for
supported image files. Image files will be displayed as thumbnails; only
sub-directories containing compatible files will be displayed.
/
or use the joystick to scroll through all available files.
Tap
When a thumbnail is selected, a red border appears around it.
42
Multimedia mode s
Viewing files in Full Screen mode
In Full Screen mode, image files can be viewed in a larger or smaller scale.
You can also change its orientation angle.
To open image files in Full Screen mode:
1. Search for the file you want to view.
Tap
/
or use the joystick to scroll through all available files.
to return to the device’s root directory.
Tap
2. Open the file in full screen mode.
o
When the file is located in the root directory, tap the file.
o
When the file is located inside a sub-directory, tap the sub-directory
icon, then tap the file you want to view.
Tap to view files in Full Screen mode
•
Tap
or move the joystick left/up to display the
previous available image file.
•
Tap
or move the joystick in a right/down direction to
display the next available image file.
43
Multimedia mode
To change the image magnification level:
•
or press the Zoom In hot key
Tap
the center of the image.
to zoom into
When in a Zoom In state, you can hold and drag the image to pan it in
any direction you want.
•
Tap
or press the Zoom Out hot key
the image display.
•
To change the image orientation:
•
Tap
to zoom out
to rotate the images 90° clockwise.
To return to Thumbnail mode:
•
Tap screen or press the joystick.
Viewing files in Slide Show mode
You have the option to view images in a slide show much like viewing a
PowerPoint presentation in your computer. Images are adjusted to fit the
entire display area and are shown in a 3-second interval.
To enable the Slide Show mode:
•
In Thumbnail mode, tap
Tap the touch screen or press the joystick to stop the slide show and return
to the previous viewing mode.
44
System configuration
This chapter describes the ways you can customize the NAV 350 by setting
user preferences.
System settings overview
You can adjust the settings of the device to suit the way. Adjusting certain
settings, such as those for system volume, power LED, and hot keys/ touch
screen backlight may increase the standby time.
To access the System panel:
•
Tap
on the Main Menu panel.
There are six preferences icon on this panel:
•
- Tap to set the volume level for system sounds and
enable tapping sound.
•
- Tap to view the battery power level and enable the
hot keys backlight.
45
System configuration
•
-Tap to set the touch screen backlight level and
enable its auto-off function.
•
- Tap to change the system date, time, and time
zone settings.
•
- Tap to set the language option for the system
menus and voice prompts.
•
- Tap to displays your device’s model name and
related technical specifications. Options for factory reset,
GPS reset, and screen recalibration are also shown.
Customizing user preferences
Volume
To set the system sounds volume level:
1. Tap
/
to adjust the volume level.
2. Tap
to apply the changes made.
46
System configuration
To enable tap sounds:
1. Tap the Enable sounds for taps check box.
2. Tap
to apply the changes made.
Power
To enable the hot keys backlight:
1. Tap the Hot keys backlight on when pressed check box.
2. Tap
/
to set the hot keys backlight’s auto-off function.
Options include backlight off after 5, 10, 15, and 20 seconds.
3. Tap
to apply the changes made.
To enable the hot keys backlight when running on AC power:
1. Tap the Hot keys backlight on when AC-in check box.
Tap Backlight
47
System configuration
To set the screen backlight level:
1. Tap
/
to adjust the screen backlight level.
2. Tap
to apply the changes made.
To set the screen backlight auto-off function:
1. Tap
/
under the Battery and AC Power settings.
Options include Never, backlight off after 10 or 15 seconds, and backlight
off after 1, 2, or 3 minutes.
2. Tap
to apply the changes made.
Date Time
Go to step 3 of the “To configure system settings” section for instructions on
how to set the system date and time.
48
System configuration
Language
49
System configuration
The NAV 350’s user interface supports five pre-loaded languages:
International English, French, German, Italian, and Spanish. Additional
language support is provided in navigation mode (i.e., when using
Destinator Destinator OP). This includes English, Italiano, Frangais, Castellano,
Deutsch, Portuguese, Nederlands, Danish, Swedish.
Go to step 2 of the “To configure system settings” section for instructions on
how to set the system language.
To load additional language options, refer to the Destinator OP User’s Guide.
When an additional language is installed and selected, it will only affect the Destinator
OP user interface. System menus and non-navigation screens (Contacts, MP3, and
Photo) will default to English.
System Info
Go to the “Troubleshooting your NAV 350” section for instructions on how to
use the three command buttons on the System Info screen.
50
System maintenance and user support
System maintenance and user support
This chapter contains information regarding system usage, maintenance,
and troubleshooting. Lists of frequently asked questions (FAQs) and user
support contact information are also provided for reference.
Using your NAV 350 safely
The precautions and instructions stated in this Guide shall be executed in the English
language. In the event of any discrepancy between the English language original
hereof and any translation hereof into any other language, the English language
original shall govern.
Driving precautions
When using the device in a vehicle, the vehicle operator is solely responsible
for operating the vehicle in a safe manner. It is your responsibility to comply
with all traffic laws. Failure to follow the directions below could result in
death or catastrophic bodily injury to you or to others.
•
Do not attempt to enter information or configure the
device while driving. If you need to do so, pull out of traffic
and come to a stop in a legally permissible and safe
location before using your device.
•
Vehicle operators must maintain full surveillance of
pertinent driving conditions at all times. Minimize the need
to view the device screen while driving and use voice
prompts to guide you.
•
Never place the device on the passenger seat or any
place else in the car where it can become a projectile
during a collision or stop.
•
An air bag inflates with great force. DO NOT mount the
device in the area over the air bag or in the air bag
deployment area.
51
System maintenance and user support
•
Although reasonable attempt has been made to ensure
that the database in your NAV 350 is accurate, such
information may change from time to time. The NAV 350
database does not include any of the following:
Legal restrictions (such as vehicular type, weight, height,
width, load and speed restrictions)
Road slope, bridge height, weight or other limits
Construction work zones or hazards; road closures, traffic
conditions
Weather conditions
Emergency events
It is your responsibility to disregard any unsafe, hazardous or illegal route
suggestions. Your judgment and common sense shall take precedence
over any information that may be received through the use of your
device.
Operating precautions
Device usage precautions
•
Do not use your device anywhere it may be exposed to
water or in conditions of high humidity.
•
Do not expose the device to extreme temperatures, which
could occur in a vehicle under direct sunlight. Such
exposure can shorten the life of the device, damage the
plastic housing and/or battery, and increase the risk of
explosion.
•
Do not subject your device to sudden and severe
temperature changes. This could result in moisture
condensation in the device that could cause damage to
the device. In the event of moisture condensation, allow
the device to dry out completely.
•
Do not leave the device unattended on an automobile
dashboard. When your vehicle is parked and the device is
not in use, protect it from theft and extreme heat by storing
it in an unobtrusive location, away from direct sunlight.
52
System maintenance and user support
•
The device is not a toy. Never allow children to play with
the device.
•
Never touch the liquid that might leak from a broken liquid
crystal display. Contact with this liquid could cause a skin
rash. If the crystal display liquid should come into contact
with the skin or clothing, wash it immediately with clean
water.
•
Never raise the sound volume level too high when using
the device with earphones. An excessive sound volume
level could cause damage to your hearing.
Car mount precautions
•
Some countries prohibit the mounting of any electronic
device in any location on the vehicle dashboard. Be sure
to check the local laws for applicable mounting before
installing the car mount.
•
Some newer vehicle models may have a heat reflective
shield embedded in the windshield. This may in some cases
obstruct the GPS signal reception. If you encounter this
problem in the vehicle, you need to purchase an external
GPS antenna.
•
The heating and cooling cycle of a vehicle's interior will in
some cases loosen the adhesion of the suction cup. Check
the vacuum seal of the car mount for adequate adhesion
each time you use the unit, and reinstall it if necessary.
•
If the car mount has problems staying on, clean the plastic
suction cup with alcohol, then reinstall. Moistening the
suction cup may help adhesion in some cases.
•
To avoid extreme temperature from damaging the car
mount, remove the unit if the temperature inside your
vehicle exceeds 70°C (160°F).
•
The dip in humidity and temperature at night may loosen
the adhesion of the suction cup. For this reason, as well as
for security, it is recommended that you remove both the
car mount kit and the NAV 350 when leaving your vehicle
overnight.
53
System maintenance and user support
Storage precautions
•
Do not store the device anywhere it may be exposed to
water or in conditions of high humidity.
•
When the device is not in use for an extended period of
time, bring it indoors and store it in some location with a
temperature range of -20° to +70°C (-40° to 140°F) .
•
Cleaning the NAV 350
•
Use a damp soft dry cloth to wipe the device’s casing (not
the display screen). Never use organic solvents such as
benzene or paint thinner to clean the device. Use of these
solvents can cause deformation or discoloration.
•
Use a soft, clean, lint-free cloth to clean the display screen.
Moistened LCD screen wipes could also be used as
required.
Troubleshooting the NAV 350
Recalibrating the screen
If while using the device, you discover tapping an item doesn’t bring up the
appropriate response, it means your device has lost its calibration.
Recalibrate the screen.
54
System maintenance and user support
To recalibrate the screen:
3. Tap
on the Main Menu panel.
4. Tap
on the System panel.
5. Tap Calibration on the System Info screen.
6. Tap the center of the black dot as it moves around the screen.
7. Tap
to apply the changes made.
Resetting the NAV 350
You may have to perform a reset if the device freezes (i.e., device no longer
responds to the buttons on the screen). A soft reset allows your device to
get a fresh start, similar to rebooting a computer. This will restart your device
and adjust memory allocation. All records and entries are retained after a
soft reset. GPS settings are also retained.
To perform a soft reset:
•
Hold the device securely, and then press the soft reset
button (1) on the bottom of the device.
1
55
System maintenance and user support
Loading the factory default settings
If you still encounter system errors even after soft resetting the device, load
the factory default settings to correct the error. These default settings have
been selected to optimize your device’s performance.
To load the factory default settings:
1. Tap
on the Main Menu panel.
2. Tap
on the System panel.
3. Tap Factory Reset on the System Info screen.
4. Tap Yes on the dialog box.
5. After the factory reset, reconfigure your device’s user preferences.
Resetting the GPS function
In the following circumstances, the TTFF (Time To Fix First) values of your NAV
350 may be longer than usual.
•
After a long period of inactivity
•
If the current GPS fix position is more than 500 km, or more
than apart 12 hours apart, from the previous position
56
System maintenance and user support
This is due to the nature of the GPS algorithm and rotational velocity
between the satellites and planet Earth, and is deemed normal. To correct
this, perform a GPS reset. This will update the GPS database, which contains
information about the GPS satellites that the unit needs to function in
navigation mode.
57
System maintenance and user support
To load the factory default settings:
1. Tap
on the Main Menu panel.
2. Tap
on the System panel.
3. Tap GPS Reset on the System Info screen.
4. Tap Yes on the dialog box.
The GPS reset process will take about a minute to complete.
FAQs
This section lists frequently-asked questions that may arise during the use of
your NAV 350, and gives easy answers and solutions to these questions.
Aspect
Audio
Touch screen
Question
Answer
Why is there no sound coming from
the device?
Why is the touch screen not
responding to my finger taps?
•
If the earphone is plugged into the device,
the speaker is automatically shut off.
Disconnect the earphone.
•
Check that the device’s volume settings is
not muted. In the System panel, tap
Volume.
The screen may have lost its calibration.
Recalibrate the screen. Go to the
“Recalibrating the screen“ section for
instructions.
58
System maintenance and user support
Language setting
Aspect
Multimedia mode
Navigation mode
System
information and
performance
Power
When I switched the language
setting to Dutch, why do I still get
an English Main Menu?
If a user selects a language that is not one of
the five pre-loaded options (International
English, French, German, Italian, and Spanish),
the new setting will only affect the Destinator
OP user interface. System menus and nonnavigation screens will default to English.
Question
Answer
Why can’t I view my picture files?
You may be trying to view an image that is not
supported by Photo. Go to the “Photo“ section
for a list of supported image formats.
Why can’t I play my music files or
view my pictures while navigating?
The device’s multimedia programs—MP3 and
Photo—are not available in navigation mode.
This is for safety reasons so as not to distract the
driver’s attention from the road.
Why is it that sometimes my device
takes longer than 5 minutes to get
a GPS fix?
If the previous GPS fix position was more than
500 km or 12 hours apart from your current
position and time, it will take significantly longer
than the standard TTFF time to get a GPS fix.
This is due to the nature of the GPS algorithm
and rotational velocity between the satellites
and planet Earth, and deemed normal and is
not the fault of your NAV 350 device.
How do I acquire a GPS fix within
standard time frame (about 1
minute in general)?
Perform a GPS reset. Go to the “Resetting the
GPS function“ section for instructions.
How do I check the OS version of
my device?
•
Perform a soft reset on the device. Go to
the “Resetting the NAV 350“ section for
instructions. The device’s OS version
appears on the bottom left corner of the
screen.
•
View the device’s OS version and other
technical specifications. In the System
panel, tap Sys Info.
How do I restore the system back to
its default factory settings?
Users can perform this task by using the Factory
Reset button on the System Info screen. Go to
the “Loading the factory default settings“
section for instructions.
Does performing a factory reset
means a GPS reset as well?
No. The Factory Reset function mainly reset the
OS settings to their default factory values; it will
not cause the GPS settings to reset.
What should I do if the system stops
functioning normally?
Perform a soft reset on the device. Go to the
“Resetting the NAV 350“ section for instructions.
I couldn’t turn on the device.
The battery power may be depleted.
Recharge the device. Go to the “Recharging
the device” section for instructions.
59
System maintenance and user support
Customer support
Technical assistance
If you encounter a problem with your NAV 350, review the following first:
•
“Troubleshooting your NAV 350” section
•
“FAQs” section
Product warranty
Refer to the NAV 350 Portable Navigator
60
System specifications
This chapter lists the features and operating specifications of the NAV 350.
Hardware features
Aspect
Description
Processor
Samsung S3C2410 266 MHz application processor
GPS chipset
SiRF Star II LP chipset with Xtrac v2 firmware
Memory
•
64 MB SDRAM for system memory (for user applications and map
storage)
•
64 MB Flash ROM onboard flash memory (for operating system and
embedded applications)
•
High-density rechargeable 2200 mAh Lithium Ion battery
Power
•
Display
Audio
o
Up to 5 straight hours of operation (backlight in 10% and GPS
locked
o
4.5 hours charging time from empty to full capacity via car
charger or AC adapter
Recharging options
o
Indoors using the AC adapter
o
On-the-road using either the car charger or the USB cable
•
Power status LED indicator
•
3.5-inch screen for a wider viewing angle
•
320 x 240 QVGA screen with 16.7M colors for a full-color display
•
200-nit LCD provides higher brightness, high contrast, and low power
consuming display
•
TMR (Transmissive with Micro Reflective) technology allows the
screen to display well-reproduced images even under bright
outdoors lighting.
•
Hardware backlight control via the power button
•
1.5W built-in speaker
•
3.5 mm stereo earphone jack on the device
63
System specifications
Aspect
Connectivity
Hardware
command
interface
Description
•
USB port
•
SD/MMC slot
•
Volume control hot keys
•
Image magnification level hot keys
•
Main Menu hot key
•
Navigation hot key
•
Multi-directional joystick
GPS specifications
Item
Description
Chipset
SiRF Star II LP with Xtrac v2 firmware
Receiver
12 parallel channel, WAAS enabled
Antenna
•
Integrated patch antenna for optimum satellite pick up at every
angle
•
Optional connection for external antenna when the vehicle’s
windshield has a heat reflective shield
Navigation
software
Map database
Destinator OP features include:
•
Destinator Address Manager
•
Favourite destination hot list
•
Destination history
•
Navigation mode support for driving, hiking, and cycling activities
•
Trip planner
NAVTEQ digital map database
64
System specifications
Item
TTFF (Time To Fix
First, typical)
Description
•
Reacquisition: 1 sec.
•
Hot start: 8 sec.
•
Warm start: 35 sec.
•
Cold start: 55 sec.
Accuracy of
position fix
(horizontal
position)
10 m for 90%
Velocity
0.1 m/s
Protocol
NMEA-0183 v3.0 supporting the following commands:
•
GGA
•
GSV
•
GGL
•
RMC
•
GSA
•
VTG
Software specifications
Item
Description
Operating
system
Microsoft Windows CE .NET 4.2
Navigation
software
Destinator OP
Item
Address book
Contacts
management
Multimedia
applications
Description
Contacts
•
Maximum capacity of 500 contact entries
•
Integrated with Destinator OP for faster navigation using address
entries as destination points
•
Contacts for managing contact information on your device
•
NAV 350 Contacts Manager for managing contact information on
your computer
•
Microsoft ActiveSync for synchronizing contact information
between your device and your computer
•
MP3 – supports MP3, WMA, and WAV formats
•
Photo – supports JPEG and BMP formats
65
System specifications
Design and ergonomics
Aspect
Description
Compact and
lightweight
•
Dimensions (L x W x H): 97.6 x 113 x 50 mm (3.8 x 4.4 x 2.0 in)
•
Weight: 300 g (10.6 oz)
User-friendly
interface
•
NAV 350
•
•
o
Hot keys with dynamic backlight feature
o
Quick launch hot keys for Main Menu and Navigation panels
o
Control hot keys for volume and image magnification levels
o
Multi-directional joystick
o
Touch sensitive screen
Car mount
o
Versatile mounting options: windshield or dashboard positioning
o
Firm grip suction cup provides a steady vibration-free support
o
Swiveling mechanism and axial rod allows for multi-angle
adjustment for optimum viewing position
Software
o
Multi-language user interface options: International English,
French, German, Italian, and Spanish
o
Additional navigation mode language support: Danish, Dutch,
Norwegian, Portuguese, and Swedish.
o
Contacts-integration with navigation function
o
System configuration based on individual user preferences
66
System specifications
Aspect
Description
Power-saving
options
•
Auto-off function for touch screen backlight
•
Auto-off function for hot keys backlight
Mobile design
•
Suction-based car mount facilitates multi-vehicle usage
•
Compact and lightweight body makes it easy for users to carry it
anywhere
•
On-the-road recharging options via the car charger and USB cable
•
Simple, out-of-the-box operation: Mount, dock, and you’re on the
go. No fussing with screws and cables.
Entertainment
function
Pre-loaded software for accessing digital music (MP3) and image files
(Photo)
Bundled
peripherals
•
Car mount
•
Cradle
•
Car charger
•
AC adaptor
•
USB cable
•
External GPS antenna
•
Screen protector
•
Protective carrying bag
Accessory
options
Environmental specifications
Aspect
Description
Temperature
Operating
Storage
0° to 45°
-10° to +60°C
Relative humidity (non-condensing)
Operating
20% to 90% RH
Non-operating
20% to 90% RH
Regulatory information
This device fully satisfies the requirements for CE marking when used in a
residential, commercial or light industrial environment.
67
Index
NAV 350
accessories, 66
cleaning, 56
design and ergonomics, 65
driving precautions, 54
environmental specifications, 66
factory default settings, 58
FAQs, 59
feature highlights, 4
fundamentals, 15
GPS specifications, 63
hardware specifications, 62
initial setup, 7
multimedia mode, 40
package contents, 7
peripherals, 66
product warranty, 61
regulatory information, 66
safety information, 53
serial number, 52
software specifications, 64
system configuration, 48
system information, 52
system tour, 1
technical assistance, 61
troubleshooting, 56
user preferences, 48
ActiveSync
creating a partnership, 21
installation requirements, 18
installing, 18
synchronization rules, 38
synchronizing contacts, 38
audio
earphone jack, cradle, 6
earphone jack, device, 3
hot keys, 2
speaker, 2
specifications, 62
system settings, 49
backlight
control button, 4
hot keys, 50
touch screen, 15
basic operations
command interface, 27
hardware interface, 15
battery
lost data warning, 26
specifications, 62
status icons, 25
viewing status, 50
bottom view, 4
car charger
parts, 6
usage, 10
car mount
ergonomics, 65
extreme temperature caution, 23
GPS signal obstruction, 8, 17
parts, 5
removing, 24
troubleshooting, 55
usage, 23
usage precautions, 55
car mount bracket
legal prohibition, 8
car mount kit
installation reminders, 8
installing, 8
parts, 5
command interface
hot keys, 27
joystick, 27
Main Menu panel, 28
touch screen, 28
Contacts
creating, 31
deleting, 34
editing, 31
68
Index
exporting, 32
importing, 33
navigating, 32
opening program, 30
overview, 30
Contacts Manager
exporting, 36
importing, 37
installation procedures, 20
opening program, 35
overview, 35
cradle
docking the device, 10
parts, 6
removing the device, 24
device release button, 6
hardware specifications, 62
driving precautions, 53
earphone jack
cradle, 6
device, 3
environmental specifications
humidity, 66
temperature, 66
ergonomics
NAV 350, 65
car mount, 65
dimensions, 65
entertainment function, 66
mobile options, 66
power-saving options, 66
software command interface, 65
weight, 65
FAQs
audio, 59
language setting, 59
multimedia mode, 60
navigation mode, 60
power, 60
system information, 60
system performance, 60
touch screen, 59
front panel, 1
Full Screen mode, 46
GPS specifications
accuracy value, 64
antenna, 63
chipset, 63
map coverage, 64
map database, 63
navigation software, 63
protocols, 64
receiver, 63
TIFF values, 64
velocity value, 64
hardware procedures
battery recharging, 25
SD/MMC slot, 15
touch screen backlight, 15
USB cable usage, 21
using the car mount, 23
hardware specifications
audio, 62
battery, 62
command interface, 63
connectivity options, 63
flash memory, 62
GPS antenna, 63
GPS chipset, 62
GPS receiver, 63
processor, 62
system memory, 62
Home panel. See Main Menu
hot keys
enabling backlight, 50
enabling backlight auto-off timer, 50
location, 2
Main Menu, 2
Navigation panel, 2
usage, 27
Volume down, 2
Volume up, 2
Zoom in, 2
Zoom out, 2
humidity
non-operating, 66
operating, 66
image files
supported formats, 45
viewing, 45
70
Index
joystick
limitation, 27, 30
location, 2
usage, 27
left panel, 3
Main Menu
hot key, 2
icons, 28
memory
flash memory, 62
system memory, 62
MP3 program
controlling playback, 42
features, 40
opening files, 41
opening program, 41
playback pad icons, 42
playback volume, 44
Repeat mode, 44
Shuffle mode, 43
supported formats, 40
multimedia mode
FAQ, 60
overview, 40
safety limitation, 40
using MP3, 40
using Photo, 45
music files
playing, 40
supported formats, 40
navigation mode
driving precautions, 53
FAQ, 60
GPS database limitations, 54
GPS reset, 58
GPS specifications, 63
operating precautions
NAV 350, 54
car mount, 55
peripherals tour
car charger, 6
car mount, 5
cradle, 6
Photo program
changing image orientation, 47
changing magnification level, 46
features, 45
Full Screen mode, 46
opening program, 45
panning images, 46
Slide Show mode, 47
Thumbnail mode, 45
power
battery level status icons, 25
button, 4
recharging via AC adapter, 26
recharging via car charger, 10
status LED indicator, 1
viewing battery status, 50
power connector
cradle, 6
device, 3
power-saving options
hot keys backlight, 50
touch screen backlight, 51
processor, 62
rear panel, 1
recharging
time, empty to full capacity, 26
via AC adapter, 26
via car charger, 10
Repeat mode, 44
right panel, 3
safety information
cleaning instructions, 56
compatible accessories, 56
driving precautions, 53
operating precautions, 54
repair, 56
storage precautions, 56
SD/MMC slot
location, 3
usage, 15
setup procedures
calibrating the device, 11
configuring preferences, 12
installing the car mount kit, 8
overview, 7
turning on the device, 11
unpacking, 7
Shuffle mode, 43
Slide Show mode, 47
soft reset
button, 4
71
Index
performing, 57
software specifications
address book, 65
contacts management, 65
multimedia, 65
navigation, 64
operating system, 64
speaker, 2
storage card
inserting into device, 16
removing from device, 16
synchronization
contacts, 38
rules, 38
system configuration
battery status, 50
date and time, 51
hot keys backlight, 50
language, 51
overview, 48
preference icons, 48
system information, 52
System panel, 48
touch screen backlight, 50
volume, 49
system date
preference icon, 49
setting, 13
system information
preference icon, 49
System Info screen, 52
system language
additional languages, 52
loading additional language support,
52
preference icon, 49
pre-loaded languages, 52
setting system default, 12
System panel
Backlight, 50
Date Time, 51
icons, 48
Language, 51
Power, 50
System Info, 52
Volume, 49
system reset
factory reset, 58
GPS reset, 58
soft reset, 57
system specifications
environmental, 66
ergonomics, 65
GPS, 63
hardware, 62
physical dimensions, 65
regulatory information, 66
software, 64
system time
preference icon, 49
setting, 13
system time zone
preference icon, 49
setting, 14
system tour
bottom view, 4
front panel, 1
left panel, 3
rear panel, 1
right panel, 3
top view, 4
temperature
operating, 66
storage, 66
Thumbnail mode, 45
top view, 4
touch screen
adjusting the viewing angle, 23
location, 2
specifications, 62
usage, 28
touch screen backlight
setting auto-off timer, 51
setting brightness level, 51
usage, 15
troubleshooting
factory reset, 58
GPS reset, 58
screen recalibration, 56
soft reset, 57
USB cable
connection, 21
USB port
location, 3
72
Index
enabling tap sound, 49
hot keys, 2
setting volume level, 49
Zoom in hot key
location, 2
use in Photo, 46
Zoom out hot key
location, 2
use in Photo, 46
usage, 21
user preferences
date and time, 51
hot keys backlight, 50
language options, 51
power, 50
System panel, 48
touch screen backlight, 50
volume, 49
volume
73