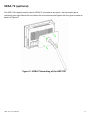
1
ADP-1121 Display Monitor
User Manual
Release Date
Revision
November 2005
May 2007
V0.1
V0.2
®2005 Aplex Technology, Inc.
All Rights Reserved.
Published in Taiwan
Aplex Technology, Inc.
9F-5, No. 2, Jian Pa Road, Chung Ho City, Taipei County, Taiwan
Tel: 886-2-82262881
Fax: 886-2-82262883
E-mail: [email protected] URL: www.aplex.com.tw
ADP-1121 User Manual
1
Warning!___________________________________
This equipment generates, uses and can radiate radio frequency energy and if not installed and
used in accordance with the instructions manual may cause interference to radio communications.
It has been tested and found to comply with the limits for a Class A computing device pursuant to
FCC Rules, which are designed to provide reasonable protection against such interference when
operated in a commercial environment. Operation of this equipment in a residential area is likely
to cause interference in which case the user at his own expense will be required to take whatever
measures may be required to correct the interference.
Electric Shock Hazard – Do not operate the workstation with its back cover removed. There are
dangerous high voltages inside.
Disclaimer
This information in this document is subject to change without notice. In no event shall Aplex Technology
Inc. be liable for damages of any kind, whether incidental or consequential, arising from either the use or
misuse of information in this document or in any related materials.
ADP-1121 User Manual
2
Table of Contents______________________
Warning!…………………………………………………………………………….……..….2
Disclaimer………………………………………………………………….…………………2
Chapter 1
Getting Started
1.1 Features………………………………………………………….…..…..…4
1.2 Specifications…………………………………………. ...……………...….4
1.3 Dimensions…………………………………...………………………….…7
1.4 Brief Description...................................................................................8
Chapter 2
OSD
2.1 Front Panel Controls………….………………………………….…..……9
2.2 OSD Controls………………………………………………………………9
2.3 Main Menu…..……………………………………………………………..10
2.4 AD Board (TB-6020) OSD Functions……………………………………12
Figures
Figure 1.1: Dimensions of ADP-1121….……………………………………..6
Figure 1.2: Front View………………………………………………………….8
Figure 1.3: Rear View…………………..……………………………………...8
Figure A: Panel-mounting…………………………………………………..13
Figure B: Rack-mounting (optional)……………………………………….13
Figure C: VESA 75-mounting………………………………………………14
Appendix
Panelmounting…..…………………………………………………………….13
Rackmounting…..……………………………………………………………..13
VESA75mounting……………………………………………………………...14
ADP-1121 User Manual
3
Chapter 1_____________________________
1.1 Features
Display:
12.1” TFT SVGA LCD
Luminance:
300 cd/m²
Front Panel Compliance:
NEMA 4/IP 65 rating
Mounting Type:
Wall-mount screw holes
Touch Screen:
Resistive (optional)
I/O Port:
VGA, DVI (optional), Composite Video and S-Video (optional)
Resolutions:
Wide-ranging resolutions from 640x480 to up to 1600x1200 with auto phase and auto position
1.2 Specifications
Display
TFT LCD:
12.1” SVGA
Luminance:
300 cd/m²
Viewing Angle:
120(H) x 95(V) degrees
ADP-1121 User Manual
4
Resolution:
800 x 600
Maximum Colors:
262K colors
Backlight Lifetime:
2 CCFL tubes (50,000 hours)
Touch Screen:
Resistive and antiglare
OSD Controls/Indicators:
Automatic screen, setup (OSD), brightness, contrast, horizontal/vertical position,
image lock, color balance, video information, power on and sync detected
OS Compatibility:
Win 95/98, XP, 2000, NT 4.0, QNX, Linux
Environment
Operating Temperature:
0~50°C (32°~122°F)
Storage Temperature:
-20~60°C (-4°~140°F)
Relative Humidity:
10~90% @40°C non-condensing, without touch screen
Vibration:
1g peak, 5~500Hz (at random)
Shock:
15G peak acceleration (11msec. duration)/operation
Front Panel Compliance:
NEMA 4/12, IP65 rated
Certifications:
CE, FCC Class A
ADP-1121 User Manual
5
Mechanical
Construction:
Steel chassis, plastic front bezel
External Power Input:
12V AC or 12~24V AC (optional)
Power Supply:
90V~240V, 50~60Hz, 1.5A (max.)
Dimensions
317(W) x 52.8(D) x 243(H) mm
Weight:
2.62kg
Mounting Type:
Panel/VESA 75
Ordering Information
ADP-1121
Option
12.1” SVGA industrial display monitor (plastic front bezel)
resistive touch screen
ADP-1121 User Manual
6
1.3 Dimensions
Figure 1.1: Dimensions of the ADP-1121
ADP-1121 User Manual
7
1.4 Brief Description of the ADP-1121
The ADP-1121 display monitor is compact and thus, it is ideal for monitoring and control applications.
It comes with an optional touch screen, making operation more convenient and faster. The front panel
of the display monitor is sealed with gasket for the NEMA 4/IP 65 compliance when it is
panel-mounted in a NEMA rated cabinet or enclosure.
Figure 1.2: Front View of ADP-1121
Figure 1.3: Rear View of ADP-1121
ADP-1121 User Manual
8
Chapter 2_____________________________
2.1 Front Panel Controls
Power switch: To turn ON or OFF the power
Shift the icon to the right side or shift it up
Shift the icon to the left side or shift it down
Menu: To enter OSD menu for related icon and item.
Auto Button: One-touch auto adjustment
2.2 OSD Controls
To make any adjustment, select the following:
1. Press
(Menu) to show the OSD menu or disable the OSD menu.
2. Select the icon that you wish to adjust with the (
/
or +/-) key in the menu.
3. Press
(Menu) and then choose the item with the (
4. Press
(Menu) and then adjust the quality with the (
ADP-1121 User Manual
or +/-) key.
/
/
or +/-) key.
9
2.3 Main Menu
In the Main menu, there are the following items:
z Color
z Image Setting
z Position
z OSD Menu
z Language
z Misc
z Exit
For Color, check out the following:
z Contrast
z Brightness
z Color Adjust
z Color Temp
z Back
For Image setting, check out the following:
z Clock
z Phase
z Gamma
z Sharpness
z Back
ADP-1121 User Manual
10
In the Position, there are the following:
z H. Position
z V. Position
z Back
In the OSD menu, there are:
z
z
z
z
OSD H. Pos.
OSD V. Pos.
OSD Timer
Back
In the Language menu, there are:
z
z
z
z
z
z
z
English
Frances
Germany
Spanish
Traditional Chinese
Simplified Chinese
Japanese
In the Misc menu, there are:
z Signal Source
Select VGA: Analogue VGA Input
Select DVI: Digital DVI-D Input
Select AV: Composite Video Input
Select SV: S-Video Video Input
z Reset
z Back
ADP-1121 User Manual
11
2.4 AD Board (TB-6020) OSD Functions
1.) Getting into Burn-in Mode
Before setting into a burn-in mode, first disconnect the AC power cord. Then press (don’t let them go)
the
buttons until the AC power cord is connected and the “RGB” appears on the top left corner
of your screen. Now it can be put into the burn-in mode for changing colors.
2.) Getting Out of Burn-in Mode
Before getting out of the burn-in mode, please first disconnect the AC power cord. Then press the
button (If not workable, press the
button and don’t let them go) until the AC power cord is
connected. Please don’t let your fingers go until the AC power cord is connected again and the
wording of “RGB” appears on the top left corner of your screen, and wait for 3 second. Under the
non-signal entry situation, if Cable Not Connected
is seen, exit is thus successfully made.
When the Burn-in Mode is Unable to Eradicate…
1.)
If the “RGB” is still on the top left corner of the screen, press
choose “Reset”, and then Yes, and press
to enter “Miscellaneous” and
. When the screen goes black, disconnect power and
repeat the above steps.
buttons
2.)
If the “RGB” is not found, disconnect the AC power cord first. Then press the
3.)
(don’t let them go) until the AC power cord is connected, and wait for 2 to 3 seconds. When
“RGB” appears, repeat the above steps.
Functions of OSD Keys
Auto Adjust
Up/Left Down/Right Power
Menu/Entry
ADP-1121 User Manual
Power Indicator
12
Appendix_____________________________
Panel Mounting
The ADP-1121 display monitor is designed to be panel-mounted as shown in Figure A. Just carefully
place the unit through the hole and tighten the given 8 screws from the rear to secure the mounting.
Figure A: Panelmounting of the ADP1121
Rack Mounting (optional)
The ADP-1121 display monitor can be rack-mounted as an option. Just carefully slide it into the rack
and tighten the given 8 screws from the front to secure the mounting as shown in Figure B.
Figure B: Rackmounting of the ADP1121
ADP-1121 User Manual
13
VESA 75 (optional)
The ADP-1121 display monitor can be VESA 75-mounted as an option. Just accurately put a
monitoring arm right behind the unit where the four holes are and tighten the four given screws as
shown in Figure C.
Figure C: VESA 75mounting of the ADP1121
ADP-1121 User Manual
14