1
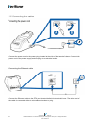
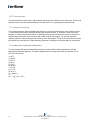
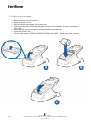
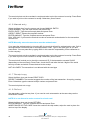
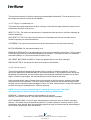
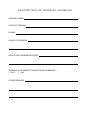
Verifone Finland Oy
1
Vantaankoskentie 14 FI-01670 VANTAA | tel: +358 (0)9 477 4330 | fax: +358 (0)9 436 2490
www.verifone.fi
Verifone Finland Oy
Vantaankoskentie 14
01670 Vantaa
www.verifone
www. verifone.fi
verifone .fi
[email protected]
Switch: 09 477 433 0
Fax: 09 436 24 90
Our opening hours on weekdays are 88-16
Sales:
09 477 433 40
[email protected]
Accessories:
09 477 433 44
[email protected]
Order processing:
09 477 433 43
[email protected]
Maintenance:
09 477 433 70
[email protected]
Customer service:
0600 01 02
0 2 03 (1,31 € / min )
weekdays: 8 – 21
Saturdays: 9 – 18
Sundays: 12 – 18
[email protected]
Invoicing / Lindorff:
02 2700 390
weekdays: 8 – 20
Saturdays:
Saturdays: 10 – 15
[email protected]
Verifone Finland Oy
2
Vantaankoskentie 14 FI-01670 VANTAA | tel: +358 (0)9 477 4330 | fax: +358 (0)9 436 2490
www.verifone.fi
INDEX:
INDEX :
1. BEFORE USE ............................................................................................................... 5
1.1 Important .................................................................................................................. 5
1.2 PA-DSS –Standard ............................................................................................... 5
1.3 Terminal structure ................................................................................................. 6
1.4 Technical data ......................................................................................................... 7
1.5 Connecting the cables ......................................................................................... 8
1.6 Touchscreen ........................................................................................................... 9
1.7 Using the menus ................................................................................................... 9
1.8 Letters and special characters .......................................................................... 9
1.9 Switching the paper ........................................................................................... 10
1.10 Testing the connection................................................................................... 11
2. SETTINGS ................................................................................................................... 11
2.1 Terminal settings ................................................................................................. 11
2.2 Parameter printing .............................................................................................. 11
2.3 Batch time ............................................................................................................. 12
2.4 Cashier number .................................................................................................. 12
2.5 Time and date settings ..................................................................................... 12
2.6 Fixed IP-address ................................................................................................. 12
2.7 Power options ...................................................................................................... 12
2.8 Contrast .................................................................................................................. 13
2.9 Sounds ................................................................................................................... 13
2.10 Audit log IP .......................................................................................................... 13
3. DOWNLOADS ............................................................................................................ 13
3.1 Downloading applications ................................................................................ 13
3.2 Parameter downloading ................................................................................... 13
4. DAILY USE .................................................................................................................. 14
4.1 Transactions ......................................................................................................... 14
4.1.1 Chip card transactions .................................................................................. 14
4.1.2 Swipe card transactions ............................................................................... 14
4.1.3 Contacless card transactions ..................................................................... 14
4.1.4 Reversal .............................................................................................................. 15
4.1.5 External reversal .............................................................................................. 15
4.1.6 Manual entry...................................................................................................... 16
Verifone Finland Oy
3
Vantaankoskentie 14 FI-01670 VANTAA | tel: +358 (0)9 477 4330 | fax: +358 (0)9 436 2490
www.verifone.fi
4.1.7 Receipt copy ..................................................................................................... 16
4.1.8 Refund ................................................................................................................ 16
4.1.9 Cash back ......................................................................................................... 17
4.2 ONLINE TRANSACTIONS ............................................................................... 17
4.2.1 General information on online transactions .......................................... 17
4.2.2 Online batch ...................................................................................................... 18
4.2.3 Verifone reporting ............................................................................................ 18
4.3 Reports and bank connection ....................................................................... 18
4.3.1 Print batch.......................................................................................................... 18
4.3.2 Monthly report ................................................................................................... 18
4.3.3 Send Batch ....................................................................................................... 19
4.3.4 Blacklist .............................................................................................................. 19
4.3.5 Report explanations ....................................................................................... 20
4.3.6 Issue report........................................................................................................ 20
4.3.7 Issue acknowledgment................................................................................. 21
4.4 Authorization notifications ................................................................................ 22
5. SPECIAL FUNCTIONS ............................................................................................ 22
5.1 Cash receipt .......................................................................................................... 24
5.2 Extra amount........................................................................................................ 24
5.3 VAT ........................................................................................................................... 25
5.4 Mandatory authorization ................................................................................... 25
5.5 Invoice ..................................................................................................................... 25
5.6 Preauthorization .................................................................................................. 26
5.7 Multiuser version.................................................................................................. 27
5.8 Product version ................................................................................................... 28
6. TROUBLE SHOOTING ........................................................................................... 31
6.1 Notifications on the screen.............................................................................. 31
6.2 Notifications on the receipt .............................................................................. 32
6.3 Other exceptions ................................................................................................. 32
6.4 Service .................................................................................................................... 33
Verifone Finland Oy
4
Vantaankoskentie 14 FI-01670 VANTAA | tel: +358 (0)9 477 4330 | fax: +358 (0)9 436 2490
www.verifone.fi
1. BEFORE USE
1.1 Important
NOTE! If these instructions are not followed and the terminal is damaged it will void the
warranty!
•
•
•
•
•
•
•
•
•
•
•
Protect the power cord and modem. If they are damaged they are not to be used anymore.
The terminal is not waterproof or dustproof, and is intended for indoor use only.
The warranty of the terminal will void if it is exposed to water or dust.
Do not use the terminal next to water or moist areas.
Do not use below 0°C degrees.
Never place anything inside the chip slot or connection ports that are not meant there. This
might seriously damage the terminal.
If the terminal is damaged contact Veri’s maintenance service. Never try to fix the terminal
by yourself.
Use only appropriate paper with the terminal’s printer. Poor quality paper can jam the
printer and create excessive paper dust.
The terminal should not be connected to the same electrical outlet as a device which is not
using an electrical transformer, or which transformer’s voltage is too high.
Never use thinner, trichloroethylene, or ketone-based solvents- they may cause
deterioration of plastic or rubber parts. Do not spray cleaners or other solutions directly onto
the keypad.
Disconnecting the power during a transaction may cause transaction data files not yet
stored in terminal memory to be lost.
1.2 PA-DSS –Standard
The purpose of the PA-DSS –standard is to help software suppliers develop, according to the PCIDSS requirements, payment solutions which do not save forbidden card information such as the
CVV2 or the PIN-code.
Companies must use solutions for card payment processing that are approved according to the
PCI-DSS –standard.
For the latest version of the Verifone PA-DSS Implementation Guide, go to
http://www.verifone.fi/manuals
Verifone Finland Oy
5
Vantaankoskentie 14 FI-01670 VANTAA | tel: +358 (0)9 477 4330 | fax: +358 (0)9 436 2490
www.verifone.fi
1.3 Terminal structure
TOUCH SCREEN
DISPLAY
NUMERIC
KEYPAD
CANCEL KEY
SWIPE READER
CLEAR KEY
CHIP READER
ENTER KEY
TERMINAL REST
PRINTER COVER
THERMAL PRINTER
POWER PLUG
Verifone Finland Oy
6
Vantaankoskentie 14 FI-01670 VANTAA | tel: +358 (0)9 477 4330 | fax: +358 (0)9 436 2490
www.verifone.fi
1.4 Technical data
Processor:
400 MHz ARM11, 32-bit RISC processor
Memory:
160 MB (128 MB Flash, 32 MB SDRAM) standard,can exceed up to 500
MB.
Display:
240 x 320 pixel color TFT (QVGA)
supports up to 26 lines x 26 characters
Swipe card reader:
Triple track (tracks 1, 2, 3), high coercivity, bi-directional
Chip card reader:
ISO 7816, 1.8V 3V 5V, synchronous and asynchronous cards
EMV Approved
SAM-card readers:
3 Security Access Modules (SAMs)
Keypad:
3 x 4 numeric keypad, plus screen addressable keys can be simulated
on resistive touch screen
Peripheral ports:
Ethernet- (10/100BaseT), telco-, RS-232- and USB 2.0-ports.
Connection:
LAN
Printer:
Integrated thermal with graphics capabilities, 18 lines per second, 24 or,
32 columns. Paper roll width 57mm, diameter 40 mm.
Security:
3DES, Master/session and DUKPT key management; PED approved,
SSL, WPA
Physical:
Length 17.8 cm, width 9.8 cm, height 10.9 cm, weight 735 g
Verifone Finland Oy
7
Vantaankoskentie 14 FI-01670 VANTAA | tel: +358 (0)9 477 4330 | fax: +358 (0)9 436 2490
www.verifone.fi
1.5 Connecting the cables
Connecting the power cord
Connect the power cord to the power plug located at the side of the terminal’s base. Connect the
power cord to the power supply and the plug to an electrical outlet.
Connecting the Ethernet cable
Connect the Ethernet cable to the ETH-port located behind the terminal’s base. The other end of
the cable is connected either to a broadband modem or plug.
Verifone Finland Oy
8
Vantaankoskentie 14 FI-01670 VANTAA | tel: +358 (0)9 477 4330 | fax: +358 (0)9 436 2490
www.verifone.fi
1.6 Touchscreen
The terminal has a touchscreen, which allows selecting menus directly from the screen. Enter- and
cancel-functions can be selected directly from the screen or by pressing the particular key.
1.7 Using the menus
To see the terminal’s various settings and functions, press the desired menu icon from the screen.
To scroll inside the menu’s press the arrow keys from the screen, or numbers 1 and 3 from the
keypad. To select a particular function or setting, press its text field from the screen. A function is
selected by pressing the enter key from the screen or from the keypad. To view the previous
display, press the cancel key from the screen or from the keypad. To get to the main screen, press
the cancel key several times. When selecting Reports or Settings the terminal asks to press enter.
1.8 Letters and special characters
To insert letters and special characters press the number with the desired character until the
appropriate character appears. To switch capital letters into lower case letters, press the ”A->a”
icon from the screen.
1= Q Z .
2= A B C
3= D E F
4= G H I
5= J K L
6= M N O
7= P R S
8= T U V
9= W X Y
0= - space +
*= , ‘ “
#= ! : ; @ = & / \ % $ _
Verifone Finland Oy
9
Vantaankoskentie 14 FI-01670 VANTAA | tel: +358 (0)9 477 4330 | fax: +358 (0)9 436 2490
www.verifone.fi
1.9 Switching the paper
•
•
•
•
•
•
•
Raise the terminal from its base.
Open the printer cover.
Remove the previous paper roll from the tray.
Place the new paper roll so that the paper moves from the bottom of the roll towards the
front edge.
Leave a small amount of paper to extend outside the printer door.
Close the printer cover.
The terminal informs ”PAPER INSERTED PRESS ANY KEY”. Press any key to continue.
Verifone Finland Oy
10
Vantaankoskentie 14 FI-01670 VANTAA | tel: +358 (0)9 477 4330 | fax: +358 (0)9 436 2490
www.verifone.fi
1.10 Testing the connection
From the main display, select the Reports icon. After this, press enter and select SEND BATCH.
The screen informs DIALING. If the terminal successfully connects, the text CONNECTED appears
on screen. A white bar and the text RECEIVING are displayed on screen. The bar turns gradually
black as the batch sending progresses. The terminal downloads the blacklist and other required
card information files from the bank.
After this the terminal is ready for use.
If the blacklist is not downloaded to the terminals memory, you can test the connection by
switching on the terminal.
The screen informs BLACKLIST MISSING UPDATE THE BLACKLIST? Press Enter, and the
terminal connects to the bank and downloads the blacklist and other required card information files.
If the connection is not working, see section 6 TROUBLESHOOTING for further information.
2. SETTINGS
2.1 Terminal settings
To get to the terminals setting menu, select the Settings icon from the screen and press Enter.
Some of the listed settings are explained in later sections. The sections are marked in brackets.
From the Settings menu choose EDIT.
BATCH TIME (2.3)
CASHIER NUMBER (2.4)
TCP/IP PARAMETERS (2.6)
LANGUAGE
EXTRA AMOUNT (5.2)
CASH RECEIPT (5.1)
POWER OPTIONS (2.7)
AUTH. MANDATORY (5.4)
TIME SETTINGS (2.5)
VAT (5.3)
PREAUTHORIZATION (5.6)
SOUND (2.9)
CONTRAST (2.8)
AUDIT LOG IP (2.10)
Batch sending time
Terminal’s cashier number
DHCP / FIXED IP
Terminal’s language (FIN/SWE/ENG)
Extra amount settings
YES / NO
Terminal’s power settings
YES/ NO
Time and date settings
YES / NO
YES / NO
ON / OFF
Settings for the screen’s brightness
2.2 Parameter printing
Select the Settings menu and press Enter.
Choose PRINT and PAREMETERS.
The terminal prints out the parameters list, which shows the technical settings of the terminal. This
list is good to save.
Verifone Finland Oy
11
Vantaankoskentie 14 FI-01670 VANTAA | tel: +358 (0)9 477 4330 | fax: +358 (0)9 436 2490
www.verifone.fi
2.3 Batch time
The terminal will send the batch automatically if you have set a particular time for this function. The
sending time can be at any time. We recommend that the time is after your stores
closing time. Even hours are not recommended (e.g. 2100).
If you do not want to use the automatic sending time, set it to be at 9999. The
batch must then be sent manually.
To set the sending time, choose BATCH TIME from the EDIT menu. Type on the screen the
sending time that you want with four digits (e.g. 0315).
2.4 Cashier number
If you have in use more than one terminal, it is important to specify each terminal by their cashier
number. The cashier number is printed on every receipt so that it is easy to discover which
transaction has been done with which terminal in any problem cases.
From the EDIT menu, choose CASHIER NUMBER.
Type on the screen the cashier number that you want for the terminal with three digits (e.g. 001).
2.5 Time and date settings
Select TIME SETTINGS from the EDIT menu.
Choose ADJUST CLOCK.
Select the information you want to change, type in the new value and press Enter.
2.6 Fixed IP-address
If the terminals network uses fixed IP-addresses, they must be defined to the terminal.
Select TCP/IP PARAMETERS from the EDIT menu and choose FIXED IP.
Activate IP address = the IP-address for the terminal
Default gateway = Default gateway
SUBNET MASK = Subnet mask
2.7 Power options
Select POWER OPTIONS from the EDIT menu.
Shut down timer = Time it takes that the terminal automatically shuts down. The time is indicated in
seconds (e.g. 180 = 3 min.) The terminal does not shutdown if it is connected to the power cord. If
the sleep timer is enabled the terminal also will not shut down. If you want to disable the shut down
timer, type 0 as the value.
Verifone Finland Oy
12
Vantaankoskentie 14 FI-01670 VANTAA | tel: +358 (0)9 477 4330 | fax: +358 (0)9 436 2490
www.verifone.fi
Online bat percent = minimum battery reserve that the terminal requires to work. This is indicated
in percentage (e.g. 20).
GPRS shut down timer = the function is not used in this model.
2.8 Contrast
You can adjust the screen’s contrast from the CONTRAST-settings with the minus and plus icons.
Select the Menu icon from the screen and choose CONTRAST.
2.9 Sounds
To disable the terminal’s button sounds, select SOUND from the EDIT menu and choose OFF.
2.10 Audit log IP
With the audit log IP-function, your payment terminal sends log information to a desired IPaddress. The terminal logs include error and update information etc. from the payment terminal.
To input your desired IP-address, select the Settings icon from the screen and press enter.
Choose Edit, and select Audit log IP.
Input the IP-address; to get a dot, press 1 repeatedly until the correct character is on the display.
3. DOWNLOADS
3.1 Downloading applications
NOTE! Send the batch from the terminal before downloading.
To send the batch, select the Reports icon from the screen, press Enter and choose SEND
BATCH.
Select the Settings icon from the screen and press Enter.
Choose APP. DOWNLOAD
Select APP + PARAMS or ONLY APPLICATION
The terminal downloads the application. A white bar appears on the screen, which gradually turns
black as the download progresses.
NOTE! Parameters must be downloaded to the terminal after the application download has
ended. Guides for parameter downloading are listed below.
3.2 Parameter downloading
Select the Settings icon from the screen and press Enter.
Choose DOWNLOAD
Choose FROM LOADPOINT
Choose PHONE
Verifone Finland Oy
13
Vantaankoskentie 14 FI-01670 VANTAA | tel: +358 (0)9 477 4330 | fax: +358 (0)9 436 2490
www.verifone.fi
The terminal downloads the parameters. A white bar appears on the screen, which gradually turns
black as the download progresses. The terminal prints on the paper “SUCCESSFUL
PARAMETERS DOWNLOAD”.
NOTE! After downloading the parameters, the terminal must connect to the bank. Select
Reports from the screen, press Enter and choose SEND BATCH.
4. DAILY USE
4.1 Transactions
4.1.1 Chip card transactions
ENTER AMOUNT: Type the precise amount, including the cents, and press Enter.
INSERT/SWIPE OR PRESENT CARD: Insert the card into the chip reader, located at the front of
the terminal, with the chip side facing up.
CREDIT / DEBIT: Customer selects the payment method.
ENTER PIN: Customer types the PIN-code and presses Enter.
NOTE! You can pass the PIN-code by pressing Enter. In this case the responsibility of the
transaction is yours.
The terminal prints out the merchant’s receipt and asks to print the customer’s receipt. Press Enter
if you wish to print out the customer’s receipt. Otherwise, press Cancel.
If the PIN-code was entered, the customer does not need to sign the receipt. The terminal will
remind you to check the customer’s ID, if the transaction exceeds 50,00€ (depending on the card
used). Press Enter, check the ID and write the last 4 digits of the social security number and which
ID was checked to the receipt.
REMOVE CARD: Take the card from the chip card reader.
NOTE! The card must be in the reader during the entire transaction. Otherwise the
transaction is cancelled.
4.1.2 Swipe card transactions
ENTER AMOUNT: Type the precise amount, including the cents, and press Enter.
INSERT/SWIPE OR PRESENT CARD: Swipe the card from the magnetic reader.
CREDIT / DEBIT: Choose the payment method
The terminal prints out the merchant’s receipt and asks to print the customer’s receipt. Press Enter
if you wish to print out the customer’s receipt. Otherwise, press Cancel.
4.1.3 Contacless card transactions
ENTER AMOUNT: Type the precise amount, and press Enter.
Verifone Finland Oy
14
Vantaankoskentie 14 FI-01670 VANTAA | tel: +358 (0)9 477 4330 | fax: +358 (0)9 436 2490
www.verifone.fi
INSERT/SWIPE OR PRESENT CARD: Place the card on top of the display.
CREDIT / DEBIT: Choose the payment method
The terminal prints out the merchant’s receipt and asks to print the customer’s receipt. Press Enter
if you wish to print out the customer’s receipt. Otherwise, press Cancel.
The terminal will remind you to check the customer’s ID, if the transaction exceeds 50,00€
(depending on the card used). Press Enter, check the ID and write the last 4 digits of the social
security number and which ID was checked to the receipt.
NOTE! Contactless cards have a floor limit for contactless transactions that is defined by
the card company. When the limit is exceeded the terminal asks to insert the card into the
chip reader. In these cases the transaction is done with the chip reader.
4.1.4 Reversal
NOTE! A reversal can only be done to a transaction that is still in the terminals memory.
Press the Menu icon from the screen and choose REVERSAL.
ENTER RECEIPT NUMBER: The terminal suggests the number of the last transaction. Accept by
pressing Enter. Otherwise, type the wanted receipt number and press Enter.
The terminal informs CANCELLATION APPROVED, prints out the merchant’s receipt and asks to
print out the customer’s receipt. Press Enter if you wish to print out the customer’s receipt.
Otherwise, press Cancel.
TRANSACTION DOESN’T EXIST: The receipt number is incorrectly typed or the transaction has
been sent forward from the terminal.
4.1.5 External reversal
NOTE! External voids cannot be performed without the card that the transaction has been
made with.
With the external void you can void a transaction that has been made with another terminal. This
requires that the terminals are linked to Verifone reporting.
Select the Menu icon from the screen and choose EXTERNAL VOID
ENTER RECEIPT NUMBER: Type the transaction’s receipt number. This is found on the receipt.
INPUT SN: Enter the serial number of the terminal, in which the transaction has been made. The
serial number is located at the back side of the terminal, next to the bar code after initials S/N.
TRANSACTION TIME HHMM?: Type the time of the transaction (hours:minutes). This is found on
the receipt.
PLEASE INSERT CARD: Insert the card that the transaction has been made with into the chip
reader. The terminal connects and voids the transaction. The terminal informs CANCELLATION
APPROVED.
Verifone Finland Oy
15
Vantaankoskentie 14 FI-01670 VANTAA | tel: +358 (0)9 477 4330 | fax: +358 (0)9 436 2490
www.verifone.fi
The terminal prints out the merchant’s receipt and asks to print the customer’s receipt. Press Enter
if you wish to print out the customer’s receipt. Otherwise, press Cancel.
4.1.6 Manual entry
Select the Menu icon from the screen and choose MANUAL ENTRY
CARD NUMBER: Type the card number and press Enter
EXPIRY DATE: Type the card’s expiry date and press Enter
CREDIT / DEBIT: Choose the payment method.
ENTER AMOUNT: Type the complete amount and press Enter .
DIAL YES / NO: If you want the terminal to make an automatic authentication for the transaction
choose YES
NOTE! Manually entered transactions must be authenticated
If you pass the authentication by choosing NO, the terminal will ask for authentication code. Call to
the authorization centre and ask for an authentication code. Type in the code given to you and
press Enter. You can pass this by typing 9999. In this case the responsibility of the transaction is
on the company.
The terminal prints out the merchant’s receipt and asks to print the customer’s receipt. Press Enter
if you wish to print out the customer’s receipt. Otherwise, press Cancel.
The terminal will remind you to check the customer’s ID, if the transaction exceeds 50,00€
(depending on the card used). Press Enter, check the ID and write the last 4 digits of the social
security number and which ID was checked to the receipt.
NOT ALLOWED: The transaction is not allowed with the card type
4.1.7 Receipt copy
Select the Menu icon and choose PRINT COPY.
RECEIPT NUMBER: The terminal suggests the number of the last transaction. Accept by pressing
Enter. Otherwise, type the wanted receipt number and press Enter.
The terminal prints out a copy.
4.1.8 Refund
You can make a refund at any time. If you need to undo a transaction at the same day use the
REVERSAL instead
NOTE! It is not allowed to make a return for a bank card.
Select the Menu icon and choose RETURN
ENTER AMOUNT: Type the complete amount and press Enter
INSERT/SWIPE OR TAP CARD: Insert the card into the chip reader, swipe the card or place the
card on top of the display
Verifone Finland Oy
16
Vantaankoskentie 14 FI-01670 VANTAA | tel: +358 (0)9 477 4330 | fax: +358 (0)9 436 2490
www.verifone.fi
CREDIT / DEBIT: Choose the payment method.
The terminal prints out the merchant’s receipt and asks to print the customer’s receipt. Press Enter
if you wish to print out the customer’s receipt. Otherwise, press Cancel.
If the PIN-code was entered, the customer does not need to sign the receipt. The terminal will
remind you to check the customer’s ID, if the transaction exceeds 50,00€ (depending on the card
used). Press Enter, check the ID and write the last 4 digits of the social security number and which
ID was checked to the receipt.
Return without the card: Press the * key when the terminal asks to insert the card. The terminal
asks for the card number and expiry date. The terminal will inform NOT ALLOWED if the card does
not allow manual entry.
4.1.9 Cash back
Cash back is a function that allows customers to withdraw cash from the cash register during a
transaction. This action is possible with a credit- or debit card and always requires a transaction.
Only withdrawing cash is not possible with the cash back-function.
Press the MENU icon and select CASH BACK
PAYMENT AMOUNT: Type the sum of the transaction and press Enter.
CASH BACK AMOUNT: Type the sum of the cash withdraw and press Enter.
The terminal prints out receipts, which display separately the payment and cash back amounts.
Always check the customer’s ID during a cash back transaction.
4.2 ONLINE TRANSACTIONS
4.2.1 General information on online transactions
Online batch is a function which sends information on each payment transaction to the real-time
database of the Verifone reporting service. This is to prevent the loss of information from the
payment terminal. In connection with the next manual or automatic transaction transmission the
transactions stored in the database change status in the Verifone reporting service and will be
automatically sent to the recipient.
The option CONDITIONAL for online batches is available for terminal devices using GPRS. If an
offline transaction is made (the card is not verified), the terminal will not make an online
transmission of the transaction. When a verified transaction is carried out, the terminal makes an
online transmission of the transaction and also sends any transactions that have been queued.
NOTE! If the online batch is not activated, the transactions will be stored in the terminal’s
memory until the next batch sending. In these cases the responsibility is always the
merchant’s! It is recommended to use the online batch-function. If you wish to deactivate
this setting, please contact Verifone’s customer service.
Verifone Finland Oy
17
Vantaankoskentie 14 FI-01670 VANTAA | tel: +358 (0)9 477 4330 | fax: +358 (0)9 436 2490
www.verifone.fi
4.2.2 Online batch
Online batch settings enable you to choose the maximum sum and number of transactions in the
terminal memory. After the maximum is reached, the terminal transmits the transactions forward.
• ONLINE QUEUE AMOUNT = The maximum sum of the transactions in queue. After this amount
is reached, the terminal will send all of the transactions in queue (e.g. 2,000 euros).
• ONLINE QUEUE COUNT = The maximum number of the transactions in queue. After this
number is reached, the terminal will send all of the transactions in queue (e.g. 20).
The largest possible sum is 999999,99 €. The largest possible number is 40.
NOTE! If you wish to edit these settings, please contact Verifone’s customer service
4.2.3 Verifone reporting
Verifone reporting is a transaction collecting system by Verifone, which enables companies to
monitor their centralized money flow. The service offers a customer-specific website that makes
the centralized management possible for companies. Verifone reporting gathers transactions from
terminals into different groups determined by the customer. The transactions are sent from the
service to the customer’s bank every day. The banks payments appear in the company’s account
with the Verifone reporting group names. A group-specific reference can be determined for the
bank payments. This makes it easier for financial management programs to target specific
payments.
A customer needs only one contract to enable all their terminals to be linked to Verifone reporting.
Terminals linked to the service do not require installment of PATU-keys from the bank. The
customer-specific websites for the system are encrypted with the same method as online bank
services. The connection between a client’s web browser and Verifone reporting is encrypted
(https). Users log in to the service with three different identification information’s: username, fixed
password and a variable password from a password list.
For further information about Verifone reporting, contact Verifone’s sales department:
Tel: +358 (0)9 477 43340
E-mail: [email protected]
4.3 Reports and bank connection
4.3.1 Print batch
Select the Reports icon from the screen and press Enter.
Choose PRINT BATCH.
The terminal prints out a report of the current days transactions. Different card types are grouped
separately on the receipt. The terminal resets the report after sending the batch from the terminal.
4.3.2 Monthly report
The monthly report can also be used as a shift report. The report gathers information of the
transactions until the monthly report is reset.
Verifone Finland Oy
18
Vantaankoskentie 14 FI-01670 VANTAA | tel: +358 (0)9 477 4330 | fax: +358 (0)9 436 2490
www.verifone.fi
NOTE! The report must always be printed before being reset.
Printing the monthly report:
Select the Reports icon and press Enter.
Select MONTHLY REPORT.
Select again MONTHLY REPORT.
The terminal prints out the report.
Resetting the monthly report:
Select the Reports icon and press Enter.
Select MONTHLY REPORT.
Select RESET REPORT
The terminal resets the report.
4.3.3 Send Batch
The terminal automatically sends the batch, if you have installed a sending time to the settings.
You can also send the batch manually, for example if the automatic batch sending has not
succeeded.
NOTE! The automatic batch sending does not work, if the terminal is turned off.
Select the Reports menu from the screen and press Enter.
Choose SEND BATCH.
The terminal prints out the report and connects to Verifone reporting. The terminal sends the
transactions, retrieves the necessary files: return report, EMV keys, AID and BIN tables, and the
blacklist.
If the batch sending is ok, the terminal prints out ”BATCH SENDING OK”.
NOTE! The merchant has the duty to check that the accounting is correct with the daily
report and the return report.
4.3.4 Blacklist
The terminal updates the blacklist automatically during the batch sending. You can also download
the blacklist manually if it is missing from the terminal.
Select the Settings menu from the screen and press Enter.
Choose DOWNLOAD.
Choose FROM HOST
Choose BLACKLIST and select FULL or UPDATE.
FULL = Terminal downloads the full blacklist
UPDATE = Terminal updates the blacklist
Verifone Finland Oy
19
Vantaankoskentie 14 FI-01670 VANTAA | tel: +358 (0)9 477 4330 | fax: +358 (0)9 436 2490
www.verifone.fi
The terminal connects to Verifone reporting and downloads the blacklist. The terminal prints out to
the receipt the amount of cards on the blacklist.
4.3.5 Report explanations
The batch report lists transactions by their card type. After this the report shows the total count of
transactions and their total amount.
SENT TO TCS: The total count and amount of transactions that are sent to Verifone reporting as
online transactions
NOT SENT TO TCS: The total count and amount of transactions that have not been sent to
Verifone reporting as online transactions.
YHTEENSÄ: The total count and amount of all the transactions in the terminal’s memory.
BATCH SENDING OK: the batch sending is ok.
MAKSUPAATEPALAUTE: Acknowledgement of the previous batch by the acquirer. This is printed
if the batch has been received and forwarded by the acquirer. This does not come on weekends
and bank holidays, or if the terminal has not been in use.
AID TABLE, BIN TABLE and KEYS: These are updated if they have been changed.
KIELTOLUETTELO: this shows the amount of cards on the blacklist.
4.3.6 Issue report
The terminal sends all transactions forward from its memory to Verifone reporting. From this
service the batches are forwarded daily to the chosen acquirer. If any problems occur during the
forwarding of the batches, the terminal will print out information about the situations on an issue
report. In order to save paper, the terminal will print out 20 issues at the most.
Here are listed all the types of issues that can be printed on the issue report, and also the proper
actions that will fix the problem. The issue report will be printed from the terminal during a batch
sending until the issues are acknowledged or fixed. The term ”batch receiver” refers to the acquirer
to which the batch is forwarded from Verifone reporting.
NOTE! Once an issue is acknowledged, it cannot be in any cases sent again.
Acknowledging an issue is always the responsibility of the Merchant.
PENDING = The batch is waiting to be forwarded to its receiver
Actions = No actions required. The batch will be automatically forwarded.
OLD TRANSACTIONS = Over 20 days old transactions have been sent to Verifone reporting.
Actions = The batch can be forwarded by Verifone. Contact Verifone’s customer service. If the
transactions have already been processed through other ways, the issues can be acknowledged
from Verifone reporting or from the terminal.
Verifone Finland Oy
20
Vantaankoskentie 14 FI-01670 VANTAA | tel: +358 (0)9 477 4330 | fax: +358 (0)9 436 2490
www.verifone.fi
SENT TO BANK FAILED = Sending of the batch to the receiver has failed.
Actions = Contact the batch receiver (bank / credit card company) and check why the sending has
failed. If the batch must be sent again, it will be done by Verifone. Please contact Verifone’s
customer service. If the batch has been processed in the bank, the issue can be acknowledged
from Verifone reporting or from the terminal.
NOT SENT, CONTAINS DUPLICATES = The batch has not been sent forward because it contains
duplicate material.
Actions = Contact your own bank and check the duplicates that the batch contains. If the batch
must be sent again, it will be done by Verifone. Please contact Verifone’s customer service about
the issue. If the batch has been processed through other ways, the issue can be acknowledged
from Verifone reporting or from the terminal.
SENT TO BANK, REPORT OVERDUE = The batch has been forwarded to the receiver, but the
report has been delayed.
Actions = Contact the batch receiver and confirm that the batch has been successfully received.
Acknowledge the issues from Verifone reporting or from the terminal.
ALL REJECTED = The batch has been rejected by the receiver
Actions = Contact the batch receiver and check why the batch has been rejected. If the batch
needs to be sent again, it will be done by Verifone. Please contact Verifone’s customer service. If
the batch has already been processed through other ways, the issue can be acknowledged from
Verifone reporting or from the terminal.
PARTLY REJECTED = Part of the transactions that the batch contains have been rejected by the
receiver.
Actions = Contact the batch receiver and check why the batch has been partially rejected. When
the batch has been processed the issue can be rejected from Verifone reporting or from the
terminal.
MISMATCH IN PAYMENT = The batch sum does not match with the bank statement.
Actions =Contact your bank and acknowledge the issue from Verifone reporting or from the
terminal.
PAYMENT OVERDUE= Payment to the bank account has been delayed.
Actions = Contact your own bank and acknowledge the issues from Verifone reporting or from the
terminal.
4.3.7 Issue acknowledgment
Press the Reports icon and Enter.
Choose ISSUE REPORT
Select ACKNOWLEDGE ISSUE
ISSUE ID: Type in the four-digit number that is next to the issue and press Enter.
The terminal connects to Verifone reporting, acknowledges the issue and displays on the screen
ISSUE ACKNOWLEDGED.
If the acknowledgment fails, the screen displays COULD NOT ACKNOWLEDGE ISSUE.
NOTE! Once an issue is acknowledged, it cannot be in any cases sent again.
Acknowledging an issue is always the responsibility of the Merchant.
Verifone Finland Oy
21
Vantaankoskentie 14 FI-01670 VANTAA | tel: +358 (0)9 477 4330 | fax: +358 (0)9 436 2490
www.verifone.fi
4.4 Authorization notifications
When a transaction is declined at the authorization centre a declining code is printed on the
receipt. This code tells you the reason why it has been declined. The transaction is declined by a
notification given by the bank or the credit card company.
000-099
Accepted
000
001
002
003
005
006
card donor
007
Accepted
Check ID
Accepted for partial amount
Accepted (VIP)
Accepted, account type defined by the card donor
Accepted for partial amount, account type defined by the
100-199
Declined, card removal not needed
100
101
102
103
104
105
106
107
108
manual authorization
109
110
111
112
113
114
115
116
117
118
119
120
121
122
123
124
125
126
127
128
129
Declined
Card is no longer valid
Suspected card counterfeit
Cashier, call recipient
Limited card
Cashier, call recipients’ security department
Exceeds PIN-code attempts
Cashier, call the card donor
Cashier, check the card donors’ special terms, make a
Accepted, chip update
False payment recipients’ identifier
False amount
False card number
PIN-code required
Commission not accepted
False account type
Required action not supported
Not enough allowance
False PIN
Unknown card
Transaction is not allowed for card holder
Transaction is not allowed for payment terminal
Exceeds withdrawals floor limit
Security violation
Exceeds withdrawals time limit (too often)
Crown violation
Card is not valid yet
False PIN block
False PIN length
False PIN key synchronization
Suspected abuse
Verifone Finland Oy
22
Vantaankoskentie 14 FI-01670 VANTAA | tel: +358 (0)9 477 4330 | fax: +358 (0)9 436 2490
www.verifone.fi
200-299
Declined, card removal needed
200
201
202
203
204
205
206
207
208
209
210
300
306
307
400
Declined
Card expired
Suspected card counterfeit
Cashier, contact the recipient
Limited card
Cashier, contact recipients’ security department
Exceeds PIN-code attempts
Special situation
Extinct card
Stolen card
Suspected abuse
Successful
Unsuccessful
unsuccessful, form fault
Declined. Accepted revocation of authorization, try again
900-999
System error, authorization not successful
902
903
904
905
906
907
908
909
910
911
912
913
914
915
916
917
918
919
920
921
922
923
930
False transaction
Do the transaction again
Form fault, try again
Unable to route the transaction to recipient
Temporary usage brake in the card donors system
No connection to the card donor
Unable to route the message
System error
Unable to connect to the card donor
Unable to connect to the card donor
Card donor not available
Dual transaction sending
The original transaction cannot be traced
Control error, card donors’ system temporarily unavailable
MAC-error
MAC-synchronization error
Data transfer keys not available
Encryption keys’ synchronization error
Security program error, try again
Security program error, no transaction
Unknown message number
Transaction is being processed
Payment terminal error, date error
1Z3
0Y1
0Y3
1Z1
Unable to connect to authorization centre, try again
Offline accepted, no authorization
Offline accepted, unsuccessful authorization
Offline declined
Verifone Finland Oy
23
Vantaankoskentie 14 FI-01670 VANTAA | tel: +358 (0)9 477 4330 | fax: +358 (0)9 436 2490
www.verifone.fi
5. SPECIAL FUNCTIONS
5.1 Cash receipt
Cash receipt is used when a customer pays with cash and a receipt is wanted from the terminal.
Cash receipts are also seen on batch reports.
Cash receipt is activated from the EDIT menu (2.1).
Making a cash receipt sale:
Press the MENU icon
Choose CASH RECEIPT
Select CASH RECEIPT SALE
ENTER AMOUNT: Enter the complete amount and press Enter.
VAT RATE %: Select the VAT percent.
The terminal prints out the merchant’s receipt and asks to print the customer’s receipt. Press Enter
if you wish to print out the customer’s receipt. Otherwise, press Cancel.
Voiding a cash receipt sale:
Press the MENU icon
Choose CASH RECEIPT
Choose CASH RECEIPT VOID
ENTER AMOUNT: Enter the complete amount and press Enter.
The terminal prints out the merchant’s receipt and asks to print the customer’s receipt. Press Enter
if you wish to print out the customer’s receipt. Otherwise, press Cancel.
5.2 Extra amount
Extra amount is used for example in restaurants when a customer wishes to leave tip for the
waiter.
The Extra amount-function is activated from the EDIT menu (2.1).
Extra amount options:
No = Extra is not in use
Only before = Extra amount is given during the transaction
Only after = Extra amount is printed on the receipt and it is entered afterwards to the terminal
Unrestricted = The terminal asks for extra during the transaction and also prints an extra line to the
receipt
NOTE! If the card in use is a chip card you can only give the extra amount during the
transaction.
Entering the extra amount afterwards:
The receipt has an amount marked on the EXTRA part. This amount should be typed manually to
the terminal during the same day of the transaction.
Press the MENU icon and select EXTRA AMOUNT
Verifone Finland Oy
24
Vantaankoskentie 14 FI-01670 VANTAA | tel: +358 (0)9 477 4330 | fax: +358 (0)9 436 2490
www.verifone.fi
RECEIPT NUMBER: The terminal suggests the number of the last transaction. Accept by pressing
Enter. Otherwise, type the wanted receipt number and press Enter.
EXTRA: Enter the amount and press Enter.
The terminal prints out the merchant’s receipt and asks to print the customer’s receipt. Press Enter
if you wish to print out the customer’s receipt. Otherwise, press Cancel.
5.3 VAT
VAT is activated from the Settings menu (2.1).
YES = terminal asks for the rate during transactions. Select this if you are using multiple VATrates.
NO = VAT is not in use.
FIXED VAT = Terminal will not ask for the VAT-rate during transactions. Select this if you are using
a specific VAT-rate for all transactions.
When VAT is activated, the terminal prints out specified VAT-details on transaction receipts.
5.4 Mandatory authorization
Mandatory authorization is activated from the EDIT menu (2.1). When the mandatory authorization
is activated, the terminal automatically authenticates all transactions regardless of the amount or
the card type.
5.5 Invoice
The invoice works in the same way as a cash receipt, except that the text INVOICE is printed on
the receipt instead of CASH RECEIPT.
Making an invoice:
Press the MENU icon and choose INVOICE
Choose INVOICE again.
ENTER AMOUNT: Enter the complete amount and press Enter.
The terminal prints out the merchant’s receipt and asks to print the customer’s receipt. Press Enter
if you wish to print out the customer’s receipt. Otherwise, press Cancel.
Voiding an invoice:
Press the MENU icon and choose INVOICE
Choose VOID INVOICE
ENTER AMOUNT: Enter the complete amount and press Enter.
The terminal prints out the merchant’s receipt and asks to print the customer’s receipt. Press Enter
if you wish to print out the customer’s receipt. Otherwise, press Cancel.
Verifone Finland Oy
25
Vantaankoskentie 14 FI-01670 VANTAA | tel: +358 (0)9 477 4330 | fax: +358 (0)9 436 2490
www.verifone.fi
5.6 Preauthorization
Preauthorization enables to perform a provision for a credit card, which can later be charged or
reversed.
1. New preauthorization
Menu -> Preauthorization -> New pre-auth
Input the reference number if used, otherwise press enter.
Insert or swipe card
Enter amount and press enter
ENTER PIN: Customer types the PIN-code and presses Enter.
The terminal performs a provision for the credit card, prints out the merchant’s receipt and asks to
print the customer’s receipt. Press Enter if you wish to print out the customer’s receipt. Otherwise,
press Cancel.
NOTE! Preauthorizations cannot be done using contactless payment
2. Ending the preauthorization
Preauthorizations can be charged or reversed. The sum of the preauthorization can also be
changed.
Menu -> Preauthorization -> Finalize pre-auth
a) Reversal pre-auth
Insert or swipe card
The card number can be typed by pressing the * key, preauthorization ID can be typed
by pressing the # key. The preauthorization ID number is found on the receipt.
The terminal asks for the reference number if used. Input the reference number and press
enter. If the reference number is used for multiple preauthorizations, select the correct
preauthorization ID. If the preauthorization did not use a reference number, press enter.
If multiple preauthorizations have been made with the same credit card, select the correct
preauthorization ID.
The terminal performs a reversal for the preauthorization, prints out the merchant’s receipt and asks
to print the customer’s receipt. Press Enter if you wish to print out the customer’s receipt.
Otherwise, press Cancel.
b) Charge pre-auth
Insert or swipe card
The card number can be typed by pressing the * key, preauthorization ID can be typed
by pressing the # key. The preauthorization ID is found on the receipt.
The terminal asks for the reference number if used. Input the reference number and press
enter. If the reference number is used for multiple preauthorizations, select the correct
preauthorization ID. If the preauthorization did not use a reference number, press enter.
If multiple preauthorizations have been made with the same credit card, select the correct
preauthorization ID.
Verifone Finland Oy
26
Vantaankoskentie 14 FI-01670 VANTAA | tel: +358 (0)9 477 4330 | fax: +358 (0)9 436 2490
www.verifone.fi
Amount: The terminal shows the preauthorization’s amount. This can be changed by pressing the
yellow-key. Accept the amount by pressing enter.
Amount not changed: The terminal prints out the merchant’s receipt and asks to print the
customer’s receipt. Press Enter or Cancel.
Amount is greater than preauth: The terminal asks if the payment is done using the same card.
To do this, press enter. If the payment is done with multiple cards press cancel. The terminal asks
to insert or swipe card, after which the customer types the PIN-code and presses Enter.
The terminal prints out separate merchant receipts from the preauth amount and the extra amount.
The terminal asks to print the customer’s receipt. Press Enter or Cancel.
If the charge has been started by typing the reference number or preauthorization ID, the whole
amount is charged from the same credit card.
Amount is smaller than preauth: The terminal prints out separate merchant receipt’s from the
reversed and charged amounts. The terminal asks to print the customer’s receipt. Press Enter or
Cancel.
NOTE! The terminal informs “failed” if there are no preauthorizations with the card.
3. Free reference
Menu -> Preauthorization -> Free reference
If you wish to use reference numbers with preauthorizations press Enter.
When references are in use, the terminal asks to type the number during preauthorizations.
The reference number is found on preauthorization receipts at FREE REFERENCE.
You can type numbers, letters and special characters on references.
To type letters or special characters, press the selected key until the correct character appears.
To switch from upper to lower case letters, press the arrow up icon from the screen.
1= Q Z .
2= A B C
3= D E F
4= G H I
5= J K L
6= M N O
7= P R S
8= T U V
9= W X Y
0= - space +
*= , ‘ “
#= ! : ; @ = & / \ % $ _
5.7 Multiuser version
The multiuser version allows several users to take transactions with one terminal so that the
batches can be sent to various bank accounts. In order to update your terminal to this version,
Verifone Finland Oy
27
Vantaankoskentie 14 FI-01670 VANTAA | tel: +358 (0)9 477 4330 | fax: +358 (0)9 436 2490
www.verifone.fi
please contact Verifone.
Printing the user list
Press Settings, enter and choose Print.
Select Users.
The terminal prints a list of the terminal users. This list shows the user numbers, receipt texts and
merchant numbers.
Multiuser transactions
Enter amount: Type the transaction price and press enter.
User number: Type your user number and press enter.
Please insert or swipe card: Insert the chip card to the reader or swipe the card.
CREDIT / DEBIT: Choose the payment method.
ENTER PIN: Customer types the PIN-code and presses Enter.
The terminal prints out the merchant’s receipt and asks to print the customer’s receipt. Press Enter
if you wish to print out the customer’s receipt. Otherwise, press Cancel.
The terminal will remind you to check the customer’s ID, if the transaction exceeds 50,00€
(depending on the card used). Press Enter, check the ID and write the last 4 digits of the social
security number and which ID was checked to the receipt.
Multiuser reports
Daily and monthly multiuser reports are similar to normal reports, except that multiuser reports
specify every user’s transactions separately.
5.8 Product version
Product version allows you to define products for your terminal. In this version receipts print out
details of the sold products. This version can replace receipts from cash registers. In order to
update your terminal to this version, please contact Verifone.
Forming VAT-groups
Select Settings, press enter and choose Edit.
Navigate down with the arrow key and select Edit VAT group
The display shows the following:
a) Add VAT group
b) Edit VAT group
c) Remove VAT group
a) Add VAT group
VAT group: Type the groups number (0-99) and press Enter.
VAT%: Type the VAT percent and press Enter.
The display shows the group number and VAT percent. Accept this group by pressing enter;
cancel by the cancel-key.
Add next VAT: If you wish to add a new group, press enter. Otherwise press cancel.
Verifone Finland Oy
28
Vantaankoskentie 14 FI-01670 VANTAA | tel: +358 (0)9 477 4330 | fax: +358 (0)9 436 2490
www.verifone.fi
b) Edit VAT group
VAT group: Type the group number and press Enter.
VAT: Type a new VAT percent and press Enter.
The display shows the group number and VAT percent. Accept this group by pressing enter;
cancel by the cancel-key.
Edit next VAT: If you wish to edit another group, press enter. Otherwise press cancel.
c) Remove VAT group
NOTE! You cannot remove a VAT-group if products are defined to the group. The products
must be removed first in these cases.
VAT Group: Type the group number and press enter.
The terminal asks to confirm of the removal of the VAT group. To accept, press enter. Otherwise
press cancel.
Delete next VAT: If you wish to remove another group, press enter. Otherwise, press cancel.
Forming product groups
Select Settings, press enter and choose Edit.
Navigate down with the arrow key and select Edit products
The display shows the following:
a) Add product
b) Edit product
c) Remove product
a) Add product
Product id: type the products number (0-99) and press Enter.
Product name: Type the product name and press enter. To get letters, press repeatedly a number
key until the correct character is on the screen. To get a lowercase letter, press the icon on the
screen.
VAT group: Type the VAT group number and press enter.
Price: Type the price for the product, and enter. If the product does not have a fixed price, type 0.
The display shows the product name, VAT group and the price. Accept this by pressing enter;
cancel by the cancel-key.
Add next product: If you wish to add another product, press enter. Otherwise, press cancel.
b) Edit product
Product id: type the products number and press Enter.
Product name: Change the name of the product if needed and press enter.
VAT group: Change the VAT group if needed and press enter.
Price: Change the price if needed and press enter.
The display shows the product name, VAT group and the price. Accept this by pressing enter;
cancel by the cancel-key.
Edit next product: If you wish to edit another product, press enter. Otherwise, press cancel.
c) Remove product
NOTE! You cannot remove a product that is included in unsent transactions, or if you have
not sent the batch.
Verifone Finland Oy
29
Vantaankoskentie 14 FI-01670 VANTAA | tel: +358 (0)9 477 4330 | fax: +358 (0)9 436 2490
www.verifone.fi
Product id: Type the products number and press enter.
The display shows the product name, VAT group and the price. Accept the removal by pressing
enter; cancel by the cancel-key.
Delete next product: If you wish to remove another product, press enter. Otherwise, press cancel.
Product and VAT group lists
To print product or VAT group lists, press Settings, enter and choose Print.
VAT groups: select Print VAT groups
Product groups: select Print products
Product transaction
Press the *-key (below 7)
Product id: Type the products number and press enter.
Units: Type the unit amount for this product and press enter.
Price per unit: Type the price for the product and press enter. If the product has a fixed price, this
will show on the screen. This can be changed if needed.
The terminal shows the total unit amount and total price for the transaction. Press enter.
The following options are shown:
a) Cash receipt – choose this, if the customer pays in cash.
b) Make a payment? – Choose this, if the customer uses a payment card.
c) Add next product? – Choose this, if you wish to sell multiple products.
The terminal prints out the receipts.
Reversal of a product transaction
Press Menu and select cash receipt.
Choose Cash receipt void
Add products: press enter and type the product number.
Units: Type the unit amount for this product and press enter.
Price per unit: Type the price for the product and press enter. If the product has a fixed price, this
will show on the screen. This can be changed if needed.
The terminal shows the total unit amount and total price for the transaction. Press enter.
The following options are shown:
a) Make a payment? – The terminal prints out the receipt.
b) Add next product? – Choose this, if you wish to reverse multiple products.
The terminal prints out the receipts.
NOTE! If the transaction has been made with a payment card, the reversal must also be
done to the card transaction.
Product reports
Report printing:
Press Reports, enter and choose product report.
Verifone Finland Oy
30
Vantaankoskentie 14 FI-01670 VANTAA | tel: +358 (0)9 477 4330 | fax: +358 (0)9 436 2490
www.verifone.fi
Choose daily report.
The terminal prints out a report that lists the sold products, the amount of products, the total
amount of sold products and the different VAT groups of the sales.
Resetting the report:
The terminal gathers transactions to the report until it is been reset. The report can be reset at any
time.
Press Reports, enter and choose Product report.
Choose daily report and select reset report.
Choose yes.
The terminal prints out the product report and resets it.
6. TROUBLE SHOOTING
6.1 Notifications on the screen
BLACKLIST MISSING = The blacklist is missing from the terminal. See instructions for
downloading the blacklist (4.3.4).
USE MAG CARD = The terminal cannot read the card’s chip. Use the magnetic strip reader.
USE CHIP = The card has an EMV-chip. Use the chip reader.
PIN LOCKED = The pin code of the card in use has been locked. It can be unlocked
by contacting the card donor or by using the card on an atm.
APPLICATION LOCKED = The application on the card is locked. The card holder has
to contact the card donor.
JÄSENLIIKENUMERO PUUTTUU = The card is not included in the terminals card
selection. It cannot be used. The terminal also might not have the AID and BIN-tables. Send the
batch from the terminal (instructions 4.3.3).
SERVICE NOT ALLOWED FOR THIS CARD PRODUCT = The card in use is not included
in the terminals card selection. It cannot be used.
NOT ALLOWED = The card in use does not permit to make the wanted transaction. For example
manual entry with a Visa Electron is not allowed.
WRONG CARD = Check that the card in use is the correct card for the required transaction.
TRANS NOT FOUND = The transaction is not in the terminals memory, check the receipt number.
Verifone Finland Oy
31
Vantaankoskentie 14 FI-01670 VANTAA | tel: +358 (0)9 477 4330 | fax: +358 (0)9 436 2490
www.verifone.fi
MAX LIMIT EXCEEDED = The amount of the transaction exceeds the maximum limit of the card in
use.
WRONG PIN = Customer has typed the wrong PIN-code for the card.
DOWNLOAD NEEDED = The program needs to be downloaded to the terminal. Contact Verifone’s
customer service.
TAMPERING DETECTED = The terminal has suffered a knock or a power surge, which has
caused it to go into a security lock mode. The terminal must be delivered to Verifone’s
maintenance service, where the security lock can be opened. See instructions, part 6.4.
6.2 Notifications on the receipt
CONNECTION ERROR = There is a problem with the connection. See part 6.3.
BATCH SENDING ERROR = There is a problem with the connection. See part 6.3.
”PYYTÄMÄÄNNE AINEISTOA EI OLE” = The bank does not have information of the previous
batch sending ready.
”TAPAHTUMATIEDOSTO PUUTTUU” = The bank does not have information ready of the previous
batch sending.
ERROR FILE NOT EXISTENT = The bank does not have information ready of the previous batch
sending.
OTA YHTEYS NEUVONTAAN = Contact the bank.
6.3 Other exceptions
CONNECTION PROBLEM = Switch the terminal off and on and try to connect again. Check that
the Ethernet wire is properly in its place in both plugs. Check that the modem is switched on.
TERMINAL DOES NOT READ CARDS =Switch the terminal off and on and try again. The chip
card reader might also be unclean. Clean the reader with a cleansing card and try again.
POWER IS OFF = Check that the power cord is installed to the power plug on the terminal’s base.
Check that the power transformer has both power cords properly plugged in and that the signal
light is burning. Check that the wire leaving from the power transformer is properly plugged to the
electrical outlet.
Verifone Finland Oy
32
Vantaankoskentie 14 FI-01670 VANTAA | tel: +358 (0)9 477 4330 | fax: +358 (0)9 436 2490
www.verifone.fi
6.4 Service
NOTE! Do not, under any circumstances, try to fix the terminal by yourself. The terminal
should be always delivered to the maintenance service.
If you suspect that the terminal is damaged or broken, do the following:
•
•
•
•
•
Pack the terminal firmly, so that it will not be damaged during the delivery.
Attach a description of the problem and your contact information with the terminal. Attach
also a notification if there are transactions in the terminal.
You do not have to send the cables with the terminal unless you want them tested too.
Send the terminal by post. The postage is always paid by the sender.
Service address is:
Verifone Finland Oy/
Maintenance
Vantaankoskentie 14
01670 Vantaa
Verifone Finland Oy
33
Vantaankoskentie 14 FI-01670 VANTAA | tel: +358 (0)9 477 4330 | fax: +358 (0)9 436 2490
www.verifone.fi
DESCRIPTION OF TERMINAL PROBLEM
COMPANY NAME:
CONTACT PERSON:
PHONE:
CAUSE OF PROBLEM:
HOW IS THE PROBLEM NOTICED?:
TERMINAL HAS UNSENT TRANSACTIONS IN MEMORY?
[ ] YES
[ ] NO
OTHER REMARKS: