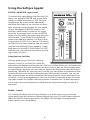
1
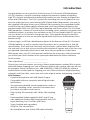
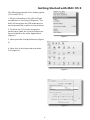
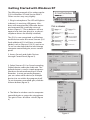
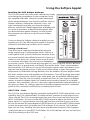
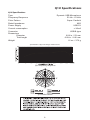
PROFESSIONAL MICROPHONES
DYNAMIC USB MICROPHONE
Contents
Introduction
1
Q1U Features
1
Installing the Q1U
2
Getting Started with MAC OS X
3
Getting Started with Windows XP
4
Using the Softpre Applet Software
5
Setting a Good Level
5
Using the Q1U Applet Software
6
Operating the Q1U
7
Powering the Q1U
7
Polar Pattern
7
Microphone Placement
7
Setting Up the Signal Level
8
P-Popping
8
Stand Mounting the Q1U
8
Q1U Specifications
9
Copyright 2005, Samson Technologies Corp.
Printed NOVEMBER, 2005 - v1
Samson Technologies Corp.
Phone: 1-800-3-SAMSON (1-800-372-6766)
Fax: 516-364-3888
www.samsontech.com
Introduction
Congratulations on your purchase of the Samson Q1U Dynamic USB Microphone.
The Q1U features a smooth sounding neodymium element, capable of handling
high SPL, cleverly interfaced to onboard high quality mic pre, Analog-to-Digital converter and USB output. The Q1U is perfect for recording your music, podcast or any
acoustic audio source on your favorite DAW (Digital Audio Workstation). Just plug in
the supplied USB cable, launch your DAW and start recording. For expanded control,
install the Samson Softpre applet software and you'll have additional features like
programmable GAIN, Low Cut Filter, Input Metering and Phase switch. The Q1U faithfully reproduces a variety of sound sources including vocals, acoustic instruments and
overhead cymbals, to name a few and because the Q1U can handle high SPL you can
use it on drums or in front of a loud guitar amp. The extended frequency and fast
transient response insures an accurate reproduction with linear characteristics from
bottom to top.
In these pages, you’ll find a detailed description of the features of the Q1U Dynamic
USB Microphone, as well as step-by-step instructions for its setup and use, and full
specifications. You’ll also find a warranty card enclosed—please don’t forget to fill it
out and mail it in so that you can receive online technical support and so we can send
you updated information about these and other Samson products in the future.
With proper care, your Q1U will operate trouble free for many years. We recommend
you record your serial number in the space provided below for future reference.
Serial number: __________________________
Date of purchase: ________________________
Should your unit ever require servicing, a Return Authorization number (RA) must be
obtained before shipping your unit to Samson. Without this number, the unit will not
be accepted. Please call Samson at 1-800-3SAMSON (1-800-372-6766) for a Return
Authorization number prior to shipping your unit. Please retain the original packing
materials and if possible, return the unit in the original carton and packing materials.
Q1U Features
• Dynamic Microphone with USB Digital Output.
• Compatible with any computer based Digital Audio
Workstation.
• The extremely detailed sound reproduction makes it
ideal for recording vocals, acoustic instruments and
just about any other sound source.
• High Quality AD convertor with 16 Bit, 48K sampling
rate.
• Downloadable Softpre applet for MAC and PC provide additional features like Programmable Gain, LED
Input Metering, Low Cut Filter, and Phase.
• Super Cardioid pick-up pattern.
• Solid Die Cast construction.
• Mic Stand Mount and 10 foot USB cable included.
1
Installing the Q1U
Installing the Q1U is a simple procedure that takes just a few minutes. Since the Q1U
is USB compliant, you can use either a MAC or PC, connect the included USB cable and
plug and play. You will be able to control your Q1U using the standard audio interface
controls in the MAC or Windows operating system. You will find detailed instructions
on setting up with MAC OS and Windows in the following sections of this manual.
For expanded control you can install the Samson Q1U Softpre applet software which
will give you programmable Gain and a digital Input Meter so you can adjust the
internal digital microphone pre-amplifier to the correct level. You can also use the Low
Cut Filter to remove unwanted low frequency rumble. There's even a Phase switch so
you can invert the signal polarity when using multiple microphones.
Since it is possible to adjust the level of the signal from the operating system preferences, and in your recording software, it's a good idea to be familiar with these controls in the MAC or Windows operating system. Therefore, we recommend that you
follow the section Getting Started with Windows XP or Getting Started with MAC OS X
before installing the Samson Softpre applet software.
IMPORTANT NOTE: The Softpre applet is not compatible with every recording software
program, so we recommend that you install the microphone on your computer without
the Softpre first. Then, please check our website for a list of programs that work with the
Softpre applet.
2
Getting Started with MAC OS X
The following example is for setting up the
Q1U in MAC OS X .
1. Plug in microphone. The LED will light
to indicate it is receiving USB power. The
MAC will recognize the USB audio device
and automatically install a universal driver.
2. To select the Q1U as the computers
audio input, open the System Preferences
from the dock or the main Apple Menu
(figure 1).
Figure 1
3. Next open the Sound preference (figure
2).
4. Now, click in the Input tab and select
Q1U (figure 3).
Figure 2
SAMSON Q1U
Figure 3
3
Getting Started with Windows XP
The following example is for setting up the
Q1U in Windows XP with Service Pack 2.
Other versions may vary slightly.
1. Plug in microphone. The LED will light to
indicate it is receiving USB power. Windows will recognize the USB audio device
and automatically install the universal
drivers (figure 1). (These balloons will not
appear next time you plug it in, as the microphone drivers are already installed.)
Figure 1
The Q1U is now recognized as a Windows
audio device under the name Samson Q1U.
Each additional Q1U will have a number
added, such as Samson Q1U (2), and so on.
To set it as the default device and change
computer-controlled gain, access control
panel.
Figure 2
2. Access Sounds and Audio Devices
through Control Panel (figure 2).
3. Select Samson Q1U as Sound recording
Default device under the Audio tab. The
default device is used in simple programs
like those for teleconferencing or Sound
Recorder. In most pro audio programs
you can select which device (or multiple
devices) to use within the program itself.
To set computer-controlled gain, click the
Volume button (figure 3).
SAMSON Q1U
Figure 3
4. The Wave In window sets the computercontrolled gain or mutes the microphone.
The gain is from –62 dB to +48 dB (figure
4).
Figure 4
4
Using the Softpre Applet
Installing the Q1U Softpre Software
The Q1U can work with most audio software by simply
connecting the microphone to your computer using
the supplied USB cable. However, to take advantage
of the advance features you should install the Samson
Softpre software. Getting the software is easy. Just
type samsontech.com into your favorite internet
browser, look for the Softpre applet link and follow the
on screen instructions to download the applet. After
you download the applet software, run the installation program and start to use the Samson Softpre
software.
Once you have the Softpre software installed you can
operate your Q1U by following the simple instructions
outlined in the following sections of this manual.
Setting a Good Level
One of the most important fundamentals of good
audio engineering is setting proper levels. Even on a
small typical mixer, or basic multi-track recorder, there
are several controls that affect the level of a signal as it
makes it’s way from your sound source to your speakers and then, ultimately, the level of your headphone
or monitor system. These include pre-amp gain, EQ, aux sends and returns, channel
fader level, bus or group levels, and finally, the master fader. That’s not to mention
the level of the 5:15 train on its way to Pennsylvania station who’s thunderous crossing horn can be picked up from 5 miles away while miking a nylon string guitar,
despite the use of double moving blankets over the windows of your project studio.
But that’s another story with another set of disciplines. Start off by being aware that
anytime you change any control in the audio path, you are probably affecting gain
somewhere. Then, be sure to carefully monitor the levels on your input and output
meters to avoid a clipped signal. You should never record any peaks in any digital
recorder. Also, remember your ear is the most sophisticated and calibrated piece of
test gear you have. So, setting a good level should be approached from a technical
point of view, and then confirmed, by a creative point of view.
INPUT GAIN – Fader
The Q1U has an onboard, digitally controlled analog INPUT GAIN stage which is controlled by the Q1U software fader. The fader control provides a range of gain from
-62 to +48 dB. The Q1U can accept levels from most any sound source by using the
INPUT GAIN fader. You can use the INPUT GAIN control to adjust the level of your
input signal. It is a good idea to start with the level low and raise it up as you need.
Be sure to monitor the input digital VU METER and try to set the INPUT GAIN control
so that the meter reads just below the CLIP indicator. If you see the CLIP indicator
light you are “Over–Loading” and the sound may become distorted. If this happens,
simply back down on the INPUT GAIN Fader. The CLIP indicator will stay red until you
clear it by clicking on the CLIP icon.
5
Using the Softpre Applet
DIGITAL VU METER - Input Level
To monitor the signal being sent from the Q1U,
there is an digital VU METER with a scale from
infinity to Digital Maximum or CLIP. The level
displayed on the meter will be affected by
the Input Gain Fader so be sure that you have
that set to the correct position for your sound
source. The digital VU METER features “VU”
ballistics, which means it reacts to the signal
based on an average level. Use the VU METER
when you are setting your input level using the
GAIN control. Try to set the level so that the
meter reads about just below CLIP but so that
it never goes to CLIP. If you see the CLIP indicator light you are “Over–Loading” and the sound
may become distorted. If this happens, simply
back down on the INPUT GAIN Fader. The CLIP
indicator will stay red until you clear it by clicking on the CLIP icon.
Using the Low Cut Filter
Like any good mic pre, the Q1U software
features a Low Cut, (or High Pass), filter for
attenuating the bottom-end frequencies. The Low Cut filter allows you to remove the
lower frequencies that you sometimes just don’t want to pick up. For example, when
you are miking a high-hat you only want to capture the frequencies that the hi-hat is
producing. Therefore, by using the Low Cut filter, you can reduce the amount of pickup from the low toms and bass drum that may leak into the hi-hat mic. You can use
the same technique on other instruments like acoustic guitar, violin, piano and even
on vocals. In live sound applications, the Low Cut filter is especially useful for removing stage rumble. The Softpre software provides a variable Low Cut filter that allows
you to adjust the exact frequency at which the low frequencies begin to roll-off, or
attenuate.
PHASE – Switch
For a variety of miking and mixing techniques, it may be necessary to invert the
signal phase from the source you have plugged into your Q1U and Softpre software.
When the PHASE switch is pressed in, the yellow LED will light showing that the
input signal is now out-of-phase.
6
Operating the Q1U
Powering the Q1U
The Q1U is a dynamic microphone, however since it has internal electronics, e.g. digitally controlled mic pre and analog-to-digital convert, the microphone requires an
active power supply. This is not a problem since the Q1U receives its power from the
USB bus. Simply connect the microphone to the computers USB port and the microphone is ready to operate. The Q1U features a power on LED, which will illuminate
when USB power is present.
Polar Pattern
The most important characteristic of any microphone is its directionality or “pick-up
pattern”. There are three basic categories of pick up patterns; omni, bi and uni-directional. Omni mics pick up sound from all directions, bi-directional (figure 8) mics pick
up the sound directly in front and back of the microphone while rejecting the sound
on the left and right sides, and uni-directional (cardioid) mics pick up the sound in
front of the microphone.
While omni and bi-directional microphones are very useful for a variety of applications, the majority of “miking” situations in recording and live sound require unidirectional or cardioid microphones. The Q1U's pick-up pattern is super-cardioid, or
uni-directional, which offers more rejection at the rear of the mic. The uni-directional
nature allows for better separation of instruments in the studio and more control over
feedback in live sound reinforcement. When positioned correctly the super-cardioid
pick-up pattern allows you to pick up more of the sound you want and less of the
sound you don’t want.
Microphone Placement
In order to maximize the sound quality, you must pay careful attention to the placement of your Q1U and how it is positioned for the instrument or vocalist that you are
miking. All microphones, especially uni-directional or cardioid microphones, exhibit a
phenomenon known as “proximity effect.” Very simply put, proximity effect is a resulting change in the frequency response of a microphone based on the position of the
mic capsule relative to the sound source. Specifically, when you point a cardioid mic
directly at the sound source (on axis) you will get the best frequency response, however when you start pointing the microphone slightly away (off axis) you will notice
the high frequency response dropping off and the microphone will start to sound
more muffled.
For most vocal applications you’ll want to position the microphone directly in front of
the artist. The same may be true for miking instruments, however, you
7
Operating the Q1U
can make some pretty amazing equalization adjustments by slightly changing the
angle of the capsule to the sound source. This can be a very useful technique in capturing the optimum sound of drum set, acoustic guitar, piano or other instruments in
a live room or sound stage. Experimentation and experience are the best teachers in
getting good sounds, so plug in!
Setting Up the Signal Level
You can adjust the Q1U's internal digitally controlled analog Input Gain stage by
using the Softpre software, or you can control the input gain by using the software
control in your computer's operating system. Some DAWS control the Q1U's analog pre amp, however some attenuate digitally, so it is better to use the Softpre or
operating system level control. Either way, the purpose of the mic trim control is to
optimize the amount of good signal to any associated noise. A good mic pre, like the
Q1U's Softpre control panel, also will have a LEVEL or CLIP indicators. To set a good
level on the mic, set the Q1U up in front of the desired sound source and slowly raise
the input trim control until you see the CLIP or Peak indicator light up. Then, turn
the input trim control down until the indicator does not light any more. For more
information on setting the Input Gain with the Q1U software, see the section "INPUT GAIN
- Fader" on page 5 in this manual.
P-Popping
P-Popping is that annoying pop that you can get when the microphone diaphragm
gets a blast of air from a vocalist pronouncing words with the letter “P” included.
There are a few ways to deal with the problem. Some famous engineers have relied
on an old nylon stocking over a bent clothes hanger, which actually works very well,
but can also smell really bad. A more clever solution is to use a external pop filter
like the Samson PS01. You can also try placing the microphone slightly off axis (on
a slight angle) from the vocalist. This can often solve the problem without using an
external pop filter. However, for a more reliable solution, try an external pop filter like
the Samson PS-01.
Stand Mounting the Q1U
The Q1U can be mounted to a standard microphone stand using the included mic
clip. If you are using a U.S. 5/8” mic stand, you will need to remove, by unscrewing,
the Euro stand adapter. Simply screw the mic clip on to your mic stand or boom
arm. If nesccesary, tighten the mic clip screw using a flat head screw driver or coin to
secure the microphone in place.
8
Q1U Specifications
Q1U Specifications
Type
Dynamic USB Microphone
Frequency Response
50 Hz - 16 kHz
Polar Pattern
Super Cardioid
Rated Impedance
90Ω
Power Supply
USB 5V
Current consumption
< 30mA
Connector
USB B-type
Dimensions
Diameter
Total length
2.09 in. / 53 mm
6.09 in. / 180 mm
Weight
12 oz. / 370 g
Specifications subject to change without notice.
Q1U Frequency Response
Q1U Polar Pattern
9
Samson Technologies Corp.
Phone: 1-800-3-SAMSON (1-800-372-6766)
Fax: 516-364-3888
www.samsontech.com