1
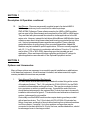
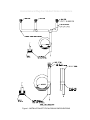
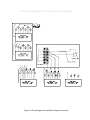
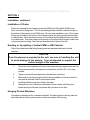
Installation & Service Manual for Horizontal Media & Plug Fan Series Collectors February 23th, 2004 Horizontal and Plug Fan Media Filtration Collectors Table of Contents Disclaimer ....................................................................................................... 3 Introduction ..................................................................................................... 4 Description & Operation ................................................................................. 4 Description & Operation continued................................................................. 5 Description & Operation continued................................................................. 6 Options and Accessories ............................................................................... 6 Options and Accessories continued .............................................................. 7 Options and Accessories continued .............................................................. 8 Installation ....................................................................................................... 8 Figure 1 - Installation of Typical Drain Configurations .................................... 9 Installation continued .................................................................................... 10 Unducted (Ambient) Installation .................................................................... 10 Installation continued .................................................................................... 11 Installation continued .................................................................................... 12 Installation continued .................................................................................... 13 Ducted Installation ........................................................................................ 13 Installation continued .................................................................................... 14 Figure 2 - Wiring Diagram Unit and Motor Voltage Connections .................. 15 Installation continued .................................................................................... 16 Installation continued .................................................................................... 17 Figure 3 - Up-Righting a Typical PMW or HM Vertical Collector ................... 17 Installation continued .................................................................................... 18 Ordering Replacement Parts ........................................................................ 19 Ordering Replacement Parts continued ....................................................... 20 Operation & Maintenance ............................................................................. 21 Maintenance continued ................................................................................. 22 Maintenance continued ................................................................................. 23 Figure 4 - Bag Replacement HM and PM Collectors.................................... 24 Troubleshooting ............................................................................................ 25 Specifications ............................................................................................... 26 Limited Warranty ........................................................................................... 27 Horizontal and Plug Fan Media Filtration Collectors Disclaimer Although instructions and recommendations are included for installation of your Horizontal and Plug Fan Media Collector equipment, the manufacturer does not assume responsibility for the installation of this equipment nor shall he be held liable for direct or consequential damages resulting from improper installation, application, maintenance or use. The immense variety of contaminants make it impossible to list all of the potential hazards that may be encountered with air pollution control systems. It is therefore important that the application of the equipment be discussed with an AER Control Systems representative or application engineer prior to use. Additionally, users should consult and comply with all National and Local Fire, Electrical and /or other appropriate codes when determining the application, location and operation of any air pollution control equipment. Collection of combustible or explosive materials and collection on flame or spark-generating operations may require specific system configurations (contact AER Control Systems LLC. Applications Engineering Department for questions and/or design assistance). The combined collection of combustible or explosive materials and contaminants from spark or flame generating operations, with a common collector or duct system, is not recommended, unless special design provisions have been made to the system (sparks or flames resulting from such operations may ignite the combustible or explosive material). Under no circumstances should anyone be allowed to discard a lighted cigarette, other burning materials, or refuse into an inlet hood or the duct of the collection system. It is the responsibility of the end user to comply with all applicable national, state, and local fire and safety codes. This manual should be read completely before attempting Operation or Maintenance of this equipment. All work should be performed by qualified personnel according to local requirements. All data and dimensions in this manual have been thoroughly checked however, we cannot assume responsibility for possible errors or omissions. We reserve the right to change designs and/or specifications without notice. WARNING Failure to comply fully with the following instructions and local code requirements may increase your risk of physical injury due to fire, explosion or electrical shock. Horizontal and Plug Fan Media Filtration Collectors SECTION 1 Introduction This manual covers four types, of AER Control Systems LLC. air cleaning equipment used to remove contaminants from the environment making the plant or facility a healthier and safer work place. This equipment has been assembled using only quality materials and has been checked for operation prior to shipment. You can identify your equipment from the prefix to the model number on the nameplate and associate it to one of the types listed. A) HMD...Horizontal with dry filters, suspended overhead B) HMW...Horizontal with wet filters, suspended overhead C) PMD...Vertical with dry filters, similar to VMD, but direct drive fan D) PMW Vertical with wet filters, similar to VMW, but direct drive fan Each machine is shipped ready for connection to the customers motor controller, unless specific controls are ordered with the air cleaner. This manual provides installation recommendations, operating and maintenance procedures, and spare and repair parts lists. Description & Operation HMD & HMW Series Machines These units are assembled from combinations of the following components depending on the particular model. Most likely, your machine will not contain all of the modules described here. The HMD series units are horizontally mounted using dry filter stages. The HMW series are horizontally mounted using wet filter stages. (See Figure 6) 1. HMM Module, Multi-Vee Air Filter Throwaway - Medium efficiency pleated filter (40-percent by ASHRAE 52-76 test method). 2. HMM3 Module, 3 Stage Multi-Vee Air Filter Throwaway - Medium efficiency pleated filter (40-percent by ASHRAE 52-76 test method). 3. HMl Module, Mist Impinger - Removes large percentage of mist droplets from air stream. 4. HMl3 Module, 3 Stage Mist Impinger - Removes large percentage of mist droplets from air stream. 5. HMD Module (3-stage horizontal dry filters) a) Pre-filter - Removes large particles and equalizes airflow across filters b) Multi-Vee Air Filter Throwaway - Medium efficiency pleated filter (40-percent by ASHRAE 52-76 test method) c) Vee-Bag Air Filter - A 95-percent efficiency collapsible borosilicate glass filter constructed in a series of V-shaped pockets providing a large amount of media surface area to allow highcapacity loading. (Efficiency is based on ASHRAE 52-76 test method). Horizontal and Plug Fan Media Filtration Collectors SECTION 1 Description & Operation continued 6. HMW Module (3-stage horizontal wet filters) a) Mist Impinger - Removes large percentage of mist droplets from air stream. b) Metal Mesh Air Filter, Washable - Medium efficiency c) Vee-Bag Air Filter - A 95-percent efficiency collapsible borosilicate glass filter constructed in a series of V-shaped pockets providing a large amount of media surface area to allow high capacity loading. (Efficiency is based on ASHRAE 52-76 test method). 7. HMH Module (2-stage) a) Pre-filter - Removes large particles and equalizes airflow across filters. (Aluminum mesh). b) HEPA Filter - High efficiency particulate air filters for smoke or toxic particulate capture. Filters have a guaranteed collection efficiency of 99. 97 percent at the 0.3-micron range (based on the DOP particle count test method). 8. HMC1 and HMC2 Modules (2-stage) There are two types for this module; HMC1 Carbon Filter-fold module - Contains a thick (45-lb) bed of activated carbon between two perforated metal walls which are formed into a continuous series of pleats. This configuration provides high air-handling capacity in small profile equipment. HMC2 Carbon Filter Tray module - Houses 12 trays of AC carbon. Each plastic tray is filled with a one-inch thick carbon bed. A total of 90-lbs of carbon is used in the single module, while 180-lbs is contained in the double - wide HMC2-60 module. Post filter - Captures particles of carbon which otherwise might be released into the blower module during initial startup. 9. HMB Module Motor/Blower - Seven blower modules with motor/horsepower and blower capacity combinations may be supplied. this module contains a belt-driven blower assembly with the motor wired to an external power connection box with a power indicator light. Horizontal and Plug Fan Media Filtration Collectors SECTION 1 Description & Operation continued 10. Inlet Plenum - Plenums are generally supplied as part of a ducted HMD & HMW and provide easy hose connection for collector pickups. PMD & PMW Collectors:These collectors employ the HMD or HMW modules and use most of the filter elements and components of the HMD or HMW series. They are fitted with plenums and floor stands in similar applications to the HM series units. However, instead of a belt-driven Motor/Blower HMB Module, these collectors use a direct-drive blower wheel and housing mounted at the top of the unit. Various horsepower/blower capacities are supplied. These collectors areinstalled either as ceiling hung or floor mounted assemblies. Added HM Modules may be installed for specific applications. PMs are normally supplied with 1/2, 1.0 or 3.0-hp motor in combination with either a 10-inch or 12- inch fan, and in either 1725 or 3450-RPM, depending upon the intended use and application. Other machines with larger capacities and higher HP ratings for special applications are referred to in the Optional Equipment section. SECTION 2 Options and Accessories Many of these options are necessary to accomplish special installations or add features to the base-line equipment. A brief overview is included, and where essential, supplementary installation instructions are provided. 1. Drain Kits and Drain Bottles (See figure 4) All PMW series vertical machines are provided with a drain fitting at the center of the plenum (bottom). The 1-1/4-inch drain kit (P/N H10024-01) for the PMW contains the hose adapter and length of hose. This may be connected to drain into a container or return to a machine sump. If possible the end of the hose should be kept submerged in the captured fluid. A drain loop trap is shown with installation instructions on figure 4. This should be used whenever a closed end system, (submerged) is not possible. Horizontally mounted HMW machines also require draining and are provided with at least two drains. The 1/2-inch drain kit (P/N H10024-02) includes four fittings, three tees, and length of hose to allow reaching from overhead machines to a floor collector, if required. Up to four modules or stages thus may be connected to the drain with this kit. End of the hose, as described above, should be submerged or an in-line trap provided. Horizontal and Plug Fan Media Filtration Collectors SECTION 2 Options and Accessories continued Many of these options are necessary to accomplish special installations or add features to the base-line equipment. A brief overview is included, and where essential, supplementary installation instructions are provided. 1. Drain Kits and Drain Bottles continued Drain bottles are optional equipment and may be connected directly to the fitting in the bottom of the machine. Two sizes are available, 32-oz. (1/2-inch adapter) and 128-oz. (1-1/4-inch adapter). 2. Sound Attenuator (for PM series) An Attenuator is added to PM series machines where noise levels must be reduced to the required ambient levels. The acoustically lined enclosure is supplied with two angle-bar supports. The supports are installed on either side, at the top of the cabinet, with two 3/8-16 X 1-inch long hex-head machine screws, washers, and lock washers. The angle bars are pre-drilled for locating the Attenuator. After attaching the supports, place the Attenuator over the plug-fan cage with the larger opening facing upward. Align the Attenuator with the support brackets and transfer the hole pattern from the support bar for drilling the Attenuator, or attach the Attenuator using self drilling sheet-metal screws applied from the opening in the support bar through the metal flange of the Attenuator. 3. Magnehelic Gauges Magnehelic gauges are standard and provided to allow visual indication and assessment of filter media condition. When installed across a particular stage of filtration, the gauge will indicate a relative pressure drop across the filters. Useful for troubleshooting system problems, gauges will also aid in establishing a periodic maintenance schedule for changing filters. Gauges are factory installed if ordered with the machine, but may be added in the field. 4. Floor Stand The floor stand for the PM or vertical mounted HM Series machines provides a rigid support foundation for the unit to work at a sufficient height to drain the plenum into a container placed under the machine, or route the drain line from this height as a gravity return. Installation instructions are covered in the procedure for Floor Mounted Equipment. Horizontal and Plug Fan Media Filtration Collectors SECTION 2 Options and Accessories continued 5. Inlet Plenum A plenum is standard equipment on PM Series units, this is a required option for wet application of HMW machines, and optional for horizontally mounted HMD machines that requires a facility for ducting. Installation of the AER Control Systems LLC. supplied plenum is described in the procedure for attaching the Plenum. 6. Portable HMW Mounted Units Portable HMW machines are arranged on a four-caster wheeled base with a contaminant collection drawer feature incorporated into the base plenum. A 10-foot pickup arm and hood assembly is standard equipment on the portable unit. No drains are provided in the plenum of the portable unit since most are used in dry collection applications. These machines are supplied with a 15-foot long power cable. Since electrical outlet configurations are so variable at the point of use, the customer must supply the connector plug. Refer to the name plate for proper selection of power requirements. SECTION 3 Installation Mechanical installation of this equipment falls into two basic applications, the HMD and HMW series are typically mounted horizontally, and the PMD and PMW are mounted vertically. The HMD and HMW can be mounted vertically, but usually a VM series collector is better suited for vertical mounting. Connection to ducting, or mounting methods is described below. Generally, the HMD (horizontal, wet) is used for dry applications and the HMW (horizontal, wet) is used for wet applications. However on wet applications, if the mist-laden air is very concentrated, only (VM Series) vertical units should be employed because of the drainage requirements. (Designed to handle concentrated volumes of mist, (VM series) vertical mist collecting machines are equipped with an aluminum mesh filter and an impinger.) In wet applications, continuous duty (three-shift operation) is not recommended because of the drainage requirement. A daily shutdown of about four hours may be required to permit the filter Vee-bags to drain sufficiently to allow proper operation or derating the unit maybe required. A drain is provided in the bottom of the unit. Optional drain kits are described in the OPTIONS SECTION. Special Vee-bags with support loops are used in (HMW series) horizontal, wet machines to prevent bag collapse which otherwise would hamper oil drainage. A plenum is used for attaching adapter collars for ducting. Horizontal and Plug Fan Media Filtration Collectors Figure 1 - INSTALLATION OF TYPICAL DRAIN CONFIGURATIONS Horizontal and Plug Fan Media Filtration Collectors SECTION 3 Installation continued HMD, Horizontal Dry Units are best employed for collecting dry contaminants, but may also be used where mist is very light. Drains are provided where light mist application may be encountered. These collectors may be used for both ducted and un-ducted applications. Horizontal units are generally used in ambient overhead applications. Unducted (Ambient) Installation Site selection considerations should include maintenance requirements such as cleaning, filter replacement, belt renewal, and lastly obtaining maximum performance from the effective placement. Following guidelines may assist you in selecting a location for the machine. a) Maximum performance can be accomplished when a good air flow pattern is maintained. Air from the unit should circle the area and re-enter the intake. When more than one unit is used, the output of each machine should be directed into the next unit. Arrange units in a race track loop 40 to 45-ft apart until the last unit is exhausting into the intake of the first unit. Units are normally suspended approximately six feet from a wall or about 10-ft directly above an area to be served. If the area is wider than 75-ft, it may be necessary to provide circulation through the center portion of the space. b) When placing the units, check existing heating and cooling air patterns. Always use these air patterns to assist the pattern for the air cleaner. CAUTION Maximum overhung load on recommended bridging is 12 inches. Always use stops to prevent bridging bars from shifting. Apply Loctite or equal to eyebolt threads. CAUTIONS 1. Horizontal assemblies of the HM Media Series machines are provided with a minimum of four lifting/suspension eyebolts or pad eyes. Always insure that lock nuts and washers are adequately tightened so that the eyebolt is not free to move. No less than four chains or cables are required. 2. Always check weight of combined unit and suspension hardware to insure that rigging equipment is adequate to lift the weight into position. 3. Verify structural integrity to insure beams or joists from which equipment will be suspended can support the additional weight. Horizontal and Plug Fan Media Filtration Collectors SECTION 3 Installation continued CAUTIONS 4. Verify that air space for the machine will not obstruct handling or rigging equipment access to the serviced area (e.g. jib cranes, bridge cranes, or high fork trucks). Attachment Requirements NOTE Mounting hardware is not included with the standard cataloged machine unless an optional installation kit has been ordered. 1. Safe working load of chain or cable shackles, eyebolts, and other rigging hardware must be 700-pound minimum. 2. Quantity of four eyebolts, 16-each nuts and washers, and 8 shackles. 3. Minimum Spreader bars for bridging ceiling I-beams or open joists must be Unistrut (or equal) 12-gage 1-5/8 X 1-5/8 inch; bar or structural steel channel bar 2-in X 5/8-in X 3/16-thick. Installation Procedure Mechanical 1. Secure chain or adequate wire-cable to building structure such as beams, trusses, or joists, by installing shackles, bridging and eyebolts, or pad eyes. Orient the opening of the eye to compliment the angle of support for the unit. 2. Raise unit to chains and fasten chains to each of the installed eyebolts. Make sure that the eyebolts are turned with their open end away from the angle of support (pull angle). Adjust chain length to level unit at each corner. Do not adjust the units eyebolt length to compensate leveling errors. Ensure all twist is removed from chain when attaching it to the unit. 3. Check that all access doors can be opened and shut without obstruction from surrounding areas. Also, remove the blower module panel and check that all motor mounting bolts are tight and belt deflection is about 1/2-inch in the center of the belt. Horizontal and Plug Fan Media Filtration Collectors SECTION 3 Installation continued Electrical All models in this series are to be installed in accordance with NEC requirements (U.S.A.) for fixed industrial machinery, (Article 670-4) except the portable wheeled units. Drive motors used in this equipment series are UL recognized and internal wiring is UL rated at 600-volts. Power line protection is required. Line load and current requirements are identified on the motor nameplate. All three-phase units require a connection from the power line to the unit. Unless ordered with the machine, the power switch for operating the machine, and any fusible disconnects, motor controller, or starter, are to be provided by the customer/user and located externally to the machine. All three-phase units are wired for the voltage specified on the order. If not specified, the machine is delivered for operation from 460-volts. 1. All connections to the unit are made at the surface mounted terminal box on top of the machine. Remove the cover by removing the two retainer screws. The cover has a gasket seal and may require a stiff pull to remove it. NOTE Motor thermal protection must be provided by the User. Thermal overloads are usually installed in the external motor contactor. Consult the contactor manufacturer for recommended size heaters for the installed horsepower. 2. A standard 7/8-inch knockout is provided in the side of the box for a cable connector. Motor connections are made at the terminal strip in the box. Observe (U.S.A.) standard color codes for three phase operation. WARNING Permanent damage to the motor will be sustained if connected to voltages other than the normal operating voltage for which the unit is pre-wired. 3. The motor is pre-wired for the voltage as labeled in the box. Observe these ratings. Verify the incoming voltage prior to connecting it to the machine (see figure 2). Horizontal and Plug Fan Media Filtration Collectors SECTION 3 Installation continued NOTE A motor starter with overload protection must be provided by the User. Thermal overload heaters are installed in the external motor starter. Consult the starter manufacturer for recommended heater size for the installed motor. 4. Verify proper rotation of the blower motor. It will be necessary to remove the blower module access panel to view the rotation. Proper rotation is marked on the blower-housing label. The blower pulley should be rotating counterclockwise when viewed from the driven (pulley) end. If opposite rotation is experienced, reverse the phase connections from the power line to the terminal strip in the connection box by interchanging any two-wire connections. Do not operate the blower for more than two minutes with the panel removed (or any of the module doors open) as over amping will occur and may trip the heater overloads or damage the motor. 5. Replace blower cabinet panel and screws. Check that all filters are in place and start the machine. A small amount of fine dust or particulate may be discharged. This is normal, as some accumulation may have occurred in the blower area during shipping and initial break-in of bag filters. Charcoal modules may initially release some small amount of the media particles. SECTION 3 Ducted Installation Either HM Series, (horizontal) or PM Series (vertical) may be equipped with direct ducting through the use of an inlet plenum. This is especially useful when the polluted air is captured at its source. Ducted HMD series (horizontal) machines should be employed only when the contaminant is dry and HMW series (horizontal) machines used when (wet) moisture is anticipated. All general guidelines and site selection will be similar to that described above. It is important to locate the unit close to the source of pollution as possible, thus eliminating excessive duct lengths. Installation of ducting should be made with good workmanship practice to insure tight joints, good drainage, and proper supports. Horizontal and Plug Fan Media Filtration Collectors SECTION 3 Installation continued Ducted Installation Procedure (Mechanical) Depending on the duct arrangement, you have selected, or AER Control Systems LLC. has recommended, the plenum will either; a) Have collars already installed to fit the ducting, or b) Collars were supplied loose and must be fitted to the plenum. c) If ducting requirements were not specified on your order, your supplied plenum will have to be adapted to the ducting of your choice. The following procedure assumes that fittings have been completely installed, with proper orientation in the plenum to match the desired duct routing. Check that the collars have been properly sealed to prevent air leaks. Attaching the Plenum NOTE The plenum is usually packed in its own protective container. Attaching hardware is either bagged or installed on the flange of the machine intake. 1. Align the hole pattern in plenum to those holes in the intake flange of the machine while the machine is in the horizontal position on its shipping skid or temporary blocking. Match-mark the flanges for assembly. 2. Apply a continuous bead of sealer (customer supplied) to the top of the plenum mounting flange, to ensure a complete air-seal. Using a helper where neces-sary, raise the plenum to the flange of the machine and secure with screws. NOTE Any recognized brand of RTV rubber adhesive sealer is recommended. However, it has been reported that some lubricants or additives have reacted with curing agents and silicone adhesives. Use of RTV or other duct sealers should be reviewed for compatibility with the product or process. Horizontal and Plug Fan Media Filtration Collectors Figure 2 - Wiring Diagram Unit and Motor Voltage Connections Horizontal and Plug Fan Media Filtration Collectors SECTION 3 Installation continued Installation of Drains Drains are required for free hanging horizontal (HMW) and Plug Media (PMW) units. Drain connection fittings are 1-1/4 inch standard pipe taper threads, located centrally, in the bottom of the plenum on the PMW units. On horizontal installations, two 1/2-inch pipe fittings are provided in the bottom of the cabinet nearest the side opposite the electrical connection box. When mounted or hung, unit should be slightly tilted so fluids may collect to the drain side. This style is easily recognized, as the doors will be hinged to side-open in the horizontal mounting. Drain kits are described in the Options Section. Erecting or Up-righting a Vertical PMW or HM Collector Sets of four fabricated steel lifting/hanging pads are packaged with each vertical machine. CAUTION Once the plenum is mounted to the unit, use care in handling the unit to avoid damage to the plenum. It is not intended to support the vertical weight of the machine. 1. Remove the two eyebolts on the top of the blower module; replace them with the lifting pads secured by flat washers, lock washers, and 3/8-16 X 1-inch long screws. 2. Tighten screws with pad upper hole extended over end of unit. 3. Block end of unit high enough off skid to allow installation of the second set of two pads at the lower holes in the blower module. 4. Install shackles through open holes in the pads. 5. Raise plenum end on blocks so that when a strain is taken to lift the motor/ blower end by the lift pads, the plenum will not bottom on the floor. Hanging Ducted Machines Procedure is the same as for un-ducted machines. Provide support for ducting near the attached collar so that the plenum does not bear the weight of the ducting. Horizontal and Plug Fan Media Filtration Collectors SECTION 3 Installation continued Figure 3 - Up-Righting a TypicalPMW or HM Vertical Collector Floor-Mounted Vertical Installation When the optional floor stand is used with a PMW or vertical HM Collector, the unit should be located as near as possible to the source of the contaminant. Installation Procedure Mechanical 1. Locate stand where desired and level the feet prior to anchoring or grouting the base. 2. Raise (or up-right) the machine and align the holes in the cabinet corners to those in the welded support pads while the unit is still suspended. 3. Insert 3/8-16 X 1-inch long screws with flat washers and lock washers at each of the four pads. Tighten securely. 4. Release all rigging and let unit settle. Check that all doors can be opened without obstruction. Replace panel. SECTION 3 Installation continued Register Adjustment Four-way adjustable louvers at the discharge end of the HM series units should be turned to accomplish the desired air flow pattern best suited for the type of installation. If multiple units are installed, adjust the louvers to direct air to the inlet of the next unit in line. If a single unit installation, adjust the louvers to direct the air away from the center in each of the four directions. This will minimize effect of air being entrained at the edges of the exhaust grille. Further improvement to single unit, or free-hanging performance may be obtained through the use of an optional accessory inlet flange. (See Options Section) Field Installation of Magnehelic Gauge 1. Install gauge by using supplied manufacturers template, or transfer the hole pattern from the back of the gauge to the side of the filter module (HM Series) end nearest the blower module. Remove the Vee-Bag, Multi-Vee, and other filter elements before drilling cabinet and remove all chips from the cabinet interior before replacing the filters 2. Insert Hose adapter fitting, and plug port on side of gauge. 3. Hose adapter for back of gauge must be cut short to avoid interference with the bag surface. Insert the modified fitting into the gauge and apply a liberal amount of RTV sealant around the exterior of the fitting. Mount the gauge while the adhesive is still wet to form a seal. Insert the mounting screws from the rear of the gauge. Tighten securely. 4. Drill hole to mount the rubber grommet for the opposite end of the hose termination. Apply sealant around end of hose and then insert into the grommet Mount hose supports and measure hose length to fit up to gauge. Cut hose and fit hose over gauge end adapter. SECTION 4 Ordering Replacement Parts Information required for prompt delivery of replacement parts will be: 1. Model and Serial Number 2. Part Number and Description Contact your local AER Control Systems LLC. distributor for replacement parts. Use either our toll free telephone number or our website www.aercontrolsystem.com to obtain the nearest AER Control Systems LLC. distributors name and telephone number. 1-866-265-2372 R e place me nt Par ts List Descrip tion Par t N u mb er HB -20/30 B low er A ssemb ly 1006-01 HB -60/90 B low er A ssemb ly 1006-02 Magn eh elic Gau ge 0-10" 1217-02 Drain Fittin g 1.25" 1086-02 Drain A ssemb ly Kit for PMW-20/30/60 H10024-01 B ottle Drain 32oz. H10023-01 B ottle Drain 128oz. H10025-01 Door Gasketin g 3/4 x 1/4 1101-02 Miscellan eou s Filters Imp in ger Cell 4 x 24 x 24 H10015-01 Fib erglass Pre-Filter 1 x 24 x 24 1034-01 6 Pack Fib erglass Pre-Filter 1 x 24 x 24 1034-02 Mu lti-Vee Filter 4 x 24 x 24 40% 1035-05 6 Pack Mu lti-Vee Filter 4 x 24 x 24 40% 1035-06 Vee-B ag Filter 21 x 24 x 24 w / Loop s 95% 1039-07 6 Pack Vee-B ag Filter 21 x 24 x 24 w /Loop s 95% 1039-10 Vee-B ag Filter 36 x 24 x 24 w /Loop s 95% 1039-01 6 Pack Vee-B ag Filter 36 x 24 x 24 w /Loop s 95% 1039-04 A lu min u m Pre-Filter 1 x 24 x 24 1034-03 6 Pack A lu min u m Pre-Filter 1 x 24 x 24 1034-04 Pleated Post Filter 1 x 24 x 24 1035-09 6 Pack Pleated Post Filter 1 x 24 x 24 1035-10 Carb on Filter Fold - 45lb s 1044-01 HEPA Filter 24 x 24 x 12 99.97% @ 3 micron s 1040-02 HEPA Filter 24 x 24 x 12 Metal Frame 99.97% @ 3 micron s 1040-05 HEPA Filter 24 x 24 x 12 95% 1040-06 HEPA Filter 24 x 24 x 12 Metal Frame 95% 1040-07 A ctivated Carb on Tray - 72lb s (7.5 lb s each tray ) 1045-02 A ctivated Carb on - 50lb B ag 1046-02 SECTION 4 Ordering Replacement Parts continued Information required for prompt delivery of replacement parts will be: 1. Model and Serial Number 2. Part Number and Description Contact your local AER Control Systems LLC. distributor for replacement parts. Use either our toll free telephone number or our website www.aercontrolsystem.com to obtain the nearest AER Control Systems LLC. distributors name and telephone number. 1-866-265-2372 R e place me nt Par ts Lis t Co ntinue d Descrip tion Par t N u mb er Miscellan eou s Motors & Electrical 2HP Motor for HM Med ia U n its 1001-14 3HP Motor for HM Med ia U n its 1001-19 5HP Motor for HM Med ia U n its 1001-24 7.5HP Motor for HM Med ia U n its 1001-27 0.5HP, 1725 RPM Motor for PM Med ia U n its 1003-02 1HP, 3450RPM Motor for PM Med ia U n its 1003-05 3HP, 3450RPM Motor for PM Med ia U n its 1003-15 Red In d icator Lamp 1205-02 2HP B low er Sh eave 1009-01 2HP & 3HP Motor Sh eave 1009-03 2HP B elt 1008-09 3HP & 5HP B low er Sh eave 1009-02 3HP B elt 1008-12 5HP Motor Sh eave 1009-10 5HP B elt 1008-11 7.5HP B low er Sh eave 1009-20 7.5HP Motor Sh eave 1009-13 7.5HP B elt 1008-24 Miscellan eou s Hoses & Clamp s 4" x 10' N eop ren e/Poly ester Flexh ose 1051-01 6" x 10' N eop ren e/Poly ester Flexh ose 1051-02 8" x 10' N eop ren e/Poly ester Flexh ose 1051-06 10" x 10' N eop ren e/Poly ester Flexh ose 1051-07 12" x 10' N eop ren e/Poly ester Flexh ose 1051-08 8" x 11' Heavy Du ty Oran ge Strip e PV C/Poly ester Flexh ose 1051-14 4" Hose Clamp 1050-01 6" Hose Clamp 1050-02 8" Hose Clamp 1050-06 SECTION 5 Operation & Maintenance This section includes periodic maintenance that generally only entails filter media replacement and interior cleaning of the machine. Troubleshooting, corrective maintenance and repair are also covered. A parts list supports the repair section and includes replacement filter OEM part numbers. NOTE: Prior to approved methods of disposal, contaminated filter elements should be inserted in heavy-duty plastic Periodic Maintenance The time interval for filter replacement will vary as it depends on the equipment application and run time. Establishment of a periodic maintenance schedule for replacement can be determined after an initial monitored usage. Not all filters will have the same replacement cycle. The filters employed are of different efficiencies to extend the useful life of the final Vee-bag by preventing premature blocking of the filter with larger size particles. Basic Vee-Bag Modules CAUTION Always DISCONNECT electrical power to the unit. Tag out controllers or contactors that may be used for automatic operation of the machine. Multi-Vee Filter Replacement 1. Open filter access door closet to the inlet of the collctor on the HMD module. Slide the 4 inch Multivee filter out of the cabinet. Place in bag and dispose. 2. Unpack new Multi-Vee Filter and inspect for damges. 3. Slide new filter into track and close filter access door. NOTE: If no other access door is next to the Vee-Bag module, it will be necessary to open the blower access panel to reach the bag support rods. This is not necessary on PM Series units SECTION 5 Maintenance continued Vee-Bag Replacement (All Units) 1. Open the access door on the Vee-bag module and the access door on the adjacent module near the blower end of the machine. 2 Locate and remove the bag support rod by reaching through the adjacent module door access and raising the rod from its retainer brackets. Slip the rod from the bag loops. See illustration. (Figure 5) 3. At the Vee-bag access door, slide the Vee-bag frame from its track, guiding the trailing bags from the cabinet. Place in plastic bag or dispose. 4. Install new Vee-bag filter with paper retainer strip in place and with side of bag pockets across door opening. 5. When filter is fully seated, remove the paper strip. 6. Reaching through the adjacent access door, fan out the bags and insert the support rod through all of the loops. When completed, replace the rod into the brackets at each end. 7. Close and secure all doors. Replace the blower module access cover panel if it was removed. Do not operate machine with any access open. 8. Restart machine. Check for normal operation. Carbon Filter Fold Module - HMC1 1. Open the access door for the carbon filter fold module. Pull module out (approximately 75 lbs). 2. Remove screws from metal top, then empty carbon into suitable container. 3. Replenish module with fresh carbon and rap module to settle carbon. 4. Replace top and put module back into unit. Carbon Trays - HMC2 1. Open the access door for the carbon tray module. Starting at top, pull out 1-in thick trays. 2. Remove flat head screw from edge of tray and slide cap back to reveal interior. 3. Empty carbon into suitable container and replenish with fresh carbon. SECTION 5 Maintenance continued Carbon Trays - HMC2 4. Rap tray to settle carbon then slide cap back into tray and replace screw with lock-tite. 5. Install trays into unit in reverse order of removal. 6. Clean post filter whenever trays are recharged. Insure it is in place prior to restarting machine to avoid AC carbon dust from escaping the unit. HEPA Filter Inspection and Replacement - HMH 1. Open the access doors, and retract the upper and lower hold-down channel bars. 2. Carefully remove the filter by prying it away from the sealing surface (toward the loosened retaining bars). 3. Inspect the filter for damage. If ripped, or visibly damaged, discard. 4. Unpack new HEPA and inspect sealing surface. Carefully slide it into the cabinet with gasket toward the metal seal edge 5. Slide back hold down channel bars securely and carefully close door watching that filter is fully mounted and door closes freely. Cleaning and Inspection of Cabinet After dirty components have been removed, inspect cabinet interior. Remove foreign material, wipe interior, and clean all filter-seating surfaces. Corrective Maintenance and Repair Corrective Maintenance Includes the replacement of components that have been determined through troubleshooting procedures to require renewal. A detailed parts list is provided for identification and reordering of these parts. Observe the method of removal and replace components exactly as installed. Always use original equipment manufacturers replacement parts to insure continued warranty coverage. Lubrication Motor is provided with sealed ball bearings. No further lubrication will be required. A small amount of light oil may be applied to the wheels and casters during routine cleaning. NOTE: If collected contaminant is dry, filter may be cleaned by turning over and rapping on sides. If filter is saturated with oil it should be replaced. Water soaked filters may be air-dried and reused. Figure 4 - Bag Replacement HM and PM Collectors Troubleshooting If after performing the above TROUBLE SHOOTING the unit fails to perform to specifications, contact your AER Control Systems Representative for further assistance. In the unlikely event local help is unavailable, contact the factory for engineering assistance. WARNING AN INDICATOR POWER LIGHT IS INCLUDED IN CONTROL BOX OF THE UNIT TO INDICATE POWER IS SUPPLIED TO THE UNIT. BEFORE WORKING ON THE UNIT, DISCONNECT POWER AT SOURCE Troub leshooting Char t Ind icator light is off and motor w on't star t. Check if overload heaters are in the star ter (customer sup p lied ), if all sw itches are ON , p ush the reset b utton on the star ter. Motor star ts w ith a w ine, and d oes not reach full sp eed . If three p hase p ow ered , stop the motor immed iately. It may b e "single p hasing" and w ill overheat, p ossib ly d amaging internal w ind ings. Check fuses and /or w ires for an interrup tion in one of the lines. The motor may b e op erating on tw o p hases only. Motor makes scrap ing of knocking noise. Check motor cooling fan and its cover it may have b een d amaged or shifted in transit and the motor fan is rub b ing. N o sucton or p ressure, or some suction b ut not as req uired . (low or no air flow ) Check and op en all d amp ers if installed . Check d ucting for b lockage if installed . Check for d ir ty or b locked filters (refer to maintenance section). Check rotation of fan. Check for loose b low er or motor sheaves, tighten if neccessary. Excess vib ration. Check structural sup p or t memb ers, tighten all b olts on legs and cross b races. Make sure entire structure is solid . Check for loose b low er or motor sheaves, tighten if neccessary. Check b elt tension and tighten if loose. Check fan b lad e for d amage, if d amaged and out of b alance return to factory for rep air. Ind icator light is off, b ut motor and b low er are op erating. Check light inp ut voltage at terminal b lock, if inp ut is p resent, neon lamp s must b e rep laced . Contaminants are b low ing through the u n i t. Check for torn b ags or d amaged HEPA . Check clamp ing b ar on HEPA , tighten if nesccesary. Check d oor seals. Specifications The specification chart below will give the important information for each module. Overall sizes, weight, filter area can be figured out by totaling module data. The dimensions are taking as if you are facing the access doors on the unit, the doors would be the front of the unit and the depth dimension is from the front to the back. The width dimension is from one side to the other side. Dimensions with the single asterisk include the bottom inlet collar plate. HM Seri es Mod u l e Pre-Fi l ter In termed i ate Fi n al /Mai n A fter-Fi l ter Wei gh t ( l b s) Di men si on s w" L" H" HMI-20/30 Imp i n ger 24x 24x 4 50 24.5 8.25 26.5 HMI-60 ( 2) Imp i n ger 24x 24x 4 97 48.5 8.25 26.5 HMI-90 ( 3) Imp i n ger 24x 24x 4 125 70.5 8.25 26.5 HMM-20/30 4" Mu l ti vee 28ft2 45 24.5 8.25 26.5 HMM-60 ( 2) 4" Mu l ti vee 56ft2 88 48.5 8.25 26.5 HMM-90 ( 3) 4" Mu l ti vee 84ft2 122 70.5 8.25 26.5 HMD-20 1" Fi b ergl ass 4ft2 4" Mu l ti vee 28ft2 Vee-B ag 74ft2 100 24.5 29.5 26.5 HMD-30 1" Fi b ergl ass 4ft2 4" Mu l ti vee 28ft2 Vee-B ag 126ft2 120 24.5 44.5 26.5 HMD-60 ( 2) 1" Fi b ergl ass 8ft2 ( 2) 4" Mu l ti vee 56ft2 ( 2) Vee-B ag 252ft2 191 48.5 44.5 26.5 HMD-90 ( 3) 1" Fi b ergl ass 12ft2 ( 3) 4" Mu l ti vee 84ft2 ( 3) Vee-B ag 378ft2 270 70.5 44.5 26.5 HMW-20 Imp i n ger 24x 24x 4 1" A l u mi n u m 4ft2 Vee-B ag 74ft2 105 24.5 29.5 26.5 HMW-30 Imp i n ger 24x 24x 4 1" A l u mi n u m 4ft2 Vee-B ag 126ft2 125 24.5 44.5 26.5 HMW-60 ( 2) Imp i n ger 24x 24x 4 ( 2) 1" A l u mi n u m 4ft2 ( 2) Vee-B ag 252ft2 205 48.5 44.5 26.5 HMW-90 ( 3) Imp i n ger 24x 24x 4 ( 3) 1" A l u mi n u m 4ft2 ( 3) Vee-B ag 378ft2 284 70.5 44.5 26.5 HMH-20/30 1" Fi b ergl ass 4ft2 24x 24x 12 HE PA 1" Fi b ergl ass 4ft2 118 24.5 20.25 26.5 210 48.5 20.25 26.5 HMH-60 ( 2) 1" Fi b ergl ass 8ft2 ( 2) 24x 24x 12 HE PA ( 2) 1" Fi b ergl ass 8ft2 HMH-90 ( 3) 1" Fi b ergl ass 12ft2 ( 3) 24x 24x 12 HE PA ( 3) 1" Fi b ergl ass 12ft2 319 70.5 20.25 26.5 Carb on 45l b s 1" Fi b ergl ass 4ft2 75 24.5 13.5 26.5 HMC1-60 Carb on 90l b s ( 2) 1" Fi b ergl ass 8ft2 161 48.5 13.5 26.5 HMC2-20/30 12 Carb on Tray s 90l b s 190 24.5 28 26.5 HMC2-60 24 Carb on Tray s 180l b s 350 48.5 28 26.5 HMC2-90 36 Carb on Tray s 270l b s 460 70.5 28 26.5 20 19.13 14 26.5 2323 HMC1-20/30 In l et Pl en u m 20/30 In l et Pl en u m 60 35 42.63 17.5 In l et Pl en u m 90 50 66 18 23 Mtr/B l w 20/30 195 24.5 29.5 26.5 Mtr/B l w 60 380 48.5 29.5 26.5 Mtr/B l w 90 420 70.5 29.5 26.5 Limited Warranty AER Control Systems LLC warrants all products sold only to purchasers for use in business or for resale, against defects in workmanship or materials under normal use, for one (1) year after the date of purchase from AER Control Systems LLC. Misapplication of the product, decomposition by reaction or chemical action and wear caused by abrasion will not constitute, or be considered as a defect. Warranty is void if the product has been subject to damage, unreasonable use, neglect, improper service, improper installation, or other causes not arising from defects in original materials or workmanship. Any part that is determined to be defective in material or workmanship and returned to an AER Control Systems LLC distributor or authorized service facility, as AER Control Systems LLC designates, shipping costs prepaid, will be, as the exclusive remedy, repaired or replaced at AER Control Systems LLCs option. AER Control Systems LLC shall not be liable for any incidental or consequential cost, expenses, or damages resulting from any failure, defect, or malfunction of this product, liability is expressly disclaimed. AER Control Systems LLCs liability in all events is limited to and will not exceed, the purchase price of the product. Title and risk of loss pass to the buyer on delivery to the common carrier. If a product is damaged in transit, the recipient MUST make note of the damage upon receipt of the product and file a claim with the carrier. AER Control Systems LLC will make a good faith effort for prompt correction or other adjustment, with respect to any product that proves to be defective within the warranty period. Collection of combustible or explosive materials and collection on flame or spark-generating operation any require specific system configurations (contact AER Control Systems LLCs Applications Engineering Department for questions and/or design assistance). The combined collection of combustible or explosive materials and contaminants from spark or flame generating operations, with a common collector or duct system, is not recommended, unless special design provisions have been made to the system (sparks or flames resulting from such operations may ignite the combustible or explosive material). Under no circumstances should anyone be allowed to discard a lighted cigarette, other burning materials, or refuse into an inlet hood or the duct of the collection system. It is the responsibility of the end user to comply with all applicable national, state, and local fire and safety codes. AER Control Systems LLCs liabiltiy for consequential and incidental damage resulting from a fire or explosion is expressly disclaimed. Installation of suitable overload protection such as a motor starter, according to NEC guidelines, is required. Failure to provide proper overload protection will void warranty coverage on electrical components in the system. (Combination motor starters with fusible disconnect packages are available through your local AER Control Systems LLC representative). To ensure optimum collector performance, always use AER Control Systems LLC replacement filters.