1
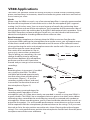
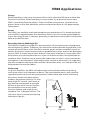
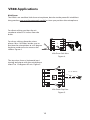
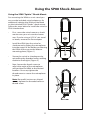
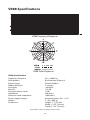
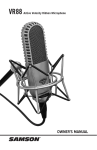
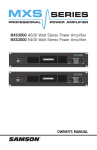
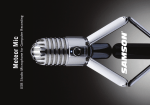
PROFESSIONAL MICROPHONES
Active Velocity Ribbon Microphone
Copyright 2007, Samson Technologies Corp.
Printed January, 2007 v1.0
Samson Technologies Corp.
45 Gilpin Avenue
Hauppauge, New York 11788-8816
Phone: 1-800-3-SAMSON (1-800-372-6766)
Fax: 631-784-2201
www.samsontech.com
Table of Contents
VR88 Proper Care and Handling. . . . . . . . . . . . . . . . . . . . . . . . . . . . 3
Introduction. . . . . . . . . . . . . . . . . . . . . . . . . . . . . . . . . . . . . . . . . . . . . . . 4
VR88 Features . . . . . . . . . . . . . . . . . . . . . . . . . . . . . . . . . . . . . . . . . . . . . 5
Operating the VR88. . . . . . . . . . . . . . . . . . . . . . . . . . . . . . . . . . . . . . . . 6
Operating the VR88. . . . . . . . . . . . . . . . . . . . . . . . . . . . . . . . . . . . . . . . 7
VR88 Applications . . . . . . . . . . . . . . . . . . . . . . . . . . . . . . . . . . . . . . . . . 8
VR88 Applications . . . . . . . . . . . . . . . . . . . . . . . . . . . . . . . . . . . . . . . . . 9
VR88 Applications . . . . . . . . . . . . . . . . . . . . . . . . . . . . . . . . . . . . . . . . 10
Using the SP88 Shock-Mount. . . . . . . . . . . . . . . . . . . . . . . . . . . . . . 11
VR88 Specifications. . . . . . . . . . . . . . . . . . . . . . . . . . . . . . . . . . . 12 - 13
VR88 Proper Care and Handling
Your new VR88 ribbon microphone is a sophisticated audio instrument and
with proper care and handling it will provide years of enjoyable and reliable
performance. Follow each point below to ensure a your microphone remains
in good condition.
•
Handle the VR88 carefully and avoid dropping the microphone.
•Always store the VR88 in its case. It’s a good idea to keep the case upright
so that the microphone is at a ninety-degree angle with the floor or
storage shelves.
•Always keep the included sock on the microphone when you’re handling
it or when it’s set up but not in use. Always cover the microphone with
the included sock when moving the microphone around the studio or
sound stage.
•Be mindful of, and protect the microphone's ribbon element from direct
blasts of air.
•Whenever possible, use a pop filter on vocals and other plosive sounds to
avoid excessive blasting on the ribbon element.
•Be sure to lower the mixer’s channel and master faders when connecting
or disconnecting the microphone, and when switching the phantom
power supply on and off.
•Be sure to use good working, high quality cables like the included
Samson Tourtek TM20L XLR mic cable.
•Keep the microphone clean and free from contact with any foreign
particles.
•
Don’t use the VR88 in close proximity of an AC motor.
•While traveling on an aircraft, never transport the VR88 in a nonpressurized luggage compartment. If possible, hand carry it on to the
plane.
•If you lend your VR88 to a friend, make sure that they are familiar with
the operation of ribbon mics and understand all of the points above.
Introduction
Congratulations on your purchase of the VR88 velocity ribbon microphone
from Samson Audio! The VR88 features a fine, pure aluminum corrugated
foil ribbon suspended within an intense neodymium field producing a warm
and natural response that's silky smooth from bottom to top. The VR88
combines the sweetness of traditional classic ribbon technology with the
precision and versatility of advanced condenser microphone head-amplifier
electronics. Like a modern condenser microphone, the VR88 operates on
standard 48-volt phantom power. This provides the VR88 with a high output
that’s compatible with any mic pre amplifier. Unlike old ribbon microphones,
you don’t have to worry about impedance mis-matches and the VR88 has no
problems with long cable runs. The VR88 is capable of handling high sound
pressure levels (135 dB), making it an excellent choice for miking vocals, as
well as acoustic instruments and even percussion or loud guitar amplifier
stacks.
In these pages, you’ll find a detailed description of the features of the
VR88 Studio Condenser Microphone, as well as step-by-step instructions
for its setup and use, and full specifications. You’ll also find a warranty
card enclosed—please don’t forget to fill it out and mail it in so that you
can receive online technical support and so we can send you updated
information about these and other Samson products in the future. Also,
be sure to check out our website (www.samsontech.com) for complete
information about our full product line.
With proper care, your VR88 will operate trouble free for many years. We
recommend you record your serial number in the space provided below for
future reference.
Serial number: ____________________________________
Date of purchase: __________________________________
Should your unit ever require servicing, a Return Authorization number (RA)
must be obtained before shipping your unit to Samson. Without this number,
the unit will not be accepted. Please call Samson at 1-800-3SAMSON (1-800372-6766) for a Return Authorization number prior to shipping your unit.
Please retain the original packing materials and if possible, return the unit
in the original carton and packing materials. If you purchased your Samson
product outside the United States, please contact your local distributor for
warranty information and service.
VR88 Features
VR88 Features
•
Active Velocity Ribbon Microphone.
•The microphone's element features a 2.5-inch long, 2-micron thin, 99
percent pure aluminum corrugated ribbon, set in a precise flux field
created by a precision tooled, neodymium magnet structure.
•
Bidirectional, Figure-8 pick-up pattern.
•
Active head amplifier with 48 volt phantom power operation.
•Capable of handling signals with high (135 dB) SPL’s (Sound Pressure
Levels).
•Smooth and transparent sound reproduction great for warming up
digital tracks.
•
Internal shock-mount.
•
Solid die cast construction.
•
Shockmount and swivel stand mount included.
•
Samson Tourtek 20-foot right angle XLR cable included.
•
Aluminum carry case included.
Operating the VR88
Powering the VR88
The VR88 features an active head amplifier and therefore needs to be operated by
connecting a phantom power supply. Phantom power is standard on most quality
mixers, outboard mic-pres and hard disk recorders. If necessary, an external phantom
supply can also be used. The VR88 receives the phantom power directly from a mic
cable when connected to a mixer or other microphone input that includes a phantom
supply. Most mixers have a switch to engage the phantom power so be sure to check
that the phantom power is on.
Polar Pattern
The most important characteristic of any microphone is its directionality or “pickup pattern”. There are three basic categories of pick up patterns; omnidirectional,
unidirectional and bidirectional. Omnidirectional mics pick up sound from all
directions while unidirectional, or cardioid, mics pick up the sound from the front
and reject the sound from the rear. Bidirectional, or figure-8, mics pick up the sound
directly in front and back of the microphone while rejecting the sound on the left and
right sides.
While omni and unidirectional microphones are very useful for a variety of
applications, the VR88's bidirectional pick up pattern is very desirable and performs
well in many recording situations. You can use the bidirectional pattern to capture
room ambiance by carefully placing the microphone between the sound source and
studio walls. You can also capture the simultaneous performance of two instruments
or vocalists by positioning the microphone directly between them, so one is
addressing the front of the microphone and the other the rear.
Microphone Placement
In order to maximize the sound quality, you must pay careful attention to the
placement of your VR88 and how it is positioned for the instrument or vocalist that
you are miking. The VR88 is a side address microphone employing a bidirectional pick
up pattern, so it picks up sound from the front and rear. All microphones, especially
unidirectional and bidirectional microphones, exhibit a phenomenon known as
“proximity effect.” Very simply put, proximity effect is a resulting change in the
microphone's frequency response based on the distance of the mic capsule relative
to the sound source. Generally, you will get a bass boost when miking in close. It
is also important to pay attention to the direction of the microphone's element.
When you point a unidirectional or bidirectional mic directly at the sound source
(on axis) you will get the best frequency response, however when you start pointing
the microphone slightly away (off axis) you will notice the high frequency response
dropping off and the microphone will start to sound like it has more bass.
For most vocal applications you’ll want to position the microphone directly in front of
the artist. The same may be true for miking instruments, however, you can make
Operating the VR88
some pretty amazing equalization adjustments by slightly changing the angle of
the capsule to the sound source. This can be a very useful technique in capturing
the optimum sound of a drum set, acoustic guitar, piano or other instruments in a
live room or sound stage. Experimentation and experience are the best teachers in
getting good sounds, so plug in! For more information on microphone placement,
see the section, "VR88 Applications" later in this manual.
Setting Up the Signal Level
When connecting the VR88 to a mixer or recorder input, be sure that the input is of
microphone level. Also, be sure that the phantom power is engaged (as explained
the previous section “Powering the VR88”). Most mixers and recorders of reasonable
quality will offer a microphone input with mic trim (usual called Trim or Gain) control.
The purpose of the mic trim control is to optimize the amount of good signal to any
noise associated with the mixers electronics. A good mic pre with trim also will have
a PEAK or CLIP LED. To set a good level on the mic, set the VR88 up in front of the
desired sound source and slowly raise the mic trim control until you see the PEAK
LED light up. Then, turn the mix trim control down until the LED does not light any
more. On most mixers, the ideal setting is that the trim control is turned up as much
as possible without lighting the PEAK LED.
P-Popping
P-Popping is that annoying pop that you can get when the microphone diaphragm
gets a blast of air from a vocalist pronouncing words with the letter “P” included.
There are a few ways to deal with the problem including using an external pop filter.
Some famous engineers have relied on an old nylon stocking stretched over a bent
clothes hanger, which actually works very well, but can be a little smelly. You can also
try placing the microphone slightly off axis (on a slight angle) from the vocalist. This
can often solve the problem without using an external pop filter. However, on the
VR88 or any ribbon microphone, use of an external pop filter like the Samson PS01 is
strongly recommended.
Stand Mounting the VR88
The VR88 can be mounted to a standard microphone stand using the included swivel
mount adapter. If you are using a U.S. 5/8” mic stand, you will need to remove, by
unscrewing, the Euro stand adapter from the swivel's threaded insert. Simply screw
on the swivel adapter on your mic stand or boom arm. Now, loosen the thumbscrew
and adjust the microphone to the desired angle. Once set, tighten the thumbscrew
to secure the microphone in place. For more information on using the swivel and
shockmount, see the section "Using the SP88 Shockmount" on page 11 in this manual.
VR88 Applications
The VR88 is an excellent choice for miking a variety of sound sources including vocals,
piano, reed and brass instruments, electric and acoustic guitars and choirs and orchestras to name just a few.
Vocals
When using the VR88 on vocals, use of an external pop filter is strongly recommended.
Position the microphone in front of the artist so that the microphone grill is approximating 4 to 10 inches away. You can record a group of vocalist by positioning them
around the front and rear of the microphone. Just remember that the extreme sides of
the microphone picks up nothing due to the VR88’s bidirectional pick up pattern. Since
the VR88’s frequency response remains flat off axis, you don’t have to be concerned
about the microphone sounding different from center to sides.
Reed Instruments
When recording saxophone or clarinet, place the VR88 one to two feet from the
instrument. When placing the microphone closer to the source, you will capture more
of the direct sound and less of the reflected sound. Be aware of the reflected sound
when positioning the artist and microphone near the studio walls. Often you can use
the wall to capture some natural echo.
Ever notice that saxophonists like to
warm up in some corner somewhere?
Two Feet
They’re telling you something. You can
change the delay time by adjusting
the distance between the microphone,
Figure 1.
performer and the wall. Experiment
around and you can get some amazing
recordings.
Brass
Recording brass instruments is handled
very nicely by the VR88. The VR88
should be positioned approximately
two feet away when recording brass
instruments. (figure 1.) If you are
recording a group of brass and reed
instruments increase the distance of
the microphone. (figure 2.)
Four to Six Feet
Piano
There are many great techniques for
Figure 2.
recording piano, regardless of what
microphone you use. Often piano tracks are recorded in stereo so using two VR88’s is
a great solution. The VR88’s are an excellent choice on piano since their active ribbon
technology does not exhibit the comb filtering normally associated with condenser
microphones. When recording piano, you first need to decide what kind of sound is required for the project. For an ensemble performance a more direct or up front sound
will be captured with the microphones positioned closer to the strings. So if you want
the track to lie in the mix position move the mics closer (favoring the mid and upper
strings). For a solo performance, position the microphones further back from the piano
to capture more of the room ambiance.
VR88 Applications
Strings
When recording a solo string instrument like a violin, place the VR88 one to three feet
from the instrument. When recording a string section, try to position one or more
VR88’s several feet from the players. If the size of the room permits, raise the microphones three or four feet above the section and position them at a 45-degree angle,
facing down.
Drums
The VR88 is an excellent overhead microphone to record drums. For stereo overheads,
use two VR88’s approximately four feet above the kit. You can set the spread depending on how large the kit is, however, generally you position one over the hi-hat and the
other over the floor tom.
Recording Sounds With High SPL
The VR88 can handle very high SPL’s however blasts of wind can be very damaging to
the microphone’s ribbon. Therefore, you need to be certain that the microphone is not
receiving harmful blasts of air. Kick drum, electric guitar and bass amplifiers are all examples of common sound sources that can produce blasts of air that can be damaging
to your VR88. A simply way to check if there is too much wind blast, is to position your
hand where you want to place the mic, if you can feel the air blast, don’t place the microphone there. Another way to protect the ribbon from air blast is to ensure that the
microphone is positioned at a slight angle, either vertical or horizontal. It is important
that the microphone element does not take a direct blast of air, so a little bit of tilt will
help prevent harm to the ribbon.
Guitar amp
On guitar amplifiers, the VR88 will capture the nuance of the performance along
with some serious low frequency response. The round bottom end is well suited for
reproducing the warm tone of a jazz guitarist’s hollow body and also for delivering
the serious chunk desired by today’s
modern, drop down guitarists. As with
other high SLP sounds, you’ll want to
position the microphone at an angle
off-axis to the sound source. Position
the microphone two to ten inches
from the speaker and angle the microphone 7 to 15 degrees off-axis. The
side view shows a vertical positioning
technique. Figure 3.
Figure 3.
VR88 Applications
Kick Drum
The VR88 is an excellent kick drum microphone, but due to the powerful wind blast
they produce you must be extremely careful on how you position the microphone.
For direct miking, position the microphone at least 18 inches from the
drum.
For closer miking, place the microphone 10 to 18 inches, but be sure to
position the microphone at a 45 degree
angle to avoid excessive wear to the
ribbon. Figure 4.
18” to 24”
45° Angle
Minimum
10”
Kick Drum Side View
Figure 4.
The top view shows a horizontal positioning technique with the microphone
tilted 7 to 15 degrees off-axis. Figure 5.
7° to 15° Off Axis
Percussive Wave
Kick Drum Top View
Figure 5.
10
Using the SP88 Shock-Mount
Using the SP88 “Spider” Shock-Mount
For mounting the VR88 to a mic stand you
can use the included swivel adapter or for
additional isolation the VR88 can be fitted
on the included SP88 “Spider” shock mount.
Follow the steps below to install the swivel or
SP88 shockmount.
1
•First, screw the swivel mount or shock
mount onto your mic stand or boom
arm. If you’re using a US 5/8” mic stand
or boom, remove the Euro adapter.
• Install the VR88 into the swivel or
shockmount by fitting the microphone
into the center of the holder, positioning
the VR88 all the way to the bottom
mounting plate. (Figure 1)
•Secure the swivel or shockmount by
reinstalling the threaded collar, rotating
clockwise until tight. (Figure 2)
•Now, loosen the thumb screw to
adjust the angle of the microphone
and position the VR88 to the desired
location. Once set, tighten the
thumbscrew to secure the microphone
in place.
ote: Be careful not to cross thread
N
or over tighten the threaded collar or
thumb screw.
11
2
VR88 Specifications
VR88 Frequency Response
VR88 Polar Response
VR88 Specifications
Frequency Response Polar pattern
Element type Ribbon thickness Sensitivity Max SPL Equivalent Noise Level
Impedance
Minimum Load Impedance
Power supply voltage Weight
Dimensions
30 ~ 16000 Hz
Bi-directional (Figure 8)
Velocity Ribbon
2 microns
-40 dB/Pa
135 dB
17dB
200 ohms
1000 ohms
phantom power 48V +/-3V
1.1 lbs. (500 g)
Height: 7" (175 mm)
Width: 2.125" (54 mm)
Depth: 2.125" (54 mm)
Specifications subject to change without notice.
12
Samson Technologies Corp.
45 Gilpin Avenue
Hauppauge, New York 11788-8816
Phone: 1-800-3-SAMSON (1-800-372-6766)
Fax: 631-784-2201
www.samsontech.com