1
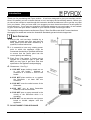
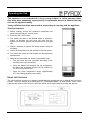
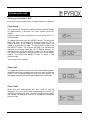
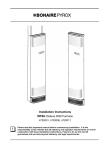
Owner’s Manual
5 Star Silhouette
4740001, 4740011
Please keep this important manual in a safe place. It is the owner’s responsibility to
ensure that regular maintenance is carried out on this Silhouette. Failure to do so
will void all guarantees beyond statutory and legal requirements.
ELECTRONIC SILHOUETTE
Table of Contents
INTRODUCTION ........................................................................................................................3
Safe Operation .......................................................................................................................... 3
UNIT OPERATION .....................................................................................................................4
Start-Up Sequence.................................................................................................................... 4
Using the Controls......................................................................................................................... 4
Turning the Unit ON or OFF ...................................................................................................... 5
Clock Setup............................................................................................................................... 5
Child Lock ................................................................................................................................. 5
Fault Codes............................................................................................................................... 5
Controlling the Unit .................................................................................................................... 6
WARRANTY .............................................................................................................................8
Warranty on Replacements Parts................................................................................................ 10
Periods Of Warranty – Years....................................................................................................... 10
Proof Of Purchase....................................................................................................................... 11
SERVICE ...............................................................................................................................12
Page 2
ELECTRONIC SILHOUETTE
Introduction
Introduction
Thank you for purchasing this Pyrox product. It has been designed to give you excellent service.
Now it is installed, you are no doubt anxious to run it and enjoy the far-reaching warmth. Before you
do, take a few minutes to read through this instruction booklet and discover how to get the very best
from your heater. After you have read it, we suggest you store these instructions in a safe place for
future reference. If you have any questions of problems relating to your new heater, do not hesitate
to get in touch with your dealer / installer or your nearest Climate Technologies office.
The Australian designed and manufactured Pyrox 5 Star Gas Silhouette Wall Furnace has been
thoroughly life tested and carries the Australian Standards gas and electrical approvals.
SAFE OPERATION
1.
Ensure this unit has been installed by a
qualified, licensed gas fitter and that the
240V power point has been installed by a
qualified, licensed electrician.
2.
It is essential to have any existing power
point to which the appliance might be
connected checked by a qualified electrician
to ensure that the power point has the
correct polarity and earthing.
3.
Each Pyrox Gas heater is factory set to
operate on a particular type of gas. DO
NOT use any type of gas other than that
specified on the appliance and packaging.
4.
Clearances – See Fig 1.
4.1. DO NOT drape clothing, towels etc on
or over the heater.
Maintain a
clearance of 3 metres in front of the
heater.
4.2. DO NOT place articles on or against
the Silhouette – at least 300 mm
clearance
4.3. DO NOT cover the outlet louvres of the
Silhouette.
4.4. DO NOT use or store flammable
materials near the Silhouette
4.5. DO NOT store or spray aerosols in the
vicinity of the Silhouette while it is
operating.
4.6. DO NOT use an extension cord, power
board or double adaptor with this
appliance.
5.
DO NOT MODIFY THIS APPLIANCE
Page 3
ELECTRONIC SILHOUETTE
Operating the Unit
Unit Operation
This appliance is not intended for use by young children or infirm persons unless
they have been adequately supervised by a responsible person to ensure that they
can use the appliance safely.
Young children should be supervised to ensure they do not play with the appliance.
Start-Up Sequence
1. Before starting ensure the protective membrane has
been removed from the control decal.
2. Press the ON / OFF button.
3. The heater will start in the Manual mode of operation.
Within 10 seconds the gas valve will open and the
sparker will function. Ignition will commence on a low gas
rate.
4. Within 5 seconds of ignition the flame sensor will prove
the flame.
5. Within 20 seconds the fan will operate on low fan speed.
6. The Gas Valve Level and Fan Speed can be adjusted to
desired point.
7. Alternatively the heater can be set to Automatic mode.
•
The gas valve will now modulate according to the
sensing of the room thermistor.
•
Once the heater has reached the set temperature,
the flame will extinguish and the fan will continue to
run for at least one minute.
•
Once the room temperature drops approximately
2oC, the heating sequence will restart.
USING THE CONTROLS
The user interface consists of a display, a push button for turning the unit on and off and five touch
buttons. The touch buttons are named SELECT, PROGRAM, MODE, UP and DOWN. There is also
a buzzer that emits a short beep for valid user action and a longer beep for invalid user actions.
Page 4
ELECTRONIC SILHOUETTE
Operating the Unit
Turning the Unit ON or OFF
Press and hold the on/off button for approximately one second.
Clock Setup
The clock can be changed by firstly touching the MODE button
for approximately 3 seconds. The clock format screen will
display.
If 24-hour clock format is desired, then touch either the UP or
DOWN button.
To change the hours touch the SELECT button. The hours will
flash. The hours are changed by touching either the UP or
DOWN buttons. If the button is touched continuously the
speed of change will increase. To change the minutes touch
the SELECT button. The minutes will flash. The minutes are
changed by touching either the UP or DOWN buttons. To
change the day, touch the SELECT button. The day will flash.
The days are changed by touching either the UP or DOWN
buttons. Then touch the SELECT button to return to the
previous state.
Time setup is now complete.
Child Lock
To engage the Child Lock touch the UP and DOWN together.
When the child lock is engaged any button touches or pressing
ON/OFF will be ignored and the Lock icon will display. To
disengage touch the UP and DOWN together for 3 seconds.
Error Codes
When the unit malfunctions, the error code Er will be
displayed. The unit can be reset by powering the unit OFF (2
seconds minimum) then ON. Should the malfunction persist,
call Climate Technologies Service for assistance and advise
the error code.
Page 5
ELECTRONIC SILHOUETTE
Operating the Unit
Controlling the Unit
When the unit is in the on state, there are three modes of operation, Manual, Automatic and
Programming.
The mode of operation is changed by briefly touching the mode button. The mode of operation will
change from manual to automatic to program to manual.
•
Manual Mode
In this mode the user directly selects the level of heat
output and also the fan speed.
If the level and fan speed bars are not flashing, the
heating output can be changed by firstly touching the
SELECT button. The temperature bars will flash.
Then by touching either the UP or Down buttons the
level of heat output can be changed.
If the temperature bars are flashing, the fan speed
can be changed by firstly touching the SELECT
button. The fan speed bars will flash. Then by
touchng either the UP or DOWN buttons the fan
speed can be changed to low, medium or high.
In this mode the unit will continue to operate and not
shut off based on room temperature. Also, each hour
the unit will momentally turn off to conduct safety
checks and restart.
•
Automatic Mode
In this mode the heater runs at an output level set by
the user, aiming to reach the defined temperature set
point. Once the point is reached the unit will cycle on
and off to maintain the temperature.
If the temperature and fan speed bars are not
flashing, the temperature setpoint can be changed by
firstly touching the SELECT button. The temperature
bars will flash. Then by touching either the UP or
DOWN buttons the temperature setpoint can be
changed.
If the temperature bars are flashing, the fan speed
can be changed by firstly touching the SELECT
button. The fan speed bars will flash. Then by
touchng either the UP or DOWN buttons the fan
speed can be changed to low, medium or high.
•
Programming Mode
In the programming mode you can program the unit
to come on and off either once or twice in any 24
hour period, any day of the week, weekdays,
weekend or for the whole week. For each active
period the start time should enter and whether the
period is ON or OFF. ON period have set
temperature and fan speed.
Page 6
ELECTRONIC SILHOUETTE
Operating the Unit
Programming Sequence
1. Touch the program button. The display will show
the day group. To change the day or day group
(Single day, Week days, Weekend or Whole
week) touch the UP/DOWN button to select the
desired day group and touch the SELECT button
to select.
1
2. The display will flash the period bar at bottom of
the display. Touch the UP/DOWN button to
change the program period and touch the
SELECT button to select. (you can set 4 program
periods in each day)
3. Now the display will flash the hour segment.
Touch the UP/DOWN button to change the start
hour and touch the SELECT button to set.
2
NOTE: If you want to disable the period, set
time to “--:--”
4. The display will flash the minute segment. Touch
the UP/DOWN button to change the start minutes
and touch the SELECT button to set.
5. Now the temperature bar is flashing. Touch the
UP/DOWN button to increase or decrease the
temperature level and touch the SELECT button
to set.
NOTE: No temperature bar means OFF time.
3
4
6. The display will flash the fan speed. Touch the
UP/DOWN button to increase or decrease the fan
speed and touch the SELECT button to set.
When you touch the SELECT button, the controller
will display the main programming screen. To set
another period, touch the SELECT button and follow
the programming sequence from STEP 2.
If the unit is running under Program mode, the user
may temporarily override the programmed settings by
changing the temperature or fan speed level. If the
unit is running under Program mode, touch the
SELECT button to select temperature level or fan
speed level and then touch the UP/DOWN button to
change. In this case, an “Override” icon will appear
on the display.
Page 7
5
6
ELECTRONIC SILHOUETTE
Warranty – Australia Only
Warranty
IMPORTANT
Please read this warranty information and complete the Dealers Product information on the
following page. KEEP this with your original purchase documents for any claim under
warranty.
WARRANTY PROCEDURES:
Firstly refer to your owners manual to ensure you have followed the correct operating
procedures of your product, and refer to the trouble shooting guide to assist solving any
problems you may have.
1. Read this warranty statement carefully before you request warranty service as items relation
to installation are not covered by this appliance warranty.
2. A proof of product purchase must be provided for warranty service, to validate the appliance
is within the manufacturer’s warranty periods.
3. This warranty is only for products and associated original controls for Climate Technologies
manufactured product.
4. Only an authorised Climate Technologies service provider must carry out warranty service.
Climate Technologies provides the following Manufacturers warranty additional to all
implied warranties and other statutory rights which you may have under the Trade
Practices Act and similar State & Territory Laws, subject to the following terms and
conditions.
TERMS AND CONDITIONS:
Conditions to warranty
•
•
•
•
•
•
•
•
•
Subject to the exclusions noted, Climate Technologies warrant the product for the period as
prescribed in the table following this statement to be free from Inherent defects in materials
and workmanship for functional and structural components.
This product is only valid if the product is operated in accordance with the manufacturers
instructions
The appliance must not be modified or changed in any way.
Your proof of purchase MUST be produced before free service will be provided.
Travelling time and mileage are included within 30km of either your authorised Climate
Technologies dealer or service provider’s premises. Customers in areas other than the
above are responsible for any travelling time and mileage required to carry out warranty
repairs.
The product must be installed by a qualified person in the manner prescribed by local &
statutory regulations and to the manufacturer’s specifications.
Service within the terms of this warranty will be recognised where we are satisfied that the
appliance or part was supplied within the relevant time limits. Documents of purchase and
Dealer/Installer information will assist in this process.
Product fitness for purpose and overall system design / sizing is solely the responsibility of
the dealer / installer. This includes but is not limited to heat load calculations, air flow,
system balancing, humidity, water quality etc.
The product must be installed in an easily and safe accessible area for service, appliances
installed in areas not easily and safely assessable, costs will be borne by the owner for
access equipment should maintenance be required.
Page 8
ELECTRONIC SILHOUETTE
Warranty – Australia Only
DIY (Do It Yourself) installation Warranty
•
If the product has been installed as a DIY, a supply part only warranty will apply. Parts
only will be supplied free of charge on the return of the faulty part and the owner will
be responsible for all labour charges incurred for the part to be fitted by a qualified
person. Labour warranty as prescribed in the following table is void in this situation.
Remote Location Warranty
•
If the product has been installed outside the Climate Technologies service network, a
supply part only warranty will apply. Parts only will be supplied free of charge on the
return of the faulty part and the owner will be responsible for all labour charges
incurred for the part to be fitted by a qualified person. Labour warranty as prescribed
in the following table is void in this situation.
Exclusions to warranty
•
Consumable items subject to wear and tear such as filter pads, drive belts and bearings are
not covered by this warranty.
•
Components used as part of the installation such as grilles filters, ducting, fittings, zone
motors and consumer services pipe work are warranted from your place of purchase and not
covered by this warranty.
•
Damage caused by elements such as wind, rain, lighting, floods etc along with power spiking
and brownouts are not considered defective material or workmanship and as such are not
considered warranty.
•
No responsibility will be accepted for outside elements such as pests, animals, pets and
vermin that may cause damage to the unit.
•
Harsh environmental situations such as salt air that may cause cabinet damage / rusting can
not be considered warranty.
•
The manufacturer does not accept liability or any claims for damage to building contents,
carpet, walls, ceilings, foundations or any other consequential loss either direct or indirect.
Damage resulting from, power spikes, incorrect operation, incorrect installation, incorrect
maintenance is also not covered.
• All warranties are NOT transferable.
Conditions where warranty may be void
•
If there is no certificate of compliance for plumbing, electrical or refrigeration as required by
State & Territory Laws. Climate Technologies reserves the right to refuse service on noncompliant installations.
•
The defective operation of the appliance that is due to failure of electricity, gas, water or
refrigerant gas supplied.
•
Defects are caused by neglect, incorrect application, abuse or by accidental damage of the
appliance.
•
An unauthorized person has attempted to repair the appliance.
•
A situation arises referenced in the trouble-shooting guide.
•
A charge will be made for, work done or a service call where there is nothing wrong with the
appliance.
Page 9
ELECTRONIC SILHOUETTE
Warranty – Australia Only
WARRANTY ON REPLACEMENTS PARTS
Parts replace under warranty are warranted for the balance of the original warranty period.
PERIODS OF WARRANTY – YEARS
Unit Components
RESIDENTIAL
Parts
Labour
COMMERCIAL
Parts
Labour
Heat Exchanger
10
2
2
2
Burner
10
2
2
2
All other components
2
2
1
1
Aged New Product Warranties
For a New Product warranty to apply, a product needs to be sold and installed within 3 years
of the manufacturing date.
Product that is aged as the result of extended storage or being used for demonstration
purposes, the following warranty will apply.
•
For a product that is greater than 3 years and less than 5 years old from date of
manufacture the statutory warranty will apply and any voluntary warranty originally
supplied will be reduced by 1 year
•
For a product that is greater than 5 years of age from date of manufacture, the statutory
warranty will apply to electrically functioning components only. All other components
being cabinets, louvres, filters etc. will not be covered by warranty.
Page 10
ELECTRONIC SILHOUETTE
Warranty – Australia Only
PROOF OF PURCHASE
It is important that the name of the Dealer or Retailer from whom you purchased your product and
the name of the installer are recorded on this page. The installer is responsible for the correct
installation, start up and demonstrating the operation of this product. The Dealer or retailer is also
responsible for issuing the relevant certificates of compliance for the electrical connections. (These
may differ from state to state)
Please attach your proof of purchase here. Your receipt is your warranty and will be required to
validate any warranty.
DEALER PRODUCT INFORMATION:
Dealer/Retailer:
Dealer Address:
Dealer Phone Number:
Unit Model Number:
Serial No:
Date Installed:
Installed by:
Date Commissioned:
Commissioned by:
Signature:
Page 11
ELECTRONIC SILHOUETTE
Service
Service
It is recommended by Climate Technologies that, for normal domestic applications, a biannual
service be performed on your wall furnace to maintain it efficiency performance and increase its life
expectancy. More frequent servicing may be required subject to the unit application / usage and its
environmental conditions.
Service work on your gas Silhouette must be carried out by a qualified, licensed, service technician.
If the supply cord is damaged, it must be replaced by the manufacturer or its service agent or
similarly qualified person in order to avoid a hazard.
Warranty service work must be carried out by an authorized Climate Technologies service provider.
For Metro Service only ring the numbers below.
South Australia
1300 665 087
Email: [email protected]
New South Wales
1300 665 087
Email: [email protected]
Queensland
Australian Capital Territory
1300 665 087
Western Australia
1300 665 087
Email: [email protected]
Victoria/Tasmania
(03) 8795 2456
Email: [email protected]
Mobile Callers all states
03 8795 2460
Outside Metro areas please contact your nearest Climate Technologies Service Provider.
New Zealand (ABERGAS Ltd) 0800 161 161
Page 12
Manufactured by
Climate Technologies
ABN 13 001 418 042
26 Nylex Avenue
Salisbury, SA 5108
Australia
www.climatetechnologies.com.au
Page 13
P/N 4742202A