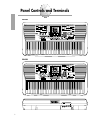
1
ENGLISH
DEUTSCH
FRANÇAIS
ESPAÑOL
OWNER'S MANUAL
BEDIENUNGSANLEITUNG
MODE D'EMPLOI
MANUAL DE INSTRUCCIONES
SPECIAL MESSAGE SECTION
This product utilizes batteries or an external power supply (adapter). DO NOT
connect this product to any power supply or adapter other than one described
in the manual, on the name plate, or specifically recommended by Yamaha.
This product should be used only with the components supplied or; a cart, rack,
or stand that is recommended by Yamaha. If a cart, etc., is used, please
observe all safety markings and instructions that accompany the accessory
product.
approximately five years. When replacement becomes necessary, contact a
qualified service representative to perform the replacement.
This product may also use “household” type batteries. Some of these may be
rechargeable. Make sure that the battery being charged is a rechargeable type
and that the charger is intended for the battery being charged.
When installing batteries, do not mix batteries with new, or with batteries of a
different type. Batteries MUST be installed correctly. Mismatches or incorrect
installation may result in overheating and battery case rupture.
SPECIFICATIONS SUBJECT TO CHANGE:
The information contained in this manual is believed to be correct at the time of
printing. However, Yamaha reserves the right to change or modify any of the
specifications without notice or obligation to update existing units.
Warning:
Do not attempt to disassemble, or incinerate any battery. Keep all batteries
away from children. Dispose of used batteries promptly and as regulated by the
laws in your area. Note: Check with any retailer of household type batteries in
your area for battery disposal information.
This product, either alone or in combination with an amplifier and headphones
or speaker/s, may be capable of producing sound levels that could cause
permanent hearing loss. DO NOT operate for long periods of time at a high
volume level or at a level that is uncomfortable. If you experience any hearing
loss or ringing in the ears, you should consult an audiologist.
IMPORTANT: The louder the sound, the shorter the time period before
damage occurs.
Disposal Notice: Should this product become damaged beyond repair, or for
some reason its useful life is considered to be at an end, please observe all
local, state, and federal regulations that relate to the disposal of products that
contain lead, batteries, plastics, etc. If your dealer is unable to assist you,
please contact Yamaha directly.
NOTICE:
NAME PLATE LOCATION:
Service charges incurred due to a lack of knowledge relating to how a function
or effect works (when the unit is operating as designed) are not covered by the
manufacturer’s warranty, and are therefore the owners responsibility. Please
study this manual carefully and consult your dealer before requesting service.
The name plate is located on the bottom of the product. The model number,
serial number, power requirements, etc., are located on this plate. You should
record the model number, serial number, and the date of purchase in the
spaces provided below and retain this manual as a permanent record of your
purchase.
ENVIRONMENTAL ISSUES:
Yamaha strives to produce products that are both user safe and
environmentally friendly. We sincerely believe that our products and the
production methods used to produce them, meet these goals. In keeping with
both the letter and the spirit of the law, we want you to be aware of the
following:
Model
Serial No.
Battery Notice:
This product MAY contain a small non-rechargeable battery which (if
applicable) is soldered in place. The average life span of this type of battery is
Purchase Date
PLEASE KEEP THIS MANUAL
FCC INFORMATION (U.S.A.)
IMPORTANT NOTICE: DO NOT MODIFY THIS UNIT!
This product, when installed as indicated in the instructions contained in this
manual, meets FCC requirements. Modifications n ot expressly approved by
Yamaha may void your authority, granted by the FCC, to use the product.
electronic devices. Compliance with FCC regulations does not guarantee that
interference will not occur in all installations. If this product is found to be the
source of interference, which can be determined by turning the unit “OFF” and
“ON”, please try to eliminate the problem by using one of the following
measures:
IMPORTANT:
When connecting this product to accessories and/or another product use only
high quality shielded cables. Cable/s supplied with this product MUST be
used. Follow all installation instructions. Failure to follow instructions could
void your FCC authorization to use this product in the USA.
• Relocate either this product or the device that is being affected by the
interference.
NOTE:
• In the case of radio or TV interference, relocate/reorient the antenna. If
the antenna lead-in is 300 ohm ribbon lead, change the lead-in to coaxial type cable.
This product has been tested and found to comply with the requirements listed
in FCC Regulations, Part 15 for Class “B” digital devices. Compliance with
these requirements provides a reasonable level of assurance that your use of
this product in a residential environment will not result in harmful interference
with other electronic devices. This equipment generates/uses radio
frequencies and, if not installed and used according to the instructions found in
the users manual, may cause interference harmful to the operation of other
• This applies only to products distributed by Yamaha Corporation of America.
• Utilize power outlets that are on different branch(circuit breaker or fuse)
circuits or install AC line filter/s.
If these corrective measures do not produce satisfactory results, please contact
the local retailer authorized to distribute this type of product. If you can not
locate the appropriate retailer, please contact Yamaha Corporation of America,
Electronic Service Division, 6600 Orangethorpe Ave, Buena Park, CA90620
Congratulations on your purchase of the Yamaha PortaTone!
You now own a portable keyboard that combines advanced functions, great sound and exceptional ease-ofuse in a highly compact package. Its outstanding features also make it a remarkably expressive and
versatile instrument.
Read this Owner’s Manual carefully while playing your new PortaTone in order to take full advantage of its
various features.
CONTENTS
Main Features
1
Precautions — Taking Care of Your PortaTone
2
Setting Up
3
Power Requirements ..........................................3
PHONES/AUX OUT Jack ....................................4
SUSTAIN Jack ......................................................4
Music Stand ........................................................4
Getting Started — Playing the Demo Songs
5
Panel Controls and Terminals
6
Basic Display Operations
8
Playing Voices — The Voice Mode
10
Selecting and Playing a Voice — Main Voice Mode....10
■ Main
Voice Sub Menu..............................................11
■ Percussion
Kit Voice Chart ........................................12
Playing Two Voices — Dual Voice Mode ........12
■ Dual
Voice Sub Menu ..............................................13
Playing Two Voices — Split Voice Mode ........14
■ Split
Voice Sub Menu ..............................................15
Other Voice Controls
16
Chorus ..............................................................16
Harmony/Echo ................................................16
■ Harmony/Echo
Sub Menu ........................................17
Reverb ..............................................................18
Touch Response ..............................................18
Overall Controls ..............................................19
■ Reverb/Others
Sub Menu ........................................19
Playing Songs — Tne Song Mode
Selecting and Playing a Song ........................28
Using the Repeat Play Function ......................29
Using the Guide Function (PSR-230 only) ......30
Using the Minus One Function ........................31
■ Selecting
Playing Auto Accompaniment — The Style Mode
20
■ About
the METRONOME Icon ..................................21
■ Sync-Stop
Function ..................................................24
Changing the Fingering Mode ........................24
■ Fingered
■ Full
................................................................25
........................................................................26
■ Single
Finger ..........................................................26
Changing the Accompaniment Split Point ......26
One Touch Setting ............................................27
individual channels for Minus One ..............31
■ Song
Sub Menu ......................................................32
■ Song
Volume ..........................................................32
■ One
Touch Setting in the Song Mode ........................33
Recording User Songs — Easy Chord Memory
33
Real-time Recording ........................................34
Step Recording ..................................................35
Song Clear ........................................................35
User Song Playback ........................................35
Music Cartridge (PSR-230)
36
Inserting a Music Cartridge..............................36
■ Music
Cartridge Precautions......................................36
Selecting Styles on a Music Cartridge ............37
Selecting Songs on a Music Cartridge ............37
MIDI Functions
38
MIDI Basics ........................................................38
■ MIDI
Sub Menu ......................................................40
Appendix
41
Data Backup and Initialization........................41
■ Initialize
Operation ..................................................41
Voice List ..........................................................42
■ Voice
Polyphony......................................................42
■ Panel
Voice List ......................................................42
■ GM
Selecting a Style and Playing an Auto Accompaniment........20
28
Voice List..........................................................43
Troubleshooting ................................................44
Index ................................................................45
MIDI Implementation Chart ............................46
Specifications ....................................................48
Main Features
The PortaTone is a sophisticated yet easy-to-use keyboard with the following features and
functions:
■
Exceptionally realistic, high-quality Voices (100 Panel, 129 GM Voices (128 Voices +
1 Percussion Kit)), created with AWM (Advanced Wave Memory) technology, which utilizes
digital recordings of actual instruments.
■A
convenient Voice Set function that automatically calls up the most suitable Voice-related
settings whenever you select a Panel Voice.
■
100 auto accompaniment Styles, each with different Intro, Main A and B, four Fill-ins,
and Ending sections. Each of the 100 Styles also features a special Jam Track section,
providing stylistically appropriate chord progressions and section changes for playing along
with.
■
Large custom LCD gives you easy, at-a-glance confirmation of all important settings.
■
One Touch Setting buttons, for automatically calling up an appropriate Voice (along with
matching effect and other settings) for playing with the Style you select. Each of the 100
Styles features four different One Touch Settings.
■
Touch Response function for natural, expressive control over the Voices.
■
Rich, luscious-sounding effects — including Reverb, Chorus, Harmony and Echo — for
enhancing the Voices.
■
Easy Chord Memory for recording your own chord progressions — letting you create
automatic backing for your original songs.
■
Guide lamps (on PSR-230), and the Minus One and Repeat Play functions provide
convenient, powerful tools for learning new songs and improving your keyboard technique.
■
Music Cartridge slot (on PSR-230) lets you plug in optional Yamaha Music Cartridges for
adding new accompaniment Styles and Songs.
■
Comprehensive MIDI control, including 16-part multi-timbral capacity and full General
MIDI compatibility.
■
Built-in high-quality stereo amplifier/speaker system.
1
Precautions —
Taking Care of Your PortaTone
Your new PortaTone is a fine musical instrument — and should be treated as such. Handle it with care and
common sense, and it will give you years of enjoyment.
Location -----------------------------------------------------------------• Avoid exposure to direct sunlight or other sources of heat. Never leave it inside a car where it can get
very hot. Also avoid highly humid or dusty places.
Interference From Electromagnetic Fields-----------------------• Do not use your PortaTone close to television sets, radios or similar equipment since this may cause
interference noise in the other appliance.
Handling ---------------------------------------------------------------• Protect your PortaTone from strong impact. Be careful not to drop it or place heavy objects on it.
Avoid applying excessive force to the controls and keys.
• Always unplug cables by gripping the plug firmly, and not by pulling on the cable.
Turn Power Off When Making Connections -------------------• To avoid damage to the PortaTone or other equipment, turn off the power of all related equipment —
including the PortaTone — before connecting or disconnecting any cables.
When Not Using the PortaTone -----------------------------------• After use, always turn off the POWER switch. When not using your PortaTone for long periods, be sure
to remove the batteries to avoid damage through battery leakage. When using the PortaTone with an AC
adaptor, unplug the adaptor from the electrical outlet, if the instrument is not to be used for a long period
of time, or during electrical storms.
Cleaning-----------------------------------------------------------------• Clean the exterior with a soft, dry cloth. To remove stubborn stains, use a slightly moistened cloth.
• Never use alcohol, thinner, or other chemical solvents, since they will damage the finish. Also, do not
leave vinyl chloride material on the PortaTone for a long time, since it may adhere to the exterior.
Service and Modification -------------------------------------------• Your PortaTone contains no user-serviceable parts. Opening it or tampering with it in any way may
result in damage and even electrical shock. Refer all servicing to qualified Yamaha personnel.
NOTE
• Yamaha is not responsible for damage caused by improper usage.
2
Setting Up
This section contains information about setting up your PortaTone for playing. Make sure to read this section
carefully before using the instrument.
Power Requirements
Your PortaTone can run either on batteries (sold separately) or on normal household current by using the optional
Yamaha PA-3/3B Power Adaptor (or another adaptor specifically recommended by Yamaha).
■ Using an AC Power Adaptor
To connect your PortaTone to a wall socket, you will need the optionally available Yamaha PA-3/3B
Power Adaptor. Use of other AC adaptors could result in damage to the instrument, so be sure to ask for
the right kind. Plug the adaptor into a convenient wall outlet and its connector into the DC IN 10-12V
jack on the back of your PortaTone.
DC IN 10-12V
■ Using Batteries
Inserting Batteries
Turn the instrument upside-down and remove the battery compartment lid. Insert six 1.5-volt size “D”
batteries as shown in the illustration, making sure that the positive and negative terminals are properly
aligned, and replace the lid.
When the Batteries Run Down
When the batteries run low and the battery voltage drops below a certain level, the PortaTone may not
sound or function properly, or it may reset to the default status. As soon as this happens, replace them
with a complete set of six new batteries. Never mix old and new batteries or different types of batteries
(e.g., alkaline and manganese).
NOTE
• To prevent possible damage from battery leakage, remove the batteries from the instrument if it is not to be used for
an extended period of time.
3
PHONES/AUX OUT Jack
■ Using Headphones
For private practicing and playing without disturbing others, connect a set of stereo headphones to the
rear panel PHONES/AUX OUT jack. Sound from the built-in speaker system is automatically cut off when
you insert a headphone plug into this jack.
PHONES /
AUX OUT
■ Connecting a Keyboard Amplifier or Stereo System
Though the PortaTone is equipped with a built-in speaker system, you can also play it through an
external amplifier/speaker system. First, make sure the PortaTone and any external devices are turned off,
then connect one end of a stereo audio cable to the LINE IN or AUX IN jack(s) of the other device and
the other end to the rear panel PHONES/AUX OUT jack on the PortaTone.
SUSTAIN Jack
An optional Yamaha FC4 or FC5 footswitch can be connected to the rear panel SUSTAIN jack for sustain
control. The footswitch functions like the damper switch on a piano: press and hold to sustain the sound,
and release for normal decay.
For normal operation, turn the power off before connecting the footswitch, then turn the PortaTone on
without pressing the footswitch. Also, do not disconnect the switch while the power is on.
SUSTAIN
NOTE
• Make sure to turn the power off before connecting or disconnecting the footswitch.
Music Stand
Insert the bottom edge of the included music stand into the slot located at the top rear of the PortaTone control panel.
(PSR-230)
4
Getting Started —
Playing the Demo Songs
The PortaTone has sixteen various Demo Songs, specially recorded to showcase the dynamic sounds and
rhythms and give you an idea of what you can do with the instrument.
1 First, turn on the power.
Press the POWER ON/OFF button. Whenever the power is turned on, the Voice mode is
automatically called up and set to play Voice 01 (GRAND PIANO).
POWER
2 Set the Volume.
Initially, turn the VOLUME control about a third of the way up. You can adjust the control for
optimum level once you start playing.
VOLUME
MIN
MAX
3 Press the DEMO button.
The Demo Songs will play in sequence from Song number 01. You can also play along on the
keyboard with the Songs.
DEMO
NOTE
• When Demo Songs that use the internal accompaniment Styles are played back, chord names are indicated in the
display as the chords of the Song change.
To stop playback, press the DEMO button again or press the START/STOP button.
DEMO
START/STOP
START/STOP
5
Panel Controls and Terminals
PSR-230
POP
01 8BEAT POP
02 8 UPBT POP
03 LIGHT POP
04 FOLKROCK
05 DETROIT POP
06 UP POP SHFL
07 POP RHUMBA
08 SHOWTUNE
POP BALLAD
09 8BEAT LIGHT
10 SLOW BALLAD
11 EPIC BALLAD
12 16BEAT BLD 1
13 PNO BALLAD
14 6/8 BALLAD 1
15 6/8 BALLAD 2
ROCK
16 ROCK BALLAD
17 LITE RK BLD
18 LATIN ROCK
19 6/8HVY ROCK
20 6/8 GOSPEL
21 SLOW ROCK
DANCE
33 B B BALLAD
34 SWING
35 CHARLESTON
CONTEMP JAZZ
22 ACID JAZZ
23 70S DISCO
24 DISCO PARTY
25 DISCO TROP
26 POLKA POP
ROCK & ROLL
36 COOL JAZZ
37 JAZZ BALLAD
38 JAZZ WALTZ
LATIN
39 FAST BOSSA
40 SLOW BOSSA
41 SAMBA 1
42 JAZZ SAMBA
43 MAMBO
44 BEGUINE
45 MERENGUE
46 SON
47 BOLERO LNTO
48 REGGAE 12
27 ROCK&ROLL 1
28 ROCK&ROLL 2
29 BOOGIE
30 TWIST
TRAD JAZZ
31 DIXIELAND
32 BIG BAND
50 BLUEGRASS
51 C ROCK 1
52 C ROCK 2
53 COWBOY BOOG
54 C BALLAD
55 C SHUFFLE
56 TWO STEP
57 C WALTZ 1
58 C WALTZ 2
WORLD MUSIC
69 TANGO ARGN
70 FOXTROT
71 JIVE
72 QUICKSTEP
73 SLOWFOX
74 SLOW WALTZ
75 VIEN WALTZ
BALLROOM LTN
59 POLKA 1
60 POLKA 2
61 ESPAGNOLE
62 TARANTELLA
63 TRAD WALTZ 1
64 TRAD WALTZ 2
POWER
!
MARCH
65 MARCH 1
66 MARCH 2
67 6/8 MARCH 1
68 6/8 MARCH 2
BALLROOM STD
49 REGGAE 16
C&W
76 CHA CHA
77 RHUMBA
78 SAMBA 2
79 CONGA
80 PASODOBLE
DEMO
VOLUME
"
PIANO
STYLE
81 POP ROCK
82 POP SHUFFLE
83 ROCK POP
84 ROCK SHUFFL
85 16BEAT POP
86 16BEAT BLD 2
87 TECHNO
88 DANCE POP
89 POP RAP
90 EUROBEAT
91 DISCO POP
92 DISCO SOUL
93 R&B
94 SOUL
95 FUNK
96 6/8 BLUES
97 FUSION
98 POP BOSSA
99 SALSA
00 POP RAGGAE
(
MODE
NAME / SUB MENU
STYLE
KEYBOARD
TOUCH
A
SPLIT
SUB MENU
'
DUAL VOICE
EASY CHORD MEM
3
FINGERING
4
DUAL
CHORUS
STYLE
REVERB
SONG
B
REPEAT
MINUS ONE
SYNC
STOP
LARGE/SMALL
STYLE
GUIDE
HARMONY
12 VIBRAPHONE
13 MARIMBA
14 XYLOPHONE
15 TUBE BELLS
16 TIMPANI
17 STEEL DRUMS
18 MUSIC BOX
HARMONY/ECHO
EASY CHORD
MEMORY
STYLE SECTION
#
SONG
2
SPLIT VOICE
EFFECT
SONG
VOICE
1
ONE TOUCH SETTING
MAIN VOICE
TEMPO
6 5aug
dim
minMaj 7 sus4
MIDI
VOLUME
B
A
REVERB/OTHERS
JAM
ACCOMPANIMENT
MIN
VOLUME
RESET
%
MAIN A
MAIN B
ENDING
)
JAM TRACK
MAX
*
TEMPO
RESET
SYNC-START START/STOP
19 JAZZ ORG 1
20 JAZZ ORG 2
21 JAZZ ORG 3
22 FULL ORGAN
23 ROCK ORG 1
24 ROCK ORG 2
25 16+2 ORGAN
26 16+4 ORGAN
27 CHURCH ORG
28 REED ORGAN
29 MUSETTE
30 TRAD ACCORD
31 BANDONEON
GUITAR
52 PIZZ STR
53 CHOIR
54 CHOIR AAHS
55 CHOIR OOHS
56 SYNTH CHOIR
57 ORCH HIT
STRINGS
37 CLEAN GTR
38 MUTE GUITAR
39 OVRDRV GTR
40 DIST GUITAR
BASS
41 ACC BASS
42 FINGER BASS
43 FRETLESS
44 SLAP BASS
45 SYNTH BASS
ENSEMBLE
32 CLASSIC GTR
33 FOLK GUITAR
34 12ST GUITAR
35 JAZZ GUITAR
36 OCTAVE GTR
46 STRINGS
47 CHAMBER STR
48 SYNTH STRS
49 SLOW STRS
50 TREMOLO STR
51 VIOLIN+STRS
1
2
3
4
5
6
7
8
9
58 VIOLIN
59 CELLO
60 CONTRABASS
61 HARP
BRASS
62 TRUMPET
63 MUTE TRP
64 TROMBONE
65 TRB SECTION
66 FRENCH HORN
INTRO
MAIN/AUTO FILL
JAM TRACK
ENDING
SYNCSTOP
LARGE/
SMALL
&
START/STOP
ONE TOUCH SETTING
KEYBOARD
TOUCH
RESPONSE
SPLIT
FINGERING
95 FANTASIA
96 BELL PAD
97 XENON PAD
98 ANGELS
99 DARK MOON
DRUM KIT
84 PICCOLO
00 DRUM KIT
PSR-230
STYLE
5 VOICE EFFECT
0
+
TEMPO
89 SQUARE LEAD
90 SAWTOOTH LD
91 VOICE LEAD
92 CRYSTAL
93 BRIGHTNESS
94 ANALOG LEAD
SYNTH PAD
73 SOPRANO SAX
74 ALTO SAX
75 TENOR SAX
76 BARI SAX
77 SAX+CLARNET
78 SAX+TRB
79 OBOE
80 ENG HORN
81 BASSOON
82 CLARINET
83 HARMONICA
PIPE
3
SONG
VOLUME
85 FLUTE
86 PAN FLUTE
87 RECORDER
88 OCARINA
SYNTH LEAD
MAIN MENU
INTRO
VOICE
$
67 TUBA
68 BRASS SECT
69 BRASS+SAX
70 BRASS+TRB
71 BRASS+TRP
72 SYNTH BRASS
REED
ORGAN
01 GRAND PIANO
02 HONKY-TONK
03 FUNKY E PNO
04 DX E PIANO
05 MIDI GRAND
06 HYPER E PNO
07 BELL E PNO
08 HARPSICHORD
09 HARPSI CPL
10 CLAVI
11 CELESTA
MALLETS
MAIN MENU
GrandPno
CART
REPEAT PLAY MINUS ONE
1
GUIDE
SONG
2
EASY CHORD MEMORY
3
NO
YES
CARTRIGE
4
DUAL/
CHORUS
REC/
END
SONG
CLEAR
HARMONY/
ECHO
REVERB
CART
BEAT
MEASURE
EASY
CHORD
MEMORY
PSR-220
POP
01 8BEAT POP
02 8 UPBT POP
03 LIGHT POP
04 FOLKROCK
05 DETROIT POP
06 UP POP SHFL
07 POP RHUMBA
08 SHOWTUNE
POP BALLAD
09 8BEAT LIGHT
10 SLOW BALLAD
11 EPIC BALLAD
12 16BEAT BLD 1
13 PNO BALLAD
14 6/8 BALLAD 1
15 6/8 BALLAD 2
ROCK
16 ROCK BALLAD
17 LITE RK BLD
18 LATIN ROCK
19 6/8HVY ROCK
20 6/8 GOSPEL
21 SLOW ROCK
DANCE
33 B B BALLAD
34 SWING
35 CHARLESTON
CONTEMP JAZZ
22 ACID JAZZ
23 70S DISCO
24 DISCO PARTY
25 DISCO TROP
26 POLKA POP
ROCK & ROLL
36 COOL JAZZ
37 JAZZ BALLAD
38 JAZZ WALTZ
LATIN
39 FAST BOSSA
40 SLOW BOSSA
41 SAMBA 1
42 JAZZ SAMBA
43 MAMBO
44 BEGUINE
45 MERENGUE
46 SON
47 BOLERO LNTO
48 REGGAE 12
27 ROCK&ROLL 1
28 ROCK&ROLL 2
29 BOOGIE
30 TWIST
TRAD JAZZ
31 DIXIELAND
32 BIG BAND
49 REGGAE 16
C&W
50 BLUEGRASS
51 C ROCK 1
52 C ROCK 2
53 COWBOY BOOG
54 C BALLAD
55 C SHUFFLE
56 TWO STEP
57 C WALTZ 1
58 C WALTZ 2
WORLD MUSIC
59 POLKA 1
60 POLKA 2
61 ESPAGNOLE
62 TARANTELLA
63 TRAD WALTZ 1
64 TRAD WALTZ 2
POWER
!
MARCH
65 MARCH 1
66 MARCH 2
67 6/8 MARCH 1
68 6/8 MARCH 2
BALLROOM STD
69 TANGO ARGN
70 FOXTROT
71 JIVE
72 QUICKSTEP
73 SLOWFOX
74 SLOW WALTZ
75 VIEN WALTZ
BALLROOM LTN
76 CHA CHA
77 RHUMBA
78 SAMBA 2
79 CONGA
80 PASODOBLE
VOLUME
"
DEMO
PIANO
STYLE
81 POP ROCK
82 POP SHUFFLE
83 ROCK POP
84 ROCK SHUFFL
85 16BEAT POP
86 16BEAT BLD 2
87 TECHNO
88 DANCE POP
89 POP RAP
90 EUROBEAT
91 DISCO POP
92 DISCO SOUL
93 R&B
94 SOUL
95 FUNK
96 6/8 BLUES
97 FUSION
98 POP BOSSA
99 SALSA
00 POP RAGGAE
MODE
NAME / SUB MENU
STYLE
EFFECT
KEYBOARD
TOUCH
MAIN VOICE
DUAL VOICE
EASY CHORD MEM
3
4
SPLIT
FINGERING
DUAL
CHORUS
STYLE
REVERB
SONG
B
REPEAT
MINUS ONE
SYNC
STOP
LARGE/SMALL
STYLE
GUIDE
HARMONY
12 VIBRAPHONE
13 MARIMBA
14 XYLOPHONE
15 TUBE BELLS
16 TIMPANI
17 STEEL DRUMS
18 MUSIC BOX
HARMONY/ECHO
EASY CHORD
MEMORY
STYLE SECTION
'
SONG
2
SPLIT VOICE
A
SONG
VOICE
1
TEMPO
6 5aug
dim
minMaj 7 sus4
A
MIDI
VOLUME
B
REVERB/OTHERS
JAM
MAIN A
MAIN B
ENDING
)
JAM TRACK
ACCOMPANIMENT
RESET
MAX
%
TEMPO
RESET
*
SYNC-START START/STOP
19 JAZZ ORG 1
20 JAZZ ORG 2
21 JAZZ ORG 3
22 FULL ORGAN
23 ROCK ORG 1
24 ROCK ORG 2
25 16+2 ORGAN
26 16+4 ORGAN
27 CHURCH ORG
28 REED ORGAN
29 MUSETTE
30 TRAD ACCORD
31 BANDONEON
GUITAR
37 CLEAN GTR
38 MUTE GUITAR
39 OVRDRV GTR
40 DIST GUITAR
BASS
41 ACC BASS
42 FINGER BASS
43 FRETLESS
44 SLAP BASS
45 SYNTH BASS
ENSEMBLE
32 CLASSIC GTR
33 FOLK GUITAR
34 12ST GUITAR
35 JAZZ GUITAR
36 OCTAVE GTR
46 STRINGS
47 CHAMBER STR
48 SYNTH STRS
49 SLOW STRS
50 TREMOLO STR
51 VIOLIN+STRS
1
2
3
4
5
6
7
8
9
52 PIZZ STR
53 CHOIR
54 CHOIR AAHS
55 CHOIR OOHS
56 SYNTH CHOIR
57 ORCH HIT
STRINGS
58 VIOLIN
59 CELLO
60 CONTRABASS
61 HARP
BRASS
62 TRUMPET
63 MUTE TRP
64 TROMBONE
65 TRB SECTION
66 FRENCH HORN
TEMPO
INTRO
MAIN/AUTO FILL
ENDING
JAM TRACK
SYNCSTOP
LARGE/
SMALL
STYLE
ONE TOUCH SETTING
KEYBOARD
&
START/STOP
TOUCH
RESPONSE
SPLIT
FINGERING
EASY CHORD MEMORY
REPEAT PLAY MINUS ONE
1
2
MEASURE
SONG
3
4
NO
DUAL/
CHORUS
YES
HARMONY/
ECHO
EASY CHORD MEMORY
REC/
END
BEAT
MIDI
OUT
IN
6
6
89 SQUARE LEAD
90 SAWTOOTH LD
91 VOICE LEAD
92 CRYSTAL
93 BRIGHTNESS
94 ANALOG LEAD
SYNTH PAD
95 FANTASIA
96 BELL PAD
97 XENON PAD
98 ANGELS
99 DARK MOON
DRUM KIT
00 DRUM KIT
PSR-220
5 VOICE EFFECT
0
+
84 PICCOLO
General MIDI compatible
Reverb and chorus effects
Touch responsive keys
SONG
VOLUME
73 SOPRANO SAX
74 ALTO SAX
75 TENOR SAX
76 BARI SAX
77 SAX+CLARNET
78 SAX+TRB
79 OBOE
80 ENG HORN
81 BASSOON
82 CLARINET
83 HARMONICA
PIPE
85 FLUTE
86 PAN FLUTE
87 RECORDER
88 OCARINA
SYNTH LEAD
MAIN MENU
INTRO
VOICE
MIN
VOLUME
67 TUBA
68 BRASS SECT
69 BRASS+SAX
70 BRASS+TRB
71 BRASS+TRP
72 SYNTH BRASS
REED
ORGAN
01 GRAND PIANO
02 HONKY-TONK
03 FUNKY E PNO
04 DX E PIANO
05 MIDI GRAND
06 HYPER E PNO
07 BELL E PNO
08 HARPSICHORD
09 HARPSI CPL
10 CLAVI
11 CELESTA
MALLETS
MAIN MENU
GrandPno
CART
ONE TOUCH SETTING
SUB MENU
#
(
SONG
CLEAR
SUSTAIN
PHONES/
AUX OUT
DC IN 10-12
+ -
7
8
9
REVERB
Top Panel Controls
! POWER switch ..........................................................................page 5
" VOLUME control ........................................................................page 5
# DEMO button ............................................................................page 5
$ ACCOMPANIMENT/SONG VOLUME controls ................pages 23, 32
% ACCOMPANIMENT/SONG TEMPO controls ........................ page 22
& KEYBOARD controls
67 TUBA
68 BRASS SECT
69 BRASS+SAX
70 BRASS+TRB
71 BRASS+TRP
72 SYNTH BRASS
REED
ORGAN
19 JAZZ ORG 1
20 JAZZ ORG 2
21 JAZZ ORG 3
22 FULL ORGAN
23 ROCK ORG 1
24 ROCK ORG 2
25 16+2 ORGAN
26 16+4 ORGAN
27 CHURCH ORG
28 REED ORGAN
29 MUSETTE
30 TRAD ACCORD
31 BANDONEON
GUITAR
52 PIZZ STR
53 CHOIR
54 CHOIR AAHS
55 CHOIR OOHS
56 SYNTH CHOIR
57 ORCH HIT
STRINGS
37 CLEAN GTR
38 MUTE GUITAR
39 OVRDRV GTR
40 DIST GUITAR
BASS
41 ACC BASS
42 FINGER BASS
43 FRETLESS
44 SLAP BASS
45 SYNTH BASS
ENSEMBLE
32 CLASSIC GTR
33 FOLK GUITAR
34 12ST GUITAR
35 JAZZ GUITAR
36 OCTAVE GTR
46 STRINGS
47 CHAMBER STR
48 SYNTH STRS
49 SLOW STRS
50 TREMOLO STR
51 VIOLIN+STRS
1
2
3
4
5
6
7
8
9
58 VIOLIN
59 CELLO
60 CONTRABASS
61 HARP
BRASS
62 TRUMPET
63 MUTE TRP
64 TROMBONE
65 TRB SECTION
66 FRENCH HORN
89 SQUARE LEAD
90 SAWTOOTH LD
91 VOICE LEAD
92 CRYSTAL
93 BRIGHTNESS
94 ANALOG LEAD
SYNTH PAD
73 SOPRANO SAX
74 ALTO SAX
75 TENOR SAX
76 BARI SAX
77 SAX+CLARNET
78 SAX+TRB
79 OBOE
80 ENG HORN
81 BASSOON
82 CLARINET
83 HARMONICA
PIPE
95 FANTASIA
96 BELL PAD
97 XENON PAD
98 ANGELS
99 DARK MOON
DRUM KIT
84 PICCOLO
00 DRUM KIT
PSR-230
5 VOICE EFFECT
YES
CARTRIGE
• TOUCH RESPONSE button ..................................................page 18
• SPLIT button ........................................................................ page 14
• FINGERING button ..............................................................page 24
' SUB MENU buttons .......................................................... pages 8, 11
3
0
NO
85 FLUTE
86 PAN FLUTE
87 RECORDER
88 OCARINA
SYNTH LEAD
EASY
CHORD
MEMORY
DUAL/
CHORUS
REC/
END
SONG
CLEAR
HARMONY/
ECHO
( Panel Display .......................................................................... page 8
) MAIN MENU buttons ...................................................... pages 8, 11
REVERB
CART
* ACCOMPANIMENT controls
• SYNC-START button ............................................................page 21
• START/STOP button ............................................................ page 21
• INTRO button ...................................................................... page 21
• MAIN/AUTO FILL A, B buttons .................................. pages 21, 22
• ENDING button .................................................................. page 24
• JAM TRACK button ............................................................ page 23
• SYNC-STOP button ............................................................ page 24
• LARGE/SMALL button ........................................................ page 23
+ SONG controls
• START/STOP button ............................................................ page 29
• REPEAT PLAY button .......................................................... page 29
• MINUS ONE button ............................................................ page 31
• GUIDE button (PSR-230 only) ............................................ page 30
67 TUBA
68 BRASS SECT
69 BRASS+SAX
70 BRASS+TRB
71 BRASS+TRP
72 SYNTH BRASS
REED
ORGAN
19 JAZZ ORG 1
20 JAZZ ORG 2
21 JAZZ ORG 3
22 FULL ORGAN
23 ROCK ORG 1
24 ROCK ORG 2
25 16+2 ORGAN
26 16+4 ORGAN
27 CHURCH ORG
28 REED ORGAN
29 MUSETTE
30 TRAD ACCORD
31 BANDONEON
GUITAR
37 CLEAN GTR
38 MUTE GUITAR
39 OVRDRV GTR
40 DIST GUITAR
BASS
41 ACC BASS
42 FINGER BASS
43 FRETLESS
44 SLAP BASS
45 SYNTH BASS
ENSEMBLE
32 CLASSIC GTR
33 FOLK GUITAR
34 12ST GUITAR
35 JAZZ GUITAR
36 OCTAVE GTR
46 STRINGS
47 CHAMBER STR
48 SYNTH STRS
49 SLOW STRS
50 TREMOLO STR
51 VIOLIN+STRS
1
2
3
4
5
6
7
8
9
52 PIZZ STR
53 CHOIR
54 CHOIR AAHS
55 CHOIR OOHS
56 SYNTH CHOIR
57 ORCH HIT
STRINGS
58 VIOLIN
59 CELLO
60 CONTRABASS
61 HARP
BRASS
62 TRUMPET
63 MUTE TRP
64 TROMBONE
65 TRB SECTION
66 FRENCH HORN
84 PICCOLO
General MIDI compatible
Reverb and chorus effects
Touch responsive keys
89 SQUARE LEAD
90 SAWTOOTH LD
91 VOICE LEAD
92 CRYSTAL
93 BRIGHTNESS
94 ANALOG LEAD
SYNTH PAD
95 FANTASIA
96 BELL PAD
97 XENON PAD
98 ANGELS
99 DARK MOON
DRUM KIT
00 DRUM KIT
PSR-220
DUAL/
CHORUS
YES
HARMONY/
ECHO
, VOICE Mode button ................................................................page 10
- STYLE Mode button ................................................................ page 20
. SONG Mode button .............................................................. page 28
/ ONE TOUCH SETTING 1 - 4 buttons ............................ pages 27, 33
(also:) EASY CHORD MEMORY controls ................................ page 35
• MEASURE +/- buttons ........................................................ page 35
5 VOICE EFFECT
0
NO
73 SOPRANO SAX
74 ALTO SAX
75 TENOR SAX
76 BARI SAX
77 SAX+CLARNET
78 SAX+TRB
79 OBOE
80 ENG HORN
81 BASSOON
82 CLARINET
83 HARMONICA
PIPE
85 FLUTE
86 PAN FLUTE
87 RECORDER
88 OCARINA
SYNTH LEAD
REVERB
• BEAT +/- buttons ................................................................ page 35
EASY CHORD MEMORY
REC/
END
0 Numeric keypad .................................................................... page 10
SONG
CLEAR
1 -/NO, +/YES buttons ............................................................ page 11
2 CARTRIDGE button (PSR-230) ................................................ page 37
3 Music Cartridge slot (PSR-230) ............................................ page 36
4 EASY CHORD MEMORY (REC/END) button .......................... page 34
5 VOICE EFFECT controls
• DUAL/CHORUS button .............................................. pages 12, 16
(also:) SONG CLEAR button for Easy Chord Memory .................. page 35
• HARMONY/ECHO button .................................................. page 16
• REVERB button .................................................................... page 18
Rear Panel Terminals
IDI
6
IN
SUSTAIN
PHONES/
AUX OUT
DC IN 10-12
+ -
7
8
9
6 MIDI IN/OUT terminals .......................................................... page 38
7 SUSTAIN jack .......................................................................... page 4
8 PHONES/AUX OUT jack .......................................................... page 4
9 DC IN 10-12V jack ................................................................
page 3
7
Basic Display Operations
The PortaTone features a large multi-function display that shows all important settings for the instrument. The
section below briefly explains the various icons and indications in the display.
Main Menus and S
MAIN MENU • NAME/SUB MENU
The Main Menu and the Sub Menus give you access to the detailed settings for the PortaTone. These include settings for the
Main, Dual and Split Voices, as well as various settings for the Styles, Songs and effects. They also include MIDI settings and
overall controls. The display indicates the selected Main Menu item, and shows the name and number of the selected Voice,
Style, or Song, or the selected Sub Menu parameter.
• Main Voice (page 11)
— Main Voice Name
— Main Voice Volum
— Main Voice Octave
— Main Voice Pan
— Main Voice Reverb
— GM Voice
Use the MAIN MENU buttons to select a Main Menu item, and the SUB MENU buttons to select a Sub Menu item. The first Sub
Menu item can be directly selected by pressing both SUB MENU buttons simultaneously.
KEYBOARD
MODE
This section contains indications for the keyboard-related
functions: Touch Response (page 18), Split mode (page
14), and Fingering (page 24). Pressing the appropriate
button in the KEYBOARD section of the panel turns the
corresponding function on/off. (The display indication
appears or disappears accordingly.)
•CART (Cartridge) (P
When a Music Cartridg
Style is selected, this ic
This section indicates which mode is selected — Voice,
Style, Song, or Easy Chord Memory. To select the desired
mode, press the corresponding button: VOICE, STYLE,
SONG, or EASY CHORD MEMORY (REC/END).
CART
STYLE
VOICE
SONG
EASY CHORD MEM
•General MIDI
When a GM Voice is se
icon appears.
ONE TOUCH SETTING
TOUCH
SPLIT
This indicates which of the One Touch Settings have been
called up. To select a One Touch Setting, press one of the
ONE TOUCH SETTING buttons. (See pages 27, 33.)
FINGERING
SONG
1
This section contains indications for the Song-related
functions: Repeat Play (page 29), Minus One (page 31),
and Guide (PSR-230 only) (page 30). Pressing the
appropriate button on the panel turns the corresponding
function on/off. (The display indication appears or
disappears accordingly.)
2
3
4
NAME / SUB
MODE
Gra
CART
STYLE
ONE TOUCH SETTING
A
B
REPEAT
KEYBOARD
MINUS ONE
GUIDE
EFFECT
STYLE
EASY CHORD MEMORY
STYLE
This section contains indications for the Easy Chord Memory
function (page 33). These include the current measure and
beat, as well as the chord name entered at the current
position. The chord name is also displayed when playing
chords in the Auto Accompaniment section of the keyboard
(page 22). The current measure and beat are also displayed
during Song playback (page 28).
6 5aug
dim
minMaj 7 sus4
8
TOUCH
A
SONG
This section contains indications for the Style-related
functions: Sync Stop (page 24), Large/Small (page 23), and
Tempo (page 22). Pressing the SYNC-STOP button turns that
function on/off. Pressing the LARGE/SMALL button switches
between the two accompaniment ensemble “sizes”: Large and
Small. Using the TEMPO controls changes the playback
speed and the TEMPO value in the display. The metronome
icon flashes in time with the current tempo.
SYNC
STOP
LARGE/SMALL
TEMPO
EASY CHORD
MEMORY
STYLE SECTION
VOICE
SONG
1
2
SPLIT
FINGERING
B
REPEAT
MINUS ONE
SYNC
STOP
LARGE/SMALL
GUIDE
TEMPO
6
dim
minMaj 7 s
B
A
STYLE SECTION
This indicates playba
rhythm/accompanim
“sections” — Intro, M
and Jam Track — eac
as it plays. These can
appropriate button du
page 22.)
A
Main Menus and Sub Menus
settings for the
DI settings and
selected Voice,
em. The first Sub
• MIDI (page 40)
— Remote Channel
— Keyboard Out
— Accompaniment Out
— Receive Channel Select
— Receive Switch
— Local Control
— External Clock
• Split Voice (page 15)
— Split Voice Name
— Split Voice Volume
— Split Voice Octave
— Split Voice Pan
— Split Voice Reverb Level
— Split Point 1
— Split Point 2
— GM Voice
•CART (Cartridge) (PSR-230 only)
When a Music Cartridge Song or
Style is selected, this icon appears.
s selected — Voice,
To select the desired
on: VOICE, STYLE,
Y (REC/END).
• Harmony/Echo (page 17)
— Type Name
— Harmony Volume
— Echo Speed
• Dual Voice (page 13)
— Dual Voice Name
— Dual Voice Volume
— Dual Voice Octave
— Dual Voice Pan
— Dual Voice Reverb Level
— GM Voice
• Main Voice (page 11)
— Main Voice Name
— Main Voice Volume
— Main Voice Octave
— Main Voice Pan
— Main Voice Reverb Level
— GM Voice
CART
EASY CHORD MEM
• Style (page 20, 26)
— Style Name
— Accompaniment Split Point
•General MIDI
When a GM Voice is selected, this
icon appears.
uch Settings have been
etting, press one of the
ee pages 27, 33.)
• Song (page 32)
— Song Name
— Minus One Part
— Minus One Right Hand Channel
— Minus One Left Hand Channel
4
e-related
(page 23), and
button turns that
L button switches
“sizes”: Large and
he playback
The metronome
NAME / SUB MENU
MODE
STYLE
EFFECT
STYLE
EASY CHORD
MEMORY
STYLE SECTION
SONG
2
EASY CHORD MEM
3
MAIN VOICE
DUAL VOICE
4
SPLIT VOICE
TOUCH
A
SONG
VOICE
1
ONE TOUCH SETTING
KEYBOARD
MAIN MENU
GrandPno
CART
SPLIT
FINGERING
DUAL
CHORUS
STYLE
HARMONY
REVERB
SONG
B
REPEAT
MINUS ONE
SYNC
STOP
LARGE/SMALL
GUIDE
• Reverb/Others (page 19)
— Reverb Type Name
— Transpose
— Tuning
— Voice Set
— Touch Sensitivity
— Guide Lamp (PSR-230 only)
— Metronome
EFFECT
This section contains indications for the Voice effectrelated functions: Dual mode (page 12), Chorus (page 16),
Harmony/Echo (page 16), and Reverb (page 18). Pressing
the appropriate button in the VOICE EFFECT section of
the panel turns the corresponding function on/off. (The
display indication appears or disappears accordingly.)
HARMONY/ECHO
TEMPO
6 5aug
dim
minMaj 7 sus4
MIDI
VOLUME
B
A
JAM
REVERB/OTHERS
DUAL
CHORUS
HARMONY
REVERB
JAM
STYLE SECTION
This indicates playback of the Styles, or the
rhythm/accompaniment patterns. Each Style has different
“sections” — Intro, Main A and B, four Fill-ins, Ending,
and Jam Track — each of which is indicated in the display
as it plays. These can be played by pressing the
appropriate button during accompaniment playback. (See
page 22.)
A
B
VOLUME
This graphic indication shows the Accompaniment and
Song volume.
JAM
VOLUME
9
Playing Voices —The Voice Mode
The PortaTone features a wealth of dynamic, realistic Voices — 100 Panel Voices, or 129 GM Voices (128
Voices + 1 Percussion Kit). (See pages 42, 43.) The Voice mode gives you many powerful and versatile
tools for playing and enhancing these Voices.
The Voice mode is actually divided into three separate modes: Main, Dual and Split. In the Main Voice mode (see
below), you can play a single Voice over the entire range of the keyboard. The Dual Voice mode (page 12) allows
you to “layer” two different Voices together for rich, complex sounds. The Split Voice mode (page 14) lets you set
up two different Voices for playing from separate sections of the keyboard. Moreover, a special Voice Effect
section (page 16 - 18) lets you enhance the sound of the Voice or Voices with Chorus, Harmony, Echo, and Reverb
effects.
Selecting and Playing a Voice — Main Voice Mode
1 Select the Voice mode.
Press the VOICE button. (The VOICE indications appear in the display, indicating that the Voice
mode and Main Voice menu are selected.)
VOICE
NAME / SUB MENU
MODE
STYLE
KEYBOARD
EFFECT
VOICE
1
ONE TOUCH SETTING
MAIN MENU
GrandPno
CART
SONG
2
EASY CHORD MEM
3
MAIN VOICE
DUAL VOICE
4
SPLIT VOICE
TOUCH
SPLIT
FINGERING
DUAL
CHORUS
STYLE
NOTE
• You can quickly select the first parameter in the Main Voice menu (Main Voice Volume) by pressing and holding
the VOICE button.
• Selecting MAIN VOICE (or DUAL VOICE, SPLIT VOICE) with the Main Menu buttons does not change the selected
mode; the Style or Song mode is still active, but the appropriate Voice menu is called up.
2 Select the desired Voice number.
Use the numeric keypad. Available Voices are listed on the upper right of the panel.
You can either enter the Voice number directly with the number buttons, or step up and down
through the Voices by using the +/- buttons.
Using the number buttons
Be sure to enter a two-digit number, as is printed next to each Voice name on the panel. For
example, to select Voice 09, first press “0” on the numeric keypad, then “9.”
1
2
3
1
2
3
4
5
6
4
5
6
7
8
9
7
8
9
0
NO
0
YES
NO
For GM Voices, make sure to enter three-digit numbers.
10
YES
Using the +/- buttons
Press the + button to select the next Voice, and press the - button to select the previous Voice.
Holding down either button continuously scrolls up or down through the numbers. The +/- buttons
have a “wrap around” feature. For example, pressing the + button from the last number returns to
Voice 01.
About Panel Voices and GM Voices
Keep in mind that the PortaTone has two separate sets of Voices: 100 Panel Voices and 129 GM
(General MIDI) Voices. The GM Voices can also be used for optimum playback of GMcompatible song data. This means that any GM song data (played from a sequencer or other
MIDI device) will sound just as the composer or programmer intended.
To change between Panel and GM Voices, use the Sub Menu in the Main, Dual, or Split Voice
modes (see pages 11, 13, 15).
3 Play the selected Voice.
To change to another Voice, repeat step 2 above.
NOTE
• You can also play rhythm Styles in the Voice mode by simply pressing the START/STOP button. The Style last selected
from the Style mode will be played.
other settings for the Voice — Volume, Octave,
4 Change
Pan, etc. — if you wish.
Whenever you select a Panel Voice for the Main Voice, the Sub Menu parameters for that Voice are
automatically set to values that best suit the Voice. This is the Voice Set function. (See page 19.)
However, you can change the Voice settings if you wish by using the Sub Menu. First, select the
desired Sub Menu parameter with the SUB MENU buttons. Then, use the numeric keypad or +/buttons to change the setting.
SUB MENU
NAME / SUB MENU
MODE
STYLE
EFFECT
SONG
2
EASY CHORD MEM
3
MAIN VOICE
DUAL VOICE
4
SPLIT VOICE
TOUCH
A
SONG
VOICE
1
ONE TOUCH SETTING
KEYBOARD
MAIN MENU
M.Volume
CART
REPEAT
STYLE
SPLIT
FINGERING
DUAL
CHORUS
STYLE
HARMONY
REVERB
SONG
B
MINUS ONE
GUIDE
HARMONY/ECHO
■ Main Voice Sub Menu
Parameter Name
Display Name
Range
Description
Main Voice Name
—
01 - 00/001 - 129
This determines the Main Voice. Panel Voices are
from 01 - 00, and GM Voices are from 001 - 129. (To
change between Panel and GM Voices, use the GM
Voice parameter below.)
Main Voice Volume
M.Volume
000 - 127
This determines the volume of the Main Voice, letting
you create the optimum blend with the Dual Voice.
Main Voice Octave
M.Octave
-2 - +2 octaves
This determines the octave range for the Main Voice.
Main Voice Pan
M.Pan
-7 (full left) - +7
(full right)
This determines the pan position of the Main Voice in
the stereo image.
Main Voice Reverb
Level
M.RevLvl
000 - 127
This determines how much of the Main Voice’s signal
is sent to the Reverb effect. Higher values result in a
louder Reverb effect.
GM Voice
GMvoice
on, off
This determines whether the Main Voice is selected
from the Panel Voices (off), or from the GM Voices
(on). When GM Voice is on, the General MIDI icon
will appear at the left of the Voice number in the
display.
11
NOTE
• The Main Voice Volume parameter can be directly selected by pressing and holding down the VOICE button.
• The Main Voice Name parameter can be directly selected by pressing both MAIN MENU buttons simultaneously.
• Reset to default settings
To reset the selected Main Voice parameter to its default settings, simultaneously press the +/- buttons.
• Negative values
To directly enter negative values (for Octave and Pan parameters), press the desired number button while holding
down the - button.
■ Percussion Kit Voice Chart
Mu
te
eM
Sh
ut
ak
e
er
gl
ca
ian
Cu
i
Tr
Br
us
h
Cl
Br
i
Sw ush ck
S
irl
W wirl
/A
Sn ttac
k
ar
eR
ol
S
l
n
Ba
ss are
1
Ba Dru
m
ss
1
Ba Dru
m
ss
Dr 2
um
Sn 3
ar
e
Sn 2
Fl
oo are
rT 3
Fl
oo om
L
rT
o
Lo m H
w
Mi Tom
d
T
Mi om
d
To L
Ch Hig m H
in
h
Ri ese Tom
de
C
Cy ym
b
Sp mba al
lC
la
Cr sh C up
as
h ymb
Ri Cym al
de
b
Cy al 2
m
ba
l
Co Bon 2
g
ng
aH oH
M
Co ute
n
Ti ga L
m
ba
l
Ag e H
og
o
Sa
m
Ca H
b
ba
Sa a W
sa
h
m
ba istl
eH
W
hi
Gu stle
L
W iro
oo
Lo
d
Bl ng
W
o
oo
ck
d
H
B
Cu lock
i
Tr ca O L
ian
gl pen
e
Jin Ope
n
gl
eB
Be ell
ll T
re
e
Br
u
sh
Ta
Br
p
us
h
Sl
ap
Ca
st
an
et
St
ick
s
Op
en
Ri
m
Sh
Cl
ot
os
ed
R
Ha
im
nd
Sh
Cl
ot
ap
Hi
-H
at
Cl
Hi
os
-H
ed
at
Pe
Hi
da
-H
l
at
Op
en
Cr
as
h
Cy
Ri
m
de
ba
l1
Cy
m
ba
Ta
l1
m
bo
ur
Co
i
wb ne
ell
Vi
br
as
lap
Bo
ng
o
L
Co
ng
aH
Op
Ti
en
m
ba
le
Ag
L
og
o
L
Ma
ra
ca
s
Gu
iro
Sh
or
Cl
t
av
es
The PortaTone also has a special Percussion Kit Voice (Panel Voice #00, or GM Voice #129) that lets you
play various drum and percussion sounds from the keyboard. Symbols for the sounds are also printed
above the keyboard, conveniently indicating which sounds are played from which keys.
NOTE
• The corresponding MIDI note numbers for the notes are actually one octave lower. For example, the MIDI note
number for note 36 (C1) is note 24 (C0).
Playing Two Voices — Dual Voice Mode
The Dual Voice mode lets you create richly textured sounds by “layering” two different Voices together — one
Voice being the Main Voice selected in the normal way (page 10), and the other a Dual Voice selected as described
below.
1 Turn on the Dual Voice mode.
Press the DUAL/CHORUS button (in the VOICE EFFECT section) once, or repeatedly until the Dual
Voice icon appears in the display.
VOICE EFFECT
DUAL/
CHORUS
HARMONY/
ECHO
REVERB
SONG
CLEAR
DUAL/CHORUS button
DUAL
DUAL icon in display
When you play the keyboard, both the currently selected Main and Dual Voices will be heard.
12
the desired Dual Voice and make other settings for the Voice,
2 ifSelect
desired.
First, use the MAIN MENU buttons to select DUAL VOICE in the display.
MAIN MENU
NAME / SUB MENU
MODE
STYLE
EFFECT
SONG
2
EASY CHORD MEM
3
MAIN VOICE
DUAL VOICE
4
SPLIT VOICE
TOUCH
A
SONG
VOICE
1
ONE TOUCH SETTING
KEYBOARD
MAIN MENU
ViolinSt
CART
SPLIT
FINGERING
DUAL
CHORUS
STYLE
HARMONY
REVERB
SONG
B
REPEAT
MINUS ONE
GUIDE
HARMONY/ECHO
Next, select the desired Sub Menu parameter with the SUB MENU buttons. Then, use the numeric
keypad or +/- buttons to change the setting.
SUB MENU
NAME / SUB MENU
MODE
STYLE
EFFECT
STYLE
SONG
2
EASY CHORD MEM
3
MAIN VOICE
DUAL VOICE
4
SPLIT VOICE
TOUCH
A
SONG
VOICE
1
ONE TOUCH SETTING
KEYBOARD
MAIN MENU
D.Volume
CART
SPLIT
FINGERING
DUAL
CHORUS
STYLE
HARMONY
REVERB
SONG
B
REPEAT
MINUS ONE
SYNC
STOP
LARGE/SMALL
GUIDE
HARMONY/ECHO
TEMPO
MIDI
■ Dual Voice Sub Menu
Parameter Name
Display Name
Range
Description
Dual Voice Name
—
01 - 00/001 - 129
This determines the Dual Voice. Panel Voices are
from 01 - 00, and GM Voices are from 001 - 129. (To
change between Panel and GM Voices, use the GM
Voice parameter below.)
Dual Voice Volume
D.Volume
000 - 127
This determines the volume of the Dual Voice
(relative to the Main Voice’s volume), letting you
create the optimum blend with the Main Voice.
Dual Voice Octave
D.Octave
-2 - +2 octaves
This determines the octave range for the Dual Voice
(relative to the Main Voice’s octave setting).
Dual Voice Pan
D.Pan
-7 (full left) - +7
(full right), -(opposite of
Main Voice)
This determines the pan position of the Dual Voice in
the stereo image. To set Dual Voice Pan to the
opposite of that of the Main Voice (“--”), press the +
or - button (past +7 or -7).
Dual Voice Reverb
Level
D.RevLvl
000 - 127
This determines how much of the Dual Voice’s signal
is sent to the Reverb effect. Higher values result in a
louder Reverb effect for the Dual Voice.
GM Voice
GMvoice
on, off
This determines whether the Dual Voice is selected
from the Panel Voices (off), or from the GM Voices
(on). When GM Voice is on, the General MIDI icon
will appear at the left of the Voice number in the
display.
NOTE
• If the Voice Set function (page 19) is on, the Dual Voice parameters will change automatically whenever a different
Panel Voice is selected in the Main Voice menu.
• The Dual Voice Name parameter can be directly selected by pressing and holding down the DUAL/CHORUS button.
• Reset to default settings
To reset the selected Dual Voice parameter to its default settings, simultaneously press the +/- buttons.
• Negative values
To directly enter negative values (for Octave and Pan parameters), press the desired number button while holding
down the - button.
13
Playing Two Voices — Split Voice Mode
In the Split Voice mode, you can assign two different Voices to opposite sections of the keyboard, and play one
Voice with your left hand while your right plays another. For example, you could play bass with the left hand and
play piano with the right. The right-hand (or upper) Voice is selected in the Main Voice mode, and the left-hand (or
lower) Voice is selected in the Split Voice mode, as described below.
1 Turn on the Split Voice mode.
Press the SPLIT button (in the KEYBOARD section) so that the Split Voice icon appears in the
display.
KEYBOARD
TOUCH
RESPONSE
SPLIT
FINGERING
SPLIT
SPLIT button
SPLIT icon in display
When you play the keyboard, both the currently selected Main and Split Voices will be heard.
Select the desired Split Voice and make other settings for the Voice, if
2 desired.
First, use the MAIN MENU buttons to select SPLIT VOICE in the display.
MAIN MENU
NAME / SUB MENU
MODE
STYLE
EFFECT
SONG
2
EASY CHORD MEM
3
MAIN VOICE
DUAL VOICE
4
SPLIT VOICE
TOUCH
A
SONG
VOICE
1
ONE TOUCH SETTING
KEYBOARD
MAIN MENU
FngrBass
CART
SPLIT
FINGERING
DUAL
CHORUS
STYLE
HARMONY
REVERB
SONG
B
REPEAT
MINUS ONE
GUIDE
HARMONY/ECHO
STYLE
Next, select the desired Sub Menu parameter with the SUB MENU buttons. Then, use the numeric
keypad or +/- buttons to change the setting.
SUB MENU
NAME / SUB MENU
MODE
STYLE
EFFECT
STYLE
SONG
2
EASY CHORD MEM
3
MAIN VOICE
DUAL VOICE
4
SPLIT VOICE
TOUCH
A
SONG
VOICE
1
ONE TOUCH SETTING
KEYBOARD
MAIN MENU
S.Volume
CART
SPLIT
FINGERING
DUAL
CHORUS
STYLE
HARMONY
REVERB
SONG
B
REPEAT
MINUS ONE
SYNC
STOP
LARGE/SMALL
GUIDE
HARMONY/ECHO
TEMPO
NOTE
• Dual Voice and Split Voice can be used together. You can have the Split Voice play in the lower section of the
keyboard and play the Main and Dual Voices together in the upper.
14
■ Split Voice Sub Menu
Parameter Name Display Name
Range
Description
Split Voice Name
—
01 - 00/001 - 129
This determines the Split (lower) Voice. Panel Voices
are from 01 - 00, and GM Voices are from 001 - 129.
(To change between Panel and GM Voices, use the
GM Voice parameter below.)
Split Voice Volume
S.Volume
000 - 127
This determines the volume of the Split (lower) Voice,
letting you create the optimum blend with the Main
(upper) Voice.
Split Voice Octave
S.Octave
-2 - +2 octaves
This determines the octave range for the Split (lower)
Voice.
Split Voice Pan
S.Pan
-7 (full left) - +7
(full right)
This determines the pan position of the Split (lower)
Voice in the stereo image.
Split Voice Reverb
Level
S.RevLvl
000 - 127
This determines how much of the Split (lower) Voice’s
signal is sent to the Reverb effect. Higher values
result in a louder Reverb effect for the Split Voice.
Split Point 1
SpltPnt1
36 - 96 (C1 - C6)
This determines the Split Point — i.e., the key that
separates the Split (lower) and Main (upper) Voices
— when the Voice mode or Song mode is active.
(The Split Voice sounds up to and including the Split
Point key.) The default for Split Point 1 is 59 (B2).
Split Point 1 can also be set directly by pressing the
desired key while this parameter is selected.
Split Point 2
SpltPnt2
37 - 96 (C#1 - C6)
This determines the Split Point — i.e., the key that
separates the Split (lower) and Main (upper) Voices
— when the Style mode is active. (The Split Voice
sounds up to and including the Split Point key.) The
default for Split Point 2 is 71 (B3). Split Point 2 can
also be set directly by pressing the desired key while
this parameter is selected.
GM Voice
GMvoice
on, off
This determines whether the Split Voice is selected
from the Panel Voices (off), or from the GM Voices
(on). When GM Voice is on, the General MIDI icon
will appear at the left of the Voice number in the
display.
NOTE
• If the Voice Set function (page 19) is on, the Split Voice parameters (excepting Split Points 1 and 2) will change
automatically whenever a different Panel Voice is selected in the Main Voice menu.
• The Split Voice Name parameter can be directly selected by pressing and holding down the SPLIT button.
• Split Point 2 cannot be set lower than the Accompaniment Split Point. (See page 26.)
• The Split Point 1 and 2 settings are retained in memory when power is turned off, as long as batteries are installed
or an AC adaptor is connected.
• Reset to default settings
To reset the selected Split Voice parameter to its default settings, simultaneously press the +/- buttons.
• Negative values
To directly enter negative values (for Octave and Pan parameters), press the desired number button while holding
down the - button.
15
Other Voice Controls
Chorus
The Chorus effect lets you enhance the sound of a Voice with chorus modulation. This slightly detunes the Voice
with itself, creating a thicker and warmer sound.
Turn on the Chorus effect.
Press the DUAL/CHORUS button once or twice, or until the CHORUS icon appears in the display.
VOICE EFFECT
DUAL/
CHORUS
HARMONY/
ECHO
REVERB
SONG
CLEAR
CHORUS
DUAL/CHORUS button
CHORUS icon in display
NOTE
• The Chorus effect can be applied to the Main Voice.
Harmony/Echo
Harmony and Echo are two separate effects that can be applied to a Voice. Harmony is used in conjunction with
the auto accompaniment features (page 20), and creates automatic harmonies (for notes played in the upper section
of the keyboard) to match the accompaniment chords. Echo produces delayed repeats of the sound for special
effects. Various settings for the two effects can be changed in the Sub Menus.
To use Harmony or Echo:
1 Turn on the Harmony/Echo effect.
Press the HARMONY/ECHO button. (The HARMONY icon appears in the display.)
VOICE EFFECT
DUAL/
CHORUS
HARMONY/
ECHO
REVERB
SONG
CLEAR
HARMONY/ECHO button
HARMONY
HARMONY icon in display
When you play the keyboard, the currently selected Harmony or Echo effect will be heard.
16
the Harmony/Echo type and make other settings for the
2 Change
effect, if desired.
Use the MAIN MENU buttons to select the HARMONY/ECHO menu, and select the desired Sub
Menu parameter with the SUB MENU buttons. Then, use the numeric keypad or +/- buttons to
change the setting.
MAIN MENU
NAME / SUB MENU
MODE
STYLE
EFFECT
STYLE
SONG
2
MAIN VOICE
EASY CHORD MEM
3
DUAL VOICE
4
SPLIT VOICE
TOUCH
A
SONG
VOICE
1
ONE TOUCH SETTING
KEYBOARD
MAIN MENU
Duet
CART
SPLIT
FINGERING
REPEAT
MINUS ONE
SYNC
STOP
LARGE/SMALL
EASY CHORD
MEMORY
DUAL
CHORUS
STYLE
HARMONY
REVERB
SONG
B
GUIDE
HARMONY/ECHO
TEMPO
dim
6
7
5aug
MIDI
■ Harmony/Echo Sub Menu
Parameter Name
Display Name
Range
Description
Type Name
—
1 - 8 (1-5:
Harmony types;
6-8: Echo types)
This determines the type of effect for Harmony or
Echo. The Harmony types are (1) Duet, (2) Trio, (3)
Block, (4) Country, and (5) Octave. The Echo types
are (6) Trill, (7) Tremolo, and (8) Echo.
Harmony Volume
HarmVol
000 - 127
This determines the volume of the Harmony effect,
letting you create the optimum blend with the original
note.
Echo Speed
EchoSpd
1-7
This determines the “speed” of the Echo effect, or the
amount of time between the delayed repeats — which
is based on note values. The actual Echo speed
depends on the selected tempo.
Settings:
1 — 04: 1/4 note
2 — 06: 1/4 note triplets
3 — 08: 1/8 note
4 — 12: 1/8 note triplets
5 — 16: 1/16 note
6 — 24: 1/16 note triplets
7 — 32: 1/32 note
NOTE
• The Harmony effect is not available in the Voice mode, nor when the Auto Accompaniment Chord Cancel function
(page 25) is on.
• If the Voice Set function (page 19) is on, the Harmony/Echo parameters will change automatically whenever a
different Panel Voice is selected in the Main Voice menu.
• The Harmony/Echo Type Name parameter can be directly selected by pressing and holding down the
HARMONY/ECHO button.
• Reset to default settings
To reset the selected Harmony/Echo parameter to its default settings, simultaneously press the +/- buttons.
• Harmony/Echo is not available when the Full Fingering mode (page 26) is on, and will automatically be turned off
when the Full Fingering mode is selected.
17
Reverb
The Reverb effect reproduces the natural ambient “wash” that occurs when a sound is heard in a room or concert
hall. Several different Reverb types are available in the Sub Menus.
To use Reverb:
1 Turn on the Reverb effect.
Press the REVERB button. (The REVERB icon appears in the display.)
VOICE EFFECT
DUAL/
CHORUS
HARMONY/
ECHO
REVERB
SONG
CLEAR
REVERB
REVERB button
REVERB icon in display
When you play the keyboard, the currently selected Reverb effect will be heard.
2 Change the Reverb type, if desired.
First, select REVERB/OTHERS in the Main Menu, then select the Reverb Type Name parameter with
the SUB MENU buttons, and use the numeric keypad or +/- buttons to change the setting. (For
details, see the REVERB/OTHERS Sub Menu chart on page 19.)
NOTE
• The Reverb Type will change automatically whenever a different Style is selected in the Style menu.
• The Reverb Type Name parameter can be directly selected by pressing and holding down the REVERB button.
• Reverb is turned on whenever the power is turned on.
• The Reverb Send Level can be ajusted independently for each of the Main, Dual and Split Voice modes. (See pages 11, 13 and 15)
• If Reverb Type 9 (No Effect) is selected. Reverb will not be applied to the Sound, even when the REVERB button is pressed.
Touch Response
The PortaTone keyboard has a Touch Response feature, letting you expressively play the Voices, controlling the
volume by how soft or hard you strike the keys. Touch Response can be turned on or off, and the Touch Sensitivity
(the degree of Touch Response) can be adjusted.
1 Turn on the Touch Response feature.
Press the TOUCH RESPONSE button. (The TOUCH icon appears in the display.)
KEYBOARD
TOUCH
RESPONSE
SPLIT
FINGERING
TOUCH
TOUCH RESPONSE button
TOUCH RESPONSE icon in display
2 Change the Touch Sensitivity, if desired.
First, select REVERB/OTHERS in the Main Menu, then select the Touch Sensitivity parameter with
the SUB MENU buttons, and use the numeric keypad or +/- buttons to change the setting. (For
details, see the REVERB/OTHERS Sub Menu chart on page 19.)
NOTE
• The Touch Sensitivity parameter can be directly selected by pressing and holding down the TOUCH RESPONSE button.
• The Touch Response on/off setting is retained in memory when power is turned off, as long as batteries are installed
or an AC adaptor is connected.
18
Overall Controls
Various controls related to the overall operation of the PortaTone are contained in the Reverb/Others menu. These
include the Reverb Type parameter as well as the following overall parameters: Transpose, Tuning, Voice Set, Touch
Sensitivity, Guide Lamp (PSR-230 only), and Metronome.
■ Reverb/Others Sub Menu
First, use the MAIN MENU buttons to select the Reverb/Others menu, and select the desired Sub Menu
parameter with the SUB MENU buttons. Then, use the numeric keypad or +/- buttons to change the
setting.
NAME / SUB MENU
MAIN MENU
MODE
STYLE
EFFECT
STYLE
SONG
2
MAIN VOICE
EASY CHORD MEM
3
DUAL VOICE
4
SPLIT VOICE
TOUCH
A
SONG
VOICE
1
ONE TOUCH SETTING
KEYBOARD
MAIN MENU
Hall1
CART
SPLIT
FINGERING
DUAL
CHORUS
STYLE
HARMONY
REVERB
SONG
B
REPEAT
MINUS ONE
SYNC
STOP
LARGE/SMALL
GUIDE
HARMONY/ECHO
EASY CHORD
MEMORY
STYLE SECTION
Range
TEMPO
6 5aug
dim
minMaj 7 sus4
A
B
MIDI
VOLUME
JAM
REVERB/OTHERS
Parameter Name
Display Name
Description
Reverb Type Name
—
1-9
This determines the type of Reverb effect. The Reverb types
are (1) Hall 1, (2) Hall 2, (3) Room 1, (4) Room 2, (5) Plate
1, (6) Plate 2, (7) Delay 1, (8) Delay 2, and (9) No Effect.
Transpose
Transpos
-12 - +12 semitones
(+/- 1 octave)
This determines the overall pitch of the instrument, up
or down in semitone increments.
Tuning
Tuning
-50 - +50 cents (+/approx. 1 semitone)
This determines the overall fine pitch setting of the
instrument.
Voice Set
VoiceSet
on/off
This determines whether the Voice Set feature is on or
off. When Voice Set is on (default), selecting a Panel
Voice in the Main Voice menu automatically sets the
Voice-related parameters to values that best match the
selected Voice. (Voice Set includes all parameters for
the Main, Dual, and Split Voices — with the exception
of Split Points 1 and 2 — as well as all Harmony/Echo
parameters.)
Touch Sensitivity
TouchSns
0-9
This determines the degree of touch sensitivity for the
keyboard (when Touch Response is on). (See page
18.) Higher values result in a wider dynamic range
and give you more expressive control over the level of
the Voices. The default Touch Sensitivity setting is 5.
Guide Lamp (PSR230 only)
Lamp
on/off
This turns the keyboard guide lamps on or off. Red
lamps correspond to the white keys and green lamps
to the black keys. (See page 30.)
Metronome
Metronom
on/off
This turns the metronome function on or off. When
set to on, the metronome sounds during Auto
Accompaniment and Song playback.
NOTE
• Reset to default settings
To reset the selected parameter to its default settings, simultaneously press the +/- buttons.
• Negative values
To directly enter negative values (for Transpose and Tuning parameters), press the desired number button while
holding down the - button.
• The following settings are retained in memory when power is turned off, as long as batteries are installed or an AC
adaptor is connected: Tuning, Voice Set, Touch Sensitivity, Guide Lamp (PSR-230 only), and Metronome.
• Transpose cannot be changed during Accompaniment or Song playback, or when the keyboard is being played.
19
Playing Auto Accompaniment —
The Style Mode
The Style mode provides rhythm/accompaniment patterns for various popular music styles, as listed on the panel.
A total of 100 different Styles are available. Each Style is made up of different “sections” — Intro, Main A and B,
four Fill-ins, Ending, and Jam Track — letting you call different accompaniment patterns as you perform.
Each Style’s Jam Track section features specially programmed chord progressions and section changes that are
ideal for the selected musical Style. If you’re a novice and not familiar with playing chords, the convenient Jam
Track section automatically plays stylistically appropriate chord and section changes for you to “jam” over.
The Auto Accompaniment features that are built into the rhythms add the excitement of instrumental backing to
your performance, letting you control the accompaniment by the chords you play.
NOTE
• The default split point for the Auto Accompaniment section is 54 (F 2). However, this can be changed in the Style
Sub Menu. (See page 26.)
Selecting a Style and Playing an Auto Accompaniment
1 Select the Style mode.
Press the STYLE button. (The STYLE indications appear in the display, indicating that the Style
mode and the Style menu are selected.)
NAME / SUB MENU
MODE
STYLE
STYLE
EFFECT
STYLE
SONG
2
EASY CHORD MEM
3
MAIN VOICE
DUAL VOICE
4
SPLIT VOICE
TOUCH
A
SONG
VOICE
1
ONE TOUCH SETTING
KEYBOARD
MAIN MENU
8BeatPop
CART
SPLIT
FINGERING
DUAL
CHORUS
STYLE
HARMONY
REVERB
SONG
B
REPEAT
MINUS ONE
SYNC
STOP
LARGE/SMALL
GUIDE
HARMONY/ECHO
EASY CHORD
MEMORY
STYLE SECTION
TEMPO
6 5aug
dim
minMaj 7 sus4
A
B
MIDI
VOLUME
JAM
REVERB/OTHERS
NOTE
• Selecting STYLE with the Main Menu buttons does not change the selected mode; the Voice or Song mode is still
active, but the Style menu is called up.
2 Select the desired Style number.
Use the numeric keypad. Available Styles are listed on the upper left of the panel.
1
2
3
4
5
6
7
8
9
0
NO
YES
You can either enter the Style number directly with the number buttons, or step up and down
through the Styles by using the +/- buttons.
20
NOTE
• Dynamic Style
The Style numbers 81~00 are the Dynamic Styles, which play more complex and interesting accompaniment patterns
than the others since they may contain tension notes and so on. Because the note other than the notes derived from
the chord you designated may be played back, some Dynamic Styles may not match the song you play.
3 Start the selected Style.
You can do this in one of three ways:
Pressing the START/STOP button
The rhythm starts playing immediately without bass and chord accompaniment. The currently
selected Main A or B section will play. (You can select either pattern by pressing the appropriate
button — MAIN/AUTO FILL A or B — before pressing the START/STOP button.)
START/STOP
START/STOP
Using Synchro Start
The PortaTone also has a Synchro Start function that allows you to start the rhythm/accompaniment
by simply playing a chord on the keyboard. To use Synchro Start, first press the SYNC-START
button (the metronome icon flashes to indicate Synchro Start stand-by), then play a chord in the Auto
Accompaniment section of the keyboard.
SYNC-START
START/STOP
Using Synchro Start with an Intro pattern
First, press one of the section buttons — MAIN/AUTO FILL A, B, or JAM — to select which pattern
follows the Intro. Next, press the INTRO button, followed by the SYNC-START button. (The INTRO
indication in the display lights, and the metronome icon and the MAIN A /B/JAM indication flashes to
indicate Synchro Start stand-by.) To actually start the Intro pattern and accompaniment, play a chord
in the Auto Accompaniment section of the keyboard.
NOTE
• Selecting the Style mode by pressing the STYLE button automatically sets Synchro Start to stand-by.
• Pressing the SYNC-START button during accompaniment playback automatically stops the accompaniment and sets
Synchro Start to stand-by.
■ About the METRONOME Icon
The METRONOME icon in the display moves in time with the current tempo during playback of an
accompaniment Style (or Song). The flashing pattern provides a visual indication of both the tempo and
time signature of the Style or Song. The icon flashes at the first beat of each measure.
NOTE
• The metronome sound can be turned on or off as needed. (See page 19.)
21
4 Change chords using the Auto Accompaniment feature.
Try playing some chords in the Auto Accompaniment section of the keyboard, and notice how the
bass and chord accompaniment change with each chord you play. (Refer to the section “Changing
the Fingering Mode” on page 24 for more information.) The chord name recognized will be shown
in the display.
NOTE
• When the Single or Fingered Fingering mode (pages 25, 26) is selected, chords played in the Auto Accompaniment
section of the keyboard are also detected and played when the accompaniment is stopped. In this condition (Stopped
Accompaniment function), the Voices used for the bass and chords are automatically selected.
• The range of the Auto Accompaniment section can be changed; see “Changing the Accompaniment Split Point” (page 26).
5 Change the tempo of the Style, if you wish.
Use the TEMPO buttons to change the tempo of the Style.
TEMPO
RESET
TEMPO
Press TEMPO▲ to increase the speed and TEMPO▼ to decrease it; holding down the appropriate
button continuously increases/decreases the speed. The tempo value appears in the display. Tempo
range is from 32 to 280 bpm (in 1 bpm steps).
To reset the tempo to its original default setting, press both TEMPO buttons simultaneously.
NOTE
• Default Tempos — Each Song and Style has been given a default or standard tempo. If you change the tempo,
you can set it back to the original default setting, by pressing both TEMPO buttons simultaneously. Also, the tempo
of a Song or Style returns to the default setting when selecting a different Song or Style. If a Style is playing and the
One Touch Setting is off (see page 27), the set tempo remains even when switching Styles. When you turn on the
power of the PortaTone, the tempo is automatically set to the default setting of Style 01.
6 Change the Style section (Main A , Main B, or Jam Track), if you wish.
Main A and Main B
While the Style is playing, you can add variation in the rhythm/accompaniment by pressing the
MAIN/AUTO FILL A or B button. This automatically plays one of four Fill-in patterns, and smoothly
leads into the next section — even if it is the same section.
MAIN/AUTO FILL
A
A
MAIN/AUTO FILL A or B buttons
22
A indication in display
Jam Track
The Jam Track is a special accompaniment pattern that includes automatic chord progressions and
section changes that match the selected Style. Press the JAM TRACK button during playback, and
the accompaniment will continue, changing chords according to the programmed progression and
sections letting you “jam” or play along with the changes.
JAM TRACK
JAM
JAM TRACK button
JAM
JAM indication in display
Since the Jam Track progression is based on the last chord played, you may want to play the root
chord before pressing JAM TRACK. (For example, if you are playing a song in the key of E, play an
E chord before pressing JAM TRACK.)
NOTE
• If you press the MAIN A or B button, the Fill-in will begin immediately, and the new section will actually begin
playing from the top of the next measure — unless the MAIN A or B button is pressed during the last beat of the
measure, in which case the Fill-in will begin from the first beat of the next measure.
Change the accompaniment ensemble “size”
7 (LARGE/SMALL),
if you wish.
Press the LARGE/SMALL button.
SYNCSTOP
LARGE/
SMALL
LARGE/SMALL button
LARGE/SMALL
LARGE/SMALL
LARGE icon
SMALL icon
This switches between “large” ensemble and “small” ensemble accompaniment, allowing you change
the instrumental texture and dynamics of the Auto Accompaniment as you play. (The icon shows
four people when set to LARGE, and one person when set to SMALL.)
NOTE
• LARGE is selected whenever the power is turned on.
8 Change Set the Accompaniment Volume, if you wish.
You may want to adjust the accompaniment volume, separate from the overall instrument volume.
To do this, use the VOLUME buttons in the STYLE mode.
ACCOMPANIMENT
VOLUME
RESET
SONG
VOLUME
Press VOLUME▲ to increase the accompaniment volume and VOLUME▼ to decrease it; holding
down the appropriate button continuously increases/decreases the accompaniment volume. The level
is shown in the display.
VOLUME
To reset the accompaniment volume to its original default setting, press both VOLUME buttons
simultaneously.
23
9 Stop the Style.
You can do this in one of two ways:
Pressing the START/STOP button
The rhythm/accompaniment stops playing immediately.
Using an Ending pattern
Press the ENDING button (the ENDING indication in the display flashes). An ending pattern plays
from the next measure, then playback stops.
■ Sync-Stop Function
The Sync-Stop function lets you easily add natural sounding breaks and pauses in the accompaniment as
you play.
To use Sync-Stop:
1 Turn on the Sync-Stop function.
Press the SYNC-STOP button. (The SYNC-STOP icon appears in the display.)
SYNCSTOP
LARGE/
SMALL
SYNC
STOP
SYNC-STOP button
SYNC-STOP icon in display
playing the accompaniment, release your fingers from the
2 While
keyboard in the Auto Accompaniment section.
This automatically stops the accompaniment, and sets Synchro Start to stand-by. (The SYNC-STOP
icon flashes.) You can resume accompaniment playback of the selected section by playing the
keyboard again.
Changing the Fingering Mode
The PortaTone provides three different fingering modes for controlling the Auto Accompaniment function: Fingered,
Full, and Single Fingered. To select among the three, press the FINGERING button in the KEYBOARD section until
the appropriate mode is called up.
KEYBOARD
TOUCH
RESPONSE
SPLIT
FINGERING
FINGERING FINGERING FINGERING
FINGERING button
Single Finger
Fingered
Full
NOTE
• The Fingering mode setting is retained in memory when power is turned off, as long as batteries are installed or an
AC adaptor is connected.
24
■ Fingered
In the Fingered mode, you can play complete three- or four-note chords yourself in the Auto
Accompaniment section of the keyboard and the PortaTone will produce full accompaniment in the
selected Style.
Using the key of C as an example, the chart below shows the types of chords that can be recognized in
the Fingered mode. (Notes in parentheses may be omitted.)
Example for "C" chords
C
CM7
Csus4
Cm7
CmM7
C7♭5
Caug
Cdim
Abbreviation
Normal Voicing
Major [M]
1-3-5
Minor [m]
1- 3-5
Major seventh [M7]
1-3-(5)-7
Major sixth [6]
1-(3)-5-6
Suspended fourth [sus4]
1-4-5
Minor sixth [m6]
1- 3-5-6
Minor seventh [m7]
1- 3-(5)- 7
Minor seventh flatted fifth [m7]
1- 3- 5- 7
Minor major seventh [mM7]
1- 3-(5)-7
Seventh [7]
1-3-(5)- 7
Seventh flatted fifth [75]
1-3- 5- 7
Seventh suspended fourth [7sus4]
1-4-5- 7
Augmented [aug]
1-3- 5
( Seventh augmented [7aug]
1-3- 5- 7 )
Diminished [dim]
1- 3- 5
( Diminished seventh [dim7]
1- 3- 5-6 )
One + Two + Five
1-2-5
Cm
C6
Cm6
Cm7♭5
C7
C7sus4
C7aug
Cdim7
C1+2+5
NOTE
• If the chord is inverted (i.e., C-E-G is played as G-C-E), the PortaTone will still recognize it as a C chord.
• Chord fingerings are listed here in “root” position; however, other inversions can be used — with the following exceptions:
* Major 6th chords are recognized only in root position. All other inversions are interpreted as minor 7th.
* Minor 6th chords are recognized only in root position. All other inversions are interpreted as minor 7th flatted 5th.
* One + two + five chords are recognized only in root position. All other inversions are interpreted as suspended 4th.
* If augmented chord is inverted, the lowest note will be recognized as the root.
* For 7th flatted 5th chords, the lowest note played is recognized as the root or the flatted 7th.
• 7th augmented and diminished 7th chords are interpreted as simple augmented and diminished.
• For one+two+five chords, only the root is displayed.
• Chord Cancel function
The PortaTone also has a Chord Cancel function to stop the chord accompaniment but allow the rhythm pattern to
continue playing. To use Chord Cancel, simultaneously press any three consecutive notes in the Auto
Accompaniment section; for example, C, C# and D.
25
■ Full
In the Full mode, chords played anywhere on the keyboard are recognized for producing Auto
Accompaniment. Here, the PortaTone “intelligently” distinguishes between the playing of your right and
left hands and produces accompaniment. (A single note eleven notes higher than the lowest note of the
chord is recognized as a right-hand or melody note.) Chords recognized are the same as in Fingered
above.
NOTE
• The Harmony/Echo effect is not available when the Full mode is selected.
■ Single Finger
Single Finger mode makes it easy to produce fully orchestrated accompaniment by simply playing a one-,
two- or three-finger chord indication (in the Auto Accompaniment section), as shown below. The key of C is
used here as an example; other keys follow the same rules. For example, Bb7 is played as Bb and A.
Major chord:
Seventh chord:
C
Minor chord:
Cm
C7
Press the root note of the chord.
Press the root note together with
any white key to the left of it.
Press the root note together with
any black key to the left of it.
Minor seventh chord:
Cm7
Press the root note together with
any white and black key to the
left of it (three keys altogether).
Changing the Accompaniment Split Point
This function allows you to set the highest key in the Auto Accompaniment section of the keyboard. (All keys
below and including this point will be used for Auto Accompaniment.) Accompaniment Split Point is the only
parameter in the Style menu.
1 Call up the Accompaniment Split Point parameter.
Select STYLE in the Main Menu (with the MAIN MENU buttons) and use the SUB MENU buttons to
select Accompaniment Split Point.
You can also directly select the Accompaniment Split Point parameter by pressing and holding either
the STYLE or FINGERING button.
2 Set the parameter.
Set this directly by pressing the desired key on the keyboard. You can also use the numeric keypad
or +/- buttons to enter the key number. The lowest key on the keyboard (C1) is 36, while middle C
(C3) is 60, and the highest key (B5) is 95.
NAME / SUB MENU
MODE
STYLE
EFFECT
STYLE
SONG
2
EASY CHORD MEM
3
MAIN VOICE
Split Point 1
DUAL VOICE
4
SPLIT VOICE
TOUCH
A
SONG
VOICE
1
ONE TOUCH SETTING
KEYBOARD
MAIN MENU
AccSpPnt
CART
SPLIT
FINGERING
DUAL
CHORUS
STYLE
HARMONY
REVERB
SONG
B
REPEAT
MINUS ONE
SYNC
STOP
LARGE/SMALL
GUIDE
HARMONY/ECHO
EASY CHORD
MEMORY
STYLE SECTION
TEMPO
6 5aug
dim
minMaj 7 sus4
A
MIDI
VOLUME
B
Accompaniment Split Point
Split Point 2
REVERB/OTHERS
JAM
NOTE
• The default Accompaniment Split Point is F# 2 (54) and can be restored by simultaneously pressing the +/- buttons.
• The Accompaniment Split Point cannot be set higher than the Split Point 2 parameter (page 15).
• The Accompaniment Split Point setting is retained in memory when power is turned off, as long as batteries are
installed or an AC adaptor is connected.
26
One Touch Setting
The One Touch Setting function automatically selects an appropriate Voice (or Voices) and other important settings
for playing with the Style you select. In other words, when one of the One Touch Settings is turned on, the Voice
and other settings automatically change when you change the Style. (See list below.)
To turn on One Touch Setting, press one of the ONE TOUCH SETTING buttons (1 - 4) in the STYLE mode to select
the desired type. (The selected One Touch Setting is indicated in the display, and other settings may change
accordingly.)
ONE TOUCH SETTING
1
2
3
4
1
ONE TOUCH SETTING button
ONE TOUCH SETTING indication
To change to a different One Touch Setting, press a different numbered ONE TOUCH SETTING button.
The following parameters and settings may be changed when selecting a One Touch Setting:
• Main Voice — all settings
• Dual Voice — all settings
• Dual/Chorus — on/off
• Split Voice — all settings (excepting Split Points 1 & 2)
• Harmony/Echo — on/off, all settings
• Reverb — on/off
• Accompaniment Volume
• Accompaniment Large/Small
• Tempo
• Synchro Start — set to on
Changing any of the panel settings while a One Touch Setting is active turns off the selected ONE TOUCH SETTING
indication.
NOTE
• A “No OTS” indication appears in the display if you have selected a One Touch Setting for an optional Music
Cartridge which has no One Touch Setting data (PSR-230 only).
27
Playing Songs —
The Song Mode
The Song mode features special Songs that have been created using the rich and dynamic sounds of the
PortaTone.
These Songs (#01 - #16) are generally for your listening enjoyment; however, you can also play along with them
on the keyboard. By using the Minus One function, you can “mute” the original melody and play it manually on
the keyboard yourself. The Song mode also features convenient practice tools such as the Repeat Play function
— which lets you repeat playback of any portion of a Song — and the Guide lamps (PSR-230 only) — which
show you which melody notes to play, and waits for you to play them.
The Song mode also lets you create and save your own original Songs. This is done with the four User Songs
(#17 - #20), to which you can record your own chord and section changes by using the Easy Chord Memory
function. (See page 33.)
Selecting and Playing a Song
1 Select the Song mode.
Press the SONG button. The Song mode and the Song menu are selected. (The SONG indications
light in the display.)
NAME / SUB MENU
MODE
SONG
STYLE
SONG
2
EASY CHORD MEM
3
MAIN VOICE
DUAL VOICE
4
SPLIT VOICE
EFFECT
TOUCH
A
SONG
VOICE
1
ONE TOUCH SETTING
KEYBOARD
MAIN MENU
Piano&EP
CART
SPLIT
FINGERING
REPEAT
MINUS ONE
SYNC
STOP
LARGE/SMALL
STYLE
DUAL
CHORUS
STYLE
HARMONY
REVERB
SONG
B
GUIDE
HARMONY/ECHO
EASY CHORD
MEMORY
STYLE SECTION
TEMPO
6 5aug
dim
minMaj 7 sus4
A
B
MIDI
VOLUME
JAM
REVERB/OTHERS
2 Select the desired Song number.
Use the numeric keypad.
1
2
3
4
5
6
8
9
7
0
NO
YES
You can either enter the Song number (two digits) directly with the number buttons, or step up and
down through the Songs by using the +/- buttons. Songs 01 - 16 are the Demo Songs, and Songs 17
- 20 are User Songs. (For more information on User Songs, see page 33.)
28
3 Start the selected Song.
Press the START/STOP button.
NOTE
• You can play along with the Song using the currently selected Voice, or even select a different Voice for playing
along. Simply select MAIN VOICE in the Main Menu while the Song is playing back and select the desired Voice.
• Pressing the VOICE or STYLE button during Song playback selects the VOICE or STYLE menu but does not change
the mode; the Song mode is still active.
4 If you want to change to another Song, repeat step 2 above.
5 Stop the Song.
Press the START/STOP button. If playback was started by pressing the START/STOP button, the
selected Song stops automatically at the end.
NOTE
• If you start Song playback with the DEMO button, all Songs play back repeatedly in succession (starting with Song
#01), indefinitely.
Using the Repeat Play Function
The Repeat Play function in the Song mode lets you continuously repeat playback of any portion of a Song. This
comes in particularly handy when practicing a Song with the Minus One and/or Guide (PSR-230 only) functions.
For example, you could have the verse portion of a Song repeatedly play back while you practice with it.
While the Song is playing, press the REPEAT PLAY button twice — once to set the beginning point for the
repeat and a second time to set the end point.
Press the REPEAT PLAY button once at the beginning of the section to be repeated (the REPEAT “A” indication
lights), and a second time at the end of the section (the REPEAT “B” indication lights).
INTRO
REPEAT PLAY
A
REPEAT
REPEAT PLAY button
A
B
REPEAT
REPEAT PLAY "A" and
REPEAT PLAY "A–B" indicators
As soon as the end point (B) has been selected, the specified section begins playing back repeatedly. To stop
playback, press the START/STOP button. You can use START/STOP to alternately start and stop Repeat Play of the
specified section. To cancel Repeat Play at any time, press the REPEAT PLAY button again.
NOTE
• When only the A point is set, playback repeats from the A point to the end of the Song.
• Repeat playback is per measure.
• The end point (B) tempo or your manually adjusted tempo will be used during Repeat playback.
29
Using the Guide Function (PSR-230 only)
The Guide function in the Song mode serves as an automatic music “tutor,” showing you which notes to play on
the keyboard. It even waits for you to play each note, before going on to the next. This lets you learn to play the
Songs of the Song mode at your own pace, and makes practicing the Songs extremely natural (and fun!).
1 Select a Song.
2 Select the desired “guided” part.
Press the SONG button to enter the Song mode, then use the numeric keypad to select the desired Song.
The Guide function lets you choose which part of a Song is to be guided. For example, you can
select the right-hand melody part to be guided — in which case, the guide lamps will light to help
you play the right-hand melody part. Or, you could select the left-hand chord backing part.
With “MinusMod” selected in the Song menu, select the desired Minus One Part (guided part setting).
(See page 32.)
NOTE
• The Minus One Part parameter in the Song menu can be directly selected (in Song mode only) by pressing and
holding the GUIDE button.
3 Press the GUIDE button.
The GUIDE icon appears in the display, indicating that the Guide function is on.
MAIN/AUTO FILL
GUIDE
GUIDE
GUIDE button
GUIDE icon in display
4 Start playback.
When you press the START/STOP button to begin playback, the Song introduction will automatically
play up to the first note(s) of the main section of the Song, and pause until you play the next note(s).
The notes to be played are indicated by the Guide lamps above each key (red for the white keys and
green for the black). As you play each correct note, Song playback will continue, pausing until you
play the correct notes each time.
5 If desired, turn on the Minus One function to mute the guided part.
Normally, the guided part also plays back along with your performance. You can mute this part,
however, and play the guided part yourself. To do this, press the MINUS ONE button. (The Minus
One icon appears in the display.)
Song playback stops automatically when the end is reached. To stop the Song manually, press the
START/STOP button.
NOTE
• Turning off the Guide lamps
If you find the Guide lamps distracting or wish to play the part without them, use the Lamp parameter in the
REVERB/OTHERS Menu (page 19) to turn the Guide lamps off. (Keep in mind that this doesn’t turn off the Guide
function, but only the lamps.)
30
Using the Minus One Function
Minus One, as its name implies, takes away (or mutes) a part of the Song, allowing you to play that part yourself.
You can turn Minus One on before starting a Song, or do it even while a Song is playing.
1 Select a Song.
2 Select the part of the Song you wish to mute.
Minus One lets you choose which part of a Song is to be muted. For example, you can mute the
right-hand melody part and play it yourself, or do the same for the left-hand chord backing part.
With “MinusMod” selected in the Song menu, select the desired Minus One Part setting: left-hand,
right-hand, or both. (See page 32.)
NOTE
• The Minus One Part parameter in the Song menu can be directly selected (in Song mode only) by pressing and
holding the GUIDE button (PSR-230).
■ Selecting individual channels for Minus One
Each Song actually has more than just one right-hand and one left-hand part. For example, one Song
may be made up of a melody, a harmony, chord backing, pad, and rhythm parts — each on a different
channel. Also, the right-hand and left-hand parts have different channels. Minus One lets you specify
which channel you wish to mute, for both the right-hand and left-hand parts.
With “MinusChR” or “MinusChL” selected in the Song menu, select an individual channel for the Minus
One right-hand and left-hand parts. Also, set the desired Minus One Part setting: left-hand, right-hand, or
both. (See “SONG Sub Menu” chart below.)
NOTE
• The “MinusChR” parameter in the Song menu can be directly selected (in Song mode only) by pressing and holding
the MINUS ONE button.
• If the selected Song contains Minus One right- and left-hand channel settings, the channel for the corresponding
parts will be automatically selected.(A “--” indication appears in the display.)
3 Turn on the Minus One function.
Press the MINUS ONE button. (The Minus One icon appears in the display.)
MAIN/AUTO FILL
MINUS ONE
MINUS ONE
MINUS ONE button
MINUS ONE icon in display
4 Start playback.
Play the appropriate part along with the Song. Song playback stops automatically when the end is
reached. To stop the Song manually, press the START/STOP button.
31
■ SONG Sub Menu
First, use the MAIN MENU buttons to select the Song menu, and select the desired Sub Menu parameter
with the SUB MENU buttons. Then, use the numeric keypad or +/- buttons to change the setting.
Parameter Name
Display Name
Range
Description
Song Name
—
01 - 20
This determines the Song to be played (or edited).
Songs 01 - 16 are the Demo songs, and Songs 17 - 20
are User Songs (for use with Easy Chord Memory).
Music Cartridge Songs can be selected by pressing the
CARTRIDGE button (PSR-230 only). (See page 37)
Minus One Part
MinusMod
L, r, L_r
This determines which part of the Song is to be
turned off for the Minus One function: the left-hand
(L), the right-hand (r), or both (L_r). It also
determines which part is used with the Guide function
(page 30). The default Minus One Part is “r.”
Minus One Right Hand Channel
MinusChR
01 - 16
This determines the channel of the right-hand part
which is to be muted with the Minus One function.
To reset to the default channel (01), press the +/buttons simultaneously.
Minus One Left
Hand Channel
MinusChL
01 - 16
This determines the channel of the left-hand part
which is to be muted with the Minus One function.
To reset to the default channel (02), press the +/buttons simultaneously.
■ Song Volume
The Song Volume can be adjusted separately from the main instrument volume. This is particularly useful
when using Minus One, since it lets you control the balance between the Song and the Voice you play on
the keyboard. To change the Song Volume, use the VOLUME buttons in the song mode.
ACCOMPANIMENT
VOLUME
RESET
SONG
VOLUME
Press VOLUME▲ to increase the song volume and VOLUME▼ to decrease it; holding down the
appropriate button continuously increases/decreases the song volume. The level is shown in the display.
VOLUME
To reset the Song Volume to its original default setting, press both VOLUME buttons simultaneously.
32
■ One Touch Setting in the Song Mode
The One Touch Setting function is convenient when used with the Minus One function, and lets you
automatically select an appropriate Voice for playing the Minus One Part along with the Song you select.
Also, if you’ve specified Minus One channels (see page 32), One Touch Setting automatically selects
appropriate Voices for those channels.
To turn on One Touch Setting, press one of the ONE TOUCH SETTING buttons (1 - 4) in the song mode.
(The selected One Touch Setting is indicated in the display.)
ONE TOUCH SETTING
1
2
3
4
1
ONE TOUCH SETTING button
ONE TOUCH SETTING indication
To turn the function off, press the same button again.
NOTE
• Keep in mind that even with the One Touch Setting function on, there are some Songs which change the selected
Voice in the middle of the Song.
• For some Music Cartridge Songs, use of One Touch Setting will call up the piano Voice regardless of the Minus One
Channel settings (PSR-230 only).
Recording User Songs —
Easy Chord Memory
The Easy Chord Memory feature lets you record your own chord progressions (or chord “sequences”) and create
automatic backing tracks for your original songs. Once you’ve recorded and saved your own chord sequences
(to User Songs 17 - 20), you can perform along with them — playing the melody part, for example, over the
custom backing tracks.
You can record Songs in two different ways: Real-time and Step. Real-time recording lets you play the chord
changes normally as the rhythm accompaniment plays back, while Step recording lets you manually enter each
chord at specific positions in the Song. (Each beat can have a different chord.) Generally, Real-time recording is
the basic recording method, while Step recording is used to edit Songs already recorded in real time.
Easy Chord Memory has a capacity up to about 120 measures (total for all four User Songs, in 4/4 time).
Easy Chord Memory records the following data to User Songs (17 - 20):
• Chord changes and timing (per beat)
• Style number* (incl. Cartridge Styles; PSR-230 only)
• Section changes (Fill-ins: per beat; others: per measure)
• Accompaniment Volume setting*
• Tempo setting*
• Large/Small setting*
* Recorded only at the beginning of a Song; changes cannot be made during recording.
NOTE
• Section changes cannot be entered in Step recording.
• Material recorded in Easy Chord Memory is retained in memory even when power is turned off — as long as an AC
adaptor is connected or a set of batteries is installed. However, if the batteries fail and the AC adaptor is
disconnected, the recorded data will be lost.
33
Real-time Recording
In Real-time recording, you can record chord changes for a Song by simply playing them along with the rhythm.
1 Select a User Song number.
2 Select a Style and set other parameters, if desired.
Select one of the User Song numbers 17 - 20. (See page 28.)
Select a Style. (See page 20.) Also, make settings for Accompaniment Volume, Tempo, and
Large/Small, if desired.
3 Enter the Easy Chord Memory mode.
Press the EASY CHORD MEMORY (REC/END) button.
NAME / SUB MENU
EASY
CHORD
MEMORY
MODE
STYLE
REC/
END
EFFECT
STYLE
(PSR-230)
EASY CHORD
MEMORY
STYLE SECTION
SONG
2
MAIN VOICE
DUAL VOICE
EASY CHORD MEM
3
4
SPLIT VOICE
TOUCH
A
SONG
VOICE
1
ONE TOUCH SETTING
KEYBOARD
MAIN MENU
ECM1
CART
SPLIT
FINGERING
DUAL
CHORUS
STYLE
HARMONY
REVERB
SONG
B
REPEAT
MINUS ONE
SYNC
STOP
LARGE/SMALL
GUIDE
Easy Chord Memory
mode indication
Record Stand-by indication
(metronome icon flashes at current tempo)
HARMONY/ECHO
TEMPO
MIDI
6 5aug
dim
minMaj 7 sus4
A
B
REVERB/OTHERS
JAM
Start of Song indication
NOTE
• If you press the EASY CHORD MEMORY (REC/END) button when a non-User Song number has been selected, an
“empty “ User Song number (one not containing data) will automatically be selected. If all User Songs contain
data, User Song number 17 will be selected.
4 Record the chord sequence.
Recording begins as soon as you play a chord in the Auto Accompaniment section of the keyboard.
The recognized chord name appears in the display.
6 5aug
dim
minMaj 7 sus4
chord indication
NOTE
• If you wish to record only the rhythm, use the Chord Cancel function.(See page 25)
5 Stop recording.
Press the EASY CHORD MEMORY (REC/END) button. (The display returns to the beginning of the
Song: measure number 01, beat number 1.)
To record an Ending section at the end of the Song, first press the ENDING button, then (after the
Ending has played back) press the EASY CHORD MEMORY (REC/END) button.
Operation automatically returns to the Song mode.
NOTE
• Easy Chord Memory automatically changes to Step Record Ready mode in the following conditions:
* When an Ending section has been recorded and the accompaniment is stopped.
* When the memory is full. (A “Full” message appears in the display.) In this case, you can use the Song Clear
operation (see below) to delete the Song.
* When the recording is stopped by pressing the START/STOP button.
• Timing is important when stopping Real-time recording. If you press the START/STOP button before the second beat
of the intended final measure, the actual end of the Song will be at the previous measure. However, if you press the
button after the second beat, the Song will end properly at that measure.
34
Step Recording
Step recording allows you to manually enter chord changes to a Song, one by one. As such, it’s convenient for
editing and making precise changes to an existing Song. In general, use Real-time recording to create a Song, and
use Step recording to polish it up and finish it.
1 Enter the Step Record Ready mode.
With the desired Song selected and record stand-by engaged (see Real-time Recording, steps 2 and 3),
press the SYNC-START button.
NOTE
• You can also enter the Step Record Ready mode by pressing the START/STOP button during Real-time recording.
2 Specify the desired position in the Song.
Use the MEASURE +/- and BEAT +/- buttons to specify the exact place in the Song to which the
desired chord is to be entered. Press the appropriate button to step through the values, or hold
down the button to continuously advance or reverse through the values.
1
2
3
MEASURE
4
BEAT
3 Enter a chord.
Play a chord in the Auto Accompaniment section of the keyboard. The recognized chord name
appears in the display and is entered at the selected measure/beat.
4 Stop recording.
Press the EASY CHORD MEMORY (REC/END) button. (Operation automatically returns to the Song mode.)
NOTE
• Section changes cannot be entered in Step recording.
• You can play back the User Song within Step recording by pressing the START/STOP button.
Song Clear
The Song Clear operation lets you delete selected User Song data.
To clear data of a Song:
1 Select the User Song to be cleared.
2 Enter the Easy Chord Memory mode.
Press the EASY CHORD MEMORY (REC/END) button. Make sure to disengage recording stand-by
by pressing the SYNC-START button.
3 Press the SONG CLEAR button.
A “Clear ?” message appears, prompting you for confirmation. Press the +/YES button to clear the
selected Song, or press the -/NO button to cancel.
NOTE
• Song Clear cannot be executed during Real-time recording and recording stand-by states. Also, Song Clear is
available only in Easy Chord Memory mode.
User Song Playback
Playback of User Songs is exactly the same as with other Songs. (See page 28.) Remember, that you can play along
on the keyboard with your original chord accompaniment — making your performances more dynamic and
enjoyable.
35
Music Cartridge (PSR-230)
The PSR-230 features a cartridge slot for use with special Yamaha Music Cartridges containing accompaniment
Style and Song data. These Cartridges give you instant access to an ever-expanding library of new Styles and
Songs. The PSR-230 includes a sample Music Cartridge. To obtain other Cartridges, see your Yamaha dealer.
Inserting a Music Cartridge
With the power off, insert the Music Cartridge into the cartridge slot as shown, and press down firmly until the
Cartridge is seated properly (as shown in the illustration). The Cartridge is shaped so that it will only fit in the slot
one way - don’t try to force it in the wrong way. Turn the power back on again after inserting.
The triangular mark on the front of the
Cartridge should be completely below the panel
edge when the Cartridge is properly seated.
For Cartridges without the mark, the bottom of the
serrated edges of the Cartridge should be even with the
panel edge (not above it).
■ Music Cartridge Precautions
• Do not leave Music Cartridges in locations which are subject to excessive heat or humidity.
• Do not drop Music Cartridges or subject them to strong shock.
• Do not disassemble Music Cartridges.
• Do not directly touch the Music Cartridge’s electrical contacts. Static electricity can cause loss of data
and unreliable operation.
• Do not insert objects or cartridges other than Yamaha Music Cartridges in the cartridge slot. Doing so
can result in serious damage to the instrument.
• Do not insert Music Cartridges in other instruments or devices. Doing so can result in serious damage
to the Cartridges.
• Never attempt to insert or remove a Music Cartridge when the power is on. Doing so may result in
loss of data or unreliable operation.
• Dust or foreign particles on the electrical contacts of the Music Cartridge may prevent proper selection
or playback of Cartridge data. If this occurs, insert and remove the Cartridge several times, and try the
operation again. If the problem persists, clean the electrical contacts with a soft, dry cloth.
NOTE
• Make sure that the Music Cartridge is properly inserted when playing back a Song based on Cartridge data.
Otherwise, the Song may not play back, and a “No Cart” or “WrongCrt” message may appear.
36
Selecting Styles on a Music Cartridge
1 Select the Style mode.
2 Select a Style from the Cartridge.
Press the STYLE button. (The Style mode and Style menu are selected.)
First, press the CARTRIDGE button below the numeric keypad. (The Cartridge icon appears at the
upper left of the display.) Then, enter the Cartridge Style number directly with the number buttons,
or step up and down through the Styles by using the +/- buttons.
CARTRIGE
CARTRIDGE button
CART
Cartridge icon in display
Cartridge Styles are used in exactly the same way as the internal accompaniment Styles. (See page 20.)
NOTE
• The cartridge styles can be selected by using the +/- buttons to go beyond the highest or lowest internal style numbers
—e.g. pressing the + button while internal style number 00 is selected will select cartridge style number 01.
• The cartridge styles have no Jam Track Sections.
• A “No OTS” message appears in the display if the selected Cartridge Styles have no One Touch Setting data.
Selecting Songs on a Music Cartridge
1 Select the Song mode.
2 Select a Song from the Cartridge.
Press the SONG button. (The Song mode and Song menu are selected.)
First, press the CARTRIDGE button below the numeric keypad. (The Cartridge icon appears at the
upper left of the display.) Then, enter the Cartridge Song number directly with the number buttons,
or step up and down through the Songs by using the +/- buttons.
CARTRIGE
CARTRIDGE button
CART
Cartridge icon in display
Cartridge Songs are used in exactly the same way as the internal Songs. (See page 28.)
NOTE
• For Cartridge Songs created with Cartridge accompaniment Styles:
* Chord names are indicated in the display as the chords of the Cartridge Song change.
* The Harmony effect can be applied when playing along with the chord progression of the Song.
• The Minus One, Repeat Play, and Guide (PSR-230 only) functions can be used with Cartridge Songs.
37
MIDI Functions
The PortaTone is MIDI-compatible and provides a variety of MIDI-related controls. What is MIDI? MIDI —
Musical Instrument Digital Interface — is a worldwide standard that makes it possible for various electronic
musical instruments and other devices to “communicate” with each other. For example, you could connect a
computer or sequencer to the PortaTone and play back a song on the sequencer using the PortaTone’s
Voices.
The PortaTone is also compatible with the GM (General MIDI System Level 1) format. One of the most
important features of General MIDI is in the standardization of Voices. This means that a song recorded in
GM format can be played back on any GM-compatible instrument and sound just as the composer intended.
With the GM-compatible PortaTone and a computer or sequencer, you can take advantage of the vast wealth
of musical material recorded in that format.
MIDI Basics
MIDI is a huge, complex subject, and it would be impossible to cover all its aspects here. However, this short
section will introduce you to some MIDI basics, and help you use this powerful tool in your own system.
MIDI Terminals
The MIDI terminals are located on the rear panel of the PortaTone. MIDI IN receives MIDI data from an
external device, and MIDI OUT transmits MIDI data from the PortaTone — which includes, for example,
performance data when you play the keyboard.
MIDI
OUT
IN
MIDI Channels
MIDI data is usually sent and received over one of sixteen MIDI channels. In order to get two devices to
properly communicate with each other, you should set them to the same MIDI channel. On the
PortaTone, the relevant parameters are Keyboard Out and Receive Channel Select in the MIDI Sub Menu
(page 40).
You can also use the PortaTone as a sixteen-channel multi-timbral sound source. This means that you can
play song data on a connected MIDI sequencer (see “Using with a Computer or Sequencer” below) and
have up to sixteen different instrument Voices sound simultaneously. To do this, make sure that the MIDI
Receive Switch is set to “on” (see MIDI Sub Menu page 40), and set Remote Channel (also MIDI Sub
Menu) to “off.”
38
Using with a MIDI Tone Generator or Second Keyboard
In the simple MIDI connection shown below, the PortaTone is used to play sounds on a tone generator
(essentially a synthesizer without a keyboard). This lets you play both instruments at once, giving you
thick multi-instrument sounds. Depending on how the other device is set up, this system also lets you
change sounds on the tone generator from the PortaTone’s panel (via program change messages).
PortaTone PSR-230/220
MIDI OUT
MIDI IN
TONE GENERATOR
In a similar example, the PortaTone is connected to a second MIDI keyboard. This allows you to play
and control the PortaTone from the other keyboard. In this application, first make sure that the MIDI
Receive Switch is set to “on” (see MIDI Sub Menu below), then set the Remote Channel (also MIDI Sub
Menu below) and the MIDI Send Channel on the other keyboard to the same value.
PortaTone PSR-230/220
MIDI IN
MIDI OUT
MIDI KEYBOARD
Using with a Computer or Sequencer
If you have a sequencer or a computer with a MIDI interface, you can easily and instantly integrate the
PortaTone into your system. And with its GM-compatibility, the PortaTone is a natural for
multimedia/computer music applications, letting you playback any GM song data with the high-quality
Voices.
PortaTone PSR-230/220
MIDI OUT
MIDI IN
MIDI IN
MUSIC
Computer
MIDI OUT
NOTE
• To avoid a MIDI feedback loop, check that the MIDI Thru (or MIDI Echo) setting on the external device and the Local
Control setting on the PortaTone are set appropriately. If both are set to ON, MIDI feedback may occur.
39
■ MIDI Sub Menu
First, use the MAIN MENU buttons to select the MIDI menu, and select the desired Sub Menu parameter
with the SUB MENU buttons. Then, use the numeric keypad or +/- buttons to change the setting.
Parameter Name
Display Name
Range
Description
Remote Channel
RemoteCh
off, 01 - 16
This determines how the PortaTone is controlled by a
“remote” (external) MIDI keyboard. Set this to one of
the 16 channels (01 - 16) for using an external
keyboard to remotely control the PortaTone functions
over the selected channel. (The remaining 15
channels can be used for multi-timbral operation.)
When this is set to “off,” the PortaTone can be used as
a full 16-channel multi-timbral sound source. The
default setting is “off.”
Keyboard Out
KeybdOut
off, 01 - 16
This determines over which channel keyboard data
for the Main Voice is transmitted. The default setting
is channel 01.
Accompaniment
Out
AcompOut
on/off
This determines whether Auto Accompaniment data is
transmitted via MIDI OUT or not. When set to “on,”
Auto Accompaniment data is transmitted over
channels 3 - 10. The default setting is “off.”
Receive Channel
Select
RcvChSel
01-16
This determines over which channel MIDI data is
received. The default setting is channel 01 .
Receive Switch
Rcv SW
on/off
This determines whether MIDI data is received over
the selected MIDI channel or not, set in Receive
Channel Select above. (This parameter works in
tandem with Receive Channel Select.)
Local Control
Local
on/off
This determines whether the keyboard is “connected”
to the internal Voices of the PortaTone. When set to
“on,” the Voices respond to notes played from the
keyboard. When set to “off,” the Voices respond only
to incoming MIDI data (via MIDI IN). The default
setting is “on.” If you are routing the MIDI OUT on
the PortaTone to a sequencer and back to the MIDI
IN, you may want to set this to “off” to avoid MIDI
“feedback.”
External Clock
ExtClock
on/off
This determines whether the Style and Song playback
functions are controlled by the PortaTone’s internal
clock (off) or by MIDI clock data from an external
sequencer or computer (on). This should be set to
“on” when you want to have Style or Song playback
follow the external device. The default setting is “off.”
NOTE
• Whenever using a MIDI device to control the PortaTone, make sure that the Receive Switch is set to “on” for the
appropriate channel or channels.
• For the Keyboard Out parameter, performance data of the Main Voice can be sent over the specified MIDI channel,
but the other Voices are fixed as follows:
Dual Voice — channel 11
Split Voice — channel 2
Auto Accompaniment — channels 3 - 10
• To reset any parameter to its default setting, press the +/- buttons simultaneously.
• All settings in the MIDI Sub Menu are retained in memory when the power is turned off, as long as batteries are
installed or an AC adaptor is connected.
• In the Song or Easy Chord Memory mode, MIDI data cannot be transmitted or received, and none of the MIDI menu
settings have any effect.
40
Appendix
Data Backup and Initialization
Except for the settings listed below, all PortaTone panel settings are reset to their initial settings whenever the power
is turned on. The parameter settings listed below are retained in memory as long as an AC adaptor is connected or
a set of “live” batteries is installed.
• Touch Response on/off
• Touch Sensitivity
• Fingering mode
• Split Points 1 and 2, Auto Accompaniment Split Point
• Easy Chord Memory (User Song)
• All MIDI Sub Menu settings
• Tuning
• Voice Set on/off
• Guide Lamp on/off (PSR-230 only)
• Metronome on/off
■ Initialize Operation
All data can be initialized and restored to the factory preset condition by simultaneously holding the +\buttons and turning on the power. (A “Clr All!” message appears briefly in the display.)
NOTE
• If operation of the PortaTone “hangs up” or “freezes” due to static electricity or other causes, turn the power off and
execute the Initialize operation.
41
Voice List
■ Voice Polyphony
The PortaTone has a maximum polyphony of 28 — in other words, it can play up to 28 individual notes
at the same time. This includes all Voices used: Dual, Split, Auto Accompaniment, and Song. If the
maximum polyphony is exceeded, some notes and sounds may be cut off.
Another feature affecting polyphony is the fact that some Voices are actually made up of two Voices (as
indicated in the list below). Using these Voices correspondingly reduces the available polyphony.
■ Panel Voice List
Voice
Number
MIDI
Bank Select
MSB
LSB
MIDI
Bank Select
MSB
LSB
Voice Name
Number
of Notes
Used
Voice
Number
Grand Piano
Honky-tonk Piano
Funky Electric Piano
DX Electric Piano
MIDI Grand Piano
Hyper Electric Piano
Bell Electric Piano
Harpsichord
Harpsichord Coupled
Clavi
Celesta
1
2
2
2
2
2
2
1
2
1
1
58
59
60
61
0
0
0
0
0
0
0
0
57
58
59
60
62
63
64
65
66
67
68
69
70
71
72
0
0
0
0
0
0
0
0
0
0
0
0
0
0
0
0
0
0
0
0
0
0
61
62
63
64
65
66
67
68
69
70
71
73
74
75
76
77
78
79
80
81
82
83
0
0
0
0
0
0
0
0
0
0
0
0
0
0
0
0
0
0
0
0
0
0
72
73
74
75
76
77
78
79
80
81
82
84
85
86
87
88
0
0
0
0
0
0
0
0
0
0
83
84
85
86
87
89
90
91
92
93
94
0
0
0
0
0
0
0
0
0
0
0
0
95
96
97
98
99
0
0
0
0
0
0
0
0
0
0
00
0
0
*Program
Number
PIANO
01
02
03
04
05
06
07
08
09
10
11
0
0
0
0
0
0
0
0
0
0
0
0
0
0
0
0
0
0
0
0
0
0
0
1
2
3
4
5
6
7
8
9
10
12
13
14
15
16
17
18
0
0
0
0
0
0
0
0
0
0
0
0
0
0
11
12
13
14
15
16
17
19
20
21
22
23
24
25
26
27
28
29
30
31
0
0
0
0
0
0
0
0
0
0
0
0
0
0
0
0
0
0
0
0
0
0
0
0
0
0
18
19
20
21
22
23
24
25
26
27
28
29
30
32
33
34
35
36
37
38
39
40
0
0
0
0
0
0
0
0
0
0
0
0
0
0
0
0
0
0
31
32
33
34
35
36
37
38
39
1
1
1
1
1
2
2
ORGAN
Jazz Organ 1
Jazz Organ 2
Jazz Organ 3
Full Organ
Rock Organ 1
Rock Organ 2
16'+2' Organ
16'+4' Organ
Church Organ
Reed Organ
Musette Accordion
Traditional Accordion
Bandoneon
2
2
2
2
2
2
2
2
2
2
2
2
2
GUITAR
Classical Guitar
Folk Guitar
12Strings Guitar
Jazz Guitar
Octave Guitar
Clean Guitar
Muted Guitar
Overdriven Guitar
Distortion Guitar
1
1
2
2
2
2
1
2
2
BASS
41
42
43
44
45
0
0
0
0
0
0
0
0
0
0
40
41
42
43
44
Acoustic Bass
Finger Bass
Fretless Bass
Slap Bass
Synth Bass
1
1
1
1
2
ENSEMBLE
46
47
48
49
50
51
52
53
54
55
56
57
0
0
0
0
0
0
0
0
0
0
0
0
0
0
0
0
0
0
0
0
0
0
0
0
45
46
47
48
49
50
51
52
53
54
55
56
Strings
Chamber Strings
Synth Strings
Slow Strings
Tremolo Strings
Violin+Strings
Pizzicato Strings
Choir
Choir Aahs
Choir Oohs
Synth Choir
Orchestra Hit
Number
of Notes
Used
STRINGS
MALLETS
Vibraphone
Marimba
Xylophone
Tubular Bells
Timpani
Steel Drums
Music Box
Voice Name
*Program
Number
Violin
Cello
Contrabass
Harp
1
1
1
2
BRASS
Trumpet
Muted Trumpet
Trombone
Trombone Section
French Horn
Tuba
Brass Section
Brass+Sax
Brass+Trombone
Brass+Trumpet
Synth Brass
1
1
1
2
1
1
2
2
2
2
2
REED
Soprano Sax
Alto Sax
Tenor Sax
Baritone Sax
Sax+Clarinet
Sax+Trombone
Oboe
English Horn
Bassoon
Clarinet
Harmonica
1
1
1
1
2
2
1
1
1
1
1
PIPE
Piccolo
Flute
Pan Flute
Recorder
Ocarina
1
1
1
1
1
SYNTH LEAD
88
89
90
91
92
93
Square Lead
Sawtooth Lead
Voice Lead
Crystal
Brightness
Analog Lead
2
2
2
2
2
2
SYNTH PAD
94
95
96
97
98
Fantasia
Bell Pad
Xenon Pad
Angels
Dark Moon
2
2
2
2
2
DRUM KIT
99
Drum Kit
1
2
2
2
2
2
2
1
2
2
2
2
2
* The MIDI Program Number column indicates the numbers that are used to select the corresponding voices from an
external MIDI device.
42
■ GM Voice List
Voice
Number
MIDI
Bank Select
MSB
LSB
MIDI
Bank Select
MSB
LSB
Voice Name
Number
of Notes
Used
Voice
Number
Acoustic Grand Piano
Bright Acoustic Piano
Electric Grand Piano
Honky-tonk Piano
Electric Piano 1
Electric Piano 2
Harpsichord
Clavi
1
1
2
2
2
2
1
1
065
066
067
068
069
070
071
072
0
0
0
0
0
0
0
0
0
0
0
0
0
0
0
0
64
65
66
67
68
69
70
71
1
1
2
1
1
1
1
2
073
074
075
076
077
078
079
080
0
0
0
0
0
0
0
0
0
0
0
0
0
0
0
0
72
73
74
75
76
77
78
79
2
2
2
2
1
2
1
2
081
082
083
084
085
086
087
088
0
0
0
0
0
0
0
0
0
0
0
0
0
0
0
0
1
1
1
2
1
1
1
1
089
090
091
092
093
094
095
096
0
0
0
0
0
0
0
0
0
0
0
0
0
0
0
0
1
1
1
1
1
1
1
1
097
098
099
100
101
102
103
104
0
0
0
0
0
0
0
0
0
0
0
0
0
0
0
0
96
97
98
99
100
101
102
103
1
1
1
1
2
2
1
1
105
106
107
108
109
110
111
112
0
0
0
0
0
0
0
0
0
0
0
0
0
0
0
0
104
105
106
107
108
109
110
111
1
1
2
2
1
1
1
1
113
114
115
116
117
118
119
120
0
0
0
0
0
0
0
0
0
0
0
0
0
0
0
0
1
1
1
1
1
1
2
2
121
122
123
124
125
126
127
128
0
0
0
0
0
0
0
0
0
0
0
0
0
0
0
0
129
127
0
*Program
Number
Piano
001
002
003
004
005
006
007
008
0
0
0
0
0
0
0
0
0
0
0
0
0
0
0
0
0
1
2
3
4
5
6
7
009
010
011
012
013
014
015
016
0
0
0
0
0
0
0
0
0
0
0
0
0
0
0
0
8
9
10
11
12
13
14
15
017
018
019
020
021
022
023
024
0
0
0
0
0
0
0
0
0
0
0
0
0
0
0
0
16
17
18
19
20
21
22
23
025
026
027
028
029
030
031
032
0
0
0
0
0
0
0
0
0
0
0
0
0
0
0
0
24
25
26
27
28
29
30
31
033
034
035
036
037
038
039
040
0
0
0
0
0
0
0
0
0
0
0
0
0
0
0
0
32
33
34
35
36
37
38
39
041
042
043
044
045
046
047
048
0
0
0
0
0
0
0
0
0
0
0
0
0
0
0
0
40
41
42
43
44
45
46
47
049
050
051
052
053
054
055
056
0
0
0
0
0
0
0
0
0
0
0
0
0
0
0
0
48
49
50
51
52
53
54
55
057
058
059
060
061
062
063
064
0
0
0
0
0
0
0
0
0
0
0
0
0
0
0
0
56
57
58
59
60
61
62
63
Lead 1 (square)
Lead 2 (sawtooth)
Lead 3 (calliope)
Lead 4 (chiff)
Lead 5 (charang)
Lead 6 (voice)
Lead 7 (fifth)
Lead 8 (bass+Lead )
2
2
2
2
2
2
2
2
88
89
90
91
92
93
94
95
Pad 1 (new age)
Pad 2 (warm)
Pad 3 (polysynth)
Pad 4 (choir)
Pad 5 (bowed)
Pad 6 (metallic)
Pad 7 (halo)
Pad 8 (sweep)
2
2
2
2
2
2
2
2
FX 1 (rain)
FX 2 (soundtrack)
FX 3 (crystal)
FX 4 (atmosphere)
FX 5 (brightness)
FX 6 (goblins)
FX 7 (echoes)
FX 8 (sci-fi)
2
2
2
2
2
2
2
2
Sitar
Banjo
Shamisen
Koto
Kalimba
Bagpipe
Fiddle
Shanai
1
1
1
1
1
2
1
1
Percussive
Brass
Trumpet
Trombone
Tuba
Muted Trumpet
French Horn
Brass Section
Synth Brass 1
Synth Brass 2
80
81
82
83
84
85
86
87
Ethnic
Ensemble
Strings Ensemble 1
Strings Ensemble 2
Synth Strings 1
Synth Strings 2
Choir Aahs
Voice Oohs
Synth Voice
Orchestra Hit
1
1
1
1
2
1
1
1
Synth Effects
Strings
Violin
Viola
Cello
Contrabass
Tremolo Strings
Pizzicato Strings
Orchestral Harp
Timpani
Piccolo
Flute
Recorder
Pan Flute
Blown Bottle
Shakuhachi
Whistle
Ocarina
Synth Pad
Bass
Acoustic Bass
Electric Bass (finger)
Electric Bass (pick)
Fretless Bass
Slap Bass 1
Slap Bass 2
Synth Bass 1
Synth Bass 2
1
1
1
1
1
1
1
1
Synth Lead
Guitar
Acoustic Guitar (nylon)
Acoustic Guitar (steel)
Electric Guitar (jazz)
Electric Guitar (clean)
Electric Guitar (muted)
Overdriven Guitar
Distortion Guitar
Guitar Harmonics
Soprano Sax
Alto Sax
Tenor Sax
Baritone Sax
Oboe
English Horn
Bassoon
Clarinet
Pipe
Organ
Drawbar Organ
Percussive Organ
Rock Organ
Church Organ
Reed Organ
Accordion
Harmonica
Bandoneon
Number
of Notes
Used
Reed
Chromatic Percussion
Celesta
Glockenspiel
Music Box
Vibraphone
Marimba
Xylophone
Tubular Bells
Dulcimer
Voice Name
*Program
Number
112
113
114
115
116
117
118
119
Tinkle Bell
Agogo
Steel Drums
Woodblock
Taiko Drum
Melodic Tom
Synth Drum
Reverse Cymbal
2
1
2
1
1
1
1
1
Sound Effects
120
121
122
123
124
125
126
127
Guitar Fret Noise
Breath Noise
Seashore
Bird Tweet
Telephone Ring
Helicopter
Applause
Gunshot
1
1
2
2
1
2
2
1
Percussion Kit
0
Standard Kit
1
* The MIDI Program Number column indicates the numbers that are used to select the corresponding voices from an
external MIDI device.
* The following voices use only one voice in the indicated ranges : 46 (Pizzicato Strings) : all notes below C# 2 and
above F5, 110 (Bagpipe) : all notes above A# 2.
43
Troubleshooting
Problem
44
Possible Cause and Solution
When the PortaTone is turned on or off, a buzzing or popping
sound is temporarily produced.
This is normal and indicates that the PortaTone is receiving electrical
power.
The sound of the Voices or rhythms seems unusual or strange.
The display has gone out and the panel settings have been
returned to default.
The battery power is too low. Replace all batteries with new ones of
the same type. (See page 3.)
Not all notes are heard when playing a number of notes
simultaneously.
Too many keys are pressed at the same time. The PortaTone is
polyphonic up to a maximum of 28 notes. (See page 42.)
There is no sound when the keyboard is played.
The Local Control setting could be off. Make sure Local Control is
turned on. (See page 40.)
The Auto Accompaniment does not function properly. Chords
played in the lower section of the keyboard do not sound or
sound different than expected.
Make sure that you’re playing in the Auto Accompaniment section of
the keyboard. (See page 22.)
Also, make sure that you’re using the proper Fingering mode and that
you’re playing “legal” chords that the PortaTone can recognize. For
example, when playing Single Finger chords, make sure that the Single
Finger mode is selected. (See page 26.)
There is no sound even when the keyboard is played or when
a Song is being played back.
Check that nothing is connected to the PHONES/AUX OUT jack on the
rear panel. When a set of headphones is plugged into this jack, no
sound is output.
The selected Voice does not sound properly.
Make sure that the following settings are appropriate: Main Voice
Volume (page 11), Dual Voice Volume (page 13), and Split Voice
Volume (page 15)
The selected Accompaniment Style or Song does not sound
properly.
Make sure that the Accompaniment Volume or Song Volume is set to
an appropriate level. (See pages 23, 32.)
Split Point 2 cannot be entered, or the
Accompaniment Split Point cannot be entered.
Split Point 2 (page 15) cannot be set lower than the Accompaniment
Split Point (page 26). Also, the Accompaniment Split Point cannot be
set higher than Split Point 2.
The footswitch operation is reversed; releasing the footswitch
causes sustain.
Connecting the footswitch after power is on reverses the footswitch
operation (polarity). For normal operation, turn off the power,
connect the footswitch, then turn the power back on (without pressing
the footswitch).
Cartridge data cannot be selected or properly played back.
Make sure that an appropriate Yamaha Music Cartridge is properly
inserted into the Cartridge slot. Also, make sure that the electrical
contacts on the Cartridge are clean and free from foreign particles.
Insert and remove the Cartridge several times, and try the operation
again. If the problem persists, clean the contacts with a soft, dry cloth.
The Harmony effect cannot be heard properly.
Make sure that the Harmony Volume is set to an appropriate level.
(See page 17.)
The Harmony or Echo effect cannot be used.
Harmony/Echo is not available when the Full Fingering mode (page
26) is on, and will automatically be turned off when the Full Fingering
mode is selected.
The PortaTone does not respond to or work with a connected
MIDI device.
Whenever using a MIDI device to control the PortaTone, make sure
that the Receive Switch is set to “on” for the appropriate channel or
channels. (See page 40.)
MIDI data cannot be transmitted or received.
When the Song or Easy Chord Memory mode is selected, MIDI data
cannot be transmitted or received, and none of the MIDI menu settings
have any effect. Select another mode (Voice or Style).
The mode cannot be changed.
While a Song or Rhythm/Accompaniment are being played back, the
mode cannot be changed. Stop the Song or Rhythm/Accompanyment
and press the VOICE, STYLE, SONG, or EASY CHORD MEMORY
(REC/END) button.
Index
A
K
S
AC power adaptor................................ 3
Accompaniment Out .......................... 4 0
Accompaniment Split Point................ 2 6
Accompaniment Volume ............... 9, 23
Auto Accompaniment ........................ 2 0
Keyboard controls................................ 8
Keyboard Out..................................... 4 0
data backup ....................................... 4 1
data initialization ............................... 4 1
D e m o.................................................... 5
Demo Songs......................................... 5
Dual Voice GM Voice.......................... 1 3
Dual Voice menu ................................ 1 3
Dual Voice mode................................ 1 2
Dual Voice Octave ............................. 1 3
Dual Voice Pan ................................... 1 3
Dual Voice Reverb Level .................... 1 3
Dual Voice Volume............................. 1 3
Main A and B sections..................... 21, 22
Main Voice GM Voice ......................... 1 1
Main Voice menu................................ 1 1
Main Voice Octave ............................. 1 1
Main Voice Pan................................... 1 1
Main Voice Reverb Level .................... 1 1
Main Voice Volume ............................ 1 1
Metronome...................................... 19, 21
MIDI .................................................... 3 8
MIDI Implementation Chart................. 4 6
MIDI menu .......................................... 4 0
Minus One .......................................... 3 1
Minus One Channel
Settings (Left, Right)..................... 31, 32
Minus One Part Setting ................... 31, 32
Music Cartridge (PSR-230 only) ........ 3 6
Music Stand.......................................... 4
sections ......................................... 9, 22
Single Finger ...................................... 2 6
Song Clear.......................................... 3 5
Song menu......................................... 3 2
Song Volume ................................. 9, 32
Songs, Demo........................................ 5
Songs, selecting................................. 2 8
Songs, User........................................ 3 3
Split Point 1, 2................................... 1 5
Split Voice GM Voice.......................... 1 5
Split Voice menu................................ 1 5
Split Voice mode................................ 1 4
Split Voice Octave ............................. 1 5
Split Voice Pan................................... 1 5
Split Voice Reverb Level .................... 1 5
Split Voice Volume ............................ 1 5
Start/Stop ............................ 21, 24, 29
Step recording ................................... 3 5
Stopped Accompaniment function .... 2 2
Style menu......................................... 2 6
Style mode......................................... 2 0
Styles, selecting ................................ 2 0
Sustain ................................................. 4
Sync-Stop .......................................... 2 4
Synchro Start..................................... 2 1
E
N
T
Easy Chord Memory....................... 8, 33
Echo Speed ........................................ 1 7
Effect controls ..................................... 9
Ending section ................................... 2 4
External Clock .................................... 4 0
numeric keypad ................................. 1 0
Tempo................................................ 2 2
Touch Response................................. 1 8
Touch Sensitivity ............................... 1 9
Transpose .......................................... 1 9
Troubleshoooting............................... 4 4
Tuning................................................ 1 9
B
batteries .............................................. 3
C
Cartridge ..................................... 9, 36
Chorus................................................ 1 6
D
F
Fill-in section...................................... 2 2
Fingered ............................................. 2 5
Fingering modes ................................ 2 4
Full (Fingering mode)......................... 2 6
G
GM Voice, Dual Voice......................... 1 3
GM Voice, Main Voice ........................ 1 1
GM Voice, Split Voice......................... 1 5
Guide Lamps (PSR-230 only)............. 3 0
H
Harmony Volume ............................... 1 7
Harmony/Echo ................................... 1 6
Harmony/Echo type........................... 1 6
Harmony/Echo menu ......................... 1 7
headphones.......................................... 4
I
Intro section ...................................... 2 1
J
Jam Track section.............................. 2 3
L
Large/Small ....................................... 2 3
Local Control ..................................... 4 0
M
O
Octave, Dual Voice ............................ 1 3
Octave, Main Voice ............................ 1 1
Octave, Split Voice ............................ 1 5
One Touch Setting, Song................... 3 3
One Touch Setting, Style................... 2 7
U
User Songs......................................... 3 3
P
Pan, Dual Voice .................................. 1 3
Pan, Main Voice.................................. 1 1
Pan, Split Voice.................................. 1 5
Percussion Kit Voice .......................... 1 2
PHONES/AUX OUT................................ 4
Power switch........................................ 5
R
Real-time recording............................ 3 4
REC/END (Easy Chord Memory)......... 3 4
Receive Channel Select ...................... 4 0
Receive Switch................................... 4 0
Recording, Real-time .......................... 3 4
Recording, Step ................................. 3 5
Remote Channel................................. 4 0
Repeat Play ........................................ 2 9
Reverb................................................ 1 8
Reverb Level, Dual Voice ................... 1 3
Reverb Level, Main Voice ................... 1 1
Reverb Level, Split Voice ................... 1 5
Reverb Type....................................... 1 9
Reverb/Others menu ......................... 1 9
V
Voice List........................................... 4 2
Voice Polyphony ................................ 4 2
Voice Set ........................................... 1 9
Voices, selecting................................ 1 0
Volume control .................................... 5
Volume, Accompaniment .............. 9, 23
Volume, Dual Voice............................ 1 3
Volume, Main Voice ........................... 1 1
Volume, Song ................................ 9, 32
Volume, Split Voice ........................... 1 5
45
MIDI Implementation Chart / Implementierungstablle
YAMAHA [ Portable Keyboard ]
Model : PSR-220 / 230
Function
Transmitted
Recognized
Basic
Channel
Default
Changed
1 - 16
1 - 16
1 - 16 (*0)
1 - 16 (*0)
Mode
Default
Messages
Altered
Mode 3
×
*******
(*0)
×
×
: True voice
0 - 127
*******
0 - 127
0 - 127
Velocity
Note on
Note off
〇 9nH, v = 1 - 127
× 9nH, v = 0
〇 9nH, v = 1 - 127
× 9nH, v = 0 or 8nH
After
Touch
Key's
Ch's
×
×
×
×
〇
〇
〇 (*1)
〇
〇
〇
〇
〇
〇
×
〇
×
〇
×
×
〇 (*2)
〇
〇
〇 (*1)
〇
〇
〇
〇
〇
〇
〇
〇
×
〇
〇
〇
〇 (*2)
〇
〇 (*3)
〇 0 - 127
*******
〇 0 - 127
0 - 127
〇 (*4)
〇 (*4)
Note
Number
Pitch Bender
Control Change
Program
Change
0,32
1
6,38
7
10
11
64
66
84
90
91
96
97
100, 101
120
121
: True number
System Exclusive
System
Common
: Song Position
: Song Select
: Tune
×
×
×
×
×
×
System
Real Time
: Clock
: Commands
〇
〇 (*6)
〇 (*5)
〇 (*6)
Aux
Messages
: Local On/Off
: All Notes Off
: Active Sense
: Reset
×
×
〇
×
×
〇
〇
×
Mode 1: OMNI ON, POLY
Mode 3: OMNI OFF, POLY
46
Date: 14-Feb-1996
Version: 1.0
Mode 2: OMNI ON, MONO
Mode 4: OMNI OFF, MONO
Remarks
Bank select MSB, LSB
Modulation depth
Data entry MSB, LSB
Volume
Pan
Expression
Sustain
Sostenuto
Portament control
Dry send level
Reverb depth
RPN data increment
RPN data decrement
RPN LSB, MSB
All sound off
Reset All Controllers
〇 : Yes
× : No
/ Table d
ablle
/ Table d'implémentation / Gráfico de implememtación
*0 PSR-220/230 function as 16 MIDI channel multi-timbral
tone generator.
The Remote Keyboard channel can be set by the panel
settings.
The designated channels on the PSR-220/230 can be
controlled by an external device and receive the
following data:
• Note Off
• Note On
• Contorl Chanage:
Bank select MSB, LSB
Volume
Pan
Sustain
Reverb depth
All sounds off
Reset all controllers
• Program Change
• Exclusive ( Panel voice / GM voice select )
*1 Bank select transmission: The LSB is fixed at 00H.
Bank select reception: The bank select MSB is used for
melody voice and rhythm voice switching.
MSB 00H: Melody voice.
MSB 7FH: Rhythm voice.
The bank select LSB is ignored.
The bank select on the channel 10 is ignored.
No voice change will occur when only a bank select is
received.
When a program change is received, the latest bank
select value is used.
*2 RPN transmits and receives the following data:
Pitch bend sensitivity: BnH, 64H, 00H, 65H, 00H
Fine tuning:
BnH, 64H, 01H, 65H, 00H
Coarse tuning:
BnH, 64H, 02H, 65H, 00H
Null:
BnH, 64H, 7FH, 65H, 7FH
*3 Reset all controllers.
Pitch bend, modulation, expression, sustain, sostenuto,
and registered parameter number are returned to their
default values.
Portamento is reset.
*4 Exclusive.
< GM1 System On >
F0H, 7EH, 7FH, 09H, 01H, F7H
All parameters except MIDI Master Tuning are reset to
their default values.
< DISK ORCHESTRA ON >
F0H, 43H, 73H, 01H, 14H, F7H
< DISK ORCHESTRA OFF >
F0H, 43H, 73H, 01H, 13H, F7H
< MIDI Master Volume >
F0H, 7FH, 7FH, 04H, 01H, ll, mm, F7H
Allows the volume of all channels to be changed
simultaneously (universal system exclusive).
“mm” is used as the MIDI Master Volume value (“ll” is
ignored).
The relation between MIDI Master Volume value and the
actual volume is the same as the one between control
change master volume value and the actual volume.
The default value for “mm” is 7FH.
This value is reset by a GM1 System On message.
< MIDI Master Tuning >
F0H, 43H, 1nH, 27H, 30H, 00H, 00H, mm, ll, cc, F7H
Allows the pitch of all channels to be changed
simultaneously.
“mm, ll” is used as the MIDI Master Tuning value, and
the actual tuning value is represented as follows:
T = M x 200 / 256 - 100
Where T is the actual tuning value in cents. M is decimal
value represented by 1-byte using bits 0..3 of “mm” as
the MSB and bits 0..3 of “ll” as the LSB.
The default values of “mm” and “ll” are 07H and 0FH,
respectively.
“n” and “cc” are also recognized.
This value is not reset by a GM1 System On or Reset All
Controllers message.
< Panel Voice >
F0H, 43H, 76H, 1BH, cc, vv, F7H
This message alternately selects Panel voice or GM
voice.
cc: MIDI channel
vv: 00 = GM voice mode, 01 = Panel voice mode
*5 Internal / External clock selectable.
*6 Start / Stop message is transmitted.
Start / Stop message is received as a message for
“STYLE”.
GM System Level 1
The existing MIDI protocol allows performance and other data to be transferred between different instruments, even
if they are from different manufacturers. This means, for example, that sequence data that was originally created to
control a tone generator from manufacturer A can also be used to control a different tone generator from manufacturer
B. Since the voice allocation in different devices from different manufacturers is usually different, however, appropriate
program change data must be transmitted to select the right voices.
The General MIDI protocol was developed to minimize confusion and the need for re-programming when playing
software created by one MIDI device on another. This has been achieved by defining a standard voice allocation in
which the same or similar voices are accessed by the same program change numbers or MIDI channels. The current
standard recognized by the International MIDI Association is known as “GM System Level 1.” The PSR-230/220 voice
allocation complies with the GM System Level 1 standard.
47
Specifications / Technische Daten / Spécifications /
Especificaciones
Keyboard:
61 standard-size keys (C1-C6) with touch response
(with Touch Sensitivity parameter).
Display:
Large multi-function display
Voice:
AWM 100 (Panel) / 128 + 1 Percussion Kit (GM)
Maximum Polyphony: 28 notes
Modes: Main, Dual, Split
Parameters: Volume, Octave, Pan,
Reverb Send Level, GM on/off, Split Points 1 & 2
Effect:
• Chorus
• Harmony/Echo: 5 types Harmony, 3 types Echo
(with Harmony Volume, Echo Speed parameters)
• 9 types Reverb
Style
100 Styles
Auto Accompaniment
Fingering Modes: Fingered, Full, Single Finger
Sections: Intro, Main A, Main B, Fill-in x 4, Ending
100 Jam Track (1 per Style)
Other Controls: Tempo (32 - 280), Large/Small,
Accompaniment Volume, Accompaniment Split Point
400 One Touch Setting (4 per Style)
Song
Song: 16 Preset, 4 User
Minus One
Repeat
Guide (PSR-230 only)
Song Volume
One Touch Setting
Easy Chord Memory
4 User Songs: Real-time Recording, Step Recording,
Song Clear
Overall Controls
Transpose
Tuning
Metronome
Music Cartridge
PSR-230: Yes
PSR-220: No
Guide Lamps
PSR-230: Yes
PSR-220: No
Controls
POWER, VOLUME, DEMO, SUB MENU, MAIN
MENU, TOUCH RESPONSE, SPLIT, FINGERING,
VOLUME, TEMPO, SYNC-START, START/STOP,
INTRO/REPEAT PLAY, MAIN/AUTO FILL A and B
[also MINUS ONE, GUIDE (PSR-230 only)],
ENDING, JAM TRACK, SYNC-STOP,
LARGE/SMALL, ONE TOUCH SETTING 1 - 4
(MEASURE +/-, BEAT +/-), VOICE, STYLE, SONG,
Numeric Keypad, CARTRIDGE (PSR-230 only),
EASY CHORD MEMORY (REC/END),
DUAL/CHORUS, HARMONY/ECHO, REVERB
Other Terminals & Fittings
Music Cartridge slot (PSR-230 only)
DC IN 10-12V jack
PHONES/AUX OUT jack
SUSTAIN jack
MIDI IN/OUT terminals
Music Stand slot
Amplifier
Stereo: 3.0 W + 3.0 W (with PA-3B adaptor);
6.0 W+6.0 W (with batteries)
PHONES/AUX OUT Output
48 Ω impedance ±5%
Speakers
10 cm x 2
Power Consumption
12 W (with PA-3B adaptor)
Rated Power Supply
DC 10-12 V: 6 “D” size / R-20 / SUM-1 (1.5 V) batteries,
or PA-3/3B Power Adaptor
Dimensions (W x D x H)
933 x 372 x 126mm (36-3/4" x 14-5/8" x 5")
Weight
PSR-230: 7.1 Kg (15.7 lbs.) excluding batteries
PSR-220: 7.0 Kg (15.4 lbs.) excluding batteries
Supplied Accessories
• Music Stand
• Owner’s Manual
• Music Cartridge (PSR-230 only)
Optional Accessories
Headphones: HPE-3 or HPE-150
AC Power Adaptor: PA-3 or PA-3B
Keyboard Stand: L-2L or L-2C
* Specifications are subject to change without notice.
* Änderungen ohne Vorankündigung vorbehalten,
* Sous toute réserve de modification des caractéristiques sans préavis.
* Especificaciones sujetas a cambios sin previo aviso.
48
Limited Warranty
90 DAYS LABOR
1 YEAR PARTS
Yamaha Corporation of America, hereafter referred to as Yamaha, warrants to the original consumer of a product included in the categories listed
below, that the product will be free of defects in materials and/or workmanship for the periods indicated. This warranty is applicable to all models
included in the following series of products:
PSR SERIES OF PORTASOUND ELECTRONIC KEYBOARDS
If during the first 90 days that immediately follows the purchase date, your new Yamaha product covered by this warranty is found to have a defect in
material and/or workmanship, Yamaha and/or its authorized representative will repair such defect without charge for parts or labor.
If parts should be required after this 90 day period but within the one year period that immediately follows the purchase date, Yamaha will, subject to
the terms of this warranty, supply these parts without charge. However, charges for labor, and/or any miscellaneous expenses incurred are the
consumers responsibility. Yamaha reserves the right to utilize reconditioned parts in repairing these products and/or to use reconditioned units as
warranty replacements.
THIS WARRANTY IS THE ONLY EXPRESS WARRANTY WHICH YAMAHA MAKES IN CONNECTION WITH THESE PRODUCTS. ANY IMPLIED
WARRANTY APPLICABLE TO THE PRODUCT, INCLUDING THE WARRANTY OF MERCHANTABILITY IS LIMITED TO THE DURATION OF THE
EXPRESS WARRANTY. YAMAHA EXCLUDES AND SHALL NOT BE LIABLE IN ANY EVENT FOR INCIDENTAL OR CONSEQUENTIAL DAMAGES.
Some states do not allow limitations that relate to implied warranties and/or the exclusion of incidental or consequential damages. Therefore, these
limitations and exclusions may not apply to you.
This warranty gives you specific legal rights. You may also have other rights which vary from state to state.
CONSUMERS RESPONSIBILITIES
If warranty service should be required, it is necessary that the consumer assume certain responsibilities:
1. Contact the Customer Service Department of the retailer selling the product, or any retail outlet authorized by Yamaha to sell the product for
assistance. You may also contact Yamaha directly at the address provided below.
2. Deliver the unit to be serviced under warranty to: the retailer selling the product, an authorized service center, or to Yamaha with an explanation of
the problem. Please be prepared to provide proof purchase date (sales receipt, credit card copy, etc.) when requesting service and/or parts under
warranty.
3. Shipping and/or insurance costs are the consumers responsibility.* Units shipped for service shold be packed securely.
*Repaired units will be returned PREPAID if warranty service is required within the first 90 days.
IMPORTANT: Do NOT ship anything to ANY location without prior authorization. A Return Authorization (RA) will
be issued that has a tracking number assigned that will expedite the servicing of your unit and provide a tracking system
if needed.
4. Your owners manual contains important safety and operating instructions. It is your responsibility to be aware of the contents of this manual and to
follow all safety precautions.
EXCLUSIONS
This warranty does not apply to units whose trade name, trademark, and/or ID numbers have been altered, defaced, exchanged removed, or to failures
and/or damages that may occur as a result of:
1. Neglect, abuse, abnormal strain, modification or exposure to extermes in temperature or humidity.
2. Improper repair or maintenance by any person who is not a service representative of a retail outlet authorized by Yamaha to sell the product, an
authorized service center, or an authorized service representative of Yamaha.
3. This warranty is applicable only to units sold by retailers authorized by Yamaha to sell these products in the U.S.A., the District of Columbia, and
Puerto Rico. This warranty is not applicable in other possessions or territories of the U.S.A. or in any other country.
Please record the model and serial number of the product you have purchased in the spaces provided below.
Model___________________________
Serial #________________________________
Sales Slip #________________________________
Purchased from____________________________________________________________
(Retailer)
Date______________________________________
YAMAHA CORPORATION OF AMERICA
Electronic Service Division
6600 Orangethorpe Avenue
Buena Park, CA 90620
KEEP THIS DOCUMENT FOR YOUR RECORDS. DO NOT MAIL!