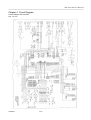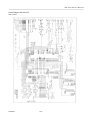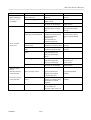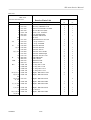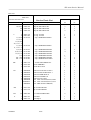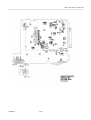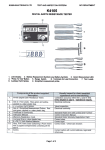
1
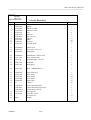
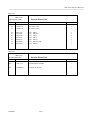
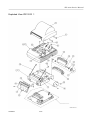
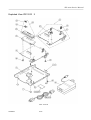
Service Manual
Model : iDP-3210
Rev.
0.01
Issued
May 7, 1997
Japan CBM Corporation
Information Systems Div.
iDP-3210 Service Manual
Preface
This manual, which describes the operational principles and procedures for maintenance,
is to be read by service personnel.
Features
This printer, a small-sized line thermal printer, has been developed to be applicable with various
data communication terminals, POS terminals, kitchen printers, etc..
Since it is equipped with many abundant functions, it can be used widely in various applications.
(1)
(2)
(3)
(4)
(5)
(6)
(7)
(8)
(9)
Light weight and small foot print.
Easy paper loading due to auto loading function.
Easy maintenance and cleaning of print head due to the removable platen design.
High speed printing and quiet printing due to Line thermal printing .
High reliability due to long life of printer head and simple design.
Input buffer incorporated.
Bar code printing is available. (Exclusive command)
Drawer kick-out interface incorporated.
Equipped with an auto cutter.
CITIZEN
2/46
iDP-3210 Service Manual
CONTENTS
Preface............................................................................................................................................................................. 2
Features ........................................................................................................................................................................... 2
Chapter 1 Handling and Maintenance of Printer............................................................................................................ 5
Chapter 2 Specifications and Operation Principle.......................................................................................................... 5
2-1 General Specifications .......................................................................................................................................... 5
2.2 Mechanism and Operational Principle ............................................................................................................. 6
2.2.1 Power Transmission and Paper Feed Mechanism. ........................................................................................ 6
2.2.2 Platen Attaching/Removing Mechanism ....................................................................................................... 6
2.2.3 Sensor Mechanism ........................................................................................................................................ 7
2.2.4 Print Head Mechanism .................................................................................................................................. 8
Chapter 3 Dismantling and Assembling....................................................................................................................... 10
3.1 Procedure for Dismantling .................................................................................................................................. 10
3.1.1 Remove the printer cover. ............................................................................................................................ 10
3.1.2 Remove the upper cover............................................................................................................................... 10
3.2 Procedure for Assembling ................................................................................................................................... 14
Chapter 4 Circuit Diagram ........................................................................................................................................... 16
Circuit Diagram iDP-3210-RF .................................................................................................................................. 16
Circuit Diagram iDP-3210-PF................................................................................................................................... 17
Chapter 5 Trouble-Shooting......................................................................................................................................... 20
5.1 Procedure for Repair ........................................................................................................................................... 20
Exploded View IDP-3210 1 ......................................................................................................................................... 25
Exploded View IDP-3210 2 ........................................................................................................................................ 26
Appendix 1. Outer Drawing of Printer.......................................................................................................................... 36
Appendix 2. Outer Drawing of AC Adapter Model : 30AD ....................................................................................... 37
Appendix 3. ACS-130 Service Manual......................................................................................................................... 38
*For Auto Paper Cutter ACS-130, please see attached service manual for ACS-130.
CITIZEN
3/46
iDP-3210 Service Manual
Chapter 1
Handling and Maintenance of Printer
Chapter 2
Specifications and Operational principle
CITIZEN
4/46
iDP-3210 Service Manual
Chapter 1 Handling and Maintenance of Printer
Please refer to “Item 2 Prior to use” and “Item 3 In using” described in the User’s manual contained
in printer package.
Chapter 2 Specifications and Operation Principle
2-1 General Specifications
ITEM
Printing system
Print width
Dot pitch
Printing speed
No. of printed digits
Character size
Character type
Bar code type
Line-line distance
Paper
Interface
Input buffer
Spec. of power supply unit
Weight
External dimensions (main body)
Operating temperature/humidity
Storage temperature/humidity
Reliability
DESCRIPTION
Line thermal dot printing system
73.92 mm/448 dots
Horizontal 0.165mm (approx. 6 dots/mm)
Vertical 0.163mm (1/156 inch)
73.3mm/sec. (Max, Print Density = Dark) (450 dot line/sec)
44 columns (10 x 16 dots)or 42 columns (10 x 16 dots)
(can be selected by dip switch.)
1.485mm x 2.61mm (9 x 16 dots)
Alphanumeric, International characters
UPA-A/E, JAN(EAN) 13 columns/18 columns, ITF
CODE 39, CODE 128, CODABAR
1/6 inch (approx. 4.23mm) (can be selected by dip switch.)
Thermal roll paper 80mm x Ø83mm (See Paper Spec..)
Serial (RS-232C), Parallel (Conforms Centronics.)
4K byte
Rated input : AC100V - 240V, 50/60HZ, 112VA
Rated output : DC24V, 2.0A
Main unit : 1300 g, Power supply unit : 450 g
152(W) X 201(D) X 123(H)
5 - 40°C, 35 - 85%RH (free of dew condensation)
- 20 - 60°C, 10 - 90%RH (free of dew condensation)
Print head’s life :
Pulse resistance 50 million pulses
Wear resistance 100 Km
(Printing ratio 12.5%, normal temperature,
normal humidity, recommended paper)
Auto cutter’s life :
500,000 cut (Normal temperature,
normal humidity, recommended paper)
*PRINTING PAPER SPECIFICATION (RECOMMENDED PAPER)
Type
: Thermal paper
Paper width
: 80 ± 1 mm
Paper thickness
: 65 ± 5 Micro m
Roll diameter
: Ø83mm or less
Print surface
: Outside of the roll (surface)
Recommended paper
: Japan Paper Mill. TF50KS-E2C or equivalent
Core
: Ø12mm (inner diameter), Ø18mm (outer diameter)
Remarks : Do not use the paper roll if its end is pasted to the core of roll.
CITIZEN
5/46
iDP-3210 Service Manual
2.2 Mechanism and Operational Principle
The basic construction and operational principle of the printer are divided into the following blocks for explanation.
* Power Transmission and Paper Feed Mechanism.
* Sensor Mechanism.
* Print Head Mechanism.
2.2.1 Power Transmission and Paper Feed Mechanism.
The drive force of the motor as power is transmitted from the motor gear fixed to the motor shaft to the platen
roller through the platen gear. The platen gear rotates by this driving force.
The platen roller is pressed to the surface of the heating element of the thermal head by the force
of bar-shaped springs connected to both the ends of the roller. When paper is inserted between the platen roller
and thermal head, it is caught between the roller and the head by the rotation of the roller,
and transferred to the paper outlet being linked with the rotation of the platen roller.
2.2.2 Platen Attaching/Removing Mechanism
The platen roller of the printer, part of the paper feed mechanism, is constructed in a way that allows attaching
and removing. The platen roller block is composed of a platen roller, platen gear, platen bushes, and platen guides.
Setting this block on to the U-supports of the chassis, the platen gear engages with the motor gear.
Further, the platen block has come in contact with the thermal head by means of the platen bushes being pressed
by bar-formed springs one end of which is fixed to the chassis.
The platen roller can be attached/removed by hooking/undoing each movable end of the springs to the hook on
the metal fitting on the chassis.
CITIZEN
6/46
iDP-3210 Service Manual
2.2.3 Sensor Mechanism
(1) Paper Sensor
The paper sensor detects the presence/absence of paper
in front of the thermal head. Activation of the thermal
head when paper is not inserted could cause damage or shorten
the life of the head significantly. This sensor is used
to prevent such trouble and for detection of the
presence/absence of paper in the automatic
loading mode.
(The paper sensor is built in the thermal head.)
(2) Paper Near-End Sensor
The paper near-end sensor detects that the remaining paper is low.
The reduced outside diameter of the paper roll (corresponding to approximately 50 cm to 2 m in length of
normal paper) is detected by a sensor provided on the chassis near one end of the paper roll.
The remainder of paper differs depending on paper thickness and core material.
This remainder can not be adjusted.
CITIZEN
7/46
iDP-3210 Service Manual
2.2.4 Print Head Mechanism
A thermal head is used for this printer. The head is composed of the heating element and the head drive
for the drive and control of the element.
(1) Outline of Drive and Control
Serial print data input from DATA IN(D1) are transmitted to
the shift resistor in synchronization with CLOCK(CP),
and stored in the latch resistor by LATCH(LA) signal.
When the gate is closed by the head activation signal
(Print commands STR 1-3), the heating elements
corresponding to the stored print data are activated,
and the data are printed on paper by heat.
(2) Print Data and Print Position
Print data Nos. 1 to 448 of the 448 bits transferred by DATA IN(D1)
are printed on positions shown in the
following figure.
Circuit Diagram of Thermal Head
CITIZEN
8/46
iDP-3210 Service Manual
Chapter 3
Disassembling / Assembling
CITIZEN
9/46
iDP-3210 Service Manual
Chapter 3 Dismantling and Assembling
For maintenance, pay attention to the following matters.
Caution
(1) If printer performs well, do not dismantle, reassemble, nor adjust the printer without reasons.
(2) Upon the completion of an inspection, be sure to check the printer again for abnormality before turning on the
power.
(3) Never print without paper inserted into the printer.
(4) Confirm that paper and the platen roller are set normally.
(5) Be careful not to leave parts, screws, or the like used for maintenance work in the printer.
(6) When handling the thermal head, do not use gloves that easily generate static electricity.
(7) In dismantling and assembling the printer, check cords and circuit boards and the like for flaws,
and be sure not to pass nor fix them forcibly.
3.1 Procedure for Dismantling
3.1.1 Remove the printer cover.
(1) Open the printer cover.
(2) Remove the hinge on the one side
with it bent to the inside.
(3) Remove the other hinge.
3.1.2 Remove the upper cover.
(1) Remove the head SP, and remove the platen roller.
(2) Unfasten two M3 x 8 screws.
(3) Lift the aft part of the cover up to remove it.
Then, insert a (-) screw driver or the like to the clearance
between the case and chassis at the locations shown
by arrow marks (1) and (2) on the front side to
remove the hooks that secures the case to the chassis
(4) If the printer is provided with an optional black
mark sensor or paper holder, pull out the connector for
connection with the control circuit board.
(5)Lift up and remove the cover paying attention
to the head SP.
CITIZEN
10/46
iDP-3210 Service Manual
l Remove the black mark sensor (option) from the upper cover.
(1) Remove the upper cover.
(2) Bend the claw on the reverse side of the upper cover shown by an arrow mark to remove the edge of
the circuit board on the cable side,
(3) Remove the cable from the upper cover.
(4) When removing the circuit board, be careful not to damage the two projections of the case that hold
the edge of the circuit board.
l Remove the roller from the upper cover
(1) Bend one of the roller shaft fixing blocks to the outside as sown by arrow marks to remove the roller shaft.
l Dismantle the platen roller.
(1) Remove the E ring on the platen gear side.
(2) Remove the platen gear and platen bushes. (In reassembling, set the notch on the circumference of
the platen bush to the projection on the side of the paper guide.
(3) Remove the E ring on the opposite side, and remove the platen bushes.
(4)Remove the end of the platen roller (the side opposite to that with a D-cut) from the paper guide.
CITIZEN
11/46
iDP-3210 Service Manual
5. Remove the bottom plate from the chassis.
(1) Unfasten two M3 x 8 screws.
(2) Slide the bottom plate slightly in the direction
of the arrow mark (1) to remove the power supply
connector from the housing.
(3) Turn and lift the connector side up to remove
the connection with the chassis.
6. Remove the auto-cutter ACS-131.
(1) Remove the bottom plate.
(2) Remove the upper cover.
(3) Remove the connector connected with the
control board.
(4) Unfasten two M2.6 x 6 screws to lift up and
remove the auto-cutter.
7. Remove the control board from the chassis.
(1) Remove the bottom plate.
(2) Remove the upper cover.
(For models not provided with the optional black
mark sensor and paper holder, remove the
platen roller only, since it is not required
to remove the upper cover.)
(3) Undo two M3 x 16 screws and two M3 x 8 screws.
(4) Lift up vertically and remove the board paying
attention not to deform nor damage the thermal head,
paper near-end sensor, power supply switch,
and others in particular.
CITIZEN
12/46
iDP-3210 Service Manual
l Remove the thermal head from the control board.
(1) Insert a (-) screwdriver between the heat sink of the thermal head and the head BK (at one end of the arrow mark)
to lift the head slightly so that it may float a little from the connector.
(2) Lift the other end of the head slightly in the same manner so that it may float a little from the connector.
(3) Lift the thermal head vertically paying attention not to touch the heating element, and remove the head
from the connector.
Reference: If the upper cover is removed and the above sub items (1) to (3) are carried out, the thermal head
can be removed without removing the control circuit board.
8. Remove the motor from the chassis.
(1) Remove the upper cover.
(2) Remove the control board.
(3) Remove the cable from the chassis,
and unfasten two M3 x 5 screws.
9. Remove the head SP from the chassis.
(1) Remove the upper cover.
(2) Turn the head SP until it becomes vertical, and then, lower
it downward as it is.
CITIZEN
13/46
iDP-3210 Service Manual
3.2 Procedure for Assembling
For assembling, mount each part according to the procedures shown in the article 3.1, "Procedure for Dismantling"
in the opposite order.
CITIZEN
14/46
iDP-3210 Service Manual
Chapter 4
Circuit diagram
CITIZEN
15/46
iDP-3210 Service Manual
Chapter 4 Circuit Diagram
Circuit Diagram iDP-3210-RF
D/N. 3210-08
CITIZEN
16/46
iDP-3210 Service Manual
Circuit Diagram iDP-3210-PF
D/N.3210-05
CITIZEN
17/46
iDP-3210 Service Manual
Block Diagram
CITIZEN
18/46
iDP-3210 Service Manual
Chapter 5
Trouble Shooting
CITIZEN
19/46
iDP-3210 Service Manual
Chapter 5 Trouble-Shooting
5.1 Procedure for Repair
If a failure occurs, observe the cause of the failure carefully,
locate the point of the failure, and repair it following the prescribed procedures.
l
Problem
: Seek the cause of the failure from items in this column.
If the problem falls into plural items, check all the matters in such items.
By so doing, hidden causes of the failure may be located.
l Cause
: Possible causes are listed as many as possible. Assume possible causes, and specify the cause
by methods shown in the next column.
l Check Method : Check methods for specifying failures are mentioned.
l Repair Method : Repair the failure according to methods mentioned in the following column.
Following the above-mentioned procedure assures effective trouble-shooting with little misjudgment.
5.2 Guide to repair
Phenomenon
Poor print
No print or print
result is not clear
Cause
Poor power supply.
Poor installation and
connection of thermal head
Poor installation of control
board.
Poor installation of platen
roller.
Missing dot
Print result is very
dirty.
Defect of thermal head
unit.
Foreign matters are
deposed on thermal head.
Defect of thermal head
unit.
Poor power supply.
Dirt is stuck on thermal
head.
Poor print quality
CITIZEN
Poor paper.
20/46
Check method
Check if specified AC
adapter is used.
Check condition of
installation and connection
of thermal head and
control board.
Check installation of
control board.
Check condition of
installation of platen roller.
Check head SP for
deformation and bent.
------------Check head for foreign
matters stuck on it.
------------Check if specified AC
adapter is used.
Check thermal head for
stuck dirt.
Repair method
Use specified AC adapter.
Connect thermal head
to control board correctly.
Install control board
correctly.
Install platen roller
correctly. Replace
deformed thermal head
unit.
Replace thermal head
unit.
Wipe foreign matter off
with a cotton or soft cloth
soaked in ethyl alcohol.
Replace thermal head unit.
Use specified AC adapter.
Wipe foreign matter off
with a cotton or soft cloth
soaked in ethyl alcohol.
Confirm that the paper
Use paper to meet
meets specifications is used. specifications.
iDP-3210 Service Manual
Phenomenon
Poor paper feed
Paper feed motor
does not work, or
is unstable.
No or unstable
paper feed.
Defect of paper
sensor.
Presence/absence
is not detected.
Cause
Defect in connection of
motor connector.
Poor power supply.
Check method
Check connection of
connector.
Check if specified AC
adapter is used.
Defect of motor unit.
Measure supply voltage
with tester or oscilloscope.
Abnormality in paper feed
Check paper course for
jammed, broken, or hung
paper.
Poor installation and
Check condition of
connection of thermal head. installation and connection
of thermal head and
control board.
Check head SP for
deformation and bent.
Poor installation of
Check condition of
control board.
installation of control board.
Poor installation of platen
Check condition of
roller.
installation of platen roller.
Foreign matters mixed in
Remove platen roller, and
gears.
check platen gear and
motor gear for foreign
matters.
Gear damage.
Remove platen roller, and
check platen gear and
motor gear for damage.
Defect of motor unit.
Measure supply voltage
with tester or oscilloscope.
Repair method
Connect connector
correctly.
Use specified AC adapter.
Defect of paper sensor.
Repeal thermal head
assembly.
Near-end of paper
is not detected.
Defect of paper near-end
sensor.
Defect of paper cutter.
---------------
CITIZEN
21/46
Replace thermal head
assembly, and confirm
its normal operation.
Replace PE sensor
assembly of control board,
and confirm its normal
operation.
Refer to appendix 3.
service manual for
auto paper cutter ACS-130.
If supply voltage is normal,
replace motor.
Remove unnecessary
paper, and insert paper
correctly.
Install thermal head to
control board correctly.
Remove deformed head
SP.
Install control board
correctly.
Install platen roller
correctly.
Remove foreign matters.
Replace damaged gear.
For motor gear,
replace motor.
If supply voltage is normal,
replace motor.
Replace PE sensor
assembly.
--------------
iDP-3210 Service Manual
Chapter 6
Parts List
CITIZEN
22/46
iDP-3210 Service Manual
Parts List
MODEL
IDP-3210
EXPLODED VIEW
Ref.
Service Parts List
Parts No.
Description
QTY'
1
5
6
7
8
9
10
11
12
13
E 4002-490
E 62020190
E 62020200
E 6302-370
E 6601-330
E 62010730
E 62010731
E 6612-050
E 5200-250
E 5049-030
Chassis
Bottom case-RF
Bottom case-PF
Foot
Protector
Top case assy
Top case
Roller
OP sheet
Feed SW knob
17
19
20
E 62040260
E 8000-140
E 8010-240
Printer cover
Auto cutter ACS-131
Mouth plate
1
1
1
23
24
25
E 66000230
E 6611-570
E 391-150
Thermal head RJ073-6S72
Paper sensor holder
Photointerrupter SG-101
1
1
1
27
28
E 6601-310
E 6601-320
Head BRT
Head spring
1
2
30
E 8017-070
Motor SMB40-4845-A
1
32
33
34
35
36
37
E 8040-010
E 8031-070
E 8025-050
E 8019-080
E 8028-020
E4
Platen roller assy
Platen roller
Bush, Platen
Gear, Platen
Paper guide
E Ring 4
1
(1)
(2)
(1)
(1)
(2)
41
E 70010780
E 70010781
E 70010810
E 5071-140
E 5110-530
Control board assy-RF
Control board assy-RF for UL
Control boars assy-PF
Key top, LED
Cover PE, sensor
PE sensor assy
Adapter
1
1
1
1
1
(1)
1
42
43
44
45
30AD
CITIZEN
1
1
1
4
1
1
(1)
(2)
(1)
1
23/46
iDP-3210 Service Manual
Parts List
MODEL
IDP-3210
EXPLODED VIEW
Ref.
Service Parts List
Parts No.
Description
QTY'
46
47
E 6100-735
E 6100-730
AC cord for 120V
AC cord for 230V
1
1
58
59
60
61
62
63
64
23G57459
23G57481
23G29538
23G22821
23G62837
23G42966
23G22796
Screw
Screw
Screw
Screw
Screw
Screw
Screw
2
2
2
6
2
1
1
M2x3
M2.6x6
M3x5
M3x8
M3x16
M3x6 w/TW
M3x8
Parts List
MODEL
IDP-3210
PE SENSOR ASSY
Ref.
Service Parts List
Parts No.
Description
QTY'
PH 1
E 391-170
Photointerrupter GP2S04
1
CN
E 48000720
Connector 5530-03A
1
CITIZEN
24/46
iDP-3210 Service Manual
Exploded View IDP-3210 1
CITIZEN
25/46
iDP-3210 Service Manual
Exploded View IDP-3210 2
D/N. 3210-02
CITIZEN
26/46
iDP-3210 Service Manual
Parts List
MODEL
IDP-3210
CONTROL BOARD ASSY
Ref.
IC
Parts No.
1 E 107-280
2 E 104-530
3 E 107-290
4 E 202-920
5 E 4101-720
6 E 202-950
E 210-070
101
102 E 107-300
TA
1 E 390-270
2 E 202-830
Tr
1,5 E 358-040
1,5,10 E 358-040
2 E 358-050
3,6,9,101 E 359-090
4 E 327-030
7,8 E 359-170
D
1,2 E 400-580
3 E 400-570
LED
1 E 480-390
2 E 480-330
RA
1 E 3500-180
2 E 3500-080
3 E 3500-050
4 E 3500-190
R 1,2,12,13 E 3900-380
3,6,16,28 E 3900-390
103
3,6,16,28 E 390-390
31,103
4 E 3900-400
5,7,17,102 E 3900-410
104
8,14,101 E 3900-420
9 E 3279-020
10,11,24,25 E 3900-430
27,29,30
CITIZEN
Service Parts List
Description
CPU HD6413002F16
Gate array CBM202LA-00
RAM LC36256AML-10-TRM
Reset IC M51953A(B)L
DC-DC com. SI-8401L
I/F IC MAX202CPE
HC-MOS 74HC04AF
Not used
EP-ROM M27C512F-12F1
Tr. array STA471A
Tr. array TA8428K
Transistor RN1002
Transistor RN1002
Transistor 2SJ139
Transistor 2SC1740SR
Transistor 2SB1065QR
Transistor 2SC4671-AN
Diode MPG06B
Diode 1SS118
LED SEL2410E
LED SEL2110S
Re. array M4-1-103J
Re. array M9-1-332J
Re. Array M5-1-103J
Re. Array M5-1-332J
Chip Re. RK73K2A3.3KJ
Chip Re. RK73K2A100J
IDP-3210
IDP-3210
RF
PF
1
1
1
1
1
1
1
1
1
1
1
1
1
1
1
2
1
4
1
2
2
1
1
1
1
1
1
4
5
Chip Re. RK73K2A100J
1
1
1
3
1
4
1
2
2
1
1
1
1
1
1
1
4
6
Chip Re. RK73K2A30KJ
Chip Re. RK73K2A33KJ
1
5
1
5
Chip Re. RK73K2A180J
Re. 2W 2.7J
Chip Re. RK73K2A10KJ
3
1
7
3
1
7
27/46
iDP-3210 Service Manual
Parts List
MODEL
IDP-3210
CONTROL BOARD ASSY
Ref.
Parts No.
R
15,26 E 3900-440
18,19,23 E 3900-450
20 E 3900-460
21 E 3900-470
C
3 E 2022-730
4 E 2047-685
1,2,5,6,8 E 2110-870
11,15,16
17,18,189
20, CP 1 - 6
1,2,5,6,8 E 2110-870
11, CP 1 - 7
7,12,101 E 2110-875
9,10,13,14 E 2110-900
15,16,115 E 2110-900
115 E 2110-900
102 - 108 E 2110-885
109 - 114 E 2110-905
Service Parts List
IDP-3210
IDP-3210
Description
Chip Re. RK73K2A82K
Chip Re. RK73K2A1KJ
Chip Re. RK73K2A220J
Chip Re. RK73K2A330J
RF
PF
2
3
1
2
2
3
1
2
El. Cap. 35V220
El. Cap. 16V470
C. Cap. GRM40F104Z50PT
1
1
18
1
1
C. Cap. GRM40F104Z50PT
13
C. Cap. GRM40B103K50PT
C. Cap. GRM40B102K50PT
C. Cap. GRM40B471K50PT
C. Cap. GRM40B471K50PT
C. Cap. GRM40B331K50PT
C. Cap. GRM40CH101J50PT
3
4
1
7
6
7
6
3
4
3
SW
1 E 4003-570
2 E 5102-490
3 E 5102-500
P. switch T883S1BBR1-AL
Switch SKHHBV
Switch D3C-2220
1
1
1
1
1
1
CN
1 E 48000690
2 E 48000695
3 E 48000700
4 E 48000705
5 E 48000350
7 E 48000640
E48000645
E 48000625
Connector TCS7960-53-2010
Connector PS-265D-D4TS1-1
Connector B6B-PH-K-S
Connector TM5RJ3-66
Connector 5267-04A
Con. 17LE-13250-27(D3AC) EUR
Con. 17LE-13250-27(D3CC) USA
Con. 57RE-40360-730B(D29)
1
1
1
1
1
1
1
1
1
1
1
1
DS
1 E 5103-520
2 E 5103-510
Dip switch KSD10H
Dip switch KSD08H
1
1
1
FB
1,2 E 4009-280
Fe. beads BL02RN2-R62
2
2
F
1 E 4005-795
2 E 4005-770
Fuse MS3
Fuse MQ1.5
1
1
1
1
CITIZEN
28/46
1
iDP-3210 Service Manual
Parts List
MODEL
IDP-3210
CONTROL BOARD ASSY
Ref.
X
Service Parts List
Parts No.
1 E 501-360
L 2,3,14 - 20 E 4009-480
Description
IDP-3210
IDP-3210
RF
PF
X'tal CST16.00MXW0C3
1
1
Fe. beads BLM41P800S
15
22,26,27
104 - 106
2,3,14-20 E 4009-480
Fe. beads BLM41P800S
16
22,26,27,49
104 - 106
1,4 - 13,21 E 4009-490
Fe. beads BLM21A121S
27
23 - 25
101 - 103
1,4 - 13,21 E 4009-490
Fe. beads BLM21A121S
23 - 25
28 - 48,50
101 - 103
CITIZEN
29/46
40
iDP-3210 Service Manual
Parts Layout on Control Board
CITIZEN
30/46
iDP-3210 Service Manual
CITIZEN
31/46
iDP-3210 Service Manual
CITIZEN
32/46
iDP-3210 Service Manual
CITIZEN
33/46
iDP-3210 Service Manual
CITIZEN
34/46
iDP-3210 Service Manual
CITIZEN
35/46
iDP-3210 Service Manual
Appendix 1. Outer Drawing of Printer
CITIZEN
36/46
iDP-3210 Service Manual
Appendix 2. Outer Drawing of AC Adapter Model : 30AD
CITIZEN
37/46
iDP-3210 Service Manual
Appendix 3. ACS-130 Service Manual
SERVICE MANUAL
AUTO CUTTER UNIT
MODEL :ACS-130/120 (132/134)
Japan CBM Corporation
Information Systems Div.
CITIZEN
38/46
iDP-3210 Service Manual
1. Maintenance and Handling
1.1 Attention to Handling
(1) Precaution for use
l Do not cut paper other than the specified recording paper, nor pull recording
paper while paper is being cut, or the blade will be damaged to shorten the life.
l Do not make an excessive force to the frame.
(2) Precaution for storage
l Do not store the unit at a dusty place and under a high temperature and humidity.
1.2 Cleaning
(1) Eliminate paper powder appropriately.
A vacuum cleaner is available for better and easier cleaning.
(2) To eliminate dirt, wipe it away using alcohol or benzene.
Never use Thinner Trichloroethylene or ketone solvent because they may
damage plastic parts.
(3) Lubricate as required after cleaning.
1.3 Lubrication
Lubrication is not necessary expressly for use of 300,000 times or less,
however lubrication is necessary if the blade shows a dull move or oil has
run out due to cleaning, or when the unit is disassembled, reassembled or
replaced.
Use a little oil, or an excess of oil causes paper dust to stick, resulting
in malfunction. (For where to oil, refer to the instruction drawing for lubrication location).
Gear pivots:
MALTEMP
by brushing
Worm gear block:
Molybdenum by brushing
Sliding portion of blade and frame: Molybdenum by brushing
CITIZEN
39/46
iDP-3210 Service Manual
2. Mechanism and Operational Principle
2.1 Outline of Mechanism
ACS-130 is designed for compact printers, and offers major advantage of
ultra slim design and light weight. Its mechanism is composed of a frame,
transmission mechanism, sensor and blade mechanism blocks.
2.2 Mechanism and Operational Principle
2.2.1 Transmission Block
The reduction gears train of this auto cutter is composed of a worm
fitted to the motor shaft, worm gear, and two cutter gears.
One revolution of the motor causes the cutter gears 1/64 revolution
(Fig. 1)
.
2.2.2 Sensor Block
The sensor block is composed of a mechanical contact switch and cutter gear cam.
It detects the cutter's home position (Fig. 2), the turning position for partial cut (Fig. 3),
and the return of the blade. While the blade is in the home position, the status is ON, and when the blade
has returned to the home position, the status becomes ON. The position where the status changes from ON to
OFF after the movable blade starts moving is the turning position for partial cut.
CITIZEN
40/46
iDP-3210 Service Manual
2.2.3 Blade Mechanism Block
The blade cuts recording paper by its linear motion converted by the crank pin.
(1) Full cut
For full cut, the crank pin returns to the home position after one revolution. The blade moves 11 mm.
(2) Partial cut (one tear-point left)
For partial cut, the crank pin turns reversely from the moment when it receives the signal from the switch to
return to the home position.
The blade moves approximately 8.5 mm.
CITIZEN
41/46
iDP-3210 Service Manual
3. Repairs (Trouble shooting)
Trouble shooting is divided into the following items to explain how to repair.
In accordance with the following items to check and repair.
(1) Trouble ………….. Find the trouble in this item.
(2) Conditions ………..The same trouble can show different conditions.
Confirm which conditions your trouble comes under,
comparing your trouble with the description in this item.
(3) Causes …………… Causes are listed according to the conditions of troubles.
Find the cause of your trouble.
(4) Check method ……. Method to locate causes of your trouble.
(5) How to repair ……... Repair the defect following the methods mentioned in this item.
CITIZEN
42/46
iDP-3210 Service Manual
4. Disassembling and Reassembling
(1) Disassembling procedures
Disassemble the unit according to the assembling procedures in the reverse order.
(2) Assembling procedures
Assemble the unit according to the assembling procedures shown in the separate table.
CITIZEN
43/46
iDP-3210 Service Manual
CITIZEN
44/46
iDP-3210 Service Manual
Exploded View
ACS-131
CITIZEN
45/46
iDP-3210 Service Manual
Parts List
MODEL
ACS-131
AUTO PAPER CUTTER
Ref.
1
2
3
4
5
6
6-1
6-2
6-4
6-5
6-6
7
8
9
11
12
CITIZEN
Parts No.
E 8010-250
E 8022-060
E 8021-110
E 8015-020
E 8020-020
E 8033-020
E 8016-050
E 8018-010
E 8035-010
E 8030-100
E 8036-010
E 8023-070
71SEC-1678
71G57459
Service Parts List
Description
Cutter frame assy
Paper stopper
Lraf spring
Cutter gear assy
W gear
Motor harness assy
Motor assy
Micro Switch D2F-01FL
Tube 5.2 X 230
Tube 2.7 X 10
Binder T18S
Movable blade-130
Fixed blade-130
Cutter cover
Screw M2 X 8-SW
Screw M2 X 3
46/46
QTY'
1
1
1
2
1
1
1
1
1
1
1
1
1
3