1
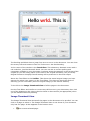
Welcome to ClaroRead
Welcome to ClaroRead. ClaroRead is designed to make it easier for you to do things with
your computer by making it speak and making things easier to read. It is closely
integrated with Microsoft™ Word® to assist you as you work with text but also helps you
with web pages and email and anything else you want to do.
ClaroRead adds powerful speech features which allow you to listen to any information
depicted on your computer screen. It also includes many easy ways to make the text
clearer and more visible. We have also included useful text checking tools, to aid you in
creating the most accurate documents.
ClaroRead will work with any application or software program on your PC. The highlyvisible ClaroRead toolbar can be locked in one place, docked to the top of the screen or
can be left to float around the screen as suits you best.
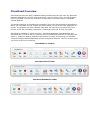
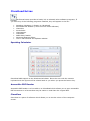
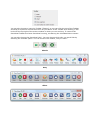
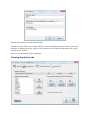
ClaroRead Pro Toolbar
ClaroRead Plus Toolbar
ClaroRead Standard Toolbar
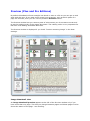
ClaroRead Overview
ClaroRead provides an easily-readable floating toolbar that will lock onto any Windows
software application you have open and active. You can easily add or remove buttons
from this toolbar. The full list of buttons is described in the next section, ClaroRead
Toolbar Buttons.
The speech features of ClaroRead are powerful. One of the key benefits of ClaroRead is
that it can read back menus, button text and tooltips, as well as any text displayed on
screen. The program will also instantly read back any text that you select using your
mouse. It will also read back characters, words and sentences as they are typed.
ClaroRead is available in three versions – ClaroRead Standard, ClaroRead Plus and
ClaroRead Pro. The Plus and Pro versions have the additional features of scanning from
paper or a PDF file (Optical Character Recognition or OCR) and echoing text dictated
using the Dragon NaturallySpeaking speech recognition software. The Pro version gives
you more control over scanning.
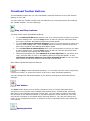
ClaroRead Pro Toolbar
ClaroRead Plus Toolbar
ClaroRead Standard Toolbar
ClaroRead Toolbar Buttons
The ClaroRead Toolbar lets you use ClaroRead's powerful features at any time without
getting in your way.
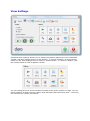
You can make the Toolbar smaller and less obtrusive by removing buttons and making
the Toolbar smaller: see View Settings.
Play and Stop buttons
The Play button starts ClaroRead speaking:
To read Microsoft Word documents click your mouse pointer to where you want
to start reading from. Click the Play button to start to read the document from
the cursor onwards. See Making Word Documents Speak.
To read web pages in Internet Explorer click your mouse pointer to where you
want to start reading from. Click the Play button to start to read the document
from there onwards. See Making Web Pages Speak.
To read PDF files in Adobe Reader click your mouse pointer to where you want
to start reading from. Click the Play button to start to read the document from
there onwards. See Making PDF Files Speak.
Otherwise ClaroRead will read whatever is in the clipboard, so just select text,
copy, and click Play to hear it. See Making Other PC Programs Speak. In fact,
ClaroRead will speak whatever you select with the mouse so you can read
back emails or PDF files without even having to press Play!
More about ClaroRead's Speech features.
Click on Stop to halt ClaroRead speaking. You can also click the mouse (anywhere,
it does not matter) or press the Control or F8 keys to stop ClaroRead speaking.
You can change how ClaroRead speaks in the Speech settings and Advanced Speech
settings.
Font button
The Font button allows you to quickly change the font of a whole Microsoft Word
document to one of three more readable and popular fonts, Trebuchet MS, Microsoft
Sans Serif or the specially-designed Tiresias font. You can easily increase or decrease
the font size of the whole document or just select portions of the document. The font
size can be increased or decreased within Internet Explorer. You can also change the
colour of the complete document, or portions of text in Microsoft Word. More about the
Font feature.
Spacing button
You can change the spacing between text characters, lines and paragraphs easily with
the Spacing button. This function can be used in Microsoft Word and Internet Explorer.
More about the Spacing feature.
Homophones button
When working in Microsoft Word, click your mouse pointer somewhere within the
paragraph you would like to check for homophones. Click the Homophone button to
highlight all the homophones in the paragraph. Homophones are words that sound alike
but are different in spelling, meaning or origin. An example of a pair of homophones is
blew and blue. More about the Homophones feature.
Check button
ClaroRead contains an integrated word- and document-checking feature. We have
concentrated on bringing together the Word spell checker, thesaurus and a separate
homophone checker into one simple Check button. More about the Check feature.
Predict button
Word prediction can be a very useful tool for certain writing styles. The ClaroRead word
prediction feature contains the most frequently-used English words. You can also train
prediction to use your own vocabulary either from a document or learning from your
typing. More about the Word Prediction feature.
Save button
You can convert the text in the current Microsoft Word document or anything you copy
into the clipboard (e.g. from a web page) into an audio file or a video file to save on your
computer. Click the Save button in Microsoft Word and the current document will be
saved, or select text and copy it to the clipboard for any other source of text. More about
the Save feature.
Extras button
This provides a handy link to start other selected software programs. More about Extras.
Settings button
The Settings button opens the Setting dialog that lets you change all the main
ClaroRead options and settings, including Speech, View, Prediction, Check and Scan
(Plus and Pro versions only). More about Settings.
Scan button (ClaroRead Plus only)
The Scan button is only available in the ClaroRead Plus and Pro editions. It enables
printed paper documents (books, newspapers, handouts) to be scanned with a standard
scanner and automatically converted into text (using the leading OmniPage Optical
Character Recognition software) into Microsoft Word. The text can then be edited and
read back by ClaroRead. You can also scan Portable Document Format (PDF) files to
make them accessible and then read them back with ClaroRead. You can also create files
like PDF or Word documents from scanned documents. More about the Scanning feature.
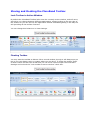
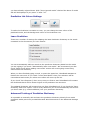
Moving and Docking the ClaroRead Toolbar
Lock Toolbar to Active Window
By default the ClaroRead Toolbar locks onto the currently-active window, and will move
around as you change between different applications, always locking to the top-right of
the window so you can still use the application without ClaroRead getting in the way but
still providing all the toolbar functions.
You can change this behaviour in View Settings.
Floating Toolbar
You may want the toolbar to behave like a normal window, though it will always stay on
top so you can always use it no matter what you are doing. To make the toolbar "float"
so that it has a title bar like normal and you can move it around open the View tab in
Settings and uncheck the "Lock toolbar to active window" check box.
Dock toolbar to the top of the screen
You can dock the floating toolbar to make a toolbar all the across the top of the screen.
First set the ClaroRead toolbar to float by unchecking "Lock toolbar to active window" on
the View tab in Settings.
Once in floating mode, click on the toolbar title bar and drag it to the top of the screen.
Release the toolbar and it will lock to the top of the screen.
Click the Undock button and the toolbar will return to its normal floating state.
Minimise or hide the toolbar
You can hide the ClaroRead Toolbar completely by minimising or hiding the toolbar.
Many of the speech and prediction features will still work, such as speaking when you
select with the mouse or hovering over web pages.
The simplest way to do this is to tap the Pause key, which will make the toolbar appear
and disappear. You can also minimise using the normal minimise button on the floating
toolbar:
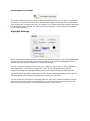
ClaroRead will still be running, and confirmation of this is the small ClaroRead icon sitting
in the System Tray near to your clock, usually on the bottom right hand of your PC
screen:
This icon gives you another way to show or hide the toolbar. If you left-click on the
ClaroRead icon, the toolbar will appear. If you right-click on the icon the toolbar will
disappear. If you double-right-click on the ClaroRead icon then ClaroRead will close
(exit).
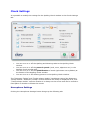
Speech Features
ClaroRead's ability to make the computer talk is one of its key innovative features.
ClaroRead uses high-quality synthesized voices, such as RealSpeak or Vocalizer voices
from Scansoft (now Nuance). ClaroRead will also work with any other text to speech
synthesiser voices that may be installed on your computer so long as they comply with
the SAPI5 standard.
The Play button or the F7 key start speech in Word or Internet Explorer or Adobe
Reader. They also start speech from the clipboard. Other speech is activated by mouse
actions or key presses.
With ClaroRead you have the following extensive range of speech facilities:
Make Microsoft Word documents speak by simply clicking the cursor at the point
you want to start, and clicking Play. The text will also be highlighted as it is
spoken back. More about Highlighting.
Make Web pages speak by hovering your mouse or simply pressing the Play
Button [or F7].
Make Adobe Reader PDF files speak by clicking the cursor at the point you want
to start, and clicking Play. The text will be highlighted as it is spoken back. More
about Highlighting.
Make any other program speak by selecting with the mouse. Great for proofing
any text from word processors and listening to your e-mails.
Echo back letters, words or sentences as you type them. Great for positive
confirmation that you have typed what you wanted to!
Automatically hear many menu items, tooltips and "objects" spoken by hovering
the mouse over the item.
Echo back words and phrases dictated into any text processor or email application
using Dragon NaturallySpeaking Preferred or Professional Versions speech
recognition software (ClaroRead Plus edition only). This increases your confidence
that the speech recognition has recognised what you said, or draws your
attention to words for later correction.
Make audio and video files from Word documents or web pages for listening
to/watching later on your PC, 'phone or media player. Or you could transfer the
audio/video files from your computer to a portable device. (Using separate
portable audio player software).
Make Calculator speak.
Get a Speaking look-up dictionary.
At any time you can stop the computer talking by pressing either the Control or F8 key
or by clicking the mouse button.
See Speech Settings and Advanced Speech Settings.
Making Word Documents Speak
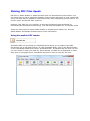
Using Play
Open Microsoft Word and open the Word document you would like to have spoken or
type some text of your own.
Click your mouse in the document to place the caret where you want to start speaking.
Press the green Play button on the toolbar or press the F7 key. The text will be
spoken back to you and highlighted as it is spoken. See Highlighting settings.
Using Control and Hover
In the Speech settings checking the "Speak word on Ctrl + Hover" box will enable you
hear one particular word spoken at a time. Hover your mouse over a word and hold
down the Control key.
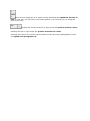
Speaking selected text with the mouse
Select some text with the mouse to make it all speak without highlighting. This is good
for speaking a particular bit of text or a textbox. See Advanced Speech settings.
Stop After Every Sentence
In the Speech settings checking the "Stop after sentence" box will set ClaroRead to read
only one sentence at a time. After each sentence ClaroRead will stop. To read the next
sentence press the Play button again. This is helpful when you want to review a
document one sentence at a time.
If you do not have "Stop after sentence" checked, you can also make ClaroRead read
only the next sentence and stop by holding down the Shift key when you press F7 or by
holding down the Shift key when you click the Play button.
Using the Arrow (Cursor) Keys
ClaroRead can speak text under the cursor when you move around in
any text area, including Microsoft Word, using the up/down/left/right arrows on your
keyboard (instead of your mouse). Turn this on by checking "Cursor moves" in the
Advanced Speech settings.
When moving using the up or down arrows, ClaroRead will speak the full line of
text. In this way, you can have a document spoken to you line by line, by using the
down arrow key.
Pressing the Control and left or right arrow will speak a word at a time.
Pressing the left or right arrow will speak a character at a time.
Pressing the Control key and the up and down arrows will jump a paragraph at a time
and speak each paragraph out.
Making Web Pages Speak
ClaroRead allows most web pages to be spoken back easily.
Pointing the mouse
You can make hyperlinks and object and pictures and text in web pages speak in the
web browser by just "hovering the mouse" over what you want spoken. This will work in
Internet Explorer and Mozilla Firefox and Safari and Opera. See Advanced Speech
settings.
Speaking selected text with the mouse
Select some text with the mouse to make it all speak without highlighting. This is good
for speaking a particular bit of text. It also works in any web browser - Firefox, Internet
Explorer, Chrome, Safari or Opera. See Advanced Speech settings.
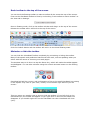
Using Play (Internet Explorer)
If you click the green Play button or press F7, the web page will be spoken from
"top to bottom" in an order that is related to the way the web page is built.
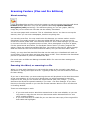
If you click your mouse at the beginning of the paragraph that you would like to have
spoken back, a "virtual cursor" will appear, like this:
Clicking Play or pressing F7 will now start speaking, and the sentence will highlight in
your chosen colour. ClaroRead will carry on reading the web page until you click Stop or
press F8 or Control.
Making PDF Files Speak
PDF files in Adobe Reader or Adobe Acrobat work like Microsoft Word documents. You
can select text to hear a particular passage, press Control and Hover to hear a particular
word, and click Play to read back a whole document with highlighting just like Word. You
cannot cursor around PDF files, however.
However, PDF files are very complex, so this can sometimes cause problems for
ClaroRead (and all assistive technology). See PDF and Accessibility for a complete guide.
There are many ways to make Adobe Reader or Acrobat more usable, too. See the
Adobe Reader and Adobe Acrobat help for more information.
Using Accessible PDF reader
Accessible PDF is a free Extra for ClaroRead which allows you to import some PDF
documents into a web page format. To read accessible PDFs, click on the Extras button
on the ClaroRead toolbar and choose "Accessible PDF". Accessible PDF will now run and
you can choose to open your PDF file. Once opened, the PDF can be displayed in either
plain text or web page layout. ClaroRead can then be used to read out the text.
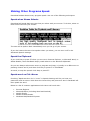
Making Other Programs Speak
ClaroRead makes almost every program speak. Use one of the following techniques.
Speak when Mouse Selects
ClaroRead will speak back any text that you select with your mouse. To do this, select or
block some text with your mouse:
The text will be spoken back immediately once you let go of your mouse.
If you don't want the text to be spoken when you select, you can turn it off in the
Advanced Speech settings.
Speak the Clipboard
If you click Play or press F7 when you are not in Internet Explorer, or Microsoft Word, or
Adobe Reader, then ClaroRead simply reads what is in the Windows Clipboard.
So you can always select some text in a program and Copy it (usually in an Edit menu or
pressing Control and C) and then click Play or press F7 in ClaroRead.
As usual, to stop the speech click Stop or press F7.
Speak word on Ctrl+Hover
Checking "Speak word on Ctrl + hover" in Speech Settings will let you hear one
particular word at a time. Hold down the Control key and point at a word. ClaroRead will
then speak the word.
Below is a list of common applications Ctrl+Hover will work with:
Internet Explorer
Microsoft Office (including Word and Outlook)
Mozilla Firefox
Adobe Acrobat Reader
Windows Mail/Outlook Express
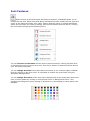
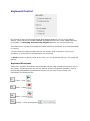
Font Features
When working in Microsoft Word and Internet Explorer, ClaroRead allows you to
modify the font size. Within Microsoft Word, ClaroRead can also modify the font type and
colour of the whole document very easily. Ensure that the mouse is clicked somewhere
within the document you want to change, and the Font button becomes active. Clicking
the Font Button brings up the following menu:
You can increase or decrease the font size of the document by clicking Increase Font
or Decrease Font by two points at a time. This will go down to 8 points minimum and to
over 100 points maximum.
You can change the font of the whole Word document to one of three highly-readable
fonts by clicking on the font name. It is possible to modify the three fonts using the
Advanced Settings Editor.
You can change the colour of the text and/or background of the whole Word document
from a colour palette by clicking on Foreground Colour or Background Colour. This
changes the background colour setting in Windows so it also applies to other places, like
Notepad.
Spacing Features
Changing character, line and paragraph spacing in Microsoft Word requires some
detailed knowledge and quite a few key actions if you use the Word menus, but it can
make documents much more readable and easy to use. ClaroRead makes it simple to
change spacing in Microsoft Word and Internet Explorer. Pressing the Spacing button
when working in Word or IE will bring up the following menu:
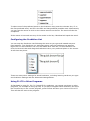
Change Character Spacing will expand the spacing by 1 point, then 2 points, and then
3 points. If clicked again it will return to normal spacing.
Change Line Spacing will change the line spacing from 1 line, to 1.5 lines, to 2 lines,
and then back to 1 line. This example shows line spacing set at 2 lines, and character
spacing at 3 points.
Change Paragraph Spacing changes the number of points (space) after the end of
each paragraph to either zero points, 6 points, 12, 18, 24 points, and then back to zero
points.
Homophone Features
Clicking the Homophone button when you are working in Microsoft Word
produces a pull down menu selection.
Click the mouse pointer in a paragraph that you would like to check for homophones, or
select some text with the mouse. Click Show Homophones or press F10 and all the
homophones in that paragraph or in the selected text will be highlighted. Homophones
are words that are pronounced alike even if they differ in spelling or meaning, such as
"pair" and "pear". ClaroRead highlights this by indicating the homophones as blue, but
you can change this colour in the Homophone settings.
You can prevent a homophone from being shown in the Homophone settings. You can
further edit the homophones identified by ClaroRead in the Homophones Tab of the
Advanced Settings Editor. You can edit the default list of homophones to add your own
or even add confusable words that you have difficulty spelling and want to be able to
highlight.
When you have shown homophones then click the mouse pointer in a homophone and
click the Check button. Check opens with the Homophone tab. You can then step
through all the homophones in your paragraph or selected text with the Next, Ignore All
or Change buttons. This allows you to check homophones on more than just a word at a
time. See the Check feature for more.
To remove your highlighted homophones click on Clear Homophones or press F11.
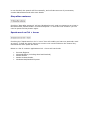
Check Features
ClaroRead provides a single Check button which will check text for spelling, offer
meanings, dictionary definitions, alternatives and identify homophones with their
meanings.
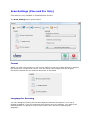
How to use
First, select the text you want to spellcheck with the mouse so it is highlighted. You can
select text in any application, for example a web browser like Internet Explorer or an
email program like Outlook.
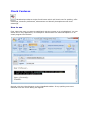
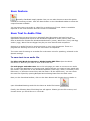
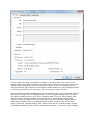
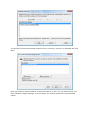
Second, click the Check button on the ClaroRead toolbar. If any spelling errors are
detected then the Check dialog will appear:
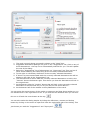
1. The word currently being corrected is shown in the "Word" box.
2. Suggested alternative spellings are given in the "Suggestions" list. Click on any of
these alternatives - the top one is automatically selected for you. This will update
the rest of the dialog.
3. Below the "Suggestions" list of alternatives is a "Synonyms" list. This is a list of
other words meaning the same thing as the currently-selected alternative.
4. To the right is a dictionary definition of the currently-selected alternative.
5. If there is a picture associated with the currently-selected alternative this will be
shown to the right of the "Suggestions" list.
6. The selected text is shown with the currently-selected alternative in bold in the
"Context" box at the bottom right. This shows you how the alternative will look in
the original text.
7. At the bottom-right the "Lookup" button that will look up the currently-selected
alternative on the Internet for you so you can find out more about it.
8. At the bottom-left of the window is the syllabification of the word.
You can point the mouse at any of the words or sentences and hear them spoken so you
can decide which is the right word to use. If you find this too talkative then you can turn
this on or off with the mute button at the top:
You can also make this dialog simpler by hiding the definitions, context and lookup
button by clicking on the arrow to open and close the right-hand-side of the dialog. This
just leaves you with the "Suggestions" and "Synonyms".
Clicking Change will change the word in your selection and go on to the next misspelled
word. When you have gone through all the misspellings then the dialog will close and
your changes will be pasted back into the program to replace the text you selected. If
this does not work for any reason then do not worry: your corrected text is safely in the
clipboard, so you can just paste it manually. If you want to revert your changes then
click Edit and Undo (or press Control and Z) to reverse all the changes you made in your
selection.
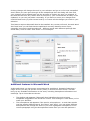
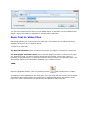
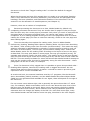
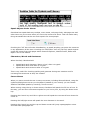
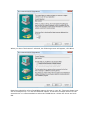
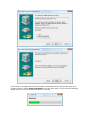
This feature requires Microsoft Word to be installed. Any version will work, but with Word
2007 and 2010 you will find that the spellcheck correctly identifies more errors,
especially incorrectly-used homophones - different words with different spellings that
sound alike, such as "their" and "there" in our example:
Additional features in Microsoft Word
In Microsoft Word you have some more options for spellcheck. Instead of selecting a
range of text you can just put the cursor (caret) in a word and click Check. This will
bring up any available information on the word, including homophone information and
meanings. Up to three tabs are shown:
The Spelling tab appears if Microsoft Word identifies the word as being
misspelled. Suggestions are shown as normal. Click Change or Close when you've
made your decision.
The Homophones tab appears if the word is a homophone - a word that sounds
just like another different word, like "there" and "their". You can select different
homophones and change the word. If you have highlighted homophones in the
current paragraph using the Homophones button then you can also perform a
Homophone Check by clicking the Next button and you will step through all the
identified homophones. This is useful if you know homophones are a problem for
you and you want to check a whole section. See Homophone Features for more
information. Note that if Word identifies a homophone as a spelling error - when
Word notices that you have used the wrong homophone - then it will be shown in
the Spelling tab, not the Homophone tab. If Word has identified the wrong
homophone then Word is probably correct, so it is simpler for you to see the
suggested, correct homophone than all the options. For example, if you use
"there" instead of "their" then it does not help you to see that "they're" is a third
homophone - only "there" will be suggested.
The Meanings tab shows more information on the word, including more
alternatives you might want to use.
Selecting a range of text works just like everywhere else. If you select a range of text
and click Check you will only get the spellcheck function for that range, just like before.
Finally, you can also spellcheck the whole Word document. Bring up the Spelling dialog
by clicking in a word and then clicking the Spellcheck All button. You will be taken
through the spelling errors in the whole current Word document.
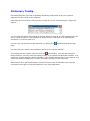
Dictionary Tooltip
ClaroRead provides you with a speaking dictionary tooltip that gives you a spoken
definition for any word in any program.
Hold down the Control key and point the mouse at a word. The Dictionary Tooltip will
appear:
You will hear the word you pointed at spoken aloud so long as you have Speak Word on
Ctrl + Hover turned on. The definition is shown and you can hear it by pointing the
mouse at it, or select parts of it.
You can look up the word on the Internet by clicking the
right.
Lookup button at the top-
You can click on a word in the definition and it in turn will be defined.
The tooltip will stay visible until you click the
Close button. You can also drag the
tooltip around. You may want the tooltip to stay in one place and be always visible: if so,
check the "Tooltip always visible" checkbox in the Check Settings tab. If you want to turn
off the dictionary tooltip then uncheck "Dictionary tooltip" on the same tab.
Note that to save space the tooltip is limited to three lines of definition text: use the
scroll bar at the right to see the bottom for very long definitions.
Word Prediction Feature
ClaroRead contains a powerful word prediction feature. ClaroRead uses a base
prediction dictionary (which can be changed) consisting of 2000 or 5000 of the most
frequently used words in the English language. You can change between base
dictionaries in the Prediction Settings. More Prediction Dictionaries can be created using
the Advanced Settings Editor.
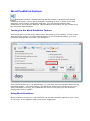
Turning On the Word Prediction Feature
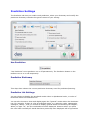
Word Prediction is turned off by default when ClaroRead is first installed. To turn on the
word prediction feature, click the Settings Button on the ClaroRead toolbar, go to the
Prediction settings tab, and check "Use Prediction":
This turns prediction on or off permanently. You can also place a Prediction button on the
ClaroRead toolbar - see View settings. This Prediction button turns prediction on or off
while ClaroRead is running, but ClaroRead will revert to the setting on the Prediction
settings tab when it restarts.
Using Word Prediction
When Prediction is turned on, the Prediction List will automatically appear by your cursor
as you type. It only appears when it has some suggestions.
To select one of the predicted words in the Prediction List, press the relevant key. F1 is
the first predicted word, and F5 is the fifth and last predicted possible word. Alternatively
you can use the mouse to click on the chosen word from the list. The word will then be
completed.
If the mouse is hovered over any of the words in the list, ClaroRead will speak the word.
Configuring the Prediction List
You can stop the Prediction List following the caret as you type and instead stay at a
fixed position. Turn Prediction on, and start typing until the Prediction List appears.
Right-click on the Prediction List. This will add a blue "title bar" to the Prediction List.
Click the blue title bar and drag the Prediction List to your preferred place on the screen.
It will then stay there.
There are many other settings for Word Prediction, including learning words as you type:
see Prediction settings and the Advanced Settings Editor.
Using F1-F5 in Other Programs
If ClaroRead is using F1, F2, F3, F4 and F5 for prediction, you cannot use them in other
programs, for example to bring up Help. If you want to bypass Word Prediction and send
the function key to the current program, press F6 first and then your choice of F1 to F5.
This will then be sent to the program.
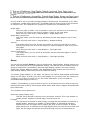
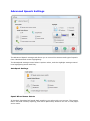
Save Feature
Normally ClaroRead simply speaks. But you can also choose to save the speech
instead for listening to later. Click the Save button on the ClaroRead toolbar to show the
output formats available.
You can save text to an audio or video file or send text to iTunes. Which is available
depends on the local machine and the version of ClaroRead.
Save Text to Audio Files
ClaroRead lets you save the text in Microsoft Word documents and text from any
application selected and copied to the Windows clipboard to audio (sound) files. The
Save to Audio file formats are Windows Media Audio (.wma), Wave files (.wav) and Ogg
Vorbis (.ogg). Wave files are bigger but play on more devices and computers.
Saving to an audio file can be a slow process on very long documents. There is a
progress bar showing how much of the conversion is completed.
The voice used for saving to an audio file is the same voice for speaking, selected in the
Speech settings.
To save text to an audio file
For Microsoft Word documents or Adobe Reader PDF files: Open the Word
document or PDF file you want to save as an audio file.
For web pages and other text: Go to the web page you want to convert to an audio
file, or open the application to view the text. Select the text you want to have saved with
the mouse. Copy this text to the Windows Clipboard (click Copy, which is normally in the
Edit menu, or press the Control key and the letter C at the same time.) You can check
this text has copied by opening Notepad and selecting Paste from the Edit menu.
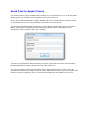
Next, on the ClaroRead toolbar, click on the Save button and choose Save to Audio or
open ClaroRead Settings and click the Save as Audio File button:
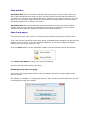
Finally, the following Save File dialog box will appear. Please give the file a name, and
choose where you would like to it. Click OK.
You can then open this file with your PC Media Player or transfer it to a portable audio
player, using your player's software or suitable other software.
Save Text to Video Files
ClaroRead allows you to save text to a video file. This allows you to watch the text a
sentence at a time as it is spoken aloud.
To save to a video file:
For Word documents: Open the Word document you want to convert to a video file.
For web pages and other texts: Go to the web page you want to convert to a video
file. Select the text you want to have saved with the mouse. Click Copy, which is
normally in the Edit menu, or press the Ctrl Key and the letter C at the same time. The
text will be copied to the Windows clipboard. You cannot see this.
THEN
On the ClaroRead toolbar, click on the Save button
and choose Save to Video.
The Save to Video application will now open. You can view the text which will be saved
and choose the video format, font style/colour, background colour and border colour
from here. More information can be found in the Save to Video help file.
Once you have set the video output to what you require, click on the Create button and
the following Save File dialog box will appear. Please give the file a name, and choose
the location on your PC where you would like to save the file.
Send Text to Apple iTunes
You need to have iTunes installed and working on your machine. If it is, then the Save
button gives you a Send to iTunes option when you click on it.
If you are in Microsoft Word or Adobe Reader then the current document will be used or a selection of it if you have selected some text in the document.
You are then presented with the Send to iTunes dialog, which asks you for the Track
Name (the title of this particular document) the Album name (the subject of the
document) and the Artist name (you, usually).
The text is converted to audio and sent to iTunes, which will convert it into the same
format specified for ripping audio CDs (e.g. AAC, MP3 etc.)
You can then find your saved audio files easily. Each document is a Track. They are
grouped into Albums by subject. And all your saved audio is under your own name. This
makes it easy to organise, and of course all the tracks will be copied to your iPod.
ClaroRead Extras
The Extras button provides a handy link to selected other software programs. If
you have any of the following programs installed, they will appear in the list:
Speaking Calculator (a feature in ClaroRead)
Accessible PDF Reader (a free tool from Claro Software)
ClaroView
ScreenRuler
ClaroCapture
ClaroIdeas
AMIS Daisy Reader
Advanced Settings Editor
Link to Claro Extras and Updates website
Speaking Calculator
ClaroRead adds speech to the Windows Calculator. Enter the sum with the numeric
keyboard and the figures will be echoed back to you when you press the Return key.
Accessible PDF Reader
Accessible PDF Reader is a free add-on to ClaroRead which allows you to open accessible
PDF documents in a format that may be easier to read than the original PDF.
ClaroView
ClaroView is a piece of software which allows you to tint the colour of the computer
screen.
ScreenRuler
ScreenRuler is a piece of software which allows you place a 'ruler' across the computer
screen and tint the computer screen to make it easier to use.
ClaroCapture
ClaroCapture is a study skills tool which lets you capture text and images from different
locations into one "ClaroCapture project". This allows you to gather information in
preparation for writing documents such as essays or reports.
ClaroIdeas
ClaroIdeas is an idea mapping software tool. In ClaroIdeas you can create idea maps
containing text, audio and images.
AMIS Daisy Reader
DAISY Digital Talking Books combine synthesised speech, recorded speech and text in
books that offer much more than plain text or audio CDs. You need a DAISY book player,
and the leading free program is the AMIS DAISY reader, supported by the DAISY
Consortium. Click for a free download of AMIS Daisy Reader.
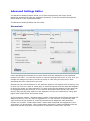
Advanced Settings Editor
This contains additional configuration options and spelling, homophone and prediction
functions for ClaroRead.
Link to Claro Extras and Updates
This option provides a quick link to the Claro Extras and Updates web page which
contains updates to ClaroRead and any new Extra add-ons which have been released.
Scanning Feature (Plus and Pro Editions)
About scanning
ClaroRead Plus and Pro include the option to scan documents into Microsoft Word
or Adobe Reader PDF files. They use the powerful OmniPage Optical Character
Recognition (OCR) technology. This allows anything you can see (paper, PDF file,
image file) to be turned into text that can be read by ClaroRead.
You can scan paper with a scanner. This is a hardware device. You have to set up the
scanner, then you can scan newspapers, books or anything else.
You can also scan files. You may need to do this because you cannot make it read in
ClaroRead. This usually means you have an Adobe PDF file that you can see on the
screen but cannot make read. The technical reason for this is that although you can see
it, the text in the file is a graphic picture of text, like a photograph of a piece of paper,
not the actual words and letters, so ClaroRead cannot read it (no other program can
either!) These are called inaccessible PDF files. You need to scan the file, which through
OCR will make the text into actual words and letters, and you can then read it back.
Finally, you may also find that PDF files that can be read out in ClaroRead will read out
much better if you scan them and then save them as PDF. This is because the ClaroRead
process is optimised to produce readable PDF files.
For much more on PDFs see Making Accessible PDFs. For more on Scan settings see
Scan settings.
Scanning into Word, or scanning to a file
When you scan with ClaroRead you can send the output to the currently-open Word
document or saving the output as a file - typically a PDF file, but also a Word or RTF file
for later editing.
If you are in Word when you start scanning the text will be placed in the Word document
at the caret position. If you are not in Word then you will be prompted to save the
output to a file, and you can choose the output format (PDF, RTF, image...). You can
also have the saved file opened instantly if you want - see Scan settings. If you have
Preview or Proofing turned on you can also choose between Word or file in the Preview
or Proofing window.
There are advantages to each:
If you scan and send to Word this scanned text is also now editable, so you can
cut, paste or copy the text into new documents within Microsoft Word or into
other suitable software.
If you scan and save as a PDF file you can have an exact copy of the original file
that reads and highlights.
Plus and Pro
ClaroRead Plus has a convenient and fast scanning process. If you start it when you
are in Microsoft Word then what you scan will be inserted into the Word document. If
you don't you can save it as a Word document, PDF file or an image or text file. You can
also turn on a Preview window that lets you select the reading order of the document
and delete pages from it before you scan it.
ClaroRead Pro has a more powerful scanning process, including an extra Proofing
window that lets you correct any mistakes in the scanning, and many more output
options including eBooks, password protection and other features.
Scan from paper
You need to ensure your scanner is correctly setup before scanning for the first time.
If you are currently working in Microsoft Word, ClaroRead scans straight into Word at the
position of your cursor. If you are working elsewhere, a file save prompt will appear
asking you to save the result as a file.
Click the Scan Button on the ClaroRead Toolbar, and the following menu will appear:
Click Scan from Paper to start your scanner operating.
See also Preview and Proofing (Pro only).
Scanning more than one page
If you have a multiple-page scanner, then ClaroRead will take as many pages as the
scanner sends.
But whether a multiple- or single-page scanner, after scanning has finished then you will
be prompted to add more pages:
If you are done adding pages then click "Stop Loading Pages." If you want to add more
pages then put the new page(s) in the scanner and click "Add More Pages" to scan the
new page(s).
Scan from PDF/File (Converting an image or PDF file to text)
This is useful for inaccessible PDF files that cannot be read back in Adobe Reader,
ClaroRead or Accessible PDF, or files you want to edit in Word or convert to audio.
If you are currently working in Microsoft Word, ClaroRead scans straight into Word at the
position of your cursor. If you are working elsewhere, a file save prompt will appear
asking you to save the result as a file.
Click the Scan Button on the ClaroRead Toolbar, and the following menu will appear:
Click Scan from PDF/Image A file selection dialogue will open:
Select the file to open. This is the same as scanning a document in from a scanner.
See also Preview and Proofing (Pro only).
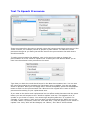
Preview (Plus and Pro Editions)
By default ClaroRead will scan straight into Word or save to a file so you can get on and
work with the text. If you want more control over scanning, such as which parts of a
page are scanned, then you can use the powerful Preview feature.
The Preview window lets you remove parts of a document you do not want to scan and
to set the reading order of the output document. The reading order is very important for
PDF files. See Making Accessible PDF Files.
The Preview window is displayed if you check "Preview scanning image" in the Scan
settings.
Image thumbnail view
An image thumbnail preview appears at the left of the Preview window only if you
have more than one page. This lets you change between pages and delete pages. It also
shows the status of the page - see Proofing.
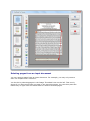
The main Preview area
The main Preview area in the centre of the Preview window shows each page and what
will be scanned (OCR) on each page. These are called Zones. Text zones and images
that will be scanned are marked with boxes and icons:
Text zone to be scanned. The text in a text zone will be OCR'd and available for
reading or editing.
Image to be scanned. Any text in an image zone will not be readable, because
it will not be OCR'd. It will appear exactly like the original document, just as you
see it here.
You can edit these Zones to control what is scanned and OCR'd. See Selecting what is
going to be scanned.
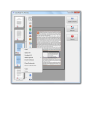
The Preview toolbar
To the left of the Preview is a toolbar with many commands:
Select zones with the mouse
Delete the selected zone. Select areas that contain scanning errors (marks on
the original paper) and useless text (repeated header and footer content) and
click Delete to stop them appearing in your output.
Create a text zone. Only text in a text zone will be scanned and appear in
your output.
Create (identify) an image. Only images in an image zone will be scanned and
appear in your output.
Create (identify) a table.
Removes a part of a zone. Use to create irregular text zones round text that
isn't in a simple rectangle.
Delete all zones on this page. Useful shortcut if you want to redraw them all
manually.
Change the reading order of the output file. Useful if you are saving to a PDF.
See Setting the reading order.
Zoom into the Preview.
Zoom out of the Preview.
Zoom so that the current page fits entirely into the Preview window. You can
maximise the Preview window to make it bigger, or zoom in to see a section in
more detail.
Undo.
Redo.
Flip the image along the vertical axis (so left goes to right and right to left).
Rotate the page anti-clockwise.
Rotate the page clockwise.
Rotate the page 180 degrees. Useful if your scanner has presented the page
upside down and ClaroRead has not managed to reverse it.
Print this whole set of scanned pages. This can be handy if you want to copy
pages: just scan, then print, without having to go through a document format in
between.
Selecting what is going to be scanned.
ClaroRead does its best to make sense of everything on a page, so sometimes it can try
to scan sections that you don't want, like marks on the page from scanning or images
you don't want in the output.
The areas that are going to be scanned are called Zones. You add and delete and edit
zones using the buttons on the Preview toolbar.
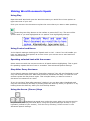
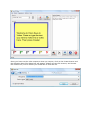
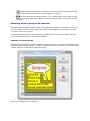
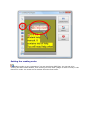
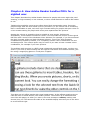
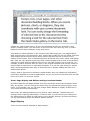
Example of editing Zones
ClaroRead has identified a speech bubble as an Image Zone, so it will be contained in the
output document after scanning. We would rather it were a Text Zone, so we could read
it back. We don't mind about losing the image.
Click on the Image Zone to select it:
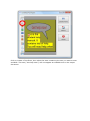
Click on Delete Zone to remove the zone. It will no longer appear in the output
document:
Click on Create a Text Zone, then select the area containing the text you want to scan
and OCR. This text ("Get help now!") will now appear as readable text in the output
document:
Setting the reading order
Reading order is very important if you are producing PDF files. You can set it by
clicking the Zone Order button, then clicking on each zone (image or block of text) in the
Preview in order. An arrow and a number show the final order.
Deleting pages from an input document
You can remove pages from an input document. For example, you may only want to
scan one chapter from a PDF file.
You do this by selecting pages in the Image Thumbnail view on the left. This is only
shown if you have more than one page in the input document. You can then press the
Delete key or right-click and select Clear to remove selected pages.
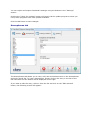
Proofing (ClaroRead Pro only)
The optional Proofing step in scanning lets you spell check and correct any errors the
program made in converting the original document to text (recognising or OCR). This
means that when you read back the scanned document it will be correct. You can edit
the document, but if you want to do any significant work we recommend that you save
the document as a Word document and edit it in Word.
You can turn on Proofing by checking the "Proofread document before saving" checkbox
on the Scan tab in Settings. Then scan as normal from scanner or PDF or image. After
Preview the Proofing dialog will appear, accompanied by a Proofing spellcheck window:
The Proofing spellcheck lets to jump from error to error in the document. You can close
this at any time and restart it from the Tools menu. See Proofreading.
In the centre of the window is the Text Editor. This shows any detected errors with a
red underline, just like Microsoft Word. You can use this to correct spelling and
recognition mistakes in your document. It always shows the page as in the format of the
original so you can easily match up the text to the original document, but your Keep
Original Format or Simplify Format setting will be preserved in the final output.
Above the Text Editor is the Verifier. This shows the actual original image you have
scanner for where your caret is in the Text Editor. This lets you check the result of
scanning (in the Text Editor) with the original image (in the Verifier window)
To the left is the Image Thumbnail View of all the pages in the document.
Use the Text Editor and Verifier to correct any OCR errors in your document, then click
one of the buttons on the right to Send to Word or Save as File (as appropriate) when
you are satisfied with the proofing.
Image Thumbnail View
The Image Thumbnail View shows all the pages in the document to be proofed. You can
click on a page to select it. The Image Thumbnail View is not shown if your document
only has one page. It also appears in the Preview view.
The current selected page.
Next to this is an icon showing the state of the page:
o
A page that has not yet been OCR'd. You see this on all the pages in the
Preview window.
o
A page that has been recognised (OCR'd) but not otherwise changed by
you.
o
A page that has been proofed by this dialog.
o
A page you've made changes to.
o
A page you have proofread and made changes to.
You can delete a page from the document by selecting it and pressing the Delete key (or
right-clicking and selecting Clear from the popup context menu.
Status bar, Ruler and Toolbars
You can turn these on and off in the View menu. By default they are all off.
The Formatting toolbar has Style, Font, Alignment, Bullets and Show Paragraph
buttons, just like Word or WordPad. These can be used to edit the text in the
proofing view so you can get the appearance of your final output just right.
The Mark text toolbar has Highlight and Strikethrough buttons, which you can use
to mark up your document. It also has a Redacting tool you can use to mark
sections of text that you want to appear with black rectangles overlying the text
(so you can see where the text was). Highlight with the Redacting tool and click
the Redact Document button, the last button on the toolbar, to redact this
marked text.
The Ruler gives you the dimensions of the current page or text area. You can
change among inches, centimetres, points and picas in the View menu with the
Measurement units submenu.
The Status Bar shows you the position of the cursor and the language that
ClaroRead believes is the writing of the text. This is useful because if it does not
match the actual language of the text then the text will be incorrectly recognised
and spell checked. Use the Set Language... option in the Tools menu to change
the selected language.
Views
You can view the current page in one of three ways, selected from the Text Editor views
submenu of the View menu.
True page means the page will be displayed on the screen as it was laid out on
the original paper. This is useful to identify page reading order and to make sense
of the structure of a page. This is the default.
Formatted text extracts the text content but keeps font, colour, font and size so it
is like editing a Word document. This may be simpler. It better represents the
output of the page if you are creating a re-flowing PDF file.
Plain text presents only the text content. This is best if you want to work with the
text content only, for example if you will be converting the text to audio.
Verifier
In the Proofing stage you are working with what ClaroRead Pro thinks is the underlying
page content. If you are scanning from a paper or an image file then this may be
inaccurate - for example, you may have some damaged area of the paper that has
confused ClaroRead. It might be hard to correct the text in the Proofing view if you don't
have sight of the original image.
The Verifier provides you with a view of the underlying image or paper that ClaroRead is
processing. This lets you check the text you have got (in the Text Editor) against what
was on the original page (in the Verifier). Just turn it on in the View menu (Verifier
submenu, select Show) and click anywhere in the Text Editor text. The Verifier then
shows the original page at that point so you can check they match. You can zoom this
original view in and out to check smaller details with the Zoom submenu.
By default the Verifier is shown at the top of the Text Editor. To make it float (follow the
cursor) select Dynamic. To change what is shown in the floating Verifier select Line,
Three words or One word from the Verifier submenu.
Character Map
You may have non-standard characters for your current language in your text. For
example, in a maths textbook you will often have Greek characters like sigma (Σ) or pi
(Π). This may confuse ClaroRead (if it is scanning English it will try to fit every letter into
an English character, for example) and produce wrong results. You can solve this and
improve scanning by adding these non-standard characters to the set of recognised
characters by using the Character Map. Make the character set you want to use visible
by selecting it in View, Character Map, Character sets. Then click on the characters to
add to the recognised set of characters for your scanning. These will be used in
subsequent scans and remembered, so you only have to do this once. The characters
you select will be added to the document, so simply delete them.
Character Training
You may want to correct some sections of text which have been incorrectly identified,
like Greek letters used in maths or scanned text from paper. These characters or
sections will be highlighted in yellow in the Text Editor. Click on the character to place
the caret on it. Then select "Train character recognition" from the Tools menu. The
"Train Character" window will open, showing the original text/image and what ClaroRead
thinks it is. Enter the correct character or characters in the "Correct" box and click Train
to correct the scanned text. These corrections will be remembered for next time.
You can review the character training by selecting "Edit character training" from the
Tools menu. Select and delete any training you do not want to be saved, or right-click
and edit it.
You may need to train several characters, for example where ClaroRead has incorrectly
identified a single letter as several letters. Simple select all the affected letters before
you click "Train character recognition" and the training and correction will be applied to
all the letters.
Format
You can edit the text in the Proofing dialog, and the Format menu lets you change font,
paragraph alignment, style and other text attributes. This is useful if you are planning to
save the document as a PDF file and want to amend how it will look, for example using a
more readable font to replace what has been used in the original scanned document.
However, if you are sending the document to Word to read or edit you will probably find
this easier to do there.
Note that if you are saving as PDF the original position and size of text areas will be
retained. So if you make text bigger it will start to overlap and bits will be missing. If
you want to edit the document you are scanning we suggest sending it to Microsoft Word
to edit and correct it, rather than using the Proofing dialogue.
Proofreading
Just like Microsoft Word, the Proofing dialog will take you through all the identified
spelling or OCR errors in the current document. Just select Proofread from the Tools
menu and the Proofreading process will start. You will be shown the next spelling or OCR
problem and can decide whether to correct or add it, just like the spell check in Word.
Changes will be remembered for future scanning sessions. When you have finished with
a page or document click the Page Ready or Document Ready button and no more errors
on this page will be identified. When there are no more errors in the document then the
Proofread option will grey out.
You can also press F4 or select "Find next suspect" to jump straight to the next identified
error in the page without opening the Proofreading process.
Language
It is vital that ClaroRead has the language of the document correct, or it will not
recognise (OCR) correctly and it will identify all the words as incorrectly-spelled. The
Status Bar will show the language of the current text (where the caret is positioned). You
can select text and identify the correct language by selecting the language from the
Tools menu.
Making Accessible PDF files
PDF files are very common but can be very hard to use. ClaroRead Pro and Plus give you
ways to make them usable and accessible.
This is a guide to making accessible PDF files with ClaroRead. For an in-depth discussion
of PDF accessibility, see PDF and Accessibility.
Quick approach
This is suitable for individual users who want to make PDF files for their own use from
scanning books or documents, or who have a PDF file that they need to read but is
inaccessible (does not read at all or does not read very well). It works for ClaroRead Plus
(versions 5.7 or later) or ClaroRead Pro.
accessible by ClaroRead.
ClaroRead.
file for future reference much quicker than scanning it again.
You can always re-scan the PDF file with ClaroRead Plus or Pro if you want to alter its
accessibility or format or convert it into Microsoft Word to edit it.
The ClaroRead scanning process is optimised to produce an accessible PDF file, so even if
you can read a PDF okay but you have some problems (like jumping around the page), it
may work better if you scan it and save as a PDF file again.
Advanced approach
This is suitable for someone who wants to create a canonical, high-quality accessible PDF
file, maybe for redistribution or long-term storage. It works for ClaroRead Pro, although
you can still correct the reading order in the Preview window with ClaroRead Plus.
1. Decide on your target audience. The basic split is "screenreader users and people
with very low vision" versus "mouse users and people with reading problems" Or
"blind" versus "dyslexic" to simplify. See PDF and Accessibility for a discussion on
the differences.
2. Decide how much work you want to do on the document content. Are you
essentially making the existing file accessible (for a dyslexic user, for example) or
are you doing more work to re-purpose the content more fundamentally
(stripping out extraneous content for screenreader users, for example)?
3. ClaroRead Pro settings
o a. Turn on Preview and (optionally) Proofing in the ClaroRead Pro settings
Scanning tab.
o b. Set the correct OCR language in the ClaroRead Pro Scanning settings
tab.
o c. For "blind" users consider turning off images and simplifying format. For
"dyslexic" users turn on images and use the original format.
4. Scan in from paper or file using ClaroRead Pro.
ClaroRead Pro will attempt to determine the correct reading order in the
document, and remove unwanted images.
5. Correct reading order in the Preview window.
o a. Delete superfluous content for "blind" users such as headers and
footers.
o b. Remove page numbers and other non-reading content for "dyslexic"
users.
ClaroRead now performs OCR, converting all inaccessible content into accessible
text.
6. Correct text content in the Proofing window.
o a. Correct spellings and incorrect OCR results.
o b. Add full stops at the end of titles and other lines without punctuation.
7. Output to your desired format.
o a. If you need to make major changes to the document then Send it to
Word. Word is a far better editing and word processing tool than
ClaroRead. If you have Word 2010 you can then save the Word document
as a PDF file directly. Make sure it is tagged (Save As, PDF, Options, check
"Document structure tags for accessibility".) You can also add contents
and headings in Word 2010. This may be suitable for "blind" users.
o b. If you're okay with the content as it stands (correct reading order, no
spelling mistakes) then Save it as a File. Make sure it is at least PDF
version 1.4. Do not optimize for size. Do not show background image
layers.
i. If you want the output to look exactly like the original then Save
it as a ClaroRead PDF. This is the only way to make sure the output
looks exactly like the original scanned PDF or book, which is very
helpful for "dyslexic" users.
ii. If you want the output to be able to be reflowed and zoomed and
don't mind about it looking identical to the original then Save it as
PDF Edited or even text. This is useful for "blind" users.
For PDF output, accessibility information tags are added here
8. Read back with ClaroRead (Adobe Reader, Microsoft Word, or use Save to Audio
or Video) or distribute the accessible file to others. Keep the file safe so you don't
have to go through the preparation process again.
PDF and Accessibility
This is a guide to PDF, how it affects people trying to use assistive technology (A.T.) with
it, and what can be done. It assumes familiarity with A.T., whether a screenreader or
magnifier or reading toolbar like ClaroRead, and with Adobe Reader. It is designed for
organisations producing PDF files and for A.T. practitioners to better-understand the
issues. It may be of use to Adobe Reader users who want to understand how best to
approach PDFs.
Chapter 1 describes PDF, how it fits into business processes, and why it is popular. It
tells you how you can approach the production of accessible PDF files.
Chapter 2 describes the specific technical problems with PDF for the “traditional”
screenreader user, why it can be hard to use, and the solution (tags) that Adobe has
invented to help.
Chapter 3 describes how Adobe Reader handles a PDF and the implications for how a
PDF should be structured.
Chapter 4 catalogues the visual display options for Adobe Reader and how they interact
with the accessibility features.
Chapter 5 provides a set of “best” settings for Adobe Reader or for accessible PDF files.
Chapter 1: The Adobe Portable Document Format
(PDF)
PDF does a great job for what it is designed to do: it describes what should be printed on
paper. It was invented so that people creating documents on the new desktop publishing
technology in the 1980s and 1990s could send them to printers and have them appear
as they intended – font, colours, layout.
So PDF works in terms of pages, and what images and text goes where on each page. It
has no idea of things like headings, or columns, or chapters, or words or sentences.
PDFs fit into traditional business print processes very well, and still does:
Writers write text in a word processor (Microsoft Word, Pages, OpenOffice). Graphic
artists create images (Adobe Photoshop, Adobe Illustrator, Inkscape, GNU Image
Processor).
Graphic designers and editors lay out the text and images in a desktop publishing
program to create the brochure or report or book (Adobe InDesign, Microsoft Publisher,
Quark Express, Scribus).
The ready-to-print document is exported from the desktop publishing program as a
PDF file and sent to managers and stakeholders to review. Minor corrections are made
and the final PDF sent a commercial printer. Because PDF cares about font, and colour,
and layout, the editor can be confident that the printed document will look just as they
intended.
The problems arose when people started trying to use PDFs not for print but for online
distribution and eBooks and other non-print purposes. There were and are good reasons
for this. The existing business processes had already produced millions of PDF files and
continued to produce new PDF files as the final, edited format, so it was no extra work.
PDF is an open format, so every platform has a PDF reader and they all display
documents the same – you can’t send a Microsoft Word document to someone on a
different platform and count on it looking the same. Adobe has always provided a free
reader, Adobe Reader, for most users. PDFs let you keep your publications in your
corporate font and colours and style, so your manager is happy. There is an incorrect
belief that PDF files cannot be edited or changed, so people are confident that their
documents will always present their intended message. And finally, PDF gives you a way
to collect images and text together in a single file, which gave it the edge over that other
ubiquitous format, HTML, when you want to email your report.
It is likely, then, that any organisation produces PDFs as their main form of content
production, second only perhaps to their website. Often the substantive content on the
website itself is in PDF – reports, brochures, newsletters.
But while PDF is convenient for creators and distributors of content, it is not for some
consumers of content, notably people who are not in a position to use Adobe Reader to
display PDF on a standard desktop system (or print the document!) and read the content
visually off the page. People who use assistive technologies like screenreaders and
magnifiers have considerable problems with PDF, described in more detail in Chapter 2.
What can be done?
There are two options: stop using PDF and make the PDFs you produce accessible.
For the reasons given above you are probably not in a position to stop producing PDFs.
You will still be delivering files to printers. You will still be doing your final editing and
approval in PDF. The final PDF file is your canonical document for distribution. You could
change your business process: for example, when the text for your documents are
created in a word processor, before it is laid out, it is in a format that makes sense for
assistive technology – big lumps of text. But that means duplicating effort in your
business process. The flow of content from writer and artist to final document has to be
performed twice, once with PDF as the intended output and once with an alternative
format in mind. This can be expensive. It could backfire if you choose the “wrong”
alternative format. And the extra delay to produce the alternative format is likely to be a
problem.
So you are probably going to want to keep creating PDF files, and make them accessible
after the fact. There are several ways of doing this.
You can take just one step back, to the desktop publishing program that produced the
PDF, and use its ability to support accessible PDF output. For example, Adobe InDesign
lets you set reading order and created tagged documents when you output to PDF.
However, as noted above, this may not be just one step: it may be many steps. This
probably requires the most in-house investment in time and skills.
You can use another application to take the PDF and make it accessible. They vary in
terms of cost, ease-of-use, and the ability to automate the process. This can be easy or
hard but is quite cost-effective depending on the tool.
You can send your PDF files to an external agency, which will use one of the aforementioned tools to make the PDF more accessible. This is the easiest but most
expensive option. Your printer may offer this service, although PDF accessibility is a
specialised field.
Whichever approach you take, if you are interested in the accessibility of your PDFs, the
rest of this document will help you understand the issues .
Chapter 2: The basics of PDF Accessibility – Tags
PDF is a format designed for printing and displaying on the screen, so it often does not
work well with speech and other assistive technologies.
These are the problems with PDF in the context of trying to use them with A.T.:
1.
Images. It can have bitmap images in them - pictures of text, not text itself. This
means that the content cannot be read at all. This must be solved by OCR - optical
character recognition - turning the image into text.
2.
Reading order. It does not know in which order things should be read - so it does not
understand that you read down columns, then to the top of the next column, for
example. This means that when you try to read a PDF it reads across columns, or jumps
about the page, or reads out of order.
3.
Structure. It does not know anything about content, like "headings" or "lists" or even
"sentences" and "paragraphs" - so you can't skip to headings and when you try to read
by sentence the highlighting goes wrong. Not being able to skip around is okay for
sighted mouse users because they can see the headings and chapters and suchlike,
scroll around and click where they want to play. It's difficult for blind screenreader users,
who have no way to skip around the document and make sense of all the text. The lack
of "sentence" and "paragraph" structure can lead to odd reading for everybody, like
sentences being split in the wrong place or highlighting not matching the sentence being
read. (In formal terms this is referred to as “semantics” – PDF files do not have any
semantic information.)
4.
Zoom. It does not reflow well. That is, if you are reading text on a mobile 'phone, or
zooming in because your vision is poor, it is hard to read a page if you have to scroll left
and right to see the whole of every line. It is much easier if the page reflows rearranges to cope with the larger text size - and you still only have to scroll up and
down.
To solve Problem 1 (images) you have to do OCR - there is no way round that. But even
if all the text in your PDF file is text, not images of text, you still have Problems 2, 3 and
4 (reading order, structure, zoom)
To solve these problems Adobe added features called tags. These tell Adobe Reader
what order should be used for the text and provides chapters, headings and other styles.
So a tagged document is much more accessible for reading. To be exact, a document
must have tags to be read. These tags provide the information to allow reading order,
structure and zooming to work.
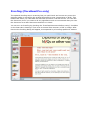
However, most documents are not tagged. Adobe Reader will therefore attempt to work
out tags when it opens these documents. This has two problems: first, it can take a long
time. That dialogue that comes up when you open a PDF file, "Preparing document for
reading" - that is Reader working out the tags. A hundred-page PDF file, which is really
quite common, can take a few minutes on a fast machine, which is very off-putting if you
just want to quickly check out a document. Second, it may not be very accurate.
Columns, textboxes, and captions can all confuse Reader when it tries to create a
reading order. No attempt at structure is made. Reflowing the PDF file may not work
well. Finally, the tags worked out by Reader are not stored anywhere for future use, so if
you close and open the PDF again then the same process must be followed.
It is clearly much better to define the tags beforehand, rather than leaving it to Adobe
Reader. In fact, this is essentially what is meant by “creating an accessible PDF” – it
means “adding correct document tags so reading order, structure and zooming are all
correct” (although OCR’ing of images is required in some cases too, of course.)
(Note that Google takes account of reading order when it indexes PDF files it finds
online, which means that your PDF files will work better and produce better search
results if you take the time to set tags to identify the reading order!)
Other PDF features that affect Accessibility
Bookmarks
These can form a “contents” section, and are turned on in View, Show/Hide, Navigation
Panes, Bookmarks. (The option is not there if there are no bookmarks in the document.)
These are examples of structural (semantic) tags in the document. They are mainly of
use to screenreader users, who can use them to quickly skip around the document using
shortcut keys, and mouse users, who can easily explore the document tree and work out
where they want to read.
Fast Web View
Fast Web View enables PDF files displayed in a web browser to start displaying before
the whole file is loaded. The file is structured so that the first few pages can be displayed
as soon as they are received. This requires some re-ordering of the PDF file, but does
not necessarily have any impact on accessibility. However, some tools may, at the same
time as processing the PDF file so that it can support Fast Web View, discard all the tags
to "optimise" the PDF file, making it smaller and faster to download to view - but losing
all the accessibility information.
Punctuation
The punctuation of a PDF file affects how usable it is. A fully-tagged document correctly
identifies paragraphs and headings and other text structures, so assistive technology can
punctuation speech and output correctly - highlighting sentence by sentence for
example. In documents where tags are missing, or the document has been transformed
or lost its tags, Adobe Reader and other tools are better able to identify sentences if they
end with full stops. This mostly applies to headings, which generally do not have full
stops at the end of them. This can mean that Adobe Reader gets confused and runs the
heading into the next paragraph, which can be confusing to the user. Full stops help
your document read correctly no matter what happens to it.
Forms in Adobe Reader
Forms allow users to fill in textboxes and select buttons and checkboxes in the PDF
document, and even submit it to an online service. For accessibility the form elements
should be tagged to indicate their name and function, and their order should be specified
for clarity and to enable tabbing around the form in a sensible order.
If you do not provide tags for forms then Reader will try to infer the tab order from the
document structure. If "Use document structure for tab order when no explicit tab order
is provided" is unchecked then Reader will go across the page and down, or down the
page and across, or some other order specified in the PDF file.
Adobe PDF files in web browsers
By default Adobe Reader makes PDF files appear within web browsers. This is generally
less accessible, since you don't have the menu, and the space given over to the display
of the PDF must be smaller, and many access programs will not work with the PDF when
it is within the browser. This is especially the case for browsers other than Internet
Explorer.
You can make Adobe Reader launch PDF files encountered by your web browser by
unchecking Preferences, Internet, Web Browser Options, Display PDF in browser. This
means Adobe Reader will pop up when you open a PDF, which may be more confusing,
but is simpler.
Adobe Reader Multimedia options
The Multimedia tab of Preferences has an Accessibility Options section. These apply to
embedded video content and provide options for subtitles and other features.
Chapter 3: How Adobe Reader handles Accessibility
This chapter explains how Adobe Reader handles PDF accessibility. This lets you
understand how accessible a given PDF is, in the context of someone requiring text
access through a screenreader or other A.T..
(It is assumed you are using Adobe Reader on Windows. Mac users can employ
VoiceOver and the native PDF display tools on their Apple machine.)
Note that Adobe Reader does nothing for embedded images – it has no built-in OCR
feature. So these will always remain inaccessible (for anyone requiring text access, that
is).
First, Reader sees if there is a "screenreader" running. This means a program that has
told Windows that it needs special access to content so it can read it out, so programs
like ClaroRead count as well as JAWS and WindowEyes. If there is no screenreader
running, it just displays the PDF and nothing more is done.
Second, it checks the PDF file for any text that is not tagged. This doesn't include text
that is stored as pictures of text. And it doesn't matter if any of the text is tagged: so
long as there is any text that is not tagged then the document must be processed to
create tags. So a completely-tagged document can become "untagged" if one person
edits the PDF file in Acrobat and adds one caption or textbox. If a PDF file is completely
tagged then nothing more is done.
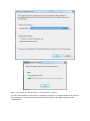
Third, it processes the PDF file and adds tags for PDF files where this is needed documents containing any untagged text. This is when you see one of these dialogues:
Again, you will or you do not have a "screenreader" running.
You can check whether a document is tagged by opening it in Adobe Reader and going to
File, Properties. The Document Properties window shows if the PDF is tagged under
"Tagged PDF":
Fourth, it takes the tags, generated or originally in the document, and works out the
reading order (technically it build the document object model.) Even for documents that
started off fully tagged this can take a long time. Also, you don't necessarily see any
progress dialogue if the document was tagged: Adobe Reader may stop responding while
it is working, but there is no other sign. You can't get it to read, of course.
Note that while by default Adobe Reader uses a reading order if one was already defined,
the user can change this. If "Reading Order" is set to "Tagged reading order" then the
pre-defined reading order is used. But if "Reading Order" is set to "Infer reading order
from document" then the reading order worked out by Adobe Reader will be used.
However, these two options are only visible where you have opened a tagged PDF file.
When Adobe Reader opens an untagged PDF file (where it has to work out the tags
itself) it hides the "Tagged reading order" option from the four "Reading Order" options
and defaults instead to "Infer reading order from document". You have to open a tagged
document to check that "Tagged reading order" is indeed the default for tagged
documents.
When the document has been fully-tagged then it is ready to be read aloud. Reading
order is fully-determined. Structure (semantics), like sentences and paragraphs and
headings, has been identified, and bookmarks identified. If the document is to be
zoomed it can be reflowed in a sensible pattern (see Chapter 4).
However, there are a number of complications.
Because processing the document is so slow, Adobe Reader by default only
completely processes documents if they are shorter than 50 pages. If they are longer
than this then only the current page is processed. Only when you scroll or read past the
processed area is processing triggered again. You cannot read, again, until this is
completed. If your reading program cannot get to the next page itself when it finishes
reading the current page you have to intervene manually, switch to the next page and
start reading again.
There are actually three options for reading order, found in Adobe Reader
Preferences, Reading, Reading Order Options, Reading Order. We have been describing
the default, "Infer reading order from document (recommended)". This means the tags,
whether generated by Adobe Reader or already in the document are used to work out
the order. A second option, "Left-to-right, top-to-bottom reading order" means that
Adobe Reader works out the reading order according to the layout of text on the page,
as described. This may work better in some pages, but may go completely wrong, for
example with columns. Finally, the third option, "Use reading order in raw print stream",
does not look at the layout of the text on the page at all, but the order of text inside the
PDF file. This can actually be better for some documents than Adobe Reader's attempt to
work out the reading order, but can be completely wrong for other documents - whole
paragraphs can be out of order, for example.
Even if a document is fully tagged then it is possible to ignore this provided order Reading Order Options, Override the reading order in tagged documents. We can
assume that someone has set this for a reason: it should be unset to provide a good
experience with a correct accessible PDF.
At a technical level, the external interfaces used by A.T. programs, like the Microsoft
Active Accessibility (MSAA) interface, and the Adobe Reader Document Object Model
(DOM) are now generated and available for use. Again, these all depend on the tags of
the document.
For non-mouse users without sight, this is generally the point where their A.T. takes
over. For example, JAWS screenreader users do not care about the zoom level of the
PDF they may not be able to see at all. Other users may employ the built-in Adobe
Reader Read Out Loud function, which reads the text using synthesised speech but
otherwise does not change the display of the PDF. For users with some sight, many
other Adobe Reader and PDF features come into play, described in the next chapter.
Chapter 4: How Adobe Reader handles PDFs for a
sighted user
This chapter describes key Adobe Reader features for people with some sight who need
zooming, or high-contrast, or low-contrast, or other visual features to make a PDF easier
to use.
Traditional accessibility concerns are often about blind screenreader users. But some
people simply want the text scaled up a bit (zoomed in) or the colours set to something
that is comfortable to read, such as a high-contrast setting for people with poor vision or
a low-contrast setting for people with some print impairments like dyslexia.
Setting the colours to something that is suitable is quite simple. Preferences,
Accessibility, check Replace Document Colours. This overrides the colours in the original
PDF files with a choice of the Windows Colour Scheme (for example, if you have selected
the High Contrast yellow-on-black Windows scheme), one of four High-Contrast
combinations provided by Reader, or a completely Custom Colour combination for text
and background. The custom option may be useful if you want a lower-contrast colour
combination, for example if you have dyslexia.
The problem with zooming in a PDF is that it designed around fixed pages, so when you
zoom in you have to start scrolling left and right to read whole lines across the PDF, just
like using a magnifying glass on a real piece of paper:
This does not only affect people with visual impairments. It also affects people trying to
read PDF files on small devices, like mobile 'phones. The solution is to make PDF files
more like web pages, so when you zoom in the text rewraps or reflows, making new
shorter lines, so it fits across the width of the available display area and you do not have
to scroll left and right:
Images are centred and scale to fit too. One drawback is that you cannot do a text
search in Reflow mode. You can switch to this view with Ctrl+4 at any time, or select
Reflow from the Zoom submenu of the View menu.
This ability to reflow depends on the content of the PDF being text, not images before
OCR, and the tags in the document. Also, some types of PDF file will not reflow: PDF files
with images and text behind them cannot reflow, because the text is locked to the
position of the image. This is important because these PDF files, often called "searchable
PDF" files, are very popular since they allow a scanned page from a book to be perfectly
captured in a PDF with text behind them so you can read it aloud. This is great for, for
example, dyslexic students who can refer to the original textbook and use the mouse to
decide what to read where on a desktop computer. It is not the right format for people
with a visual impairment who want to scale the text or people reading PDF files on a
small mobile device.
Finally, when a document is Reflowed, Adobe Reader does not update the accessibility
information available to external applications, so you will have to close and open the PDF
file to work with it in this new format.
Zoom, Page Display and Reflow settings in Adobe Reader
By default PDF files tell Adobe Reader how they should be zoomed and displayed when
they are opened. You can change this when they are opened with shortcut keys, menu
items, or the toolbar. But you can also change Adobe Reader to display all PDF files in
your preferred format permanently.
Note that if the setting Preferences, Documents, Open Settings, "Restore last view
settings when reopening documents" is checked then you will not see your changes to
the defaults have an effect for PDF files you have already opened. Uncheck this before
you try experimenting with the default display options.
Page Display
There are three default settings for Page Display:
le itself. This overrides the setting in Preferences, Page
Display.
Style. This overrides the other two settings if you check Always use Page Layout Style.
So you need to set your preferred Page Display in Preferences, Accessibility if you want
it respected. "Single Page Continuous" is probably best for seeing most of the document
at a decent size. The complete set of options in Preferences, Accessibility are:
Single Page
Only one page is shown. If it is zoomed in, then you may have to scroll around,
but when you scroll to the edge of a page it "flips" to the next page.
Same as menu item View > Page Display > Single Page View
Single Page Continuous
One page width, you can scroll up and down and see each page on top of each
other.
Same as menu item View > Page Display > Enable Scrolling
Two-up
Two pages shown at once. If they are zoomed in, then you may have to scroll
around, but when you scroll to the edge of a couple of pages it 'flips' to the next
two pages.
Same as menu item View > Page Display > Two Page View
Two-up continuous
Two pages wide, you can scroll up and down and see each two pages on top of
each other.
Same as menu item View > Page Display > Two Page Scrolling
Zoom
You can set the default Zoom by going to Preferences, Page Display, Default Layout and
Zoom, and setting Zoom to your preferred setting. You can also set the default Zoom by
going to Preferences, Accessibility, Override Page Display, Always use Zoom Setting.
These have slightly different options. The Accessibility Zoom setting will override the
Page Display setting. Both will override the PDF file setting.
"Fit visible" (Page Display) or "Fit width" are good if you have a small display and limited
sight, and "Fit page" is good if you have a big display (so you don't have any zooming or
scrolling) or you have no sight (so you don't care what size it is but it simpler to
understand what page you are on.)
"Reflow" (Accessibility) is good if want to zoom in a document but don't want to have to
handle horizontal scrolling. Some pages reflow better than others: tagged accessible PDF
files reflow best.
The complete set of options are:
Automatic (Page Display only)
The PDF file is allowed to specify how it should be zoomed. This is the default. It
usually means 'display the whole page, zoomed out to fit'.
Fit Page
The document is zoomed so that exactly one page fits horizontally or vertically in
Adobe Reader, whichever is smaller. If "Single Page" is selected as the Page
Display then only one page will be visible, but all of it will be visible. If "Single
Page Continuous" is selected as the Page Display then you can see more than one
page, but the pages will still be zoomed as though only one is being fitted to.
Fit Width
The document is zoomed so that the width of the whole page fits across the
whole of Adobe Reader. This means you don't have to scroll left or right, which
can cause confusion, but can mean that you have to scroll up and down to read a
whole page.
Fit Height
The document is zoomed so that the height of the whole page fits vertically the
whole of Adobe Reader. This means you don't have to scroll up or down, but since
most documents are portrait orientation, the PDF will appear very small.
Fit Visible (Page Display only)
PDF documents normally have blank borders, suitable for printing. "Fit Visible"
means the borders are not displayed, so the page content (text, images) can take
up more of the Adobe Reader display and therefore be a little larger.
Reflow (Accessibility only)
Every document is reflowed.
10% - 6400%
Zoom by a fixed ratio.
Colour in Adobe Reader
The Accessibility section of Preferences has a Document Colors Options
section that allows you to set the desired colour of text and background
colour. You can select from the Windows selection, a pre-defined highcontrast palette and a custom palette.
One of the problems, though, is that embedded images and other
complex drawing elements like textboxes may not change colour “cleanly”
– they may develop odd shapes, or disappear entirely. So by default
“Only change the color of black text or line art” is checked, meaning that
sections of many documents will not recolour but everything should still
be visible. A further checkbox, “Change the color of line art as well as
text” lets you decide if graphics should be recoloured – again, for
anything but plain text, this may create visual confusion.
Chapter 5: Suggested “best” settings for Adobe
Reader
Clearly, it is necessary to get the Adobe Reader settings right to maximise
the chance of any PDF reading correctly. Here is the best set for best
performance (at the expense of slower loading time for large documents).
It doesn’t take into account the many settings for multimedia and colour.
It’s primarily to ensure that external A.T. applications have the best
access to the PDF file and have the best chance of working well.
Preferences, Reading, Reading Order
Set to "Infer reading order from document (recommended)".
Preferences, Reading, Override the reading order in tagged documents.
Uncheck this checkbox.
Preferences, Reading, Screen Reader Options, Page vs Document
Set to "Read the entire document".
Preferences, Reading, Screen Reader Options, Confirm before tagging documents
Uncheck this checkbox.
Preferences, Accessibility, Override page display, Always use Page Layout Style.
Check this checkbox. Set to "Single Page Continuous".
Preferences, Accessibility, Override page display, Always use Zoom Setting.
Check this checkbox. Set to "Single Page Continuous".
Preferences, Accessibility, Tab Order, Use document structure for tab order when no
explicit tab order is specified.
Check this checkbox.
Preferences, Internet, Web Browser Options, Display PDF in browser
Uncheck this if you want PDF files to open in Adobe Reader directly. This lets you
see more document content and works better with assistive technology.
ClaroRead Settings
ClaroRead's Speech, View, Prediction, Check and Scan settings (ClaroRead Plus
and Pro only) can all be modified from their own tabs in ClaroRead's settings. The
Settings button is always present on the ClaroRead toolbar.
Speech Settings
The main Speech settings tab allows you to choose the voice used to speak. You can also
set the speed of speech and volume for this voice. ClaroRead is supplied with high
quality voices, but it will also work with other SAPI5 voices installed on your computer.
This will include the Microsoft system voices such as Sam or Anna. Contact Us if you
would like to enquire about adding additional RealSpeak voices.
Voice
Clicking the down arrow next to the currently loaded voice will show you the range of
voices available to be used with ClaroRead. Select the one you want to use and click OK.
Speed & Volume
Change the speed and volume by moving the slider bars left and right.
Test
When you change the voice setting you can test the new setting prior to
clicking OK. Loading a new voice takes a second or two, so please be patient! After it is
loaded, you can then test it. It will say "This is a test of the current voice."
Pronounce
The Pronounce button opens the text-to-speech pronunciation list. Whilst the
voices are incredibly accurate, there are times when they don't pronounce words quite
as you like. This could be, for example, names of people or place names. To make the
voices pronounce things as you want just add the word to the pronunciation list with
what it should sound like. Read Pronounce settings to learn more.
Save Audio File
Saves text to an audio file. See Save Text to Audio.
Advanced Speech
Opens the Advanced Speech settings tab.
Pause Between Words
Checking "Pause between words" will deliberately separate each word when the
computer is speaking the text. This makes hearing different separate words easier. If it
is not checked, the speech will flow naturally, and will take account of punctuation,
certain abbreviations and other text details.
Stop after sentence
Checking "Stop after sentence" will set ClaroRead to only read one sentence at a time in
Microsoft Word, Adobe Reader or Internet Explorer. To read the next sentence you will
need to press the Play button again.
Speak word on Ctrl + hover
Checking the "Speak word on Ctrl + hover" box will enable you hear one particular word
at a time. To hear the word, place your mouse over it and hold down the Control key.
ClaroRead will then speak the word.
Below is a list of common applications Ctrl + hover will work with:
Internet Explorer
Microsoft Office (including Word and Outlook)
Mozilla Firefox
Adobe Acrobat Reader
Windows Mail/Outlook Express
Text To Speech Pronounce
There are times when the text-to-speech voices don’t pronounce things quite as you like.
These could be, for example, names of people or place names. To make the voices
pronounce things as you want just add the word to the pronunciation list with what it
should sound like.
To make a pronunciation list addition, type in the word you want to change the
pronunciation of in the "Word to replace" box. Pressing the Test button allows you to
hear how the selected voice pronounces the word.
Type how you think the word should sound in the New Pronunciation box. You can test
the new pronunciation by pressing the Test button prior to adding. You can use single
words or phrases. Once you are happy that it sounds acceptable, press the Add/Replace
button to add it to the pronunciation list. Whenever the original text is seen it will be
pronounced according to your replacement text.
If you want to do whole-word replacement but not affect words that start with the same
letters you can add a space to the "Word to replace" text box. This appears as a "#"
symbol so you know it is there. You cannot type anything after the "#" symbol. For
example, if your name is "Alis" and you want it to be pronounced as "Allee" but you do
not want "Alison" to become "Allee-on" then add "Alis " (note the space) to the "Word to
replace" box. Only "Alis" will be changed, not "Alison", and "Alis#" will be shown.
Advanced Speech Settings
The Advanced Speech settings tab allows you to control the amount and type of speech
from ClaroRead and control highlighting.
The AutoSpeak settings control what is spoken when, and the Highlight settings control
how highlighting works with Play.
AutoSpeak Settings
Speak When Mouse Selects
If checked, ClaroRead will speak back anything you select with your mouse. This means
that it will read virtually anything, and will be particularly effective for use on web pages
and e-mails.
Speak Objects Under Mouse
ClaroRead can speak back any tooltips, menu items, web page links, web page text and
other items on your screen when you hover the mouse over them. This can make many
things accessible but can be too much speech for some people.
Checking the "All" box will make ClaroRead try to speak anything you point the mouse at
in any application all the time. Checking the "IE/Firefox" box only will only speak objects
under the mouse from web pages within Internet Explorer, Mozilla Firefox, Safari and
Opera. This is the default.
Characters, Words and Sentences
When checked, ClaroRead will:
Speak back each character (letter or key) after it is typed.
Speak back each word after it is typed.
Speak back each sentence after it is typed.
This is very useful for checking spelling and grammar during text creation and for
reviewing the sentences as they are created.
Cursor Moves
When you move around the text in many text areas, including Microsoft Word, using the
up/down/left/right arrows on your keyboard (instead of your mouse) you can choose
whether ClaroRead speaks by checking "Cursor moves".
When moving using the up or down arrows, ClaroRead will speak the full line of text. In
this way, you can have a document spoken to you line by line, by using the down arrow
key.
Pressing the Control key and left or right arrow will speak the next word from where the
cursor is.
Pressing the left/right arrow will speak the next character in the word.
Pressing the Control key and the up and down arrows will jump a paragraph at a time
and read each paragraph out.
Echo Dragon Voice Input
If you are dictating text using Dragon NaturallySpeaking version 7 or above, ClaroRead
can be set to echo back each word or phrase that Dragon recognises. This helps provide
user confidence, as well as accuracy of dictation, by confirming that the Dragon software
has recognised your speech. If it has not been recognised, it helps draw your attention
to the misrecognition.
Highlight Settings
When ClaroRead is speaking text from Microsoft Word documents, you can also highlight
the text that is being spoken. The voice is synchronised with the highlighted word or
sentence, giving greater assistance in following the text.
You can choose to highlight each word as it is spoken, with a trail, or each sentence, or
each paragraph. You can also change the colour of the highlighted text and the
background using the Highlight Settings part of the Advanced Speech Settings tab.
The Word with Trail option means that as each word is highlighted the previous word is
left highlighted. This reduces the flickering as words are read out.
You can make the text that is not being read out "grey out" in Word instead of having
the text that is being read out highlighted. You may find this less intrusive while still
letting you follow the text. Check "Focus Sentence" to turn this on.
View Settings
ClaroRead View Settings allows you to change the Buttons appearing on the ClaroRead
Toolbar, and also change the size of the Buttons. To include a Button, click the chosen
button on the View Settings Menu to make it "pushed down". To remove a Button, click
the chosen button so that it appears "raised".
You can change the size of the ClaroRead Toolbar to be small, medium or large. You can
decide whether to show the text caption that describes what the button does - removing
this reduces the Toolbar size further.
You can also choose to have the Toolbar "floating" so you can click the top of the Toolbar
and drag it anywhere around the screen as you desire. If the Toolbar isn't floating, it will
lock onto the top right of the active window in which you are working. To remove the
ClaroRead Toolbar but leave ClaroRead running, see Moving the ClaroRead Menu section.
You can also change the ClaroRead 'skin'. You can choose which skin you would like by
selecting the relevant option. You can choose from Classic, Grey or Silver:
Classic
Grey
Silver
Prediction Settings
The Prediction tab lets you enable word prediction, select your dictionary and modify the
prediction dictionary towards the typical content of your writing.
Use Prediction
"Use Prediction" turns prediction on or off permanently. The Prediction button on the
toolbar turns it on or off temporarily.
Prediction Dictionary
This drop-down selects the current prediction dictionary used for prediction/learning.
Prediction List Settings
You can choose to display the predicted words either in alphabetical order, or order of
likelihood within the Prediction List.
You can also choose to show and display again the "ignored" words within the Prediction
List. For example, if there is a list of predicted words, e.g. cathode, cattle, catastrophe,
catalogue, cattery - and you choose to display ignored words the following will happen;
When you type "ca", the five words above will be displayed. However when you press
the next letter normally all words that have previously been displayed will be ignored as
you have already rejected them. With "show ignored words" checked the above 5 words
will still be displayed if you press "t" after "ca".
Prediction List Colour Settings
To make the Prediction List easier to view, you can change the text colour of the
predicted words, and the background colour of the Prediction List.
Learn Prediction
There are a number of settings for adapting the base Prediction dictionary to the words
contained in the documents you have written.
You can automatically add new words to the prediction dictionary based on the words
you are typing if you check "Automatically learn new words." We recommend you also
check "Spell Check before adding new words" as this will avoid typing errors being
entered into the dictionary.
When you have finished typing a word, or press the space bar, ClaroRead attempts to
Predict the next word. If you check "Learn Word Order" then your selection will be
remembered and words you select more often will move up the list.
If you check "Sort frequency" then every time you finish a word ClaroRead will increase
the likelihood that it will be shown higher in the prediction list next time.
The updated dictionary will be saved on exit from ClaroRead only if you check the "Save
dictionary when exit" option. This is off by default so you do not accidentally add a word
you don't want (e.g. a street address) into your prediction dictionary.
Advanced Training of Prediction Dictionary
It is possible to manually edit and train the prediction dictionary directly from words
contained within previously created Microsoft Word documents in the Advanced Settings
Editor.
Check Settings
It is possible to modify the settings for the Spelling Check window in the Check Settings
tab.
You can turn on or off the Spelling and Meanings tabs in the Spelling Check
window.
You can turn on or off the parts of speech (verb, noun, adjective etc.) in the
Spelling Check window also.
You can turn on or off the syllabification of words (split down into syllables) at
the bottom of the Spelling Check window.
You can turn on or off showing pictures in the Spelling Check window.
The "Dictionary Tooltip" and "Tooltip always Visible" checkboxes control the Dictionary
Tooltip window. "Dictionary Tooltip" controls whether the tooltip is displayed at all, and
"Tooltip always Visible" controls whether it is always on the screen and can be moved to
fixed place or whether it follows the mouse.
Homophone Settings
Clicking the Homophone Settings button brings up the following tab:
Should you wish to ignore certain homophones from the ClaroRead homophone list then
simply check the box next to the word.
Check "Check whilst typing" to show homophones as they are typed into a Microsoft
Word document. A small beep will also happen when a homophone is typed.
Check "Show homophones" to show the Homophones tab in the Spelling Check window.
You can change the colour in which the homophones are shown.
You can edit the homophone list in the Advanced Settings Editor.
Keyboard Control
Key Control is part of the Check Words & Keyboards Settings. This is a very handy
feature, which can avoid TYPING WORDS IN CAPS because you hit the CAPS LOCK key
by accident, or inserting characters by mistake because you hit the Insert key.
Tick the boxes if you want to disable the CAPS LOCK key and Insert key when ClaroRead
is running.
You can choose to keep the NumLock key as normal, keep it turned on (for keying
numbers) or turned off for the alternative key functions.
To Mute the text to speech voice at any time, you can press the Ctrl key. This stops the
speech.
Keyboard Shortcuts
There are a number of keyboard shortcuts that can be used instead of having to rely on
the mouse. These shortcuts can also be used by speech recognition software, such as
Dragon NaturallySpeaking Professional version, to give fuller voice control over
ClaroRead. The shortcuts are:
F7 Key = Play
F8 Key = Stop
F9 Key = Check
F10 Key = Show Homophones
F11 Key = Clear Homophones
F12 Key = ClaroRead Help
CTRL Key = Stop Speech
CTRL + F8 Key = Mute (or un-mute) ClaroRead.
F6 Key = Swaps keyboard shortcuts to Microsoft Word
Shift + F7 Key = Play only next sentence or paragraph then stop
Shift + F8 Key = Open Settings
CTRL + Up/Down = Read whole of previous/next paragraph
Scan Settings (Plus and Pro Only)
This feature is only available in ClaroRead Plus and Pro.
The Scan Settings tab is shown below.
Format
When you scan a document you can choose either to keep the original format or simplify
the format into a single text column. You can either have images from the original
document inserted into the scanned document or discarded.
Language for Scanning
You can change the setting for the OCR (Optical Character Recognition). It is set to
English as default. If you are scanning some French text, for example, you need to tell
ClaroRead that it is going to receive some French text. Do this by selecting the
language:
Preview scanned image
Check "Preview scanned image" on the Scan tab and next time you scan the Preview
window will be opened with lots of options. See Preview.
Proofread before converting to text (ClaroRead Pro edition)
After Preview you can optionally Proofread your scanned pages. This lets you correct any
recognition errors or add additional specialised vocabulary. Check "Proofread before
converting to text" to have the Proofread window appear next time you scan. See
Proofing.
View result
If you scan when Microsoft Word is not the current application, a window will appear
asking you to save the result as a file. If "View result" is checked, once the file has been
saved, it will automatically open in your default program.
Scanner Setup Wizard
Before you scan for the first time, you should run the Scanner Setup Wizard to ensure
ClaroRead can connect to your scanner. ClaroRead supports an extensive range of
scanners.
Running The Scanner Setup Wizard
The actual screens you see will be dependent on the scanners and other devices that you
may have attached to your PC. The following screens show the various setup screens.
The first screen asks whether you would like to download the latest scanner database. It
is recommended to select No. Click Next.
When you have "No Scanner" selected, the following screen will appear, click Next.
Now there should be a list of available scanner drivers on your PC. The ones shown here
are for example only. You will see different names. If there are multiple drivers for the
same device it is recommended to select the TWAIN driver. Select the driver and click
OK.
You should now see the selected scanner driver in the list, ensure it is selected and click
Next.
Next you need to choose whether to test the scanner or not. You can select either Yes,
No or Restore original settings. In most cases, you should choose the recommended
option.
Click Finish to complete the Scanner Wizard. ClaroRead should now operate with your
chosen Scanner. Select Scan from Paper from the Scan menu. If you see the following
splash screen, then the scanning feature is running.
Advanced Settings Editor
The Advanced Settings Editor allows you to alter homophones and tricky words,
prediction settings and train the prediction dictionary. It can be accessed through the
Extras button on the ClaroRead toolbar.
The Advanced Settings Editor has four tabs:
General tab
Fonts and Background allows you to alter which fonts are displayed in the ClaroRead
toolbar Font menu. You can also choose to reset the background colour on exit, so if you
change the background colour to make it easier to read using the Font menu then
ClaroRead will turn it back when you exit.
Speech lets you choose whether or not Internet Explorer will support click-and-play. This
is when you click on a part of a web page in Internet Explorer and the black bar appears
to show you where you have selected: you then press the Play button and the page will
be highlighted and play through. If you uncheck this option then the bar will not be
shown, Play will play only what is in the clipboard, and you are restricted to using web
pages with mouse hover and mouse select.
In the Prediction section, "Window always visible" means that the Prediction Window will
always be shown, even if it has no suggestions. You can use this in conjunction with
right-clicking on the window to create a permanent and stationary little prediction
window for yourself. "Predict Next Word" means that ClaroRead will suggest the next
word when you press space. "Only predict after characters" makes ClaroRead show the
prediction window only after a set number of characters, rather than just one.
You can import and export ClaroRead's settings using the buttons in the "Settings"
section.
Clicking the "Check for updates" button will launch Claro's update program to show you
if any Claro programs have new updates available.
Click the OK button to save changes.
Homophones tab
The Homophones tab allows you to view, add, edit and delete entries in the homophones
and tricky words list. To view a homophone, simply click on the entry in the list on the
left hand side and the details will be displayed on the right.
If you want to edit the entry, select it from the list and click on the "Edit selected"
button, the following screen will appear:
Change any details you wish and click OK.
To add an entry, click on the "Add" button on the Homophones tab, fill out the form and
click OK. To delete an entry, select it from the list on the left hand side and click on the
"Delete entry" button.
Click on the OK button to save changes.
Training Prediction tab
The Training Prediction tab allows you to alter words used in the prediction dictionary
and train the prediction dictionary using Word documents.
ClaroRead has two prediction dictionaries installed: 2000-word and 5000-word. You can
select which one you want to use from the drop down box in the top left of the Training
Prediction tab.
The words in the selected dictionary are displayed in the prediction word list on the left
and you can add and remove words from the list using the "Add" and Remove "buttons"
below it.
To train the prediction file using Word, you firstly need to open the Word document you
wish to use.
Selecting "Learn new words" will add words found in your document into the
currently selected prediction dictionary.
Selecting "Learn word frequency" will save information on how often a word
appears in the current document. This enables ClaroRead to display the words
you use most often higher up the prediction list when completing words with the
prediction feature.
Selecting "Learn word order" will save information on the order of words in your
document. This enables ClaroRead to suggest words you commonly use after
other words when using prediction to complete the following word for you.
If you would like to save the current prediction settings as a new prediction dictionary,
click the "New" button and choose a name for your file.
To delete the selected prediction dictionary, click the "Delete" button.
To rename the selected prediction dictionary, click the "Rename" button.
Spelling tab
This tab shows spellings that are detected and corrected by ClaroRead and Word for you.
The current corrections made are displayed in "Your Spelling Corrections". If you type
one of the words in Word, when you use the Check button in Word then the Correction
entry is put at the top of the suggestions list. You can add or remove word pairs to and
from this list manually with the New and Delete buttons. For example, if you know you
always spell "know" as "noh" then you can add "noh" and "know" and ClaroRead will
suggest the correction when you hit check. You can go one stage further by clicking the
Autocomplete button, which adds all your spelling corrections to Word's Autocomplete
and a custom dictionary. This means that when you type a word wrongly in Word (e.g.
"noh") then Word with turn it into "know" without you having to do anything, and if you
right-click on "noh" then "know" will be suggested.
When you make a spelling correction in Word using the Spelling Check box ClaroRead
remembers the corrections for you to use later. These are placed in the Contenders
section. The word and correction are displayed. If you select a pair and click Transfer
then the pair is moved to the Your Spelling Corrections list and will appear in the
Spelling Check box. If you do not want to use the pair ever then click Delete (or Delete
All) and you will not see the contender pair again. If you want more information on the
contenders, including when you last made the correction and how often you make it,
then click Report to bring up a printable and sortable report of all your spelling
corrections.
Training and Demonstration Videos
You can try out our range of 'how-to' videos online. These take you through different
ClaroRead functions, showing you click-by-click how to use them and get the most out of
ClaroRead:
Claro Software Online Training and Demonstration Videos.
Technical Support
Questions and Answers
Q: I can't hear the voice, what's wrong?
A: Check our speech support page for possible solutions.
Q: I scan into Word but nothing appears, what's wrong?
A: Check our scanning support page for possible solutions.
Q: Why do I get an 'Error: Check the connection to your scanner' error when my
scanner is connected?
A: This sometimes happens when you choose to run the scanner tests in the setup
wizard when not running the tests is recommended. To rectify this, run the scanner
wizard again and choose 'Restore Factory Settings' on the forth screen.
Q: How do I reset the ClaroRead settings?
A: You need to run the ClaroRead Restore Settings Program. Click on Start, then All
Programs (or just Programs on Vista), then Claro Software, and run Restore ClaroRead
Settings.
Contact
If you have any other queries, please visit our help pages at help.clarodownloads.com or
contact us at [email protected]
Contact Us
We would like to thank you for using ClaroRead.
You can see more Claro Software products at www.clarosoftware.com
If you have any queries, please visit our help pages at help.clarodownloads.com or
contact us at [email protected]
To check for updates and newly released Extras, please visit the Claro Extras and
Updates webpage.
We value your feedback.
Claro Software Ltd
Tel: +44 (0)1772 977 888
US Toll Free: 1-866-800-5151
www.clarosoftware.com