1
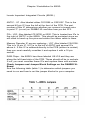
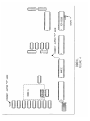
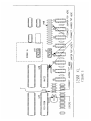
RAMBO XL
(In s t a lla t ion & Op er a t ion s Ma n u a l)
2 5 6 K Mem or y S ys t em
for At a r i 8 0 0 XL
and
1 2 0 0 XL
Com p u t er s
by ICD
Note-throughout this manual:
SpartaDOS, SpartaDOS Construction Set, UltraSpeed, US Doubler, R-Time
8,
RAMBO XL, and P:R: Connection, are trademarks of ICD, Inc.
Atari 13OXE, 800XL, and 1200XL, are trademarks of Atari, Corp.
Published by ICD, Inc.
1220 Rock Street
Rockford, IL 611011437
U.S.A.
© 1986 ICD, Inc. All rights reserved. Printed in the United States of America.
Reproduction or translation of any part of this work (beyond that permitted by sections
107 and 108 of the United States Copyright Act) without the permission of the
copyright owner is unlawful.
FORWARD
You have just purchased another high quality product of ICD, Inc.
We are the company which brought out exciting products for your
Atari like: SpartaDOS Construction Set, US Doubler, R-Time 8,
and P:R: Connection. For more information on ICD products, be
sure to fill out and send in your warranty registration card in the
back of this manual.
The installation section of this manual includes three graphic
layouts for trouble free installation. The technical description
shows the complete addressing scheme used with RAMBO XL. Our
motto is "exceptional value at a reasonable price." You will see
this carry through with our new RAMBO XL. We would like to thank
Claus Buchholz and Ron Boling for inspiring the development of
RAM upgrades for the XL computers.
CAUTION: This is a very high quality product which, if properly
installed, will enhance your computer's function. However, RAMBO
XL must be installed internally and takes a certain degree of skill.
A careful novice with soldering skills can install this product
without any outside help as long as directions are followed and the
ICs are all socketed. If you do attempt to install this yourself and
do some damage, ICD will repair your computer and install RAMBO
XL for you. However, don't be upset if you are charged a service
fee (t o repair damage) on top of our installation charge.
This manual is supplied as part of the RAMBO XL package from
ICD, Inc. The divisions of the manual and their contents are as
follows:
Chapter 1 -Introduction to RAMBO XL
CHAPTER 1-INTRODUCTION TO RAMBO XL
RAMBO XL Compatibility
RAMBO XL will work in any Atari 800XL or 1200XL computer
regardless of which ANTIC chip is used. The 1200XL will require
four jumper wires to be soldered along with soldering of the ribbon
cable. The 800XL will require one or two jumper wires to be
soldered along with soldering of the ribbon cable. Additionally,
some 800XL computers have integrated circuits (ICs) soldered
directly to the printed circuit board (PCB). If that is the case, we
strongly recommend you send your computer to ICD for
professional installation.
Compatibility With the 130XE
RAMBO XL makes your 800XL or 1200XL compatible with the
130XE in the CPU mode for extended memory. This means that it
will work with programs like BASIC XE from OSS and also support
the Ramdisk version of Atari DOS 2.5. Although RAMBO XL
actually gives you 256K of memory, the 6502 micro-processor can
only address 64K at one time. To add memory and get around this
limitation, bank selecting is used. This method used by both the
130XE and RAMBO XL uses a 16K window from $4000 to $7FFF in
the computer's memory map. These banks are controlled by the
unused ports of the 6520 PIA. The 130XE switches its four 16K
blocks of memory, one set at a time, through this window. RAMBO
XL switches twelve 16K blocks with the last four being addressed
the same as the 130XE. (See technical notes for programming
information).
RAMBO XL is compatible with the 130XE in the CPU mode, not the
ANTIC mode. The ANTIC mode allows the display to remain
undisturbed even if the display memory falls into the $4000-$7FFF
range and the banks are changed. If this happens with RAMBO XL
installed, the display will flicker as banks are changed. The program
will still operate properly except for the annoying
flickering of the screen. This display flickering can be prevented by
keeping your display list out of $4000-$7FFF.
1
Chapter 1-Introduction to RAMBO XL
RAMBO XL has been tested to be fully compatible with
the following programs:
BASIC XE from OSS ...................... same as
Synfile+ from Synapse ................... same as
Atari DOS 2.5 RAMDISK ................... same as
PaperClip from Batteries Included ..... same as 130XE
optional configuration it uses the full memory.
130XE
130XE
130XE
or with
RAMBO XL uses 256K DRAMS for the computer's main memory
and bank memory. These "state-of-the-art" memory chips retain
their memory much longer than the old 64K DRAMS used by
Atari.
The one disadvantage of this longer memory retention is that you
must wait a few seconds after turning your computer off before
you turn it back on. If you don't, the computer may lock up (crash)
when powered on.
2
Chapter 2-Pre-Installation
CHAPTER 2-PRE-INSTALLATION
BEFORE YOU START
Tools
This installation is not for the total novice. The tools needed are:
#1 and #2 phillips head screwdrivers
20-35 watt soldering iron (fine point)
small gauge rosin core solder
small needle nose pliers
small diagonal side cutters
small flat bladed screwdriver
solder sucker (if ICs are soldered in)
matches or a cigarette lighter
small dish for parts
Parts supplied
The following parts should be included with your RAMBO XL
package:
1 RAMBO XL piggyback board
3
1
1
1
Jumper Plugs (plugged onto RAMBO XL)
piece of fine hook up wire (for jumpers)
piece of heat shrink tubing
installation manual
8 256K DRAMS (optional)
PRE-INSTALLATION NOTES
Purchase your 256K DRAMS
If you have not purchased the RAM chips with RAMBO XL, then
you should purchase eight high quality 256K dynamic RAM chips
before beginning this installation. These are available either from
ICD, your dealer, or the suppliers listed at the end of this
manual.
We could have included the RAM chips in this kit but that would
have artificially inflated the price of RAMBO XL. RAM prices
change faster than computer prices. Nobody wants to be caught
holding a large inventory when the price drops.
3
Chapter 2-Pre-Installation
Check for Sockets
A few things must be determined before installing RAMBO XL.
First you must determine whether the integrated circuits (ICs or
chips) in your computer are in sockets or soldered directly to the
printed circuit board (PCB). Most 1200XLs should have sockets on
all ICs. On the other hand, many 800XLs have some or all ICs
soldered directly to the PCB. If this is the case, we strongly
recommend you have an expert install this product. If all ICs are
soldered to the PCB then you will have to unsolder nine 16 pin ICs.
That is difficult for even the most skilled technician.
If you have problems or change your mind, ICD will provide
complete installation of your RAMBO XL for $30.00 including
shipping one way. If your computer needs repair, our service
charge is $45.00 plus parts. This price also includes shipping one
way.
10
Chapter 3-Installation for 800XL
CHAPTER 3-INSTALLATION FOR 800XL
Turn your computer on its back. Remove the six phillips head
screws which hold the case together and place them in your parts
dish. Turn the computer right side up and lift the left side (near the
ESC key) up and towards the right. Look inside and find the wide
mylar (a clear plastic) ribbon cable which connects the keyboard to
the main computer board. Lift the keyboard and with your thumb
and forefinger pull firmly near the center of the mylar cable straight
up and away from the main computer board. As this pulls free, you
will see that the mylar forms the actual connector and the molded
plastic piece remains with the computer board as the female
connector. Remove the keyboard assembly and set it aside for
now.
Remove the three phillips head screws holding the computer board
in the bottom case. One of these screws is in the upper right hand
corner (holds part of the shield together), another is between the
two joystick connectors, and the third is between the power-in jack
and the channel (2-3) selector switch. (Some 800XLs have four
screws holding the computer board in with the extra screw located
along the top.)
Remove the computer board assembly from the case. Lift the lower
left hand corner up with a flat blade screwdriver. Pull the computer
board out and towards you until all the rear connectors are free.
Then, slide it towards the left to free the joystick connectors and
lift it out of the case.
Remove the metal shields and set them aside. Turn the computer
board over and remove the remaining screws. You may need to
hold the nuts on the other side to prevent them from turning.
Take
note of how the small shield is attached around the parallel bus
connector at the rear of the board. It must go back on the same
way. Also notice as you lift the shields off how the paper insulator
is aligned inside the bottom cover. NOTE: Some metal covers are
held together with bent metal tabs instead of screws. These tabs
should be stra ightened with your needle nose pliers. Then the
shields may be separated.
5
Chapter 3-Installation for 800XL
Locate Important Integrated Circuits (800XL)
ANTIC - U7 Also labeled either C012296 or C021697. This is the
second 40 pin IC from the left at the front of the PCB. The part
number of this IC determines whether you connect a jumper wire
to point 'C' (or not) on RAMBO XL and also how you set JP3.
PIA - U23 Also labeled C014795 or 6520. This is located two ICs to
the right of ANTIC in the 800XL. This should be socketed since we
will need to bend up five pins and solder the ribbon cable to them.
Memory Decoder IC we are replacing - U27 Also labeled 74LS158.
This is a 16 pin IC. U27 is to the left of ANTIC and several ICs
above it. If this IC is soldered directly to the PCB (without a socket)
then you must carefully unsolder it and replace it with a 16 pin
socket.
RAM Chips - the 800XL has them labeled U9-U16 and they are
along the left hand side of the PCB. These should all be in sockets.
If not, you must unsolder these ICs and replace them with sockets.
Check Jumpers and Jumper Block Settings on the RAMBO XL
Board
See the following table (table 1) to determine which jumpers you
need to run and how to set the jumper blocks for your computer.
6
Chapter 3-Installation for 800XL
JP1-JP3 are the jumper plugs on your RAMBO XL board. For
JP1-JP3, the '0' indicates that the jumper position should not
match the bar on the silk screen legend. The '- ' indicates that the
jumper should match that of the silk screen legend. The '0' (not
-') is the most common setting for the 800XL and also the way
we ship RAMBO XL from the factory. (See Figure 3.)
For A-D, the 'Y' indicates that this jumper needs to be connected to
your computer and the 'N' indicates that no connection is
necessary.
NOTE: A-D refers to the solder filled pads on the RAMBO XL board
marked A-D. You will solder a piece of wire from these pads to the
designated points on the computer board as required.
800XL Jumper Wire Connections (see Table 1 and Figures 3 & 4)
A no connection, 1200XL only
B no connection, 1200XL only
C this is connected to the refresh line only when you have the
old C012296 version ANTIC. This is to be connected to pin
8 of the ANTIC or soldered to the common pad which is the
upper right of ANTIC. (See Figure 4.)
D this is the RA8 line and must be attached on all
installations. RA8 is the extra address line needed for the
256K DRAMS. Jumper D must be connected to the right
side of R32 which is at the top of the column of DRAMS.
Just solder the wire to the right side of this resistor. (See
Figure 4.)
7
Chapter 3-Installation for 800XL
Remove the 64K DRAMS and replace them with your 256K DRAMS.
These ICs are very static sensitive so make sure you are grounded
while moving them around. Remove the old DRAMS with a small
screwdriver. Notice the notch goes to the left. Replace them with
the new 256K DRAMS making sure they also have the notch to the
left.
Replace U27 with RAMBO XL. Remove U27. Carefully plug RAMBO
XL into its socket with the long part of the board towards the rear.
Do not plug it in backwards. If it is plugged in correctly, you will
still be able to see the top of U26.
Connect all necessary jumpers. See Table 1 and Figures 3 and 4.
Use 30 gauge hookup wire for the jumper wires. Solder them from
the pads on the RAMBO XL board to the locations on the computer
as indicated in Figure 4.
Bend out the 5 pins on the PIA and connect the ribbon cable.
Remove U23, the PIA IC. Bend pins 12-16 straight out (See Figure
4). Slip the piece of shrink tubing over the ribbon cable and then
solder the ribbon cable from RAMBO XL onto the pins with the
black stripe towards the right (pin 16). Slip the shrink tubing over
the pins (to insulate them) and carefully heat the tubing just
enough to secure it from sliding back off the cable. Plug U23 back
into its socket.
Place the PCB back into the case, plug the keyboard in, and test
operation.
Reassemble your computer.
Test once again.
81
Chapter 4-Installation for 1200XL
CHAPTER 4-INSTALLATION FOR 1200XL
Turn your computer on its back. Remove the six phillips head
screws which hold the case together and place them in your parts
dish. Turn the computer right side up and lift the top cover up and
towards the front. Look inside and find the two ribbon cables
which connect the keyboard and console LEDs to the main
computer board. Carefully unplug these cables noting the correct
polarity of their connectors. Remove the keyboard assembly and
set it aside for now.
Remove the six phillips head screws holding the computer board in
the bottom case. One of these screws is in the upper left hand
corner near the on/off switch. Another is in the upper right corner
and goes through the heat sink. The remaining four screws are
across the front and about four inches apart. (Three of these also
hold down the metal shield.)
Remove the computer board assembly from the case. Lift the front
of the computer board and the cartridge/joystick/switch assembly
up and pull the computer board out and towards you until all the
rear connectors are free. Remove this assembly, separate the
plastic piece from the PCB and set it aside.
Remove the metal shields and set them aside. There should be
several "push" rivets. Remove these then separate and remove the
metal covers. NOTE: Some metal covers are held together with
bent metal tabs instead of screws. These tabs should be
straightened with your needle nose pliers. Then the shields may be
separated.
Locate Important Integrated Circuits (1200XL)
ANTIC-U20 Usually will be part number C012296. This is the 40
pin IC to the lower right of the PCB.
PIA-U23 Also labeled C014795 or 6520. This is located just
to the left of ANTIC in the 1200XL.
9
Chapter 4-Installation for 1200XL
Memory Decoder IC we are replacing-U10
Also labeled 74LS158.
This is a 16 pin IC. With the 1200XL, U10 is to the right and slightly
above ANTIC.
RAM Chips-labeled U1-U9 (excluding U7) on the 1200 XL and in
the lower left hand corner of the PCB. These should all be installed
in sockets.
Check Jumpers and Jumper Block Settings on the RAMBO XL
Board
See the following table (table 2) to determine which jumpers you
need to run and how to set the jumper blocks for your computer.
(Most 1200XLs have the C012296 ANTIC and will use the first
setting.)
JP1-JP3 are the jumper plugs on your RAMBO XL board. For
JP1-JP3, the '0' indicates that the jumper position should not
match the bar on the silk screen legend. The '- ' indicates that the
jumper should match that of the silk screen legend. The '- ' is the
most common setting for the 1200XL. (See Figure 3.)
For A-D, the 'Y' indicates that this jumper needs to be connected to
your computer and the 'N' indicates that no connection is
necessary.
10
Chapter 4-Installation for 1200XL
NOTE: A-D refers to the solder filled pads on the RAMBO XL board
marked A-D. You will solder a piece of wire from these pads to the
designated points on the computer board as required. When
RAMBO XL is packaged, JP1-JP3 are set in the most common
position for 800XL installations. Generally, these jumper plugs
should all be moved when making the 1200XL installation.
Remove the 64K DRAMS and replace them with your 256K DRAMS.
These ICs are very static sensitive so make sure you are grounded
while moving them around. Remove the old DRAMS with a small
screwdriver. Notice the notch goes to the left. Replace them with
the new 256K DRAMS making sure they also have the notch to the
left.
Replace U10 with RAMBO XL. Remove U10. Carefully plug RAMBO
XL into its socket with the long part of the board towards the rear.
Do not plug it in backwards. If it is plugged in correctly, you will
still be able to see the top of U7.
11
Chapter 4-Installation for 1200XL
Bend out pin 3 of U7. Remove U7 from its socket and bend out pin
3 as seen in figure 5. Plug this IC back into its socket. Pin 3 will
have jumper wire 'A' attached to it in the next step.
Connect all necessary jumpers. See Table 2 and Figures 3 and 5.
Use 30 gauge hookup wire for the jumper wires. Solder them from
the pads on the RAMBO XL board to the locations on the computer
as indicated in Figure 5.
Bend out the 5 pins on the PIA and connect the ribbon cable.
Remove U23, the PIA IC. Bend pins 12-16 of U23 straight out (See
Figure 5). Slip the piece of shrink tubing over the ribbon cable and
then solder the ribbon cable from RAMBO XL onto the pins with
the black stripe towards the right (pin 16). Slip the shrink tubing
over the pins (to insulate them) and carefully heat the tubing just
enough to secure it from sliding back off the cable. Plug U23 back
into its socket with the ribbon cable over the top of VR1.
Place the PCB back into the case, plug the keyboard in, and test
operation.
Replace resistor R63 with a jumper wire. 1200XL is the only 8-bit
Atari computer with a current limit resistor (R63). This prevents
1200XL owners from using any peripherals (including the XM301
MODEM and P:R:Connection) which draw power from the
computer. We strongly recommend removing this resistor and
replacing it with a jumper wire to make your 1200XL more
compatible. R63 is located at the top of the PCB near the center. It
is just to the right of transistor Q3. Remove this resistor and
replace it with plain wire. Now you can use devices which draw
power from your 1200XL!
Reassemble your computer.
Test once again.
12
Chapter 5-Using RAMBO XL
CHAPTER 5-USING RAMBO XL
Using RAMBO XL with SpartaDOS
SpartaDOS Construction Set now includes a new RAMDISK
handler called RD.COM. This intelligent handler determines the size
of the RAMDISK and automatically installs itself. RD.COM will
work with this RAMBO XL upgrade and install a 192K RAMDISK,
the stock 13OXE and install a 64K RAMDISK, and install a 128K
RAMDISK in the Ron Boling modified 13OXE. If the VIE' parameter is
specified, RD.COM reserves 64K for the application or language (as
with the BASIC XE extensions). RD260.COM supports the BYTE
Magazine upgrade which uses 32K banks. RD260.COM will not
work with any other memory modification.
SCOPY, our new high speed sector copier, now supports the
RAMDISKs in its automatic format of the destination device. A '/R'
is placed in the parameter location to indicate RAMDISK.
NOTE: SCOPY must see a RAMDISK already installed and it must
be a configurable type (installed with RD.COM) and large enough to
hold the entire disk being transferred. In other words, don't try a
DD sector copy to a 64K RAMDISK.
RD.COM and SCOPY are available as an upgrade to the SpartaDOS
Construction Set, with the R-Time 8 package, or with the latest
version of SpartaDOS Construction Set.
13
Chapter 5-Using RAMBO XL
TECHNICAL NOTES
Accessing the Extended Memory (for programmers)
RAMBO XL uses 5 "extra" bits of the PIA (at $D301) to enable the
extended memory and to select which bank of memory to access.
The 256K of memory is divided into 16 banks of 16K. Banks 0-3 are
your computers "main" memory banks which are normally used by
your computer. Banks 4-15 may be selected to appear at a window
from $4000-$7FFF when RAME is clear (logic 0). The function of
each bit of the PIA (port B) is as follows:
These bits select the RAM bank to appear at the 16K window
from $4000-$7FFF if RAME is enabled (clear). Programs that
are designed to use the extra memory of a 13OXE would use
banks $C-$F (12-15) since A2 and A3 are normally high and not
used as bank selects on the 13OXE. Note that only banks $4$F
(415) are valid. Banks 0-3 are main RAM banks and should not
be selected to appear at the window.
14
Chapter 5-Using RAMBO XL
Bit 4
RAME
When clear, this bit selects the bank determined by AO-A3 to
appear at the $4000-$7FFF window. When set, main bank RAM
will appear at this window.
Bit 7
DRE
When clear, this bank selects the diagnostic ROM to be
shadowed at $5000-$57FF. When set, the diagnostic ROM is
disabled.
Some Notes About Using the Extra RAM
If you do decide to use the extra RAM in your own programming,
please follow some of the following guidelines for compatibility and
fewer debugging headaches:
• Before enabling the RAM (setting RAME low), you should disable
both NMI and IRQ interrupts. NMIs may be disabled by setting
$D40E (NMIEN) to 0. Make sure that you reset it to $EO after
disabling the extra RAM. IRQs are disabled by the SEI
instruction
and enabled by CLI.
• Keyboard entry and SIO may not be used while interrupts are
disabled.
• If you are absolutely sure no interrupt handlers are at the
$4000-$7FFF window there is no need disable interrupts. Note
that if using the RAM as a RAMDISK, you may not assume this.
• Keep display lists and display data out of the $4000-$7FFF
window! When the extra RAM is in this window, ANTIC also sees
the extra RAM at this window. The 13OXE avoids this problem by
forcing ANTIC to main memory unless bit 5 is clear. If bit 5 is
clear, then ANTIC uses the memory bank selected by bits 2 and 3
on the 13OXE.
15
16
Chapter 6-Sources
CHAPTER 6-SOURCES
Suppliers of 256K DRAMS
Some suppliers of 256K DRAMS are:
Microprocessors Unltd............ (918) 267-4961
Proto PC
...................... (612) 644-4660
NEC and Hitatchi 120 ns or 150 ns DRAMS have worked well
with
our upgrade. We have had bad luck with OKI DRAMS.
SpartaDOS Construction Set
If your dealer does not carry our SpartaDOS Construction Set it
can be ordered directly from ICD, Inc. for $39.95 plus $4
shipping
(815) 968-2228
Other Software Support
We have a public domain section on our BBS where we will
make
any support files which our users upload available to the public.
The board is up 24 hours at (815) 968-2229 and supports
17
ICD, INC. warrants to the original consumer purchaser that this ICD, Inc. Personal
Computer Product (not including c omputer programs) shall be free from any defects in
material or workmanship for a period of 30 days from the date of purchase. If any such
detect is discovered within the warranty period, ICD, Inc.'s sole obligation will be to repair
or replace, at its election, the Computer Product free of charge on receipt of the unit
(charges prepaid, if mailed or shipped) with proof of date of purchase satisfactory
to ICD, Inc.
Write to:
ICD, Inc.
1220 Rock Street, Suite 310
Rockford IL 61101-1437
Attn: Service Dept.
YOU MUST RETURN DEFECTIVE COMPUTER PRODUCT FOR IN-WARRANTY REPAIR.
This warranty shall not apply if the Computer Product (i) has been misused or shows signs
of excessive wear, (ii) has been damaged by improper installation, or (iii) has been
damaged by being serviced or modified.
ANY APPLICABLE IMPLIED WARRANTIES, INCLUDING WARRANTIES OF
MERCHANTABILITY AND FITNESS FOR A PARTICULAR PURPOSE, ARE HEREBY
LIMITED TO THIRTY DAYS FROM THE DATE OF PURCHASE. CONSEQUENTIAL OR
INCIDENTAL DAMAGES RESULTING FROM A BREACH OF ANY APPLICABLE
EXPRESS OR IMPLIED WARRANTIES ARE HEREBY EXCLUDED. Some states do not
allow limitations on how long an implied warranty lasts or do not allow the exclusion or
limitation of incidental or consequential damages. so the above limitations or exclusions
may not apply to you.
This warranty gives you specific legal rights and you may also have other rights which vary
from state to state.
DISCLAIMER OF WARRANTY ON ICD, INC. COMPUTER PROGRAMS: All ICD, INC.
computer programs are distributed on an' as is" basis without warranty of any kind. The
entire risk as to the quality and performance of such programs is with the purchase. Should
the programs prove defective following then purchase. the purchaser and not the
manufacturer, distributor, or retailer assumes the entire cost of all necessary servicing or
repair
ICD, Inc. shall have no liability or responsibility to a purchaser, customer, or any other
person or entity with respect to any liability, loss. or damage caused directly or indirectly by
computer programs sold by ICD, Inc. This disclaimer includes but is not limited to any
interruption of service, loss of business or anticipatory profits or consequential damages
resulting from the use or operation of such computer programs
REPAIR SERVICE: If your ICD, Inc. Personal Computer Product requires repair other than
under warranty, please write to ICD, Inc., Service Department for repair information.
IMPORTANT: If you ship your ICD, Inc. Personal Computer Product, package it securely
and ship it, charges prepaid and insured. by parcel post or United Parcel Service.