1
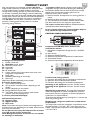
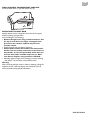
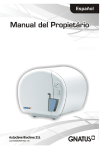
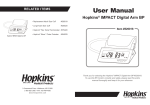
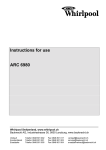
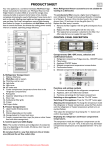
Instructions for use
KGNA 336 OPTIMA
Bauknecht AG, Industriestrasse 36, 5600 Lenzburg, www.bauknecht.ch
Verkauf
Kundendienst
Ersatzteile
Telefon 0848 801 002
Telefon 0848 801 001
Telefon 0848 801 005
Fax 0848 801 017
Fax 0848 801 003
Fax 0848 801 004
[email protected]
[email protected]
[email protected]
PRODUCT SHEET
Your new appliance is a combined ventilated, No-Frost
fridge-freezer exclusively for domestic use. Whirlpool Totalno-frost fridge freezers circulate chilled air around the
storage areas, reducing humidity to prevent the formation of
ice, thereby completely eliminating the need for defrosting.
Frozen items don’t stick to the walls, labelling stays legible and
storage space remains neat and clear. No-Frost’s temperature
control helps keep food fresher for longer. In combination
with 6th Sense, not only does it control the sensor, but
directs the cooling power exactly where it is needed,
optimising energy efficiency.
GB
The Hygiene+ filter ensures a higher level of hygiene in your
refrigerator through continuously purifying the circulating air
from bacteria. Remove it from the box found in the crisper
drawer (item 13) and insert into the grille (item 12).
Replace the filter every 6 months.
1. Remove the filter and dispose it as a whole (grate box +
insert).
2. Replace the filter and the grille with the new ones.
3. The replacement procedure is attached with the filter.
Our After-sales Service can supply this type of filter.
The crisper and the door seals are manufactured from
materials that inhibit bacterial growth.
In case of power failure the cold accumulator helps to
keep optimal storage temperature longer.
CONTROL PANEL DESCRIPTION
A. Refrigerator Compartment
1. Shelves / Shelf area
2. Multi-flow cold air system
2a. Multi-flow cold air vents
2b. Light bulbs
2c. Light cover
2d. Air intake area
3. Cooler compartment (temperature lower than in the
refrigerator compartment)
4. Rating plate
5. Separator (depending on the model)
6. Door trays
13a.Crisper divider (depending on the model)
B. Freezer Compartment
7. Upper basket (freezing zone)
8. Ice tray and/or cold accumulator (depending on the
model)
9. Shelves (depending on the model)
10. Storage basket for frozen food
11. The freezer door trays (for pizza or other frozen
products with short storage time)
C. Control panel and LCD display
Anti-bacterial protection:
12. Hygiene+ filter
13. Hygiene Crisper
14. Door seals
Note: The number and type of shelves and configuration of
accessories may vary, depending on the model. All shelves and
door trays are removable.
Do not place food in a way that obstructs the air intake
area (2d) and the air flow outlets (2a).
Note: Refrigerator/freezer accessories are not suitable
for washing in a dishwasher.
Compartments ON/OFF, menu, selection and
confirmation buttons
1. Refrigerator compartment Fridge stand-by - ON/OFF
button
2. Menu button
3. Appliance ON/OFF button
4. Selected compartment temperature increase button
5. Confirmation button
6. Selected compartment temperature decrease button.
Functions and settings symbols
1. Functions and settings for the refrigerator compartment
2. Appliance, alarm and malfunction symbols
3. Functions and settings for the freezer compartment.
Switching on the appliance: Press the “On-Off” button
Switching off the appliance: Press the “On-Off” button
again
Adjusting the temperature: To change the temperature
inside the refrigerator or freezer compartment, press the
Menu button until the refrigerator or freezer temperature
symbol turns on (symbol flashes).
Then adjust the temperature by pressing the +/- buttons and
confirm by pressing “OK”.
Displaying the refrigerator and freezer compartment
temperatures.
The temperature inside the refrigerator compartment can be
adjusted between +2°C and + 8°C. In the same way, the
freezer compartment temperature can be adjusted between
-16°C and -24°C.
GB
ELECTRICAL CONNECTION
When the appliance is connected to the power supply, the
display lights up and all the symbols appear on the display for
a few seconds.
Vacation
This function turns the refrigerator compartment to
a warmer state if you are going away for some time.
To select the function, keep pressing the menu button
The factory setting -18°C appears and flashes, the symbol
lits, while the refrigerator display shows a
temperature of +5°C (factory-set).
until the display shows the vacation symbol . Press
“OK” to confirm. To turn the refrigerator back to
setting point repeat this procedure.
Important: after activating this function, remove all
perishable foodstuffs from the refrigerator
compartment and leave the door closed, since the
refrigerator maintains a suitable temperature to
prevent the formation of unpleasant odours.
While the appliance is working to reach the factory-set
temperature, the alarm icon
lits, an acoustic alarm
sounds and temperature symbol on the freezer display
flashes (- -). This indicates that the appliance has not yet
reached the optimal temperature for storage of foodstuffs.
Press and hold the “OK” button until the acoustic alarm
disables.
The icon
disappears when the freezer compartment
reaches a temperature below -12°C, the display will show
the temperature -18°C, at which point food can be loaded
into the freezer compartment. After being switched on, the
refrigerator needs from 2 to 3 hours to reach the correct
temperature to store a typical volume of food in the
refrigerator compartment.
IMPORTANT:
• If food is placed in the refrigerator before the appliance has
cooled completely, it may deteriorate.
• Turning the refrigerator and freezer controls to a cooler
than recommended setting will not cool the compartments
any faster.
• A built-in exterior moisture control continuously guards
against moisture build-up on the front edges. Do not be
alarmed if these edges sometimes feel warm to the touch.
• The inside light switches on when the refrigerator door is
opened. After 10 minutes of door opening the light
switches off.
GUIDE TO SELECTING FUNCTIONS
Functions are not available until freezer compartment reaches
the temperature below -12°C.
Functions and settings for the refrigerator
compartment.
Refrigerator compartment door open
Refrigerator compartment temperature setting
Fast cooling
This function should be selected before
refrigerating fresh food. To select the function, keep
pressing the menu button until the display shows
the fast cooling symbol
. The symbol flashes,
press “OK” to confirm. The function is
automatically disabled after 6 hours, or can be
manually disabled by repeating the same procedure.
ON/OFF
This function turns off both the refrigerator and
freezer compartments. To enable the stand-by
function, press the “On-Off” button for 3 seconds,
two hyphens appear on both display to indicate that
the appliance is on stand-by. To switch the appliance
on again, follow the same procedure until the
previously set temperature is shown on the display.
When the appliance is on stand-by the light inside
the refrigerator compartment does not work.
Remember that this operation does not disconnect
the appliance from the power supply.
Fridge Stand-by
This function turn off the fridge compartment while
the freezer compartment continue to run. To
enable the stand-by function, press the “Fridge
stand-by” button for 3 seconds. To switch the fridge
compartment on again, follow the same procedure
until the previously set temperature is shown on the
display. When the fridge compartment is on standby the light inside the refrigerator compartment
does not work.
Functions and settings for the freezer compartment
Freezer compartment temperature setting
Fast freezing
For more efficient freezing activate this function 24
hours before freezing fresh food. To select the
function, keep pressing the menu button until the
display shows the fast freeze symbol
. Press
“OK” to confirm. After 24 hours place the food to
be frozen in the upper basket of freezer
compartment. The function is automatically
disabled after 24 hours, or can be manually disabled
by repeating the same procedure.
GB
Party mode
To select the function, keep pressing the menu
button until the display shows the party mode
symbol
.
The symbol flashes, press “OK” to confirm.
Use this function to chill drinks inside the freezer
compartment. When the function is in operation,
the symbol is animated. 30 minutes after selection
(the time required to chill a 0.75 l bottle without the
glass breaking), the symbol flashes, an acoustic
alarm sounds and the display lights up: remove the
bottle from the freezer compartment and press the
“OK” button to disable the function.
Important: do not leave the bottle inside the
freezer compartment longer than the time
necessary for chilling.
Appliance, alarm and malfunction symbols
“6th Sense” function
The 6th Sense function is automatically activated
when:
• a large amount of food is loaded into the
refrigerator and/or freezer
• the refrigerator and/or freezer door is left open for
a long time
• a prolonged power failure takes place, causing the
internal temperature of the appliance to increase to
values that cannot guarantee safe storage of food.
The symbol flashes for approximately 3 seconds,
after which it remains permanently lit until optimal
storage conditions have been automatically restored.
Control panel lock function
This function prevents anyone from inadvertently
changing settings or switching off the appliance.
To lock the control panel, press buttons “+” - “OK” “-” at the same time for 3 seconds until the display
shows the symbol
: an acoustic signal confirms
the function has been selected. To disable the
function, follow the same procedure until the symbol
switches off.
Alarms
In the event of an alarm, the acoustic alarm and
indicator lights are activated.
Freezer temperature alarm
The acoustic alarm sounds: alarm symbol lights up
and the temperature indicator flashes.
The alarm is activated when:
• The appliance is connected to the power supply for
the first time or after prolonged disuse
• The freezer compartment temperature is too high
• The quantity of foods loaded into the freezer
exceeds that indicated on the data plate
• The freezer door has been left open for a long time
Note: in these cases automatically appears on the
display
Power failure alarm
The maximum temperature reached during a power
failure flashes on the freezer display. The alarm
symbol lights up and the acoustic alarm sounds at the
same time. This alarm may activate when:
• There had been a prolonged power failure, and the
freezer internal temperature rose to the level that
does not guarantee appropriate food storage
conditions.
To disable the alarm press “OK”, after which
the pre-set temperature will appear on the
display.
Note: evaluate the state of the stored food.
Operation alarms
In the event of operation alarms, other alarms will
also be displayed in the refrigerator or freezer
compartment, depending on the malfunction site,
(e.g. CF, AL01, AL02, AL03 or AL04 etc...) call Aftersales Service and specify the alarm code.
Refrigerator door open alarm
The refrigerator door symbol lights up and the
acoustic alarm sounds. The alarm is activated when:
• the refrigerator’s door is left open for more than 2
minutes. Press “OK” to mute the acoustic alarm.
If the door is not closed, the acoustic alarm will
sound again after two minutes. Close the door/s and
press the “OK” button.
Note: in these cases 6th Sense automatically appears
on the display
Malfunction and After-sales Service symbol (Call
After-sales Service)
Function indicating the necessity to replace the
Hygiene+ filter
The replacement of the filter is described on the first
page of this Product Sheet.
After connecting the appliance, the three-segment
icon is displayed.
The segments will sequentially go off:
- after 2 months
- after 4 months
- after 6 months
After 6 months of operation, the alarm icon
and
icon will be displayed, indicating that it is
necessary to replace the filter. After replacing the
filter, keep the “OK” button pressed for about 5
seconds, until the alarm icon
goes off and the
three-segment
icon reappears. It is possible to
switch the
icon off until the filter is replaced (for
about 6 hours) by pressing the “OK” button.
Cleaning
Press the Stand-by button, which allows you to
switch off the refrigerator compartment alone,
keeping the freezer on. The refrigerator
compartment can now be emptied and cleaned.
GB
FRESH CONTROL COMPARTMENT UNBLOCK
Press the both locks (1), pull the drawer out (2).
REPLACING THE LIGHT BULB
Always disconnect the refrigerator from the power supply
before replacing any light bulbs.
If the inside light is not working:
• Remove the light cover using a small screwdriver. Put
the tip of screwdriver into upper rectangular hole,
press down the catch for unblock and pull cover
towards outside.
• Check the bulb and if necessary replace it.
• Pull the bulb towards the outside of the lamp holder.
Put the new one pushing connectors to the sockets of
lamp holder. It is used a special bulb, which does not
unscrew. This bulb is available only from our Aftersales Service. Replace using maximum 15W bulb.
• Assembly again the light cover pushing in its place, hearing
“click effect”. Do not leave uncovered the bulbs.
Warning:
After removing the light cover in order to cleaning, unplug the
appliance at first. Use only slightly wet washcloth. Do not
touch the bulbs. Keep special precautions.
5019 437 01014
.
INSTRUCTION FOR USE
BEFORE USING THE APPLIANCE
• Your new appliance is designed exclusively for
domestic use.
To ensure best use of your appliance, carefully
read the operating instructions which contain
a description of the product and useful advice.
Keep these instructions for future reference.
1. After unpacking the appliance, make sure it is not
damaged and that the door closes properly.
Any damage must be reported to the dealer within
24 hours of delivery of the appliance.
2.Wait at least two hours before switching the
appliance on, to ensure that the refrigerant circuit
is fully efficient.
3.Installation and the electrical connection must be
carried out by a qualified technician according to
the manufacturer’s instructions and in compliance
with the local safety regulations.
4. Clean the inside of the appliance before using it.
SAFEGUARDING THE
ENVIRONMENT
1. Packing
The packing material is 100% recyclable and bears
the recycling symbol. For disposal, comply with the
local regulations. Keep the packing materials
(plastic bags, polystyrene parts, etc.) out of the
reach of children, as they are a potential source of
danger.
2. Scrapping/Disposal
The appliance is manufactured using recyclable
material.
This appliance is marked in compliance with
European Directive 2002/96/EC on Waste
Electrical and Electronic Equipment (WEEE). By
ensuring the correct disposal of this appliance, you
can help prevent potentially negative consequences
for the environment and the health of persons.
GB
unattended even for a few days, since it is a
potential source of danger for children.
For further information on the treatment, recovery
and recycling of this product, contact your
competent local office, the household waste
collection service or the shop where you purchased
the appliance.
Information:
This appliance does not contain CFCs.
The refrigerant circuit contains R134a (HFC) or
R600a (HC) (see the rating plate inside the
appliance).
Appliances with Isobutane (R600a): isobutane is a
natural gas without environmental impact, but is
flammable. Therefore, make sure the refrigerant
circuit pipes are not damaged.
This product may contain Fluorinated Greenhouse
Gases covered by the Kyoto Protocol; the
refrigerant gas is inside a hermetically sealed
system.
Refrigerant gas: R134a has a Global Warming
Potential of (GWP) 1300.
Declaration of conformity
This appliance has been designed for preserving
food and is manufactured in compliance with
Regulation (CE) No. 1935/2004.
This appliance has been designed, manufactured
and marketed in compliance with:
• safety objectives of the “Low Voltage” Directive
2006/95/CE (which replaces 73/23/CEE and
subsequent amendments);
• the protection requirements of Directive “EMC”
89/336/EEC amended by Directive 93/68/EEC.
Electrical safety of the appliance can only be
guaranteed if it is correctly connected to an
approved earthing system.
The symbol
on the appliance, or on the
accompanying documents, indicates that this
appliance should not be treated as domestic waste
but must be taken to a special collection centre for
the recycling of electrical and electronic equipment.
When scrapping the appliance, make it unusable by
cutting off the power cable and removing the doors
and shelves so that children cannot easily climb
inside and become trapped.
Scrap the appliance in compliance with local
regulations on waste disposal, taking it to a special
collection centre; do not leave the appliance
7
PRECAUTIONS AND GENERAL
RECOMMENDATIONS
INSTALLATION
• The appliance must be handled and installed by
two or more persons.
• Be careful not to damage the floors (e.g. parquet)
when moving the appliance.
• During installation, make sure the appliance does
not damage the power cable.
• Make sure the appliance is not near a heat source.
• To guarantee adequate ventilation, leave a space
on both sides and above the appliance and follow
the installation instructions.
• Keep the appliance ventilation openings free.
• Do not damage the appliance refrigerant circuit
pipes.
• Install and level the appliance on a floor strong
enough to take its weight and in a place suitable
for its size and use.
• Install the appliance in a dry and well ventilated
place. The appliance is arranged for operation in
places where the temperature comes within the
following ranges, according to the climatic class
given on the rating plate.
The appliance may not work properly if it is left
for a long time at a temperature outside the
specified range.
Climatic Class
SN
N
ST
T
Amb. temp.
(°C)
From 10 to 32
From 16 to 32
From 16 to 38
From 16 to 43
Amb. temp.
(°F)
From 50 to 90
From 61 to 90
From 61 to 100
From 61 to 110
• Make sure the voltage specified on the rating
plate corresponds to that of your home.
• Do not use single/multi adapters or extension
cords.
• For the water connection, use the pipe supplied
with the new appliance; do not reuse that of the
previous appliance.
• Power cable modification or replacement must
only be carried out by qualified personnel.
• It must be possible to disconnect the appliance
from the power supply by unplugging it or by
means of a mains two-pole switch installed
upstream of the socket.
8
SAFETY
• Do not store or use petrol, flammable liquids or
gas in the vicinity of this or other electrical
appliances. The fumes can cause fires or
explosions.
• Do not use mechanical, electric or chemical
means other than those recommended by the
Manufacturer to speed up the defrost process.
• Do not use or place electrical devices inside the
appliance compartments if they are not of the
type expressly authorised by the Manufacturer.
• This appliance is not intended for use by persons
(including children) with reduced physical,
sensory or mental capabilities or lack of
experience and knowledge, unless they have
been given supervision or instruction concerning
use of the appliance by a person responsible for
their safety.
• To avoid the risk of children becoming trapped
and suffocating, do not allow them to play or hide
inside the appliance.
• Do not swallow the contents (non-toxic) of the
ice packs (in some models).
• Do not eat ice cubes or ice lollies immediately
after taking them out of the freezer since they
may cause cold burns.
USE
• Before carrying out any maintenance or cleaning
operation, unplug the appliance or disconnect it
from the power supply.
• All appliances equipped with an automatic
icemaker and water dispenser must be
connected to a water supply that only delivers
drinking water (with mains water pressure of
between 0.17 and 0.81 Mpa (1.7 and 8.1 bar)).
Automatic ice-makers and/or water dispensers
not directly connected to the water supply must
be filled with drinking water only.
• Use the refrigerator compartment only for
storing fresh food and the freezer compartment
only for storing frozen food, freezing fresh food
and making ice cubes.
• Do not store glass containers with liquids in the
freezer since they may burst.
The Manufacturer declines any liability if the
above advice and precautions are not respected.
RECOMANDATION IN CASE OF NO
USE OF THE APPLIANCE
Short vacation
There is no need to disconnect the appliance from the
power supply if you will be away for less than three
weeks. Use up perishable food, freeze other food.
If your appliance has an automatic ice maker:
1. Turn it off.
2. Shut off the water supply to the automatic ice
maker.
3. Empty the ice bucket.
Long vacation
Remove all the food if you are going away for three
weeks or more. If your appliance has an automatic
ice maker:
1. Turn it off.
2. Shut off the water supply to the automatic
icemaker at least a day before.
3. Empty the ice bucket.
Fix some wooden or plastic wedges to the upper
part of both doors with adhesive tape and leave the
doors open enough for air to circulate inside both
compartments. This will prevent odour and mould
from setting in.
Moving
1. Take out all internal parts.
2. Wrap them well, and fix them together with
adhesive tape so that they do not bang together
or get lost.
3. Screw the adjustable feet so that they do not
touch the support surface.
4. Close and fix both doors with adhesive tape and,
again using adhesive tape, fix the power cable to
the appliance.
Power failure
In the event of a power failure, call the local office of
your electricity supply company and ask how long it is
going to last. Note: Bear in mind that a full appliance
will stay cold longer than a partially filled one.
If ice crystals are still visible on the food, it may be
frozen again, although flavour and aroma may be
affected.
If food is found to be in a poor condition, it is best
to throw it away.
For power failures lasting up to 24 hours.
1. Keep both doors of the appliance closed. This
will allow the stored food to stay cold as long as
possible.
For power failures lasting more than 24 hours.
1. Empty the freezer compartment and arrange the
food in a portable freezer. If this type of freezer
is not available and, likewise, no artificial ice packs
are available, try to use up the food, which is
more easily perishable.
2. Empty the ice bucket.
MAINTENANCE AND CLEANING
Before any cleaning or maintenance operation,
unplug the appliance from the mains or disconnect
the electrical power supply.
Periodically clean the appliance with a cloth and a
solution of lukewarm water and neutral detergent
specifically for refrigerator interiors.
Never use detergents or abrasives. Never clean
refrigerator parts with flammable fluids. The fumes
can create a fire hazard or explosion.
Clean the outside of the appliance and the door seal
with a damp cloth and dry with a soft cloth.
Do not use steam cleaners.
Clean the condenser using a vacuum cleaner,
proceeding as follows: remove the front plinth (see
installation manual) and proceed to clean the
condenser
Important:
- The buttons and control panel display must
not be cleaned with alcohol or alcohol-derived
substances, but with a dry cloth.
- The refrigeration system pipes are located
near the defrost pan and can become hot.
Periodically clean them with a vacuum cleaner.
REPLACING THE BULB
Always disconnect the appliance from the
power supply before replacing any light bulbs.
How to replace the refrigerator compartment bulb.
1. In some models a special bulb is used
2. The bulb should not exceed 15W
3. Bulb change instruction is put in the chart
(PRODUCT SHEET)
TROUBLESHOOTING GUIDE
Before contacting After-sales Service....
Performance problems often result from little
things you can find and fix yourself without tools of
any kind.
Noises coming from your appliances are
normal since it has a number of fans and
engines to regulate performances that switch
on and off automatically.
Some of the functional noises can be reduced
through
- Levelling the appliance and installing it on an
even surface
- Separating and avoiding contact between the
appliance and furniture.
- Checking if the internal components are
correctly placed.
- Checking if bottles and containers are not in
contact with each other.
Some of the functional noises you might hear:
A hissing sound when switching on the
appliance for the first time or after a long
pause.
A gurgling sound when refrigerant fluid enters
into the pipes.
Buzzing sound when water valve or fan start
working.
A cracking sound when compressor starts or
when ready ice drops into ice box Abrupt
clicks when compressor switches on and off.
Automatic Ice maker noises (on some
models):
- Since your appliance has an automatic ice
maker, you may hear buzzing (from the water
valve), trickling water and the clatter of the ice
falling into the bucket.
The appliance is not working:
• Is the power cable plugged into a live socket with
the proper voltage?
• Have you checked the protection devices and
fuses of the electrical system in your home?
If your automatic ice maker does not work (on
some models):
• Has the freezer had enough time to become cold?
With a new appliance this may take overnight.
9
• Is the automatic ice maker ON/OFF button set
to ON?
• Make sure the lever of the automatic ice maker,
inside the freezer compartment, is not turned to
OFF, i.e. in the horizontal position (on some
models).
• Is the water turned on? Is water getting to the
automatic ice maker?
• Is there a water filter installed on the appliance
(on some models)? This filter may be clogged or
installed incorrectly. First, check the filter
installation instructions to ensure that the filter
was installed correctly and is not clogged. If
installation or clogging is not a problem, call a
qualified person or a technician.
If there is water in the defrost pan:
• This is normal in hot, damp weather. The pan can
even be half full. Make sure the appliance is level
so that the water does not overflow
If the edges of the appliance cabinet, which
come in contact with the door seal, are warm
to the touch:
• This is normal in hot weather and when the
compressor is running.
If the light does not work:
• Have you checked the protection devices and
fuses of the electrical system in your home?
• Is the power cable plugged into a live socket with
the proper voltage?
• Has the light bulb burnt out?
In the case of burnt-out bulbs:
1. Always unplug the appliance from the mains.
2. See chapter “Maintenance and Cleaning”.
If the motor seems to run too much:
• Is the condenser free of dust and fluff?
• Are the doors properly closed?
• Are the door seals properly fitted?
• On hot days or if the room is warm, the motor
naturally runs longer.
• If the appliance door has been left open for a
while or if large amounts of food have been
stored, the motor will run longer in order to cool
down the interior of the appliance.
• Motor running time depends on different things:
number of door openings, amount of food
stored, temperature of the room, setting of the
temperature controls.
If the appliance temperature is too high:
• Are the appliance controls correctly set?
• Has a large amount of food been added to the
appliance?
• Check that the doors are not opened too often.
• Check that the doors close properly.
• Make sure that air flow vents inside the
compartment are not blocked, as this prevents
the circulation of cold air.
If there is moisture build-up:
• Make sure that air flow vents inside the
compartment are not blocked, as this prevents
the circulation of air.
• Make sure that the food is properly packaged.
Dry any dampness on food containers before
placing them in the appliance.
• Check that the doors are not opened too often.
When the door is opened, humidity from the
room air enters the appliance. The more often
the door is opened, the faster humidity builds up,
especially when the room itself is very humid.
• If the room is very humid, it is normal for
moisture to build up inside the refrigerator.
10
If the doors do not open and close properly:
• Check that food packages are not blocking the
door.
• Check that the internal parts or automatic ice
maker are not out of position.
• Check that the door seals are not dirty or sticky.
• Ensure the appliance is level.
AFTER-SALES SERVICE
Before contacting After-Sales Service:
Switch the appliance on again to see if the problem
has been solved. If it has not, disconnect the
appliance from the power supply and wait for about
an hour before switching on again.
If, after performing the checks described in the
Troubleshooting Guide and switching the appliance
on again, your appliance still does not work properly,
contact the After-sales Service, explain the problem.
Specify:
• the model and appliance serial number (stated on
the rating plate),
• the nature of the problem,
• the Service number (the number after the word
SERVICE on the data plate on the inside of the
appliance),
• your full address,
• your telephone number and area code.
Note:
The direction of door opening can be changed.
If this operation is performed by After-sales
Service it is not covered by the warranty.
ELECTRICAL CONNECTION
1) For Great Britain only
Warning - this appliance must be earthed
Fuse replacement
If the mains lead of this appliance is fitted with a BS
1363A 13amp fused plug, to change a fuse in this
type of plug use an A.S.T.A. approved fuse to BS
1362 type and proceed as follows:
1. Remove the fuse cover (A) and
fuse (B).
2. Fit replacement 13A fuse into
fuse cover.
3. Refit both into plug.
Important:
The fuse cover must be refitted
when changing a fuse and if the fuse
cover is lost the plug must not be
used until a correct replacement is fitted.
Correct replacement are identified by the colour
insert or the colour embossed in words on the base
of the plug.
Replacement fuse covers are available from your
local electrical store.
2) For the Republic of Ireland only
The information given in respect of Great Britain
will frequently apply, but a third type of plug and
socket is also used, the 2-pin, side earth type.
3) Socket outlet / plug (valid for both countries)
If the fitted plug is not suitable for your socket
outlet, please contact Whirlpool Service for further
instruction. Please do not attempt to change plug
yourself. This procedure needs to be carried out by
a qualified Whirlpool technician in compliance with
the manufactures instructions and current standard
safety regulations.