1
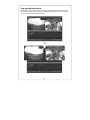
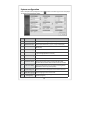
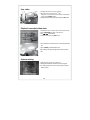
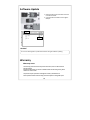
Automated Drive Recorder User Manual RoadHawk RH‐2 Pro 1 Main Features The RoadHawk RH-2 Pro is used to record both video and audio data in a continuous loop fashion. If the vehicle is involved in an accident such as a collision, impact, and sudden acceleration-related incident, this data is marked and stored. The user can also manually mark the video by pressing on the remote emergency button. When the system is being used as a teaching aid for driving instructors the USB memory stick can be removed and given to the student to allow them to analyse and review their driving skills in the comfort of their own home. Continuous recording The video and audio data from the front and interior views are continuously recorded when the camera receives power. When the capacity of the SD card or USB memory stick has been reached, the oldest files are overwritten by the newest ones in a “roundrobin”, first in, first out fashion. Emergency recording When an impact or an unusual acceleration or deceleration is detected by the built-in GSensor and has exceeded the preset limit the RH-2 creates an “EVENT”. An “EVENT” can also be triggered by pressing the emergency button. At this point, the recorded video data is locked-in and is erased only by an authorised party and by using a PC or laptop, accessing the SD card. “EVENT” data records 1 minute before and 1 minute after the event. (Note : The User may set the pre-event time to either 1 minute, 2 minutes or 3 minutes of pre-event recording). Changing the settings such as the Pre-Event record time is done using the supplied software. When you insert the card in to the camera it looks for the config file and behaves accordingly. GPS Location and Speed recording Once the RH-2 has had chance to lock on to a GPS satellite signal it will start recording GPS Data in the form of vehicle speed and location. Upon playback using the supplied viewing software you will see this data in graphical form using Google maps. Playback of video/audio data The recorded data can be played back using the provided playback software supplied on CD. This software is FREEWARE and you are allowed to send it to any person for the purposes of replaying back video recorded by the RH-2 Pro. With the RH-2 Pro you can also instantly playback video using the supplied IR remote controller direct back to a connected TFT monitor inside the vehicle. This is especially useful if you need to show a driving student an error. Data analysis The recorded data can be easily analysed for speed, vehicle location and direction of travel using the software player that is supplied on the CD-ROM. 2 Contents Before using the product -------------------------------------------------------------------------------------- 4 Preparing for the safety ---------------------------------------------------------------------------------------- 5 Components ---------------------------------------------------------------------------------------------------- 7 Technical Specifications ---------------------------------------------------------------------------------------- 7 Name of the Parts ---------------------------------------------------------------------------------------------- 8 SD Card ------------------------------------------------------------------------------------------------------- 11 Installing the RH-2 Pro --------------------------------------------------------------------------------------- 12 To Hard Wire the RH-2 Pro Camera ------------------------------------------------------------------------- 13 System LCD Display ------------------------------------------------------------------------------------------ 16 Operation Sequence ------------------------------------------------------------------------------------------ 17 Preparation for video recording ------------------------------------------------------------------- 17 Continuous recording while driving -------------------------------------------------------------- 17 Running the viewer program after driving ------------------------------------------------------- 17 Running Player (viewer program) --------------------------------------------------------------------------- 18 PC System requirements ------------------------------------------------------------------------- 18 Player installation ---------------------------------------------------------------------------------- 18 Player screen review ------------------------------------------------------------------------------ 19 Control menu -------------------------------------------------------------------------------------- 20 Playback interface controls ------------------------------------------------------------------------ 20 Playback -------------------------------------------------------------------------------------------- 21 Pop-up display window --------------------------------------------------------------------------- 22 Interfacing with a GIS/City map ------------------------------------------------------------------ 23 Converting into AVI file format ------------------------------------------------------------------- 24 System configuration ----------------------------------------------------------------------------- 25 Parking surveillance setting ---------------------------------------------------------------------- 26 Analysing G-SENSOR data ---------------------------------------------------------------------------------- 27 TV-OUT Viewer ---------------------------------------------------------------------------------------------- 28 Software Update --------------------------------------------------------------------------------------------- 30 Warranty ----------------------------------------------------------------------------------------------------- 30 3 Before using the product Warranty and responsibilities ◆ Damage due to production malfunction, loss of data, or other damages occurring when using this product shall not be the responsibility of the manufacturer. ◆ Although the Drive Recorder is a device used for recording/storing videos, the device is not guaranteed to record information on every accident in the case of a malfunction. ◆ In the case of an accident, a minor force will not trigger the G‐Force sensor to activate Emergency Recording. Therefore the user must use the Manual Record Button located on the device itself. ◆ For stable use of the product, check the product and SD card regularly to ensure its proper operation. It is important to regularly format your SD card to keep it in good condition. Tip. For safe and long‐term use of the SD card. ◆ Please make sure to turn off the device power when inserting or ejecting the SD card. ◆ Generally, the SD card has a set lifespan and may not be able to store new data after a certain period of time. In such a case, please purchase a new SD card for use. Loss of data due to overuse of the SD card shall not be the responsibility of the manufacturer. ◆ Always store data within a storage case as data loss may occur during storage or transport due to static electricity or external voltage. ◆ Always back up all important data in a different storage media. (Hard disk device, CD, portable disk drive, etc) ◆ Please refer to the SD card precaution for safe and long term use of product. (Refer to 11p) 4 Safety Caution for use User Manual ● To ensure proper operation please read the manual before installation and use. Failure to follow this safety notice may cause a malfunction and may void the warranty. Power ● Use only the provided cables and specified power input. A cable not supplied by the manufacturer may cause product damage, a fire or a short circuit. ● Please use rated capacity for the fuse and confirm the message if the product correctly connected after the installation. SD card or USB Memory Stick ● Insert the SD card in to the product. ● Ensure that the capacity of the SD card is not exceeded. A full SD card will not allow one to record manual alarms or G‐sensor based triggers. ● Please make sure to turn off the device power when inserting or ejecting the SD card or USB stick. Caution! ● Do not remove the SD card or USB Memory stick during product operation while power is on. Product or memory card could be damaged. ● Ejecting the SD card ‐ Without parking surveillance mode After the ignition is off, please check the LCD & system are off and then withdraw the SD card from the product after 1 minute. ‐ With parking surveillance mode After the ignition is off press and hold the emergency button for 3 seconds. Wait for the LCD to go off and then remove the SD card or USB memory stick. 5 Using the RH‐2 Safely ● Stop the vehicle in a safe place before operating the device. Do not operate the product when driving. Do not obstruct the view of the product through the front windshield. The GPS receiver may not work properly. ● Do not disassemble, repair or modify the device. This voids the warranty and where we take no responsibility for product damage or problems caused by the user. ● When replacing the fuse, please use a fuse with the rated capacity under the recommended power guidelines. Using this product in alternative power situations will void the product warranty and could result in fire. ● Any excessive window tinting may cause an unclear or distorted image on playback. First record and then play back the video to see if the recorded video is acceptable. ● Use only the provided cables and specified power input. A cable not supplied by the manufacturer may cause product damage, a fire or a short circuit. ● When using double‐sided tape, wipe the window clean and clean the surface of the device with dry cloth before sticking down the tape. ● When not in use Archive ● Do not insert foreign substances into the product. ● Do not cover the camera lens with any materials or objects. This may affect recording quality. ● Do not drop or apply excessive shock. This may cause product damage. ● Avoid high temperature from heating device. ● Avoid placing the product under high moisture or dust level. Cleaning ● Turn the device off before cleaning the device. ● Only clean the device with a dry cloth if it is necessary. 6 Components Components TV‐OUT / IR cable Product & Cigarette Lighter Plug Terminal Box Emergency Recording Button Remote Controller *Product package may change for product enhancement without any notification. Holder SD Card Manual Technical Specifications Built‐in Camera Video Compression 2CH ‐ Built‐in : 1.3M pixel CMOS Sensor Extra 1 : VGA CMOS Sensor H.264/AVC Resolution VGA (640X480) TV‐OUT ○ (PIP Mode) Audio GPS G‐Sensor Main car battery supported Monitoring of parking Supported memory Power 1 CH, Mono (in & out) Built‐in GPS 3D acceleration sensor built‐in Supported (Parking Surveillance Available) 0~24 hour SD Card up to 32GB DC 12V~ 24V *This manual may be changed without prior notice to users for product improvements. 7 Name of the Parts SD card Slot Insert SD card into the unit. Emergency Recording Release button/ System power off button Display window Displays time and speed information. Cancels the emergency button. System power off on the Parking surveillance mode: Press for more than 3 seconds after the car engine off. Emergency (Event) Recording button Press to perform an emergency Inward Facing Camera Records images of the driver and passenger. ……………………………………………………………………………………………………………………….. Front Camera Records forward images of the vehicle. GPS Built‐in & Holder slot 1) GPS Built‐in 2) For attaching the holder to the vehicle. 8 Remote controller Menu button MOVE & MENU Button Press this button to activate the TV‐Out signal and to access the main menu. Use the arrow buttons to navigate the menus. Press OK to select or to enter a menu. Playback control button Playback the selected file. Skip forward or backwards in 10 sec segments. MODE button Activate PIP function Press to swap PiP image MENU cancel button Page Up/Down Cancel the previous function Adjust the playback file list page. 9 T‐BOX Fixing holder USB Port To install T‐box to the vehicle. Use only recommended USB memory sticks. TV‐out & Remote controller IR port Use this port to connect the LCD screen and IR receiver for the remote controller. Data Port This port is used by the factory to program the product. Emergency button slot To connect to the external emergency button for event recording. Caution! When a USB memory stick is inserted in to the USB port. The data will be saved on to the USB memory stick. ● If there is an SD card in the camera and a USB memory stick in the USB port the USB memory stick will take priority. ● Please use the recommended SD card and/or USB Memory Sticks ONLY. (The user must use the recommended product only.) 10 SD Card Recording time by frames per second Total Frame (Frame/Sec.) Quality Setting/Maximum Recording Time (Mins) Lowest 2.5 Lower 2 25 Frame 22.5 Frame 301 2.2 1.6 1.1 3.3 2.5 1.8 1.2 1 20 Frame 4 2.7 2.7 1.3 1.1 15 Frame 5 4 5 2 1.6 10 Frame 8 5 4 2.7 1.6 7.5 Frame 10 6.7 5 3.3 2.7 5 Frame 13.3 10 6.7 5 3.3 3 Frame 20 13.3 10 6.7 5 2 Frame 26.7 20 13.3 10 6.7 1 Frame 33.3 26.7 20 13.3 10 30 Frame Normal 1.3 Higher 1 Highest 48 mins 1.1 * Time varies depending on the amount of motion seen by the camera & lighting conditions. (Based on 2GB) Caution! 1. Do not remove SD card when the power is connected. (It might cause permanent damage to the SD card.) 2. Do not use the card for any other purpose or copying unrelated files from another device. 3. Check for data abnormalities once a week for stable operations and format the SD card at least twice a month for stable use of product. 4. If your PC does not support the SD card and the SD SDHC2.0 card standard, use a separate SDHC2.0 USB reader. (SD card to USB adapter) 5. SD card needs to be replaced with a new card once it reaches end of product life and may not be able to store new data after a certain period of time. 6. Only use the provided SD card from the manufacturer. Product may not function correctly if un‐tested SD card is used. (We recommend the use over “SDHC Class4 Card”.) Caution! If the computer does not support SDHC2.0, please use an extra (recommended) SD card reader. ● SD Card should be formatted regularity in order to prevent error. ● After formatting SD card, please set up the time zone in configuration menu on the viewer program. ( Refer to Page 28 ) ● If the user does not re‐set up the time zone, the data may be saved with incorrect time and it takes a longer time to boot up the product. ● Formatting the SD card will delete all the data in the SD card. If in need, please back up the data before formatting SD card. ● 11 Installing the RH‐2 Pro Caution! Make sure to install with the ignition turned off and car keys removed. Only connect to the power supply once it has been fully installed. ● Reception will improve when the GPS receiver is fully exposed through the front window. Make sure the camera has an unobstructed view both inside and out BEFORE sticking the adhesive pad down. ● Make sure the camera is aligned vertically and horizontally. ● Installing the product Clean the window surface with a dry cloth before applying the tape. Remove the plastic from the double‐sided tape on the holder. Connect the device and T‐box. The device must be installed and mounted straight both horizontally and vertically. Installing the accessories Locate the best position for the remote alarm button. Secure the button by removing the adhesive film attached to the pad on the external button, press and hold. Locate the best position for Remote control IR receiver. Connect the video cable to the connection port of the T Box. Keep the remote control in a safe place to be reached easily. 12 To Hard Wire the RH‐2 Pro Camera Notice Each vehicle has its own system and features. Please consult its manual before wiring to the vehicle. ● Ensure the ignition is off when installing the system and contact a vehicle technician if required. ● In order to hard wire, the cigar lighter power plug should be cut off to use the cable for the wiring. ● Each part of T‐BOX 1 RED POWER SUPPLY VCC (+) POWER SUPPLY (+12V ~ +24V) 2 WHITE IGN (Ignition) RH‐2 Pro signal for operation 3 BLACK GND (‐) Connect to the ground 1. Connect the black wire (GND)(‐) with car frame or ground wire. 2. Connect the red wire(power supply cable)(+) with permanent 12v to 24v power. This will allow the RH‐2 Pro to operate in an emergency even if the ignition is off. 3. Connect the white wire (IGN) on the power cable to ignition power so that the camera operates when the ignition is turned on. Caution! For the safety reasons, when installing this camera, please connect the ground wire first. ● Please connect the power cable and ignition cable through the fuses inside. ● 13 T‐BOX Installation 1. Check the location of the fuse box in the vehicle. 2. Find a suitable place to mount the T‐Box. You might want this to be concealed or you might want to have easy access for quickly changing the USB memory stick. 3. Adjust the length of the wire from T‐BOX to the fuse box (NOTE: the RH‐2 is fitted with a cig lighter plug if you do not want to hard wire the system it can be plugged in to your car’s accessory socket. 4. Remove the lining as per picture (1) and insert (install) the cable in the gap between sealing and windshield like picture (2) 14 5. After adjusting the cable, connect the power cable. (1) Red wire is connected to permanent live. (2) Black wire should be connected to the ground of vehicle. (3) White wire should be connected to ignition live. 6. Check the wires and power on and Check to check the camera is working. After the power is off, parking surveillance will be in operation and it is normal if LCD on the product is blinking. If the LCD stays ON (not blinking), the installation might not be correct. 7. Use cable ties to tidy the wiring going to and from the camera and T‐Box. T‐BOX system operation Item(s) Input power voltage Low voltage detection Description Min. 12V ~ Max. 24V Min. 11.6V(12V battery) or Min. 23.2V(24V battery) 15 System LCD Display Display Status or Measure Displays Time & Speed The sign is ON when normal recording is taking Place. The sign is ON when event recording. The sign is ON when front camera is recording. The sign is ON when internal camera is recording. The sign is ON when TV‐out is connected. The sign is ON when USB is connected. The sign is ON when GPS signal is being received. Designated speed measurement unit. F_UP Firmware update OFF Power OFF Trouble shooting Indication Trouble description How to check Sd_E SD card ERROR or NO GOOD Check the SD card in the product or format the SD card Err1 CMOS Sensor error Problem with Camera sensor. Please contact your dealer. Err2 G‐sensor error Please contact your dealer. Err3 GPS error Please contact your dealer. Err4 RTC error Please contact your dealer. Err5 Rear camera disconnect Check the rear camera’s connection ※ If the above instruction is not working out, please contact your dealer. 16 Operation Sequence Preparation for video recording 1. After inserting an SD card into the product and then turn on, [‐‐‐‐] will be shown on LCD display. 2. If the product is operating within normal conditions, it chimes once. 3. Video will be recorded with [HELLO], REC, V1, V2 on LCD display. Continuous recording while driving 1. This Product informs you of your vehicle’s speed, when stopped, the unit it displays the time. 2. When the capacity of the SD card has been reached, the oldest files are over written for continuous recording. The EVENT files that are triggered by either the unit’s internal G‐Sensor or external manual record button are not over written. (This EVENT data must be erased by a user with the SD card inserted in a computer, erasing event data stored in the DATA folder.) 3. When you stop the engine or remove the power cable from the cigarette lighter plug, the device stops recording. Running the viewer program after driving 1. The player is built in the SD card so the user is able to view the recorded data on any PC. 2. Check the recorded SD card data regularly for stable operation of the device and the SD card. 3. Always back up all important data on a different storage media. (Hard disk drive, CD, portable disk drive, etc) 17 Running Player (viewer program) PC system requirements Component CPU Menory Orperating System Graphics HDD space Requirements Pentium4 / 1GHz processor or higher 512MB of RAM or higher Microsoft Windows XP Home Edition or higher DirectX 8.1b or higher 200MB or higher ※ When using MS Windows Vista and Player soft ware for the first time, you may have to run the Player in Administrator Mode. To do this right click on the player icon and select “run as administrator” Player installation 1. Insert the SD card into a PC or SD card reader and connect it to PC. 2. Select SD card reader drive. 3. Double‐click the “Player”. 4. Double‐click “Player.exe” to execute the program. 18 Player screen review To playback video, select the “Open a File” button, explore the SD card or other location where the recorded (or saved) data is located, (file called DATA is on the SD card), then double click the selected file from the list in order to play. No. 1 Name Description Forward Camera view Displays the video images recorded by the forward facing camera. 2 Rear Camera view 3 Vehicle Speed 4 Vehicle Location 5 Direction of Travel 6 Shock graphs Displays the video images recorded by the interior facing camera. Displays the speed of your vehicle. Displays the coordinates (latitude and longitude) of the vehicle. (Requires GPS signal lock) Displays the vehicle’s direct on of travel. Displays vehicle motion and any impact detected by the G‐Sensor with a graphically in 3‐axis. 19 Control menu Volume control Playback speed control No. Name Description 1 Volume Control Adjusts the volume level while playing back the recorded data. 2 Playback speed control Adjusts the video playback speed. Playback interface controls Button Function Button Move to the previous file Playback the previous frame Pause the Playback Stop Playback Move to the next frame Function Move to the next file Open a file Convert the file into an AVI format Playback Link the recorded data with map Playback Access System Set Up Menu Close Player Hide/Close the window Move to the previous file 20 Playback 1. After clicking the folder icon ( ) on the lower right corner of the viewer, click “Change Directory” to select the location for the recorded data. Typically the first time you do this all the files are located on the data folder of SD card. Normally it will be called removable Disk. If saved elsewhere, use this utility to explore your computer to locate the file for playback. Lots of small files are created and these can be viewed one after the other to make one long video. 2. When the file list appears, double‐click the desired file to play back. ※ Click the list name to sort by File Name, Record Time or Event Type. FILE NAME: File name of the recorded video. RECORD TIME: Date and time the images have been recorded. EVENT TYPE: Displays the recording EVENT type (Continuous recording / Emergency recording /remote event button recording). Click the list name to sort by File Name, Record Time or Event Type. Event Type Description Continuous recording No EVENT applied. Clicking on this shows the normally recorded file when driving. Emergency recording (EVENT000‐BUTTON) Annotated with the word BUTTON. This is an EVENT video caused by pressing the emergency record button. G‐Sensor automatic recording Annotated with GSENSOR. This data is recorded when any impact, sudden acceleration, or accident is detected. (EVENT000‐GSENSOR) 21 Pop‐up display window Double‐click the display window, the recorded images are played back at the original size. Double clicking the screen again returns the view to normal original size. Use the PC’s mouse to move the screens and adjust them within desktop window. 22 Interfacing with a GIS/City map The RH‐2 Pro simultaneously records the GPS data while driving so you can check the driver’s route on the map. Click the GIS/MAP icon ( ) on the lower right corner. The map window appears for the user to see the vehicle location and travel onto google map. ※ To use this function, the system must have access the Internet. Your virus killer can stop this from happening so if you have no map, check your virus killing software. 23 Converting into AVI file format Convert a portion of the recorded data into an AVI file to playback in “Windows media player” or to share the recorded data with someone else or to email a file. 1. Click the AVI conversion button ( ) at the start of video clip position to convert the images into the AVI file format. The video playback stops and the AVI conversion window appear as below. 2. Set the following options from the window and click Start. 1) AVI storage directory 2) Selection of previous/next video and whether or not to include audio data 3) AVI recording time 3. The conversion progress appears as follows. ※ The AVI files cannot be created on a portable disk such as SD Card or USB memory stick but only on a hard disk first due to the speed required for the conversion. After the file has been converted then it can be copied to a USB drive or SD memory card. You can also email the clip or upload it to video sharing sites such as Youtube. The converted video file will not contain the G‐Force or the GPS data. If you want to send this info to another party then please send them the .ASD file either on a disk or by email. You can give them a copy of the RoadHawk Player software so they can view the video will all the extra information. 24 System configuration Click on the System Setup configuration icon ( ) located at the lower right corner of the player. The following window will then appear. No. Name Description 1 Video Quality 2 Video Frame rate Sets the video frame rate (1, 2, 3, 5, 7.5, 10, 15 frame/sec) 3 Video Format Sets the video format for TV‐OUT & external camera (NTSC, PAL) 4 Audio Recording Enables or Disables the audio record function. 5 Password Setting Sets any Password to access the recorded data. (Up to 10 digit alphabet or number.) 6 Time Zone Setting Sets the time zone for the user. 7 Unit for Speed Sets the video recording quality. ( 5 Levels) Set the unit of the speed for the vehicle. 8 Sets the license plate number or fleet vehicle ID number Number of vehicle associated with the vehicle where the SD card is to be installed. 9 G‐Sensor Sensitivity 10 Pre Recording Time Sets the time to record the previous scenes before the event. Sets the sensitivity of G‐Sensor, Emergency recording button. (Available to set each X,Y,Z axis by 0.1G ) 11 TVOut OSD Language Sets the language used in TV‐Out mode 12 Parking setup Sets video frame rate of parking surveillance. ( Refer to page 29) 25 Parking surveillance setting No. 1 Name Description Timer for parking Sets the parking surveillance time (none ~ 24h) 2 Video Quality 3 Frame Rate 4 Audio Recording 5 G‐Sensor Sensitivity Sets the video recording quality. (5 Levels) Sets the video frame rate during the parking surveillance (1, 2, 3, 5, 7.5, 10, 15 frame(s)/sec) Enables or Disables the audio record function. Sets the sensitivity of G‐Sensor. (Available to set each X,Y,Z axis by 0.1G ) ※ The setting for parking surveillance will be different from the normal operation. ※ Parking surveillance mode will be off if the capacity of the battery is lower than the required voltage. 26 Analyzing G‐SENSOR data The G‐sensor (Gravity Sensor) shows data for X, Y and Z axis and stores it along with the other recorded data on the SD card. When using the playback software, this information is represented in a graphical format. The resulting graph may be used to analysis the driving condition and driver’s habits. Depending on the type of the vehicle, the amplitude of the curve of shown may vary. ※ X axis: front and rear of the vehicle ※ Y axis: left and right of the vehicle ※ Z axis: top and bottom of the vehicle 27 TV‐OUT Viewer No. Name 1 Live Video 2 Playback Video Playback video and audio data recorded previously 3 System Setup Configuration settings 4 Exit Stops TV‐out function Description Displays live video streaming 28 Live video 1. Displays live video from the cameras. nd 2. With the extra camera (the 2 CH), PIP (picture in picture) function will be activated by pressing the [MODE ] button. 3. Change the live video channel by pressing the [OK] button. Playback recorded video data 1. Playback video and audio data recorded previously. 2. Press [UP/DOWN ] to page of the file list. 3. By [ / ] to select files. 4. Selects file by pressing [OK] button. 1. Press forward or reverse buttons to scan through the video file. 2. Press [ MODE ] to activate PIP function. * RH‐2 will stop recording during the play back of recorded files. System setting 1. Setting page consists of 11 sections. 2. Setting values will be shared with the viewer program ※ For setting details, refer to the viewer program options. (Refer to p28.) 29 Software Update 1. Remove the SD card from the device and insert to the SD card reader. 2. Connect the SD card reader to PC through the USB port. COPY Caution! Do not turn off the ignition or power off the device during the software updating. Warranty Warranty cover The warranty period covers two full years for this device, return to base from the date of purchase. Should you believe that your device is defective within the warranty period, please contact our service center. The product may be repaired or exchanged for a factory refurbished unit. Faults reported outside of the warranty period are subject to a chargeable repair. 30 RH-2 Pro AUTOMATED DRIVE RECORDER Ver 1.0 31