1
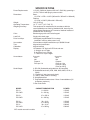
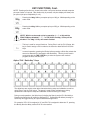
0RICE#OMPUTING3CALE
0RICE#OMPUTING3ERIES
/PERATION-ANUAL
8529-M048-01 Rev J
01/05
Cardinal Scale Manufacturing Co.
PO BOX 151 WEBB CITY, MO 64870
PH (417) 673-4631 - FAX (417) 673-5001
www.detectoscale.com
1
Printed in USA
2
).42/$5#4)/.
4!",%/&#/.4%.43
SPECIFICATIONS ...................................
INSTALLATION ……..…………………….
Unpack ….............................................
Shipping Screws ………………………..
Placement ……………………………….
Level Scale ………..……………………
Power Supply .......................................
KEY FUNCTIONS ....................................
INDICATOR FUNCTIONS .......................
OPERATION ............................................
Normal Unit Price ………………………
Unit Price per 1/4 or 1/2 lb …………..
Unit Price per 100 or 250 g ………….
Normal Unit Price with Tare …………
Prepack (PPK) Operation ……………
Tare Operation (Known Tare Weight) ..
PLU Operation Using Numeric Keypad
PLU Operation Using Quick-Keys
(First Level) ……………………………
PLU Operation Using Quick-Keys
(Alternate Level) ………………………
Prepack (PPK) Operation with PLU ….
Accumulator Feature …………………..
PRICE LOOK UP SETUP ………………...
SETTING THE TIME AND DATE ………..
MANUALLY SETTING SELL BY DATE ...
SETUP AND CALIBRATION ……………..
SETUP REVIEW MODE ………………….
RECOMMENDED SEALING ……………..
ERROR MESSAGES ……………………..
BEFORE YOU CALL FOR SERVICE …..
THERMAL PRINTER TROUBLE
SHOOTING GUIDE ……………………….
SERIAL DATA OUT AND
WEIGH ON DEMAND FUNCTION ………
PC SERIES INTERFACE CABLES ……..
CARE AND MAINTENANCE …………….
We wish to thank you for your purchase of our
Price Computing Scale. This instrument has
been designed and manufactured within the
U.S.A. with quality and reliability.
This manual will help acquaint you with the
features of this instrument, its proper
installation, adjustment, operation and care.
Please read this manual before attempting to
operate this scale and keep it handy for future
reference.
??????????????????????????????????
&###/-0,)!.#%34!4%-%.4
7!2.).'This equipment generates, uses
and can radiate radio frequency and if not
installed and used in accordance with the
instruction manual, may cause interference to
radio communications. It has been tested
and found to comply with the limits for a Class
A computing device pursuant to Subpart J of
Part 15 of FCC rules, which are designed to
provide reasonable protection against such
interference when operated in a commercial
environment. Operation of this equipment in
a residential area may cause interference in
which case the user will be responsible to
take whatever measures necessary to correct
the interference.
You may find the booklet "How to Identify and
Resolve Radio TV Interference Problems"
prepared by the Federal Communications
Commission helpful. It is available from the
U.S. Government Printing Office, Washington,
D.C. 20402. Stock No. is 001-000-00315-4.
????????????????????????????????????
All rights reserved. Reproduction or use, without
expressed written permission, of editorial or
pictorial content, in any manner, is prohibited. No
patent liability is assumed with respect to the use
of the information contained herein. While every
precaution has been taken in the preparation of
this manual, the Seller assumes no responsibility
for errors or omissions. Neither is any liability
assumed for damages resulting from use of the
information contained herein. All instructions and
diagrams have been checked for accuracy and
ease of application; however, success and safety
in working with tools depend to a great extent
upon the individual accuracy, skill and caution.
For this reason the Seller is not able to guarantee
the result of any procedure contained herein. Nor
can they assume responsibility for any damage to
property or injury to persons occasioned from the
procedures. Persons engaging the procedures do
so entirely at their own risk.
1
2
2
2
2
2
3
4
6
7
7
7
7
7
7
8
9
9
9
9
10
11
12
12
13
19
19
20
21
21
22
23
23
Serial Number _____________________
Date of Purchase __________________
Purchased From ___________________
_________________________________
_________________________________
RETAIN THIS INFORMATION FOR FUTURE USE
02%#!54)/.3
Before using this instrument, read this
manual and pay special attention to all
"WARNING" symbols:
IMPORTANT
1
ELECTRICAL
WARNING
This page intentionally left blank.
0
30%#)&)#!4)/.3
Power Requirements:
Dimensions:
Weight:
Operating Temperature:
Weighing Accuracy:
Color:
Load Cell:
Price Look Ups:
Accumulator:
Tare:
Calibration:
Display:
Annunciators:
Serial Output:
115 VAC, 50/60 Hz (Optional 230 VAC, 50/60 Hz); powering a
12 VDC, 700 mA wall-plug-in power module
Base:
13 1/2"W x 12"D x 4 1/4"H (343mmW x 305mmD x 108mmH)
Platform:
13 1/2"W x 8 3/4"D (343mmW x 222mmD)
14 lb (6.35 kg)
14° F - 114° F (-10° C 40° C)
This equipment is manufactured in accordance with the
recommendations set forth by Handbook #44, issued by the
United States Department of Commerce, National Institute of
Standards and Technology.
Black and gray with color coded keypad
Single point strain gage
100 keypad programmable PLU numbers.
(retained in memory when power is off)
Accumulates multiple transactions up to $9999.99 total
Keypad and push button
Keypad entered
16 character .56" high red LED front and rear
A. Weight: up to 5 digits
B. Unit Price: up to 5 digits
C. Total Price: up to 6 digits
lb version
kg version
Zero
Zero
Net
Net
Prepack
Prepack
Price per 1 lb
Price per 1 kg
Price per 100 g
Price ger 250 g
A. RS-232 (Selectable parity,data bits, and stop bits)
B. Selectable baud rate (1200, 2400, 4800, 9600, 19.2k, or
38.4k)
C. “Packed on” date (uses scale clock)
D. “Sell by” date (must be set daily)
E. Weight/price/total
F. Programmable header stores 2 lines of name/address (32
characters maximum)
G. Bar Code Prefix
-/$%,
PC-10
PC-10KG
#!0!#)49'2!$5!4)/.
6 x .002 lb
3 x .001 kg
0/7%2
115VAC
115VAC
PC-20
PC-20KG
15 x .005 lb
6 x .002 kg
115VAC
115VAC
PC-30
PC-30KG
PC-31
PC-31KG
30 x .01 lb
15 x .005 kg
30 x .01 lb
15 x .005 kg
115VAC
115VAC
230VAC
230VAC
“KG” models are metric models
1
).34!,,!4)/.
5NPACK
Carefully unpack the scale and commodity tray. Remove the protective film from the front and
rear displays. Make certain that no sign of damage to the instrument is visible. Should
evidence of damage be found, the carrier should be contacted at once. Make certain to keep
the carton and packing material should return shipment or storage of the instrument become
necessary.
3HIPPING3CREWS
The load cell is protected from shipping damage by two (2) shipping screws through the top
housing and one (1) shipping thumb screw located on the bottom of the scale (see figure).
Remove the two (2) shipping screws, the thumb screw and the warning label before using the
scale. Retain the two (2) shipping screws and the thumb screw to be re-installed before
transporting or shipping the scale. Note: Only hand tighten the thumb screw on the bottom of
the scale and do not over-tighten the two (2) shipping screws through the top housing.
#!54)/.$ONOTPOSITIONTHESCALEONITSTOPTURNUPSIDEDOWNTOREMOVE
THESHIPPINGTHUMBSCREW)NSTEADPOSITIONTHESCALEONITSBACKTOREMOVE
THETHUMBSCREW
0LACEMENT
Place the scale on a stable, vibration-free location away from direct sunlight and away from
any rapid moving air source. Make certain the power cord is stored out of the way of normal
traffic.
#!54)/.$/./4PLACETHESCALEONANYUNSTABLECARTSTANDORTABLE4HE
SCALEMAYFALLCAUSINGINJURYTOTHEOPERATORANDSERIOUSLYDAMAGETHEUNITOR
PROPEROPERATIONOFTHESCALEMAYBEINHIBITED
,EVEL3CALE
Before mounting the commodity tray onto the scale, level the scale if necessary by adjusting
the four legs on scale bottom, up or down, until the bubble in the level gage located on the
scale housing is centered as shown in the figure above. After level is achieved, lock legs in
place by tightening lock nuts on legs against the scale bottom.
2
).34!,,!4)/.#ONT
0OWER3UPPLY
1. Plug power supply into a wall receptacle that supplies 115 VAC power and into the
connector on the underside of the chassis.
2. On models requiring 230 VAC power, use the Cardinal/Detecto model 8529-B216-08,
230 VAC power supply. After installation of the proper connection, plug scale power
supply into 230 VAC receptacle.
#!54)/.4OAVOIDELECTRICALHAZARDANDSEVEREDAMAGETOTHESCALEUSE
ONLYTHEWALLPLUGINPOWERMODULEPROVIDEDWITHTHESCALE
3. START-UP - The scale is equipped with ON and OFF keys on the keypad. When the
/. key is pushed, the scale will show zero weight, signalling that the scale is ready for
use. If the deadload on the scale is not within ± 4% of the deadload used during
calibration, the scale will display "74 (LoAd) or =1074 (UnLoAd), indicating that
weight must be added or removed, respectively, from the platform. Once the deadload
is within ± 4% of the deadload used during calibration, the scale will zero and is ready
for use.
+%9&5.#4)/.3
This section describes the use of each of the keys on the Price Computing Scale.
4HEMEMBRANEKEYBOARDISNOTTOBEOPERATEDWITHPOINTEDOBJECTSPENCILS
PENSFINGERNAILSETC$AMAGETOKEYBOARDRESULTINGFROMTHISPRACTICEWILL
NOTBECOVEREDUNDERWARRANTY
Pressing this key when the scale is off will apply power to the instrument.
This key is used to remove power from the scale, turning it off. Press and hold
the /&&key for one or two seconds to completely remove power from the scale.
3
+%9&5.#4)/.3#ONT
Pressing the :%2/key will rezero the weight display or when displaying the
accumulator total, zero the accumulator.
Operator presses 4)-%$!4%key and is prompted for ;42<5 (sell by date).
Date is displayed in total price window as it is keyed. %.4%2key ends entry.
NOTE! Sell By Date must be re-entered whenever power has been interrupted.
This key is also used to enter the system clock mode to program the time, date
and year. Press the &Nkey, then the 4)-%$!4%key to set or change the
scale clock. The display will change to #.1?, the prompt to enter the minutes.
Tare can be subtracted by placing a container on the scale and pressing 4!2%
or by keying in a known tare (container) weight on the keypad and pressing
4!2%when the unloaded scale is at true zero.
Pressing the 02%0!#+key after unit price is entered retains the unit price for
repetitive price-computing. Tare entries are retained in PREPACK mode.
This key is used to print labels when the scale is connected to a label printer.
When in Prepack operation, it is used to print a label and add to the total price
accumulator.
Press the 0,5key and the unit price display shows %917? the request to enter a
price lookup number. As the number is keyed, it is displayed in the total price
window. After the PLU number has been entered, press the %.4%2key. The
recalled PLU description and unit price will display and operations will return to
normal. Refer to the 02)#%,//+500,53%450section of this manual for
programming price lookups.
The through numeric keys are used to enter numeric
data during the setup and calibration as well as during
normal operation of the scale. NOTE! The and keys
have dual functions. They are used to enter numeric data
during setup and calibration as well as during normal
operations and are also used to select yes or no (1 = YES,
0 = NO) to various prompts.
Pressing the %.4%2!##5-key when weight display is
zero will cause the instrument to display the current
contents of the accumulator (the number of pieces
accumulated and total price since the last time the
accumulator was zeroed). The maximum value of the
accumulator is 9999.99.
The #,%!2 key is used to clear an incorrect entry from the display without processing the
data. Pressing the #,%!2key cancels a unit price entry, cancels the PREPACK mode or
clears an incorrect or unacceptable known tare entry. If an incorrect entry is made, press the
#,%!2 key and re-enter the correct data. NOTE! The #,%!2 key must be pressed before
the %.4%2key to ensure the data is not processed.
4
+%9&5.#4)/.3#ONT
NOTE! Pressing a fraction key, shown below, after a unit price has been entered computes
price per fraction of a pound. After fraction key is pressed, unit price display will show price
per pound (unit price multiplied by 2 or 4).
Pressing the Gkey computes price per 100g or 1/4lb depending on the
scale mode.
Pressing the Gkey computes price per 250g or 1/2lb depending on the
scale mode.
./4%7ITHTHESCALEMODESETFORKGOPERATION"3?OR.OANDTHE
&2!#4)/.KEYSDISABLED:?OR.O/.,9THEGKEYWILLBE
DISABLED4HEGKEYWILLREMAINENABLED
This key is used for several functions. During Price Look Up (PLU) Setup, this
key is used to assign a PLU number to the second or alternate level of QuickKeys.
In normal operation, pressing the &N key before pressing a Quick-Key selects the
second or alternate PLU assigned to that Quick-Key. This key is also used in
conjunction with the 4)-%$!4% key to enter the system clock mode to
program the time, date and year.
!LPHA0,5h1UICK+EYv+EYS
The alpha keys are used to enter alpha characters during setup and calibration as well as
during Price Look Up (PLU) setup. The space is used to enter a blank space during
alphanumeric data input for setup and calibration as well as during PLU setup.
During normal operations, the Alpha keys (including the Space) are the PLU Quick-Keys.
Pressing the Quick-Key will output its assigned PLU. Pressing the &N before pressing an
Quick-Key will toggle the key to output its alternate assigned PLU.
For example, if PLU 23 is assigned to “A” and PLU 79 is assigned to alternate “A”, pressing
the &Nkey then the ! key causes PLU 79 to be recalled.
5
).$)#!4/2&5.#4)/.3
The following describes the functions of each of the indicators contained on the face of the
instrument display. Note that these indicators are contained within the display window.
00+
Prepack mode
:%2/
True zero ± 1/4 division load indication
.%4
Indicates that a tare weight is stored and weight display is net weight
0
%LB
2
0
%G
2
0
%G
2
0
%KG
2
The unit price is price per pound
The unit price is price per 100 grams
The unit price is price per 250 grams
The unit price is price per kilogram
6
/0%2!4)/.
.ORMAL5NIT0RICE
1. Place commodity on scale.
2. Key in unit price per pound or kilogram.
3. Read total weight and total price.
4. Remove commodity. Scale will return to zero, ready for next operation.
5NIT0RICE0ERLBORLB(so equipped)
1. Place commodity on scale.
2. Key in unit price per 1/4 lb or 1/2 lb.
3. Press corresponding fraction key. Note: Indicated price will change.
4. Read total weight and total price.
5. Unit price display will show price per pound.
6. Remove commodity. Scale will return to zero, ready for next operation.
5NIT0RICE0ERGORG(so equipped)
1. Place commodity on scale.
2. Key in unit price per 100g or 250g.
3. Press G or G key. 100g or 250g indicator will illuminate.
4. Read total weight and total price.
5. Unit price display will show price per 100g or 250g.
6. Remove commodity. Scale will return to zero, ready for next operation.
.ORMAL5NIT0RICEWITH4ARE
1. Place container on scale and press 4!2%key.
2. Weight display goes to zero. Net weight indicator comes on.
3. Key in unit price and place commodity in container. Net weight of commodity will display.
4. Read net weight and total price.
5. If a label printer is connected to the scale, press 02).4 key to print a label.
6. Remove container and commodity from scale. Scale will return to zero and clear tare and
unit price information. Scale is ready for next operation. Note! Tare weight will only be
cleared when scale returns to gross weight zero. If the tare does not clear when the Tare
weight is removed, push the #,%!2key to return to gross weight zero.
0REPACK00+/PERATION
The Prepack (PPK) mode is for repetitive price-computing of commodities with the same unit
price. Note that after the Prepack mode is entered, no change of unit price can be made until
Prepack mode is cancelled.
1. Enter tare if so desired as outlined in Tare Operation. Tare entry will be retained in
Prepack mode.
2. Enter unit price and press 02%0!#+ key. Prepack mode indicator PPK will illuminate.
3. Place commodities on scale.
4. If a label printer is connected to the scale, press 02).4 key to print a label.
5. When prepacking operation is ended, press the #,%!2 key to clear unit price and turn off
Prepack mode. Tare will then clear automatically.
./4%)N0REPACKMODEWITHALABELPRINTERCONNECTEDTOTHESCALETHE!CCUMULATOR
ISAUTOMATICALLYUPDATEDWHENTHE02).4KEYISPRESSEDTOPRINTALABEL
7
/0%2!4)/.#ONT
4ARE/PERATIONFOR+NOWN4ARECONTAINER7EIGHT
Note: Known tare weights must be entered as numbers compatible with the particular scale
division. Example: 30 lb x 0.01 = increments of 0.01 - 15 kg x 0.005 increments of 0.005. Any
known tare entry not compatible with particular scale counting increments will be replaced and
scale will display A.1<A. Press the #,%!2 key and re-enter correct compatible number.
lb Models
1. Key in known tare weight, up to 4 digits (ignoring the decimal point), as a number
appearing in the unit price display.
2. Press the 4!2% key. Entry will move to the weight display and be shown as negative (-)
weight. Net indicator will illuminate.
3. Place container and commodity on scale. Net weight of commodity will be displayed.
Enter unit price and proceed with price-computing operation.
4. After known tare operation is complete, tare weight will clear automatically after a positive
weight is indicated, unit price has been entered and commodity is removed from scale.
5. When the weight is at c/z (center of zero), any tare can be cleared by pushing the #,%!2
key. Note! Automatic tare clear is inoperable when scale is in the PREPACK mode.
kg Models
1. Key in known tare weight, up to 4 digits, as a number appearing in the unit price display
(ignore decimal point). Example:
Key in 0.28 kg as 2-8-0
Key in 0.095 kg as 9-5
Key in 1.000 kg as 1-0-0-0
Key in 1.200 kg as 1-2-0-0
2. Press the 4!2% key. The acceptable tare entry will move to the weight display and be
shown as negative(-) weight. Example: a tare entry of 1.50 kg should appear in the unit
price display as 15.00. After the 4!2% key is pressed, the weight disply will show - 1.500
and Net indicator will illuminate.
3. After known tare operation is complete, tare weight will automatically clear after a positive
weight is indicated, unit price has been entered and commodity is removed from scale.
Note! Automatic tare clear is inoperable when scale is in the PREPACK mode.
8
/0%2!4)/.#ONT
0,5/PERATION5SING.UMERIC+EYPAD
1. Press the 0,5key. The Unit price display will show %917? .
2. Enter the PLU number (0 through 99) and press the %.4%2key.
3. The recalled PLU description and unit price will display.
4. Place commodity on scale.
5. Read total weight and total price.
6. If a label printer is connected to the scale, press the 02).4 key to print a label.
7. Remove commodity. Scale will return to zero, ready for next operation.
0,5/PERATION5SING1UICK+EYS&IRST,EVEL
1. Press the desired Quick-Key.
2. The recalled PLU description and unit price will display.
3. Place commodity on scale.
4. Read total weight and total price.
5. If a label printer is connected to the scale, press the 02).4 key to print a label.
6. Remove commodity. Scale will return to zero, ready for next operation.
0,5/PERATION5SING1UICK+EYS!LTERNATE,EVEL
1. Press the &. key, then the desired Quick-Key.
2. The recalled PLU description and unit price will display.
3. Place commodity on scale.
4. Read total weight and total price.
5. If a label printer is connected to the scale, press the 02).4 key to print a label.
6. Remove commodity. Scale will return to zero, ready for next operation.
0REPACK00+/PERATIONWITH0,5
1. Enter PLU number or press the desired Quick-Key as described in the previous sections.
2. Press 02%0!#+ key. Prepack mode indicator PPK will illuminate.
3. Place commoditie on scale.
4. If a label printer is connected to the scale, press 02).4 key to print a label.
5. When prepacking operation is ended, press the #,%!2 key to clear unit price and turn off
Prepack mode. Tare will then clear automatically.
./4%)N0REPACKMODEWITHALABELPRINTERCONNECTEDTOTHESCALETHE!CCUMULATOR
ISAUTOMATICALLYUPDATEDWHENTHE02).4KEYISPRESSEDTOPRINTALABEL
9
/0%2!4)/.#ONT
!CCUMULATOR&EATURE
Adding to the Accumulator
When a stable total price is displaying, press the %.4%2!##5-key. The total price will be
added to the total price accumulator and the accumulator displayed in the total price window.
The transaction counter will be increased by one and displayed in the unit price window. Any
subsequent key press or motion on the scale will cause the totals display to disappear and
the display to resume normal operation. ./4% Another “Add” cannot be performed unless
the weight is removed from the scale and another weight placed onto it.
Adding to the Accumulator With a Label Printer Connected
When a stable total price is displaying, press the 02).4 key and then press the
%.4%2!##5-key. A label will print, the total price will be added to the total price
accumulator and the accumulator displayed in the total price window. The transaction
counter will be increased by one and displayed in the unit price window. Any subsequent key
press or motion on the scale will cause the totals display to disappear and the display to
resume normal operation. ./4% Another “Add” cannot be performed unless the weight is
removed from the scale and another weight placed onto it.
Prepack Operation, Adding to the Accumulator With a Label Printer Connected
Select the Prepack operation. When a stable total price is displaying, press the 02).4 key.
A label will print and the total price will automatically be added to the total price accumulator
The accumulator will be displayed in the total price window and the transaction counter will
be increased by one and displayed in the unit price window. ./4% Another “Add” cannot
be performed unless the weight is removed from the scale, another weight placed onto it and
the 02).4 key pressed again.
Reviewing the Accumulator
When the weight display is at zero, press the %.4%2!##5-key. The contents of the total
price accumulator and the transaction counter will display. To return to normal operation,
press the #,%!2key. The accumulator contents are unchanged.
Printing the Accumulator
When the weight display is at zero, press the !##5-key. The contents of the total price
accumulator and the transaction counter will display. Press the 02).4 key to print a Total
label. To return to normal operation, press the #,%!2key. The accumulator contents are
unchanged.
Clearing (zeroing) the Accumulator
Whenever the Total display is present, press the :%2/key. The total price accumulator in
the total price window and the transaction counter in the unit price window will clear (become
zero). Press the #,%!2key to return to normal operation.
./4%!CCUMULATORCONTENTSARELOSTIFPOWERISINTERRUPTED
10
02)#%,//+500,53%450
!DDOR%DIT0,5
1. With the scale in the Weight mode ( will be displayed on the weight display),
press the 0,5key. The unit price display will change to %917? (PLU Number).
2. Press the %.4%2key. The unit price display will change to %9BB?.
3. Using the numeric keys, enter the PLU number and then press the %.4%2key.
./4% PLU numbers can be 0 through 99.
4. The unit weight display will change to %9##?, where ## is the PLU number you
entered and the unit price display will change to (or show the current price).
5. Using the numeric keys, enter the PLU unit price and then press the %.4%2key.
./4% Unit price can be 0.01 through 999.99.
6. The unit price display will change to 45;8? (PLU Description) and the total price
display will change to a blinking segment (or show the current description).
7. Using the alpha-numeric keypads, enter up to 32 characters for the PLU description.
Characters are entered using the alpha-numeric keypad. Each character entered will
appear in the total price window as it is keyed. Refer to the table below to verify the
character displayed versus the key pressed. Press the %.4%2key to end character
entry and save it. NOTE! When entering the PLU description, pressing the #,%!2
key will act as a “backspace” key (it will back up one space and delete the character
in that space).
0,5#(!2!#4%2$)30,!942!.3,!4)/.4!",%
#HARACTER $ISPLAY #HARACTER $ISPLAY #HARACTER $ISPLAY #HARACTER $ISPLAY
A
K
U
0
a
@a
(a
a
B
L
V
1
a
"a
=a
a
C
M
W
2
a
#a
ha
a
D
N
X
3
a
#a
oa
a
E
O
Y
4
a
7a
)a
a
F
P
Z
5
a
%a
a
a
G
Q
6
a
]a
a
H
R
7
30!#%
blank
a
&a
a
I
S
8
.a
+a
a
J
T
9
!a
'a
a
8. The weight display will change to ".? (Shelf Life) and the unit price display will
change to (or show the current setting).
9. Using the numeric keys, enter the shelf life of the item and then press the %.4%2key.
./4% Shelf life can be 1 through 255 days.
10. The weight display will change to ? (Unit of Measure, Each or per Pound) and
the unit price display will change to 17a (or show the current setting).
11. Using the ./ or 9%3 keys, enter the setting and then press the %.4%2 key.
0 = NO, Price per lb (17a will be displayed in unit price display)
1 = YES, Price is for Each item (>5;a will be displayed in unit price display)
12. The unit price display will change to <2:5? (Tare Weight) and the total price display
will change to 1<&a(Press ENTER to Set Tare Weight).
To set the tare, place the empty container on the scale platform and then press
the %.4%2 key.
To bypass setting the tare and/or keep the current tare, press the #,%!2key.
11
02)#%,//+500,53%450#ONT
!DDOR%DIT0,5#ONT
13. The unit price display will change to %"(? (Assign Quick-Key).
To assign the PLU to the first level of Quick-Keys:
A. Press the desired Quick-Key. (%"(? will be displayed in unit price display).
The total price display will display the Quick-Key pressed.
B. Press the %.4%2 key to save the setting.
C. The total price display will change to show the PLU unit price to verify the
setting was saved.
To assign the tare PLU to the second or alternate level of Quick-Keys:
A. Press the &. key, then the desired Quick-Key. (%"(? will be displayed on
unit price display). The total price display will display the Quick-Key pressed.
B. Press the %.4%2 key to save the setting.
C. The total price display will change to show the PLU unit price to verify the
setting was saved.
14. Repeat steps 1 through 13 for each PLU required. When all PLU’s have been entered
(or edited), press the #,%!2 key to complete the PLU setup.
3%44).'4(%4)-%!.$$!4%
1. With the scale in the Weight mode ( will be displayed on the weight display),
press the &Nkey, then the 4)-%$!4%key.
2. The display will change to #.1? (MINUTES). Observe the current setting. If the
value displayed is acceptable, press the %.4%2 key to save it. Otherwise, use the
numeric keys to enter a new value, then press the %.4%2 key to save it. Allowable
values are: 0 through 59.
3. The display will change to 7(:? (HOURS). Observe the current setting. If the
value displayed is acceptable, press the %.4%2 key to save it. Otherwise, use the
numeric keys to enter a new value, then press the %.4%2 key to save it. Allowable
values are: 0 through 23. Note that the time is entered in a 24-hour format. When
entering times after noon (12:00 PM), you must add 12 to the time. For example,
3:00 PM would be entered as 15.
4. The display will change to 4>? (DAY). Observe the current setting. If the value
displayed is acceptable, press the %.4%2 key to save it. Otherwise, use the numeric
keys to enter a new value, then press the %.4%2 key to save it. Allowable values
are: 1 through 31.
5. The display will change to #71? (MONTH). Observe the current setting. If the value
displayed is acceptable, press the %.4%2 key to save it. Otherwise, use the numeric
keys to enter a new value, then press the %.4%2 key to save it. Allowable values
are: 1 through 12.
6. The display will change to >&? (YEAR). Observe the current setting. If the value
displayed is acceptable, press the %.4%2 key to save it. Otherwise, use the numeric
keys to enter a new value, then press the %.4%2 key to save it. Allowable values
are: 00 through 99.
-!.5!,,93%44).'4(%3%,,"9$!4%
1. With the scale in the Weight mode ( will be displayed on the weight display),
press the 4)-%$!4%key.
2. The unit price display will change to ;42<5 and the total price display will change to
(or show the current setting).
3. Using the numeric keys, enter the sell by date in the MMDDYY format, (e.g. 010105
for January 01, 2005) The date will appear in the total price window as it is keyed.
Press the %.4%2key to save the date setting.
12
3%450!.$#!,)"2!4)/.02/#%$52%
This scale was calibrated at the factory and should not require adjustment. In the event that
the scale should need calibration, the following describes the Calibration of the Price
Computing Scale. A qualified technician should perform this function to maintain the
instrument’s high degree of accuracy.
Before beginning calibration, the following equipment is required:
Calibrated test weights
(6 lb for PC-10, 15 lb for PC-20, or 30 lb for PC-30)
(3 kg for PC-10KG, 6 kg for PC-20KG, or 15 kg for PC-30KG)
No. 1 Phillips screwdriver to remove side cover
With the scale power off, remove the four (4) screws and two (2) calibration sealing tabs
securing the right side cover (as viewed from the scale front) and remove the cover. Referring
to the illustration, locate the calibration switch S1. Push and hold calibration switch S1. Press
the /.key to turn power on. The weight display window will show %?.
)FSEALINGWIRESREQUIREBREAKINGFORPURPOSESOFCALIBRATIONPROPER
PROCEDURESCOVEREDUNDERTHE.ATIONAL)NSTITUTEOF3TANDARDSAND4ECHNOLOGY
(ANDBOOKMUSTBEADHEREDTO
Note: The unit price window will usually contain the current value for the label in the capacity
window if setup has been previously performed. Subsequent keystrokes will replace the
current value.
#!54)/.)FPOWERISINTERRUPTEDDURINGSETUPANDCALIBRATIONNEWVALUES
ENTEREDARELOST(OWEVERALLPREVIOUSLYENTEREDDATAWILLBERETAINED.OTE
THATNEWDATAENTEREDISSTOREDWHENTHEh471vMESSGEISDISPLAYEDATTHE
ENDOFSETUPANDCALIBRATION
%?a3#!,%#!0!#)49
With the display showing %?, observe the current setting. If the value displayed is
acceptable, press the %.4%2 key to save it. Otherwise, use the numeric keys to enter a new
value, then press the %.4%2 key to save it. Allowable values are: 3, 6, 15, or 30.
"?a7%)'().'5.)4a
With the display showing "3?, observe the current setting. If the setting displayed is
acceptable, press the %.4%2 key to save it. Otherwise, using the numeric keys, ./ or
9%3, enter the new setting, then press the %.4%2 key to save it. Allowable values are:
0 = NO (Kilograms)
1 = YES (Pounds)
13
3%450!.$#!,)"2!4)/.02/#%$52%CONT
"$4?a,/!$#!,)"2!4)/.7%)'(4
The display will change to "$4? which is a prompt for the entry of the calibration weight
value and placement of the test weights on the scale platform.
./4%If recalibration is not desired, press the 0 (zero) key on the numeric keypad, then
press the %.4%2key and proceed to (%4%?.
1. If recalibration is desired, make certain the scale platform is empty and free of debris,
then apply a weight equal to 70% to 100% of the scale capacity to the scale (do not use
fractional lb or kg weights).
2. Using the numeric keypad, input the value of the test weight and press the %.4%2key.
3. Press the %.4%2key.
(1"$4?a5.,/!$#!,)"2!4)/.7%)'(4
After a moment the display will change to (1"4?a%:++a1<:awhich is a request that
the test weights be removed from the scale platform. Remove the weights then press the
%.4%2 key. The calculated calibration factor is now stored in the indicator’s nonvolatile
memory.
(%4%?a5.)402)#%$%#)-!,0,!#%3a
With the display showing (%4%?, observe the current setting. If the value displayed is
acceptable, press the %.4%2 key to save it. Otherwise, use the numeric keys to enter a new
value, then press the %.4%2 key to save it. Allowable values are:
0 = XXXXXX
1= XXXXXX
2 = XXXXXX
3 = XXXXXX
./4% The number of decimal places in the unit price does not affect the preset prices.
<%4%?a4/4!,02)#%$%#)-!,0,!#%3a
With the display showing <%4%?, observe the current setting. If the value displayed is
acceptable, press the %.4%2 key to save it. Otherwise, use the numeric keys to enter a new
value, then press the %.4%2 key to save it. Allowable values are:
0 = XXXXXX
1= XXXXXX
2 = XXXXXX
3 = XXXXXX
&#?a2/5.$4/4!,02)#%a
With the display showing :14?, observe the current setting. If the setting displayed is
acceptable, press the %.4%2 key to save it. Otherwise, using the numeric keys, ./ or
9%3, enter the new setting, then press the %.4%2 key to save it. Allowable values are:
0 = NO (Normal Operation)
1 = YES (Round to nearest 5)
'%"?a4/4!,02)#%",!.+).'a
With the display showing <%3"?, observe the current setting. If the setting displayed is
acceptable, press the %.4%2 key to save it. Otherwise, using the numeric keys, ./ or
9%3, enter the new setting, then press the %.4%2 key to save it. Allowable values are:
0 = NO (Disable) Total price is shown when scale motion is present.
1 = YES (Enable) Total price is blanked out when scale motion is present
14
3%450!.$#!,)"2!4)/.02/#%$52%CONT
:?a&2!#4)/.+%93a
With the display showing :?, observe the current setting. If the value displayed is
acceptable, press the %.4%2 key to save it. Otherwise, use the numeric keys to enter a new
value, then press the %.4%2 key to save it. Allowable values are:
0 = Fraction keys are disabled in lb mode or only 100g in kg mode
1 = Enables both fraction keys (lb or kg mode)
2 = Disables both fraction keys (lb or kg mode)
':?a4!2%&5.#4)/.3a
With the display showing <:?, observe the current setting. If the value displayed is
acceptable, press the %.4%2 key to save it. Otherwise, use the numeric keys to enter a new
value, then press the %.4%2 key to save it. Allowable values are:
0 = Disables keypad tare and enables push button tare
1 = Enables both keypad and push button tare
2 = Disables both keypad and push button tare
$'&?a!54/-!4)#:%2/42!#+).'a
With the display showing 7<:?, observe the current setting. If the setting displayed is
acceptable, press the %.4%2 key to save it. Otherwise, using the numeric keys, ./ or
9%3, enter the new setting, then press the %.4%2 key to save it. Allowable values are:
0 = NO (Disable Automatic Zero Tracking)
1 = YES (Enable Automatic Zero Tracking, 1 Division)
.a"<? &),4%2,%6%,3%,%#4)/.
The display will change to show .a"<? which is the prompt for the selection of the digital
filtering level. Please check with your scale service technician should you wish to change the
filter level, break range and sample rate.
Observe the current setting. If the value displayed is acceptable, press the %.4%2 key to
save it. Otherwise, use the numeric keys to enter a new value, then press the %.4%2 key to
save it. Allowable values are: 0, 1, 2 or 3. Note, that if you select 3 (Custom Filtering) three
additional prompts will be displayed.
0 = NO Filtering and a sample rate of 3 samples per second
1 = Changes the sample rate to 4 samples per second (factory setting)
2 = Changes the sample rate to 4 samples per second
3 = Allows customizing the filter for special needs
./4% The prompts, ? (Filter Level), 3:? (Break Range) and +&? (Sample Rate)
will only be displayed if you select 3 (Custom Filtering) for the .a"<?Filter Level.
?&),4%2,%6%,
If you select Custom Filtering, the display will change to show ?, the Filter Level. The
filter level is a number from 1 to 16 that corresponds to the level of filtering with 16 being
the greatest filtering and 1 the least.
Observe the current setting. If the value displayed is acceptable, press the %.4%2 key to
save it. Otherwise, use the numeric keys to enter a new value, then press the %.4%2 key
to save it. Allowable values are: 1 through 16.
15
3%450!.$#!,)"2!4)/.02/#%$52%CONT
3:?"2%!+2!.'%a
The break range is a number from 0 to 64 that corresponds to the number of graduations
of weight change to break out of filtering. Note that the higher the number,the greater the
filtering.
Observe the current setting. If the value displayed is acceptable, press the %.4%2 key to
save it. Otherwise, use the numeric keys to enter a new value, then press the %.4%2 key
to save it. Allowable values are: 0 through 64.
+:?3!-0,%2!4%
The Sample rate value for filter number 3 is a value which represents the rate at which the
displayed weight is refreshed. Note, that the lower the number, the slower the refresh and
the more resistant the weight will be to vibration or other causes of weight deviation.
Observe the current setting. If the value displayed is acceptable, press the %.4%2 key to
save it. Otherwise, use the numeric keys to enter a new value, then press the %.4%2 key
to save it. Allowable values are 1 to 8 samples per second.
4HEFOLLOWINGPROMPTSAREFORPRINTEROUTPUTONLY
(?a3%2)!,/54054"!5$2!4%
With the display showing 32(4?, observe the current setting. If the value displayed is
acceptable, press the %.4%2 key to save it. Otherwise, use the numeric keys to enter a new
value, then press the %.4%2 key to save it. Allowable values are: 12, 24, 48, 96, 19, 38.
12 = 1200 Baud
96 = 9600 Baud
24 = 2400 Baud
19 = 19.2k Baud
48 = 4800 Baud
38 = 38.4k Baud
%&?a0!2)493%44).'
With the display showing %2:?, observe the current setting. If the value displayed is
acceptable, press the %.4%2 key to save it. Otherwise, use the numeric keys to enter a new
value, then press the %.4%2 key to save it. Allowable values are: 0, 1 or 2.
0 = No parity (8-N-1)
1 = Even parity (7-E-1)
2 = Odd parity (7-O-1)
%&'?a,!"%,02).4%23%,%#4)/.
With the display showing %:<?, observe the current setting. If the value displayed is
acceptable, press the %.4%2 key to save it. Otherwise, use the numeric keys to enter a new
value, then press the %.4%2 key to save it. Allowable values are: 0, 1, 2, 3 or 4.
0 = P200 (Eltron Companion Plus)
P220 / P240 (Eltron 2722 / 2742)
1 = user defined (via “n-Control”)
2 = P200, P205, or P220 / P240 with DSR handshake check
3 = user defined (via “n-Control”) with DSR handshake check
4 = P205 (Cognitive Del-Sol)
16
3%450!.$#!,)"2!4)/.02/#%$52%CONT
+")?a3%,%#4$%,!9
The select delay value is the delay before responding to a “W” received on the serial port.
The actual delay time (in second) is the +4")? value entered multiplied by 0.2.
For example:
If a 1 second delay is desired, then +4")? 5 (5 x 0.2 = 1)
If a 2 second delay is desired, then +4")? 10 (10 x 0.2 = 2)
With the display showing +4")?, observe the current setting. If the value displayed is
acceptable, press the %.4%2 key to save it. Otherwise, use the numeric keys to enter a new
value, then press the %.4%2 key to save it. Allowable values are 0 (no delay) to 255.
.4?a34/2%.!-%)$
The display will change to show .4? which is the prompt to enter up to 32 characters of the
store name/ID. Characters are entered using the alpha-numeric keypad. Each character
entered will appear in the total price window as it is keyed. Refer to the table below to verify
the character displayed versus the key pressed. Press the %.4%2key to end character
entry and save it.
34/2%.!-%)$#(!2!#4%2$)30,!942!.3,!4)/.4!",%
#HARACTER $ISPLAY #HARACTER $ISPLAY #HARACTER $ISPLAY #HARACTER $ISPLAY
A
K
U
0
a
@a
(a
a
B
L
V
1
a
"a
=a
a
C
M
W
2
a
#a
ha
a
D
N
X
3
a
#a
oa
a
E
O
Y
4
a
7a
)a
a
F
P
Z
5
a
%a
a
a
G
Q
6
a
]a
a
H
R
7
30!#%
blank
a
&a
a
I
S
8
.a
+a
a
J
T
9
!a
'a
a
./4%If %:<?1 or 2, setup will bypass the steps 3:? , 3"1? and 3:9? and
the display will advance to the #.1? (MINUTES) prompt.
&?a"!2#/$%02).4).'a
With the display showing 3:?, observe the current setting. If the setting displayed is
acceptable, press the %.4%2 key to save it. Otherwise, using the numeric keys, ./ or
9%3, enter the new setting, then press the %.4%2 key to save it. Allowable values are:
0 = NO (Disable Bar Code Printing)
1 = YES (Enable Bar Code Printing)
./4% If 0 = NO was selected, proceed to the #.1? (Minutes) prompt.
17
3%450!.$#!,)"2!4)/.02/#%$52%CONT
"#?a"!2#/$%02%&)8,)-)4a
If the bar code printing prompt (3:?) was answered Yes, this prompts the operator to
set a limit for the bar code prefix. Allowable values are 4 or 5.
Entering a 4, will allow a total price of 6 digits and limit the bar code prefix to 4 digits.
Entering a 5, will allow a total price of 5 digits and allow a bar code prefix of 5 digits.
With the display showing 3"1?, observe the current setting. If the setting displayed is
acceptable, press the %.4%2 key to save it. Otherwise, use the numeric keys to enter a
new value, then press the %.4%2 key to save it.
&%?a"!2#/$%02%&)8a
With the display showing 3:9?, observe the current setting. If the setting displayed is
acceptable, press the %.4%2 key to save it. Otherwise, use the numeric keys to enter a
new value, then press the %.4%2 key to save it. Enter 4 or 5-digits (depending on what
was selected for the previous bar code prefix limit prompt (3"1?).
#.1?a-).54%3
With the display showing #.1?, observe the current setting. If the value displayed is
acceptable, press the %.4%2 key to save it. Otherwise, use the numeric keys to enter a new
value, then press the %.4%2 key to save it. Allowable values are: 0 through 59.
7(:?a(/523
With the display showing 7(:?, observe the current setting. If the value displayed is
acceptable, press the %.4%2 key to save it. Otherwise, use the numeric keys to enter a new
value, then press the %.4%2 key to save it. Allowable values are: 0 through 23.
./4%The time is entered in a 24-hour format. When entering times after noon (12:00 PM),
you must add 12 to the time. For example, 3:00 PM would be entered as 15.
4>?a$!9
With the display showing 4>?, observe the current setting. If the value displayed is
acceptable, press the %.4%2 key to save it. Otherwise, use the numeric keys to enter a new
value, then press the %.4%2 key to save it. Allowable values are: 1 through 31.
#71?a-/.4(
With the display showing #71?, observe the current setting. If the value displayed is
acceptable, press the %.4%2 key to save it. Otherwise, use the numeric keys to enter a new
value, then press the %.4%2 key to save it. Allowable values are: 1 through 12.
>:?a9%!2
With the display showing >&?, observe the current setting. If the value displayed is
acceptable, press the %.4%2 key to save it. Otherwise, use the numeric keys to enter a new
value, then press the %.4%2 key to save it. Allowable values are: 00 through 99.
4715a$/.%
This message will be displayed briefly, indicating that calibration/setup is complete and
calibration data will be stored at this time. The scale will reset, display the model number and
software revision momentarily and then display weight. Replace the right side cover and
secure using the four (4) screws and two (2) calibration sealing tabs removed earlier. Check
for proper weighing. The scale is ready to use.
18
3%4502%6)%7-/$%
The SETUP REVIEW MODE allows several operational parameters to be reviewed and
changed as necessary without having to enter the setup and calibration mode. The
parameters in the setup review will be processed in the following sequence:
•
•
•
•
•
•
•
•
•
•
•
•
•
(4?a
%2:?aa
%:<?aa
+40>?a
.4?a a
2:8?a
051?a
32:9?a
#.1?aa
7(:?a
>?aa
#71?aa
)&?a
Select baud rate for serial output.
Parity setting
Label printer selection
Select delay
Store Name/ID
Enable or Disable bar code printing
Select bar code prefix limit
Enter bar code prefix
Set the minutes portion of the time
Set the hours portion of the time
Set the day of the month
Set the month of the year
Set the year
To enter the setup review mode:
1. Turn the scale off.
2. Press and hold the %.4%2key, then press the /.key.
3. The display will show +<(% the model number and software revision momentarily,
then change to the 32=4?, the selection to set the baud rate for the serial output.
4. Refer to the instructions listed in the Setup and Calibration section of this manual for
information on how to change these parameters.
2%#/--%.$%$3%!,).'
To prevent access to interior components, seal the indicator as follows:
1. Bend tab over end cap retaining screw as shown. Press the tab down against the
screw head. Make certain both screws are tightened securely before proceeding.
2. Thread the sealing wire through the hole in the tabs as shown. Pull the wire tight and
install the lead seal. Neither screw can be removed without damaging the seal.
19
%22/2-%33!'%3
".3a
a
Indicates that the scale has never been setup and calibrated or has
been interrupted during the setup and calibration sequence.
::"a
a
Indicates a faulty component or broken wire in the analog circuitry of the
instrument.
."a
a
a
A7=Aa
a
$%a
a
Will appear whenever the program cannot write data into the system
memory (setup and calibration is in progress).
(1+<3a
a
1. The 02).4key is pressed.
2. The :%2/key is pressed.
3. The 4!2%key is pressed (to enter current weight as push
button tare).
::7:a
a
"74a
a
(1"74a
A7=Aa
a
A.1<Aa
a
A<:"a
+:7=a
a
17%:<a
a
+=.1,a
a
Will appear in the weight display whenever a net weight exceeds -9999
(4 digits negative).
Indicates the scale weight capacity has been exceeded.
Indicates motion on the commodity tray during sampling. This message
may occur when:
Indicates an incorrect key depression. It is accompanied by a long tone
(beep).
Indicates there is insufficient deadload for the scale to zero.
Indicates there is too much deadload for the scale to zero.
The error message A7=A(overflow) will appear in either the unit price
or total price displays whenever the amount to display exceeds 99999
for unit price or 999999 for total price. A7=Awill also appear in the
weight window when an attempt is made to tare a weight greater than
9999.
The error message A.1<A(interval) will appear in the unit price display
whenever the keyboard tare weight division value isn’t the same as the
scale division value.
For example, a PC-20 (15 lb x .005 lb) will display A.1<Aif you attempt
to enter 1.003 for the tare weight.
The error message A<:"A(zero tracking limit) will appear in the unit
display whenever the :%2/key is pressed with the weight outside the
scale zero weight range. NOTE! Only 4% of scale capacity can be
zeroed.
The error message +:7(serial overflow) will appear in the total price
display whenever the scale’s serial buffer is overrun during
communication.
The error message 17%:<(no printer) will appear when attempting to
print without a “handshake cable” if the value for Prt= is a 2 or 3.
The message +=.1,(saving) is displayed while downloading a
nControl ticket.
20
"%&/2%9/5#!,,&/23%26)#%
Customer satisfaction is of utmost importance. Should you experience difficulty with the
operation of this instrument, please check the following items before requesting service:
1. Is the power supply fully inserted into the wall receptacle?
2. Is the power supply connector fully inserted into the scale power supply receptacle?
3. Is the wall receptacle receiving power? Does another piece of equipment work when
plugged into this receptacle? Has the circuit breaker been checked?
4. Has proper operation procedure been followed?
5. Have the shipping screws been removed?
If you have any problems, DO NOT TRY TO REPAIR THIS UNIT YOURSELF! Unplug the
power cord and contact your dealer.
4(%2-!,02).4%242/5",%3(//4).''5)$%
3YMPTOM
READY indicator does not light
GREEN.
3OLUTIONOR2EASON
Check the power connections, both at the rear of
the printer and at the wall outlet.
READY indicator lights GREEN, but
printer will not print.
Check the interface cable connections from the
scale to the printer.
Printer appears to be working, but
nothing is printed.
1. Verify labels are the correct type (direct thermal).
Printing is faded or poor quality
Ensure front door (cover) is fully closed.
Prints only partial label.
1. Label caught on printhead. Clean print head.
Use ONLY soft plastic to scrape the label from
the printhead. DO NOT USE METAL OBJECTS;
printhead may be permanently damaged.
2. Check that roll is properly loaded (see printer
manual).
2. When loading the first (initial) roll of labels, OR
when loading a different size label, approximately
one to three labels will be used to establish the
TOF (top of form) setting. NOTE! The TOF is
determined by the gap between the labels. To
check the TOF setting, press FEED. Only one
label should advance.
Printer skips labels.
The Label Sensor is missing the gap between the
labels due to one of the following reasons:
A. Operator is holding label backing in an
upwards direction as it exits the printer.
B. The labels are exiting close to an obstruction,
forcing the labels to exit in an upwards
direction.
C. The backing is allowed to pile up in front of the
printer, forcing the labels to exit in an upwards
direction.
Printing stops, READY indicator
flashes.
Printer is out of labels.
Printing stops, READY indicator
flashes for 3 seconds then returns to
GREEN.
1. Possible label jam.
2. Communication error. Check interface cable and
%&'? settting in Setup and Calibration.
21
3%2)!,$!4!/54!.$7%)'(/.$%-!.$&5.#4)/.
The PC series scale will transmit SMA Level 1 compliant serial weight data when the PRINT
key is depressed or when connected to a host (Weight On Demand). When connected to a
host, serial weight data will be transmitted to the host in a SMA Level compliant format when
the host sends the scale a <If> W <cr> (linefeed, capital W, and a carriage return) or in an
alternate format when the host sends the scale a W (capital W only).
The Weight On Demand feature equires a special serial cable (Cardinal P/N
8529-B305-0A) connected between the scale and host.
3-!,EVEL#OMPLIANT&ORMAT
When the PRINT key is depressed or the Weight On Demand command (<If> W <cr>) is sent
by the host, the weight data will be transmitted in the following format:
<If>srnmfxxxxxx.xxxuuu<cr>
where:
<If>
s
-
r
n
m
-
f
xxxxxx.xxx
uuu
<cr>
-
line feed (oA hex)
Status ’Z’ = Center of Zero
’O’ = Zero Error
’ ’ = space (none of the above)
Range ’1’
Gross/Net status
Motion Status
’m’ = scale in motion
’ ’ = scale not in motion
Reserved for future use
Weight (fixed at 10 characters)
Unit of measure
Carriage return (0D hex)
!LTERNATE7EIGHT/N$EMAND&ORMAT
When the alternate Weight On Demand command “W” (57H) is sent, the weight data will be
transmitted in the following format:
Response:
Response:
Weight
1 byte
STX
02H
5 byte
WEIGHT
Kg = XX.XXX
1 byte
CR
0DH
ERROR
1 byte
STX
02H
1 byte
?
3FH
1 byte
STATUS
1 byte
CR
STATUS:
Bit 4 = 1
Bit 2 = 1
Bit 1 = 1
Bit 0 = 1
center of zero
under zero
out of range
motion
22
0DH
0#3%2)%3).4%2&!#%#!",%3
The PC series scale can be interfaced to different Detecto printers as well as to a host
computer. The following table lists the model numbers of the printers supported and the cable
required to connect to them or to a host computer.
0#3ERIES)NTERFACE#ABLES
0RINTER-ODEL.UMBER
#ARDINAL0.
P200
6980-1047
P220/P240
8529-B304-0A
HOST (computer 9-pin)
8529-B305-0A
./4% Using nControl, serial printers from other manufacturers may be used with the PC
series scale. Some printers may work using one of the above listed standard cables, others
may require a custom built cable. It is the responsibility of the purchaser to insure that the
custom built cable is correctly wired. Refer to the printer manufacturer’s owner’s manual and
the following illustration to determine the correct cable configuration.
3ERIAL$ATA/UTPUT#ONNECTOR
Pin 1 ...................... N.C. (no connection)
Pin 2 ...................... GROUND
Pin 3 ...................... TXD (transmit)
Pin 4 ...................... RXD (receive)
Pin 5 ...................... DSR(data set ready)
Pin 6 ...................... N.C. (no connection)
#!2%!.$-!).4%.!.#%
1. DO NOT subject the commodity tray to sudden shocks.
2. DO NOT submerge the scale in water or spray water directly on the scale. The scale
may be cleaned using a damp soft cloth and mild detergent.
3. DO NOT use an abrasive cleaner on this instrument.
4. DO NOT use acetone or other volatile solvents for cleaning.
5. DO NOT use any sharp or pointed instrument to depress keys.
23
./4%3
24
25
26
27
28