1
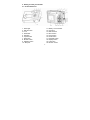
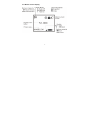
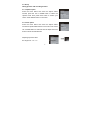
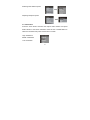
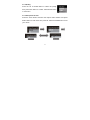
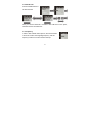
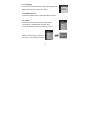
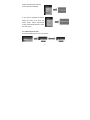
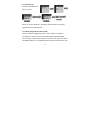
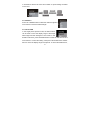
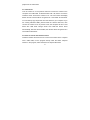
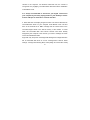
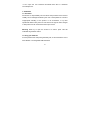
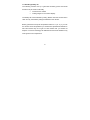
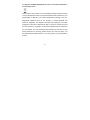
DC-500
User manual
CONTENT
1. Advisory Note
1.1 CD-ROM
1.2 Before using the DC-500
1.3 Copyright information
1.4 Caution when using the camera
2. Getting to know your DC-500
2.1 Control Reference
2.2 Monitor screen display
3. Usage preparations
3.1 Load batteries and memory card
3.2 Turn ON/OFF the camera
3.3 Set up
1
3.4 Playback function
3.5 Using your DC-500
4. How to install and use the application
4.1 Driver Installation
4.2 Software Installation
5. Specifications
6. Q&A section
7. Addendum
8. Customer Care
2
1. Advisory Note
Thank you for purchasing this DC-500 digital camera. Please read these
operating instructions carefully in order to use the product correctly. Keep
the instructions in a safe place after reading so that you can refer to them
later.
1.1 CD-ROM
The software CD-ROM packaged with the camera is designed for PC only.
To play this CD-ROM on a stereo or CD player may cause damage to it.
This camera is a precision electronic device. Do not attempt to service this
camera yourself, as opening or removing covers may expose you to
dangerous voltage points or other risks. This will invalidate all guarantee
claims. Do not expose this camera under direct sunlight to avoid causing a
fire.
1.2 Before using the DC-500
Try to take some pictures before you perform the formal recording. Before
taking pictures with this camera of any important occasion (such as a
3
wedding ceremony or on vacation), do test the camera beforehand to
ensure that it functions well. Any additional loss caused by the malfunction
of this product (such as costs of photography or any loss of benefit
generated by the photography) is not the responsibility of our company and
no compensation will be given for it.
1.3 Copyright information
Unless agreed by the right owner, all the pictures taken with this digital
camera cannot be used in violation of copyright law. Any transfer of
pictures or memory card with date must be conducted under the
constraints of copyright law.
1.4 Caution when using the camera
This product consists of intricate electrical parts, to ensure the camera
photographs normally, do not drop or hit the camera when taking pictures.
•
Avoid using or placing the camera in the following locations:
1. Damp and dusty places
2. Sealed vehicles or places exposed to direct sunlight or places subject to
4
extremely high temperatures or heat
3. Turbulent environment
4. Locations full of smoke, oil fumes or steam
5. In rain or snow environment
•
Do not open the battery cover when the power is on
•
If water has entered the camera, immediately turn the power off and
remove the batteries
•
How to maintain your camera:
1. If the lens, LCD monitor or viewfinder surface is dirty, please use a lens
brush or soft cloth to wipe the surface clean instead of touching the lens
with your fingers.
2. Do not use any solid object to hit the camera to avoid scratching the
lens, LCD monitor or viewfinder surface.
3. Do not use any detergent or volatile solution, which will subject the
camera case and paint to dissolving or distortion, use soft cloth only.
5
2. Getting to know your DC-500
2.1 Control Reference
1. Flash light
2. Self-time LED
3. Lens
4. Viewfinder
5. USB jack
6. Tripod socket
7. Flash LED
8. Shutter button
9. ON/OFF button
10. Strap bar
11. Battery cover/card slot
12. Up button
13. RIGHT button
14. Menu button
15. Down button
16. Flash button
17. Playback button
18. Display button
19. Left button
20. Monitor screen
6
2.2 Monitor screen display
7
3. Usage preparations
3.1 Load batteries and memory card
Open the battery cover and put in 3 AAA new alkaline batteries according
to the polarity indicated on the battery door, then insert the memory card,
close the cover. When the battery is in low voltage, a selected icon will
appear on the screen, you need to select what kind of battery you are using,
if you use alkaline battery, you should select 1, the battery capacity icon will
display half, then you cannot use flash light, but you can still take photos
until the icon displays empty; if you use rechargeable battery, you should
select 2, the battery capacity icon still display full, you can take photos until
the icon display empty.
3.2 Turn ON/OFF the camera
You start the camera when you press the ON/OFF button until the
operation LED lights. Press the ON/OFF button for 2 seconds the camera
will turn off. The camera will turn off automatically after 30 seconds of
inactivity if not connected to USB. The auto power off time can be set in the
menu of auto power off function.
8
3.3 Set up
Taking pictures and recording function
3.3.1 Capture option
Press the menu button and enter the capture select
window, press the UP or DOWN button to select the
capture mode. Then press menu button to confirm your
choice. Press RIGHT button to next menu.
3.3.2 Color option
Press the menu button and enter the capture select
window and press RIGHT button to next menu color. Press
UP or DOWN button to select the item to adjust and menu
button to enter the selected item.
Adjusting exposure value:
EV range from -1.5 ~ 1.5
9
Selecting white balance option:
Adjusting sharpness option:
3.3.3 Resolution
Press the menu button and enter the capture select window and press
RIGHT button to next menu resolution. Press the UP or DOWN button to
select the resolution then press menu button to confirm:
High: 2592x1944
Middle: 2048x1536
Low: 1600x1200
10
3.3.4 Quality
Press the UP or DOWN button to select the quality
then press menu button to confirm. Press RIGHT button
to next menu.
3.3.5 Auto power off time
Press the menu button and enter the capture select window and press
RIGHT button to next menu Auto power off. Press the DOWN button to set
your choice.
11
3.3.6 Date & Time
Press the DOWN button to
set date and time.
When you choose “DISPLAY”, the date & time will show on the picture,
otherwise choose “NO DISPLAY”.
3.3.7 Frequency
In order to take a better indoor picture, the camera needs
to be set to suit the correct lighting frequency. Set the
frequency to 60Hz for US and 50Hz for Europe.
12
3.3.8 Language
Press the UP or DOWN button to select the language then
press menu button to confirm your choice.
3.4 Playback function
Press the Playback button to select the playback mode
3.4.1 Erase
Press the menu button to enter the erase window,
press the UP or DOWN button to select "One”
or "All". Press menu button to confirm your choice.
Select the format mode and format
the memory card inside the camera.
13
Select the protected mode and
protect the frame selected.
If you want to unprotect the frame,
select the frame, then enter the
erase mode; select unprotected
mode. Press RIGHT button to enter
the next menu.
3.4.2 Auto power off time
Press the DOWN button to set your choice.
14
3.4.3 Date & Time
Press the DOWN button to
set your choice.
When you choose “DISPLAY”, the date & time will show on the picture,
otherwise choose “NO DISPLAY”.
3.4.4 DPOF (Digital Print Order Format)
”DPOF” stands for “Digital Print Order Format”, which is a format for
recording on a memory card or other medium which captured images
and how many copies should be printed. Then you can print on a DPOF
compatible printer or at a professional print service from the memory card
15
in accordance with the file name and number of copies settings recorded
on the card.
3.4.5 Rotation
Press UP or DOWN button to select the rotation angle and
menu button to enter the selected angle.
3.4.6 Zoom/ PAN
In the single picture preview mode, the PAN function
can be used to move the display range of the image
after image has been enlarged in zoom mode. In the
ZOOM / PAN menu, press the DOWN button to enter the PAN function and
menu button to confirm the setting. Now press UP/ DOWN/ LEFT/ RIGHT
button to move the display range of the picture. To cancel the PAN function,
16
press the menu and then DOWN button to exit.
3.5 Using your DC-500
3.5.1 Take pictures
You just press the shutter button down and with a distinct beeping sound, a
snapshot is finished. At the same time, the number on the monitor screen
will decrease by one.
3.5.2 Self-timer
Press the menu button into the menu, change to the self-timer mode, after
that press the menu button to confirm. Press the shutter button, the
self-timer LED will blink for 10 seconds and then capture a picture.
3.5.3 Take video
Press the menu button into the menu and change to the video mode. Press
the menu button to confirm your choice. Press the shutter button to start
recording. Press the shutter button again to stop recording.
17
3.5.4 Use the flash
Press the flash button into the FLASH AUTO or ON mode, the camera will
charge the flash; the monitor screen will be close and the operation LED
will blink. When LED stops blinking and the monitor screen turns on, the
charging is done. The FLASH ON function will always fire the flash, the
FLASH AUTO function will fire automatically as needed. When the shutter
button is pressed, the flash will fire.
3.5.5 Use the digital zoom
In the REC mode you can use the digital zoom. Before taking videos press
the UP button to zoom in, press the DOWN button to zoom out.
3.5.6 Playback mode
Press the playback button to come to the playback mode. You can view up
9 pictures and video clip files on the LCD screen. Press the DISPLAY
button and up to 9 files appear on the screen. In the one picture mode,
press the UP or DOWN button and zoom in or zoom out of the picture. If a
video is selected in the nine picture mode, press the DISPLAY button and
18
playback of the video starts.
3.5.7 Download
Turn the camera on to the preview mode and connect the camera to the
computer via a USB cable. In Windows 2000 / ME / XP, there is no need to
install the driver. Connect the camera to PC. The LCD screen will display
MSDC and the camera will be recognized as a removable FLASH DISK.
You can directly copy the pictures from the camera to your computer. If you
are running Windows 98SE, please install the camera driver first, then
connect the camera to PC in preview mode, the computer will find a new
device like USB mass storage device and install the device driver
automatically, after the driver installed, the camera will be recognized as a
removable FLASH DISK.
3.5.8 How to Use the PC camera function
Install the camera driver from the CD. Connect the camera to the computer
with a USB cable, run the program Amcap under the folder <Sunplus
Ca533> in the program, select the device as Sunplus SPCA533.
19
After that please select Options as Preview.
20
If you want to change the imaging size, select the Video Capture Pin then
change the output Size.
4. How to install and use the Accompanying application
Insert the accompanying CD into the CD-ROM drive and the install
dialogue box will appear automatically.
21
4.1 Driver Installation
Click on the Camera Driver button and follow the next steps.
22
23
Set the camera to recording mode and connect it to the computer. The
24
computer will find a new device and automatically install the device driver. If
the computer prompt needs a file path, search it with the path
C:\WINDOWS\SETUP533. When the installation is finished, go to Control
Panel \System \Hardware \Device Manager and check the Imaging Device
\Icatch(IV) Still Camera Device and Icatch(IV) Video Camera Device are
OK.
4.2 Software Installation
Click on ArcSoft VideoImpression to install the Application software
(ArcSoft VideoImpression).
25
Click on ArcSoft PhotoImpression to install the Application software
(ArcSoft PhotoImpression).
Click on Adobe® Acrobat® Reader™ to install the software
(Adobe® Acrobat® Reader™).
26
Click on User Guide (in PDF Format) to view the user guide.
Click on the “Exit” icon to close this screen and exit the setup program.
27
5. DC-500 specifications
*3 in 1 mode:
- Digital still camera mode: image capture
- PC camera mode: video capturing / conferencing
- Camcorder mode: Video clips
Sensor: CMOS sensor, 5 megapixel
Lens: F=2.8 f=8.4
Focus range: 1.5M to infinity
Illumination: 100-16000 (lux)
Shutter speed: shutter 1/20-1/6000 s
Image resolution: high (2592 x 1944), medium (2048 x 1536), low (1600 x
1200) for image capture
VGA (640 x 480)/ QVGA (320 x 240) for PC camera mode
QVGA (320 x 240)/ QCIF (192 x 144) for Video recording mode
Memory: Internal memory 16 MB image memory, external SD and MMC
card compatible (1 GB)
Self-timer: 10 secs
Zoom: 8x digital zoom
28
Colour LCD screen: 1.5 inch display
OSD language: English, French, German, Spanish, Italian, Dutch, Turkish
Portuguese
Flash mode: On/Auto/Off
Battery: 3AAA (alkaline/ 1.5V) batteries
Interface: USB 1.1
PC Demand Specification
CPU: Pentium III 800MHz and upper
OS: Windows 98SE/2000/ME/XP
Memory: 256MB and upper memory
Disk space: At least 250MB space free
CD-ROM drive
Technical details can be changed without notice.
29
6. Common problems
6.1 Camera will not turn on
1. Battery is not properly installed: Remove and reinstall the batteries.
2. Insufficient battery voltage: Do not use old batteries or batteries with
mixed battery life. It is not recommended to use rechargeable batteries with
lower voltage.
6.2 Flash will not fire
1. The flash is set to OFF: Set the flash to Auto or on.
2. Flash has not been fully charged the flash takes a few seconds to charge
up while the operation LED is blinking. Flash light is fully charged when the
operation LED turns off.
3. Battery level is low: When the battery indicator does not show a fully
charged battery, the voltage is low for the flash to work. Please change new
batteries.
6.3 Image is blurred / out of focus
1. Subject is out of focal range. Ensure that there is at least 1.5 m ( 5ft )
30
between the camera lens and subject.
2. Camera moved: Hold the camera steady while taking the picture. When
flash is on, hold the camera steady until flashes have fired two times. (First
flash is to reduce a red-eye phenomenon and to detect the brightess of the
target).
6.4 Subject in recorded image is too dark
Insufficient light for shooting: Set the flash on, or adjust the exposure
compensation to a positive (+) setting.
6.5 Flickering on LCD screen or recorded image
Incorrect frequency setting: Check the correct anti-flicker frequency (50Hz
or 60Hz) under fluorescent light setting.
6.6 Picture download problem
1. Computer does not recognize camera for Windows 98SE, camera driver
has to be installed first before picture downloading. In picture preview
mode, ensure that USB mode is set to MSDC before connecting the
31
camera to the computer. For Windows 2000/ ME /XP, the camera is
recognized as a plug&play, removable flash disk without driver installation
under MSDC mode.
It is always recommended to disconnect your digital camera from
your computer by the safety unplug button on your desktop to ensure
that the USB port is released for next-time interface.
2. Flash disk does not display images recorded. The camera will load two
removable flash drives on your computer under MSDC mode. The first
drive is the external SD or MMC cartridge and the second drive is the
recorded images saved in the built-in memory of the camera. In cases
when the removable flash drive names coincide with those already
assigned by the computer in the network, you need to reassign the name
for the removable flash disks:
Right click <My Computer>Æ Manage Disk Management ÆRight click blue
bar of removable disk which is on line ÆChange Drive Letter & Paths
Change Æ Assign the Following Drive Letter (assign an unused drive name)
32
Æ OK. Open the new renamed removable flash drive to download
recorded pictures.
7. Addendum
7.1 Disclaimer
We assume no responsibility over and above the provisions of the Product
Liability Law for damages suffered by the user or third parties as a result of
inappropriate handling of the product or its accessories, or by their
operational failure and by their use. We reserve the right to make changes
to this product and its accessories without prior notice.
Warning! Never try to open the camera or to take it apart. This will
invalidate all guarantee claims.
7.2 Using your batteries
For best performance and prolonged battery life, we recommend the use of
AAA alkaline or rechargeable Ni-MH batteries.
33
7.3 Extending battery life
The following functions use up a great deal of battery power and should
therefore only be used occasionally:
•
Excessive use of flash
•
Editing images on the camera display
The battery life can be affected by soiling. Please clean the contacts with a
clean and dry cloth before putting the batteries in the camera.
Battery performance drops at temperatures below 5 °C (41 °F). If you use
the camera at low temperatures you should have replacement batteries to
hand and ensure they do not get too cold. Please note: you should not
dispose of cold and seemingly flat batteries because these batteries may
work again at room temperature.
34
7.4 Disposal of Waste Equipment by Users in Private Households in
the European Union
This symbol on the product or on its packaging indicates that this product
must not be disposed of with your other household waste. Instead, it is your
responsibility to dispose of your waste equipment by handing it over to a
designated collection point for the recycling of waste electrical and
electronic equipment. The separate collection and recycling of your waste
equipment at the time of disposal will help to conserve natural resources
and ensure that it is recycled in a manner that protects human health and
the environment. For more information about where you can drop off your
waste equipment for recycling, please contact your local city office, your
household waste disposal service or the shop where you purchased the
product.
35
7.5 Declaration of Conformity
We herewith confirm the following designated product: DC-500 has been
tested and found to comply with the requirements set up in the council
directive on the approximation of the low of members states relating to the
EMC Directive 89/336/EEC, amended by 92/31/EEC & 93/68/ EEC. For the
evaluation regarding to the electromagnet compatibility, the following
standards were applied
EN 55022: 1998 + A1 : 2000 + A2: 2003
EN 55024: 1998 + A1: 2001 + A2: 2003
EN 610000-3-2: 2000
EN 61000-3-3: 1995 + A1: 2001
The device is marked with CE Logo.
7.6 FCC Compliance and Advisory
This device complies with Part 15 of the FCC Rules. Operation is subject to
the following two conditions: 1.) this device may not cause harmful
interference, and 2.) this device must accept any interference received,
36
including interference that may cause unsatisfactory operation.
This equipment has been tested and found to comply with the limits for a
Class B peripheral, pursuant to Part 15 of the FCC Rules. These limits are
designed to provide reasonable protection against harmful interference in a
residential installation. This equipment generates, uses, and can radiate
radio frequency energy and, if not installed and used in accordance with
the instructions, may cause harmful interference to radio communication.
However, there is no guarantee that interference will not occur in a
particular installation. If this equipment does cause harmful interference to
radio or television reception, which can be determined by turning the
equipment off and on, the user is encouraged to try to correct the
interference by one or more of the following measures.
•
Reorient or relocate the receiving antenna.
•
Increase the separation between the equipment and receiver.
•
Connect the equipment to an outlet on a circuit different from that to
which the receiver is connected.
•
Consult the dealer or an experienced radio/TV technician for help.
37
Any changes or modifications not expressly approved by the party
responsible for compliance could void the user’s authority to operate the
equipment. When shielded interface cables have been provided with the
product or when specified additional components or accessories have
elsewhere been designated to be used with the installation of the product,
they must be used in order to ensure compliance with FCC regulations.
38
8. Customer care
More information to the complete product range can be found under:
www.plawa.com
Service & Repair Hotline (EU):
00800 75292100 (from landline only)
Service & Support Hotline (D):
0900 1000 042 (1,49 Euro/min. from a German landline only)
Online Service:
[email protected] (German / English)
Manufactured by
plawa-feinwerktechnik GmbH & Co. KG
Bleichereistr. 18
73066 Uhingen
Germany
39
AGFAPHOTO is used under license of Agfa-Gevaert NV & Co. KG. Agfa-Gevaert NV & Co. KG does not manufacture this
product or provide any product warranty or support. For service, support and warranty information, contact the distributor
or manufacturer. All other brands and product names are registered trademarks of their respective owners. Product design
and technical features can be changed without notice.
AgfaPhoto Holding GmbH, www.agfaphoto.com
Manufactured and distributed by plawa-feinwerktechnik GmbH & Co. KG, www.plawa.com
RZ-AGFA-06-017-UserM_DC500-RS.in1 1
28.03.2007 14:54:28 Uhr