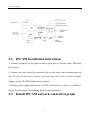
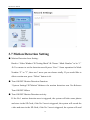
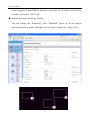
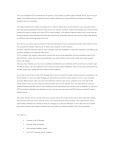
1
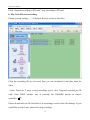
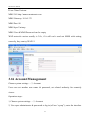
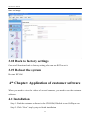
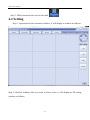
IPCAM User Manual
GSMIP Series
Video and Burglar Alarm IP CAM
USER MANUAL
1
IPCAM User Manual
Catalogue
1st Chapter: Product introduction……………………………………………4
1.1
System requirement……………………………………. ………4
2nd Chapter: Hardware installation………………………………………. …4
2.1
IPCAM connection graph.………………………………………5
2.2 IPCAM install instruction………………………………………5
2.3 Install IPCAM network connection……………………………..5
3rd Chapter: System operation………………………………………………..6
3.0 Installation of activeX, management software, IPCAM searcher…6
3.1
Application of IPCAM searcher…………………………………6
3.2
System login……………………………………………………..8
3.3
View on IE…………………………………….…………………9
3.4
Snap/shooting function………………………………………….10
3.5
Video settings……………………………………………………10
3.6
Change default storage route…………………………….. ……..11
3.7
Motion detection settings……………………..…………………12
3.8
Network setting………………………………………………….14
3.9
PPPoE setting……… …………………………..……………….14
3.10
Dynamic DNS………………………………………………….15
3.11
UPNP Services…………………………………………………17
3.12
Port settings…………………………………………………….17
2
IPCAM User Manual
3.13 Record to SD Card and play back.............……………………18
3.14 Alarm function setting…………………………….……….….21
3.15 MMS setting…………………………….………………….…22
3.16 Account management………………………………………....23
3.17
Network Time Protocol……………………………….….…....24
3.18
Back to factory settings…………………………………….….25
3.19
Reboot………………………………………………. …… .....25
4th Chapter: Customer end software installation and adjust ………………...25
4.1 Installation………………………………………………………...25
4.2 Setting…………………………………………………..………...26
4.3 Snap/shooting a picture……………………………..………….....27
4.4 Recording……………………………………………………….....27
4.5 PTZ control……………………………………………………….28
5th Chapter: F.A.Q.…………………………………………………………..28
3
IPCAM User Manual
1st Chapter: Product introduction
GSMIP series are the most economical & efficiency solution for remotely monitor
& home burglar alarm. With built-in Web server, can connect with Internet, No need
via PC, easy to install & adjust. Can monitor and mange remotely through LAN or
WAN IE at any time/place, make you very quickly/conveniently to access to real time
monitor/control the camera far away. GSMIP series support SD card storage function,
it is very professional security protection for home remotely monitor & snap.
1.1
System requirement
PC system:
1. Processor: Intel Pentium 4 1.6GHz or same grade processor & above
2. Memory: 256MB or above
3. Operation system: Windows 2000 or Windows XP
4. Browser: Microsoft IE 6.0
2nd Chapter: Hardware installation
2.1
IPCAM connection graph:
4
IPCAM User Manual
2.2
IPCAM Installation instruction
1, Connect it properly as the graph on above (plug power, network cable, SIM card,
SD card,etc.)
2, Connect the other end of the network cable to the router which connecting with
your PC.(if you don’t have a router, you must buy one. If not, it can’t be adjust.
Suggest to buy TP-LINK brand, easy for adjust.)
3, Plug the power supply (after about 10s, PTZ will self-check 1 time, you will hear 1
sound “B” after finish self-checking. System starts normally.)
2.3 Install IPCAM network connection graph
5
IPCAM User Manual
3rd Chapter:System Operation
3.0 Installation of IP Cam Control ActiveX,
Management Software, Searching Tool
Copy the files on the ROM CD to your computer and dbclick SAPlayer.exe , install
the software following instructions.
3.1 Application of Searching Tool
Operation Steps.:
1. After the software is installed, find the Shortcut of the searching tool
, on the desktop, dbclick it to run the software. You will get
interface as below. Press Search, you can get the IP of the IP camera:
6
IPCAM User Manual
*On the left of the bottom is your computer’s IP, and on the right of the top is the IP
CAM’s IP, check if the two IPs are in one Network segment, if they are, you can
input the IP in the Internet Explorer and get the instant video; if they are not in one
Network segment, you need to change it into one Network segment. Take the
example as below. Dbclick
on the right of the bottom of the desktop and
open the IP CAM tool, you will get interfaces as below.
7
IPCAM User Manual
Suppose the IPs above are your computer’s IP and your IP CAM’s IP, obviously the
two IPs of different are of different Gateway, so they are not in one network segment.
z As picture above, the IP of the computer is 192.168.0.165,so you need to change
the IP CAM’s IP as 192.168.0.*(*=1-254)
,well, they should not be the same.
z Subnet Masks are the same, you do not need to change it, as default it is:
255.255.255.0.
z The Gateway of the computer is 192.168.0.1, and the IP Cam’s gateway should be
changed as: 192.168.0.1 as well.
After you finish the settings, press save to confirm.
3.2 Logging in the system
After your setting the IP of the IP Cam, open the IE and input the IP Camera’s IP, as
default the IP Cam’s IP is 192.168.1.1,input http://192.168.1.11, you will get the
logging in interface window, as default, the username and the password are the same,
both are: Sysop.
8
IPCAM User Manual
3.3 View on IE
After you input the correct username and password, you will get the interface as
below:
If you can’t see the video, please refer to Chapter Five: “F.A.Q.”
9
IPCAM User Manual
3.4 Snap/shooting function
You can click
button directly to snap remotely online and the photos will be
stored in your current PC HD automatically. (Default storage route: C:\GMPlayer
Files)
3.5 Video Settings
The video setting functions include the following 3 settings:
● Resolution Setting
Video output resolution:
PAL:
176*144, 352*288, 720*576
NTSC: 176*120, 352*240, 720*480
● Frame Rate Setting
1fps~30fps is optional
● Fixed Bitrate Setting
Bigger Bitrate, better picture quality, but occupy huger Net speed.(After setting the
Bitrate, please choose the “Quality” option.)
Setting Steps:
1. Login IE browserÆ“System Settings”Æ“Video”
2. Set all the relevant parameters and save.
3. Back to “Video Window”Æchoose the right channel you want to recordÆclick
to record.( Default storage route: C:\, Video format: AVI )
As follow showing:
10
IPCAM User Manual
3.6 Change default storage route
1. Login IPCAM on IE browser
2. Choose “System Settings”Æ”Record”Æ”RecPath”ÆChange the storage routeÆ
“Save”
3. To find the video storage file you set, then you can view the videos which can be
played by the WINDOWS display software.
You can view the following picture:
11
IPCAM User Manual
3.7 Motion Detection Setting
● Motion Detection Area Setting:
Back to “Video Window”Æ”Setting Mode”Æ Choose “Mask Number” to be “1”
Æ Use mouse to set the detection areaÆ press “Save”. Same operation for Mask
Number “2” or ”3”, there are 3 areas you can choose totally. If you would like to
delete certain area, press “Delete” button is ok.
● Turn ON/OFF Motion Detection Function:
“System Settings”Æ”Motion”Æchoose the motion detection area No.Æchoose
Turn ON/OFFÆSave
● Turn ON/OFF Motion Detection activity:
If the No.1 motion detection area is triggered, the system will take some photos
and store in the SD Card; if the No.2 area is triggered, the system will record the
video and store in the SD Card; if the No.3 area is triggered, the system will send
12
IPCAM User Manual
E-mail to preset E-mail ID(This function is optional). If you want to turn On this
function, just choose “ON” is ok.
● Motion Detection Sensitivity Setting:
You can change the “Sensitivity” and “Threshold” figure to set the motion
detection sensitivity grade. Generally, just to set the “Sensitivity” figure is ok.
13
IPCAM User Manual
3.8 Network Setting
Network setting here is synchronous with the searcher. That is to say, there is no need
to set it again here if you have done necessary setting on Searcher. If you should
change IP address, set it as on above then do not forget to click the SAVE button.
3.9 PPPoE Setting
Click System Settings —》PPPoE to enter the interface as below.
If users access to internet via ADSL and link the IP camera with a MODE instead of a
router, you need to fill in the account NO. and the password as the window shows.
Then pitch on the “Auto Start after reboot”, click the Apply button. Restarting the
software, the system could link with the Internet through PPPOE dialing. If use a
router to link to the Internet, then no need to do settings. As picture showing below:
14
IPCAM User Manual
3.10 Dynamic DNC
Click System Settings —》Dynamic DNC to enter the interface as below.
If we want to see the surveillance images of a curtain IP camera, we need to find that
camera through its IP address on public network. But the IP address on public
network is dynamic now, it changes every 16 hours. That is to say, the IP address we
use now will be invalid 16 hours later and we need to find it again. In this case, it is
very complicated. So domain applying is to solve this trouble.
Now there are many websites for Domain Name Resolution. http://www.3322.org is
one of this kind of websites. Applying a free Domain Name, then fill it into “Host
Name” label. Input the User Name and the Password, then click OK button. If the
Domain Name information is correct and the IP address configured to the IP camera
could link to Internet, then the IP camera could refresh its IP address automatically
every a curtain time. In other words, when the IP address changes, it will guide
automatically the new IP address to the Domain Name WE applied. In this way,
whenever we open the Domain Name, it could assure that the IP address which the
camera in use and the IP address on public network is synchronous.
For DDNS Service, overseas customers often use dynadns.org, while Chinese
customers often use 3322.org.
15
IPCAM User Manual
For the Interface, if you use a router dialing to access to Internet, please select etho, if
you use a MODE and the PPPOE dialing function of IP camera to link to Internet,
please select ppp0. As the interface showing below:
16
IPCAM User Manual
3.11 UPnP Services
Start UPnP Services, users don’t need to do the port mapping on router when
remotely setting.
3.12 Port Settings
Choose system settings when real time monitor, system settings —》Port Set
to enter the interface as below:
This setting can set the IPCAM remotely communication port, open 3 ports of
554,553,80 on router, these ports can be modified according to practically application
of network port.
17
IPCAM User Manual
3.13 Record to SD card and play back
First insert SD card to the card slot on main host.
a, Record to SD card
Choose system settings —》SD Card Record
as below interface:
18
IPCAM User Manual
Click “Start recording to SD card”
Choose system settings —》SD Card Record, “STATE” will be “Recording ON”.
19
IPCAM User Manual
Click “Suspend recording to SD card”, stop recording to SD card.
b, Play back SD card recording
Choose system settings —》Playback Record, as below interface:
Click the recording file as you need, then you can download it and play back the
video.
(Note: There are 2 ways to stop recording, one is click “Suspend recording to SD
card” from WEB, another way is pressing the DISARM button on remote
controller
.
Please do not take out SD card while it is recording to avoid video file damage. If you
would like to take it out, please first stop recording.
20
IPCAM User Manual
3.14 Alarm function setting
Choose system settings —》AlarmConfig to enter the interface as below to set the
functions:
This unit of alarm function not only can be set via wireless keypad, also can be set
via IPCAM IE software interface.
z Alarm record: start/close alarm recording
z Video movement alarm: When detect movement in preset detection area,
main panel will take place alarm. (Optional function)
z Siren Accompanying sound: start/close siren accompanying sound
z Sound alarm: start/close sound alarm
z AC power off alarm: start/close AC power off alarm function
z Auto dial first phone number firstly: close/start(close: send SMS,MMS, then
dial phone number; start: send SMS, then dial phone number, answer phone call
and press “*” key or hang up the call, then it will send MMS; if press “#” to
confirm then exit, it won’t send MMS.)
z Siren hooting time: set siren hooting time
z Ring times: Dial to IPCAM, the main panel will get thru after how many times
ring
z Arm delay(secs.): Press ARM button, wait for some time to arm.
z Alarm delay(secs.): wait for some time when alarm
z Autodialing times overtime: Not used currently
z MMS quantity: send how many pictures to appointed phone number
z Recording time(minute): recording time after alarm
21
IPCAM User Manual
z MMS picture pixel: image size big/small
z Alarm phone number for SMS: phone number for SMS sending
z Alarm phone number: can set 1-6 group phone numbers for phone call
z Alarm phone number for MMS: can set 1-5 group phone numbers for MMS
sending
3.15 MMS setting
Choose system settings —》MMS Set
Users can set the MMS parameter here according to local communication operator.
The main panel can successfully send out MMS after setting correctly. Please contact
the locally operator (such as China Mobile:10086, China Unicom:10010). Open
GPRS service to get MMS parameters. Default setting: China Mobile.
22
IPCAM User Manual
If use China Unicom:
MMS Url: http://mmsc.monternet.com
MMS Gateway: 10.0.0.172
MMS Port: 80
MMS Apn: Uniwap
MMS User & MMS Password can be empty
WAP network version usually is 2.0v, if it still can’t send out MMS with setting
correctly, they can try WAP1.2.
3.16 Account Management
Choose system settings —》Account
Users can set another user name & password, set related authority for remotely
viewer.
Operation steps:
1, Choose system settings —》Account
2, Use super administrator & password to log in( all are “sysop”), enter the interface
23
IPCAM User Manual
as below.
3, Input a new account & password, press OK to add one account.
Delete an account: choose the existent account, press Delete.
Modify the password of an account: choose the existent account, input new password,
Press set new password is ok.
4, The default user name & password of administrator are “sysop”, to modify this
password, you should go to the Modify Password in the menu, input new password,
then press set new password is ok.
3.17 Network Time Protocol
Choose system settings —》NTP
There are 3 ways to set the time display on network camera, any way is ok.
Usually it is in-phase of PC, then save it. Back to monitor interface, it will display
24
IPCAM User Manual
time on image.
3.18 Back to factory settings
Can set all functions back to factory setting, also can use RST to set it.
3.19 Reboot the system
Re-start IPCAM
4th Chapter: Application of customer software
When you need to view the videos of several cameras, you need to use the customer
software.
4.1 Installation
Step 1: Find the customer software in the CD-ROM, Dbclick to run SAPlayer.exe
Step 2: Click “Next” step by step to finish installation
25
IPCAM User Manual
Step 3: Dbclick and run the icon on the desk
4.2 Setting
Step 1: Open and run the customer software, it will display a window as follows:
Step 2: Dbclick windows that you want to show video, it will display an IP setting
window as follows:
26
IPCAM User Manual
Here are something about port settings. You must input IPCAM’s IP address or
domain name, adding “RTSP Port” as “Sever address”. “Control port” and “WEB
Port” are the same as “Control Port” and “HTTP Port” under “Port Settings” menu.
Step 3: Press “OK” to confirm, then you can see the video.
4.3 Snap/shooting a picture
Select places you want to shoot, press shooting button.(default save directory:
C:\GMPlayer Files)
4.4 Recording
27
IPCAM User Manual
Select the channel you want to record, press record button to start recording
(default save directory: C:\GMPlayer Files, find the files and use play software which
support AVI format to play the recorded videos)
4.5 PTZ control
Select the image you want to control on the left. Click the direction buttons on the
turnplat to control Pan Tilt, click middle button to stop.
5th Chapter: F A Q
1. Q: Can not view the video after inputting the IP address?
A:
1) You may not install the control software correctly. Uninstall software that play
videos in your computer and re-install the software, because the video software may
conflict each other. If it still can’t be seen, try to uninstall web TV software likes
PPS,PPL,etc.
2) Do not set the IP address correctly
2. Q: Can not send MMS
A:
1) Firstly, please check whether you have set the MMS number correctly; secondly
check whether the host has found the GSM signal(you can check this by dialing to
this number); thirdly take out the SIM card which install in your host to put in your
mobile phone, please check whether it can send out MMS or not. When the host is
28
IPCAM User Manual
sending MMS, the green light will flash quickly.
2) Enter “System settings”→ “platform setting”, click on the right and refresh to
check signal. In general, the signal value should be above 20.
3. Q: What is the most storage of the SD card?
A: 4 G at present
4. Q: How many bytes will be used for recording 1 hour video of 1 CAM?
A: 400MB/hour/CH
5. Q: Can not find device by search engineer
A: Close the firewall in windows, disable dummy and wireless network card
6. Q: PTZ turning in disorder after alarming
A: That is because our camera preset 6 video points which is coordinate with
wireless accessory. When alarm occurs, the PTZ will turn to the related video point
that the accessory has been triggered. When coding the accessory, please do it as per
the video point diagram. The diagram is listed as follows:
29