1
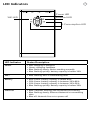
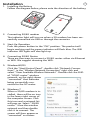
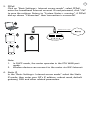
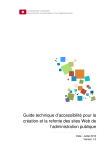
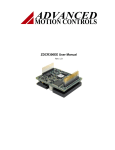
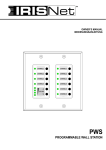
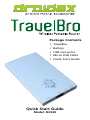
Package Contents
• TravelBro
• Battery
• USB Converter
• Micro USB Cable
• Quick Start Guide
Quick Start Guide
Model: DX328
Functions
2
3G/DHCP
Switch
DC Input
Reset/ETH Switch
Items
Functions
DC Input
DC 5V, to charge product by the port
Reset/Ethernet SW
Press and hold for 2 - 4 seconds to turn the Ethernet function off. If held for more than 8 seconds,
it will revert to the factory default settings.
Note: If you are not using the Ethernet function,
turning it off will save 20% capacity.
3G/DHCP Switch
Switch the connection status between 3G and
DHCP. (If reading Micro SD, switch to DHCP. If
inserting an external 3G/4G USB modem or ETH
cable, switch to 3G).
Power Check
ON/OFF
3G Port
USB Charge
WAN/LAN
Items
Functions
Capacity Indicator
To check remaining power, press and hold the button
for 2 seconds until the LED light turns on. After 3
seconds the light will turn off automatically to save
power.
USB Charge Port
5V, 1-3A adaptive output, suitable for charging smartphones, MID and PSP etc.
WAN/LAN
For 10/100M RJ45, WAN/LAN options.
3G/4G USB Port
To connect a 3G/4G modem.
Power on/c/off
To turn the Voyager on and off. (Switch to “ON”, for
USB modem, ETH, Micro SD, USB drive; or switch to
“C” to use the charging function).
LED Indicators
3
Power LED
WiFi LED
Ethernet LED
3 Consumption LED
LED Indicator
Status Description
Power
• Red: charging in progress
• Green: charging complete
• Blue flashing slowly: device working normally
• Blue flashing quickly: battery capacity is below 20%
WiFi
• Blue flashing: WiFi is transmitting data
Battery
• 80% Green: battery capacity is above 80%
• 50% Green: battery capacity is between 50%-80%
• 20% Green: battery capacity is between 20%-50%
• Blue flashing quickly: battery capacity is below 20%
Ethernet
• Blue: ethernet working and connected successfully
• Blue flashing slowly: Ethernet Network is transmitting
data
• Blue off: Network line cut or power off
Installation
4
1. Installing the Battery
Follow the diagram below, please note the direction of the battery.
2. Connecting 3G/4G modem
The indicator light will turn on when a 3G modem has been successfully connected via USB or through the converter.
3. Start-Up Operation
Push the power button to the “ON” position. The product will
begin working and the power indicator will flash blue. The WiFi
indicator LED lights will also light up.
4. Connecting 3G/4G Router
There are two ways to connect a 3G/4G router: either via Ethernet
or WiFi. We suggest choosing the WiFi.
5. WindowsXP/OS
Click the “Start/Control Panel”, double-click “Network Connections”, in the “Wireless Network Connection” right click and
select “View Available Wireless Networks”. Double-click the SSID
of “3G/4G router” wireless
network, on the right shows
“connected” that indicates
being successfully connected to the 3G router.
6. Windows 7
When a 3G/4G modem is installed, there will be an icon
in the lower right corner of
the computer screen. Click
this icon and a network list
will pop-up. Select “3G/4G
router “ from the wireless
network and then double
click it to connect. The
screen will then appear as
“connected” as shown:
Now let’s open the IE Explorer( Iphone for Safari),type the default IP:192.168.100.1 in the
5
Open Explorer and type the default IP:192.168.100.1 in the Address
bar, then the Username: admin, Password: admin and click ok.
Note:
If WiFi
is connected
successfully,
thethe
management
marks:
If WIFI
connected
successfully,
but failed but
to open
management interface
interface. Pleas
fails to open, please double check the IP address. If you manually set
eck the IP address whether is right or not. If you manually set the IP address, it
the IP address, it is recommended to automatically obtain. The XP
ommended to automatically obtain. Take XP System for example, click on "Start/Contr
System for example: click on “Start/Control Panel”, double-click the
nel", double-click the network connection in the "Wireless Network Connection" right clic
network connection in the “Wireless Network Connection” right click
ect select
properties,
select "Internet
(TCP
/ IP)", (TCP
click on
Properties
to bring
up TCP /
properties,
select Society
“Internet
Society
/ IP)”,
click on
Properttings
page,
Selectup
"Obtain
addresspage,
automatically"
and "Obtain
server addres
ties
to bring
TCP / an
IP IP
Settings
Select “Obtain
an IPDNS
address
tomatically"
setting is completed,
the DNS
computer
canaddress
automatically
obtain the IPsetting
address of th
automatically”
and “Obtain
server
automatically”
uter.is completed, the computer can automatically obtain the IP address of
the router.
Parameters Settings
router support 3G/4G, Static IP, Dynamic IP, PPPoE, click “Basic Settings” on the left side
EB page, so you should first choose Router’s operating mode, the default mode is “3G/4
lup”.
1 3G Dial-UP
e default mode for product is 3G/4G Dial-UP, in China, Includes Taiwan and Hong Kong,
egrates all main ISP Dial data, and customers can choose the ones they want. For th
eigners, we can realize it from remote online control, to make your 3G modems comply o
uter.
r example, China Telecom, APN is blank, enter “#777” in the Dialup Number box, enter
ard” in the User Name and Password box, both lower case letters. Range of Online Tim
re keeps default (always online). Enter DNS server in Primary DNS box if you know it. It yo
n’t know it, leave it as blank.
Settings
6
The router supports 3G/4G, Static IP, Dynamic IP and PPPoE. Click
“Basic Settings” on the left side of web page and choose the Router’s
operating mode, the default mode is “3G/4G dial-up”.
1. 3G Dial-UP
The default mode is 3G/4G dial-up, it integrates all the main ISP
dial data and customers can choose the ones they want. For international customers, we can use remote online control, to make
your 3G modem comply with our router. For example, Telstra APN
is telstra.internet, enter “*99#” in the Dialup Number box, leave
User Name and Password boxes blank, this will vary with providers
Range of Online Time, keep as default (always online). Enter DNS
server in Primary DNS box if you know it. It you don’t know it,
leave it as blank.
Return to Status > Running Status, check 3G/4G Dialup says connected, if it’s connected,
should be able to access Internet via 3G. Other cases:
you
R
eturn
to Status > Running Status, ensure that 3G/4G dialup says
“connected”, if it’s connected, you should be able to access InterIf 3G/4G Dialup says “disconnect”, it means no 3G connection, maybe your 3G Modem is not
net
via 3G.
attached to the router, you can check the Modem’s VID/PID in 3G/4G card information filed, if
the VID/PID is Unrecognized, either the router’s USB port is bad or the 3G Modem is bad.
Other situations:
IfIf 3G/4G
dialup
“disconnect”,
it means
nois3G
connec3G/4G Dialup
sayssays
“connecting,
please wait…”,
it means there
that the is
router
dialing
now, please
tion.
It aismoment,
possible
3G modem
notuntil
attached
to the
wait for
afteryour
20 seconds,
refresh theispage
3G/4G Dialup
saysrouter,
“connected”, if
the
status
“connecting,
please
wait…”
has
shown
for
a
long
time,
please
check
as follows:
check the modem’s VID/PID in 3G/4G card information, if the VID/
check
settings are correct;
check
3G routerUSB
has port
supported
your 3G
3G Modem;
check
PID
is your
unrecognized,
either
thethe
router’s
or the
modem
3G Modem can work well, when directly connected to your computer.
isyour
faulty.
Dynamic IP(DHCP)
If3.2
3G/4G
dialup says “connecting, please wait…”, it means that
Dynamic IP is the hotels and restaurants and other public places commonly used means of
the
router
is dialing, please wait for a moment, after 20 seconds
access, the router can connect via dynamic IP mode to hotels and other public access network
refresh
the page until 3G/4G dialup says “connected”. If the status
resources, the first hotel of the network cable to the ETH interface to the router, then through
the following two methods to router switch to dynamic IP mode.
7
“connecting, please wait…” has shown for a long time, please:
check your settings are correct; check the 3G router supports your
3G Modem; check your 3G Modem works when directly connected
to your computer.
2. Dynamic IP(DHCP)
This is good for hotels, restaurants and other public places. The
router can connect via dynamic IP mode to network resources via
the network cable to the router. Then via either of the following
two methods.
1. Hard-switching: 3G/DHCP set to DHCP.
2. S
oft Switch: turn on the router interface, click on the “Basic
Settings> Internet access mode”, select the dynamic IP, and
then click “OK” to save the settings.
eturn to the system state if the IP address for that network is conR
nected successfully, if not click the “Update” button to obtain an IP
address.
Note:
1. In DHCP mode, the router works in the ETH WAN port mode.
2. Wireless devices can connect to the router via WiFi Internet.
8
3. PPPoE
Click on “Basic Settings> Internet access mode”, select PPPoE,
enter the broadband Internet account ID and password, click “OK”
to save the settings. Return to “System Status> running”, if PPPoE
dial-up shows “Connected” then connection is successful.
Telephone Line
MODEM
Note:
1. In DHCP mode, the router operates in the ETH WAN port
mode.
2. Wireless devices can connect to the router via WiFi Internet.
4. Static IP
In the “Basic Settings> Internet access mode” select the Static
IP mode, then enter your ISP’s IP address, subnet mask, default
gateway, DNS and other related parameters.
Charging for other devices
9
The device can charge tablet PCs, smart phones, PSPs and other
mobile devices. Use the original cable to achieve the best results with
Apple iPhone, see below for example:
Charging with power-on
1. USB-OUT interface can only charge Apple devices such as iPod,
iPad, iPhone.
2. When the 3G-USB 3G card isn’t connected you can also charge
most mobile phones, eg- Apple, Nokia, Sony Ericsson, LG, Samsung, MOTO, Cool, HTC, etc.
Charging with power-off.
3G-USB interface is not available, USB-OUT allows charging of most
phones, eg. Apple, Nokia, Sony Ericsson, LG, Samsung, MOTO, Cool,
HTC etc.
Charge the product
10
When the battery is empty, connect the USB cable between the
USB port & the computer’s USB port to charge.
PIC 2
Charging Notes:
1. Charging time: 5V 1000mA charge takes about 4.5 hours, first
charge;
5V 500mA takes about nine hours
2. Remove the battery when not in use to extend battery life.
FAQ’s
11
Q: Why can’t 3G successfully connect?
A: It may be one of the following four reasons:
1. Check the compatibility between 3G/4G modem and 3G/4G
Router.
2. Check the SIM and router and check that 3G/4G SIM card is
inserted.
3. Check whether your SIM has PIN protection. If yes, remove it.
4. Check that 3G/4G settings are correct.
Q: Why can’t I obtain a wireless signal?
A: There are 6 possible reasons:
1. Please check whether WiFi is enabled with your laptop, netbook, tablet pc and PC.
2. Check whether the WiFi indicator LED lights are on, if not then
turn on the router or restart it.
3. Remove the battery from the router & check whether you can
receive WiFi signal.
4. Check whether WiFi service is enabled in OS
5. Check that the device isn’t too far to receive signal, move
closer if needed.
6. Check whether SSID is blocked.
Q: My 3G/4G modem is not compatible?
A: Please contact support through the following email address for
modem compatibility:
1. [email protected]
Warranty against Defects
12
DROIDAX provides a 12-month warranty on the hardware of this product with respect to defects in material and workmanship under normal
use and service. The warranty, with respect to the proper performance
of the product, is limited in conjunction with the other products specified on the packaging and/or this manual.
Our goods come with guarantees that cannot be excluded under the
Australian Consumer Law. You are entitled to a replacement or refund
for a major failure and for compensation for any other reasonably
foreseeable loss or damage. You are also entitled to have the goods
repaired or replaced if the goods fail to be of acceptable quality and
the failure does not amount to a major failure DROIDAX does not
cover damage of failure caused by accident, misuse, modified, faulty
installation, struck by lightning, serial number has been removed or
repaired contrary to the instructions given by DROIDAX , or by others
than those previously specifically designated for that purpose by DROIDAX. The warranty does not extend to defects resulting from normal
wear and tear, nor does it extend to any deviating application relating
to local, regional, or national (deviation) technical or safety standards.
The benefits to the consumer given by this warranty are in addition
to other rights and remedies of the consumer under the Australian
Consumer Law and other applicable laws relating to the product.
Model: DX328
N12127
www.droidax.com
[email protected]