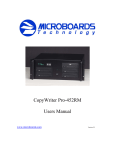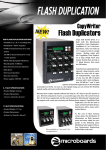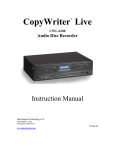
1
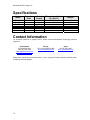
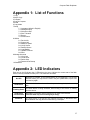
Copywriter
Flash Duplicator
Series
User’s Manual
www.microboards.com
Version 2.3
Microboards Technology, LLC
2
Compact Flash Duplicator
Table of Contents
Introduction ......................................................................................................................... 5 What’s Included .............................................................................................................. 5 Installation........................................................................................................................... 5 Loading and Unloading Flash Cards................................................................................... 5 USB Flash (USB models only) ...................................................................................... 5 SD Flash (SD models only) ........................................................................................... 5 MicroSD Flash (SD models only).................................................................................. 5 Main Menu Flowchart......................................................................................................... 7 Main Menu .......................................................................................................................... 8 Copy ................................................................................................................................ 8 Async Copy ..................................................................................................................... 8 Compare .......................................................................................................................... 8 Copy & Compare ............................................................................................................ 9 Erase ................................................................................................................................ 9 Copy Mode...................................................................................................................... 9 Setup ............................................................................................................................. 10 Language ................................................................................................................... 10 Read Error Skip......................................................................................................... 10 Write Error Skip ........................................................................................................ 10 Size Tolerance ........................................................................................................... 10 Buzzer ....................................................................................................................... 10 Screen Saver.............................................................................................................. 10 Utilities.......................................................................................................................... 11 Device Info................................................................................................................ 11 System Info ............................................................................................................... 11 Measure Speed .......................................................................................................... 11 Verify Source ............................................................................................................ 11 Rebuild Source .......................................................................................................... 11 Load Default ............................................................................................................. 11 Update Firmware ...................................................................................................... 11 Save ........................................................................................................................... 11 Manage Accounts.......................................................................................................... 12 View User ................................................................................................................. 12 Create User................................................................................................................ 12 Delete User................................................................................................................ 12 Password on Bootup ................................................................................................. 12 Shutdown ...................................................................................................................... 12 Troubleshooting and Frequently Asked Questions ........................................................... 13 Specifications .................................................................................................................... 14 Contact Information .......................................................................................................... 14 Appendix 1: List of Functions ......................................................................................... 15 Appendix 2: LED Indicators ............................................................................................ 15 3
Microboards Technology, LLC
4
Compact Flash Duplicator
Introduction
Make fast copies of flash cards using the Copywriter Flash Duplicator series. This series is
available in 7, 11, or 15 copy configurations, with a model for USB duplication and a model for
SD/MicroSD duplication.
The Copywriter Flash Duplicator offers both Synchronous and Asynchronous duplication. In
Synchronous mode, all drives are inserted and copied to at the same time. When duplicating in
Asynchronous mode, duplication starts on each drive as the drive is recognized, allowing you to
remove and replace individual drives as the duplication process is completed to continue
duplicating without additional user action.
What’s Included
When unpacking your Copywriter Flash Duplicator system, the following items should be
included:
•
•
•
Copywriter Flash Duplicator
Users Manual (this document) and Starter Kit
Power Cord
If any of these items are missing, please contact your distributor or Microboards Technology
Technical Support.
Please have the Model and Serial Number of your Copywriter Flash Duplicator available when
contacting Technical Support.
Installation
•
Connect the power cable to the Copywriter Flash Duplicator and plug in to a
protected power outlet strip or UPS power supply.
Turn on power to the duplicator.
The system will go through initialization and then display: 1. Copy.
The system is now ready to use.
•
•
•
Loading and Unloading Flash Cards
You should never unload any card that is in use by the duplicator. If the green LED above the
port is flashing, the card is in use.
USB Flash
(USB models only)
To load USB flash cards, slide the card into the port. If it does not slide in easily, flip the USB
card over and try again.
To unload USB flash cards, simply pull them out of the port.
SD Flash
(SD models only)
To load SD flash cards, slide the card into the upper, wide port with the circuit side down until the
card clicks into place. If the green LED above the card port fails to light after a moment, unload
the card, flip it over, over and try again.
To unload SD flash cards, push in and release each card. The ports will slightly eject the cards.
MicroSD Flash
(SD models only)
To load MicroSD flash cards, slide the card into the lower, narrow port with the circuit side up. If
the green LED above the card port fails to light after a moment, flip the card over and try again.
To unload MicroSD flash cards, simply pull them out of the port.
5
Microboards Technology, LLC
Hardware Description
Controller Interface
and Display
Recorder Ports
(all ports below the first
row are also recorder
ports)
Reader
Port
Copywriter USB
11 Flash
Duplicator
Power Switch
The Copywriter Flash Duplicator consists of a reader port; 7, 11, or 15 flash drive ports; and
Controller module.
The master card will always be inserted into the TOP LEFT port.
The blank cards will always be inserted into the remaining ports.
The green LEDs above each port will flash when in use or will stay solid green after a successful
duplication. The red LED above each port will light when an error on that card occurs.
The LCD display will show the different menu selections and also information pertaining to the
recording process. Here is a typical example of what is displayed during the COPY process:
Displays the function being performed, such as
Copying or Comparing
Shows the size
of the Master
▲
▼
Navigate through
the menu options
ENT
Accept the
menu item
showing
ESC Exit from the
menu item
showing
Displays an estimate of the
amount of time remaining
6
Displays the percentage
of the master that has
been copied
Compact Flash Duplicator
Main Menu Flowchart
ENT
1. Copy
Copy
1m12s
3669M
89%
OK:11NG:0 (Job:011)
Remove All Devices
ENT
ESC
▼
ENT
2. Async Copy
Async Copy 3669M
Working:0 Waiting
Async Copy 3669M
Working:15
89%
Remove Flash drives and
add more blanks to continue
ESC
▼
ENT
3. Compare
Compare
1m12s
3669M
89%
OK:11NG:0 (Job:011)
Remove All Devices
ENT
ESC
▼
ENT
4. Copy & Compare
Copying… 3669M
1m12s
89%
Comparing…3669M
1m12s
89%
ESC
▼
5. Erase
ENT
Quick Erase
▼
Full Erase
▼
ENT
SMART
▼
▼
Secure Erase
RAW
▼
▼
7. Setup
RAW Erase
▼
▼
6. Copy Mode
ENT
OK:11NG:0 (Job:011)
Remove All Devices
ENT
See Setup on page 10
▼
8. Utilities
ENT
See Utilities on page 11
▼
9. Manage Accounts
ENT
See Manage Accounts on page 12
▼
10. Shutdown
.
ENT
Shutdown
Press ENT to Shutdown
7
Microboards Technology, LLC
Main Menu
There are 10 different Main Menu items for the Copywriter Flash Duplicator: Copy, Async Copy,
Compare, Copy & Compare, Erase, Copy Mode, Setup, Utilities, Manage Accounts, and
Shutdown. For the Setup options, please refer to page 10.
These instructions refer to using 11 USB recorder ports (available only in the USB 11 Flash
Duplicator), but the instructions will not differ when using any of the Copywriter Flash Duplicators,
either USB or SD. Any Copywriter Flash Duplicator model will operate using any number of the
available recorder ports.
Copy
Place your master card into the reader port, always the upper left port, and your blank cards into
the recorder ports.
Press the ENT button on the controller interface. If all recorder ports are filled, duplication will
begin. If not, the display will show how many target cards are in place; press ENT again to begin
duplication to the loaded target cards. If all target ports are not being used, duplication will also
begin automatically in 30 seconds if you do nothing.
The data will be copied from the master flash drive to the blank flash drives.
When the job is completed, the green LED above the recorder ports will show a steady green and
the cards can be removed.
When each duplication cycle completes, the status of the
duplication will be displayed. OK indicates the number of
OK: 11 NG: 0 (Job: 011)
successful duplications during the cycle just completed, NG
Remove All Devices
shows the number of failed duplications, and Job shows how
many flash drives have been duplicated since the duplicator was last at the Copy menu.
Replace all cards and press the ENT button to restart duplication. If you need to make copies of
a new master drive, replace the flash drive in the reader slot. You do not need to exit out of Copy
mode to change masters. Changing masters will reset the Job total.
Async Copy
Async Copy mode allows you to have the duplication process begin on each flash drive as it is
inserted into the duplicator, rather than waiting for all drives to be inserted.
Press the ENT button on the controller interface. The inserted
Async Copy
3669M
master will first be recognized, then the duplicator will start
searching for inserted flash drives. As it finds drives, the
Working:0
Waiting
displayed Working number will increase and drives will begin
to be copied to as they are found. Continue inserting flash drives until you have as many as
needed, or until you have reached the capacity of your duplicator.
The display will show the completed percentage of the flash
drive that is farthest along in the duplication process, until that
drive reaches 100% complete, at which point the green and
red LEDs above that drive will both come on. Remove the
drive, and insert another drive to begin copying to the new
drive.
Async Copy…
Working:15
3669M
48%
When the last drive you need is complete, press the ESC button and remove the master drive.
Compare
The Compare function is used to compare the master card with the copied cards.
Place your master card into the reader port and your copied cards into the recorder ports.
Press the ENT button on the controller interface. The
duplicator will now compare the master and copied cards.
When completed, the display will read:
8
OK: 11 NG: 0 (Job: 011)
Remove All Devices
Compact Flash Duplicator
Copy & Compare
The Copy and Compare function will perform both operations, one after the other. If the Copy
portion passes without errors, the system will automatically start the Compare process.
Place your master card into the reader port and your blank cards into the recorder ports. Press
the ENT button on the controller interface.
The duplicator will first copy the master card to the blank cards. When the Copy completes, the
unit will start the Compare process. The display will switch from showing Copying… to
Comparing… during the comparison.
When the job is completed, the totals will be provided.
Erase
The Erase function has 4 erasure method options:
• Quick Erase will erase only the beginning section of the Flash Storage Device, which will
hide the data and allow the data to be overwritten. Then it will format the Flash Storage
Device using FAT32 File System.
• Full Erase will erase the entire Flash Storage Device by writing 0’s throughout. Then it
will format the Flash Storage Device using FAT32 File System. The erase timeframe
varies depending on the data capacity of the Flash Storage Device.
• RAW Erase is identical to Full Erase, except that it does NOT format the Flash Storage
Device.
• Secure Erase will erase the Flash Storage Device thoroughly to make the chances of
data recovery almost impossible. This method involves several rounds of complete data
overwriting in various patterns with full erasure each time, and will take the longest of the
4 methods to complete.
Copy Mode
This setting will allow you to choose which Copy Mode to use. There are 2 available options:
•
Smart Copy: This is the recommended and fastest approach to making copies since it
will scan your Flash Storage Device and copy only the area which contains data.
When in Smart Copy mode, the Size Tolerance setting will check that the size of the data
on the source drive will fit onto the target drives.
•
RAW Copy: This is the safest but slowest approach to making copies since it will copy
your entire Flash Storage Device bit by bit.
When in RAW Copy mode, the Size Tolerance setting will check that the size of the
target drive and source drives match or fall within the size variance specified.
Selecting the Copy Mode for your Master Formats
Some formats, such as NTFS, are not supported by the Smart Copy mode. In any case in
which the formatting of the source drive is not supported in Smart Copy mode, RAW Copy
mode will automatically be used. You will not need to change the Copy Mode setting to
duplicate a format not supported in Smart Copy mode.
Because of this, having the Copy Mode set to Smart Copy will always provide you with the
fastest duplication possible for your master flash drive.
9
Microboards Technology, LLC
Setup
The Setup menu gives you access
to some of the default settings used
by the Copywriter Flash Duplicator.
6. Setup
ENT
Language
This setting specifies the language on the display.
The default language is English.
Read Error Skip
This setting will allow you to change the number of
times you want the system to skip ahead when the
system encounters a reading error while reading
your original Flash Storage Device. By default, the
system does not skip any reading error. Under this
setting, if the system encounters any errors, it would
result in an immediate job failure.
This function will not fix any discovered error. It will
merely skip the error and copy the remaining data.
The setting will allow the number of errors specified
before generating an error.
ENT
This setting specifies the language
displayed on the interface.
ENT
This setting can be changed to
alter the Read Error behavior.
ENT
This setting can be changed to
alter the Write Error behavior.
ENT
Allows you to change tolerance of
different size master and blank flash
drives.
ENT
Turns the buzzer ON or OFF.
ENT
Turns the Screensaver ON or
OFF.
1. Language
▼
2. Read Error Skip
▼
3. Write Error Skip
▼
4. Size Tolerance
▼
5. Buzzer
▼
6. Screen Saver
Write Error Skip
This setting will allow you to change the number of times the system will skip when the system
encounters a writing error during the copying process. By default, the system does not skip any
writing errors. Any writing errors would result in an immediate failure on this Flash Storage
Device.
This function will not fix any errors that it may find. It will only skip errors to write the remaining
data. The setting will allow the number of errors specified before generating an error.
Size Tolerance
This setting allows you to determine how closely the capacity of the target cards match the
capacity of the source card. The Size Tolerance behavior will change depending on the Copy
Mode setting (see page 9). If Copy Mode is set to Smart Copy, the size of the data on the
source will be checked against the target drive capacity. If Copy Mode is set to RAW Copy, the
target drives must be as large as or larger than the source regardless of the data size being
copied.
Options are: OFF (target cards must be the same capacity or larger than the source card), 1%
difference in capacity size between the master and the blanks, 5% difference, or IGNORE.
Because errors can occur if the Size Tolerance is set to IGNORE, we do not recommend the
IGNORE setting, but is available if you absolutely need it.
This setting is intended for flexibility if the source card is a low-capacity card. Note that even if
the target drives are larger than the source drive, this setting can generate a false error state.
Any attempt to duplicate more data than the target card’s capacity will fail.
Buzzer
This setting allows you to turn ON or OFF the beep produced when the buttons are pressed or
an audible status cue is provided. The default setting is ON.
Screen Saver
This setting turns the screensaver ON or OFF. Default setting is ON.
10
Compact Flash Duplicator
7. Utilities
ENT
Utilities
The Utilities menu gives you access to the utility
functions available on the Copywriter Flash
Duplicator.
Device Info
This utility will provide you with information on the
flash drive loaded in the Flash ports. Use the
arrow buttons to scroll through the list of devices
found.
The first screen will show the overall capacity of
the selected drive. Press ENT to see the current
formatting of the drive and the total amount of
space on the drive being used.
System Info
The System Info utility will provide you with
information about the Copywriter Flash Duplicator,
such as firmware and controller information.
Measure Speed
ENT
This utility provides information on any
Flash Drive currently loaded into any of
the USB ports.
ENT
This utility provides you with
information on the Copywriter
Flash Duplicator
ENT
This utility measures the Read
and Write speeds of the selected
flash drives.
ENT
This utility checks the source drive for
readability.
1. Device Info
▼
2. System Info
▼
3. Measure Speed
▼
4. Verify Source
▼
5. Rebuild Source
ENT
This utility will help eliminate false
comparison errors on fresh media when
duplicating in RAW mode.
▼
6. Load Default
ENT
This utility is used to restore
all default settings and
options.
▼
7. Update Firmware
ENT
This utility is used to update
the controller firmware.
▼
This utility is used to save any
ENT
This utility allows you to check the Read and Write
changes made to any setting or
8. Save
option.
speeds of any flash drive loaded into the Flash
ports. Use the arrow buttons to scroll through the
available drives, pressing ENT when you are on the drive you want to test. After a brief
analysis of the drive the Read Speed and Write Speed of that drive will be displayed.
If you feel your duplication is progressing slowly, run this utility on each drive to determine if
any of the drives have lower speeds than the others. Since duplication can only occur as fast
as the slowest drive, having a single drive with a lower write speed capability will slow down the
entire duplication cycle.
Verify Source
Use the Verify Source to verify the readability of your source flash drive. It is recommended
that you run this utility if you are seeing large amounts of duplication errors with a specific flash
drive when used as the source.
Rebuild Source
Flash drives that have never been written to before may cause errors during the Compare
process if you are duplicating in RAW mode. This will only affect RAW duplication mode.
Use the Rebuild Source during Compare operations if burning in RAW mode and you are using
Flash drives that have never used before. The Rebuild function will ensure that all sectors of
the blank Flash drives have been written to in order for the comparison to not generate
mistaken errors when attempting to compare the empty sectors.
Load Default
Use the Load Default utility if you need to return all settings and options back to the defaults.
Update Firmware
Use the Update Firmware utility if you need to update the firmware of your Copywriter Flash
Duplicator.
You should only update the firmware if you have verified with Microboards Technical Support
that there is a need to do so, and that the firmware files you have are appropriate for your
equipment.
Save
Many of the settings and options can be changed, but those changes will not be made
permanent unless you either Save the settings or run the correct Shutdown process. The
Save utility will make any changes you may have made to the various settings and options
permanent without running the Shutdown process.
11
Microboards Technology, LLC
8. Manage Accounts
ENT
Manage Accounts
The Manage Accounts menu includes optional
User functions that allow you to limit access to the
duplicator.
ENT
Use this option to review the user
information that has already been added.
ENT
Use this menu option to add a
new user.
1. View User
▼
2. Create User
▼
ENT
You must either log in as the Admin user or have
the Password on Bootup setting as NO if you
want to access the Manage Accounts menu.
3. Delete User
▼
4. Password on
Bootup
ENT
Use this menu to remove a user from the
list. After a user account is deleted, that
user account will no longer have access
to the duplicator.
Use this menu to turn the security on or
off.
You will be asked for the password when you enter the Manage Accounts menu. The default
password is 0000, which should be changed if you plan on using the user account security
features. If you are using the Password on Bootup option, be sure to keep a separate
record of the Admin account password!
View User
This function allows you to see the list of available user accounts. Use the ▼▲ buttons to
scroll through the user list.
Create User
Use the Create User function to add a new user account.
You will first be asked to enter in the new user name. Use the ▼▲ buttons to select the first
character, then press ENT to move to the next, or ESC to move to the prior character. You
can enter in up to 7 characters. After the 7th character is entered, press ENT when the cursor
is on OK.
Next, enter the user’s password. The password is limited to numerals, and will be 4 digits
long. Again, use the ▼▲ buttons to change the number of the current digit, pressing ENT
when the number is correct. After the 4th digit is entered, press ENT when the cursor is on
OK. The display will briefly show that the user has been added.
Delete User
The Delete User is used to remove users account from the list. The Admin user account
cannot be deleted.
Use the ▼▲ buttons to scroll through the list of existing users. When the display is showing
the user you want to remove, press the ENT button. You will be asked to verify that you want
to remove the user; press ENT if you do, or ESC if it is not the correct user to delete. The
display will briefly show that the selected user has been deleted.
Password on Bootup
To use the Managed Accounts Users to limit access to the duplicator, you must turn the
Password on Bootup setting to YES. This will take effect the next time the duplicator is
turned on.
You must use either the Save function in the Utilities menu or the Shutdown function prior
to turning the duplicator off, or changes you have made to the accounts may not be saved!
Shutdown
When turning off your Copywriter Flash Duplicator, it is highly recommended that you do so using
the Shutdown menu option. Not only does this function save any system settings that you may
have changed in the Setup menu, it also shuts down the duplicator components in a safe way.
When the display reads Ready to Power OFF after selecting the Shutdown function, you can use
the power switch on the front.
12
Compact Flash Duplicator
Troubleshooting and Frequently
Asked Questions
Is there any limitation for copy file format?
You can use SMART Copy Mode to copy FAT16/32 and Linux (ext3) formatted flash drives.
This mode will only copy the data, and therefore the time to copy your master will be shorter.
For other formats, RAW Copy Mode will be used to copy the whole Flash master
automatically if you have the duplicator set in SMART Copy Mode. You will not need to
change the Copy Mode setting if your master format is not supported for SMART Copy Mode.
How do I know the data is a true copy of the master?
The duplicator has CRC check capability and the ability to compare the copies to the master.
Why would the copied data fail during the compare when the data is
present on the copy?
The Flash chip in the copied flash drive may be unstable. This may cause the duplication to
pass but the comparison to fail.
What should I do if I encounter a copy failure?
The cause may be either your source or your blank cards.
• Make sure the source content size is not greater than the target content size. Use the
Device Info function to check the target and source capacities.
• Use a PC to double check the source data.
• Use the Prescan function to check the source flash data for readability. If the Flash
chip onto which you are copying the data is unstable, the copy process can be affected.
Why does the copy speed seem slow?
The Flash duplicator can reach 35MB/sec, but if you find the copy speed is slow it may be the
flash quality that is affecting the speed of the copy. You can use the Measure Speed function
to test the Read and Write speeds of your flash drives.
Can I make copies of Bootable Flash drives?
The duplicator can make functional copies of bootable flash drives provided the boot sector
of the original flash drive is not encrypted. Always verify with the supplier of the
master bootable flash drive that the boot sector of the master is not encrypted before
attempting to duplicate the master.
Why are both LEDs on above the ports with inserted flash drives?
If you are duplicating using the Async Copy option, both LEDs will come on to indicate drives
that have finished the duplication process and can be removed from the duplicator. In Async
Copy mode, the duplication process begins as each drive is recognized, so they will not
complete at the same time. Simply remove the flash drive, and if you need to make more
copies of the same master, insert a new blank flash drive.
13
Microboards Technology, LLC
Specifications
Model
Recorder
Ports
Card
Format
Dimensions, inches
(H x W x D)
Weight
CFD-USB-07
CFD-USB-11
CFD-USB-15
7
11
15
USB
USB
USB
7 x 7.5 x 11
11 x 7.5 x 17
11 x 7.5 x 17
11 lbs
17 lbs
18 lbs
CFD-SD-07
CFD-SD-11
CFD-SD-15
7
11
15
SD/MicroSD
SD/MicroSD
SD/MicroSD
7 x 7.5 x 11
11 x 7.5 x 17
11 x 7.5 x 17
11 lbs
17 lbs
18 lbs
Contact Information
For technical questions or support issues, please contact Microboards Technology technical
support at:
United States
PH: 952-556-1639
FAX: 952-556-1628
[email protected]
www.microboards.com
Europe
PH: +44 (0) 845 230 7800
www.microboards.co.uk
Japan
PH: 03-3561-2266
www.microboards.co.jp
Please have the Model and Serial Number of your Copywriter Flash Duplicator available when
contacting Technical Support.
14
Compact Flash Duplicator
Appendix 1: List of Functions
1 Copy
2 Async Copy
3 Compare
4 Copy & Compare
5 Erase
6 Copy Mode
7 Setup
7.1 Language (default is English)
7.2 Read Error Skip
7.3 Write Error Skip
7.4 Size Tolerance
7.5 Buzzer
7.6 Screen Saver
8 Utilities
8.1 Device Info
8.2 System Info
8.3 Measure Speed
8.4 Verify Source
8.5 Rebuild Source
8.6 Load Default
8.7 Update Firmware
8.8 Save
9 Manage Accounts
9.1 View User
9.2 Create User
9.3 Delete User
9.4 Password On Bootup
10 Shutdown
Appendix 2: LED Indicators
Each port on the Duplicator has 2 LEDs above the port to indicate the current state of the flash
device currently inserted into each port. The states are as follows:
No LED
No device is inserted, or the inserted device is not recognized. For SD and
MicroSD cards, you may have the card in the port upside-down; flip the card
over and try again.
Solid Green
A flash device has been inserted into the port and recognized, but is currently
idle.
Flashing Green
The flash device is being accessed, either writing to the device or reading
from the device.
Solid Green
and Solid Red
Solid Red
Duplication is complete and the flash device is ready to be removed.
This LED state only occurs during Async Copy.
The flash device in the port did not duplicate correctly, or differences were
found between the copy and the master during a Compare.
15