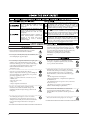
1
PORTABLE ORGAN
Owner's Manual
Thank you for purchasing a Roland C-180 Portable Organ. The C-180 is a new organ designed for religious congregations and all other occasions that call for high-quality organ or orchestral music in a portable instrument.
Two modes: Organ and Orchestra
Bass and Manual parts
The C-180 comes with the finest organ sounds
Roland, and its organ division, Rodgers, have to offer.
On top of that, it also features excellent instrument
sounds for orchestral music.
Though a single-keyboard instrument, the C-180
allows you to play monophonic bass parts (polyphonic in Orchestra mode) and polyphonic instrument
sounds. The instrument sounds can be played via the
entire keyboard, while the bass notes can be triggered
via the left half of the keyboard. Whenever you play
two-hand parts (and perhaps even chords with your
left hand), the bass part will sound the lowest note of
every chord you play.
In Organ mode, you can use the C-180 as “full works”
instrument by switching on all ten Manual organ
sounds simultaneously.
Record your own performances
The C-180 makes it easy to record your own performances.
Before using this instrument, carefully read the section on page 2. It provides important information concerning the
proper operation of the C-180.
To get the most out of the C-180 and to ensure many years of trouble-free service, we urge you to read through this
Owner’s Manual thoroughly.
To avoid confusion, let’s agree to use the word “button” for all keys on the front panel, and only use “key” when referring to the C-180’s keyboard.
Copyright © 2000 ROLAND EUROPE. All rights reserved.
No part of this publication may be reproduced in any form without the written permission of Roland Europe s.p.a.
1
Used for instructions intended to alert
the user to the risk of death or severe
injury should the unit be used
improperly.
Used for instructions intended to alert
the user to the risk of injury or material
damage should the unit be used
improperly.
* Material damage refers
other adverse effects
respect to the home
furnishings, as well
animals or pets.
to damage or
caused with
and all its
to domestic
• Before using this instrument, make sure to read the
instructions below, and the Owner’s Manual.
• Do not open (or modify in any way) the instrument, and
avoid damaging the supplied adapter.
• Do not attempt to repair the instrument, or replace parts
within it (except when this manual provides specific
instructions directing you to do so). Refer all servicing to
your retailer, the nearest Roland Service Center, or an
authorized Roland distributor, as listed on the
“Information” page.
• Never use or store the unit in places that are:
Subject to temperature extremes (e.g., direct sunlight in
an enclosed vehicle, near a heating duct, on top of heatgenerating equipment); or are
• Damp (e.g., baths, washrooms, on wet floors); or are
• Humid; or are
• Exposed to rain; or are
• Dusty; or are
• Subject to high levels of vibration.
• Be sure to use only the adapter supplied with the
instrument. Also, make sure the line voltage at the
installation matches the input voltage specified on the
name plate.
• Avoid damaging the adapter’s cord. Do not bend it
excessively, step on it, place heavy objects on it, etc. A
damaged cord can easily become a shock or fire hazard.
Do not use the adapter when it shows clear signs of
damage.
2
The
symbol alerts the user to important instructions
or warnings.The specific meaning of the symbol is
determined by the design contained within the
triangle. In the case of the symbol at left, it is used for
general cautions, warnings, or alerts to danger.
The
symbol alerts the user to items that must never
be carried out (are forbidden). The specific thing that
must not be done is indicated by the design contained
within the circle. In the case of the symbol at left, it
means that the unit must never be disassembled.
The ● symbol alerts the user to things that must be
carried out. The specific thing that must be done is
indicated by the design contained within the circle. In
the case of the symbol at left, it means that the powercord plug must be unplugged from the outlet.
• This instrument may be capable of producing sound
levels that could cause permanent hearing loss. Do not
operate for a long period of time at a high volume level,
or at a level that is uncomfortable. If you experience any
hearing loss or ringing in the ears, you should
immediately stop using the unit, and consult an
audiologist.
• Do not allow any objects (e.g., flammable material,
coins, pins); or liquids of any kind (water, soft drinks,
etc.) to penetrate the instrument.
• Immediately turn the power off, remove the adapter
from the outlet, and request servicing by your retailer,
the nearest Roland Service Center, or an authorized
Roland distributor, as listed on the “Information” page
when:
• The the adapter has been damaged; or
• Objects have fallen into, or liquid has been spilled onto
the instrument; or
• The instrument has been exposed to rain (or otherwise
has become wet); or
• The unit does not appear to operate normally or
exhibits a marked change in performance.
• In households with small children, an adult should
provide supervision until the child is capable of
following all the rules essential for the safe operation of
the unit.
• Protect the unit from strong impact. Do not drop it!
• Do not force instrument to share an outlet with an
unreasonable number of other devices. Be especially
careful when using extension cords—the total power
used by all devices you have connected to the extension
cord’s outlet must never exceed the power rating
(watts/amperes) for the extension cord. Excessive loads
can cause the insulation on the cord to heat up and
eventually melt through.
ENGLISH
..............................................................................................................
• Before using the unit in a foreign country, consult with
your retailer, the nearest Roland Service Center, or an
authorized Roland distributor, as listed on the
“Information” page.
• The instrument and the adapter should be located so
their position does not interfere with their proper
ventilation.
..............................................................................................................
• Always grasp only the plug or the body of the adapter
when plugging into, or unplugging from, an outlet or
this instrument.
..............................................................................................................
• Whenever the unit is to remain unused for an extended
period of time, disconnect the adapter.
..............................................................................................................
• Try to prevent cords and cables from becoming
entangled. Also, all cords and cables should be placed so
they are out of the reach of children.
..............................................................................................................
• Never climb on top of, nor place heavy objects on the
unit.
..............................................................................................................
• Never handle the adapter with wet hands when plugging
into, or unplugging from, an outlet or this unit.
• Before cleaning the unit, turn off the power and unplug
the adapter from the outlet (see page 7).
..............................................................................................................
• Whenever you suspect the possibility of lightning in
your area, disconnect the adapter from the outlet.
..............................................................................................................
3
Owner’s Manual
Contents
1. Panel descriptions
. . . . . . . . . . . . . . . .5
1.1 Front panel . . . . . . . . . . . . . . . . . . . . . . . . . . . . . . . . .5
1.2 Rear panel . . . . . . . . . . . . . . . . . . . . . . . . . . . . . . . . . .6
1.3 Headphone connectors . . . . . . . . . . . . . . . . . . . . . . . .6
2. Getting started . . . . . . . . . . . . . . . . . . .7
2.1 Connecting the adapter . . . . . . . . . . . . . . . . . . . . . . .7
2.2 Turning the power on and off . . . . . . . . . . . . . . . . . .7
2.3 Adjusting the volume . . . . . . . . . . . . . . . . . . . . . . . . .7
2.4 Connecting headphones (sold separately) . . . . . . . . .7
2.5 Listening to the demo songs . . . . . . . . . . . . . . . . . . .8
Selecting a demo song . . . . . . . . . . . . . . . . . . . . . . .8
3. Playing organ music (Organ mode) . . .9
3.1 Setting registers in Organ mode . . . . . . . . . . . . . . . .9
Registering the Manual section . . . . . . . . . . . . . . . .9
Registering the Bass sound . . . . . . . . . . . . . . . . . . .9
Selecting various organ timbres . . . . . . . . . . . . . . .9
3.2 BASS functions . . . . . . . . . . . . . . . . . . . . . . . . . . . . .10
Changing the split point . . . . . . . . . . . . . . . . . . . .10
Playing only bass notes to the left of the split point 10
Playing the bass notes with an optional PK-5 . . .10
3.3 Additional functions . . . . . . . . . . . . . . . . . . . . . . . . .11
Adding Reverb . . . . . . . . . . . . . . . . . . . . . . . . . . . .11
Selecting different tunings . . . . . . . . . . . . . . . . . .11
Using an expression pedal . . . . . . . . . . . . . . . . . . .11
Transposing (same fingering, different notes) . . .12
4
4. Playing other kinds of music
(Orchestra mode) . . . . . . . . . . . . . . . . .13
4.1 Selecting Manual sounds . . . . . . . . . . . . . . . . . . . . .13
Layering two Manual sounds . . . . . . . . . . . . . . . .13
Using a sustain pedal . . . . . . . . . . . . . . . . . . . . . . .13
4.2 Adding Bass sounds . . . . . . . . . . . . . . . . . . . . . . . . .14
4.3 Additional functions . . . . . . . . . . . . . . . . . . . . . . . . .14
5. Convenient functions . . . . . . . . . . . . .15
5.1 Recording your performance . . . . . . . . . . . . . . . . . .15
Recording . . . . . . . . . . . . . . . . . . . . . . . . . . . . . . . .15
Playing back a recorded song . . . . . . . . . . . . . . . .15
5.2 Using the C-180’s memories . . . . . . . . . . . . . . . . . . .15
Saving your settings as registrations . . . . . . . . . . .15
Loading the settings of a memory . . . . . . . . . . . .16
5.3 Using the audio outputs . . . . . . . . . . . . . . . . . . . . . .16
5.4 Inizializing your C-180 (Factory Setup) . . . . . . . . . . .16
6. Connecting the C-180 to MIDI devices 17
6.1 Making the connections . . . . . . . . . . . . . . . . . . . . . .17
6.2 MIDI functions supported by the C-180 . . . . . . . . . .18
7. Appendix . . . . . . . . . . . . . . . . . . . . . . .19
7.1 Troubleshooting . . . . . . . . . . . . . . . . . . . . . . . . . . . .19
7.2 Suggested registrations . . . . . . . . . . . . . . . . . . . . . .20
7.3 Demo song list . . . . . . . . . . . . . . . . . . . . . . . . . . . . .20
7.4 Specifications . . . . . . . . . . . . . . . . . . . . . . . . . . . . . .21
C-180
1. Panel descriptions
1.1 Front panel
A
B
C
D
ENGLISH
E
F
G
H
A VOLUME slider
This slider allows you to increase or decrease the volume of all sound sections. For optimum sound quality, we recommend you set this slider to the 3/4 position.
B BASS slider
This slider controls the volume of the bass sounds (in
Organ or Orchestra mode). (See page 7). It also allows
you to set the Reverb level (see page 11) and the volume of the Layer sounds in Orchestra mode
(see page 13).
C BASS tilt tabs
These tabs allow you to switch on/off the corresponding Organ bass sound (SUB BASS or OCTAVE) or
Orchestra bass tone (STR. BASS or E. BASS).
D MANUAL tilt tabs
In Organ mode (when the ORCHESTRA indicator
does not light), these tabs allow you to switch on the
corresponding organ register. You can activate all registers if you like.
In Orchestra mode (when the indicator of the same
name lights), you can press one of these to select the
orchestral sound whose name is printed below the tab
you pressed. It is also possible to select two sounds
simultaneously.
E DEMO button
Press this button to activate the C-180’s Demo mode.
See page 8.
F TRANSPOSE button
Use this button to transpose the keyboard. This allows
you to play in your favorite key, while the notes you
play are sounded in another key. See page 12.
I
J
K
L
M
H ORCHESTRA button
Press this button if you want to use the C-180’s
orchestral sounds rather than the organ sounds. See
page 13.
I CANCEL, M1~M4 buttons
Your C-180 comes with four memories that can be
accessed via the [M1]~[M4] buttons. There are four
memories for either mode (Organ and Orchestra).
Press the [CANCEL] button to override the settings of
the currently selected memory.
J SET button
Hold down this button while pressing an [M1]~[M4]
button to save the current panel settings to the corresponding memory.
K REC button
Your C-180 also contains a digital recording function.
Press this button to select the record standby mode.
(Next, press [PLAY] to start recording.)
Note: There are four song memories. See page 15.
L PLAY button
The function of this button depends on the REC indicator: if it flashes, pressing [PLAY] will start the
recording of a new song. If the REC indicator is off,
[PLAY] allows you to listen to a previously recorded
song.
M ORGAN BRILLIANCE button
In Organ mode, this button allows you to make the
organ sound(s) brighter. In Orchestra mode, it is used
to select a second bank of orchestral sounds (see page
13).
G REVERB button
Press this button to switch the digital Reverb effect on
(indicator lights) or off. See page 11.
5
Owner’s Manual
1.2 Rear panel
A
B
C
D
E
A POWER button
Press this button once to switch the C-180. Press it
again to switch the C-180 off.
B DC IN connector
This where you need to connect the supplied ACJ
adapter. If it is damaged or out of order, be sure to
replace it with the same ACJ model. Do not use other
adapters as these may damage your C-180 beyond
repair.
C Cord hook
Allows you to anchor the adapter’s power cord. See
page 7.
D SUSTAIN connector
This is where you can connect an optional DP-2, DP6, or BOSS FS-5U footswitch that allows you to hold
the notes you are playing on the keyboard.
E EXPRESSION PEDAL connector
Connect an optional Roland EV-5, or FV-300L pedal
to this jack so as to be able to control the C-180’s output level.
1.3 Headphone connectors
The C-180 features two headphone jacks. This allows
two people to listen through headphones simultaneously, making it very useful for lessons. Additionally,
this allows you to play without having to worry about
bothering others around you, even at night.
For optimum sound quality, be sure to use optional
Roland RH-25 or RH-50 headphones.
6
F
G
H
F PITCH control
Allows you to tune the C-180 to acoustic instruments.
Turn it towards the “” symbol to tune the C-180 flatter (lower), and towards “#” to tune it higher.
G OUTPUT STEREO R, L/MONO connectors
The C-180 boasts an excellent internal stereo amplifier
and speaker system that do away with the need for
external amplification. Yet there may be times, when
you prefer the C-180’s sound to be distributed via the
public address system of the hall or church where you
are performing – or you may want to record the
C-180’s sound without background noises.
H MIDI OUT/IN connectors
Use these connectors for transmitting (OUT) and
receiving (IN) MIDI messages to/from other instruments.
C-180
2. Getting started
2.1 Connecting the adapter
Note: To prevent malfunction and/or damage to speakers
or other devices, always turn down the volume, and turn
off the power of all devices before making any connections.
Turning off the power
1. Set the [VOLUME] slider to the minimum position.
2. Press the [POWER] switch to turn off the power.
2. Connect the other end to an AC outlet.
ENGLISH
1. Connect the supplied ACJ adapter to the DC IN
jack on the rear panel of the C-180.
2.3 Adjusting the volume
The C-180 features two volume sliders. The [VOLUME] slider is used to change the global volume,
while the [BASS] slider allows you to set the level of
the bass sounds with respect to the organ or orchestral sounds.
Global volume (all
sections)
2.2 Turning the power on and off
Your C-180 is fitted with an amplifier and speakers so
that you do not need additional devices.
1. Turn the volume all the way down.
VOLUME
BASS
Volume of the
bass tone
2.4 Connecting headphones (sold
separately)
The C-180 features two headphone jacks. This allows
two people to listen through headphones simultaneously, making it very useful for lessons. Additionally,
this allows you to play without having to worry about
bothering others around you, even at night.
1. Turn the volume all the way down.
2. Plug a pair of headphones (Roland RH-25, RH-50)
into a PHONES jack on the lower-left panel of the
C-180.
2. Press the [POWER] switch on the rear panel to
turn on the power.
Press at least one tab, because all sounds will be off
immediately after switching on the C-180. Adjust the
volume to your liking.
Note: Your C-180 is equipped with a protection circuit. A
brief interval after power up is required before it will operate normally.
3. Adjust the volume.
By connecting headphones to the C-180, you switch
off its speakers, which is ideal for playing or practising
without disturbing others.
Note: Be sure to use stereo headphones.
Precautions to take when using headphones
To avoid damaging or severing the headphone cord,
be sure to handle the headphones by holding the
phones themselves, and grasping the plug rather than
the cord when pulling the headphone plug.
• Connecting the headphones when the volume of connected equipment is turned up may result in damage
to the headphones. Connect the headphones only
after turning the volume down completely.
7
Owner’s Manual
• Listening at excessively high volume levels will not
only damage the headphones, but may also cause
hearing loss. Listen at appropriate levels.
3. Press the [M] button that corresponds to the bank
that contains the desired demo song.
2.5 Listening to the demo songs
The C-180 features seventeen internal demo songs
you may want to listen to before starting to play yourself.
Selecting a demo song
The C-180’s demo songs reside in four banks that can
be selected using the [M1]~[M4] buttons.
[M1] BAROQUE
TILT TAB
Title
Principal 8’ DORICA
Gemshorn 8’ CHORALE
Gedackt 8’ TRIO IN MAJOR
Octave 4’
FUGUE
Composer
Bach
Bach
Bach
Telemann
[M2] Bridal
TILT TAB
Principal 8’
Gemshorn 8’
Gedackt 8’
Octave 4’
Composer
Bach
Gounoud
Schubert
Bach
Title
BRIDAL MARCH
AVE MARIA
AVE MARIA
ALLEGRO
Here’s an example: if you wanted to listen to the
“Requiem Introitus” by Mozart, you would have to
press the [M3] button.
4. Press the tilt tab that is assigned to the desired
demo song to start playback of that song.
For the “Requiem Introitus”, press [PRINCIPAL 8’].
[M3] Largo
TILT TAB
Title
Principal 8’ REQUIEM INTROITUS
Gemshorn 8’ CHORALE BWV626
Gedackt 8’ PASSACAGLIA
Octave 4’
LARGO
Composer
Mozart
Bach
Bach
Händel
Alternatively, press [SET] to listen to all songs of the
selected [M] bank.
[M4] Classical
TILT TAB
Title
Principal 8’ VOLUNTAR
Gemshorn 8’ TOCCATA
Gedackt 8’ "BALLO DEL GRAN DUCA"
Octave 4’
SPRING
Spitzflöte 4’ HARPSICHORD CONC.
Composer
Stanley
Paradisi
Sweelinck
Vivaldi
Bach
5. Press [PLAY] (or set the tilt tab you pressed above
to the off position) to stop demo song playback.
Press [SET] again to stop playback of the selected
song bank, if you pressed [SET] above to listen to all
songs of that bank.
1. Press the [DEMO] button (indicator lights).
6. To leave the Demo mode, press [DEMO] again
(indicator goes dark).
Note: All rights reserved. Unauthorized use of this material for purposes other than private, personal enjoyment is a
violation of applicable laws.
Note: In Demo mode, the keyboard cannot be played.
Note: The data of the demo songs are not transmitted to
the C-180’s MIDI OUTput.
2. In the above table, select the song you want to listen to.
8
C-180
3. Playing organ music (Organ mode)
The C-180 features two modes that are mutually
exclusive:
• Orchestra mode: In this mode, the C-180 allows you
to play orchestral sounds (i.e. sounds that are not
related to organ sounds). In Orchestra mode, too, you
can add a bass sound to your left-hand playing.
The C-180 also features a bass section that can either
be triggered via the keyboard, or via an optional PK-5
dynamic MIDI pedal unit.
There are in fact two ways of triggering the bass notes:
• A bass note corresponding to the lowest note you play
to the left of the “▼” symbol is sounded by the BASS
tone and added to the MANUAL tone.
• Bass-only triggering without the MANUAL sound. See
“Playing only bass notes to the left of the split point”
on page 10.
Use the two BASS tabs ([SUB BASS 16’] and
OCTAVE 8’]) to add one or two bass notes to your
playing.
3.1 Setting registers in Organ
mode
In Organ mode, the white tilt tabs serve the same purpose as the stops on a church organ: they allow you to
decide which registers should be audible.
Note: Be sure to press at least one tilt tab. Otherwise, you
won’t hear anything.
Registering the Manual section
The bass note corresponds to the lowest note you play.
Selecting various organ timbres
1. Make sure the ORCHESTRA indicator does not
light. Press the corresponding button if that is the
case.
By default (and as long as you do not save your own
registrations), the four [M] buttons allow you to vary
the timbre of the organ registrations:
2. Use the MANUAL tilt tabs to activate or switch off
the assigned registers.
Press [M1] to select a soft timbre and volume, [M2]
for a “p” (“piano”) sound, [M3] for an “mf ” (“mezzoforte”) sound, and [M4] for the “tutti” (“full works”)
sound. The corresponding indicator lights.
Note: Only one memory can be active at any one time.
Note: See page 15 for how to save and recall your own settings to these memories.
Note: Press [CANCEL] to switch off all registers.
If the indicator of a tab lights, the corresponding register is audible. You can activate as many registers as
you like.
Note: The SUSTAIN function is not available in Organ
mode. An optional footswitch connected to the SUSTAIN
jack will thus not allow you to hold the notes.
Note: The [TREMULANT] register cannot be used by
itself. It must be combined with at least one other MANUAL register. It has no effect on the BASS sounds.
3. Press the [ORGAN BRILLIANCE] button (indicator goes off) if you want to make the organ sound
mellower.
9
ENGLISH
• Organ mode: In this mode, the C-180 can be used as a
high-quality organ with a main and a bass section.
This mode is active when the ORCHESTRA indicator
does not light. The orchestral sounds are not available
while the C-180 is in Organ mode. In Organ mode,
the keyboard is not velocity-sensitive. This is also true
of note messages the C-180 receives via MIDI.
Registering the Bass sound
Owner’s Manual
3.2 BASS functions
Changing the split point
As stated above, the left-hand part of the keyboard
can be used to add bass notes to your playing. The
C-180 scans all keys from the far left up to the split
point to decide which bass notes to play. After activating this split function, only the BASS part will sound:
it will sound the lowest note you play to the left of the
“▼” symbol.
Playing only bass notes to the left of the
split point
You can also activate a BASS split function that will
mute the MANUAL part to the left of the split point,
leaving only the BASS part in the left half of the keyboard:
1. Press and hold a BASS tab, whose indicator does
not light, in the off position (press the side closer to
the rear panel).
Its indicator starts flashing and goes dark when you
release the tab
2. Start playing with your left and right hands.
This time, the left half of the keyboard can be used to
play monophonic bass lines (one note at the time),
while the right half allows you to trigger the organ
registers (see page 9).
BASS range (can be
changed)
MANUAL range (without BASS split)
MANUAL range
(with BASS split, see below)
Note: Do not forget to switch on at least one BASS tab in
order to hear the bass notes.
At first, the split point is located at the “▼” symbol
(the G#3 key), but this can be changed:
1. Activate one of the two BASS registers (the SUB
BASS or OCTAVE 8’ indicator must light).
2. Press and hold the tab you just pressed until its
indicator starts flashing.
3. Now press the key where you would like the new
split point to be.
You can select any key in the indicated area:
To switch off this BASS split mode, press and hold the
BASS tab in the “off ” position until it flashes again.
Playing the bass notes with an optional
PK-5
The C-180’s BASS registers can also be triggered via
MIDI. The best way to do so is by using an optional
PK-5 MIDI bass pedal unit.
With the following procedure you can set the C-180
so that the entire keyboard triggers the MANUAL
organ registers, while the PK-5 (or another MIDI
instrument) plays the BASS notes.
1. Switch off the C-180 and the PK-5.
2. Connect the PK-5’s MIDI OUT port to the C-180’s
MIDI IN connector.
3. Switch on the PK-5 and set it to transmit on MIDI
channel “14”.
4. Hold down one of the BASS tabs (in the “on” position) while switching on the C-180.
5. Start playing on the keyboard and on the PK-5.
Press and hold
either tab…
…press any key in
this range
10
C-180
3.3 Additional functions
Note: See page 15 for how to save your settings to a registration memory.
Adding Reverb
tones of an octave. The C-180 allows you to select
from among five different tuning methods (“temperaments”):
1. Hold down [CANCEL] while pressing one of the
following buttons:
Button combination
Temperament
[CANCEL] + [M1]
Mean Tone
[CANCEL] + [M2]
Pythagorean
Note: In Orchestra mode (see page 13), the Reverb effect is
not applied to the BASS sound.
[CANCEL] + [M3]
Kirnberger
[CANCEL] + [M4]
Werckmeister
1. Press the [REVERB] button (indicator lights).
[CANCEL] + [SET]
Equal (default)
ENGLISH
The C-180 allows you to add reverberation to what
you play on the keyboard. The Reverb effect provides
a pleasant reverberation that gives the impression that
you are performing in a concert hall or similar space.
See step 2 to specify the key of the selected temperament.
Mean Tone—A partial compromise of the Just Major
tuning (purer tuning than “Equal”), created to make
transposition possible. As the intervals between two
neighboring semitones depends on their pitch, this
temperament may sound out of tune to untrained
ears.
2. To cancel the Reverb effect, press the [REVERB]
button once again.
Its indicator goes dark.
Changing the Reverb level
If you like the Reverb effect but think it is too prominent or too faint, here’s how to change the Reverb
depth:
3. Press and hold the [REVERB] button until its indicator starts flashing.
4. Use the [BASS] slider to set the desired Reverb
depth.
Selecting different tunings
Tuning the C-180
There may be times when you accompany acoustic
instruments that are difficult or impossible to tune. In
that case, use the [PITCH] control on the C-180’s rear
panel to adapt the C-180’s tuning to that of the
acoustic instrument.
Turn the [PITCH] control towards the “ ” to tune the
C-180 lower (so that the A4’s frequency drops below
the default “440Hz” setting).
Turn it towards the “#” symbol to tune the C-180
higher.
Using different temperaments
Like all digital instruments, the C-180 relies on the
standard tuning system for western music, where the
distance (interval) is the same for all semitones of an
octave. This is called “equal temperament”.
Not so long ago, however, other tunings were used for
performing classical western music. These tunings are
characterized by varying intervals between the semi-
Pythagorean—Developed in ancient Greece as a
method of tuning that resolved the ambiguity of
fourths and fifths. As a result, melodies sound cleaner,
while triads may appear to be flat.
Kirnberger—This temperament is relatively tolerant
towards transposition, and can be used to play in all
keys.
Werckmeister—A combination of the Mean Tone
and Pythagorean tunings. This tuning can be used in
all keys.
Equal—With this tuning, the octave is divided into
twelve equal intervals. Regardless of the interval, very
little ambiguity is produced.
For the Mean Tone and Pythagorean temperaments,
you also need to specify the key in which you want to
play:
2. Hold down [CANCEL] and the selected [M] button
while pressing the key on the keyboard that corresponds to the tonic of the desired key.
Note: When performing in ensemble with other instruments, be aware that, depending on the key, there may be
some shifting of the pitch. Please tune to the other instruments in the ensemble.
Note: When you play back your recorded song, it will use
the temperament that was selected at the time of recording.
This may be different from the currently selected temperament.
Using an expression pedal
In Organ mode (as well as in Orchestra mode, page
13), you can connect an optional EV-5 or FV-300L
expression pedal to the EXPRESSION PEDAL jack.
Doing so allows you to control the C-180’s global volume by foot for swelling effects.
11
Owner’s Manual
Transposing (same fingering, different
notes)
You can have the C-180 sound in a different key while
still playing the same notes on the keyboard. That
way, even songs originally written in a difficult key
with many (sharps) or (flats) (i.e. many black keys),
can be played in a more convenient way. This is especially useful when you are used to playing a given
song in one key, while someone else wants you to play
it in another key: just change the Transpose setting
and you’re there.
The transposition remains in effect until you change it
or until you switch off the C-180.
1. While holding down the [TRANSPOSE] button,
press the tonic (root) of the key to which you want to
transpose. The TRANSPOSE lights
2. To return to normal pitch, hold down the [TRANSPOSE] button while pressing a C key. The TRANSPOSE indicator goes dark.
Example: playing in C but sounding in E
If you want the E pitch to sound whenever you play a
C key, hold down the [TRANSPOSE] button and
press an E key.
E
While holding down
Press
Note: The transposition only applies to the notes you play
on the C-180’s keyboard. It does not apply to note messages
received via the MIDI IN connector, or the notes played by
the Recorder.
12
C-180
4. Playing other kinds of music
(Orchestra mode)
Additional orchestral sounds
The C-180 provides eight additional sounds that can
only be selected via MIDI (not via the front panel).
You could use an optional PC-300/180A/160A keyboard or a sequencer for doing so. Here are the
sounds we are referring to and their MIDI-addresses:
CC00 (Bank
Select MSB)
CC32 (Bank
Select LSB)
Program Change
number
Trumpet
00
00
57
French Horn
00
00
61
Piano 1w
08
00
01
Fantasia
00
00
89
Church Bell
08
00
15
Soft Pad
00
00
90
Nylon + Steel
09
00
26
Whistle
00
00
79
Sound
4.1 Selecting Manual sounds
Like in Organ mode (see page 9), there are two sections: the MANUAL section that can spread across the
entire keyboard, and the BASS section that allows you
to play a bass part with your left hand (in split mode).
Let us first look at how to select a MANUAL sound:
1. Press the [ORCHESTRA] button to make its indicator light.
There are two Orchestra tone banks. The first contains
sounds for all 11 tabs, while the second adds another
8 sounds.
2. Use the [ORGAN BRILLIANCE] button to select
bank A (indicator dark) or B (indicator lights):
A
B
Celeste Coupled
Harpsi
Nylon
Guitar
Violin
Clarinet
Brass 2
Oboe
Layering two Manual sounds
Unlike the Organ mode, the Orchestra mode does not
allow you to switch on all instrument sounds. You
can, however, combine one sound with another, which
is called “layering”. Be aware that this reduces the
polyphony (number of notes you can play simultaneously) by half, though.
Flute
Orchestral sounds in bank 'B'
1. Select one instrument sound by pressing a tab (see
above). Keep holding this tab.
2. While holding the tab of the first sound, select a
second instrument sound by pressing another tab.
The indicators of both sounds light.
Note: It is not possible to combine a sound from bank A
with another one from bank B (or vice versa).
3. Press a MANUAL tab to select the sound whose
name is printed below the tab (indicator lights).
Example: to select the “HARP” sound, press the
[SUPER OCTAVE 2’] tab. To select a sound of the “B”
bank, be sure to press the [ORGAN BRILLIANCE]
button to make its indicator light.
3. Set the volume of the second sound with respect to
the first:
• Hold down the tab of the second sound until its indicator starts flashing.
• Use the [BASS] slider to set the volume of the layer
sound.
Using a sustain pedal
Connect an optional DP-2, DP-6, or BOSS FS-5U
footswitch to the C-180’s SUSTAIN jack to be able to
hold the notes of the MANUAL section in the same
way as on an acoustic piano.
This only applies to the MANUAL sound (or layer).
The BASS notes cannot be held.
13
ENGLISH
The C-180’s second mode is called ORCHESTRA.
When you select it, the organ sounds are no longer
available. In return, you can select from two banks of
other instrument sounds, including piano, electronic
piano, strings, harpsichord, etc. In this mode, the keyboard is velocity sensitive.
Owner’s Manual
Note: You can also use an optional expression pedal in
Orchestra mode. See page 11.
4.3 Additional functions
The following functions are also available in Orchestra
mode:
4.2 Adding Bass sounds
Like in Organ mode, you can also play one bass sound
by pressing the desired BASS tab. There are four bass
sounds: two in bank A, and two others in bank B.
1. Use the [ORGAN BRILLIANCE] button to select
bank A (indicator dark) or B (indicator lights):
A
B
Double Bassoon
Bass
Double Bass
Bassoon
2. Press a BASS tab to select a sound for the left half
of the keyboard.
The indicator of this tab lights, and the keyboard is
split into a right (MANUAL) and left (BASS) section.
At first, the split point is located at the “▼” symbol
(G#3). Feel free to select another split point, however.
See page 10 for details.
If necessary, use the [BASS] slider to set the bass
sound’s volume with respect to the MANUAL
sound(s).
Note: In Orchestra mode, the BASS sounds are polyphonic. You can thus play chords with your left hand.
Note: Some MANUAL sounds (such as the Piano sound)
are transposed one octave down to provide a more consistent note distribution when you add a BASS sound.
Note: The Reverb effect is not applied to the BASS sounds
in Orchestra mode.
14
• Reverb effect (see page 11) for the MANUAL and Layer sounds
• Transposition (see page 12)
• The registration memories M1~M4. By default (and
after initializing the C-180), these memories already
contain four different setups for the Orchestra mode.
Note: See page 15 for how to save your settings to a registration memory.
C-180
5. Convenient functions
5.1 Recording your performance
You can record what you play on your C-180 and then
play it back whenever you like. There are four song
memories that can be selected using the [M1]~[M4]
buttons.
Recording
1. Hold down the [REC] button while pressing an
[M1]~[M4] button to select the song memory.
The REC indicator starts flashing.
Saving your settings as registrations
The C-180 comes with 2 x 4 memories where you can
save the panel settings (“registrations”) for convenient
recall at a later stage. There are two sets: four memories for Organ mode (see page 9), and four others for
Orchestra mode (see page 13).
Here’s what is saved in these memories:
ORGAN mode
ORCHESTRA mode
Registration
(which tabs are on)
Selected Manual sound(s)
(single or layer) & Bass status
Reverb status and depth
Reverb status and depth
ORGAN BRILLIANCE setting
BASS volume
Temperament
Layer sound volume
ORGAN BRILLIANCE setting
(i.e. the sound bank)
When the C-180 is shipped, these eight memories
already contain useful settings, but feel free to overwrite their contents with your own registrations.
Press
While holding down
Note: This will erase the song in the selected memory.
2. Press the [PLAY] button to start recording, and
start playing.
3. Press [PLAY] again to stop recording.
Note: We strongly recommend you switch on the C-180 at
least once a week. This is necessary to recharge the memory
backup system. After approximately two weeks, the backup
system becomes depleted, which means that you will lose
your registrations and song recordings (see left).
1. Select the Organ (ORCHESTRA indicator off) or
Orchestra mode (ORCHESTRA indicator lights) and
make the settings you wish to store.
2. Hold down the [SET] button and press the
[M1]~[M4] button that corresponds to the memory
where you wish to save your settings.
Playing back a recorded song
To listen to your new (or a previously recorded) song,
proceed as follows:
1. Press and hold the [PLAY] button while pressing
an [M1]~[M4] button to select a song memory.
2. Press [PLAY] to stop playback.
Note: The recorded song data are not transmitted to the
C-180’s MIDI OUT port.
Press
While holding down
Note: The settings previously saved in this memory will be
overwritten by your new registration.
15
ENGLISH
The Recorder not only memorizes the notes you play,
but also the sounds you use, the temperament and the
Reverb setting. It is even possible to switch from
Organ to Orchestra mode during recording. Especially
for the temperament, be sure to select the same setting
for the keyboard (see page 11) as the one you used
while recording if you plan on playing live to your
recorded performance. Otherwise, your part may be
out of tune with respect to the recorded music.
5.2 Using the C-180’s memories
Owner’s Manual
Loading the settings of a memory
Press an [M1]~[M4] button to load the registration of
the corresponding memory. Do not forget to first
select the Organ or Orchestra mode to have access to
the desired memories.
You can cancel all settings (switch off all tabs) by
pressing the [CANCEL] button.
5.4 Initializing your C-180
(Factory setup)
After working extensively with your C-180, you may
want to recall the original factory settings.
• Initializing your C-180 means that all four memories
M1 to M4 both in Organ and Orchestra mode will be
replaced with the original settings except for the
recorder songs that will be empty after initializing
your C-180.
5.3 Using the audio outputs
The C-180 comes with two audio outputs that may
come in handy for two things:
• When you need to perform in a large venue and fear
that the C-180’s on-board amplification system is not
powerful enough, or when you are asked to connect
the C-180 directly to the PA system;
• To record your playing (either with or without
Recorder backing) to cassette, MD, etc.
To do so, connect the C-180 as follows:
L
R
Cassette deck, MD recorder
external amplifier, mixing console
Note: If the external device is mono, use only the OUTPUT L/MONO connector.
Note: Connecting jacks to the outputs does not switch off
the internal amplification system.
16
Here is how to initialize your C-180:
1. Switch Off your C-180.
2. Hold down the [SET] button while turning your
C-180 back on again.
Once the 4 memorie indicators (M1-M4) start flashing, your C-180 has been succesfully initialized.
C-180
6. Connecting the C-180 to MIDI devices
6. Adjust the volume.
Connecting to a sequencer (Roland MT series)
MT Series
Out
The C-180 is equipped with two MIDI connectors to
allow such exchange of performance data with external equipment and devices. Connecting the C-180 to
other devices via these jacks provides you with an
even greater variety of ways to use your instrument.
In
C-180
About MIDI
MIDI, short for “Musical Instrument Digital Interface,” was developed as a standard for the exchange of
performance data between electronic instruments and
computers.
MIDI
ENGLISH
Read this chapter if you wish to connect the C-180 to
an external MIDI device.
If the C-180 is connected to a MIDI sequencer
(Roland MT series or a computer with sequencer software), you can record your playing using that device.
The Recorder songs, however, are not transmitted via
MIDI.
When the C-180 is connected to an MT series
sequencer, the rich variety of sounds built into the
MT can be played from the C-180’s keyboard.
MIDI
Out
In
Note: The MT-80s has no MIDI OUT connector.
Connecting to a MIDI sound module
Sound Module
THRU
MIDI
OUT
IN
About the MIDI connectors
MIDI In connector—Use a MIDI cable (sold separately) to connect this port to the MIDI OUT connector of the external MIDI device.
C-180
MIDI
Out
In
MIDI messages sent from connected external equipment will be received here. As a result, the C-180 will
produce sound, change tones, or perform other operations.
MIDI Out connector—Use a MIDI cable (sold separately) to connect this port to the MIDI IN connector
of the external MIDI device. Performance data detailing what has been played on the keyboard, and other
data, such as that generated when the optional
footswitch or expression pedal is used, is transmitted
from here to external MIDI devices.
6.1 Making the connections
Note: To prevent malfunction and/or damage to speakers
or other devices, always turn down the volume, and switch
off the power on all devices before making any connections.
1. Turn the volume down completely on all equipment.
2. Switch off the C-180 and any other device to be
connected.
3. Use an optional MIDI cable to connect the external
MIDI device to the MIDI connector on the C-180.
Take a look at the connection examples.
4. You should also make the settings below as needed.
5. Turn on the power to all equipment.
17
Owner’s Manual
6.2 MIDI functions supported by
the C-180
The C-180 can transmit and receive various MIDI
message types, some of which are straightforward,
while others require some insight into the workings of
the MIDI standard.
MIDI channels used by the C-180
The C-180 uses the following MIDI channels for
sending and receiving MIDI messages:
ORGAN mode
Rx/Tx channel
Manual part
12
Bass part
14
ORCHESTRA mode
Channel
Bass part
3
Manual part
4
Layer part (see page 13)
5
The C-180 also transmits SysEx messages that have a
rather complex structure and are thus only meaningful to seasoned MIDI enthusiasts. If you work with
the internal Recorder or an external sequencer, it may,
however, be possible to record them without even
knowing what they look like. See your sequencer’s
manual for details.
The C-180 transmits and receives note messages that
translate which keys you pressed on the keyboard.
Program change, bank select messages
In Orchestra mode, pressing a tab to select the desired
sound will cause the C-180 to send two bank numbers
(Bank Select MSB & LSB) as well as a program change
number. When receiving such a cluster, the C-180
selects the corresponding sound. Note that only the
following numbers are recognized. The ones in the
grey box can only be selected via MIDI, and are thus
only received.
For Orchestra mode
BASS
MANUAL
(MIDI)
Trumpet
French Horn
Piano1 w
Fantasia
Church Bell
Soft pad
Nylon+Steel
Whistle
00
00
08
00
08
00
09
00
00
00
00
00
00
00
00
00
PC
55
36
01
05
07
115
50
55
47
62
17
53
53
ORGAN BRILLIANCE ●
Double Bass
Bassoon
——
Celeste
Coupled Harpsichord
Nylon Guitar
Violin
Clarinet
——
Brass
Oboe
——
Flute
Other control changes that the C-180 transmits are
CC07 for the volume (Organ/Orchestral Bass & Layer) and CC91 to communicate the Reverb depth setting (see page 11).
SysEx messages
Note messages
CC00 CC32
00
00
00
00
00
00
00
00
00
00
00
00
00
00
00
00
00
00
00
00
00
00
00
00
10
00
In Orchestra mode, the C-180 transmits and receives
CC64 messages that describe when the optional SUSTAIN footswitch is pressed and released. Furthermore,
the C-180 sends and receives CC11 messages that
describe the movements of the EXPRESSION PEDAL.
Note: Some of the above MIDI messages are only available
in Orchestra mode. See also the MIDI implementation
chart at the end of this manual.
These channels cannot be changed, so be sure to set
the external device to the channel number of the
desired C-180 part.
ORGAN BRILLIANCE ❍
String Bass
Electric Bass
Piano
Electric Piano
Harpsichord
Chimes
Strings
Slow Strings
Harp
Warm Brass
Electric Organ
Church Choir
Choir
Control changes
CC00 CC32 PC
00 00 44
00 00 71
00
08
00
01
00
00
00
00
00
00
09
07
25
41
72
32
00
00
00
62
69
00
00
74
If the sequencer does accept SysEx messages, you can
also record the settings of the BASS and MANUAL
tabs as well as of the temperament in Organ mode,
and transmit these registration data back to the C-180
for realtime automation.
SysEx messages sent and received when the tilt tabs
are operated in Organ mode:
F0h
41h
10h
30h
12h
These data are followed by the SysEx body comprised
of a Sub-Command byte, an optional Offset byte, 34
data bytes, the Checksum and “F7” (End of exclusive).
The Checksum value can be calculated using the formula [128 – (Offset byte + data bytes)].
The data bytes respresent the new state of the bitmap.
The registers (tilt tabs) are assigned to the values listed
below.
SysEx assignments of the C-180’s tilt tabs:
[MANUAL]
57
61
01
89
15
90
26
79
[BASS]
18
Beginning of the SysEx string
Roland manufacturer’s ID
Model ID (C-180)
Instrument type (30= generic organ
data)
Data set
Byte
0
1
1
1
1
9
2
2
2
3
4
21
22
Bit
3
1
0
5
6
5
1
3
6
2
4
4
2
8’ Principal
8’ Gemshorn
8’ Gedackt
4’ Octave
4’ Spitzflöte
2 2/3 Nazard
2’ Super Octave
1 1/3 Quintflöte
IV Mixture
8’ Trompete
Manual Temulant
16’ Subbass
8’ Octave
C-180
7. Appendix
7.1 Troubleshooting
If you are encountering problems with the C-180,
please read the section below before assuming that
there is a malfunction.
Is the adapter connected properly (see page 7)?
No sound is produced
Is the [VOLUME] slider set to the minimum position
(see page 7)?
Are headphones connected (see page 7)? Disconnect
them.
Cannot hear the BASS sound
Is the [BASS] slider set to the minimum position
(see page 7)?
Does the indicator of one of the two BASS tabs light?
Cannot select orchestral sounds
Does the ORCHESTRA indicator light? Press the
[ORCHESTRA] button to make its indicator light.
If you don’t hear the problem in the headphones:
When playing at high volumes, resonance may occur
in the instrument itself, or in objects near the C-180.
At times, other objects in the room, such as fluorescent lights or glass doors, could start vibrating. To
minimize such unwanted resonance, please observe
the following:
• Locate the instrument at least 10~15 cm away from
the walls.
• Reduce the volume.
• Increase the distance from the object that is resonating.
If you can hear the problem in the headphones, there
may be another reason. Please contact your dealer.
When the C-180 is connected to an external device
Are the connections between the C-180 and the MIDI
sequencer or the other external device correct (see
page 17)?
The organ sounds are not available
Does the ORCHESTRA indicator light? Press the
[ORCHESTRA] button to make its indicator go dark.
Two sounds are produced when the keyboard is
played
Have you layered two Tones (see page 13)?
The pitch of the keyboard sounds incorrect
Is the [PITCH] setting correct (see page 11)?
Is the Transpose setting correct (see page 12)?
Is the temperament setting correct (see page 11)?
The C-180 does not respond to your playing
Does the DEMO indicator light? Press its button to
make it go dark (see page 8).
The recorded performances have been deleted
This happens if you wait longer than two weeks
before switching the C-180 on again.
In Orchestra mode, some sounds are transposed
one octave down when a BASS sound is selected
This is normal and intended to provide a more natural distribution of the pitches for the left and right sections.
The Manual sound is not available to the left of
the split point
In Organ mode: did you select the split bass mode
(see page 10)? Switch it off. In Orchestra mode, this is
normal whenever you select a BASS sound.
19
ENGLISH
The C-180 cannot be switched on
Bass notes sound wrong/buzzing or vibration
occurs
Owner’s Manual
7.2 Suggested registrations
FLUTE
Gedackt 8’
FOUNDATIONS p
Gedackt 8’
Spitzflöte 4’
FOUNDATIONS ff
Principal 8’
Gedackt 8’
Octave 4’
Spitzflöte 4’
Super Octave 2’
Mixture IV
FULL
Principal 8’
Gedackt 8’
Octave 4’
Spitzflöte 4’
Super Octave 2’
Mixture IV
Trompete 8’
FOUNDATIONS mf Principal 8’
Spitzflöte 4’
FOUNDATIONS f
Principal 8’
Gedackt 8’
Octave 4’
Spitzflöte 4’
7.3 Demo song list
20
[M1] BAROQUE
TILT TAB
Title
Principal 8’ DORICA
Gemshorn 8’ CHORALE
Gedackt 8’ TRIO IN MAJOR
Octave 4’
FUGUE
Composer
Bach
Bach
Bach
Telemann
[M2] Bridal
TILT TAB
Principal 8’
Gemshorn 8’
Gedackt 8’
Octave 4’
Composer
Bach
Gounoud
Schubert
Bach
Title
BRIDAL MARCH
AVE MARIA
AVE MARIA
ALLEGRO
[M3] Largo
TILT TAB
Title
Principal 8’ REQUIEM INTROITUS
Gemshorn 8’ CHORALE BWV626
Gedackt 8’ PASSACAGLIA
Octave 4’
LARGO
Composer
Mozart
Bach
Bach
Händel
[M4] Classical
TILT TAB
Title
Principal 8’ VOLUNTAR
Gemshorn 8’ TOCCATA
Gedackt 8’ "BALLO DEL GRAN DUCA"
Octave 4’
SPRING
Spitzflöte 4’ HARPSICHORD CONC.
Composer
Stanley
Paradisi
Sweelinck
Vivaldi
Bach
C-180
7.4 Specifications
C-180: Roland Portable Organ
Options
Keyboard
61 keys (velocity sensitive in Orchestra mode)
Velocity messages are always transmitted to the MIDI
OUT connector
Stand KS-C-180 (911 x 670 x 397 mm),
PK-5 dynamic MIDI pedal unit,
DP-2, DP-6, or BOSS FS-5U footswitch,
EV-5 or FV-300L expression pedal,
RH-25, RH-50 headphones
PCM Sound Generation, 24-voice polyphony
Tones—The best PCM samples from the Roland GS
and Rodgers sound libraries
Note: In the interest of product improvement, the specifications and/or appearance of this instrument are subject to
change without prior notice.
Manual organ tones
Principal 8’, Gemshorn 8’, Gedackt 8’, Octave 4’,
Spitzflöte 4’, Nazard 2 2/3, Super octave 2’, Quintflöte
1 1/3, Mixture IV, Trompete
Bass organ tones
Sub bass 16’, Octave 8’ (monophonic)
Orchestral tones
17 + 8 selectable via MIDI, 4 Bass tones (polyphonic)
Digital effect
Reverb with adjustable depth
Demo songs
17 complete songs
Panel controls
Volume slider, Bass volume slider,
13 tilt tabs with orange indicators,
11 buttons with indicators (except two),
Organ Brilliance button,
4 memory buttons for 2 x 4 registrations (Organ
mode: 4, Orchestra mode: 4), Set button,
Orchestra button
Transpose
–5/+6 semitones
Recorder
1 track, 4 song memories, records notes and settings
Connections
MIDI IN & OUT, Output Stereo (L/mono - Right);
Sustain, Expression Pedal, 2 headphone connectors
Amplification
7W + 7W rms
Speakers (12 cm full range)
Power supply
ACJ series adapter
Dimensions
963 (W) x 121 (H) x 321 (D) mm
Weight
7.5kg (C-180 only)
21
ENGLISH
Tone generation & sounds